FT 100 - Thermometers BEURER - Free user manual and instructions
Find the device manual for free FT 100 BEURER in PDF.
Frequently Asked Questions - FT 100 BEURER
User questions about FT 100 BEURER
0 question about this device. Answer the ones you know or ask your own.
Ask a new question about this device
Download the instructions for your Thermometers in PDF format for free! Find your manual FT 100 - BEURER and take your electronic device back in hand. On this page are published all the documents necessary for the use of your device. FT 100 by BEURER.
USER MANUAL FT 100 BEURER
natural_image
White handheld electronic thermometer with digital display showing time, no visible text or symbols on device bodyCE0483
EN Non-contact thermometer Instructions for use....31
natural_image
Simple line drawing of a mechanical component with an arrow indicating direction (no text or symbols)text_image
24 H ← 12 H AM °CAbb. 1
natural_image
Close-up of a smiling baby's face with a dashed-line circular highlight on the forehead (no text or symbols)Abb. 10
natural_image
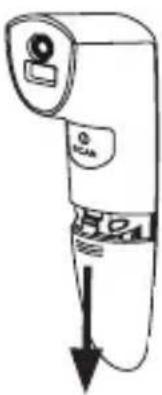
Simple line drawing of a handheld device with a label 'SCAM' and an arrow pointing downward (no text or symbols on the device itself)
12. Gerätreinigen

- Signs and symbols ......33
- Intended use 34
- Warnings and safety notes ....35
3.1 Risks to the user 35
3.2 Risks to the device....36
3.3 Notes on handling batteries .....36 - Information about this thermometer .....37
- Unit description .....40
- Initial use 42
- Switching on and setting the thermometer ...42
-
Forehead measurement .....46
-
Measuring object temperature/room temperature....50
- Error messages 51
- Batteries ....52
- Cleaning the device 53
- Storing the device 53
- Disposing of the device 53
- Technical data 54
- Guidelines .....56
- Warranty / service 57

Read these instructions for use carefully and keep them for later use, be sure to make them accessible to other users and observe the information they contain.
Dear customer,
Thank you for choosing a product from our range. Our name stands for high-quality, thoroughly tested products for applications in the areas of heat, gentle therapy, blood pressure/diagnosis, weight, massage and air.
Please read these instructions for use carefully and observe the information they contain.
With kind regards,
Your Beurer team
Included in delivery
Check that the exterior of the delivery cardboard packaging is intact and make sure that all components are present. Before use, ensure that there is no visible damage to the device or accessories and that all packaging material has been removed. If you have any doubts, do not use the device and contact your retailer or the specified Customer Service address.
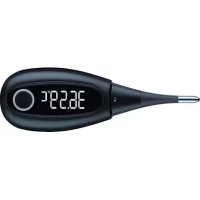
• Clinical thermometer
• 2x 1.5 V AAA batteries (LR03)
- Storage bag
- Instructions for use
1. Signs and symbols
The following symbols appear in these instructions for use and on the device:
 | WARNINGWarning notice indicating a risk of injury or damage to health. |
 | IMPORTANTSafety note indicating possible damage to the device/accessory. |
 | NoteNote on important information. |
 | Observe the instructions for use |
 | Application part, type BF |
 | Disposal in accordance with the Waste Electrical and Electronic Equipment EC Directive – WEEE |
 | The CE labelling certifies that the product complies with the essential requirements of Directive 93/42/EEC on medical devices. |
 | Manufacturer |
Storage/Transport | Permissible storage and transport temperature and humidity |
Operating | Permissible operating temperature and humidity |
| IP 22 | Device protected against foreign objects ≥ 12.5 mm and against water dripping at an angle |
 | Serial number |
 | Important information/tip |
| Cross-reference with another section | |
 PAP PAP | Dispose of packaging in an environmentally friendly manner |
2. Intendeduse
This thermometer is intended for non-contact measurement of forehead temperature. You can also measure the temperature of objects and rooms with this thermometer. The thermometer is suitable for domestic use. It allows you to quickly and easily measure body temperature. Values are saved automatically.
3. Warnings and safety notes
3.1 Risks to the user
- Only use the device once you have read and understood these instructions for use.
- Retain these instructions for use. The instructions for use must be accessible to all users. All instructions must be followed.
- The thermometer needs to be in the room in which the measurement is taken for at least 30 minutes before use.
- After physical activity, a bath or spending time outdoors, wait approx. 30 minutes before you take a measurement on your forehead.
- The FT 100 thermometer is only designed for the measuring area on the human body stated in the instructions for use.
- Measure your temperature regularly to obtain your normal average temperature. If you suspect you have a fever, simply compare your normal average temperature with the temperature measured currently.
- Do not self-diagnose or self-medicate on the basis of the measurements without consulting your doctor. In particular, do not start taking any new medication or change the type and/or dosage of any existing medication without prior approval.
- The device is only intended for the purpose stated in these instructions for use.
- The manufacturer is not liable for damage resulting from improper or careless use.
- Children must not be allowed to use the device. Medical devices are not toys.
- Check before each use that the lens is intact. If it is damaged, please contact your retailer or the service address.
-
Do not touch the lens with your fingers.
-
The measurements taken by you are for your information only – they are no substitute for a medical examination. Consult a doctor before you undertake any medical treatment.
- Clean the thermometer after each use (w 12. Cleaning the device).
- Should you have any questions about using the device, please contact either your retailer or Customer Services.
3.2 ⚠️ Risks to the device
- Do not drop the device or subject it to any mechanical impacts.
- Do not expose the device to direct sunlight, extreme temperatures or high humidity.
- Do not expose the device to liquids. The device is not waterproof. Avoid all direct contact with water or other liquids.
- Do not open or repair the device yourself. Have the device repaired by authorised service centres only, otherwise its warranty is invalidated.
- Portable and mobile HF communication systems may interfere with this device.
3.3 Notes on handling batteries
- If your skin or eyes come into contact with battery fluid, rinse the affected area with water and seek medical assistance.
- Choking hazard! Small children may swallow and choke on batteries. Store batteries out of the reach of small children.
- Observe the plus (+) and minus (-) polarity signs.
-
If a battery has leaked, put on protective gloves and clean the battery compartment with a dry cloth.
-
Protect batteries from excessive heat.
- Risk of explosion! Do not throw batteries into a fire.
- Do not charge or short-circuit batteries.
- If the device is not to be used for a relatively long period, take the batteries out of the battery compartment.
- Use identical or equivalent battery types only.
• Always replace all batteries at the same time. - Do not use rechargeable batteries.
- Do not disassemble, split or crush the batteries.
4. Information about this thermometer
The temperature measurement varies depending on the part of the body where the measurement is taken. In a healthy person, the variance can be between 0.2 °C and 1 °C (0.4 °F and 1.8 °F) in different parts of the body.
Normal temperature range with various thermometers:
| Measurements Thermometer used | ||
| Forehead temperature | 35.8 °C to 37.6 °C (96.4 °F to 99.7 °F) | Forehead thermometer |
| Ear temperature 36.0 °C | to 37.8 °C (96.8 °F to 100.0 °F) | Ear thermometer |
| Oral temperature 36.0 °C | to 37.4 °C (96.8 °F to 99.3 °F) | Conventional thermometer |
| Rectal temperature 36.0 °C | to 37.8 °C (97.3 °F to 100.0 °F) | Conventional thermometer |

Beurer tip
- Temperatures measured with different thermometers should never be compared with one another.
- Tell your doctor what type of thermometer you used to take your temperature and on what part of the body. Also bear this in mind if you are diagnosing yourself.

Holding the thermometer in your hand for too long before taking a measurement can cause the device to warm up. This means the measurement could be incorrect.
Influences on body temperature
- A person's individual metabolism
- Age
Body temperature is higher in babies and toddlers than in adults. Greater temperature fluctuations occur faster and more often in children. Normal body temperature decreases with age. - Clothing
- Outside temperature
- Time of day
Body temperature is lower in the morning and increases throughout the day towards evening. Activities - Physical and, to a lesser extent, mental activities increase body temperature.

Beurer tip
Taking the body temperature provides a current measurement of a person's temperature. If you are uncertain about interpreting the results or if the values are abnormal (e.g. fever), please consult your doctor. This also applies in the case of slight temperature changes if there are other symptoms of illness such as agitation, heavy sweating, flushed skin, fast pulse rate, tendency to collapse, etc.
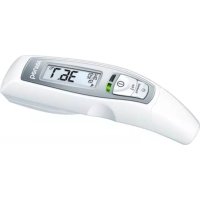
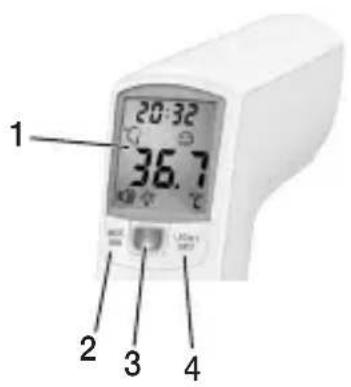
5. Unit description
1 Display
2 MODE/MEM button
3 Fever/distance indicator
4 LIGHT/SET button
5 Measuring sensor
6 Distance sensor
7 Ⓐ/SCAN button
8 Battery compartment lid
| Buttons Functions | |
| MODE/MEM | MODE Sets the measurement mode.MEM Displays the saved measurements. |
| LIGHT/SET | LIGHT Manual switch on of the illuminated display.SET Sets the basic functions. |
| 1 SCAN | Switch on the device.Starts the temperature measurement. |
text_image
1 20:32 36.7 2 3 4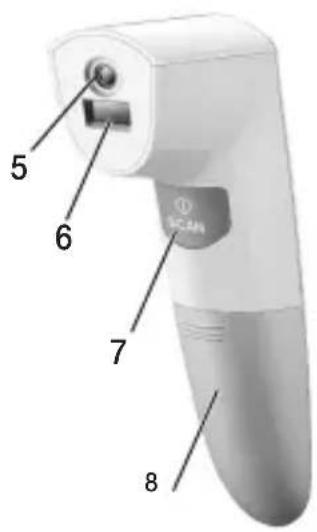
text_image
5 6 7 8Display description
1 Year/date/time display
2 Room temperature mode
3 Forehead temperature mode
4 Object temperature mode
5 Temperature/memory space number display
6 Acoustic signal symbol
7 Illuminated display symbol
8 Year
9 Memory function
10 Date
11 Measurement ≥ 38.0 °C (≥ 100.4 °F) “fever”
12 Measurement < 37.5 °C (< 99.5 °F) "no fever"
13 Battery status indicator
14 Temperature measurement unit (Celsius/Fahrenheit)
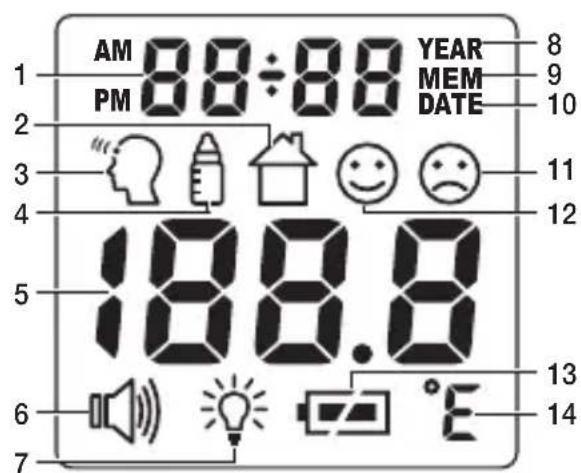
text_image
1 AM 88÷88 YEAR PM YEAR 9 MEM DATE 2 3 11 12 4 5 188.8 6 13 14 76. Initialuse
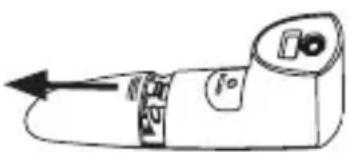
If there is a battery isolation strip, pull it out of the battery compartment. The thermometer automatically switches on and the settings menu appears in the display (w 7. Switching on and setting the thermometer).
natural_image
Simple line drawing of a mechanical device with an arrow pointing left (no text or symbols)7. Switching on and setting the thermometer
To switch on the thermometer, briefly press the ⓋSCAN button.
After a brief self-test and two short beeps the thermometer is ready for forehead measurement. The device always starts up in forehead temperature mode 📄
Set the basic functions
This menu allows you to set the following functions individually, one after another.

flowchart
graph LR
    A["Time format"] --> B["Date Time"]
    B --> C["Temperature measurementunit"]
    C --> D["Acoustic signal"]
    D --> E["Illuminated display"]
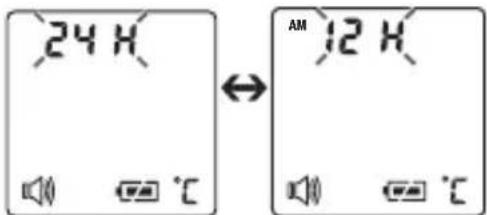
- Insert the batteries or press and hold the LIGHT/SET button for 4 seconds when the thermometer is switched on. The time format flashes on the display (Fig. 1).
- Use the MODE/MEM button to set your preferred time format, and confirm with the LIGHT/SET button.
text_image
24 H ↔ 12 H °CFig. 1
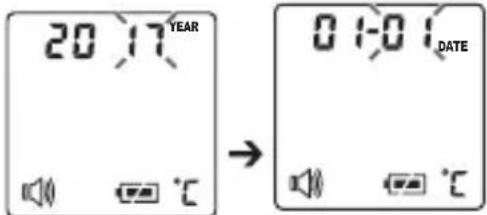
The year flashes on the display (Fig. 2).
- Use the MODE/MEM button to set the year, and confirm with the LIGHT/SET button.
The day/month flashes on the display (Fig. 3). - Use the MODE/MEM button to set the day and month, and confirm with the LIGHT/SET button.
If the hour format is set as 12 h, the day/month display sequence is reversed. Be sure to set the date and time correctly. Otherwise, you will not be able to save your measured values correctly with a date and time and access them again later.
text_image
20:17 YEAR → 01:01 DATEFig. 2
Fig. 3
The hour flashes on the display (Fig. 4).
- Use the MODE/MEM button to set the hour, and confirm with the LIGHT/SET button.
The minute flashes on the display (Fig. 5).
- Use the MODE/MEM button to set the minute, and confirm with the LIGHT/SET button.
In the 12 h format, the time is displayed with AM/ Fig. 4 PM.
text_image
0:1:0' → 0:1:0' °CFig. 4
Fig. 5
The temperature measurement unit flashes on the display (Fig. 6).
You can set the device to display the temperature in degrees Celsius (°C) or degrees Fahrenheit (°F).
- To display the temperature in Celsius, select °C using the MODE/MEM button and confirm with the LIGHT/SET button.
- To display the temperature in Fahrenheit, select °F using the MODE/MEM button and confirm with the LIGHT/SET button.
text_image
13:30Fig. 6
The acoustic signal symbol flashes on the display (Fig. 7).
You can activate/deactivate the acoustic signals (device activation, measurement in progress, measurement completion).
- To activate the acoustic signals, use the MODE/MEM button to select OR and confirm with the LIGHT/SET button.
- To deactivate the acoustic signals, use the MODE/MEM button to select OFF and confirm with the LIGHT/SET button.

text_image
13:30 ON ↔ 13:30 OFF °CFig. 7
The illuminated display symbol flashes on the display (Fig. 8).
You can activate or deactivate the automatic illuminated display (appears following forehead temperature measurement).
- To activate the automatic illuminated display, use the MODE/MEM button to select OR and confirm with the LIGHT/SET button.
- To deactivate the automatic illuminated display, use the MODE/MEM button to select AND confirm with the LIGHT/SET button.
text_image
13:30 ON ↔ 13:30 OFFFig. 8
You can also activate the illuminated display manually by briefly pressing the LIGHT/SET button.
The display lights up for 5 seconds.
The automatic and manual illuminated display cannot be used while measurement is in progress.
8. Forehead measurement

Beurer tip
Remember:
- Physical activity, increased perspiration on the forehead, taking vasoconstrictive medication and skin irritations can distort the measurement.
- The forehead, or the temples, must be free from perspiration and cosmetics.
- We recommend that you take three measurements on the forehead. If the three measurements are different, use the highest value.
- If the forehead area is covered in hair, sweat or dirt, clean the area and then wait for 10 minutes to improve the precision of the measurement.
-
It is important that you keep the thermometer still during measurement. Moving the thermometer during measurement may cause imprecise measurements.
-
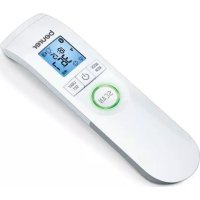
To switch on the thermometer, briefly press the Ⓐ/SCAN button. After a short self-test, the device is ready for forehead temperature measurement. The device is in forehead temperature mode. You can tell this from the "symbol" on the display.
text_image
13:30 °CFig. 9
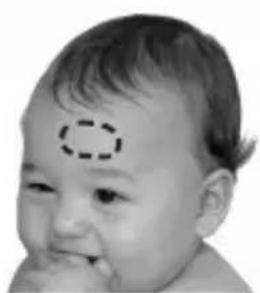
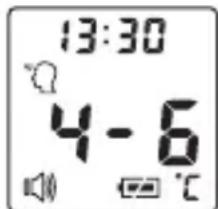
- Hold the thermometer 4 to 6 cm in front of the forehead measuring point (Fig. 10). Press the Ⓐ/SCAN button. The display shows the required measuring distance of 4-6 cm.
natural_image
Close-up of a baby's face with a dashed-line circular highlight on the forehead (no text or symbols)Fig. 10
| Measuring distance4 to 6 cm | Measuring distanceNOT 4 to 6 cm |
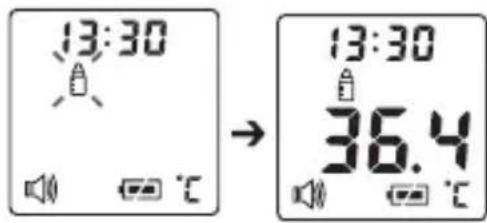
| Once the thermometer has detected the correct measuring distance of 4 to 6 cm, the measurement starts automatically. The fever/distance indicator now lights up continuously in blue. After a few seconds, the measurement appears on the display (Fig. 12). The end of the measurement is signalled by a long beep. | If the measuring distance is not 4 to 6 cm, the fever/distance indicator flashes blue (the device also beeps if the acoustic signal is switched on) and 4-5 appears on the display (Fig. 11). If the correct measuring distance is not found after 20 seconds, the measurement ends automatically. |
If the measurement is less than 37.5 °C (99,5 °F), if the fever/distance indicator lights up green and if appears on the display to indicate no fever, this indicates that the body temperature is in the normal range.
If the measurement is between 37.5 °C and 37.9 °C, the fever/ distance indicator lights up yellow. This indicates that the body temperature is in an increased range (Fig. 13).
text_image
13:30 4-6Fig. 11

text_image
13:30 36.4Fig. 12

text_image
13:30 37.6Fig. 13
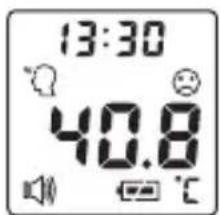
If the measurement is more than 38 °C (100,4 °F), if therever/ distance indicator lights up in red and if ● appears on the display (Fig. 14), this indicates that the body temperature is above the normal range.
text_image
13:30 40.8Fig. 14
The measurement is automatically saved with the date/time and the “fever” ☑/“no fever” classification.
The device is ready to take another measurement when two short beeps sound and the forehead symbol stops flashing.
Displaying stored measurements
The device only stores measurements in forehead temperature mode 🔒. The device automatically stores the values from the last 60 measurements.
When 60 memory spaces are exceeded, the oldest value is deleted.
• The memory can be called up as follows:
- With the thermometer switched on, press and hold the MODE/MEM button for 5 seconds. The most recent measurement is displayed.
- With each subsequent pressing of the MODE/MEM button, first the memory space number is displayed, followed by the measurement when the button is released.
- In the upper line, the time and date are displayed alternately.
9. Measuring object temperature/room temperature
If you want to measure an object temperature with this thermometer, switch to object temperature mode.
- With the thermometer switched on, briefly press the MODE/MEM button. The device switches to the object temperature mode (Fig. 15).
- Hold the thermometer 2 to 3 cm from the measuring point. Briefly press the ⓇSCAN button and read the temperature on the display (Fig. 16).
Measurements taken in object temperature mode are not stored.
text_image
13:30 → 13:30 36.4Fig. 16 Fig. 15
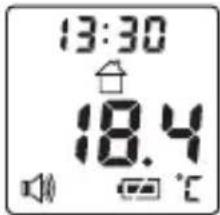
If you want to use the thermometer to measure the room temperature you need to switch to room temperature mode.
- With the thermometer switched on, briefly press the MODE/MEM button twice.
The device switches to room temperature mode

- The room temperature is immediately displayed (Fig. 17).
Measurements taken in room temperature mode are not stored.
text_image
13:30 18.4 ℃Fig. 17
- Errormessages
| Error message | Problem Solution | |
| Er 1 | Measurement during self-test, device not yet ready for measurement. | Wait until the forehead symbol stops flashing. |
| Er 3 | Room temperature below 10 °C or over 40 °C (<50 °F, >104 °F). | Room temperature must be between 10 °C and 40 °C (50 °F – 104 °F). |
| Hi | (1) Forehead temperature mode: The recorded temperature is higher than 42.2°C (108°F).(2) Object temperature mode: The recorded temperature is higher than 80°C (176°F). | Operate the thermometer only within the specified temperature ranges. In the event of a repeated error message, contact your retailer or Customer Services. |
| Lo | (1) Forehead temperature mode: The recorded temperature is lower than 34°C (93.2°F).(2) Object temperature mode: The recorded temperature is lower than -22°C (-7.6°F). | Operate the thermometer only within the specified temperature ranges. In the event of a repeated error message, contact your retailer or Customer Services. |
| Co | The batteries are empty. Replace the batteries. |
11. Batteries
Changing the batteries
The device requires two AAA (LR03) batteries.
- Open the battery compartment.
To do this, push the battery compartment down.
• Take the used batteries out of the battery compartment. - Insert new batteries.
Make sure that the batteries are inserted the correct way round. - Close the battery compartment.
Disposing of batteries
- Empty, completely flat batteries must be disposed of through specially designated collection boxes, recycling points or electronics retailers. You are legally required to dispose of the batteries.
- The codes below are printed on batteries containing harmful substances:
Pb = Battery contains lead
Cd = Battery contains cadmium
Hg = Battery contains mercury
natural_image
Illustration of a handheld device with a screen and arrow, no visible text or symbols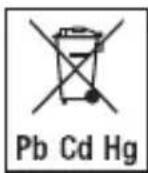
12. Cleaning the device

- The measuring sensor is the most sensitive part of the thermometer. Be very careful with the measuring sensor when cleaning the device.
-
Do not use any harsh cleaning products.
• Always observe all safety notes for users and the device. -
Warnings and safety notes
Clean the measuring sensor after each use. Use a soft cloth or cotton bud that can be moistened with disinfectant or 70% alcohol.
To clean the entire device, please use a soft cloth slightly moistened with a mild soapy solution. Under no circumstances may liquid enter the device.
Do not use the device again until it is completely dry.
13. Storing the device
The device must not be stored or used at an excessively high or low temperature or humidity ( 15. Technical data), in sunlight, in association with an electrical current or in dusty locations. Measurement inaccuracies can otherwise occur.
If prolonged storage is planned, you should remove the batteries.
14. Disposing of the device
For environmental reasons, do not dispose of the device in the household waste at the end of its useful life.
Dispose of the device at a suitable local collection or recycling point. Dispose of the device in accordance with EC Directive – WEEE (Waste Electrical and Electronic Equipment). If you have any questions, please contact the local authorities responsible for waste disposal.

15. Technicaldata
If the device is not used according to the instructions specified, perfect functionality cannot be guaranteed!
The accuracy of this thermometer has been carefully checked and it has been developed with a long service life in mind.
If the device is used for commercial medical purposes, it must be regularly tested for accuracy by appropriate means. Precise instructions for checking accuracy may be requested from the service address.
We reserve the right to make technical changes to improve and develop the product.
| Type FT 100 | |
| Measurement method Non-contact infrared measurement | |
| Basic functions Forehead temperature measurementObject temperature measurementRoom temperature measurement | |
| Measurement units Celsius (°C) or Fahrenheit (°F) | |
| Operating conditions 10 °C to 40 °C (50 °F to 104 °F) at a relative humidity of < 95% | |
| Storage and transport conditions -20 °C to 50 °C (-4 °F to 122 °F) at a relative humidity of < 95% | |
| Measuring distance 4 to 6 cm from the measuring point | |
| Measurement range and accuracy of forehead temperature measurement | Forehead temperature measurement34 °C to 42.2 °C (93.2 °F to 108 °F)Measurement accuracy 34 °C to 42.2 °C: ± 0.2 °C (93.2 °F to 108°F: ±0.4°F) |
| Clinical repeat precision | Forehead: Children 1 – 5 years ± 0.07°C (0.13°F)Adults ± 0.07°C (0.13°F) |
| Measurement range and accuracyObject temperature measurement | Object temperature measurement -22 °C to 80 °C (-7.6 °F to 176°F)Measurement accuracy ± 4% or ± 2 °C (± 4 °F) |
| Memory functionBody temperature measurement | Automatically stores the last 60 measurements. |
| Acoustic signal With device | activation, during measurement, when measurement is complete (can be set). |
| Display LCD display | |
| Energy saving functions Device automatically switches off after 1 minute. | |
| DimensionsWidth x depth x height | Approx. 40.9 mm x 68.2 mm x 199.0 mm |
| Weight 82 g (without batteries) | |
| 2 x AAA (LR03) batteries Batteries | Batteries last for approx. 2000 measurementsExtra activated functions such as acoustic signal or illuminated display reduce the battery life. |
The serial number is located on the device or in the battery compartment.
16. Guidelines
This device complies with EU Medical Devices Directive 93/42/EEC, the German Medical Devices Act (Medizinproduktegesetz), the ASTM (American Society for Testing and Materials) E 1965 - 98 and the European Standard EN60601-1-2 (in accordance with CISPR11, IEC 61000-4-2, IEC 61000-4-3, IEC 61000-4-8) and is subject to particular precautions with regard to electromagnetic compatibility.

Notes on electromagnetic compatibility
- The device is suitable for use in all environments listed in these instructions for use, including domestic environments.
- The use of the device may be limited in the presence of electromagnetic disturbances. This could result in issues such as error messages or the failure of the display/device.
-
Avoid using this device directly next to other devices or stacked on top of other devices, as this could lead to faulty operation. If, however, it is necessary to use the device in the manner stated, this device as well as the other devices must be monitored to ensure they are working properly.
-
The use of accessories other than those specified or provided by the manufacturer of this device can lead to an increase in electromagnetic emissions or a decrease in the device's electromagnetic immunity; this can result in faulty operation.
- Failure to comply with the above can impair the performance of the device.
17. Warranty / service
Beurer GmbH, Söflinger Straße 218, 89077 Ulm, Germany (hereinafter referred to as “Beurer”) provides a warranty for this product, subject to the requirements below and to the extent described as follows.
The warranty conditions below shall not affect the seller's statutory warranty obligations which ensue from the sales agreement with the buyer.
The warranty shall apply without prejudice to any mandatory statutory provisions on liability.
Beurer guarantees the perfect functionality and completeness of this product.
The worldwide warranty period is 5 years, commencing from the purchase of the new, unused product from the seller.
The warranty only applies to products purchased by the buyer as a consumer and used exclusively for personal purposes in the context of domestic use.
German law shall apply.
During the warranty period, should this product prove to be incomplete or defective in functionality in accordance with the following provisions, Beurer shall carry out a repair or a replacement delivery free of charge, in accordance with these warranty conditions.
If the buyer wishes to make a warranty claim, they should approach their local retailer in the first instance: see the attached “International Service” list of service addresses.
The buyer will then receive further information about the processing of the warranty claim, e.g. where they can send the product and what documentation is required.
A warranty claim shall only be considered if the buyer can provide Beurer, or an authorised Beurer partner, with
– a copy of the invoice/purchase receipt, and
– the original product.
The following are explicitly excluded from this warranty:
– deterioration due to normal use or consumption of the product;
- accessories supplied with this product which are worn out or used up through proper use (e.g. batteries, rechargeable batteries, cuffs, seals, electrodes, light sources, attachments and nebuliser accessories);
- products that are used, cleaned, stored or maintained improperly and/or contrary to the provisions of the instructions for use, as well as products that have been opened, repaired or modified by the buyer or by a service centre not authorised by Beurer;
– damage that arises during transport between manufacturer and customer, or between service centre and customer;
– products purchased as seconds or as used goods;
– consequential damage arising from a fault in this product (however, in this case, claims may exist arising from product liability or other compulsory statutory liability provisions).
Repairs or an exchange in full do not extend the warranty period under any circumstances.
FRANÇAIS
Sommaire
natural_image
Simple line drawing of a mechanical component with an arrow indicating direction (no text or symbols)natural_image
Close-up of a baby's face with a dashed-line circular mark on the forehead (no text or symbols)Fig. 10
natural_image
Simple line drawing of a handheld device with a downward arrow, no text or symbols present.Éliminer les piles
natural_image
Simple line drawing of a mechanical device with an arrow pointing left (no text or symbols)text_image
24 H AM 12 H °CFig. 1
natural_image
Close-up of a baby's face with a dashed-line circular highlight on the forehead (no text or symbols)Fig. 10
natural_image
Simple line drawing of a handheld device with a downward arrow, no text or symbols present.natural_image
Simple line drawing of a mechanical component with an arrow indicating direction (no text or symbols)natural_image
Close-up of a smiling baby's face with a dashed-line circular highlight on the forehead (no text or symbols)Fig. 10
natural_image
Simple line drawing of a handheld device with a downward arrow, no text or symbols present.natural_image
Simple line drawing of a mechanical device with an arrow pointing left (no text or symbols)text_image
24 H AM 12 H °CŞek. 1
Yıl ekranda yanıp söner (Şek. 2).
natural_image
Close-up of a baby's face with a dashed-line circular highlight on the forehead (no text or symbols)Şek. 10
natural_image
Simple line drawing of a handheld device with a label 'SCAM' and an arrow pointing downward (no text or symbols on the device itself)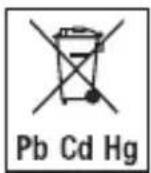
natural_image
Simple line drawing of a mechanical device with an arrow pointing to a component (no text or symbols)natural_image
Close-up of a smiling baby's face with a dashed-line circular highlight on the forehead (no text or symbols)Рис. 10
natural_image
Line drawing of a handheld device with a downward arrow indicating force or direction (no text or symbols)Утилизация батареек
natural_image
Simple line drawing of a mechanical device with an arrow pointing left (no text or symbols)natural_image
Close-up of a baby's face with a dashed-line circular mark on the forehead (no text or symbols)Rys. 10
natural_image
Line drawing of a handheld device with a downward arrow, no text or symbols present
Contracted Manufacturer: AViTA (WuJiang) Co. LTD
Factory address: No. 858, Jiao Tong Rd., Wujiang Economic Development Zone,
Suzhou City, Jiangsu Province, P.R.C.
Phone number: 0512-82078288
Product Name: Touch Free Infrared Thermometer, Model: NT series, REF Nr: FT 100
ISO Standard: ISO 80601-2-56:2017
China medical production Licence No: SSYJXSCX20040018
Manufactured in China

Beurer GmbH • Söflinger Straße 218 • 89077 Ulm, Germany • www.beurer.com
www.beurer-gesundheitsratgeber.com • www.beurer-healthguide.com