TVAC16001A - Surveillance Camera ABUS - Free user manual and instructions
Find the device manual for free TVAC16001A ABUS in PDF.
| Features | Details |
|---|---|
| Product type | Surveillance camera |
| Video resolution | 1080p Full HD |
| Night vision | Yes, with infrared |
| Viewing angle | 90 degrees |
| Connectivity | Wi-Fi |
| Storage | MicroSD card up to 128 GB |
| Mobile app | Compatible with iOS and Android |
| Power supply | Power adapter included |
| Dimensions | 120 x 80 x 60 mm |
| Weight | 300 g |
| Warranty | 2 years |
Frequently Asked Questions - TVAC16001A ABUS
User questions about TVAC16001A ABUS
0 question about this device. Answer the ones you know or ask your own.
Ask a new question about this device
Download the instructions for your Surveillance Camera in PDF format for free! Find your manual TVAC16001A - ABUS and take your electronic device back in hand. On this page are published all the documents necessary for the use of your device. TVAC16001A by ABUS.
USER MANUAL TVAC16001A ABUS
$$ A M = 0 0: 0 0 - 1 1: 5 9 $$
$$ P M = 1 2: 0 0 - 2 3: 5 9 $$
Zeitzzone
Einbinding in die App2Cam
You can find important information and FAQs about this and other products on the website www.abus.com/eng/Self-installed-security
Version 1.4

English translation of the original German user guide Retain for future reference!
Introduction
Dear customer,
Thank you for purchasing this product.
ABUS Security-Center hereby declares that this type of wireless system TVAC16001A, complies with RED Directive 2014/53/EU. Additionally, this device complies with the requirements of the following EU directives: the EMC Directive 2014/30/EU, the Low Voltage Directive 2014/35/EU and the RoHS Directive 2011/65/EU. The full EU Declaration of Conformity text can be found at: www.abus.com/product/TVAC16001A
To ensure this condition is maintained and that safe operation is guaranteed, it is your obligation to observe these operating instructions!
Read the entire user guide carefully before starting operation of the product, and pay attention to all operating instructions and safety information!
All company names and product descriptions are trademarks of the corresponding owner. All rights reserved.
In the event of questions, please contact your local maintenance specialist or dealer.

Data storage is subject to national data privacy guidelines.

Warning as required by §201 StGB (German Criminal Code):
Whosoever unlawfully makes an audio recording of the privately spoken words of another; or uses, or makes a recording thus produced accessible to a third party, shall be liable to imprisonment or a fine.
Whosoever unlawfully overhears with an eavesdropping device the privately spoken words of another not intended for his attention; or publicly communicates, verbatim or the essential content of, the privately spoken words of another, recorded or overheard, shall incur the same penalty.

Disclaimer
This user guide has been produced with the greatest of care. Should you discover any missing information or inaccuracies, please contact us under the address shown on the back of the manual.
ABUS Security-Center GmbH does not accept any liability for technical and typographical errors, and reserves the right to make changes to the product and user guide at any time and without prior warning. ABUS Security-Center GmbH is not liable or responsible for direct or indirect damage resulting from the equipment, performance and use of this product. No forms of guarantee are accepted for the contents of this document.
Explanation of symbols
| The triangular high voltage symbol is used to warn of the risk of injury or health hazards (e.g. caused by electric shock). | |
| The triangular warning symbol indicates important notes in these operating instructions which must be observed. | |
| This symbol indicates special tips and notes on the operation of the unit. |
Important safety information
| All guarantee claims are invalid in the event of damage caused by non-compliance with this user guide. We cannot be held liable for resulting damages. | |
| In the event of material or personal damage caused by improper operation or non-compliance with the safety information, we cannot be held liable. All guarantee claims are voided in such cases. |
This device has been manufactured in accordance with international safety standards. Please read the following safety instructions carefully.
Safety information
1. Power supply
100 - 240 V AC voltage, 50 - 60 Hz (using a power supply unit for 5 V DC)
Only operate this device using a power source which supplies the grid voltage specified on the type plate. If you are unsure which voltage is supplied at the installation location, contact your power supply company. Disconnect the device from the power supply before carrying out maintenance or installation work.
2. Overloading
Avoid overloading electrical sockets, extension cables and adapters, as this can result in fires or electric shocks.
3. Liquids
Make sure that no liquids of any type are able to enter the device.
4. Cleaning
Only use a damp cloth to clean the device. Do not use corrosive cleaning materials.
Disconnect the device from the power supply while doing so.
5. Accessories
Only connect devices that are suitable for the intended purpose. Otherwise, hazardous situations or damage to the device can occur.
6. Installation position
This device is suitable both for operation in protected outdoor areas as well as indoors. The product may be damaged if it is dropped, even from a low height.
Install the device so that no direct sunlight can shine on the image sensor. Pay attention to the installation instructions in the corresponding section of this user guide.
Never place the device close to heaters, stoves, other sources of heat, or in direct sunlight.
Only operate the device at locations where temperatures within the permitted ambient temperature range of -10^ to 50^ prevail.
7. Wireless transmission
The wireless range depends on a variety of environmental factors. The local conditions at the installation site may have a negative impact on the range. When there are no obstructions between the receiver and transmitter, a range of up to 150m is possible, but this range will be considerably less within buildings.
The following environmental conditions compromise both the range as well as the frame rate:
Mobile communication masts, high-tension pylons, electrical wires, ceilings and walls, devices with the same or an adjacent wireless frequency.
Warnings
Observe all safety and operating instructions before putting the device into operation for the first time.
-
Observe the following information to avoid damage to the mains cable and plug:
-
Do not modify or manipulate the power cable or plug.
- Do not pull the cable when disconnecting the device from the mains power - always hold of the plug.
- Ensure that the mains cable is positioned as far away as possible from any heating equipment, as this could otherwise melt the plastic coating.
-
The power supply unit for the door station must be protected from damp and moisture.
-
Follow these instructions. Non-compliance with these instructions could lead to an electric shock.
-
Never open the housing or power supply unit.
- Do not insert any metallic or flammable objects into the device.
-
Use overvoltage protection to prevent damage caused by overvoltage (e.g. electrical storms).
-
Disconnect defective devices from the power immediately and contact your specialist dealer.
| When installing the device in an existing video surveillance system, ensure that all devices have been disconnected from the power supply and low-voltage circuit. | |
| If in doubt, have a specialist technician carry out assembly, installation, and connection of the device. Improper or unprofessional work on the power supply or domestic installation puts both you and other persons at risk. Connect the installations so that the power supply circuit and low-voltage circuit always run separately from each other. They should not be connected at any point or be able to become connected as a result of a malfunction. |
Avoid the following adverse conditions during operation:
- Moisture or excess humidity
- Extreme heat or cold
- Direct sunlight
- Dust or flammable gases, vapors, or solvents
Strong vibrations - Strong magnetic fields (e.g. next to machines or loudspeakers)
- The camera for the door station must not be directed toward the sun, as otherwise the sensor may be destroyed.
- The camera must not be installed on unstable surfaces
Unpacking the device
Handle the device with extreme care when unpacking it.

If the original packaging has been damaged, inspect the device. If the device shows signs of damage, return it in the original packaging and inform the delivery service.
Contents
- Intended use 43
- Scope of delivery 43
- Features and functions 43
4.Information and FAQs. 44 - Device description 44
5.1. Monitordescription 44
5.2. Docking station description 44
5.3. Camera description 45
- Installation 46
6.1. Installing the monitor 46
6.2. Pairing the camera and the monitor 46
6.3. Connecting the docking station to the network 47
6.4. Mounting the camera 47
- Operation 48
7.1. Main menu 48
7.2. Live view 49
7.3.Event list. 52
7.3.1.List of recordings 52
7.3.2. Viewing recordings 53
7.3.3. Deleting recordings 54
7.4. Settings 54
7.4.1. Camera settings 54
7.4.2. Recording settings 55
7.4.3. Network settings 57
7.4.4. Alarm settings 59
7.4.5. System settings 60
7.4.6. Troubleshooting (FAQ) 63
- Remote access via app 63
- Maintenance and cleaning 70
9.1. Maintenance 70
9.2. Cleaning 70
-
Disposal 70
-
Tips for troubleshooting 71
- Technical data 72
1. Intended use
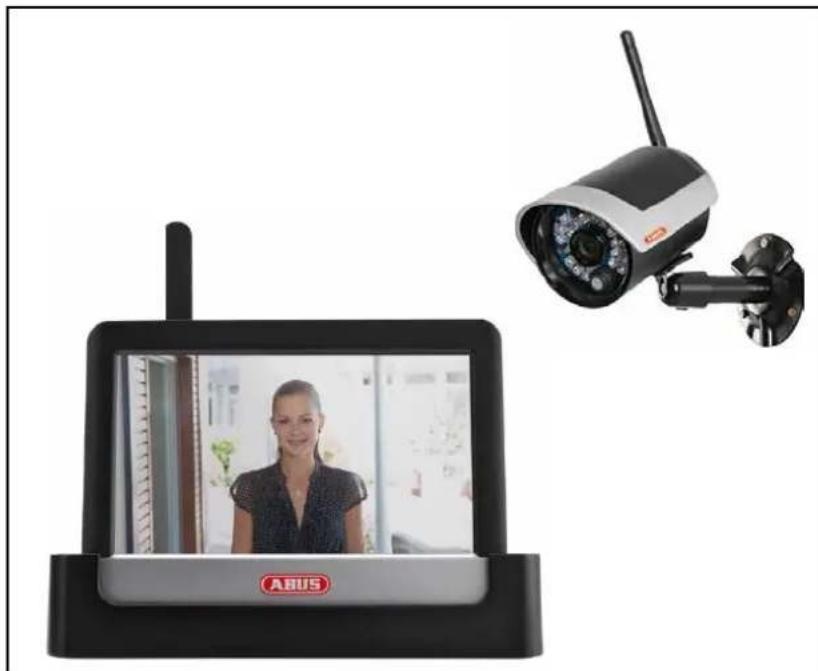
This 7" touchscreen wireless monitor and the IR wireless outdoor camera enable you to easily transmit and display video signals wirelessly across moderate and large distances.
Wireless signal transmission is an advantage everywhere cables are not able to be laid: the camera transmits the video signal wirelessly to the wireless monitor. The conversion to digital signals means that malfunctions and interference can be reduced.
As soon as the camera's sensor detects motion, the recording starts on the SD card.
You have the option of connecting up to four cameras (TVAC16011A / TVAC16010A/B) to the monitor and displaying them in the 4x camera view, as well as recording with QVGA resolution at the same time. To get a recording in full-screen view at full resolution with sound, activate just one camera in the menu.
You can also view the live images from the camera via smartphone using the ABUS "App2Cam" app and playback recorded data, provided the monitor is in the docking station and connected to the internet.
For a detailed description of functions, refer to Section 3, "Features and functions".
2. Scope of delivery

7" LCD monitor with docking station
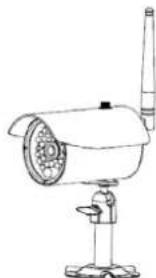
1x IR wireless outdoor camera 2.4 GHz incl. camera mount and mounting material
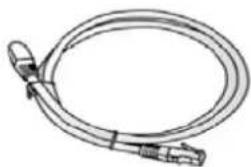
Network cable
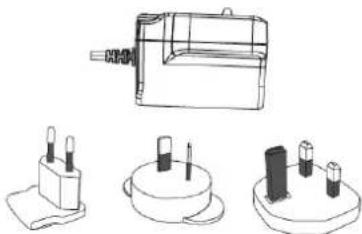
2 x power supply units incl. EU, AU and UK 5 VDC/1A adapter
3. Features and functions
Complete set consisting of an IR wireless outdoor camera, monitor and docking station
- Compact IP66 outdoor camera with infrared night vision function and 640 × 480 pixel resolution
- Mobile access via app
Remote access via LAN using the docking station (battery for monitor charged at the same time)
7" color LCD monitor with integrated loudspeakers (battery operated)
Video and audio transmitted using encrypted digital radio
- Can be extended to include up to four wireless cameras
- Easy to operate with intuitive touchscreen
4. Information and FAQs
You can find important information and FAQs about this and other products on the website www.abus.com/eng/Self-installed-security. You will find information for troubleshooting under item 11 of these instructions.
5. Device description
5.1. Monitordescription
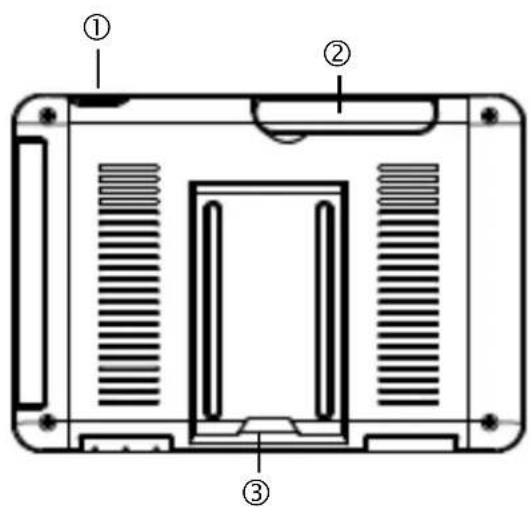
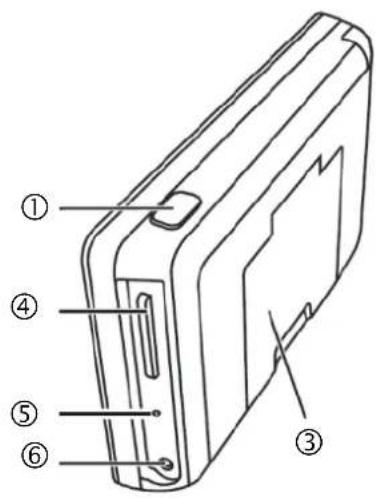
| ① | Power button |
| ② | Antenna |
| ③ | Fold-up stand |
| ④ | SD card slot |
| ⑤ | Reset button |
| ⑥ | 5VDC/1A power supply |
5.2. Docking station description
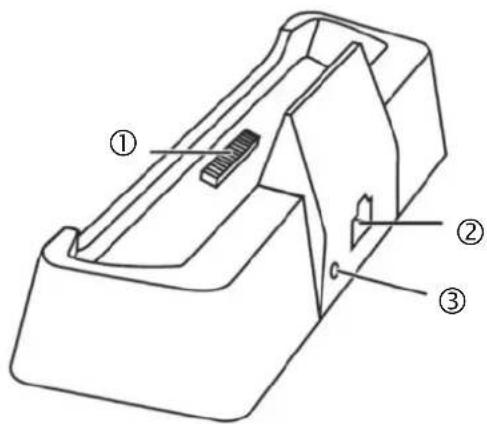
| ① | Docking interface monitor |
| ② | LAN interface |
| ③ | Power supply 5VDC/1A |
5.3. Camera description
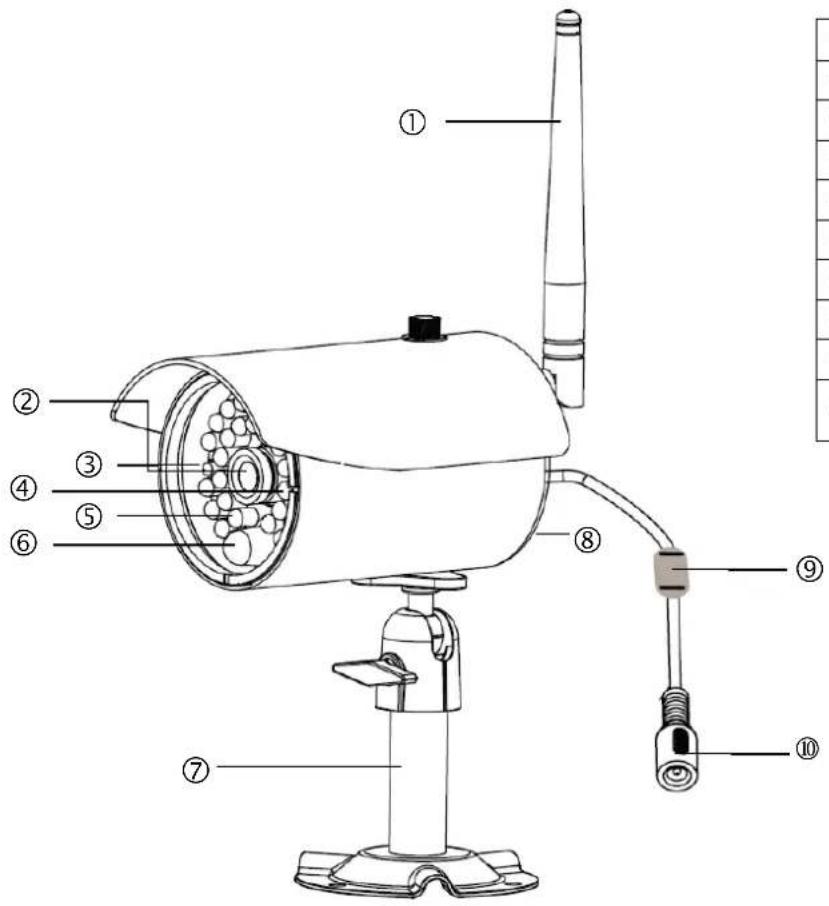
| ① | Antenna |
| ② | Fixed lens |
| ③ | Power LED |
| ④ | Link LED |
| ⑤ | IR LED |
| ⑥ | Photo sensor |
| ⑦ | Camera mount |
| ⑧ | Microphone |
| ⑨ | Pairing button |
| ⑩ | Power supply connection 5 VDC / 1A |
Meaning of the LEDs:
| LED | Status | Meaning |
| Power LED ③ | On (red) | Camera on |
| Off | Camera off | |
| Link LED ④ | Flashing | The camera is in the “Pairing Mode”. |
| On (green) | Camera is connected to the monitor | |
| Off | Camera is in standby |
6. Installation
6.1. Installing the monitor
- Connect the power supply unit to the monitor.
- Switch the device on. Press the power button for about 5 seconds.
| ! | Important: Please note that if the monitor does NOT have an external power supply, it must be charged for at least 8 hours prior to being used for the first time. The batteries will provide power for approx. 1.5 hours. |
| ! | Important: The integrated battery allows you to use the LCD monitor flexibly. If the battery symbol lights up in red, then the batteries must be charged. Please note that the battery must always be charged sufficiently so as to ensure loss-free recording. |
6.2. Pairing the camera and the monitor
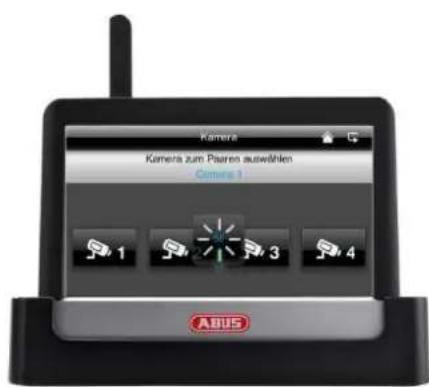
To connect a camera with the monitor, proceed as follows:
- Connect the camera and the monitor to the power supply.
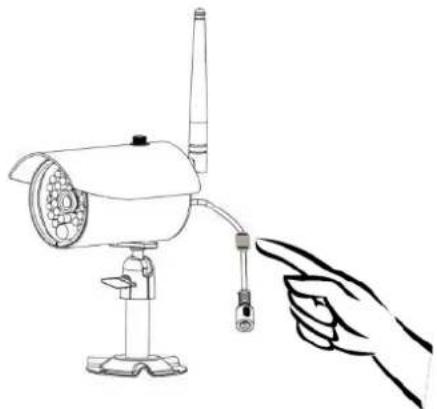
- In the monitor menu, select "Camera", then "Pairing" and the required camera (1-4). The system counts down from 60 seconds.
- Press the PAIRING button briefly on the camera cable during these 60 seconds.
- The LINK LED is lit up continuously once the connection is established.
| ! | Important: Please note that the connection can take up to 60 seconds. |
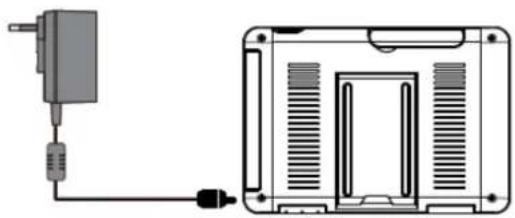
6.3. Connecting the docking station to the network
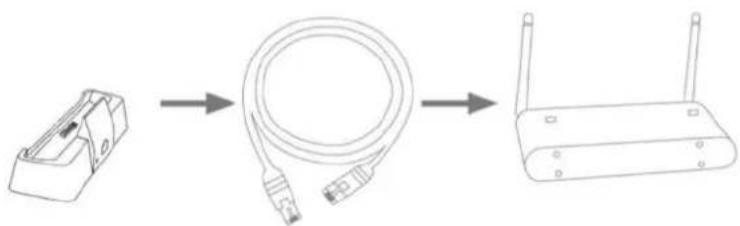
To connect the docking station to the internet, proceed as follows:
- Connect the network cable to your router and the docking station.
- Connect to the network only after you have made all the required settings on the monitor.
The network settings are described in 7.4.3.
- After the network is set up, click on the network symbol in the sub-menu and then on "Connect to internet".

The power supply unit should be connected to the docking station so that a reliable power supply is provided.
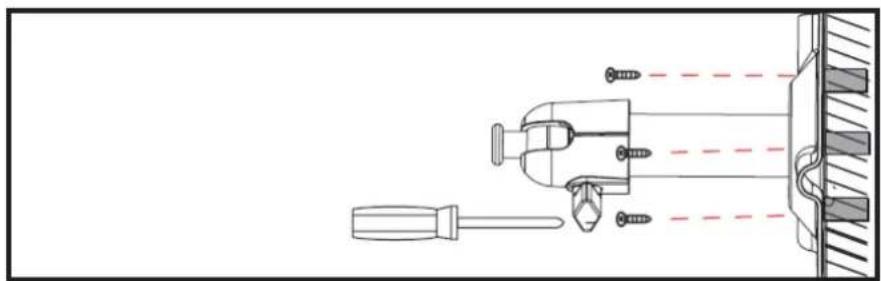
6.4. Mounting the camera
Use the camera mount to help you find a suitable place for installation. Use the drill holes to mark the surface, and drill the holes. Insert the wall plugs supplied before you attach the bracket with the screws.

Important:
Before you begin installing, make sure that the wireless transmission range is adequate at the site of the required installation.
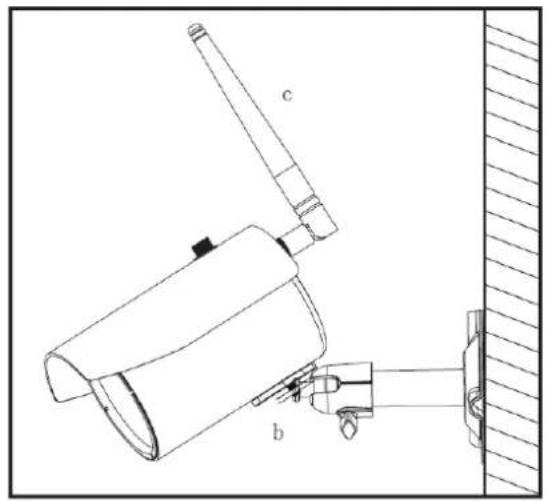
To do this, first screw in the antenna supplied.
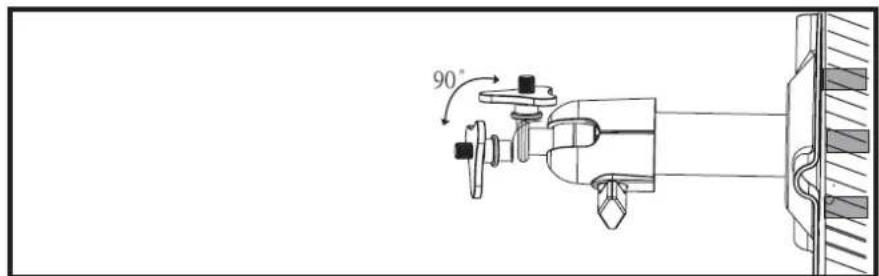
You can also swivel the mount by 90^ into a particular position. First loosen the screw on the side and set the required angle. Then tighten the screw to secure the required position.
Screw the camera onto the mount and connect the power supply unit to the camera.
7. Operation
To switch the monitor ON / OFF, press and hold down the power button for at least 5 seconds.
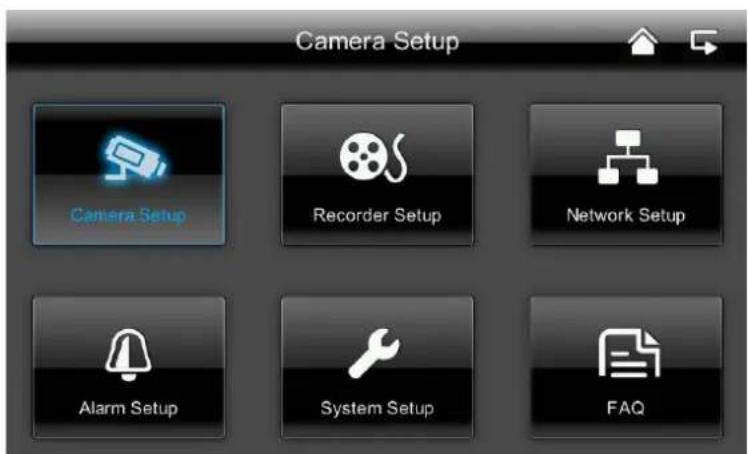
7.1. Main menu
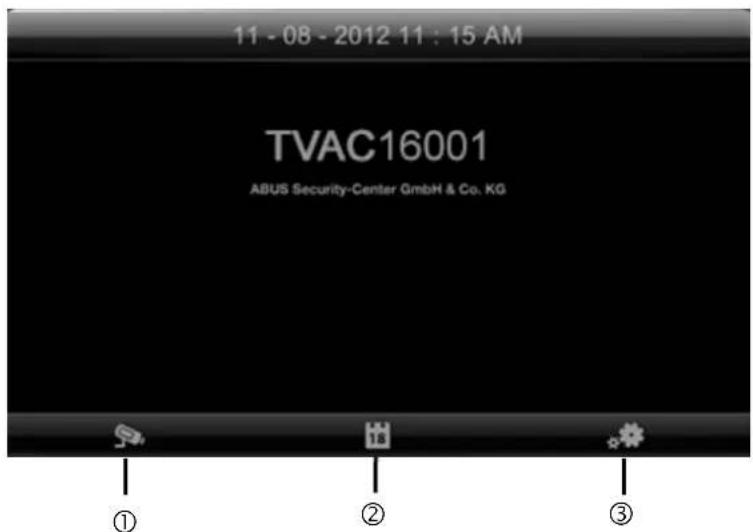
| ① | Live view |
| ② | Event list |
| ③ | Settings |

An ongoing recording always stops as soon as you enter the main menu.
7.2. Live view
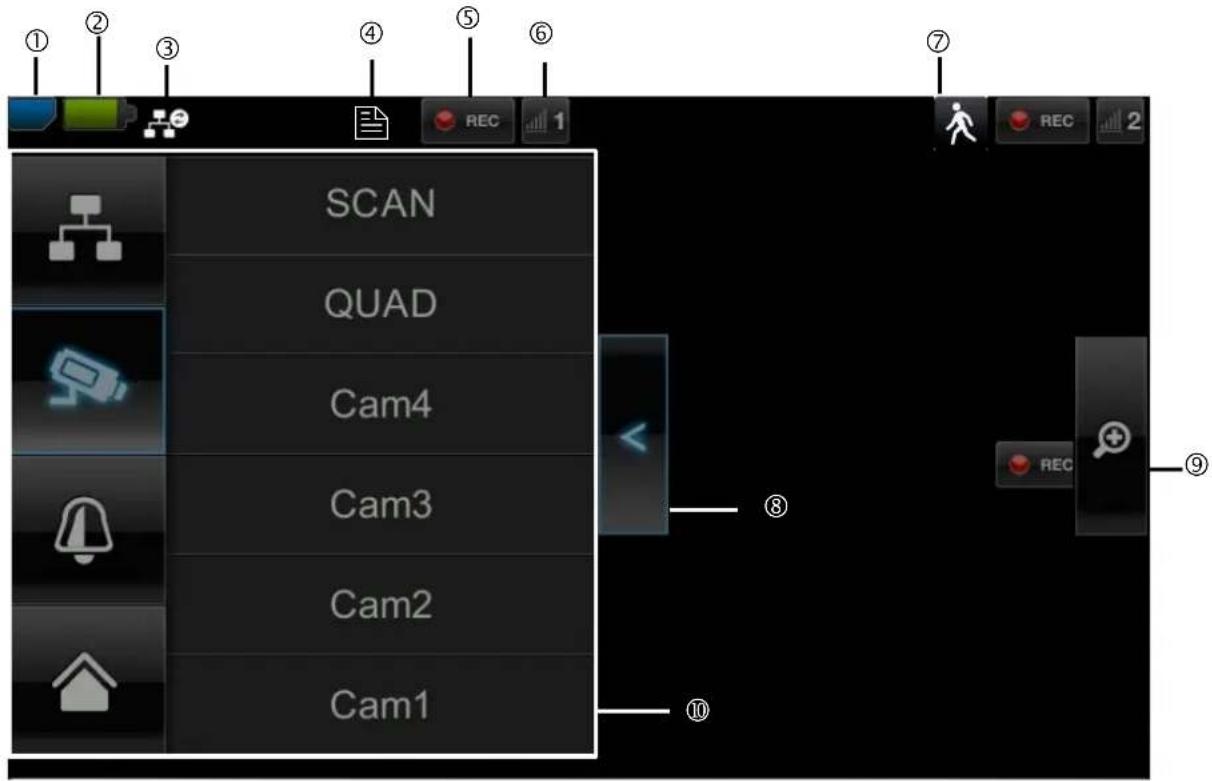
Explanation of symbols
| ① | SD card display | ||
| No SD card | Tip: Always switch off the device before removing the SD card. | ||
| SD card detected and almost empty | |||
| SD card full | |||
| ② | Battery status display | ||
| Battery fully charged | The batteries will provide power for approx. 1.5 hours. | ||
| Low battery | Charge the monitor battery as soon as the symbol appears and flashes. | ||
| ③ | Internet connection status | ||
| Connection is being established | A connection to the network is being established. | ||
| Connection established successfully | A connection to the network has been established. | ||
| Disconnected | The network connection has been disconnected. | ||
| Remote access active | This symbol appears if the live image is accessed via the app. | ||
| Intranet | This symbol appears if your monitor is connected to the network but no internet access is required. | ||
| ④ | Timer | ||
| Schedule has been saved | This symbol appears if a programmed recording is running. | ||
| ⑤ | Recording status | ||
| REC | Flashes red: the device is recording | If you press the REC symbol directly, you start a manual recording. Select this again to stop the recording. | |
| REC | Constantly red: device is not recording | ||
| ⑥ | Camera number and reception | ||
| 1 | Reception of the camera very good | The wireless transmission range depends on the environmental factors (e.g. mobile communication masts, high-tension pylons, electrical wires, ceilings and walls, etc.). Before installing the camera, check whether the wireless range is sufficient. | |
| 1 | No reception | ||
| ⑦ | Motion detection | ||
| Recording by motion detection | The maximum recording time is 2 minutes. | ||
| ⑧ | Opening and closing sub-menus | ||
| >Opens the sub-menu <Closes the sub-menu | Press the arrow keys to open and close the sub-menus. | ||
| ⑨ | Picture view | ||
| Zoom | If you press the magnifying glass in the single view, five fields are laid out over the image. If you press on one of the marked fields, it magnifies. Press the “full screen” symbol to exit the magnified view. | ||
| Full-screen | Here you return to the full-screen view | ||
| ⑩ | Sub-menu | ||
| Network connection | The sub-menu function description can be found in the table on the next page. | ||
| Camera mode | |||
| Volume | |||
| Main menu Here you go to the main menu | |||
Network connection

This option is only available if the monitor is on the docking station and the network cable is connected to the docking station as well as the router.
Press the network symbol and select whether the object should be connected to the internet or whether the device should just be charged.
Important: Set up the network first – find out how to do this by referring to point 7.4.3.
Once the monitor is connected to the internet, it can not be configured or operated. To go to the main menu, disconnect the internet connection.
Camera mode
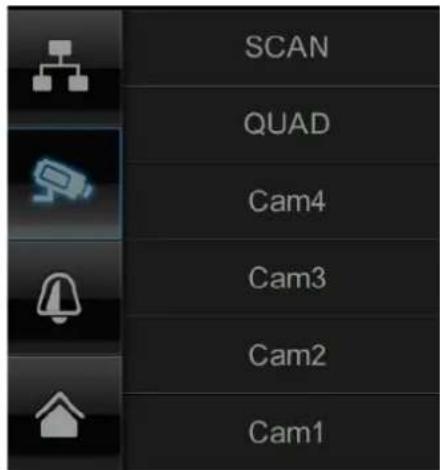
Select the required display mode, by pressing SCAN, QUAD or a camera (Cam1-4).
SCAN
Sequence display of all cameras with 5 seconds dwelling time
QUAD
Four-fold display
CAM1-4
Full screen view per camera
If you have trained 1 camera, the picture of the camera will be shown in full screen.
If you have trained 2 - 4 cameras and the system is in SCAN mode or full screen view, it jumps to QUAD mode automatically after 2 minutes. Here you can see a maximum of four cameras at the same time.

Please note that once several cameras have been trained, recording in quad mode is possible and not in full-screen.

Please note that the recording stops as soon as you go to an in menu or move from quad to full-screen mode.

Please note that when several cameras are switched on, the option is reduced and no more audio recordings can be made.
Setting the alarm and loudspeaker volume
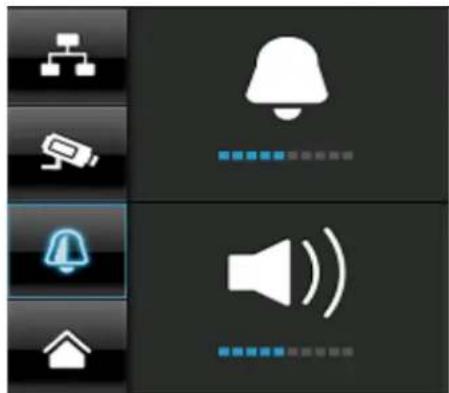
Set the volume of the alarm tone (bell symbol) or camera tone (loudspeaker symbol) by pressing "+" and "-".
The alarm tone sounds if you have saved a timer or a reminder at a certain time.
7.3.Event list
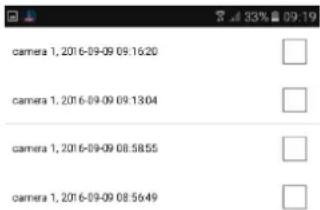
All the recordings are displayed in the event list and are sorted according to the date.

Important:
Your recordings are always made with sound. Please note the stipulation on page 2 in order to avoid putting yourself, or other persons, in an unlawful situation.
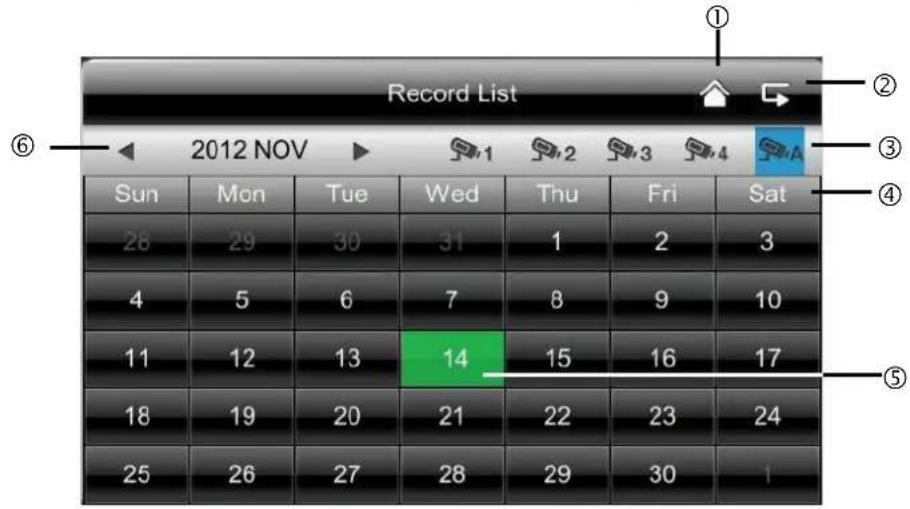
7.3.1. List of recordings
Press the date with the green background to go to the list of recordings. The recordings are saved to sub
folders which are named with the date on which the recording was made.
The recordings are saved as individual files with the duration of the recording being used as the file name.
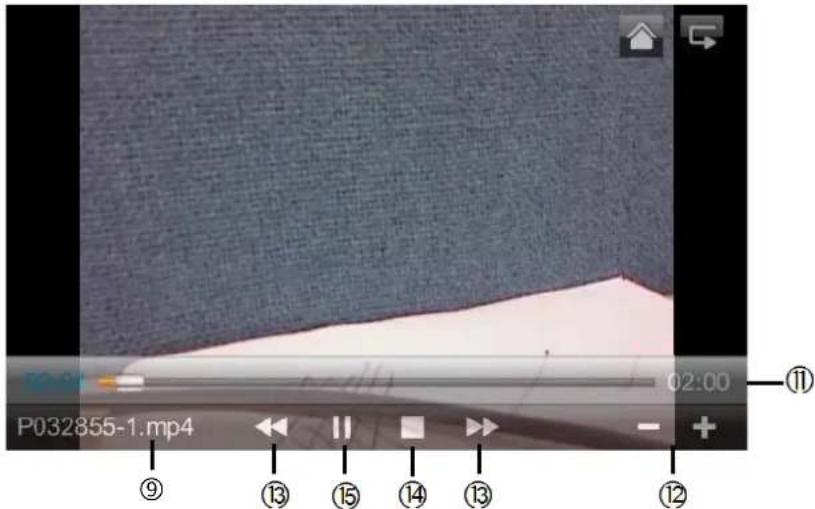
7.3.2. Viewing recordings
Press the file name to view the recording.
Explanation of symbols
| ① | Live view Change to live view | ||
| ② | Back Back to the main menu | ||
| ③ | Camera | Select one of the numbered cameras to view the recordings. Select the camera with “A” to view the recordings of all the cameras. | |
| ④ | Mon | Weekday Here you see the weekday | |
| ⑤ | 14 | Day | A field with a green background means that a recording is available on this day. Press it to go to the “List of recordings”. |
| ⑥ | Change month | Press the arrow buttons to change between months. | |
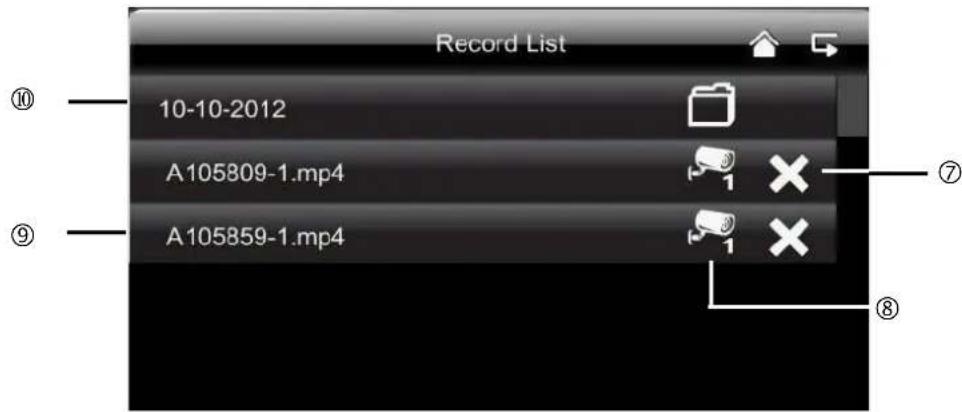
| ⑦ | Delete file | Important: Please note that the recording is deleted immediately. There is no need to confirm beforehand. | |
| ⑧ | 1 | Camera | Shows you the recording of the particular camera. |
| ⑨ | A105859-1.mp4 | Recording file | A=AM 10:58:59 = time 1 = Camera 1 |
| ⑩ | 10-10-2012 | Day of recording | |
| ⑪ | 02:00 | Duration of the recording | |
| ⑫ | -/+ | -/+ volume control | |
| ⑬ | ▶/▲ | Next / Previous recording | |
| ⑭ | ■ | Stop | |
| ⑮ | /II | Play / Pause | |
7.3.3. Deleting recordings
There are three ways to delete files from the SD card:
- Press the × symbol in the event list. Delete the file by pressing the button. To cancel the procedure, press the x button.
- Format the SD card on the monitor at the "System" > "Format memory card" menu item.
- Delete the SD card on the computer
7.4. Settings
At the "Settings" menu item you can select the following items:
7.4.1. Camera settings
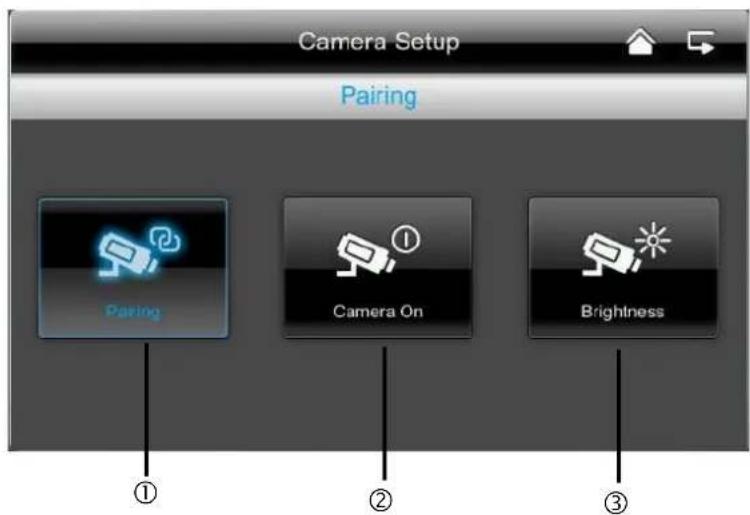
① Selecting cameras to pair
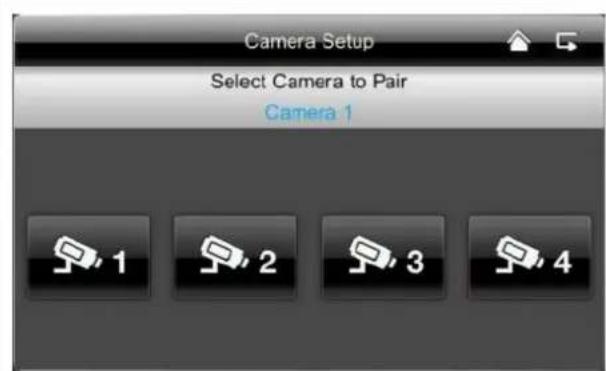
- Select the required camera (1-4). The system counts down from 60 seconds.
- During the 60 seconds, press the PAIRING button on the camera cable until the green LINK LED on the front of the camera starts flashing.
The LINK LED is lit up continuously once the connection is established.
② Displaying/concealing a camera
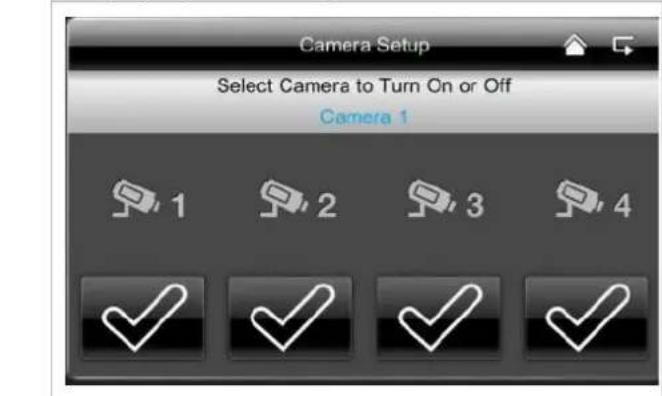
Use the buttons to display a camera or press the × button to conceal it.
If you have not trained all four cameras, conceal the other cameras.
③ Camera brightness
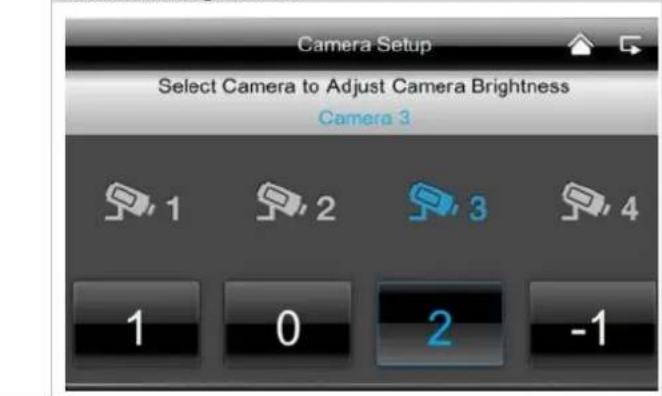
Select the required brightness from between -2 dark) to 2 (bright).
7.4.2. Recording settings
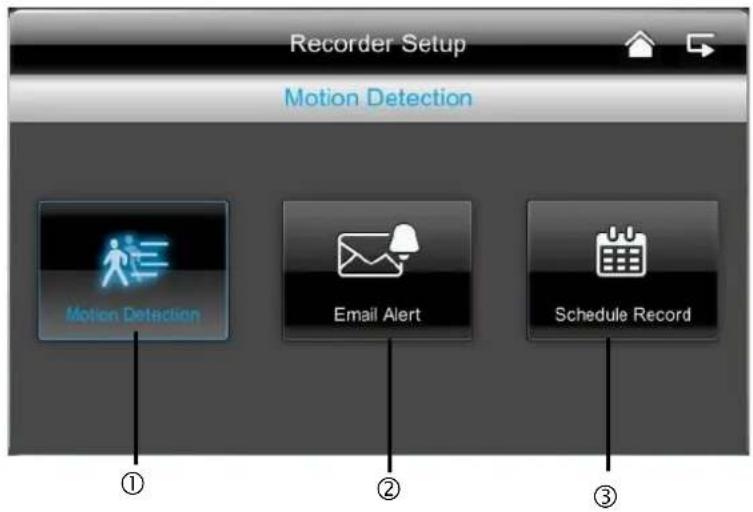
①
Motion detection
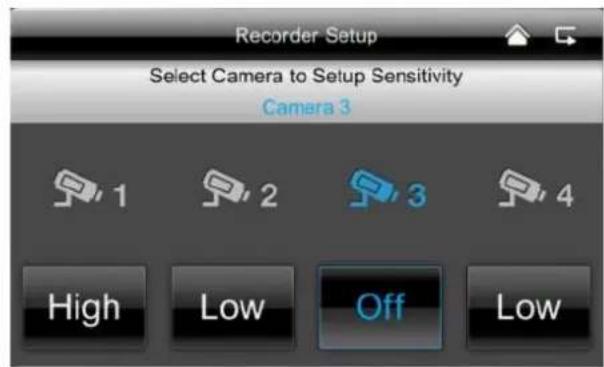
Here you can set the sensitivity of the motion detection for each camera. You can choose between "Low", "High" and "Off".
High: Motion detection with high sensitivity Low: Motion detection with low sensitivity Off: Motion detection is off. Motion is not recorded.
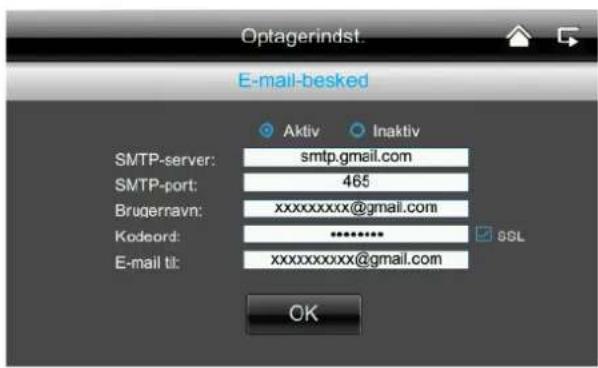
②
Alarm alerts via email
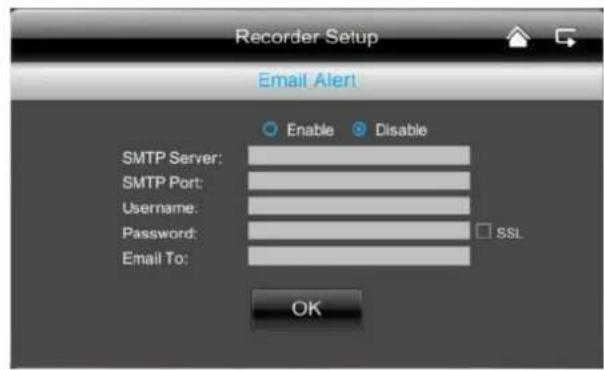
You can have an alarm alert sent to you via email as soon as the camera detects any motion.
Proceed as follows:

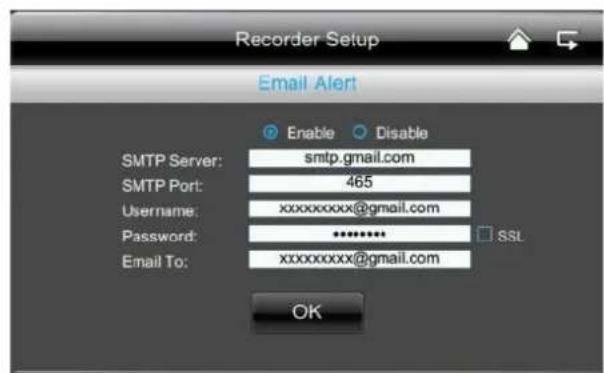
- Select "active". Select "inactive" to switch this function off again and you will not receive an email for motion detection.
- Enter your SMTP server (outgoing mail server) for your email provider. e.g. mail.gmx.net or smtp@gmail.com
- Enter the corresponding port e.g. 465
The outgoing mail server and the corresponding port can be found on your I provider's website. - Enter your email address
- Enter the password for your email account
- Enter the email address to which the alarm alert should be sent.
The two email addresses can be different. - In the event of motion detection, you receive an email with the following message: "Motion detected by your security system."
To enable this function, the monitor must be in the docking station and connected to the internet.
Please note that you only receive an email to inform you that motion has been detected. You do not receive a picture or a live view. You can then view the recording on the SD card or go to the live view via the app.
If you have not received an e-mail, please check your spam folder.
Timer recordings
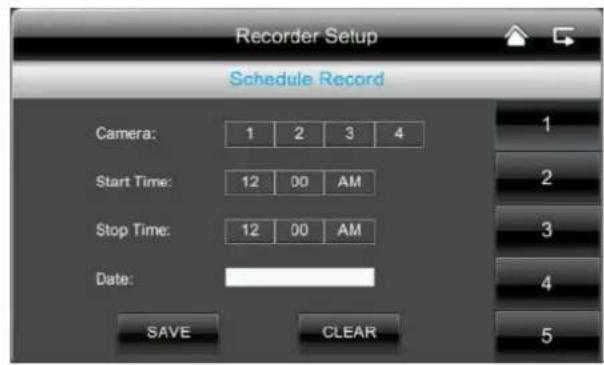
(3)
You can save a recording time to start recording at a very specific time.
You can save up to 5 recording procedures.
- First select the number of the camera.
- Set the start and stop time. To do this use the arrow buttons.
- Select the required date from the calendar.
- Press "Save" to save the procedure or "Delete" to reset.
- As soon as a timed recording has been saved, the symbol for recording appears.
7.4.3. Network settings
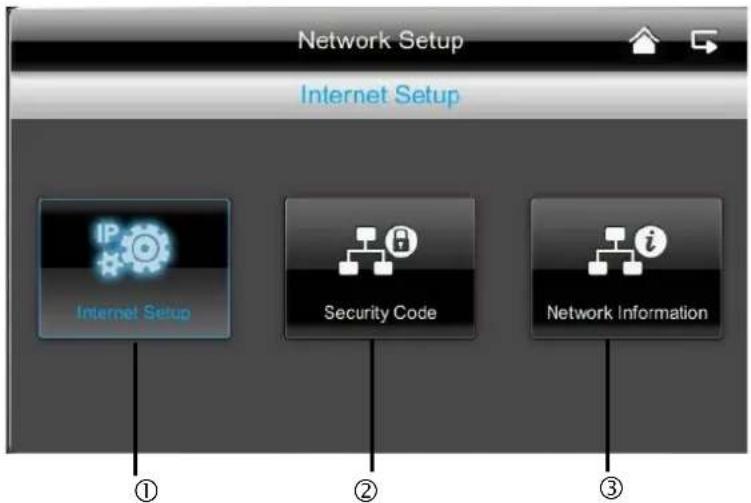
①
Internet settings
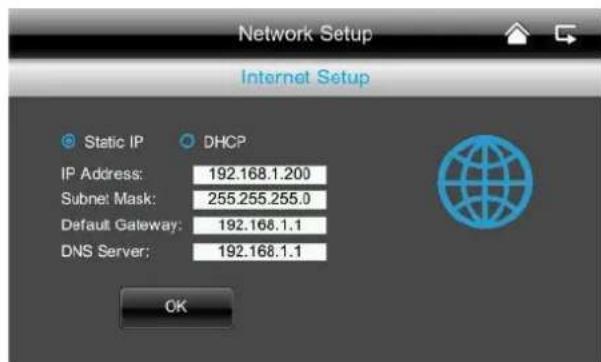
To establish a connection with the internet so that you can access the camera with the app, close the docking station using the network cable on your router.
Choose between static IP and DHCP. Then confirm with "OK".
Information:
An IP address is an address in the computer network. It is assigned to devices which are linked in a network and makes the device identifiable, allowing it to be reached.
DHCP:
A DHCP is a dynamic IP address which is allocated automatically.
Stat. IP:
You can find the data for a static IP in your router settings.
(2)
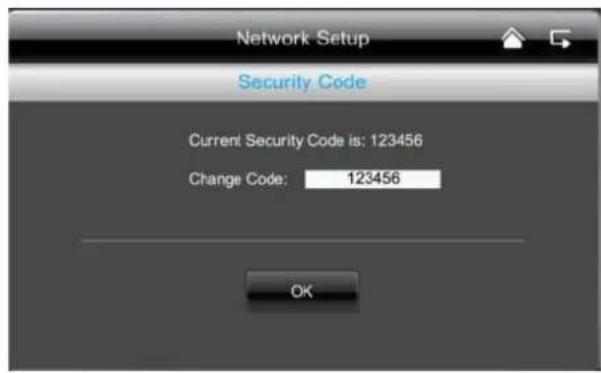
Securitycode
The standard security code is: 123456 For reasons of security, change this code and enter a new password (max. 8 digits). Press the field with the white background and a keyboard appears.
Then confirm with "OK".
You will need the security code later if you want to access the cameras via the app.
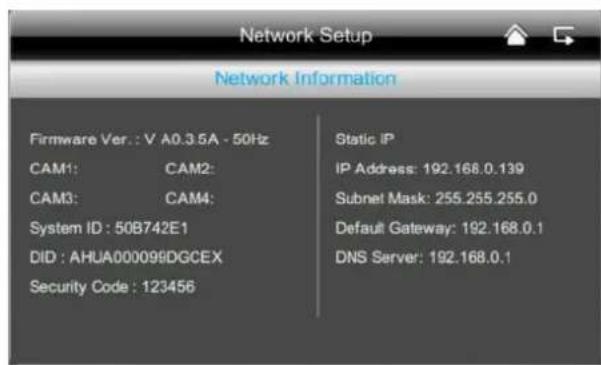
(3)
Network information
Here you can find out details about the active network.
You will need to enter the DID code for the app later.
7.4.4. Alarm settings

①
Duration
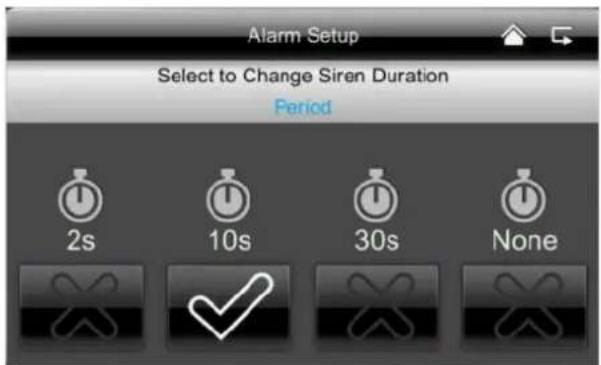
Here you can select the required duration of the alarm.
You can set the alarm duration individually: 2 seconds, 10 seconds, 30 seconds or no sound. Press any button to switch off the alarm in the event of an alarm.
②
Alarm sounds
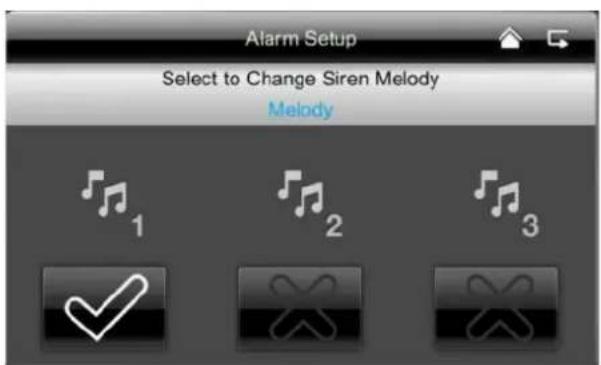
You can choose between three alarm sounds.
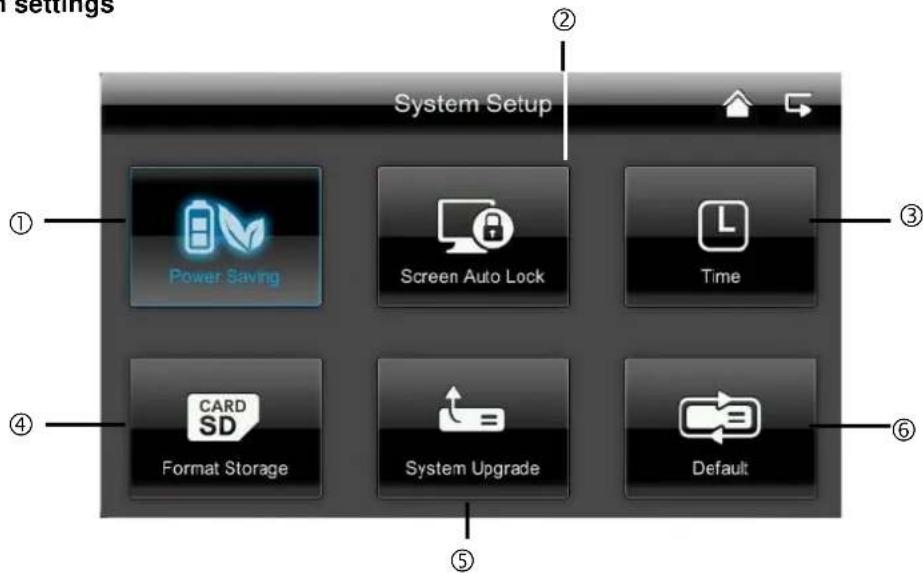
7.4.5. System settings
①
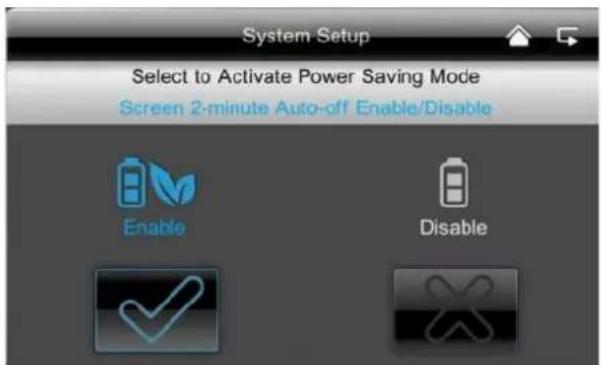
Energy saving mode
Here you can activate or deactivate the automatic screen switch-off after 2 minutes.
If the energy saving mode is activated, your battery lasts roughly half an hour longer.
②
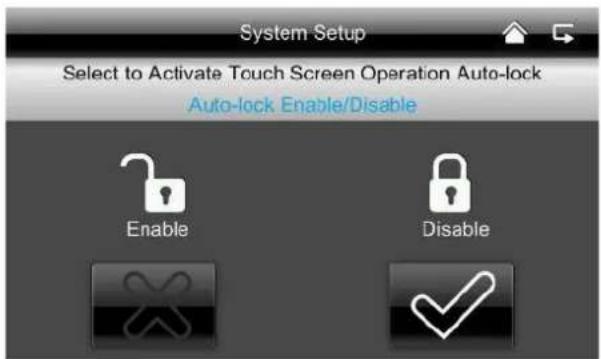
Automatic lock
If the automatic lock is activated, the monitor no longer responds to the touch function after a few minutes. Press the "Power" button to switch on the monitor again.
③
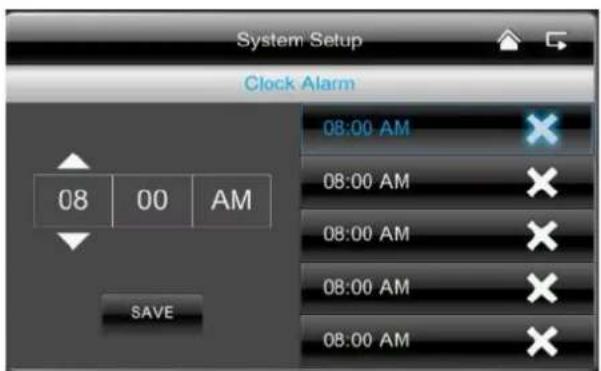
Setting the time // alarm
Enter the required time at which you want to be reminded.
Press "Save" and press on the time in the right-hand field, appears.
The system then sounds at the time saved and the following symbol appears.

Press on "OK" to stop the alarm.
Setting the time // date
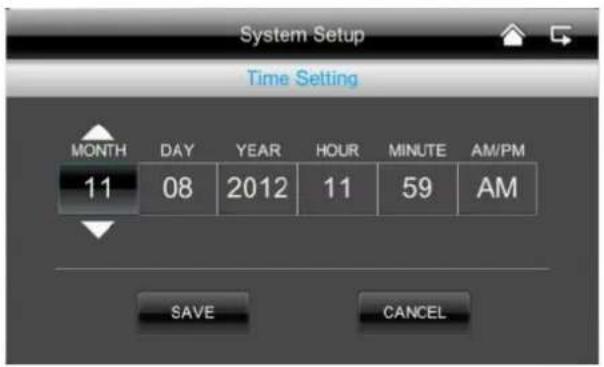
Here you can set the date and time.
Then save your entries.
Note:
AM = 00:00 - 11:59
PM = 12:00 - 23:59
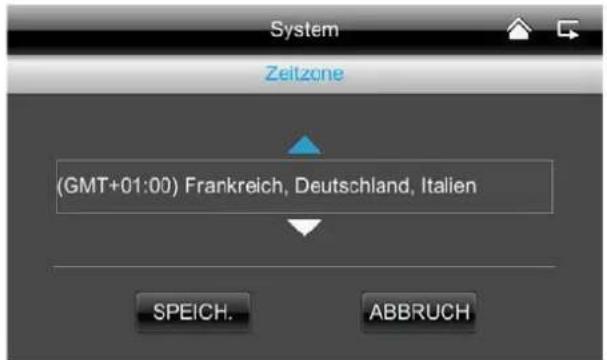
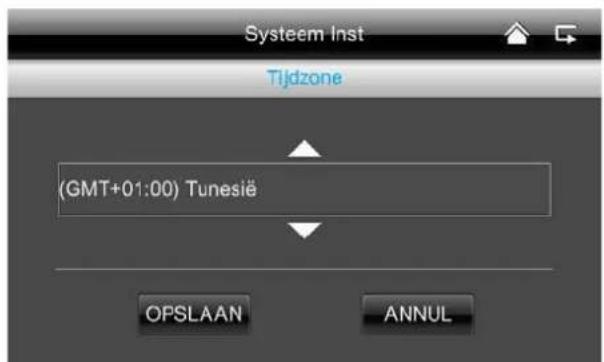
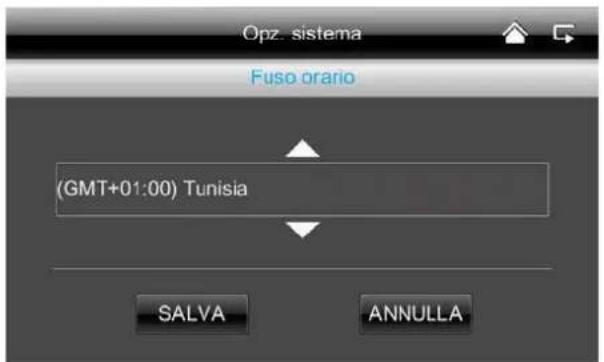
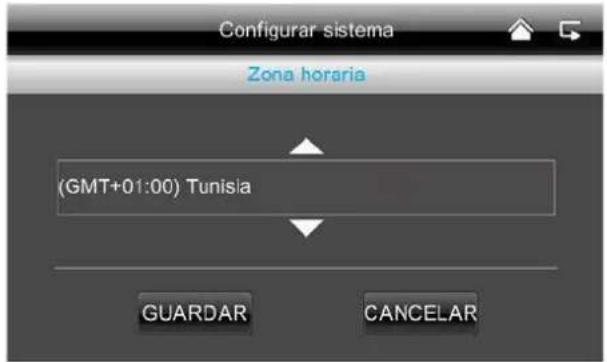
Time zone
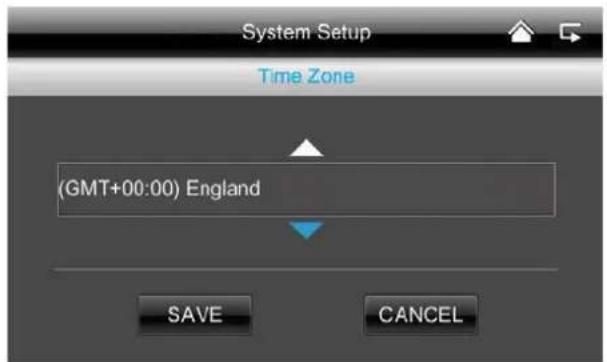
You can set the time zone for your country. Use the arrow keys to select the country region.
Then save your entries.
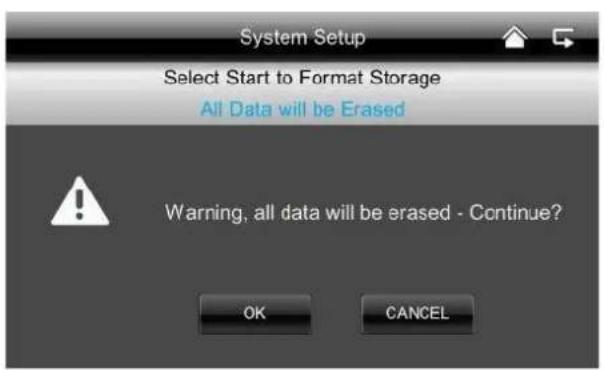
(4)
Formatting the memory card
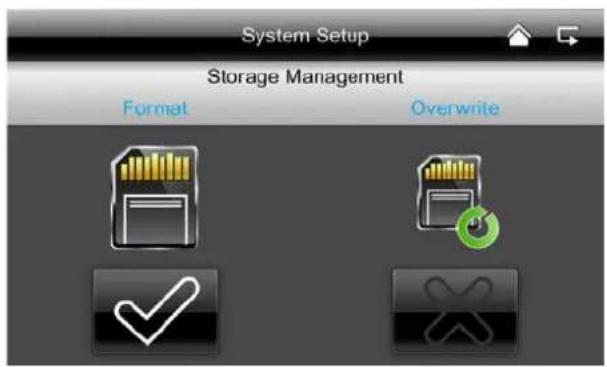
If you want to format your memory card, you can do it on the computer or directly on the monitor. Press the button and confirm with "OK". Cancel the procedure by pressing "Delete".
Activating the circular buffer
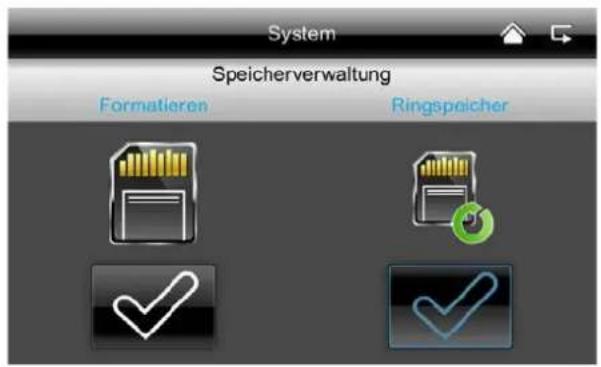
Here you can activate the circular buffer for the recording.
If this function is deactivated, the monitor stops the recording once the SD card is full.
⑤
Updating the system
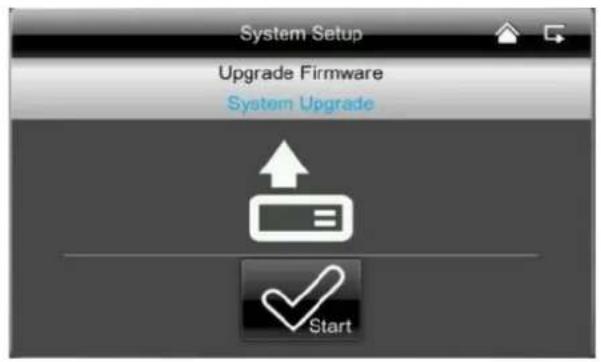
Always use the latest system firmware. You can download the latest version from our website at www.abus.com (item number TVAC16001A). To download, please proceed as follows:
1 Remove the SD card from your monitor and insert it in a SD card reader which is connected to your computer.
2 Unzip the folder. Save the files from the folder to the SD card.
3 Remove the SD card again from the SD card reader and put it back into the monitor.
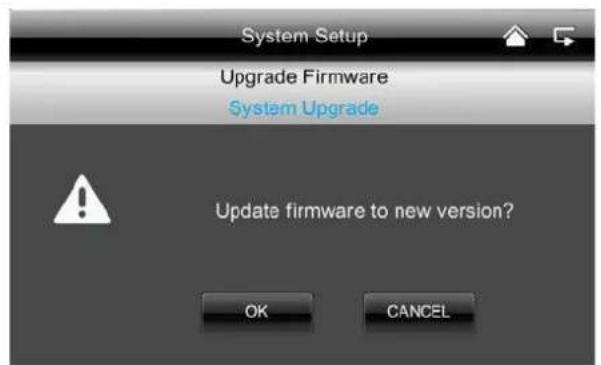
4 Go to System Settings, System Update, press "Start" and the latest firmware will be installed.
5 Press OK to install the latest firmware. Cancel the procedure by pressing "Delete".
(6)
Restoring factory settings / selecting the language and Hz
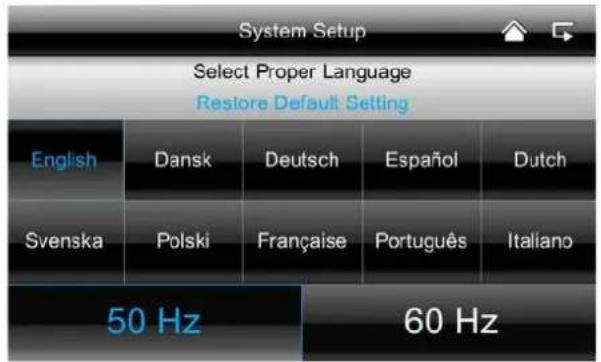
Here you can select the language and the Hz frequency.
When you change the language, the factory settings are restored. When you confirm with "OK", the system shuts down automatically. Press "Delete" to cancel the procedure.
Once the system has shut down, restart by pressing the power button.
You will then be prompted to calibrate the screen. Follow the instructions.
7.4.6. Troubleshooting (FAQ)
FAQ selection
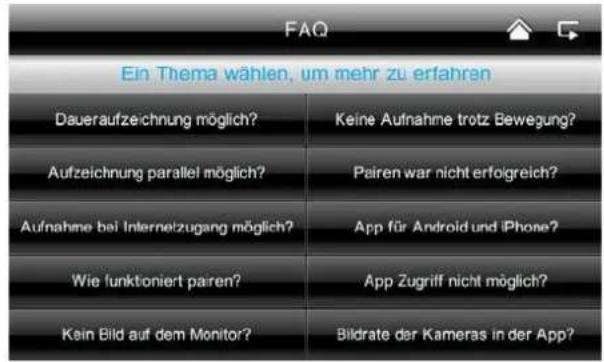
①
Here you can read about troubleshooting tips directly on your monitor.
Select the question to view the help message.
8. Remote access via app
Integration into the App2Cam
With this 7" wireless touchscreen monitor you are able to tune into your cameras in real time.
This manual explains how to integrate the TVAC16001A system into the App2Cam so you can access the live view while you are on the go.
Network connection
(1)
Ensure that the monitor is in its docking station and is connected
to your router, that there is an internet connection
you have adjusted the relevant network settings on your router.
'App2Cam' app

②
Download the 'App2Cam' app from the App Store.
Add system

(3)
Open the app on your mobile phone and tap the

symbol.
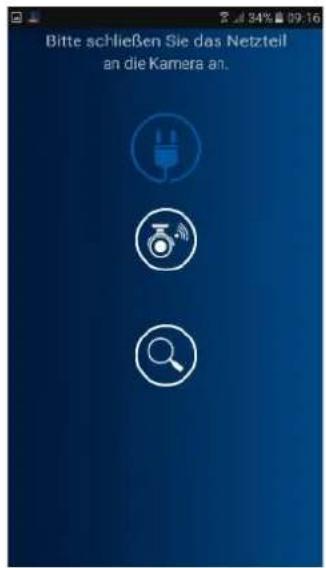
Then tap the magnifying glass symbol add your TVAC16001A system.
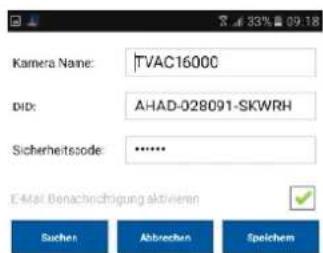
(4)
Input system information
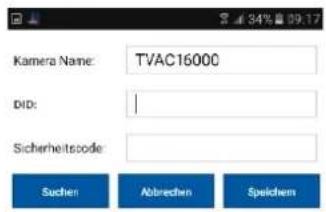
- Under 'Camera name', give your system a name that will be displayed on your mobile phone.
- Now enter the 15-digit DID number. This can be found in your monitor's network information, on the product's product sticker or by clicking on the 'Search' function where you will be shown all the devices in the network.
- After this, enter your password. The password is the security code which can also be found in your monitor's network information. If you have not already changed the password on the monitor, the standard password is: 123456.
- Finally, save these settings with 'Save' and 'Yes'.

As soon as you change the password on your monitor you must also change it in the app, otherwise you will not be able to access the cameras.
(5)
Connection status
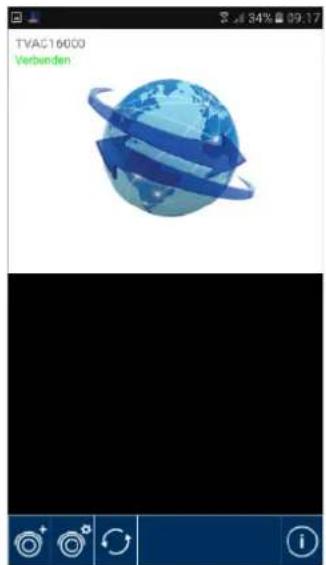
Once you have successfully added your system, the name of your system and the current connection status will appear in the overview.
Tap on the system to see the live view.
System name
E.g.: TVAC16001A
Connection status
Connected = you are connected to your system
Disconnected = there is no connection to the system

Add system
You can add further systems here

System configuration
You can go to the system configuration here.
Press return to the live view.

Connection update
The connection is being refreshed.

Firmware information / PIN code
Here you can see the system's current firmware version and set a PIN code. You can find out how to add a PIN code under ⑦.
Live view
(6)
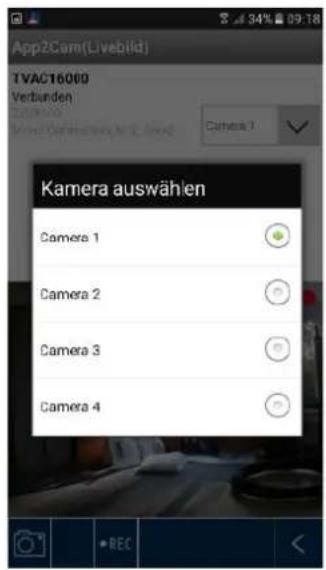
You are now looking at the live view from the selected camera and can choose which camera to view.
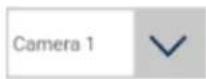
Camera selection
Select the camera you would like to view.

Screenshot
You have the option of taking a screenshot of your live view here. The image will then be saved in the photo gallery on your mobile phone.

Start recording
Here you have the option to start a manual recording, the length of which is two minutes. The recording will be saved locally on the monitor and the following icon will appear in the live view:

Back
You can return to the device overview here. A screenshot of the last successful connection will always be shown.
Set PIN code
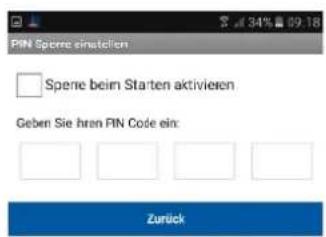
⑦
If you would like to set a PIN code for this app, please do so as follows:
- Open 'Set PIN lock' with
- Enter a four-digit PIN code and confirm it.
- Press the check box next to 'Activate start-up lock'

If you have set a PIN code, you will be required to enter it when you open the app.

System configuration
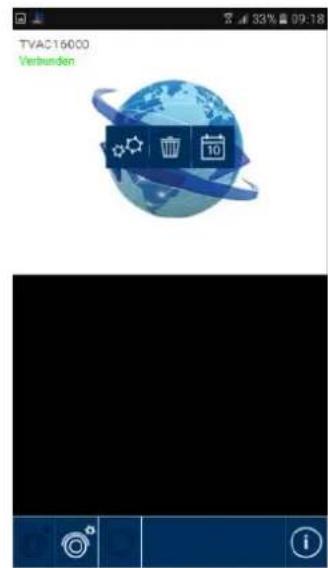
⑧

System configuration
You can go to the system configuration here. You have the following options.

System information
Change the system information

Remove system
Remove system

Recordings
Access to recordings

return to the live view.

System information
You can change the system names, the DID and the security code here. Save the settings by pressing 'Save'. Press 'Search' to search for a device in the network. To cancel the operation, press 'Cancel'.
Activate email notification
Activate this function to receive an email notification in case of an incident.
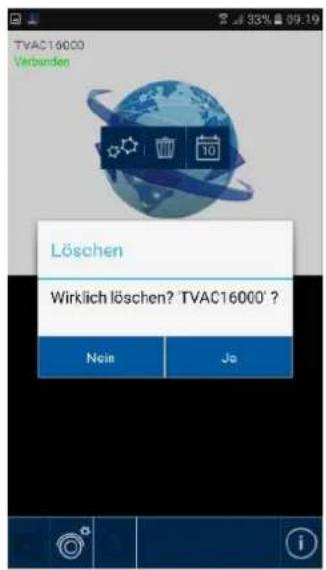

Remove system
When the icon is pressed, a new window will appear. You will be asked if you are sure that you want to delete the system.
Press 'Yes' if you want to remove the system, or cancel by pressing 'No'.

Access to recordings
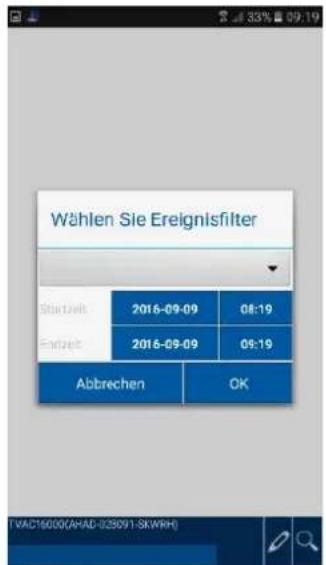
Filter event list
At the beginning, you will be prompted to filter the recordings. To do this, insert a start time and an end time and select a camera channel. All recordings that were taken by the selected camera during this time period will now be shown.
You can reset the event list filters with the symbol.

The list can include up to 100 recordings. Should there be more than 100 recordings in the specified time period, only the first 100 will be shown. In order to filter in more detail, please reduce the time period.
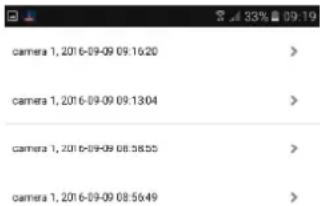
Here you can view the recordings from the individual cameras on your smart phone. Select the recording you would like to view; the playback will start immediately.
Press to pause the recording and to return to the event list press the button.

Deleting recordings
Press the symbol in the event list. You can now delete recordings for the selected camera by selecting single, or multiple files and clicking on the symbol. To delete all files, press and then the recycle bin.
Press the symbol again to clear the selection.
9. Maintenance and cleaning
9.1. Maintenance
Regularly check the technical safety of the product, e.g. check the housing for damage.
If it seems that it may no longer be possible to operate the device safely, stop using the product and protect it from unintentional use.
It is likely that safe operation is no longer possible in the event that:
The device shows signs of visible damage.
The device no longer works correctly.

Please note:
You do not need to perform any maintenance on this product. There are no components to service or anything inside the product to check. Never open it.
9.2. Cleaning
Clean the device with a clean, dry cloth. The cloth can be dampened with lukewarm water if the dirt on the monitor is hard to remove.

Do not allow any liquids to enter the device.
Do not use any chemical cleaning products as they could damage the surface of the housing (discoloration).
10. Disposal
Important: The EU Directive 2011/65/EU regulates the proper return, treatment and recycling of used electronic devices. This symbol means that in the interest of environmental protection the device must be disposed of separately from household or industrial waste at the end of its service life in accordance with applicable local legal guidelines. Disposing of used devices can be done at official recycling centers in your country. Obey local regulations when disposing of material. Further details on returns (also for non-European countries) can be obtained at your local authority. Separate collection and recycling saves natural resources and ensures that all the provisions for protecting health and environment are observed when recycling the product.
11. Tips for troubleshooting
| No. | Question | Answer |
| 1 | What does pairing the monitor and camera mean and how does this work? | Pairing creates the exclusive, encrypted wireless connection between the monitor and camera.To connect a camera with the monitor, proceed as follows:1. Connect the camera and the monitor to the power supply.2. In the monitor menu, select "Camera", then "Pairing" and the required camera (1-4). The system counts down from 60 seconds.3. During the 60 seconds, press the PAIRING button on the camera cable until the green LINK LED on the front of the camera starts flashing.4. Once the connection is established, the LINK LED on the camera is lit up continuously |
| 2 | What could be the reasons why no image is shown on the monitor? | If you do not have a signal, please check the following:1. Is the camera connected to the power supply (does the LED light up red)?2. Is the monitor charged?3. Are the camera and monitor paired with each other (see question 1)?4. Is the camera within range of the monitor?5. Is the signal between the camera and monitor disrupted? |
| 3 | What could be the reasons why the device does not record when there is movement? | Please check that the sensitivity function of the motion detection is switched on. |
| 4 | What could be the reasons why the device does not record although a schedule has been created? | Possible reasons are:1. Are the date and time set correctly?2. Is the SD card locked (Lock/Unlock?), not inserted or empty?3. Have you formatted the SD card? It must be formatted before it is first used.4. No movement was detected. |
| 5 | What could be the reasons why the camera cannot be paired with the monitor? | Please check the following:1. The camera has no power supply.2. Briefly press the pairing button on the camera while the monitor counts down from 60.3. Please press the pairing button for a short time only, not continuously.4. Restart the monitor. |
| 6 | The monitor and camera are on, but nothing can be identified on the monitor. | The key lock is probably activated. Press the power button for at least five seconds. |
| 7 | What could be the reasons why the live image can be accessed via the app within the local network, but not externally? | Please check the following:1. Is the monitor in the docking station?2. Is the docking station connected to the network?3. Do you have an internet connection?4. Have you connected the monitor to the internet? Please note the following icon a stop edge of the monitor (what icon? must be integrated on the website)5. Does your password for the monitor match the password for the app?6. Do you have an internet connection to your mobile phone?? |
12. Technical data
| Camera | 7" monitor | |
| Number of IR LEDs | 25 | - |
| Rechargeable battery running time | - | 1.5 hours |
| Battery type | - | Li-lon polymer battery, 3.7 V / 1800 mA |
| Resolution | 640 x 480 pixels | 800 x 480 pixels |
| Image sensor | 1/4" CMOS | - |
| Angle of view | 60° (Horizontal) / 43° (Vertical) | - |
| Frequency | 2.4 GHz | 2,4 GHz |
| Wireless range | 150 meters* | |
| IR swivel filter | Yes | - |
| Camera inputs | - | 4 |
| Max. operating temperature | -10 °C – 50 °C | |
| Modulation | FHSS | |
| Monitor | - | 7" LCD |
| Network access | - | RJ45 |
| Lens | 3.6 cm fixed lens | - |
| Range of night vision function | Max. 8 m | - |
| IP protection class | 66 | - |
| Transmission power | 15 +/-2 dBm | |
| Sensitivity | -80 dBm | |
| DC voltage supply | 5 V DC | |
| Storage medium | - | SD card, max. 32 GB |
| OSD language | German, English, Spanish, Dutch, French, Portuguese, Italian, Polish, Swedish, Danish | |
| Power consumption | Max. 500 mA | Max. 800 mA |
| Certifications | CE | |
*The wireless transmission range depends on the environmental factors (e.g. mobile communication masts, high-tension pylons, electrical wires, ceilings and walls, etc.). If conditions are not favorable, the range will be limited.
Storage capacity
| Storage capacity | One camera (480x272) | Several cameras (320x240 QVGA) |
| 1 GB | 200 minutes | 130 minutes |
| 2 GB | 400 minutes | 260 minutes |
| 8 GB | 1,600 minutes | 1,040 minutes |
| 16 GB | 3,200 minutes | 2,080 minutes |
| 32 GB | 6,400 minutes | 4,160 minutes |
TVAC16001A
Manuel utiliseur
wwwabus.com/fr/Securite-a-installier-soi-meme
Version 1.4
CE
Chere cliente, cher client,
7. Transmission radio
| 33% | |
| camera 1,2016-09-09 09:16:20 | |
| camera 1,2016-09-09 09:13:04 | |
| camera 1,2016-09-09 08:58:55 | |
| camera 1,2016-09-09 08:56:49 |
$$ A M = 0 0: 0 0 - 1 1: 5 9 $$
$$ \mathrm {P M} = 1 2: 0 0 - 2 3: 5 9 $$
Tijdzone
"Motion detected by your security system."
$$ A M = 0 0: 0 0 - 1 1: 5 9 $$
$$ \mathrm {P M} = 1 2: 0 0 - 2 3: 5 9 $$
Fuso orario
7. Transmission radio
| camera 1,2016-09-09 09:16:20 | > |
| camera 1,2016-09-09 09:13:04 | > |
| camera 1,2016-09-09 08:58:55 | > |
| camera 1,2016-09-09 08:56:49 | > |
| 33% | |
| camera 1,2016-09-09 09:16:20 | |
| camerera 1,2016-09-09 09:13:04 | |
Kasowanie zapisów
$$ A M = 0 0: 0 0 - 1 1: 5 9 $$
$$ P M = 1 2: 0 0 - 2 3: 5 9 $$
Zona horaria
| 33% | |
| camera 1,2016-09-09 09:16:20 | |
| camera 1,2016-09-09 09:13:04 | |
| camera 1,2016-09-09 08:58:55 | |
| camera 1,2016-09-09 08:56:49 |
Borrar grabaciones
Integration i App2Cam
Med den tradlosa 7^ skarmen med pekfungtion kan du se dina kamerainspelninger live.
Den har bruksanvisingen visar hur du kan integrera systemet TVAC16001A i App2Cam for att kunna komma at livebilden dà du ar ute.
Nätverksanslutting

①
These operating instructions are published by ABUS Security-Center GmbH & Co.KG, Linker Kreuthweg 5, 86444 Affing, Germany. No reproduction (including translation) is permitted in whole or part e.g. photocopy, microfilming or storage in electronic data processing equipment, without the express written consent of the publisher.
The operating instructions reflect the current technical specifications at the time of print. We reserve the right to change the technical or physical specifications.