
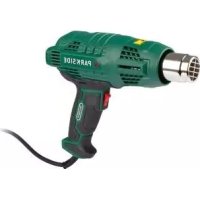
PHLG 2000 C2 - Heat gun PARKSIDE - Free user manual and instructions
Find the device manual for free PHLG 2000 C2 PARKSIDE in PDF.
| Brand | Parkside |
| Model | PHLG 2000 C2 |
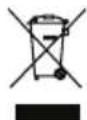
| Product type | Heat gun / Thermal stripper / Thermal weed remover 2 in 1 |
| Power consumption | 2000 W |
| Supply voltage | 230 V~, 50 Hz |
| Protection class | II |
| Max. air flow | 500 l/min |
| Adjustable temperatures | 3 levels: 100 °C, 350 °C, 650 °C |
| Main functions | Paint stripping, removing, plastic welding, thermal weeding, barbecue lighting |
| Included nozzles | Reduction nozzle, surface nozzle, scraper nozzle, barbecue lighting nozzle, conical nozzle |
| Use with pole | Yes, extension tube for weeding (2-part assembly) |
| Adjustable handle | 2 positions (weeding/lighting and manual use) |
| Rest foot | Yes, with support bracket for cooling |
| Maintenance and cleaning | Clean with brush or cloth; do not use cleaning products; store in a dry place |
| Safety | Safety goggles and gloves mandatory; do not expose to rain; hot surfaces; cable anti-pull device |
| Warranty | 3 years (France and Belgium) |
| Spare parts available | Nozzles (reduction, scraper, surface, barbecue lighting, conical) – see www.grizzlytools.shop |
| Repairability | Repairs by after-sales service (do not attempt repairs yourself) |
| Weight | Not specified |
| Dimensions | Not specified |
Frequently Asked Questions - PHLG 2000 C2 PARKSIDE
User questions about PHLG 2000 C2 PARKSIDE
0 question about this device. Answer the ones you know or ask your own.
Ask a new question about this device
Download the instructions for your Heat gun in PDF format for free! Find your manual PHLG 2000 C2 - PARKSIDE and take your electronic device back in hand. On this page are published all the documents necessary for the use of your device. PHLG 2000 C2 by PARKSIDE.
USER MANUAL PHLG 2000 C2 PARKSIDE
Translation of the original instructions
NL BE
Lange steel-hete luchtblazer / onkruidverdelger
Before reading, unfold the page containing the illustrations and familiarise yourself with all functions of the device.
F ②
General description. 17
Extent of the delivery 17
Functional description 17
Overview. 17
Technical specifications 17
Safety information 18
Symbols used in the instructions 18
Symbols on the device 18
General notes on safety 18
Initial start-up 20
Operation 21
Turning the handle. 21
Switching on and off 21
Use as a floor-mounted appliance ... 21
Use of adapter nozzles. 21
Restrictor 22
Surface nozzle 22
Spatula nozzle 22
Grill lighter nozzle 22
Conical nozzle 22
Initial start-up as a weed killer . 23
Mounting the extension 23
Working instructions
Weed killer 23
Cleaning/maintenance/storage.23
General cleaning and
maintenance work. 24
Storage. 24
Waste disposal and
environmental protection.....24
Spare parts/Accessories 24
Guarantee 25
Repair Service. 26
Service-Center 26
Importer 26
Translation of the original
EC declaration of conformity ....145
Exploded Drawing 157
Introduction
Congratulations on the purchase of your new device. With it, you have chosen a high quality product. During production, this equipment has been checked for quality and subjected to a final inspection. The functionality of your equipment is therefore guaranteed. It cannot be ruled out that residual quantities of lubricants will remain on or in the equipment/hose lines in isolated cases. This is not a fault or defect and it represents no cause for concern.

The operating instructions constitute part of this product. They contain important information on safety, use and disposal.
Before using the product, familiarise yourself with all of the operating and safety instructions. Use the product only as described and for the applications specified. Keep this manual safely and in the event that the product is passed on, hand over all documents to the third party.
Intended Use
The 2-in-1 long-reach hot air blower/ weed killer is suitable for removing weeds between paving slabs, on plastered surfaces, masonry, in flower beds and lawn areas during growth periods, as well as for removing coats of paint, for heating (for example, shrink tubing), and for reshaping and welding plastics. It can be used to loosen adhesive joints, defrost water pipes and to ignite charcoal.
This equipment is not suitable for commercial use. Commercial use will invalidate the guarantee. Any other use that is not explicitly approved in these instructions may result in damage to the equipment and represent a serious danger to the user. The use of the device in the rain or a damp environment is prohibited.
The manufacturer is not liable for damage which is caused through inappropriate use or incorrect operation.
General description
Extent of the delivery
Carefully unpack the appliance and check that it is complete:
- Heat gun
- Extension pipe
- Handle for extension
- Conical nozzle
- Restrictor
- Surface nozzle
- Spatula nozzle
- Grill lighter nozzle
- Instruction Manual
Functional description
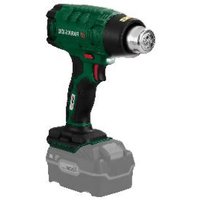
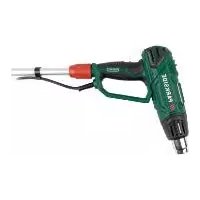
This device is a 2-in-1 long-reach hot air blower and weed killer that can be used with or without the long-reach extension. The device can be controlled with a step switch. An air volume of 500l / min reaches 100, 350, or 650^ , depending on the selected level.
Overview
1 Blow-off pipe
2 Device housing
3 Lock switch rotating handle
4 Air inlet
5 On/off switch and step switch 6 Handle
7 Threaded coupling for extension pipe
8 mains cable
9 Extension pipe
10 Coupling nut
11 Cable clips
12 Handle threaded coupling
13 Extension pipe handle
14 Cable strain relief
B 15 Grill lighter nozzle
16 Conical nozzle
17 Surface nozzle
18 Spatula nozzle
19 Restrictor

20 Base
21 Stand bracket
Technical specifications
Long Reach Heat Gun/ Weed Killer......PLHLG 2000 C2
Motor input power 2000 W
Mains voltage. 230 V\~, 50 Hz Safety class
Air quantity max. 500 l/min Temperature on level 1 100 °C
Temperature on level 2.350 °C
Temperature on level 3.650 °C
Safety information
Symbols used in the instructions

Hazard symbols with information on prevention of personal injury and property damage.

Precaution symbol with information on prevention of harm / damage.

Notice symbol with information on how to handle the device properly
Symbols on the device

Read carefully before use.

Wear safety gloves

Wear safety goggles

Do not expose to rain or moisture.

Caution! Hot surface. Risk of burns.

Safety class II

Electrical machines do not belong with domestic waste.
General notes on safety

This device may cause serious injury if used improperly. To avoid personal injury and damage to property, read and comply with the following safety instructions and familiarise yourself with all control elements.

Caution: This is how to avoid accidents and injuries:
- This appliance can be used by children aged from 8 years and above and persons with reduced physical, sensory or mental capabilities or lack of experience and knowledge if they have been given supervision or instruction concerning use of the appliance in a safe way and understand the hazards involved. Children shall not play with the appliance. Cleaning and user maintenance shall not be made by children without supervision.
Children should be supervised to ensure that they do not play with the device.
The operator or user is responsible for any accidents or personal injury and/or material damage to third parties or their property. - Only use spare parts and accessories which are supplied and recommended by the manufacturer. Using extern
nally produced parts results in the immediate loss of the warranty claim.
Using the device

Caution! This is how to avoid damage to the equipment and possible personal injuries resulting from this:
- Do not use the device in the rain. Only work in daylight or at good light.
If you are tired or lacking in concentration or have consumed alcohol or tablets, do not work with the device. Always have a break on time. Work using common sense. - Never leave the device unattended at the workplace.
- A fire can develop if the device is not handled carefully.
- Be careful when using the devices near flammable materials.
- Do not point at the same location for an extended period of time.
- Do not use in an explosive atmosphere.
- Heat can be passed to flammable materials that are hidden.
- After using the device, put it on the stand and allow it to cool down before it is packed away.
- Do not leave the device unattended as long as it is in operation.
Use as a solid fuel lighter / use of the grill lighter nozzle (15)
- Check that the solid fuel lighter is in the correct position.
Isolate from the mains before removing it from the fire. - Allow the solid fuel lighter to cool down before packing it away.
- The connection cable or other flammable materials must not come into contact with the hot parts of the solid fuel lighter.
Electrical safety

Caution: This is how to avoid accidents and injuries by an electric shock:
Make sure that the mains voltage matches the details on the type plate.
- Connect the device only to a socket with a residual current circuit breaker (RCD) with a tripping current of not more than 30mA .
- Keep the appliance away from rainy or wet conditions.
- Do not use the mains cable to pull the plug from the socket. Protect the mains cable from heat, oil and sharp edges.
- Switch the device off and pull the mains plug out of the socket if the mains cable is damaged. If the connection cable of this device is dam
aged, it must be replaced by the manufacturer or their customer service or by a similarly qualified person in order to avoid hazards.
- Do not connect a damaged mains cable to the power supply. Do not touch a damaged mains cable as long as it is connected to the power supply. A damaged mains cable can result in voltage-carrying parts being touched.
Additional safety information

Caution! Avoid injury, fire and health risks:
If in danger, immediately remove the mains plug from the socket.
- Never use the device as a hair dryer
- Never direct the hot air flow at people or animals.
- Do not look directly into the nozzle opening on the blow-off pipe.
- Do not touch the nozzle when it is hot.
- Wear safety gloves.
- Wear safety goggles.
- Remove the mains plug from the socket when not in use as well as when taking a break from working or while carry
ing out work on the device, e.g. changing the nozzle.
- Maintain distance between the nozzle outlet and the surface or workpiece you are working on. The device could overheat.
- The device must always be kept clean, dry and free of oil or lubricating greases.
Initial start-up
When used for the first time, some smoke may escape. The smoke is caused by binders which are removed from the insulating film of the heater by the heat during first use. To ensure that the smoke escapes quickly, the device should be placed on the stand area (D 20). Be sure to ventilate the working environment during first use. If the smoke/odour is too strong, move the initial start-up to outside! Initial Operation
The 2-in-1 long-reach hot air blower/weed killer can be used as both a handheld device (for operation as a hot air blower) and as a long-reach tool (for operation as a weed killer).

For use as a weed killer, the device may only be operated with the extension pipe. When eliminating weeds, hold the device by the handle on the extension.
Operation
Turning the handle
The device has two handle positions.

Position 1
Suitable for eliminating weeds and lighting charcoal.

After using the device, always place it in position 1 with its base (20) and stand bracket (21) on an even, fireproof surface until the device has cooled down.
Fold out the stand bracket (21) for use, and fold it back in after use.

Position 2
Suitable for use as a heat gun.

- To turn the handle (6), move the lock switch (3) forward towards the blow-off pipe (1). The "O" icon appears.

-
Keep the lock switch (3) in this position and turn the handle (6) to the desired position.
-
Release the lock switch (E 3). The icon appears. Check whether the handle (6) has clicked into the desired position and can no longer be turned.

Switching on and off
Depending on the application, the device can be set to three temperature levels using the on/off switch (5).
Level 1 = 100^
Level 2 = 350^
Level 3 = 650^
Switching the device on:
- Insert the mains plug into a wall socket.
- Switch the on/off switch (5) to the desired level 1, 2 or 3.
After approximately 1 minute, the device will reach the full operating temperature.
Switching the device off:
- To switch the device off, set the on/off switch (5) to level "0".
- After using the device, always place it on its base (D 20) on an even, fireproof surface until the device has cooled down.
- Remove the mains plug from the socket

Use as a floor-mounted appliance
You can use the device as a floor-mounted appliance. For this purpose, place the device on the two bases (9).
Ensure stability and safety and a heat-resistant surface.

The position as a floor-mounted appliance is also ideally suited to allowing the device to cool down after use.

Use of adapter nozzles

Before exchanging adapter nozzles, the adapter nozzle (15/16/17/18/19) and blow-off pipe 1 must be sufficiently cooled down to avoid burns.

Various uses are possible. Always comply with the safety instructions and always handle the device with care and caution.
Restrictor
Place the restrictor (19) on the blow-off pipe (A 1). Use the restrictor (19) to obtain selective heat, e.g. to seal plastics (films, shrink tubing).

When using the restrictor (19), pay particular attention to the heat development at the cutting point. If in doubt, do not stay in the same place for too long in order to avoid overheating the workpiece.
Surface nozzle
Place the surface nozzle (17) on the blowoff pipe (A 1).
Use the surface nozzle (17) to obtain heat over a large surface.
It is especially suitable for dissolving adhesive or softening paints.

When using the surface nozzle (17), pay particular attention to the heat development in adjacent locations of the cutting point. So that in cases of doubt, no adjacent component is overheated.

Spatula nozzle
Place the spatula nozzle (18) on the blowoff pipe (A 1).
The spatula form of the nozzle serves the purpose of the targeted hot air supply to paint and lacquer surfaces. The paints and lacquers can be removed with a spatula and scraper. The spatula (18) itself is not suitable for removing paint.

Grill lighter nozzle
Place the grill lighter nozzle (15) on the blow-off pipe (A 1).
Change the device with the step switch (G 5) to level "3". Place the grill lighter nozzle (15) below the charcoal. Make sure that the openings of the grill lighter nozzle (15) are not covered by charcoal as this creates heat accumulation in the unit, which is a potential fire hazard In just a few minutes the charcoal is ignited.

Never use other methods for igniting charcoal at the same time while using the grill lighter nozzle (15).

Use the grill lighter nozzle (15) only for the few minutes necessary to ignite the charcoal.

Never use the grill lighter nozzle (15) for any other application.
Conical nozzle

For use as a weed killer, the device may only be operated with the extension pipe. When eliminating weeds, hold the device by the handle on the extension.
Place the conical nozzle (16) on the blow-off pipe (A 1).
Use the conical nozzle (16) to remove weeds.

To eliminate weeds, use the conical nozzle on the plant to be removed for approx. 5-10 seconds.
For higher plants, you can shrink them by briefly heating the upper part of the plant. Then, use the coni
cal nozzle on the shrunken plant for 5-10 seconds.
Initial start-up as a weed killer

Mount the extension pipe to use the device as a weed killer.
Mounting the extension

-
Turn the handle (6) on the hot air blower to the position ① (see chapter "Turning the handle" F).
-
Insert the extension pipe (9) into the threaded coupling (12) on the handle shaft (13) and tighten the coupling nuts (10).
- Now, insert the extension pipe (9) into the threaded coupling (7) on the device housing (2) of the hot air blower and tighten the coupling nuts (10).

-
Guide the mains cable (8) along the extension handle (9) and fix it using the two cable clips (11).
-
Guide the mains cable (8) through the cable strain relief (14) on the handle shaft (13). At the height of cable strain relief, form a loop, which you can guide through the eyelets on the cable holder (14) and hang on the back.
Working instructions Weed killer
The conical nozzle (B 16) is best suited to remove weeds.
The best time to begin removing weeds is the spring
- Weed removal is most effective when
the plant is still young.
The success of actions using the device will not be immediately visible.
Depending on the plant type, it may not respond immediately to the heat for the recommended exposure time.
- Young, soft-leaved plants are sensitive to the treatment and afterwards they are no longer viable.
- Hard-leaved grasses are very robust. They have to be treated more frequently.
- Older plants and plants with hard leaves, such as thistles, have to be treated more regularly at 1-2 week intervals in order to successfully dry them out.
The visible part of the plant can also be scorched for a longer exposure time during treatment.
Scorching the plants is not absolutely necessary. Heating them dries out the leaves and any weeds die.
- When treating areas filled with roots, you will have to repeat treatments several times in short periods for lasting success. After this, longer treatment intervals will suffice.
- With some weeds, you may have to repeat the treatment.
Cleaning/maintenance/storage

Ask our service centre to carry out any work that is not described in these instructions. Do not try to repair the device by yourself, unless you have professional training. Use only original parts.
- Store the device in a dry place and out of reach of children.
General cleaning and maintenance work
Always keep the device clean. Use a brush or cloth for cleaning, but do not use any cleaning agents or solvents.
Storage
- Store the appliance in a dry place well out of reach of children.
- Give the device time to cool down before you store the device in an enclosed space.
We are not liable for damages caused by our equipment. Insofar as these are caused by improper repair or the use of non-original parts or use contrary to instructions.
Waste disposal and environmental protection
Be environmentally friendly. Return the tool, accessories and packaging to a recycling centre when you have finished with them.
Electrical machines do not belong with domestic waste.
- Hand over the device at an utilization location. The plastic and metal parts employed can be separated out and thus recycled use can be implemented. Ask our Service-Center for details.
Spare parts/Accessories
Spare parts and accessories can be obtained at www.grizzlytools.shop
If you have issues ordering, please use the contact form. If you have any other questions, contact the service centre (see "Service-Center" Page 26).
Position
instruction manual
Description Order No.
A 19
Restrictor 91105626
A 18
Spatula nozzle 91105629
A 17
Surface nozzle 91105628
A 15
Grill lighter nozzle 91105630
A 16
Conical nozzle 91105627
Guarantee
Dear Customer,
This equipment is provided with a 3-year guarantee from the date of purchase.
In case of defects, you have statutory rights against the seller of the product. These statutory rights are not restricted by our guarantee presented below.
Terms of Guarantee
The term of the guarantee begins on the date of purchase. Please retain the original receipt. This document is required as proof of purchase.
If a material or manufacturing defect occurs within three years of the date of purchase of this product, we will repair or replace - at our choice - the product for you free of charge. This guarantee requires the defective equipment and proof of purchase to be presented within the three-year period with a brief written description of what constitutes the defect and when it occurred.
If the defect is covered by our guarantee, you will receive either the repaired product or a new product. No new guarantee period begins on repair or replacement of the product.
Guarantee Period and Statutory Claims for Defects
The guarantee period is not extended by the guarantee service. This also applies for replaced or repaired parts. Any damages and defects already present at the time of purchase must be reported immediately after unpacking. Repairs arising after expiry of the guarantee period are chargeable.
Guarantee Cover
The equipment has been carefully produced in accordance with strict quality guidelines and conscientiously checked prior to delivery.
The guarantee applies for all material and manufacturing defects. This guarantee does not extend to cover product parts that are subject to normal wear and may therefore be considered as wearing parts (e.g. adapter nozzle) or to cover damage to breakable parts (e.g. switches).
This guarantee shall be invalid if the product has been damaged, used incorrectly or not maintained. Precise adherence to all of the instructions specified in the operating manual is required for proper use of the product. Intended uses and actions against which the operating manual advises or warns must be categorically avoided.
The product is designed only for private and not commercial use. The guarantee will be invalidated in case of misuse or improper handling, use of force, or interventions not undertaken by our authorised service branch.
Processing in Case of Guarantee
To ensure quick handling of you issue, please follow the following directions:
-
Please have the receipt and identification number (IAN 384543_2107) ready as proof of purchase for all enquiries.
-
Please find the item number on the rating plate.
-
Should functional errors or other defects occur, please initially contact the service department specified below by telephone or by e-mail. You will then receive further information on the processing of your complaint.
GB MT
- After consultation with our customer service, a product recorded as defective can be sent postage paid to the service address communicated to you, with the proof of purchase (receipt) and specification of what constitutes the defect and when it occurred. In order to avoid acceptance problems and additional costs, please be sure to use only the address communicated to you. Ensure that the consignment is not sent carriage forward or by bulky goods, express or other special freight. Please send the equipment inc. all accessories supplied at the time of purchase and ensure adequate, safe transport packaging.
Repair Service
For a charge, repairs not covered by the guarantee can be carried out by our service branch, which will be happy to issue a cost estimate for you.
We can handle only equipment that has been sent with adequate packaging and postage.
Attention: Please send your equipment to our service branch in clean condition and with an indication of the defect.
Equipment sent carriage forward or by bulky goods, express or other special freight will not be accepted.
We will dispose of your defective devices free of charge when you send them to us.
Service-Center
GB Service Great Britain Tel.:08004047657
E-Mail: grizzly@lidl.co.uk
IAN 384543_2107
MT Service Malta Tel:80062230
E-Mail: grizzly@lidl.com.mt
IAN384543_2107
Importer
Please note that the following address is not a service address. Please initially contact the service centre specified above.
Chere cliente, cher client,
Chere cliente, cher client,
Almendelige former for rengørings
Pooblasceni serviser:
Tel.: 01 888 92 73
E-Mail: grizzly@lidl.si
(Birotehnika, Hodošček Renata s.p., Lendavska ULICA 23, 9000 Murska Sobota)
Garancijski list
| Translation of the original EC declaration of conformity | |
| We hereby confirm that the Long Reach Heat Gun / Weed Burner model PLHLG 2000 C2 Serial number 000001 - 325000 conforms with the following applicable relevant version of the EU guidelines: | |
| 2014/30/EU • 2014/35/EU • 2011/65/EU* & (EU) 2015/863 | |
| In order to guarantee consistency, the following harmonised standards as well as natio- nal standards and stipulations have been applied: | |
| EN 60335-1:2012/A2:2019 • EN 60335-2-45:2002/A2:2012 • EN 62233:2008 EN 55014-1:2017/A11:2020 • EN 55014-2:2015 EN IEC 61000-3-2:2019 • EN 61000-3-2:2014 • EN 61000-3-3:2013 EN 61000-3-3:2013/A1:2019 • EN IEC 63000:2018 | |
| This declaration of conformity (21)** is issued under the sole responsibility of the manufacturer: | |
| CE Grizzly Tools GmbH & Co. KG Stockstädter Straße 20 63762 Großostheim Germany 05.12.2021 | Christian Frank Documentation Representative |
- The object of the declaration described above satisfies the provisions of Directive 2011/65/EU of the European Parliament and the Council of 8 June 2011 on limiting the use of certain harmful substances in electrical and electronic appliances.
** The last two digits of the year in which the CE marking was affixed.

- F ②
- Introduction
- Intended Use
- General description
- Extent of the delivery
- Functional description
- Overview
- Blow-off pipe
- B 15 Grill lighter nozzle
- Technical specifications
- Long Reach Heat Gun/ Weed Killer......PLHLG 2000 C2
- Safety information
- Symbols used in the instructions
- Symbols on the device
- General notes on safety
- Using the device
- Use as a solid fuel lighter / use of the grill lighter nozzle (15)
- Electrical safety
- Additional safety information
- Initial start-up
- Operation
- Turning the handle
- Position 1
- Position 2
- Switching on and off
- Switching the device on:
- Switching the device off:
- Use as a floor-mounted appliance
- Use of adapter nozzles
- Restrictor
- Surface nozzle
- Spatula nozzle
- Grill lighter nozzle
- Conical nozzle
- Initial start-up as a weed killer
- Mounting the extension
- Working instructions Weed killer
- Cleaning/maintenance/storage
- General cleaning and maintenance work
- Storage
- Waste disposal and environmental protection
- Spare parts/Accessories
- Spare parts and accessories can be obtained at www.grizzlytools.shop
- Position
- Guarantee
- Terms of Guarantee
- Guarantee Period and Statutory Claims for Defects
- Guarantee Cover
- Processing in Case of Guarantee
- GB MT
- Repair Service
- Service-Center
- Importer
- Garancijski list
Brand : PARKSIDE
Model : PHLG 2000 C2
Category : Heat gun