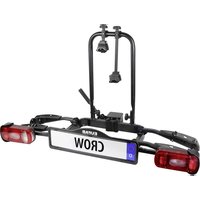
Amber IV - Bike rack Eufab - Free user manual and instructions
Find the device manual for free Amber IV Eufab in PDF.
| Product type | Bike rack for trailer hitch |
| Capacity | 4 bikes |
| Net weight | 19.5 kg |
| Maximum load capacity | 60 kg (with 90 kg of nose weight) |
| Maximum nose weight | 90 kg |
| Material | Steel |
| Electrical connection | 13-pin plug |
| Fixation | On trailer hitch with quick release and lock |
| Wheel rails | 8 rails (4 pairs) |
| Tilting system | Yes, for trunk access without removing bikes |
| Safety straps | Short (12) and long (1) for securing wheels and frames |
| Anti-sway strap | Yes, to stabilize the bike rack on tailgate |
| Maximum permitted speed | 130 km/h |
| Maintenance | Clean with water, grease moving parts, check bolts |
| Spare parts | Only original EAL GmbH parts |
| Environmental protection | Electrical device, mandatory separate recycling |
Frequently Asked Questions - Amber IV Eufab
User questions about Amber IV Eufab
0 question about this device. Answer the ones you know or ask your own.
Ask a new question about this device
Download the instructions for your Bike rack in PDF format for free! Find your manual Amber IV - Eufab and take your electronic device back in hand. On this page are published all the documents necessary for the use of your device. Amber IV by Eufab.
USER MANUAL Amber IV Eufab
Article number 11556
Bicycle rack „AMBER IV“ for trailer tow bar
Operating instructions 9
FR Ref. 11556
Read the operating instructions through carefully prior to initial use and observe all of the safety notes!
Not observing such may lead to personal injury, damages to the device or your property!
Store the original packaging, the receipt and these instructions so that they may be consulted at a later date!
Prior to initial use check the contents of the packaging to ensure that they are in perfect condition and complete!
1. PROPER USE OF THE PRODUCT
The AMBER IV bicycle rack is mounted to the trailer tow bar of a car and is designed for the transportation of up to two bicycles.
Intended use also includes the observation of all information provided in these operating instructions, particularly the observance of safety instructions. Any other use is considered improper and can lead to property damage or personal injury. EAL GmbH assumes no liability for damage resulting from improper use.
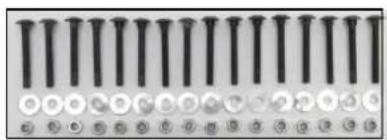
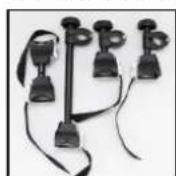
2. SCOPE OF DELIVERY
| 1 x Base frame | 1 x Frame holder, wheel to wheel | 16 x Washer 17,8 x 6,5 x 1,1 | 2 x Spring washer 8,1 x 5,5 x 1,2 |
| 8 x Wheel rail | 4 x Plastic cover | 16 x Nut M6 | 2 x Washer 9,7 x 5,3 x 0,9 |
| 1 x Lamp mount set | 12 x Tensioning strap, short | 1 x Cross-headed screw M5 x 12 | 2 x Lock screw M8 x 60 |
| 1 x U-bracket | 1 x Tensioning strap, long | 1 x Washer 9,8 x 5,4 x 0,9 | 2 x Washer 15,8 x 8,5 x 1,1 |
| 2 x Frame holder, short | 1 x Tension-relief strap, two-piece | 1 x Spring washer 8,4 x 5,5 x 1,5 | 2 x Knob nut M8 |
| 1 x Frame holder, long | 16 x Lock screw M6 x 50 | 2 x Cross-headed screw M5 x 35 | Cable tie |
3. SPECIFICATIONS
Dead weight: 19.5kg
Payload: 30kg (at 50 kg supporting load)
40 kg (at 60 kg supporting load)
max. 55kg (at 75kg supporting load)
max. 60kg (at 90 kg supporting load)
Material: Steel
Electrical connection: 13-pin connector
3.1 TOW BAR REQUIREMENTS
- The trailer tow bar must be approved in its construction.
- Ball and ball rod must have been forged in one piece.
- Only mount the bicycle rack to a coupling of steel St52-3, grey cast iron GGG52 or higher quality.
- The D-value of the tow bar ball must be at least 7.6kN
- Never mount the rack to a tow bar made of aluminium, other light metals or plastic.
Unsuitable ball rods made from GGG40 are produced by Westfalia for the following vehicles:
| Manufacturer | Test symbol Suitable for | |
| Westfalia | F 4192 Audi A4 | |
| F 3830 Audi A6 | ||
| F 4112 Audi A8 |
Observe the instructions from the tow bar manufacturer. If in doubt, ask your manufacturer directly whether their trailer tow bar is suitable.
4. SAFETY NOTES AND IMPORTANT INFORMATION
The warning sign indicates all instructions which are important for safety. Always observe these, otherwise you can injure yourself or the article could be damaged.
Children should not play with the article.
- Do not treat packaging material carelessly. This may become a dangerous plaything for a child!
Driving with a mounted bicycle rack will affect the driving characteristics of your vehicle.
- Adjust your speed to the new driving characteristics.
- Never drive faster than 130km / h
- Avoid sudden or jerky steering movements.
- Remember that your vehicle is longer than usual.
Personal injury or property damage due to loss of the bicycles.
Driving without safety straps can lead to accidents.
Before embarking on any journey, check the correct and firm seating of the strap around the bicycles and U-shaped bar of the rack.
Before embarking on any journey check the correct and firm seating of both straps around the front wheel and the strap around the rear wheel of the bicycle.
- If necessary tighten the straps again.
- Before embarking on any journey, check to make sure the straps used are undamaged and not worn.
Damaged or worn straps must be replaced with undamaged ones before you embark on your journey. Only straps authorised by EAL GmbH for the purpose may be used.
Personal injury or property damages caused by protruding parts.
Parts protruding beyond the edge of the vehicle or rack may cause personal injury or property damage during the journey.
- Only mount parts that do not protrude beyond the edge of the vehicle.
Personal injury or property damage due to overloading.
Exceeding the maximum payload of the bicycle rack and the permitted supporting load of the trailer tow bar or permitted overall weight may lead to serious accidents.
- Always observe the specifications regarding the maximum payload, permitted supporting load and permitted overall weight of your vehicle. Do not exceed these specifications at any time.
Property damage due to opening tailgate.
The tailgate could hit the bicycle rack and be damaged.
- Switch off the electric tailgate and operate it manually.
- Fold down the bicycle rack before opening the tailgate.
Property damage caused by hot exhaust gases.
Damages may be caused to the rack or bicycles if the exhaust outlet is close by.
- Use an exhaust deflector if necessary.
Personal injury or property damage possible due to a damaged bicycle rack.
Damage to the rack, e.g. by bent parts, cracks or scratches, prevents the safe operation of the rack.
- Do not mount the bicycle rack if it is damaged in any way.
- Follow the steps as described in the chapter on "Maintenance".
Personal injury or property damage due to loss of the bicycle rack while driving.
A loose or faulty connection between the bicycle rack and trailer tow bar can lead to the detachment of the bicycle rack.
- Replace a defective trailer tow bar.
- Clean the trailer tow bar of dirt, dust and grease.
Personal injury or property damage possible due to loss of bicycle parts while driving.
Damaged may be caused by parts that can be lost if they come away from the bicycle during the journey.
- Remove all parts that may be lost before starting your journey, these include air pumps, batteries of electric bikes, battery-powered lamps, navigation systems, bicycle computer, tool bags or baskets.
Personal injury or property damages caused by increase wind loads.
The bicycle rack and trailer tow bar may be damaged by too high a wind load.
- Remove all bags from the bicycle before starting your journey.
- Do not use protective covers for the bicycle during the journey.
The general operating permit must be carried in the vehicle when the rack is mounted.
Do not travel with the bicycle rack empty. Store it in the boot of your vehicle. This prevents increased fuel consumption and protects the rack.
The driver is always responsible for ensuring that the load and the load securing meet the regulations.
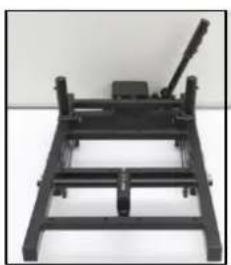
5. OPERATING INSTRUCTIONS
5.1 MOUNTING THE BICYCLE RACK
The bicycle rack must first be assembled. Take all of the components out of the packaging and set them out clearly. Every stage is described and clearly shows which components are required for the assembly of the rack.
5.1.1 MOUNTING THE WHEEL RAILS ON THE BASE FRAME
1xBaseframe8xWheel rails
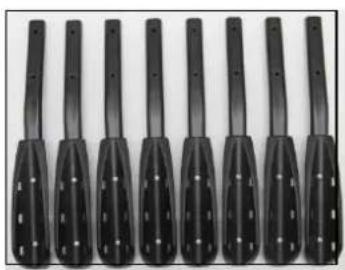
16xLock screw M6x50
16 x Washer 17.8 x 6.5 x 1.1
16x Nut M6
Two wheel rails form a pair. Place four pairs of wheel rails, with the plastic shells on the outside, parallel on the base frame so that the drilled holes in the rail match the holes in the base frame. Secure each wheel rail to the base frame with the lock screws M6 x 50, 17.8 x 6.5 x 1.1 washers and self-tapping nuts M6.
5.1.2 MOUNTING THE LAMP MOUNTS

1 x Lamp mounting set
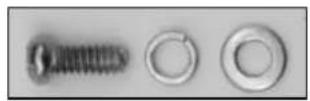
Cross-headed screw M5 x 12
Join the two halves of the lamp mount set together. This is made easier by the small guide element which is already mounted on one side. Push the rails together and secure the connection with the cross-headed screw (M5x12), spring washer, washer 9.8 x 5.4 x 0.9
5.1.3 SECURING THE LIGHT MOUNT TO THE BASE FRAME
Insert the cross-headed screws M5 x 35 with spring washers and washers, from below, through the vertical drilled holes of the lamp mount. Insert the screws through the threaded holes on the underside at the end of the lamp mount. Tighten the screws.
2x Cross-headed screw M5 x 35
2 x Spring washer 8.1 x 5.5 x 1.2
2 × Washer 9.7 × 5.3 × 0.9
5.1.4 MOUNTING THE U-BRACKET
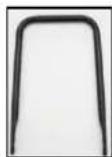
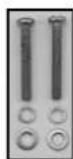
1xU-bracket 2xKnob nut M8
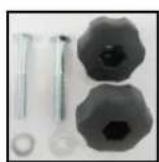
2x Washer 15.8x8.5x1.1
2xLock screw M8x60
Now fit the U-bracket onto the intended pipe sleeves. Push the lock screws M8 x 60 from the outside, through the drilled holes of the U-bracket and the pipe sleeves. Place the washers and knob nuts M8 on the ends of the screws and tighten the knob nuts firmly.
5.1.5 MOUNTING THE FRAME HOLDER
1 x Frame holder, wheel-to-wheel
1 x Frame holder, long
2 x Frame holder, short
Undo the handle screw of the frame holder and rotate out fully. Open the cuff of the frame holder and place the inserts around the U-bracket at a position suitable for your bicycle. Place the cuff around the inserts and push firmly together. Close the frame holder using the handle screw (but do not tighten).
The wheel-to-wheel frame holder is only required when you secure a fourth bicycle to the rack.
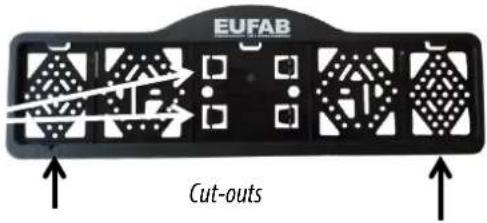
5.1.6 MOUNTING THE LICENSE PLATE HOLDER
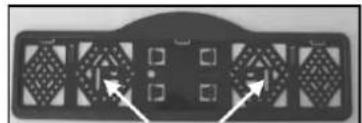
1 x License plate holder
Remove the screws from the lamp mount of the license plate holder before mounting. Insert the screws through the vertical slots of the license plate holder (see picture). Start the screws at the threaded holes of the lamp mount, but do not tighten yet. Align the license plate folder so that it is at the same height as the rear lights. Now tighten the screws.
5.1.7 INSERTING THE LICENSE PLATE
The mounting clips for securing the license plate are push-out parts in the holder. Break out two of the clips. Slide the license plate into the holder, then push the clips into the cut-outs to secure the license plate.
Clips
5.1.8 LAYING ELECTRICAL CABLES
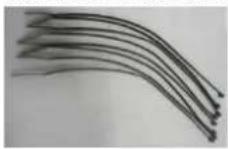
Lay the cables along the tube of the base frame. The cables may not be bent, stretched or crushed, e.g. in the vicinity of the folding mechanism. Secure the cables with the supplied cable ties. When you are finished, trim any excess material from the cable ties using cutting pliers.
5.1.9 ATTACHING THE PLASTIC COVERS
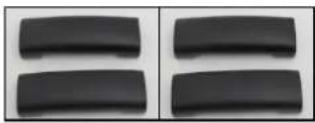
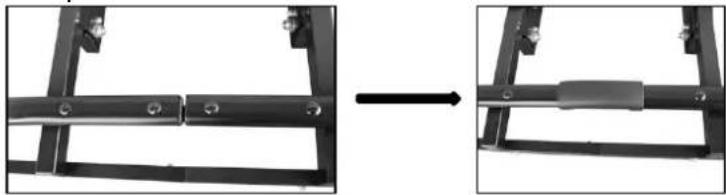
4 x Plastic cover
Fit the plastic covers onto the middle of the wheel rails.
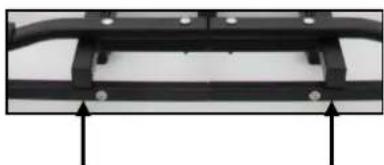
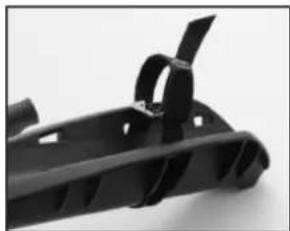
5.1.10 MOUNTING THE SHORT TENSIONING STRAPS

insert the short tensioning strap from the inside to the outside below the bike holder and then from the outside to the inside through the slots of the bike holder (see picture).
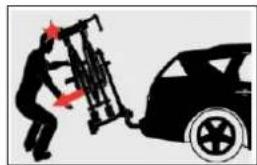
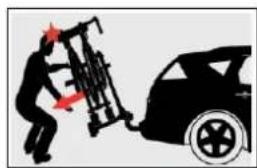
5.2 MOUNTING THE BICYCLE RACK ON THE TRAILER TOW BAR
Ensure that the trailer tow bar is undamaged, clean and free of grease.
Before you put the bicycle rack on the trailer tow bar, familiarise yourself with the quick locking system.
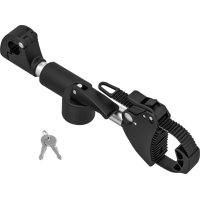
The quick locking mechanism is a component with a lever. Activating the lever opens or closes the quick locking mechanism. With the help of the securing bolt and the padlock, the quick locking system may be locked and secured.

The padlock must always be used as additional security when using the bicycle rack.
Park your vehicle on a level surface.
Apply the handbrake.
Remove the securing bolt from the quick locking mechanism and rotate by 90^ to prevent it from engaging again. Open the quick locking mechanism by lifting the lever.
Place the rack, from above, horizontally onto the trailer tow bar. Push the lever of the quick locking mechanism down (force required is approximately 35 - 40 kg) as far as it will go (the lever will remain in the horizontal position).
Check whether the bike rack is securely and firmly positioned on the trailer tow bar and can no longer be rotated. If this is not the case, the quick locking mechanism must be readjusted. Lift the lever and remove the rack from the trailer tow bar. Remove the protective cap of the adjusting screw. Undo the lock nut of the adjusting screw and rotate the adjusting screw on the quick locking mechanism tighter by a quarter turn. Then tighten the lock nut again.
Replace the rack back on the trailer tow bar and check whether the rack is securely and firmly positioned on the tow bar. Repeat the adjustment process until the rack is secure and firm. Push the protective cap back onto the adjustment screw.

Caution: Always make sure that the lock nut on the adjusting screw is correctly tightened!

Slight signs of pressure on the two bar ball are normal and do not influence the functionality.
When the rack can no longer be rotated on the trailer tow bar, rotate the securing bolt of the quick locking mechanism until it engages. Now close the quick locking mechanism with the supplied padlock and remove the key from the lock. Store the key carefully and in a safe place. The bicycle rack is now secured to prevent theft.
Regularly check the firm seating of the rack on the trailer tow bar as well as the attachment of the bicycles to the rack. Also regularly check the functions of the lighting system of your bicycle rack.
5.3 MOUNTING THE BICYCLES TO THE RACK
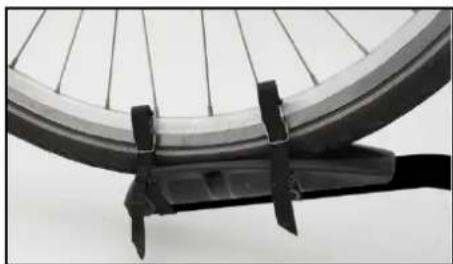
4xTensioning strap,short
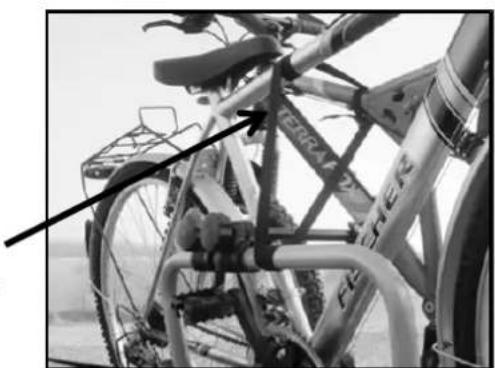
The first bicycle is placed in the first wheel rail (closest to the vehicle) and secured to the U-bracket with the short frame holder. To do this, use the side of the frame holder with the tensioning strap to secure to the bicycle frame. The wheels are secured by placing the tensioning straps around the wheel rim of your bicycle and tightening the straps. Caution: The front wheel must also be secured to prevent it from turning using an additional small tensioning strap. To do this, secure the front wheel to the rail again at a different position (see picture).
The second bicycle is usually placed in the second rail, facing the opposite direction to the first and secured to the U-bracket with the long frame holder. The wheels are secured in the same way as for the first bicycle. The third bicycle is placed in the third rail and secured with the long frame holder to the U-shaped bar. The fourth bicycle is secured in the fourth rail. With the wheel-to-wheel frame holder connect the frame of the fourth bicycle with that of the third. The bicycle wheels are secured in the same way as those of the first bicycle. It may be necessary to use a different method than the one described to secure the bicycles individually on the rack to ensure that the frame holders may be correctly secured. Now secure the bicycles with the long safety strap. Wrap the safety strap through the bicycle frames and the U-shaped bar and tighten.

The bicycle rack may not be used without this safety strap.
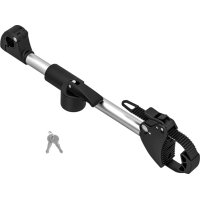
5.4 USING THE TENSION-RELIEF STRAP
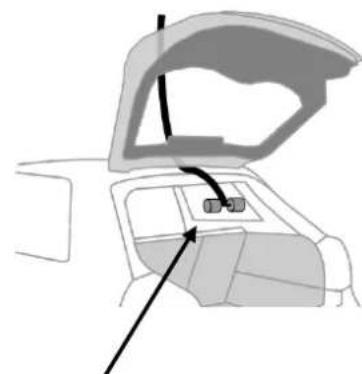
These instructions describe the use with estates and compact vehicles with a hatchback (rear door). With boots (saloons) proceed appropriately.
Before mounting the tension-relief strap, remove dust and dirt from the upper region of the rear door in order to prevent scratching and abrasion when travelling with the tow-bar rack.
Open the rear door of your vehicle. Guide the free end of the strap from the inside to the outside between the rear door and the edge of the roof. Leave approximately 20~cm free between the strap anchor and the edge of the roof. Carefully close the rear door. Make sure that the strap lies flat and straight between the seals. Now slowly pull the strap until the strap anchor meets the panel of the roof liner and the rear door.
Make sure that any roof edge spoilers are not damaged and that the functionality of the tension-relief strap is not influenced by such spoilers.
Tension-relief strap
Now attach the lock section of the strap to the U-bar as shown on Figures 1 to 4.

Figure 1 Figure 2 Figure 3 Figure 4
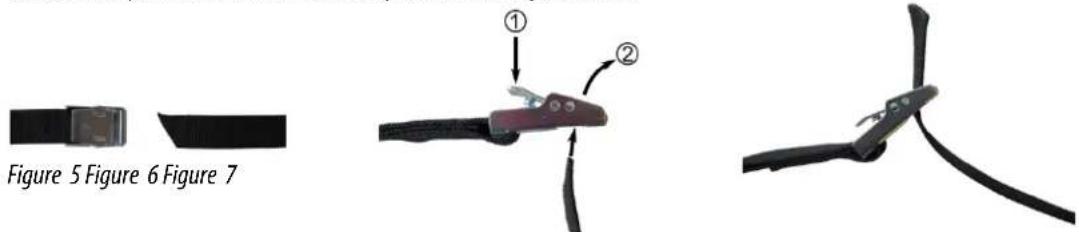
Connect both parts of the tension-relief strap as shown on Figures 5 to 7.
The tension-relief strap may not cover the third braking light. The tension-relief strap may not influence the functionality of the rear windscreen wipers.
In order to release the tension-relief strap, press the lock down (Figure 6, Position 1) and pull the strap out of the lock.
5.5 FOLDING OUT THE BICYCLE RACK

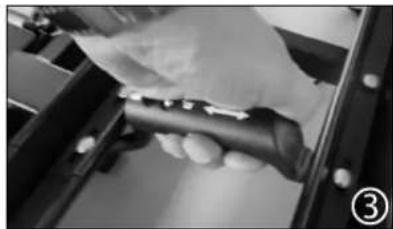
If you wish to operate the folding mechanism, always hold the U-bracket with one hand to ensure that the rack is not able to fold out suddenly. (Risk of injury)
To open the car boot, you may fold the rack down, even if bicycles are mounted.
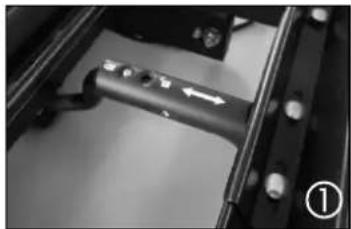
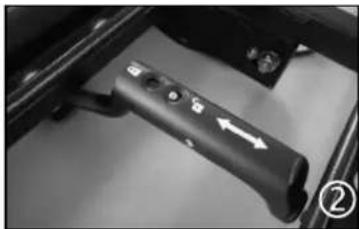
To do this, first loosen the block of the folding mechanism by pushing the locking bolt down ① and pushing the handle away from you ② . Hold the U-bracket or bicycles with one hand, with the other hand pull the lever of the folding mechanism upwards ③ . Now you can fold the rack down.
5.6 FOLDING THE BICYCLE RACK UP
Raising the rack platform engages it back into the transport position (you will hear a click). Secure the folding mechanism again by pushing the locking bolt down and pulling the handle towards you.
The bicycle rack may not be used without this safety mechanism.
6. MAINTENANCE AND CARE
- After use, store the bicycle rack in a clean and dry place. Wash any mud or other dirt off using water.
- Keep the trailer coupling clean and free of grease
- Keep the rack tow bar clean and free of grease.
Check the bicycle rack regularly for damages. Damaged or worn parts must be replaced immediately. Only original replacement parts may be used. - Check the bolts and nuts of the bicycle rack regularly and tighten when necessary.
- Immediately treat any damage to paintwork with paint.
- Regularly lubricate rotating and moving parts.
7. NOTES FOR ENVIRONMENTAL PROTECTION
Due to its lighting system, the bicycle carrier is an electrical device.
Do not dispose of electrical appliances in household waste! Discarded electrical and electronic equipment must be collected separately and recycled in an environmentally sound manner.
Contact your municipal or city government on how to dispose of old electronic equipment.
The materials are recyclable. You are making an important contribution to protecting our environment through recycling, material recycling or other forms of re-utilising old appliances!
Dispose of the bicycle rack in accordance with the laws and conditions in your country.
8. CONTACT INFORMATION
EAL GmbH
1xsetsupportolampade
5.5 SPUSCANJE NOSILCA ZA KOLESA

Če Želite aktivirati mehanizem za spusčanje, obvezno z eno roko pridržite U-nosilec, da se nosilec ne spusti sunkovito. (Nevarnost poškodbe)
5.6 DVIGANJE NOSILCA ZA KOLESA
K mizo nosilca dvignete, se ta znova zaskovi na transportnem polozaju (zasliali boste KLIK). Ponomo fiksiraje mehanizem za spuscanje tako, da zaporni sornik pritisnite navzdol in rocaj povlecate k sebi.

Brez tega varovala nosilca za kolesa ni dovoljeno uporabljati.
6.VZDRZEVANJE IN NEGA
- Po uporabi nosilec za kolo spravite Čist in suh. Po potrebi z yodo sperite blato in drugo umazanijo.
Vlecnaklukajnabobcstainemastna. - Sklopka nosilca naj bo cista in nemastra.
Redno preverjaje nosilca za kolesa glede poskodb. PoSKODovane ali obrbjene dele je treba takoj zamenjati. Uporabljati je dovoljenoismo originalne nadomestne dele. - Redno preverjaite vijake in matice nosilca za kolo in jih po potrebi privijte.
- Poškodbe laka takoi popravite z ustrezno barvo.
- Vrtlijve in premične dele redno mažite.
7. NAPOTKI O VARSTVU OKOLJA
Izdelek odstranite v zabojnik za reciklaranje ali qa odnesite na javno/komunalno zbiralisiše opadkov.
Materiale je mogoce reciklarati. Z reciklaranjem, obnovo snovi ali drugimi oblikami ponovne uporabe starih naprav ogromno prispevate k zašiti našega okolja!