FINCH 11584 - Bike rack Eufab - Free user manual and instructions
Find the device manual for free FINCH 11584 Eufab in PDF.

| Product Type | Bike rack for trailer hitch |
| Model | FINCH 11584 |
| Number of bikes | 2 |
| Dimensions (unfolded) | Approx. 122 x 88 x 57 cm (L x H x D) |
| Dimensions (folded) | Approx. 34 x 88 x 57 cm (L x H x D) |
| Weight | Approx. 17 kg |
| Maximum payload | 60 kg |
| Material | Steel / Aluminum / Plastic |
| Color | Silver / Black |
| Electrical connection | 13-pin |
| D value | 7.6 kN |
| Maximum permitted speed | 130 km/h |
| Fixing system | Quick-release with lever and anti-theft lock |
| Rear lights | Integrated, to be installed before first use |
| Tilting mechanism | Pedal to tilt the bike rack (trunk accessible) |
| Bike fixing | Adjustable frame supports (short/long) and wheel straps |
| Additional security | Long safety strap for both bikes |
| Maintenance | Clean with water, grease moving parts, check fastenings |
| Road approval | General operating permit included |
Frequently Asked Questions - FINCH 11584 Eufab
User questions about FINCH 11584 Eufab
0 question about this device. Answer the ones you know or ask your own.
Ask a new question about this device
Download the instructions for your Bike rack in PDF format for free! Find your manual FINCH 11584 - Eufab and take your electronic device back in hand. On this page are published all the documents necessary for the use of your device. FINCH 11584 by Eufab.
USER MANUAL FINCH 11584 Eufab
text_image
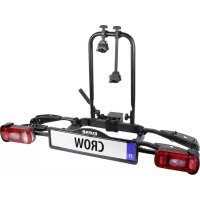
GERMANY CAR & BICYCLE ACC EUFAB FINCH® D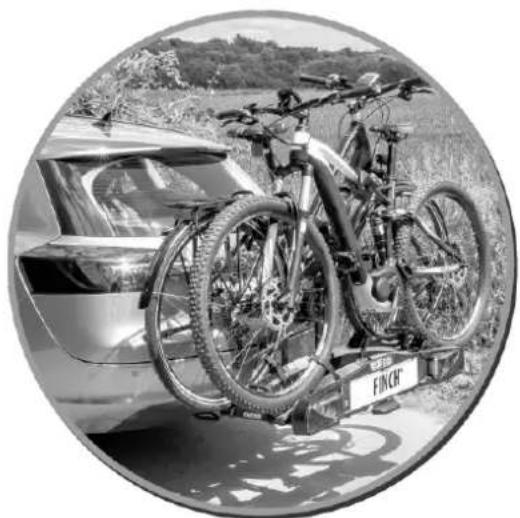
natural_image
Black-and-white circular photo of a bicycle parked near a car, with no visible text or symbols on the vehicle or background.D Art.-Nr.: 11584
FINCH®
Cycle rack for the towbar
Operating instructions....8
FR Réf. 11584
FINCH®
natural_image
Mechanical assembly diagram showing a lever mechanism with labeled parts (① and ②), no readable text or symbols beyond labels.
natural_image
Close-up of a mechanical component with a circular button and cable, no visible text or symbolsnatural_image
Close-up of a black metal bracket with triangular cutouts and a small connector (no text or symbols visible)natural_image
Metallic plastic component with internal geometric patterns and two labeled arrows (A and B), no readable text or symbols beyond labels.text_image
Technical diagram showing a mechanical component with labeled parts ① and ②, indicating directional flow or assembly.natural_image
Close-up of a bicycle frame with visible structural components and a black arrow pointing to a component (no text or symbols)natural_image
Silhouette of a person pushing a car with a bucket and wheel (no text or symbols)natural_image
Close-up of a shoe's foot and legs on a paved surface, with a partially visible 'EUFAB' label on the back (no readable text beyond label)Bild 13: Fußpedal
Please read the operating instructions carefully prior to use and observe all safety instructions!
Not observing such may lead to personal injury, damage to the device or to your property!
Store the original packaging, the receipt and these instructions so that they may be consulted at a later date! When passing on the product, also include these operating instructions.
Check the contents of package for integrity and completeness prior to use!
1. PROPER USE OF THE PRODUCT
This bicycle rack is mounted to the trailer hitch of a vehicle and is designed for the transportation of two bicycles.
This device is not designed to be used by children or persons with limited mental abilities or without experience and/or lack of required specialist knowledge. Keep children away from the device.
The device is not designated for commercial use.
Utilisation according to the intended purpose also includes the observation of all information in these operating instructions, particularly the observation of safety instructions. Any other utilisation is considered to be counter to the intended purpose and may result in material damage or personal injuries. EAL GmbH assumes no liability for damage resulting from improper use.
2. SCOPE OF DELIVERY
1 x Bicycle rack, assembled
1 x Safety strap
2 x Bolt
1 x Padlock with keys
1 x Frame holder, short, assembled
1 x General operating permit
1 x Frame holder, long, assembled
1 x Operating instructions
2 x Short tensioning straps
3. SPECIFICATIONS
Dimensions (W x H x D): approx. 122 x 88 x 57 [cm]
Weight: approx. 17 kg
Material: Steel / Aluminium / Plastic
Folded: approx. 34 x 88 x 57 [cm]
Payload: 60 kg
Colour: silver / black
Electrical
connection:
13-pin
D-value:
7.6
kN
Permitted top speed: 130 km/h
3.1 TOW BAR REQUIREMENTS
- The trailer tow bar must be approved in its construction.
- Ball and ball rod must have been forged in one piece.
- Only mount the bicycle rack on a coupling of St52-3 steel, GGG52 grey or higher quality cast iron.
- Not suitable for GGG40 ball rods.
• The D-value of the tow bar must be at least 7.6 kN. - Never mount the carrier on a tow bar made of aluminium, other light metals or plastic.
• These are manufactured for the following vehicles, e.g. by Westfalia
| Manufacturer Test symbol Suitable for | ||
| Westfalia | F 4192 Audi A4 | |
| F 3830 Audi A6 | ||
| F 4112 Audi A8 | ||
Observe the tow bar manufacturer information on your type plate. If in doubt, ask your manufacturer directly whether their trailer tow bar is suitable.
4. SAFETY PRECAUTIONS

- The warning triangle labels all instructions important to safety. Always follow these otherwise you could injure yourself or damage the device.
• Children may not play with the device. - Cleaning and user maintenance may not be carried out by children without supervision.
- Do not treat packaging material carelessly. This may become a dangerous plaything for a child!
- Only use this product for its designated purpose!
- Do not manipulate or disassemble the device!
- For your own safety, only use accessories and spare parts that are stated in these instructions or that are recommended by the manufacturer!
Personal injury or property damage due to changed vehicle driving characteristics.
- Driving with the mounted bicycle rack will affect the driving characteristics of your vehicle.
- Adjust your speed to the new driving characteristics.
- Never drive faster than 130 km/h.
- Avoid sudden and jerky steering operations.
- Remember that your vehicle is longer than usual.
Personal injury or property damage due to loss of the bicycle.
- Driving without safety straps can lead to accidents.
• Before embarking on any journey, check the correct and firm seating of the safety strap around the bicycles and U-shaped bracket of the rack. - Before embarking on any journey check the correct and firm seating of both straps around the front wheel and the strap around the rear wheel of the bicycles.
- If necessary tighten the straps again.
- Before embarking on any journey, check to make sure the straps used are undamaged and not worn.
- Damaged or worn straps must be replaced with undamaged ones before you embark on your journey. Only straps authorised by EAL GmbH for the purpose may be used.
Personal injury or property damage possible due to an incompletely mounted bicycle rack.
- Driving with the bicycle rack not fully assembled may result in accidents.
- The moving parts of the bicycle rack do not represent a source of danger when fully mounted.
- Mount the bicycle rack completely before starting your journey.
Personal injury or property damages caused by protruding parts.
• Parts protruding beyond the edge of the vehicle or rack may cause personal injury or property damage during the journey.
- Only mount parts that do not protrude beyond the edge of the vehicle.
Personal injury or property damage due to overloading.
- Exceeding the maximum payload of the bicycle rack and the permitted supporting load of the trailer tow bar or permitted overall weight may lead to serious accidents.
• Always observe the specifications regarding the maximum payload, permitted supporting load and permitted overall weight of your vehicle. Do not exceed these specifications at any time.
Property damage due to opening tailgate.
- The tailgate could hit the bicycle rack and be damaged.
- Switch off the electric tailgate and operate it manually.
- Remove the bicycle rack before opening the tailgate.
Property damage caused by hot exhaust gases.
Damages may be caused to the rack or bicycle if the exhaust outlet is close by.
- Use an exhaust deflector if necessary.
Personal injury or property damage possible due to a damaged bicycle rack.
Damage to the rack, e.g. bent parts, cracks or scratches, prevents the safe operation of the rack.
- Do not mount the bicycle rack if it is damaged in any way.
- Proceed as described in the chapter on Maintenance.
Personal injury or property damage due to loss of the bicycle rack while driving.
A loose or faulty connection between the bicycle rack and trailer tow bar can lead to the detachment of the bicycle rack.
- Replace a defective trailer tow bar.
- Clean the trailer tow bar of dirt, dust and grease.
The general operating permit must be carried in the vehicle when the rack is mounted.
Do not travel with the bicycle rack empty. Store it in the boot of your vehicle. This prevents increased fuel consumption and protects the rack.
The driver is always responsible for ensuring that the load and the load securing meet the regulations.
5. MANUAL
5.1 BEFORE USING FOR THE FIRST TIME
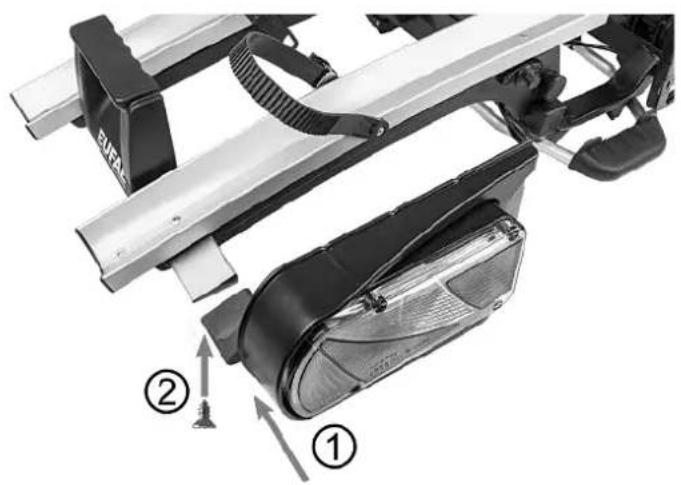
Remove the bicycle rack from the packaging. Before using the bicycle rack for the first time, the rear lights must be installed. To do this, open the cardboard packaging of the rear lights between the wings with the wheel rails. Follow the instructions on the carton. Remove the empty cardboard packaging. Carefully unfold the wings with the wheel rails. Place the rear lights on the brackets, Figure 1, and screw them tight with the screws.
natural_image
Mechanical assembly diagram showing a lever mechanism with labeled parts (① and ②), no readable text or symbols beyond labels.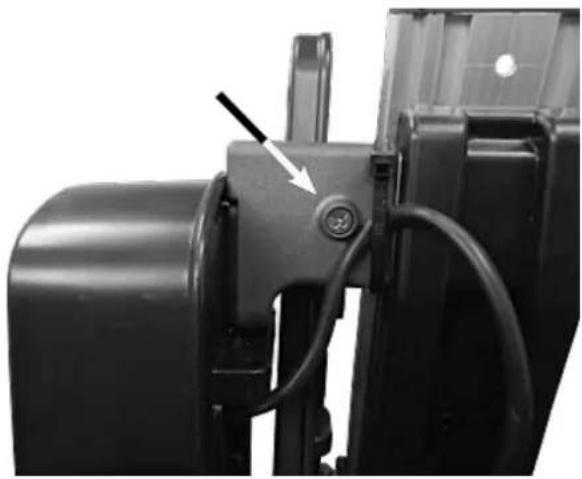
natural_image
Close-up of a mechanical component with a circular button and cable, no visible text or symbolsFigure 1: Installation of the rear lights Figure 2: Installation of the rear lights
5.2 INSERTING THE LICENSE PLATE
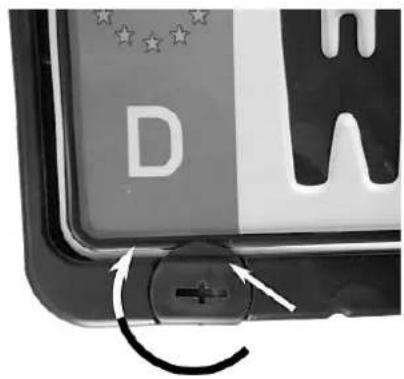
Use a wide screwdriver or a coin to turn the holders on the lower edge of the licence plate holder so that the retaining tabs point downwards, Figure 3. Place the licence plate from below under the holding lugs in the upper frame. Press the licence plate into the licence plate holder so that it is completely within the frame. Turn the holding lugs upwards again, Figure 4.

natural_image
Close-up of a black metal bracket with perforated panel and mounting bracket (no text or symbols visible)Figure 3: Open the holder Figure 4: Close the holder
text_image
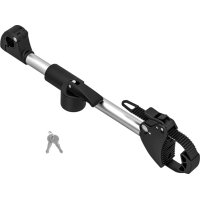
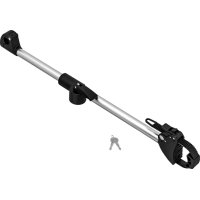
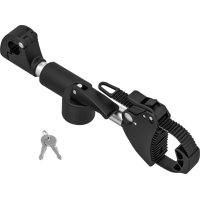
D +5.3 MOUNTING THE BICYCLE RACK ON THE TRAILER HITCH
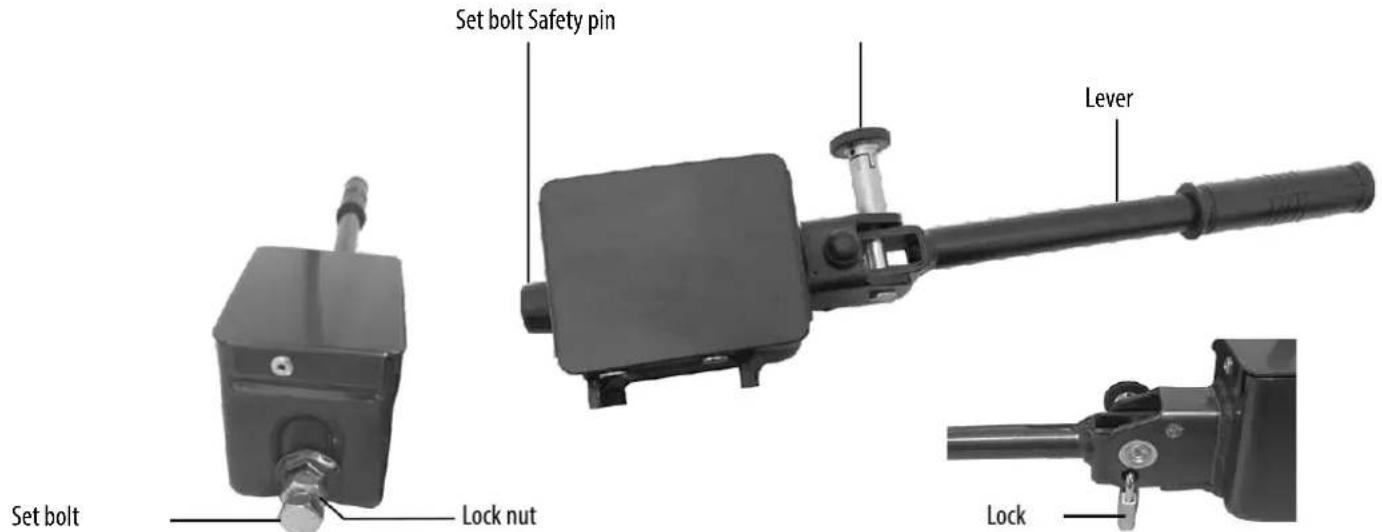
Before you put the bicycle rack on the trailer hitch, familiarise yourself with the quick locking system, Figure 5.
text_image
Set bolt Safety pin Lever Set bolt Lock nut LockFigure 5: Quick closure
Ensure that the trailer hitch is undamaged, clean and free of grease. Remove any paint from the hitch.
The quick locking mechanism is a component with a lever. Activating the lever opens or closes the quick locking mechanism. With the help of the securing bolt and the padlock, the quick locking system may be locked and secured.
The padlock is always required when using the bicycle rack. The bicycle rack may only be used if the padlock is employed correctly and locked. The lock is safety-relevant.
Park your vehicle on a level surface.
Switch the motor off and pull on the brake.
Remove the securing bolt from the quick locking mechanism and rotate by 90^ to prevent it from engaging again. Open the quick locking mechanism by lifting the lever.
Place the bicycle rack, from above, horizontally onto the trailer hitch. Align the bicycle rack horizontally and straight behind the vehicle. Push the lever of the quick locking mechanism down (force required is approximately 35 - 40kg) as far as it will go (the lever will remain in the horizontal position).
Check whether the bike rack is securely and firmly positioned on the trailer hitch and can no longer be rotated. If this is not the case, the quick locking mechanism must be readjusted. Lift the lever and remove the rack from the trailer hitch. Remove the protective cap of the adjusting screw. Undo the lock nut of the adjusting screw and rotate the adjusting screw on the quick locking mechanism tighter by a quarter turn. Then tighten the counter nut again.
Replace the rack back on the trailer hitch and check whether the rack is securely and firmly positioned on the tow bar. Repeat the adjustment process until the rack is secure and firm.
Insert the protective cap back onto the adjustment screw.
CAUTION
Always make sure that the lock nut of the adjusting screw is correctly tightened!

Slight signs of pressure on the hitch ball are normal and do not influence the functionality.
When the rack is firmly seated on the trailer hitch, rotate the securing bolt of the quick locking mechanism until it engages. Now close the quick locking mechanism with the supplied padlock and remove the key from the lock. Store the key carefully and in a safe place. The bicycle rack is now secured to prevent theft.
Insert the plug of the electrical cable of the bicycle rack into the trailer socket of your vehicle. Perform a lighting test.
5.4 UNFOLDING THE BICYCLE RACK
Unfold the bicycle rack for use as shown in the following Figures.
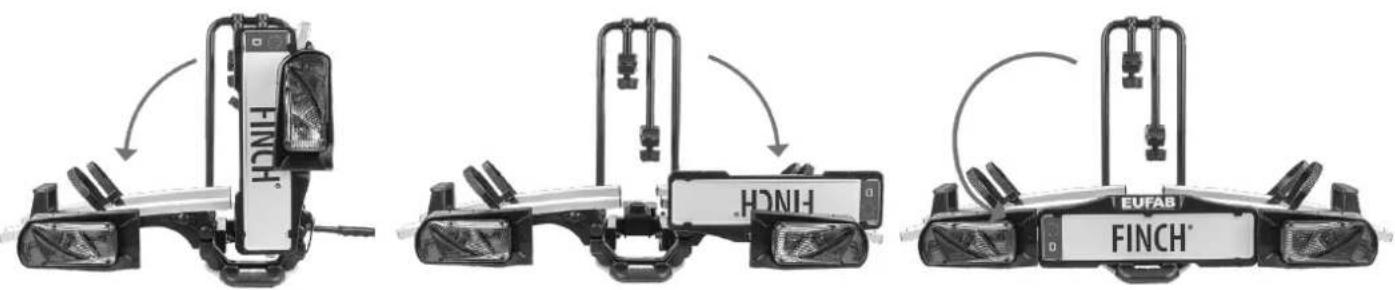
Figure 6: Step 1 Figure 7: Step 2
Figure 8: Step 3
natural_image
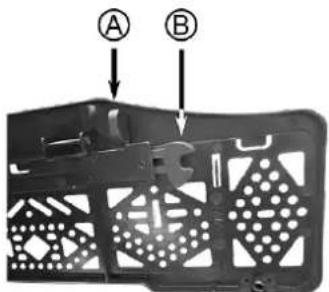
Metallic plastic component with internal geometric patterns and two labeled points A and B (no text or symbols beyond labels)Figure 9: Locking mechanism
Make sure that the locking mechanism of the license plate holder, Figure 9 Position B, engages correctly.
To fold up the bicycle rack, first release the locking mechanism of the licence plate holder. To do this, pull the hand lever, Figure 9 Position A, to the centre of the licence plate. Then follow the steps described above in reverse order.
5.5 MOUNTING THE BICYCLE RACK WITH BICYCLES
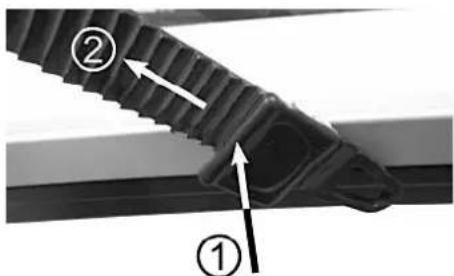
Open all the tension belts on the wheel rails by pressing down on the lock at the rear and then pulling out the tension belt completely, Figure 10.
text_image
Technical diagram showing a mechanical component with labeled parts ① and ②, indicating directional movement or assembly.Figure 10: Open the tension belts
Position the first bicycle, if possible - the heaviest, in the first wheel rail (the wheel rail closest to the vehicle). Connect the frame of the bicycle to the U-bracket using the short frame holder. Rotate the knob nut anti-clockwise until the frame clip has opened sufficiently to accommodate the bicycle frame. Insert the bicycle frame into the frame clip. Rotate the knob nut clockwise until the frame clip loosely encompasses the bicycle frame. Align the bicycle and the frame holder to ensure that it all fits together.
Place the second bicycle in the second wheel rail, facing the opposite direction to the first. Connect the frame of the second bicycle to the U-bracket using the long frame holder. Rotate the knob nut anti-clockwise until the frame clip has opened sufficiently to accommodate the bicycle frame. Insert the bicycle frame into the frame clip. Rotate the knob nut clockwise until the frame clip loosely encompasses the bicycle frame. Align the bicycle and the frame holder to ensure that it all fits together. Make sure that the two bikes do not collide with each other.
Now tighten the knob nuts firmly.

You can only lock the frame holder when it has been closed securely.
Insert the key into the lock of the knob nut and turn so that the red marking faces the lock icon. Remove the key. Your bicycle is now secured to prevent theft.

The frame holder may cause minor pressure points on the bicycle frame and damages to the paintwork. Protect the bicycle frame, for example, using protective film
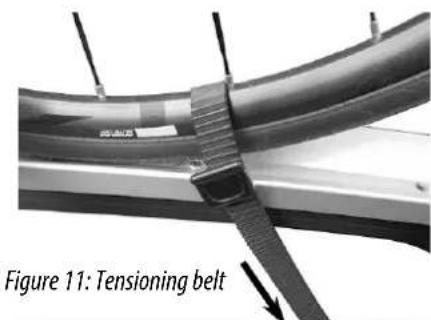
Place the tensioning belt of the wheel holder around the rim of the wheel and insert the tensioning belt into the anchor clip. Pull hard on the tensioning belt, Figure 11.
Additionally secure the front wheel against twisting with a short tension strap.
text_image
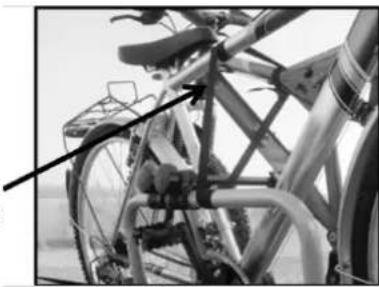
Figure 11: Tensioning beltNow secure the bicycles with the long safety strap. Wrap the safety strap through the bicycle frames and the U-shaped bracket and tighten, Figure 12.
Safety strap
natural_image
Close-up of a bicycle's front wheel and rear seats, showing structural components (no text or symbols visible)Figure 12: Safety strap
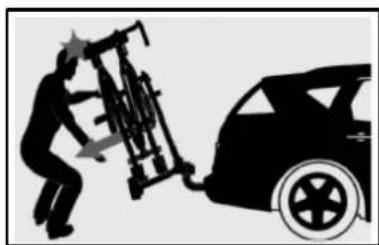
5.6 FOLDING MECHANISM
If you wish to operate the folding mechanism, always hold the U-bracket with one hand to ensure that the rack is not able to fold out suddenly. (Risk of injury)
To open the car boot, you may fold the bicycle rack down, even if bicycles are mounted.
If you hold the U-shaped bracket firmly with your hand, place your foot on the pedal, Figure 13, under the license plate holder. Carefully lower the bicycle rack by slowly pulling the U-bracket backwards.
To fold up the bicycle rack, lift it at the rear and push the U-bracket towards the vehicle. The bicycle rack must engage audibly.
natural_image
Silhouette of a person handling a car with tools next to a car wheel (no text or symbols)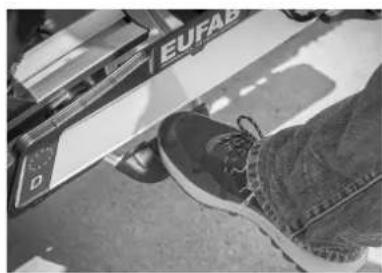
natural_image
Close-up of a shoe's foot and legs on a paved surface, with a partially visible 'EUFAB' label on the back (no readable text beyond label)Figure 13: Foot pedal

Regularly check the firm seating of the rack on the trailer hitch as well as the attachment of the bicycles to the rack. Also regularly check the functions of the lighting system of your bicycle rack.
6. MAINTENANCE AND CARE
• After use, store the bicycle rack in a clean and dry place. Wash any mud or other dirt off using water.
- Keep the rack hitch clean and free of grease.
• Check the bicycle rack regularly for damages. Damaged or worn parts must be replaced immediately. Only original replacement parts may be used.
- Check the bolts and nuts of the bicycle rack regularly and tighten when necessary.
- Immediately treat any damage to paintwork with paint.
• Regularly lubricate rotating and moving parts.
7. NOTES REGARDING ENVIRONMENTAL PROTECTION
Due to its lighting system, the bicycle carrier is an electrical device.
Do not dispose of electrical appliances in household waste! Discarded electrical and electronic equipment must be collected separately and recycled in an environmentally sound manner.
Contact your municipal or city government on how to dispose of old electronic equipment.
The materials are recyclable. You are making an important contribution to protecting our environment through recycling, material recycling or other forms of re-utilising old appliances!
Dispose of the bicycle rack in accordance with the laws and conditions in your country.
8. CONTACT INFORMATION
EAL GmbH
42115 Wuppertal, Germany

+49 (0)202 42 92 83 0
The general operating permit must be carried in the vehicle when the rack is mounted.
Do not travel with the bicycle rack empty. Store it in the boot of your vehicle. This prevents increased fuel consumption and protects the rack.
The driver is always responsible for ensuring that the load and the load securing meet the regulations.
5. NOTICE D'UTILISATION
5.1 AVANT LA PREMIÈRE UTILISATION
natural_image
Mechanical assembly diagram showing a lever mechanism with labeled parts (① and ②), no readable text or symbols beyond labels.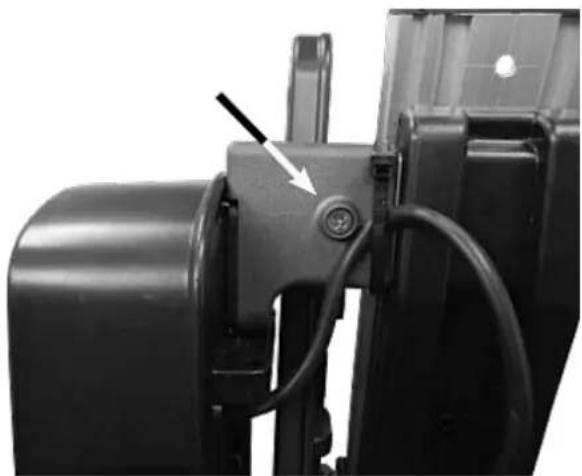
natural_image
Close-up of a mechanical component with a circular button and cable, no visible text or symbolsnatural_image
Close-up of a black metal bracket with triangular cutouts and a small connector (no text or symbols visible)natural_image
Metallic plastic housing with cutouts and mounting holes, labeled A and B (no text or symbols on the housing itself)text_image
Technical diagram showing a mechanical component with labeled parts ① and ②, including directional arrows indicating movement.natural_image
Close-up of a bicycle's front wheel and rear seats, showing mechanical components and structural details (no text or symbols visible)natural_image
Two black-and-white photos: top shows a person using a bicycle next to an electric car; bottom shows a car with 'EUFAB' license plate and shoe, no visible text or symbols.Figure 13 : Pédale
Dimensioni (L x H x P): ca. 122 x 88 x 57 [cm]
Peso: ca. 17 kg
text_image
Technical diagram of a vehicle rearview system with labeled components and directional arrows indicating motion or assembly.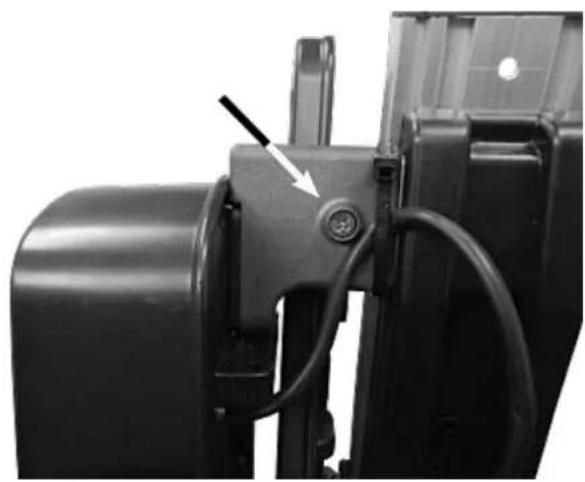
natural_image
Close-up of a mechanical component with a circular button and cable, no visible text or symbolsnatural_image
Close-up of a black metal bracket with perforated cutouts and a small mechanical component attached (no text or symbols visible)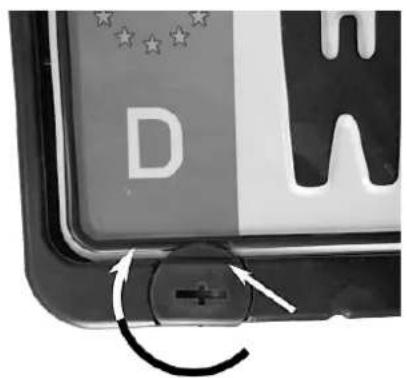
text_image
Dnatural_image
Metallic plastic component with internal cavities and mounting holes, labeled A and B (no text or symbols beyond labels)text_image
Technical diagram showing a mechanical component with labeled parts ① and ②, indicating directional movement or assembly.natural_image
Close-up of a bicycle frame with visible structural components and no text or symbolsnatural_image
Silhouette of a person pushing a bicycle next to a car (no text or symbols)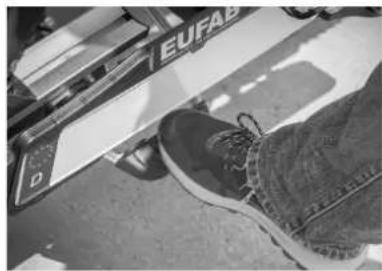
natural_image
Close-up of a shoe being posted on a flat surface, with a blue 'EUFAB' banner visible (no readable text or symbols)Figura 13: Pedale