
BSE778380T - Electric oven AEG - Free user manual and instructions
Find the device manual for free BSE778380T AEG in PDF.
| Product type | Built-in electric oven |
| Brand | AEG |
| Model | BSE778380T |
| Dimensions (H x W x D) | 594 x 595 x 567 mm |
| Built-in dimensions (H x W x D) | 578-600 x 560 x 546 mm |
| Weight | 36.5 kg |
| Volume | 71 L |
| Energy efficiency class | A++ |
| Energy consumption (conventional) | 1.09 kWh/cycle |
| Energy consumption (fan forced) | 0.52 kWh/cycle |
| Power supply | 230 V / 50 Hz |
| Cooking modes | Fan forced, top/bottom heat, grill, turbo grill, pizza, steam cooking, assisted cooking, etc. |
| Special functions | Pyrolytic cleaning, descaling, rinsing, cooking probe, Wi-Fi, remote control |
| Cleaning | Pyrolytic cleaning (3 levels: fast, normal, intensive) |
| Safety | Child lock, automatic shut-off, child safety |
| Lighting | Halogen bulb class G |
| Included accessories | Wire rack, baking tray, roasting pan, cooking probe, telescopic rails |
| Connectivity | Wi-Fi (2.4 GHz, IEEE 802.11b/g/n), My AEG Kitchen app |
| Repairability | Genuine spare parts available, user-replaceable bulb and glass |
| General information | User manual available in multiple languages, technical support via www.aeg.com/support |
Frequently Asked Questions - BSE778380T AEG
User questions about BSE778380T AEG
0 question about this device. Answer the ones you know or ask your own.
Ask a new question about this device
Download the instructions for your Electric oven in PDF format for free! Find your manual BSE778380T - AEG and take your electronic device back in hand. On this page are published all the documents necessary for the use of your device. BSE778380T by AEG.
USER MANUAL BSE778380T AEG
OBCJNYXBAHE HA KJIneHTN
BnHaHn n3noJ3BaIte opuHnaJIHn pe3epBHN qactN.
Korato ce cBbP3BaTe c Haunn OToPn3npan OToJeN „ObcnyXbaHe“, Tp6Ba Da nMaTe noD pka cIeHaTaNΦopMaunr: Moden, PNC, cepneH Homep.
HΦopMaunTa MoKe Da 6bJe OTKpNaHa Ta6eJkata C OCHOBn daHHN
IpeDynpexKdEHe / BnMaHne-InhOpMaun 3a 6e30NaCHOCT
① Ośza uHΦopMaζη n CbBéTn
HOpMaun 3a OkonHaTa CpeDa
3ana3BaMe cn npaBOTO Ha n3MeHeHn.
CbDbPjKAHNE
- INHOPMALI 3A BE3OJACHOCT
- INHCTPYKUN 3A BE3OJACHOCT
3.ОПИСАНЕHA UРEDA 9
4.KOHTPOJIENIaHEJI 11 - INPEENIbPBA YNOTPEBA 12
6.BCEKNIDHEBHA YNOTPEBA. 14
7.ФУHKUHNA YACOBHINA 19
8.KAKDACEUN3I0J3BAIPINHADJEKHOCTN 20
9.ДОПБЛНITEЛНИФУHKUIN 22 - INPENOPbKN N CbBETN 23
11.ΓPINKI IIOUCHTBAHE 26 - OTCTPAHRAHE HA HEN3INPABHOCTN 32
13.EHEPNIHA EΦEKTINBHOCT 34
14.CTPYKTKPA HA MEHIOTO 36
15.JIECHO EI 37
16.ОПАЗBAHEHAOKOLHATA CPEДA. 38
1. UNHΦOPMAÇNЯ 3A BE3OÑACHOCT
Преши монтура themselves Ha ypeда вимастенипочтсьдун. Поньдself He e OTROBOPEH 3a HapahЯВаня Илп NOBpeDi B pe3yIITaT Ha He npabINHa INCTaJIaцnia Ил n ynoTppe6a. BnHarn dprbXTe INHCTpyKcHNTe Ha 6e3OJaCHO IleCHO DoCTbNHO MЯСTO 3a cnpaBka B 6bDeSe.
1.1 БezonaachocT 3a Deça n Xopa B HepaBHOCTOHO NOLOXeHne
To3n ypei moke da 6bde n3noJ3BaH ot Deca na 8- roDnSHA Bb3pact, KaKTO I OT LInca C HamaJIeHN fN3nueckn, cETNBn I yMCTBeHn Bb3MOXHOCTn IIN OT LInca 6e3 OINT I N03HaHnA, cAmO aKO Te ca IOD Ha6JIHODeHne IIN 6bDaT INHCTpykTnpaHn OTHOCHO 6e3OpacHaTa yNoTpe6a Ha ypea n pa3bnpaT Bb3MOxHnte pIcKOBe. Deca Iod 8-roDnSHA Bb3pact n Xopa C TeKKn IIN KOMPJIeKCHn YBpeJdaHn Tp86Ba Da ce IbpxaT daJeUOT ypeDa, oCBeH aKO He ca IOD NoCToAHNO Ha6JIIODeHne.
- Деца Трабва да Бдат пон Habл endeHne, 3a da ce rapaHTnpa, Ye He cn irpaT c ypeDa n MObInn my AEG Kitchen.
- ДрьжтЕ BCичКи ONaKOBКДаJIeue OT Deцa И n3XbРЛeTe ONaKOBKITE NO MecTHHrE ПраВILA.
- ПРЕДУПЕЖДЕHINE: Урети нееговпес дocьни части се нагорец ват по Всеме на уnotpe6a. Пазete Deцату и DOMашнite Лобимци далей OT урета, korato ce n3пол3ва и korato ce oxлajda.
- Ako ypeiT nMa yctpoiCTBO 3a DeTcKa 6e30nacHOCT, To Tp8Ba Da ce AKTNBnpa.
- Deça He TpЯБа Дa ИЗВьршВаТ почистваHe Или РдръЖka Ha урEDA, KOrATO ca 6e3 habзор.
1.2 Ośza 6e3o nanopoc
To3n ypeD e npedHa3NaueH cMo 3a rotBeHe.
To3n ypeE npedHa3NaueH 3a domaunHa ynotpe6a B 3aTBOpeHn PomeuHn.
To3n ypei MoKe Da Ce n3NoJ3Ba B Oocn, CTan B XOTeI, CTan B MOTeI, KbIu 3a RoCTn I dpyrN IOo6Hn MeCTa 3a HactaHЯBaHe, KbJeTO TOBa n3NoJ3BaHe He HaDbNtAba (cpeiHO) HNBOTO Ha DomaShHa ynotpe6a.
- Camo KBaIInФицраHo JIиe Tpr6Ba Дa Инсталра урета и за смени Кабela.
He n3noJ3BaIte ypeDa, npeDn da ro nHCTaJInpaTe BbB BrpaDeHaTa KOHcTpyKzna.
- Прази n3Bbршва themselves Ha KaKBaTo Ида e Рдрьжka, n3KJIIOUte ypeda OT eJekTpO3axpaHBaHeTO.
- Ako 3axpaHbauT Ka6eI e NobpeDeH, TOn Tp8Ba Da ce CMeHN OT npOu3BODInTeJIa, HeROB OToPn3InpaH cepBn3eH ZeHTbp IIN KBaJIInΦuNciUpaHO JInCe, 3a Da Ce n36BerHe OnaCHOCT.
- ПРЕДУПЕЖДЕHINE: Уверете сe, чe уретe взклочen, пегида смени лamпата, за на збогнete ebeHTyaJIEN TOKOB удap.
- ПРЕДУПЕЖДЕНЕ: Урети нееговпес HaopseЯВа.Tо Всме Ha ynotpe6a.Тябвда ce BHMABA DA He Ce DoKocBaat HaPbeBaTeJHNTe eJeMeHTNII NOBbpxHOCTTa Ha BbTpewHOCCTTa Ha урета.
BnHaI n3noJ3BaIe pKabuI 3a cypHa npn n3BaJdaHe IJI NocTABJeHa akcecoapn IJI NcdoBe 3a neyeHe.
- Изполизвайтесамо сенистуха (Термocонд), пленорьан за тозурд.
3a da cbaNTe HocuHTe Ha paT, npBPO n3DbpnaTe PpeHaTa Yacr Ha HocuHTe, a CJeI TOBa N 3aHnKpaH Ha HocuHTe OT CTpaHnHnTE CteHi. NocTabeTe HocuHTe Ha paTb B o6paTHa NocJeDoBaTeJIHOCT.
He nouchte ypea c napounctayka.
He n3noJ3BaIte rpy6n, abpa3nBHN, nouchTbau npenapatn nn octpn, metaHn CTbprAkn 3a nouchTbaHe Ha cTBKnoto Ha Bpata, 3aOTo Te MOraT da NaDpaKaT
NOBbpxHOCCTTa N TOBa Da IOBeJe Do CuynBaHe Ha CTbKlOTO.
- Праздп пролитунно поисвае ИЗвадеTe BCИЧКи akcecoapи и пpekomерни натугованя/pa3ЛИВаня OT BьТршноctта на урEDA.
2. INHCTPYKUN 3A BE3OJACHOCT
2.1Инстация

BHIMAHNE!
Cama KbaJInΦnUpaH YOBek MoKe da n3BbPm MOHTaKa Ha ypeJa.
MaxheTe BCnUKN ONaKOBKn.
He mONTpaTne Hn He n3noJ3BaITe NOBpeDen ypeI.
CneIbaiTe HNCTpyKUInTe 3a IHCTaIIpaHe, npINIOKeH NkM ypeJa.
BnHaBn BnHmBaIte, KOraTo MeCTnte ypeDa, Tb' KaTo e TeXbK. BnHaRn n3NoJ3BaIte npEJaNa3Hn pbKaBnCn n 3aTBopeHn O6yBKn.
- He nbpnaite ypea 3a npkka t.
- MoNTupaIte ypeDa ha 6e3oNaCHO n IOxOJaMrcTo, KOeTO OTROBapr Ha MOHTaXHnTe N3NCKBaHn.
- Tp6Ba Da cna3BaTe MInHMaIHOTo pa3CTOaHne Do dpyrN ypeDN uCTpoiCTBa.
-Пре徳дамоHTираTeуpeДаплвразатMyceOTВаря 6e3npo6nemHo.
- YpeIbTe o6OpUdBaH c eIeKTpUYecka cnCTema 3a oxJaXdaHe. Tp6Ba da ce n3NoJ3Ba C eIeKTpO3axpaHbaHeto.
- BrpaIeHnIypeI TpI6Ba Da OTROBapHa n3NcKBaHnIyTa 3a Cta6NIHocT Ha DIN 68930.
2.2 EneKtpnuecko CBbp3BaHe

BHIMAHNE!
Pnck OT noxap nJIN TOKOB yIap.
Bcnu en. Bp3kn Tpa6Ba da ce HnpaT OT KBaJnФuHpaH eNeKtpOTexHnK.
- YpeT Tp8Ba Da e 3a3EmeH.
- YBepete ce, che napametpnte Ha TaBeIkata C TexHnueCKn DaHHn Ca CbBMecTUMC eJeKtpnueCKNte DaHHN Ha 3axpaHbAaTa MPexa.
Bunaru n3no3BaIte npabuHNO MOHTupan KOHTaKT CbC 3aUNTa OT TOKOB yIap.
He n3noJ3BaIte pa3KNOHTeJIu nn aDaIaTepn C MHOro BXOIOBe.
BHHMaBaIte Da He NOBpeDInTe 3axpaHbAunu IeNceI N 3axpaHbAunu Ka6en. Ako 3axpaHbAunuT Ka6en Tpr6Ba Da 6bJe IOdMeHeN, TOBa Tpr6Ba Da 6bJe N3BbPseHo OT Haunu OTOpn3npan cepBN3eH ueHTbp.
He donyckaIte 3axpaHbauIte Ka6eI Na ce do6nKabAT Do BpaTuKkaTa Ha ypea nn npoctpaHCTBOTo NOd Hero, oco6eHO KOrato e BKIOUeH nn KOrato BpaTuKkaTa e ropeua.
3aunata ot TOKOB ynap Ha ropeuinte n 130nnpaHn Yactn Tp6Ba da 6bde 3aTeHaTa NO TaBb HauHH, Ye da He MOKe Da ce OTCTpaHn 6e3 INHCTpyMeHTN.
CbpxkeTe Ka6ena 3a 3axpaHbaHeTo KbM KOHTaKta eINHCTBeHO B KpaHa INHCTaIauIra. YBepTe ce, ye IeIceJIbT 3a 3axpaHbaHe e DocTbneH cIeI INHCTaIIpaHeto.
Ako KOHTaKbTe pa3Xna6eH, He CBbP3BaIte 3axpaHbAunia uenCeI.
He n3dbpnbaiTe 3axpaHbaunKa6en,3a da n3knouyte ypea.BnHarn n3dbpnbaiTe uencela Ha 3axpaHbaHeTo.
- I3noI3BaIte cAmO npaBnHn yCTpoiCTBa 3a n30Jaun: npeJna3HN ppeKbcBauHa MpeXaTa, npeJna3NTeIN (npeJna3HTeJIte OT BnHTOB TnT Tp6Ba Da ce n3BaJrT OT facyHraTa), N3KNIOUbATEJN KOHTAKTOPn 3a yTeUka Ha 3a3EMBAHETO.
- EJektpnueckaTaNHCTaJaCnTp6Ba Da nMa N3OJIpaUO yCTpoNcTBo, KoTo Bn PO3BOJRA Da N3KJIIOUHTe ypeDa OT eI. MpeXkata Pn BCNUKN NOJUCN. N3OJIpaUOyCTPOuCTBO Tp6Ba Da e C. shInHa Ha OTBapRHe Ha KOHTaKtAmHHmym 3 MM.
3aTbOpTe n3qIIO BpaTnUkKaTa Ha ypeDa, npeDn Da CBbpXeTe 3axpaHBaunr KaBeN KbM KOHTaKTA.
To3n ypeI ce doctabc eIeKtpo3axpaHbau n IeIcn en Ka6en.
2.3 V3noJ3BaHe

BHIMAHNE!
Pnck OT HapaHbAHe, n3rapHnIy, TOKOB ydap nnEKCnNo3nI.
He npomeHnTe npedHa3HaueHneTo Ha ypeda.
- YBepete ce, Ye BEHTnlaaIOHHnte OTBOPn He ca 6nOKupaHn.
He octabray Te ypea 6e3 haan3op no Bpeme Ha pa60ta.
- N3KJIOUyBaIe ypeJa cNei BcRAKO n3NoJ3BaHe.
-Бьдete BHHMaTeHn,KOraTO OTbaprTe BpaTata Ha ypeDa,ДOKaTo ypeDbT pa60tn.Можда n3ne3e ropeu Bb3dux.
He pa6oTeTc ypeDa c MOKpn Pbue nIIN KOraTO mA KOHTaKT C BODa.
He OKa3BaIe HATnCK Bbpxy OTBOpeHaTa BpaTa.
He n3no3BaIte ypeDa KaTo pa6oTHa NOBbpxHOCT IIN NOBbpxHOCT 3a CbXpaHHeHne.
- OТварайтЕВнIMаTeNHOВpaTATAHa ypeДa.N3ПОЛЗВaHETOHa cБСТАВКИ C aNKOXONMOKEДa npeДи3ВИKa CMEcBAHe Ha aNKOXON IV Bb3dYX.
He no3B0JBAIte NCKPN IIN OTKpNT PnAmbK Da BIn3aT B KOHTaKT C ypeDa, KOrato OTBapTe BpaTata.
He noctabraye 3anaJIMn npOyKTn nn npedMeTn, KOINTo Ca HAMOKpeHN CbC 3anaJIMn npOyKTn, B 6JIIN3OCT Do ypea nn Bbpxv Hero.
He cnoeJne CBOra Ta Wi-Fi npona.

BHIMAHNE!
OnachocOT nobpea B ypea.
3a da ce n36eHnat nobpeu nu 06e3cBETBAHe Ha emaJa:
-He nocTaBnTe CbDoBe 3a cypHa nnIpyrnnpeDMeTn BypeDa DnpeKTHOBbpxy DbHOTO.
-He nocTaBnTe aIyMnHneBO oIIO dIpeKTHO Bbpxy DbHOTo Ha ypeHa.
-He nocTaBnTe BOda dInpeKTHO B ropeunypei.
-He NoCTaBnTe BJaXn CbIOBe H XpaHa B ypeDa, CneI KaTo PpIKJIuOHTe C rOTBeHTo.
-6bTe BHNMaTeHn, KOraTo MaxaTe Hnn NOCTABrTe akcecoapnte.
-Obe3BETBaHeTo Ha emaHa nnHepbKaemata CTOMHa He OKa3BaBnnaHne Bbpxy pa6oTaHa ypeHa.
- I3noI3BaIte DbIb6Oka Taba 3a BlnaxHn TopTN. IIOIOBITE COKOB epuHHraBAT netHa, KOUTo MORAT da 6bDat TpaHn.
BnHaI rOtBeTe npn 3aTbOpena BpaTuKh a Ha ypeDa.
Ako ypeDbTe uHCTaIIpaH 3ad nperpapaOT Me6eH Tn, HAp. 3ad BpatNcKa B WkaΦ, Ta3n BpTaNcKa Tpr6Ba BnHar n Da e OTBopeHa, DOKaTO ypeBt pa6Ot. Ako e 3aTBopeHa, MOraT Da ce AkymyInpaT TOJIInHa N Bnra, KOnTo BnOcJeDCTBne Da NOBpeJr T ypeDa, ShkaFa nn noJa. He 3aTBapRnTe nperpapaTa, DOKaTO ypeBt He n3CTnHe HanbIhO cJe d yNoTppeBa.
HaTnchete: Select (N36epete): PpeDnoHTaH.
CTbNka 4 N36epete: 3anaa n Tekyu nte HactpoKn.
Ctbnka 5
HaTnCHete ^+ , 3a Da do6abute Hacptponkata KbM cnncbka Cbc: PpeDnoHTAH. HaTnCHete OK

- HATNCHETe, 3a Da HyJInpate HAcTpoKata.

- HaTnCHETe, 3a Da OTMeHHTe HAcTpoKata.
Ctbnka 2 Maxhete MeTAnHnI npbCTeH nNouchTe CTbKJIeHnI KanaK.
Ctbnka 3 CmHeTe Kpykata c noDxOJaIa Kpyka, yToHnBa Ha TempepaTpa oT 300^
CTbnka 4 NocTaBte MeTaNnHn npbCTeH Ha CTbkNHeHn Kaan ITo MOHTnpaTe.
CtpaHnUHa lamna
CTbnka 1 OTCpaHete NEBn Hocau Ha ckapata,3a Da NOJyHTe DOCTbN Do JAmnata.
CTbNka 2 3noJ3BaIte TceH, Tb npEMeT (Hanp. Yaeha JbXnUka), 3a da CBaIte CTbKne-Hna Kanak.
CTbnka 3 Nocntete CTbKneHnKaNAk.
CTbNka 4 CmHeTe KpyuKaTa C NOxOJa Ka KpyuKa, yctoYnBa Ha TempepaTypa ot 300^
CTbKnka 5 NocTabete CTbKneHnKa nak.
CTbNka 6 NocTaBeTe JraBaTa onopa Ha ckapata.
12. OTCTPAHRAHE HA HEN3ПРABHOCTN

BHIMAHNE!
Bx. rnaBa "Be3oNaCHocT".
12.1 KaKa Da NoctbNITe, aKO...

YpeBt He Ce BkIoUyBa HnH He HaPraBa

Bb3MOxHa npuHnHa

PeeHne
YpeBbT He e CbBp3aHa KbM eNeKtpo3aXpaHbaHeTo nnne Ccbp3aH HenpaBnHO.
PpOBepeTe DaJIypeIbTe cBbP3aH npaBnHO KbMeJektpo3axpaHbaHeTo.
YacobnKbT He e HactpoeH. Hactpoite yacobnka, 3a noDpo6HocT BuxkTe ΦyHK- Cm Ha yacobnka rnaBa, Ka da hactponte: FyHKcnn Ha yacobnka.
BpataHa He e do6pe 3aTBopeHa. 3aTBopeTe nIbTHo BpaTata.
IpeDn3ntenr e n3ropaI. IpoBepTe danu npEtnaTne TepnunHa 3a Heu3- npabHocTtA. Ako npo6nembT ce noRbN OTHOBO, obaTe Ce Ha KBaJIncnupanTexHnK.
YpeBt 3aunTa 3a deua e BkIoueh. BnKTe rnaBa, MeHIO", noDMeHIO 3a: OnuIN.
Home Ha npoDyKT (PNC)
CepneH Homep (S.N.)
13. EHEPΓΗΑ ΕΦΕKTΝΒΗΟCT
13.1 INHOpMaun 3a npOyKta INHOpMaunHeN IInCT 3a npOyKta
ImeHaIOCTaBvAEG
NdeHTnФиkaqnaHaMoDeJa
BSE778380T 944188814
BSK778380T 944188827
HndekHa eheprnHa eΦeKTHBHOCT 61.2
KnaHa eheprnHa ekeKTNBHOCT A++
3a6paBraHe Ha MpeKaTa 3a DeakTbBpaHe Ha TeKuTaMpeKa OT aBTOMaTHHO Cbbp3BaHe CypeHa.
14.5 ПобMuно 3a: Habtroponka
IopMeHIO OnncAHne
E3nk 3aandaaba e3nka Ha ypeja.
Яркocт Ha ekpaHa 3aДаВа яркocТа Ha ekpaHa.
3Byk Ha 6byoHnTe BKnOuBa H N3KIOUBa 3Byka npHaTnCKaHe Ha ceH3OpHnTe NOJeTa. He e Bb3MOxHo Da 3arnyuHnTe 3Byka 3a:
CnHa 3ByK. CnHaa 3aaba Cnata Ha 3Byka Ha 6yToHInTe n CnHnInTe.
TbpbOCT Ha BOata 3aaba TBbpOCTTa Ha BOata.
Yac ot DeHOoIeTo 3aIaBA TeKyuIte Yac n data.
6. SVAKODNEVNA UPORABA

UPOZORENJE!
Thank you for choosing this AEG product. We have created it to give you impeccable performance for many years, with innovative technologies that help make life simpler – features you might not find on ordinary appliances. Please spend a few minutes reading to get the very best from it.
Visit our website to:

Get usage advice, brochures, trouble shooter, service and repair information: www.aeg.com/support

Register your product for better service: www.registeraeg.com

Buy Accessories, Consumables and Original spare parts for your appliance: www.aeg.com/shop
CUSTOMER CARE AND SERVICE
Always use original spare parts.
When contacting our Authorised Service Centre, ensure that you have the following data available: Model, PNC, Serial Number.
The information can be found on the rating plate.
Warning / Caution-Safety information
i General information and tips
Environmental information
Subject to change without notice.
CONTENTS
1.SAFETY INFORMATION. 74
2.SAFETYINSTRUCTIONS. 76
3.PRODUCT DESCRIPTION 79
4.CONTROL PANEL 80
5.BEFORE FIRSTUSE 81
6.DAILYUSE 84
7.CLOCK FUNCTIONS 88
8.HOW TO USE: ACCESSORIES 89
9. ADDITIONAL FUNCTIONS 91
10. HINTS AND TIPS 92
11.CARE AND CLEANING. 95
12.TROUBLESHOOTING 100
13. ENERGY EFFICIENCY 103
14.MENU STRUCTURE 104
15. IT'S EASY! 106
16. ENVIRONMENTAL CONCERNS 106
1. SAFETY INFORMATION
Before the installation and use of the appliance, carefully read the supplied instructions. The manufacturer is not responsible for any injuries or damage that are the result of incorrect installation or usage. Always keep the instructions in a safe and accessible location for future reference.
1.1 Children and vulnerable people safety
- This appliance can be used by children aged from 8 years and above and persons with reduced physical, sensory or mental capabilities or lack of experience and knowledge if they have been given supervision or instruction concerning the use of the appliance in a safe way and understand the hazards involved. Children of less than 8 years of age and persons with very extensive and complex disabilities shall be kept away from the appliance unless continuously supervised.
- Children should be supervised to ensure that they do not play with the appliance and mobile devices with My AEG Kitchen.
- Keep all packaging away from children and dispose of it appropriately.
- WARNING: The appliance and its accessible parts become hot during use. Keep children and pets away from the appliance when in use and when cooling down.
- If the appliance has a child safety device, it should be activated.
- Children shall not carry out cleaning and user maintenance of the appliance without supervision.
1.2 General Safety
- This appliance is for cooking purposes only.
-
This appliance is designed for single household domestic use in an indoor environment.
-
This appliance may be used in, offices, hotel guest rooms, bed & breakfast guest rooms, farm guest houses and other similar accommodation where such use does not exceed (average) domestic usage levels.
- Only a qualified person must install this appliance and replace the cable.
- Do not use the appliance before installing it in the built-in structure.
- Disconnect the appliance from the power supply before carrying out any maintenance.
- If the mains power supply cable is damaged, it must be replaced by the manufacturer, its Authorised Service Centre or similarly qualified persons to avoid an electrical hazard.
- WARNING: Ensure that the appliance is switched off before replacing the lamp to avoid the possibility of electric shock.
- WARNING: The appliance and its accessible parts become hot during use. Care should be taken to avoid touching heating elements or the surface of the appliance cavity.
- Always use oven gloves to remove or insert accessories or ovenware.
- Use only the food sensor (core temperature sensor) recommended for this appliance.
- To remove the shelf supports first pull the front of the shelf support and then the rear end away from the side walls. Install the shelf supports in the opposite sequence.
- Do not use a steam cleaner to clean the appliance.
- Do not use harsh abrasive cleaners or sharp metal scrapers to clean the glass door since they can scratch the surface, which may result in shattering of the glass.
- Before pyrolytic cleaning, remove all accessories and excessive deposits/spills from the appliance cavity.
2. SAFETY INSTRUCTIONS
2.1 Installation

WARNING!
Only a qualified person must install this appliance.
- Remove all the packaging.
- Do not install or use a damaged appliance.
- Follow the installation instructions supplied with the appliance.
Always take care when moving the appliance as it is heavy. Always use safety gloves and enclosed footwear. - Do not pull the appliance by the handle.
- Install the appliance in a safe and suitable place that meets installation requirements.
- Keep the minimum distance from other appliances and units.
- Before mounting the appliance, check if the appliance door opens without restraint.
- The appliance is equipped with an electric cooling system. It must be operated with the electric power supply.
- The built-in unit must meet the stability requirements of DIN 68930.
| Cabinet minimum height | 578 (600) mm |
| (Cabinet under the worktop minimum height) |
Cabinet width 560 mm
| Cabinet depth 550 (550) mm | |
| Height of the front of the appliance | 594 mm |
| Height of the back of the appliance | 576 mm |
| Width of the front of the appliance | 595 mm |
| Width of the back of the appliance | 559 mm |
| Depth of the appliance 567 mm | |
| Built in depth of the appliance | 546 mm |
| Depth with open door 1027 mm | |
| Ventilation opening minimum size. Opening placed on the bottom rear side |
560× 20mm
1500 mm
| Mains supply cable length. Cable is placed in the right corner of the back side |
| Mounting screws 4x25 mm |
2.2 Electrical connection

WARNING!
Risk of fire and electric shock.
- All electrical connections should be made by a qualified electrician.
The appliance must be earthed. - Make sure that the parameters on the rating plate are compatible with the electrical ratings of the mains power supply.
Always use a correctly installed shockproof socket. - Do not use multi-plug adapters and extension cables.
- Make sure not to cause damage to the mains plug and to the mains cable. Should the mains cable need to be replaced, this must be carried out by our Authorised Service Centre.
- Do not let mains cables touch or come near the appliance door or the niche below the appliance, especially when it operates or the door is hot.
- The shock protection of live and insulated parts must be fastened in such a way that it cannot be removed without tools.
- Connect the mains plug to the mains socket only at the end of the installation. Make sure that there is access to the mains plug after the installation.
- If the mains socket is loose, do not connect the mains plug.
- Do not pull the mains cable to disconnect the appliance. Always pull the mains plug.
-
Use only correct isolation devices: line protecting cut-outs, fuses (screw type fuses removed from the holder), earth leakage trips and contactors.
-
The electrical installation must have an isolation device which lets you disconnect the appliance from the mains at all poles. The isolation device must have a contact opening width of minimum 3 mm.
- Fully close the appliance door before you connect the mains plug to the mains socket.
- This appliance is supplied with a main plug and a main cable.
2.3 Use

WARNING!
Risk of injury, burns and electric shock or explosion.
- Do not change the specification of this appliance.
Make sure that the ventilation openings are not blocked. - Do not let the appliance stay unattended during operation.
- Deactivate the appliance after each use.
- Be careful when you open the appliance door while the appliance is in operation. Hot air can release.
- Do not operate the appliance with wet hands or when it has contact with water.
- Do not apply pressure on the open door.
- Do not use the appliance as a work surface or as a storage surface.
- Open the appliance door carefully. The use of ingredients with alcohol can cause a mixture of alcohol and air.
- Do not let sparks or open flames to come in contact with the appliance when you open the door.
- Do not put flammable products or items that are wet with flammable products in, near or on the appliance.
- Do not share your Wi-Fi password.

WARNING!
Risk of damage to the appliance.
- To prevent damage or discoloration to the enamel:
- do not put ovenware or other objects in the appliance directly on the bottom.
-
do not put aluminium foil directly on the bottom of cavity of the appliance.
-
do not put water directly into the hot appliance.
- do not keep moist dishes and food in the appliance after you finish the cooking.
-
be careful when you remove or install the accessories.
-
Discoloration of the enamel or stainless steel has no effect on the performance of the appliance.
- Use a deep pan for moist cakes. Fruit juices cause stains that can be permanent.
- Always cook with the appliance door closed.
- If the appliance is installed behind a furniture panel (e.g. a door) make sure the door is never closed when the appliance operates. Heat and moisture can build up behind a closed furniture panel and cause subsequent damage to the appliance, the housing unit or the floor. Do not close the furniture panel until the appliance has cooled down completely after use.
2.4 Care and cleaning

WARNING!
Risk of injury, fire, or damage to the appliance.
- Before maintenance, deactivate the appliance and disconnect the mains plug from the mains socket.
- Make sure the appliance is cold. There is the risk that the glass panels can break.
- Replace immediately the door glass panels when they are damaged. Contact the Authorised Service Centre.
- Be careful when you remove the door from the appliance. The door is heavy!
- Clean regularly the appliance to prevent the deterioration of the surface material.
- Clean the appliance with a moist soft cloth. Use only neutral detergents. Do not use abrasive products, abrasive cleaning pads, solvents or metal objects.
- If you use an oven spray, follow the safety instructions on its packaging.
2.5 Pyrolytic cleaning

WARNING!
Risk of Injury / Fires / Chemical Emissions (Fumes) in Pyrolytic Mode.
-
Before carrying out the pyrolytic cleaning and initial preheating remove from the oven cavity:
-
any excess food residues, oil or grease spills / deposits.
-
any removable objects (including shelves, side rails, etc., provided with the appliance) especially any non-stick pots, pans, trays, utensils, etc.
-
Read carefully all the instructions for pyrolytic cleaning.
- Keep children away from the appliance while the pyrolytic cleaning operates. The appliance becomes very hot and hot air is released from the front cooling vents.
-
Pyrolytic cleaning is a high temperature operation that can release fumes from cooking residues and construction materials, as such consumers are advised to:
-
provide good ventilation during and after the pyrolytic cleaning.
-
provide good ventilation during and after the initial preheating.
-
Do not spill or apply water on the oven door during and after the pyrolytic cleaning to avoid damaging the glass panels.
- Fumes released from all pyrolytic ovens / cooking residues as described are not harmful to humans, including children, or persons with medical conditions.
- Keep pets away from the appliance during and after the pyrolytic cleaning and initial preheating. Small pets (especially birds and reptiles) can be highly sensitive to temperature changes and emitted fumes.
- Non-stick surfaces on pots, pans, trays, utensils etc., can be damaged by the high temperature pyrolytic cleaning operation of all pyrolytic ovens and can be also a source for low level harmful fumes.
2.6 Steam Cooking

WARNING!
Risk of burns and damage to the appliance.
-
Released Steam can cause burns:
-
Be careful when you open the appliance door when the function is activated. Steam can release.
- Open the appliance door with care after the steam cooking operation.
2.7 Internal lighting

WARNING!
Risk of electric shock.
- Concerning the lamp(s) inside this product and spare part lamps sold separately: These lamps are intended to withstand extreme physical conditions in household appliances, such as temperature, vibration, humidity, or are intended to signal information about the operational status of the appliance. They are not intended to be used in other applications and are not suitable for household room illumination.
- This product contains a light source of energy efficiency class G.
- Use only lamps with the same specifications.
2.8 Service
To repair the appliance contact the Authorised Service Centre.
- Use original spare parts only.
2.9 Disposal

WARNING!
Risk of injury or suffocation.
- Contact your municipal authority for information on how to dispose of the appliance.
- Disconnect the appliance from the mains supply.
-
Cut off the mains electrical cable close to the appliance and dispose of it.
-
Remove the door catch to prevent children or pets from becoming trapped in the appliance.
3.PRODUCT DESCRIPTION
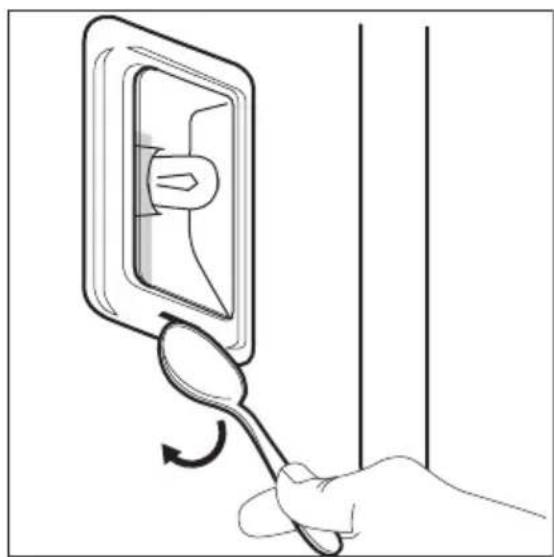
3.1 General overview
Control panel
Display
Water drawer
Socket for the food sensor
Heating element
Lamp
Fan
D escaling pipe outlet
Shelf support, removable
Shelf positions
3.2 Accessories
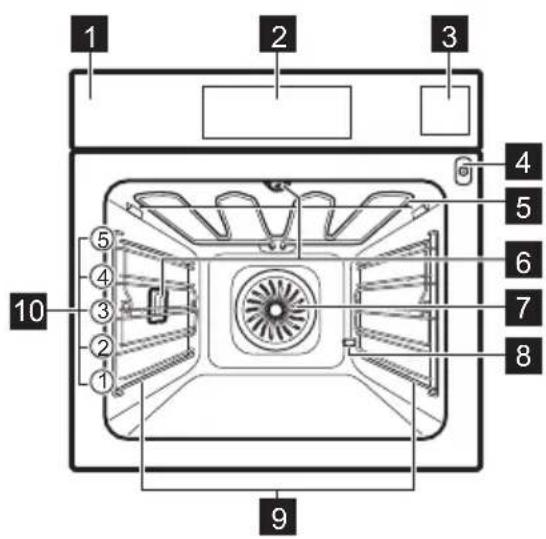
Wire shelf
For cookware, cake tins, roasts.
Baking tray
For cakes and biscuits.
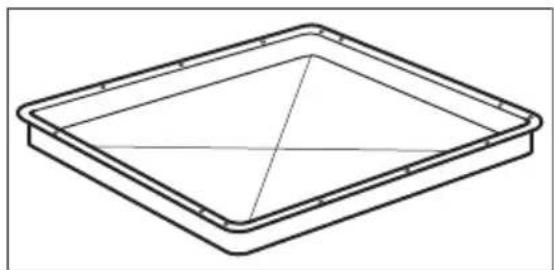
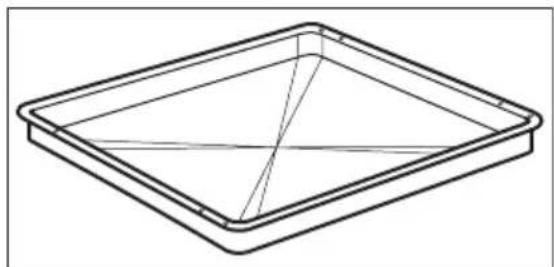
Grill-/Roasting pan
To bake and roast or as a pan to collect fat.
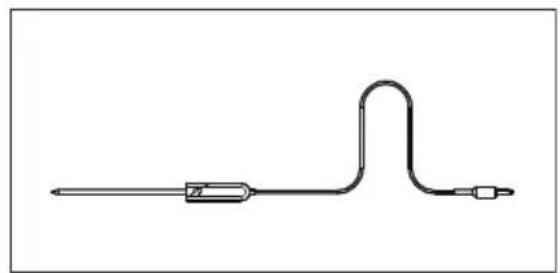
Food sensor
To measure the temperature inside food.
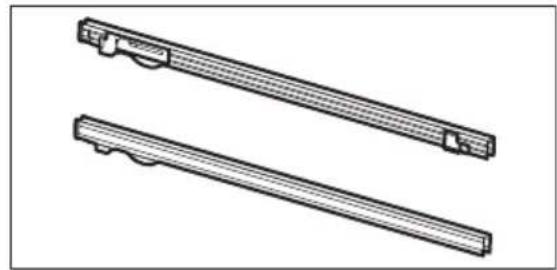
Telescopic runners
For inserting and removing trays and Wireshelf more easily.
4. CONTROL PANEL
4.1 Control panel overview

1 ON/OFF Press and hold to turn the appliance on and off.
2 Menu Lists the appliance functions.
3 Favourites Lists the favourite settings.
4 Display Shows the current settings of the appliance.
5 Lamp switch To turn the lamp on and off.
6 Fast Heat Up To turn on and off the function: Fast Heat Up.

Press Move
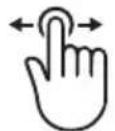

Press and hold
Touch the surface with fingertip. Slide fingertip over the surface. Touch the surface for 3 seconds.
4.2 Display
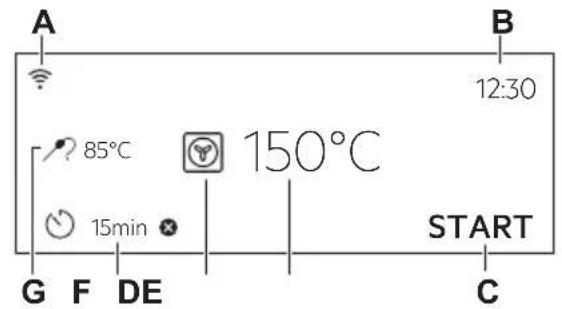
Display with key functions set.
A.Wi-Fi
B. Time of day
C. START/STOP
D. Temperature
E. Heating functions
F. Timer
G. Food sensor (selected models only)
Display indicators
Basic indicators - to navigate on the display.
OK
To confirm the selection / setting.

To go one level back in the menu.

To undo the last action.

To turn the options on and off.
Sound alarm function indicators - when the set time of cooking ends, the signal sounds.

The function is on.

The function is on. Cooking stops automatically.

Sound alarm is off.
Timer indicators

To set the function: Delayed start.

To cancel the setting.
Wi-Fi indicator - the appliance can be connected to Wi-Fi.

Wi-Fi connection is turned on.
Remote operation indicator - the appliance can be controlled remotely.

Remote operation is turned on.
5. BEFORE FIRST USE

WARNING!
Refer to Safety chapters.
5.1 Initial Cleaning

Step 1 Step 2 Step 3
| Remove all accessories and removable shelf supports from the appliance. |
Clean the appliance and the accessories only with a microfibre cloth, warm water and a mild detergent.
Place the accessories and the removable shelf supports in the appliance.
5.2 First connection
The display shows welcome message after the first connection.
You have to set: Language, Display brightness, Key tones, Buzzer volume, Water hardness, Time of day.
5.3 Wireless connection
- Wireless network with the Internet connection.
- Mobile device connected to the same wireless network.
| Step 1 | To download My AEG Kitchen app: Scan the QR code on the rating plate with the camera on your mobile device to be redirected to AEG Homepage. The rating plate is on the front frame of the appliance cavity. You can also download the app directly from the app store. |
Step 2 Follow the app onboarding instructions.
Step 3 Turn on the appliance.
Step 4 Press: Select: Settings / Connections.
Step 5 - slide or press to turn on: Wi-Fi.
Step 6 The appliance wireless module starts within 90 sec.
Frequency 2.4 GHz WLAN
2400-2483.5MHz
Protocol IEEE 802.11b DSSS, 802.11g/n OFDM
Max Power EIRP < 20 dBm (100 mW)
Wi-Fi module NIUS-50
To connect the appliance you need:
5.4 Software licences
The software in this product contains components that are based on free and open source software. AEG acknowledges the contributions of the open software and robotics communities to the development project.
To access the source code of these free and open source software components whose license conditions require publishing, and to see their full copyright information and applicable license terms, visit: http:// aeg.opensoftwarerepository.com (folder NIUS).
5.5 Initial preheating
Preheat the empty oven before the first use.
| Step 1 Remove all accessories and removable shelf supports from the oven. | ||||
| Step 2 Set the maximum temperature for the function: Let the oven operate for 1 h. | ||||
| Step 3 Set the maximum temperature for the function: Let the oven operate for 15 min. | ||||
| i The oven can emit an odour and smoke during preheating. Make sure that the room is ventilated. | ||||
| 5.6 How to set: Water hardness When you connect the oven to the mains you have to set the water hardness level. | Use the test paper or contact your water supplier to check the water hardness level. | |||
| Step 1 Step 2 Step 3 Step 4 | ||||
| Put the test paper into water for about 1 sec. Do not put the test paper under running water. | Shake the test paper to remove the excess of water. | After 1 min, check water hardness with the table below. | Set the water hardness lev- el: Menu / Settings / Setup / Water hardness. | |
| i The colours of the test paper continue to change. Do not check water hardness later than 1 min after test. | ||||
| You can change the water hardness level in the menu: Settings / Setup / Water hardness. | ||||
| The table shows water hardness range (dH) with the corresponding level of Calcium deposit and the water classification. Adjust the water hardness level according to the table. | ||||
| Water hardness Test paper Calcium depos- it (mmol/l) | Calcium de- posit (mg/l) | Water classifi- cation | ||
| Level dH | ||||
| 10 - 70 - 1.30 - 50 soft | ||||
| 28 - 14 1.4 - 2.551 - 100 mødy hard | ||||
| 3 | 15 - 21 | 2.6 - 3.8 | 101 - 150 | hard |
| 4 | ≥22 | ≥3.9 | ≥151 | very hard |
When the tap water hardness level is 4, fill the water drawer with still bottled water.
6. DAILY USE

WARNING!
Refer to Safety chapters.
6.1 How to set: Heating functions
Step 1 Turn on the oven. The display shows the default heating function.
Step 2 Press the symbol of the heating function to enter the submenu.
Step 3 Select the heating function and press: OK The display shows: temperature.
Step 4 Set: temperature. Press: OK
Step 5 Press: START Food Sensor - you can plug the sensor at any time before or during cooking.
STOP - press to turn off the heating function.
Step 6 Turn off the oven.
6.2 How to set: Steam heating function
Step 1 Turn on the oven. Select the symbol of the heating function and press it to enter the submenu.
Step 2 Press Set the steam heating function.
Step 3 Press: OK The display shows the temperature settings.
Step 4 Set the temperature.
Step 5 Press: OK
Step 6 Press the cover of the water drawer to open it.
Step 7 Fill the water drawer with cold water to the maximum level (around 950~ml ) until the signal sounds or the display shows the message. Do not fill the water drawer over its maximum capacity. There is a risk of water leakage, overflow and furniture damage.
WARNING!
Use only cold tap water. Do not use filtered (demineralised) or distilled water. Do not use other liquids. Do not pour flammable or alcoholic liquids into the water drawer.
Step 8 Push the water drawer to its initial position.
| Step 9 | Press: START Steam appears after approximately 2 min. When the oven reaches the set temperature, the signal sounds. |
| Step 10 | When the water drawer runs out of water, the signal sounds. Refill the water drawer. |
| Step 11 | Turn off the oven. |
| Step 12 | Empty the water drawer after cooking ends. Refer to "Care and Cleaning" chapter, Tank emptying. |
| Step 13 | Residual water can condensate in the cavity. After cooking, carefully open the oven door. When the oven is cold, dry the cavity with a soft cloth. |
6.3 How to set: Assisted Cooking
Every dish in this submenu has a recommended function and temperature. You can adjust the time and the temperature.
For some of the dishes you can also cook with:
Weight Automatic
Food Sensor
The degree to which a dish is cooked:
Rare or Less
Medium
Well done or More
Step 1 Turn on the oven.
Step 2 Press:
Step 3 Press: Enter: Assisted Cooking.
Step 4 Choose a dish or a food type.
Step 5 Press: START
6.4 Heating functions
STANDARD
| Heating function Application | |
| Grill | To grill thin pieces of food and to toast bread. |
| Turbo Grilling | To roast large meat joints or poultry with bones on one shelf position. To make gratins and to brown. |
Heating function Application

True Fan Cooking
To bake on up to three shelf positions at the same time and to dry food. Set the temperature 20 - 40^ lower than for Conventional Cooking.

Frozen Foods
To make convenience food (e.g., french fries, potato wedges or spring rolls) crispy.

Conventional Cooking
To bake and roast food on one shelf position.

Pizza Function
To bake pizza. To make intensive browning and a crispy bottom.

Bottom Heat
To bake cakes with crispy bottom and to preserve food.

Dough Proving
To speed up the rising of the yeast dough. It prevents dough surface from drying and keeps the dough elastic.
SPECIALS
Heating function Application

Preserving
To preserve vegetables (e.g., pickles).

Dehydrating
To dry sliced fruit, vegetables and mushrooms.

Plate Warming
To preheat plates for serving.

Defrost
To defrost food (vegetables and fruit). The defrosting time depends on the amount and size of the frozen food.

Au Gratin
For dishes such as lasagna or potato gratin. To make gratins and to brown.
Heating function Application

Slow Cooking
To prepare tender, succulent roasts.

Keep Warm
To keep food warm.

Moist Fan Baking
This function is designed to save energy during cooking. When you use this function, the temperature in the cavity may differ from the set temperature. The residual heat is used. The heating power may be reduced. For more information refer to "Daily Use" chapter, Notes on: Moist Fan Baking.
STEAM
Heating function Application

Steam Regenerating
Food reheating with steam prevents surface drying. Heat is distributed in a gentle and even way, which allows to recover taste and aroma of food as just prepared. This function can be used to reheat food directly on a plate. You can reheat more than one plate at the same time, using different shelf positions.

Bread Baking
Use this function to prepare bread and bread rolls with a very good professional-like result in terms of crispiness, colour and crust gloss.

Humidity Low
The function is suitable for meat, poultry, oven dishes and casseroles. Thanks to the combination of steam and heat, meat gets a tender and juicy texture along with a crusty surface.
6.5 Notes on: Moist Fan Baking
This function was used to comply with the energy efficiency class and ecodesign requirements (according to EU 65/2014 and EU 66/2014). Tests according to:
IEC/EN 60350-1
The oven door should be closed during cooking so that the function is not interrupted and the oven operates with the highest energy efficiency possible.
When you use this function the lamp automatically turns off after 30 sec.
For the cooking instructions refer to "Hints and tips" chapter, Moist Fan Baking. For general energy saving recommendations refer to "Energy Efficiency" chapter, Energy Saving.
7. CLOCK FUNCTIONS
7.1 Clock functions description
| Clock function | Application |
| Cooking time | To set the length of cooking. Maximum is 23 h 59 min. |
| End action | To set what happens when the timer ends counting. |
| Delayed start | To postpone the start and / or end of cooking. |
| Clock function | Application |
| Time extension | To extend cooking time. |
| Reminder To set a countdown. Maximum is 23 h59 min. This function has no effect on the operation of the appliance. | |
| Uptimer Monitors how long the function operates. Uptimer - you can turn it on and off. |
7.2 How to set: Clock functions
| How to set the clock | |
| Step 1 Press: Time of day. | |
| Step 2 Set the time. Press: OK | |
| How to set cooking time | |
| Step 1 Choose the heating function and set the temperature. | |
| Step 2 Press: | |
| Step 3 Set the time. Press: OK | |
| How to choose end option | |
| Step 1 Choose the heating function and set the temperature. | |
| Step 2 Press: | |
| Step 3 Set the cooking time. | |
| Step 4 Press: Repeat the action until the display shows the main screen. | |
| How to delay start of cooking | |
| Step 1 Set the heating function and the temperature. | |
| Step 2 Press: | |
| How to delay start of cooking | |
| Step 3 Set the cooking time. | |
| Step 4 Press: • • • | |
| Step 5 Press: Delayed start. | |
| Step 6 Choose the value. | |
| Step 7 Press: OK Repeat the action until the display shows the main screen. | |
| How to extend cooking time | |
| When 10% of cooking time is left and the food seems not to be ready, you can extend cooking time. You can also change the heating function. | |
| Press +1min to extend the cooking time. | |
| How to change timer settings | |
| Step 1 Press: ☑ | |
| Step 2 Set the timer value. | |
| Step 3 Press: OK | |
| You can change the set time during cooking at any time. |
8. HOW TO USE: ACCESSORIES
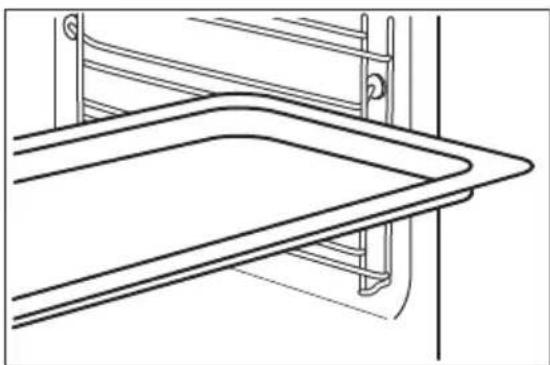
8.1 Inserting accessories
A small indentation at the top increases safety. The indentations are also anti-tip
devices. The high rim around the shelf prevents cookware from slipping of the shelf.
Wire shelf:
Push the shelf between the guide bars of the shelf support.
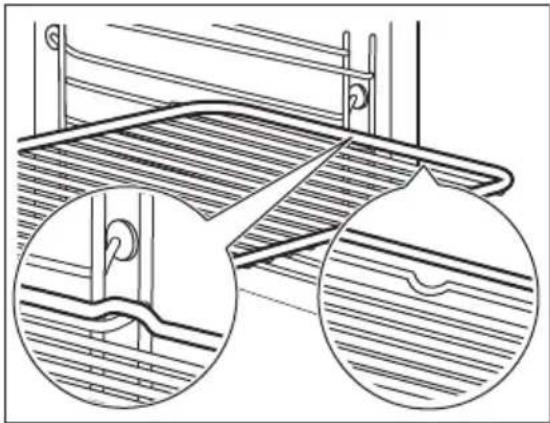
Baking tray / Deep pan:
Push the tray between the guide bars of the shelf support.
8.2 Food Sensor
Food Sensor - measures the temperature inside the food. You can use it with every heating function.
There are two temperatures to be set:
C
The oven temperature: minimum 120^
#
The core temperature.
For the best cooking results:
Ingredients should be at room tem Do not use it for liquid dishes. During cooking it must remain in the dish. perature.
The oven calculates an approximate end of cooking time. It depends on the quantity of food, the set oven function and the temperature.
How to use: Food Sensor
Step 1 Turn on the oven.
Step 2 Set a heating function and, if necessary, the oven temperature.
Step 3 Insert: Food Sensor.
Meat, poultry and fish Casserole
Insert the tip of Food Sensor into the centre of meat, fish, in the thickest part if possible. Make sure that at least 3/4 of Food Sensor is inside of the dish.
Insert the tip of Food Sensor exactly in the centre of the casserole. Food Sensor should be stabilized in one place during baking. Use a solid ingredient to achieve that. Use the rim of the baking dish to support the silicone handle of Food Sensor. The tip of Food Sensor should not touch the bottom of a baking dish.
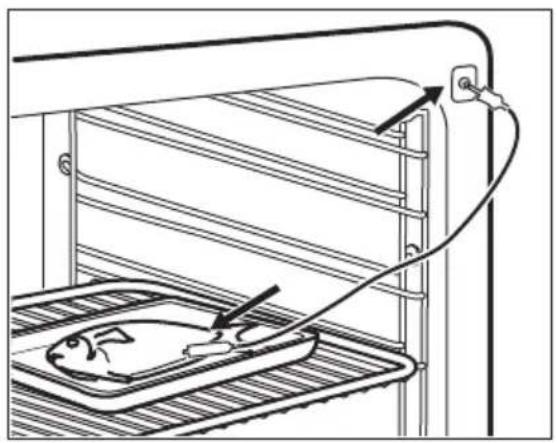

Step 4 Plug Food Sensor into the socket at the front of the oven.
The display shows the current temperature of: Food Sensor.
Step 5

- press to set the core temperature of the sensor.
Step 6

-
press to set the preferred option:
-
Sound alarm - when food reaches the core temperature, the signal sounds.
- Sound alarm and stop cooking - when food reaches the core temperature, the signal sounds and the oven stops.
Step 7
Select the option and repeatedly press: to go to main screen.
Step 8
Press: START
When food reaches the set temperature, the signal sounds. You can choose to stop or to continue cooking to make sure the food is well done.
Step 9 Remove Food Sensor plug from the socket and remove the dish from the oven.

WARNING!
There is a risk of burns as Food Sensor becomes hot. Be careful when you unplug it and remove it from the food.
9. ADDITIONAL FUNCTIONS
9.1 How to save: Favourites
You can save your favourite settings, such as the heating function, the cooking time, the
temperature or the cleaning function. You can save 3 favourite settings.
Step 1 Turn on the appliance.
Step 2 Select the preferred setting.
Step 3
Press: Select: Favourites.
Step 4 Select: Save current settings.
Step 5
Press + to add the setting to the list of: Favourites. Press OK

press to reset the setting.

To press to cancel the setting.
9.2 Function lock
This function prevents an accidental change of the heating function.
Step 1 Turn on the appliance.
Step 2 Set a heating function.
Step 3

press at the same time to turn on the function.
To turn off the function repeat step 3.
9.3 Automatic switch-off
For safety reasons the appliance turns off after some time, if a heating function works and you do not change any settings.

(^) (h)

30-115 12.5
120-1958.5
200-2455.5

(°C) (h)

250 - maximum 3
The Automatic switch-off does not work with the functions: Light, Food sensor, End time, Slow Cooking.
9.4 Cooling fan
When the appliance operates, the cooling fan turns on automatically to keep the surfaces of the appliance cool. If you turn off the appliance, the cooling fan can continue to operate until the appliance cools down.
10. HINTS AND TIPS
10.1 Cooking recommendations

The temperature and cooking times in the tables are guidelines only. They depend on the recipes and the quality and quantity of the ingredients used.
Your appliance may bake or roast differently to the appliance you had before. The hints below show recommended settings for temperature, cooking time and shelf position for specific types of the food.
If you cannot find the settings for a special recipe, look for the similar one.
For more cooking recommendations refer to cooking tables on our website. To find the Cooking Hints, check the
PNC number on the rating plate on the front frame of the appliance cavity.
10.2 Moist Fan Baking
For the best results follow suggestions listed in the table below.
| (℃) (min) | |||
| Sweet rolls, 16 pieces | baking tray or dripping pan 180 2 25 - 35 | ||
| Swiss Roll baking tray or dripping pan 180 2 15 - 25 | |||
| Whole fish, 0.2 kg baking tray or dripping pan 180 3 15 - 25 | |||
| Cookies, 16 pieces baking tray or dripping pan 180 2 20 - 30 | |||
| Macaroons, 24 pieces | baking tray or dripping pan 160 2 25 - 35 | ||
| Muffins, 12 pieces baking tray or dripping pan 180 2 20 - 30 | |||
| Savory pastry, 20 pieces | baking tray or dripping pan 180 2 20 - 30 | ||
| Short crust biscuits, 20 pieces | baking tray or dripping pan 140 2 15 - 25 | ||
| Tartlets, 8 pieces baking tray or dripping pan 180 2 15 - 25 | |||
10.3 Moist Fan Baking - recommended accessories
Use the dark and non-reflective tins and containers. They have better heat absorption than the light colour and reflective dishes.
| Pizza pan | Baking dish | Ramekins | Flan base tin |
| Dark, non-reflective 28 cm diameter | Dark, non-reflective 26 cm diameter | Ceramic 8 cm diameter, 5 cm height | Dark, non-reflective 28 cm diameter |
10.4 Cooking tables for test institutes
Information for test institutes
Tests according to: EN 60350, IEC 60350.
Baking on one level - baking in tins
| X | °C min | 1/4 | 5 |
| Toast | Grill | 1 - 2 | 5 |
| Beef steak, turn halfway through | Grill | 24 - 30 | 4 |
| Short bread True Fan Cooking 140 25 - 35 2 | |||
| Short bread Conventional Cooking 140 25 - 35 2 | |||
| Baking on one level - biscuits Use the third shelf position. | |||
| X | °C min | 1/4 | 5 |
| Small cakes, 20 per tray, preheat the empty oven | True Fan Cooking 150 20 - 30 | ||
| Small cakes, 20 per tray, preheat the empty oven | Conventional Cooking 170 20 - 30 | ||
| Multilevel baking - biscuits | |||
| X | °C min | 1/4 | 5 |
| Short bread True Fan Cooking 140 25 - 45 | 2 / 4 | ||
| Small cakes, 20 per tray, pre- heat the empty oven | True Fan Cooking 150 25 - 35 | 1 / 4 | |
| Fatless sponge cake | True Fan Cooking 160 45 - 55 | 2 / 4 | |
| Apple pie, 1 tin per grid (Ø 20 cm) | True Fan Cooking 160 55 - 65 | 2 / 4 | |
| Grill Preheat the empty oven for 5 minutes. Grill with the maximum temperature setting. | |||
| X | °C min | 1/4 | 5 |
| Toast | Grill | 1 - 2 | 5 |
| Beef steak, turn halfway through | Grill | 24 - 30 | 4 |
11. CARE AND CLEANING

WARNING!
Refer to Safety chapters.
11.1 Notes on cleaning
Cleaning Agents
Clean the front of the appliance only with a microfibre cloth with warm water and a mild detergent.
Use a cleaning solution to clean metal surfaces.
Clean stains with a mild detergent.
Everyday Use
Clean the cavity after each use. Fat accumulation or other residue may cause fire.
Do not store the food in the appliance for longer than 20 minutes. Dry the cavity only with a microfibre cloth after each use.

Accessories
Clean all accessories after each use and let them dry. Use only a microfibre cloth with warm water and a mild detergent. Do not clean the accessories in a dishwasher.
Do not clean the non-stick accessories using abrasive cleaner or sharp-edged objects.
11.2 How to remove: Shelf supports
Remove the shelf supports to clean the oven.
Step 1 Turn off the oven and wait until it is cold.
Step 2 Carefully pull the shelf supports up and out of the front catch.
Step 3 Pull the front end of the shelf support away from the side wall.
Step 4 Pull the supports out of the rear catch.
Install the shelf supports in the opposite sequence.
11.3 How to use: Pyrolytic Cleaning
Clean the oven with Pyrolytic Cleaning.

WARNING!
There is a risk of burns.

CAUTION!
If there are other appliances installed in the same cabinet, do not use them at the same time as this function. It can cause damage to the oven.
| Before the Pyrolytic Cleaning: | |
| Turn off the oven and wait until it is cold. | Remove all accessories. Clean the oven floor and the inner door glass with warm water, a soft cloth and a mild detergent. |
| Do not fill the water tank during cleaning. It restarts the cleaning cycle. | |
| Step 1 Turn on the oven. | |
| Step 2 Press: Cleaning. | |
| Step 3 Put the baking tray on the first shelf position to collect water from the water tank. OK - press to start water tank emptying. | |
| Step 4 When the tank emptying ends remove the baking tray and removable shelf supports. Wipe the oven cavity and the inner door glass with a soft cloth. Press: OK | |
| Step 5 Select the cleaning mode. | |
| Option Cleaning mode Duration | |
| Pyrolytic cleaning, quick Light cleaning 1 h | |
| Pyrolytic cleaning, normal Normal cleaning 1 h 30 min | |
| Pyrolytic cleaning, intense Thorough cleaning 3 h | |
| When the cleaning starts, the lamp is off and the cooling fan works at a higher speed. STOP - press to stop the cleaning before it is completed. Do not use the oven until the door lock symbol disappears from the display. | |
| When the cleaning ends: | |
| Turn off the oven and wait until it is cold. | Clean the cavity with a soft cloth. Remove the residue from the bottom of the cavity. |
| 11.4 Cleaning Reminder | |
| When the reminder appears, cleaning is recommended. | |
| Use the function: Pyrolytic Cleaning. | |
11.5 How to use: Dscaling
| Before you start: | |
| Turn off the oven and wait until it is cold. | Remove all accessories. Make sure that the water drawer is empty. |
| Duration of the first part: around 100 min | |
| Step 1 Place the deep pan on the first shelf position. | |
| Step 2 Pour 250 ml of the descending agent in the water drawer. | |
| Step 3 Fill the remaining part of the water drawer with water to the maximum level until the signal sounds or the display shows the message. | |
| Step 4 Select: Menu / Cleaning. | |
| Step 5 Turn on the function and follow the instruction on the display. The first part of descending starts. | |
| Step 6 After the first part is over, empty the deep pan and put it back on the first shelf position. | |
| Duration of the second part: around 35 min | |
| Step 7 Fill the remaining part of the water drawer with water to the maximum level until the signal sounds or the display shows the message. | |
| Step 8 When the function ends, remove the deep pan. | |
| When this function works, the lamp is off. | |
| When descending ends: | |
| Turn off the oven. When the oven is cold, dry the cavity with a soft cloth. | Leave the oven door open and wait until the cavity is dry. |
| If some limestone residue remains in the oven after descending, the display prompts to repeat the procedure. | |
11.6 Descaling reminder
There are two reminders which prompt you to descale the oven. You cannot disable the descaling reminder.
| Type Description |
| Soft reminder Recommends you to descale the oven. |
| Hard reminder Obligates you to descale the oven. If you do not descale the oven when the hard reminder is on, the steam functions are disabled. |
11.7 How to use: Rinsing
| Before you start: |
| Turn off the oven and wait until it is cold. Remove all accessories. |
Step 1 Place the deep pan on the first shelf position.
Step 2 Fill the water drawer with water to the maximum level until the signal sounds or the display shows the message.
Step 3 Select: Menu / Cleaning / Rinsing. Duration: around 30 min
Step 4 Turn on the function and follow the instruction on the display.
Step 5 When the function ends, remove the deep pan.
When this function works, the lamp is off.
11.8 How to use: Tank emptying
Use it after cooking with steam heating function to remove the residual water from the water drawer.
Before you start:
Turn off the oven and wait until it is cold. Remove all accessories.
Step 1 Place the deep pan on the first shelf position.
Step 2 Select: Menu / Cleaning / Tank emptying. Duration: 6 min
Step 3 Turn on the function and follow the instruction on the display.
Step 4 When the function ends, remove the deep pan.
(i) When this function works, the lamp is off.
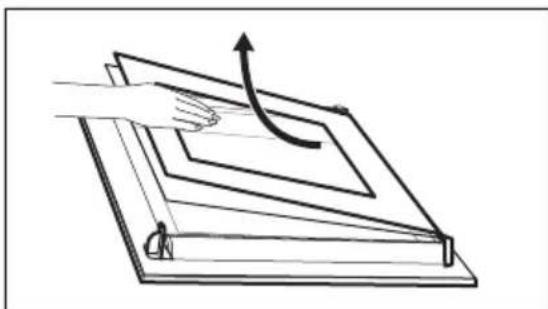
11.9 How to remove and install: Door
You can remove the door and the internal glass panels to clean it. The number of glass panels is different for different models.
WARNING!
The door is heavy.
CAUTION!
Carefully handle the glass, especially around the edges of the front panel. The glass can break.
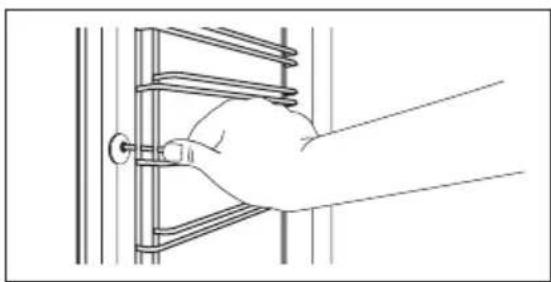
Step 1 Fully open the door.
Step 2 Lift and press the clamping levers (A) on the two door hinges.
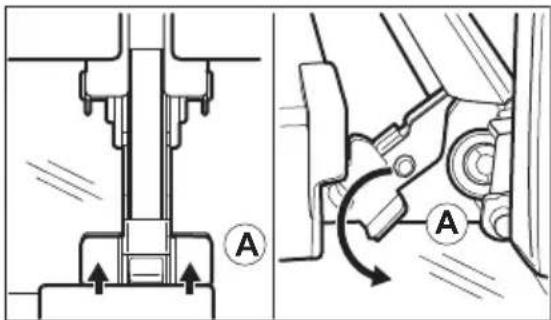
Step 3 Close the oven door to the first opening position (approximately 70^ angle). Hold the door at both sides and pull it away from the oven at an upwards angle. Put the door with the outer side down on a soft cloth on a stable surface.
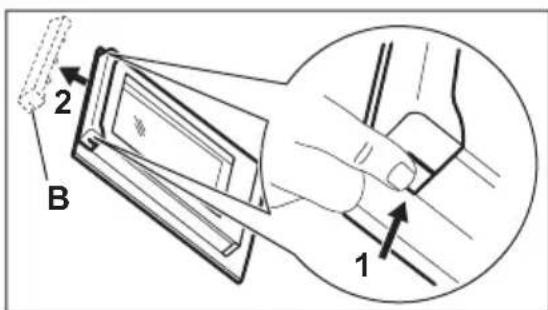
Step 4 Hold the door trim (B) on the top edge of the door at the two sides and push inwards to release the clip seal.
Step 5 Pull the door trim to the front to remove it.
Step 6 Hold the door glass panels on their top edge one by one and pull them up out of the guide.
Step 7 Clean the glass panel with water and soap. Dry the glass panel carefully. Do not clean the glass panels in the dishwasher.
Step 8 After cleaning, do the above steps in the opposite sequence.
Step 9 Install the smaller panel first, then the larger and the door.
11.10 How to replace: Lamp

WARNING!
Risk of electric shock. The lamp can be hot.
Before you replace the lamp:
| Step 1 Step 2 Step 3 | ||
| Turn off the oven. Wait until the oven is cold. | Disconnect the oven from the mains. | Put a cloth on the bottom of the cavity. |
Top lamp
Step 1 Turn the glass cover to remove it.
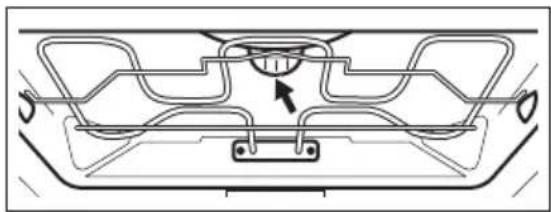
Step 2 Remove the metal ring and clean the glass cover.
Step 3 Replace the lamp with a suitable 300^ heat-resistant lamp.
Step 4 Attach the metal ring to the glass cover and install it.
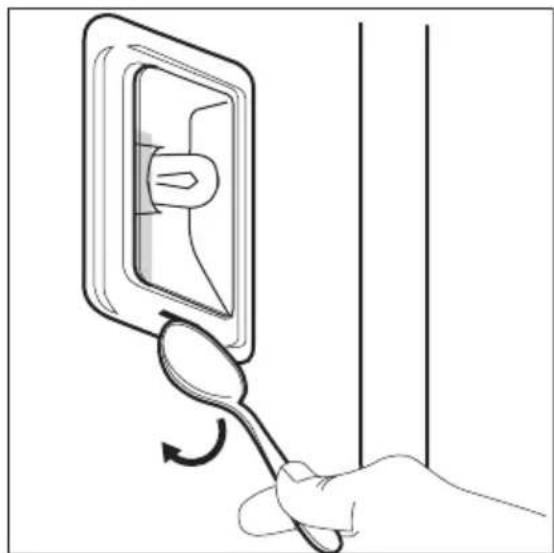
Side lamp
Step 1 Remove the left shelf support to get access to the lamp.
Step 2 Use a narrow, blunt object (e.g. a teaspoon) to remove the glass cover.
Step 3 Clean the glass cover.
Step 4 Replace the lamp with a suitable 300^ heat-resistant lamp.
Step 5 Install the glass cover.
Step 6 Install the left shelf support.
12. TROUBLESHOOTING

WARNING!
Refer to Safety chapters.
12.1 What to do if...
| The appliance does not turn on or does not heat up | |
| Possible cause | Remedy |
| The appliance is not connected to an electrical supply or it is connected incorrectly. | Check if the appliance is correctly connected to the electrical supply. |
| The clock is not set. Set the clock, for details refer to Clock functions chapter, How to set: Clock functions. | |
| The door is not closed correctly. Fully close the door. | |
| The fuse is blown. Make sure the fuse is the cause of the problem. If the problem recurs, contact a qualified electrician. | |
| The appliance Child Lock is on. Refer to "Menu" chapter, Submenu for: Options. | |
| Components | |
| Description | Remedy |
| The lamp is burnt out. Replace the lamp, for details refer to "Care and Cleaning" chapter, How to replace: Lamp. | |
| Power cut always stops cleaning. Repeat cleaning if it's interrupted by power failure. | |
| Problems with Wi-Fi signal | |
| Possible cause | Remedy |
| Trouble with wireless network signal. Check if your mobile device is connected to the wireless network. Check your wireless network and router. Restart the router. | |
| New router installed or router configuration changed. To configure appliance and mobile device again, refer to "Before first use" chapter, Wireless connection. | |
| The wireless network signal is weak. Move router as close to the appliance as possible. | |
| The wireless signal is disrupted by another microwave oven placed near the appliance. | Turn off the microwave oven. Avoid using another microwave oven and the Remote Control of the appliance at the same time. Microwaves disrupt Wi-Fi signal. |
12.2 How to manage: Error codes
When the software error occurs, the display shows error message.
In this section, you will find the list of the problems that you can handle on your own.
| Code and description Remedy | |
| C2 - the Food sensor is in the appliance cavity during Pyrolytic Cleaning. | Take out the Food sensor. |
| C3 - the door is not fully closed during Pyrolytic Cleaning. | Close the door. |
| F111 - Food sensor is not correctly inserted into the socket. | Fully plug Food sensor into the socket. |
| F240, F439 - the touch fields on the display do not work properly. | Clean the surface of the display. Make sure there is no dirt on the touch fields. |
| F601 - there is a problem with Wi-Fi signal. Check your network connection. Refer to "Before first use" chapter, Wireless connection. | |
| F604 - the first connection to Wi-Fi failed. Turn the appliance off and on and try again. Refer to "Before first use" chapter, Wireless connection. | |
| F908 - the appliance system cannot connect with the control panel. | Turn the appliance off and on. |
| When one of these error messages continues to appear on the display, it means a faulty subsystem may have been disabled. In such a case contact your dealer or an Authorized Service Centre. If one of these errors occurs, the rest of the appliance functions will continue to work as usually. | |

Code and description Remedy

F602, F603 - Wi-Fi is not available. Turn the appliance off and on.
12.3 Service data
If you cannot find a solution to the problem yourself, contact your dealer or an Authorised Service Centre.
The necessary data for the service centre is on the rating plate. The rating plate is on the front frame of the appliance cavity. Do not remove the rating plate from the appliance cavity.
We recommend that you write the data here:
Model (MOD.)
Product number (PNC)
Serial number (S.N.)
13. ENERGY EFFICIENCY
13.1 Product Information and Product Information Sheet
| Supplier's name AEG | |
| Model identification | BSE778380T 944188814 |
| BSK778380T 944188827 | |
| Energy Efficiency Index 61.2 | |
| Energy efficiency class A++ | |
| Energy consumption with a standard load, conventional mode 1.09 kWh/cycle | |
| Energy consumption with a standard load, fan-forced mode 0.52 kWh/cycle | |
| Number of cavities 1 | |
| Heat source Electricity | |
| Volume 71 I | |
| Type of oven Built-In Oven | |
| Mass | BSE778380T 36.5 kg |
| BSK778380T 36.5 kg | |
IEC/EN 60350-1 - Household electric cooking appliances - Part 1: Ranges, ovens, steam ovens and grills - Methods for measuring performance.
13.2 Energy saving

The appliance has features which help you save energy during everyday cooking.
Make sure that the appliance door is closed when the appliance operates. Do not open the appliance door too often during cooking. Keep the door gasket clean and make sure it is well fixed in its position.
Use metal cookware to improve energy saving.
When possible, do not preheat the appliance before cooking.
Keep breaks between baking as short as possible when you prepare a few dishes at one time.
Cooking with fan
When possible, use the cooking functions with fan to save energy.
Residual heat
If a programme with Duration is activated and the cooking time is longer than 30min the heating elements automatically turn off earlier in some appliance functions.
The fan and lamp continue to operate. When you turn off the appliance, the display shows the residual heat. You can use that heat to keep the food warm.
When the cooking duration is longer than 30 min, reduce the appliance temperature to minimum 3 - 10 min before the end of cooking. The residual heat inside the appliance will continue to cook.
Use the residual heat to warm up other dishes.
Keep food warm
Choose the lowest possible temperature setting to use residual heat and keep a meal warm. The residual heat indicator or temperature appears on the display.
Cooking with the lamp off
Turn off the lamp during cooking. Turn it on only when you need it.
Moist Fan Baking
Function designed to save energy during cooking.
When you use this function the lamp automatically turns off after 30 sec. You may turn on the lamp again but this action will reduce the expected energy savings.
14. MENU STRUCTURE
14.1 Menu
| Menu item Application |
| Assisted Cooking Lists automatic programmes. |
| Cleaning Lists cleaning programmes. |
| Favourites Lists the favourite settings. |
| Options To set the appliance configuration. |
| Settings Connections To set the network configuration. |
| Setup To set the appliance configuration. |
| Service Shows the software version and configuration. |
14.2 Submenu for: Cleaning
| Submenu Application |
| Tank emptying Procedure for removing the residual water from the water drawer after use of the steam functions. |
| Pyrolytic cleaning, quick Duration: 1 h. |
| Pyrolytic cleaning, normal Duration: 1 h 30 min. |
| Pyrolytic cleaning, intense Duration: 3 h. |
| Descaling Procedure for cleaning the steam generation circuit from residual limestone. |
| Rinsing Procedure for rinsing and cleaning the steam generation circuit after frequent use of the steam functions. |
14.3 Submenu for: Options
| Submenu | Application |
| Light | Turns the lamp on and off. |
Submenu Application
Child Lock Prevents accidental activation of the appliance. When the option is on, the text Child Lock appears in the display when you turn on the appliance. To enable the appliance use, choose the code letters in the alphabetical order. When the option is on, and the appliance is turned off the appliance door is locked. Access to the timer, the remote operation and the lamp is available with the option on.
Fast Heat Up Shortens the heat up time. It is available only for some of the appliance functions.
Cleaning Reminder Turns the reminder on and off.
Time indication Turns the clock on and off.
Digital clock style Changes the format of the displayed time indication.
14.4 Submenu for: Connections
Submenu Description
Wi-Fi To enable and disable: Wi-Fi.
Remote operation To enable and disable remote control. Option visible only after you turn on: Wi-Fi.
Auto remote operation To start remote operation automatically after pressing START. Option visible only after you turn on: Wi-Fi.
Network To check network status and the signal power of: Wi-Fi. Forget network To disable current network from auto connection with the appliance.
14.5 Submenu for: Setup
Submenu Description
Language Sets the appliance language.
Display brightness Sets the display brightness.
Key tones Turns the tone of the touch fields on and off. It is not possible to mute the tone for: ①
Buzzer volume Sets the volume of key tones and signals.
Water hardness Sets the water hardness.
Time of day Sets the current time and date.
14.6 Submenu for: Service
Submenu
Description
Demo mode Activation / deactivation code: 2468
Software version
Information about software version.
Submenu Description
Reset all settings Restores factory settings.
15. IT'S EASY!
| Before the first use you have to set: | ||||
| Language Display brightness Key tones Buzzer volume Water hardness Time of day | ||||
| Start using the appliance | ||||
| Quick start Turn on the appli-ance and start cook-ing with the default temperature and time of the function. | Step 1 Step 2 Step 3 | |||
| Press and hold: ① select the preferred function. | Press: START | |||
| Quick Off Turn off the appli-ance, any screen or message at any time. | ① - press and hold until the appliance turns off. | |||
| Start cooking | ||||
| Step 1 Step 2 Step 3 Step 4 Step 5 | ||||
| ① - press to turn on the appliance. | □... - select the heating function. | °C - set the tempera-ture. | OK - press to confirm. | START - press to start cook-ing. |
| Get to know how to cook quickly | ||||
| Use the automatic programmes to prepare a dish quickly with the default settings: | ||||
| Assisted Cooking | Step 1 Step 2 Step 3 Step 4 | |||
| Press: ① Press: . | Press: Assisted Cooking. | Choose the dish. | ||
| Use quick functions to set the cooking time | ||||
| 10% Finish assist Use 10% Finish assist to add extra time when 10% of the cooking time is left. | To extend the cooking time press +1min. | |||
16. ENVIRONMENTAL CONCERNS
Recycle materials with the symbol. Put the packaging in relevant containers to recycle it. Help protect the environment and human health by recycling waste of electrical and
electronic appliances. Do not dispose of appliances marked with the symbol with the household waste. Return the product to
your local recycling facility or contact your municipal office.
PARIMATE TULEMUSTE SAAVUTAMISEKS
KOPINCHNCHKA NOIDPIKAI CEPBNC
YBek Kopuncte opunHaJIHe pe3epBHe JeIOBe.
Kaanda KonhtaKtupate ObnaWheHn cepBnCHn ceHTap, BoNTe paUHa da KOD c6e HMaTe cIeDeHe noDatke: Moden, 6poj npOn3BoDa, cepNJcKn 6poj.
Iopaun Mory da ce npohay Ha nnouun ca texnukm kapaKtepncTKkama.
Uno3opehe/onpe3- nHopmaunje o 6e36eHocTn
OnuTe HOpMaunje n cabetn
HOpMaunjeOJNBOTHoJcpeINH
3aDpxKaHO npaBO n3MeHa.
CAДРЖAJ
- INHOPMALIJE O B6E3BEdHOCTN 394
2.BE3BENHOCHA YIYTCTBA 396 - ONIC PPOU3BOIDA 399
- KOMAHДHA TABla 401
5.IPE INPBE YNOTPEBE 402
6.CBAKOJIHEBHA YIOTPEBA. 404
7.ФУHKUJIE CATA. 409 - KAKO DA KOPNCTNE: PNUBOP 410
9.ДОДАТHEФУнкиIJE 412
10.KOPINCHN CABETI 413 - HEGA N U NHUHEBE 416
12.PELIABAHBE IPOBJIEMA. 422
13.EHEPRETCKA EOKACHOCT 424
14.CTPYKTKPA MEHINJA. 426
15.IAKOJEI 427 - EKOLIOWKA NITAHbA 428
1. HΦOPMAUJIJE O B6E3BEOHOCTN
Ipe nHcTanaJne i KopnshHeBa ypeJaja, naKbNBO npOHTajTe npINOxKeHO ynyTCTBO. IpOn3BoJau Hnje OndroBopan 3a 6nIO kaKBe NOBpeJe nII NSteTy KoJE cy pe3yIITaT HeNCnPabHe IHcTanaJne iIIN yNoTpe6e. CyBaJTe yNyTCTBO 3a yNoTpe6y Ha 6e36eDHom i npInCTyNauchom MeCTy 3a 6byHe KopnshHeJbe.
1.1 Be36eHocT deue n ocetJBnBnx oc06a
Obaj ypehaj mory da kopncte deca stapnja od 8 roDInHa n ocObe ca cMaJIbeHIM qn3nUckm, yJINHM nIIM MeHTaJIHIM cNooc6HoCTnMa, kao ocObe KoJIma HeIOCTajy NCKyCTBO n 3HaJIbe, yKoJIHKo IM ce obe36eDi Ha3Op IINI mCe dajy UnyTCTBa y Be3n ca ynoTpe6om ypehaja Ha 6e36eDaH Naun H yKOJIko CXBaTajy Moryhe onacHocTn. Deuy mlaHa od 8 roDInHa, kao n ocObe ca BeOMa TeWKIM n CIOJKeHIM INHBAJIndTeTom, Tpe6a dpjkatn daJIbe od ypehaja, oCIM aKO cy IOd cTaJIHIM Ha3OpOM.
- Децу Треба КонтPORINCSATи Кадо се He 6и urpaJa ca ypeнajem И мбилним урнajima ca My AEG Kitchen .
- ДожиTe cBy ambaJxу daJIbe od Deue n OndnoJte je Ha odroBapajyHn haunH.
- UПОЗОРЕБЕ:Урегajи НBEROBNdoCTуПнДeЛOBN MOry 6NTI BpeJI N TOKOM KOpuShHeBa.ДржITE deCy n KyHne JbYbIMcE daJIbe od ypeJaja KaJa ypeJaj paDi n KaJa ce XlaIaI.
- Ako obaj anapatima ypehaj 3a 6e36eHocT dece,Treba ra aKTHBnpaTN.
- Deça He cmejy da obabjajy yniushnebe n KOpncnUko odpxaBaBe ypehaja 6e3 na3opa.
1.2 Onstemepe 6e36eHoctn
ObajypehajjeHaMeHbeHcMo3a KyBaHbe.
Obaj ypehaj je hamehen 3a ynoTpeby y jeHOM domaHHCTBy y 3aTBOpEHm npocToPIma.
- Ypehaj ce moxe kopnCTHTy KaHcJIapnJaMa, XOTeJCKM c6bAma, MToTeJIMa, NaHCNOHMa, CEOCKM TypnCTNkM domaHnHCTBIma n CInuHm ObjKTIma 3a CMeWtaj rDe yNoTpe6a He 6n npeBa3nla3nla (npoceaH) HnBO NOTPOShBe NO domaHnHCTBy.
- Camo KBaIIINΦNIOBAHa OC6a MoKe Da MOHTnPa OBajypehaj n 3aMeHn Ka6I.
He kopnstte obaj ypehaj npe Hero wTo ra yrpadnte. - Iscjbyuhte ypehaj n3 ctpyje ppe 6nlo kaKBor odpxaBaHa.
- YkoIIko je ka6I 3a HanajaJIbe oUTeHEn, Hera Mopa da 3aMeHn npOn3BoJau, OndroBapajyHn OBlauHEn cepBnCHn ceHTap nIi IIna CInuHne KBaINΦnKauzJe, KaKo 6n Ce n36eIgA eJekTpnuHa onaCHOCT.
-УПОЗОРЕБЕ:Уверпеса je урегaj Искъун пе Heroшто заментсидаюкбисту могуностда doнуdo elektpruHorшoka. - UПОЗЕРБЕ: Урегaj И НBEROBи ДОCTУПНи DeJOВи могу ьNTи Врели TOKOM Коршнeьа. Тpeба ВODИТи рачуна за се ИЗБERHe ДОДИРИВaHе ГеиХ eЛeMeHатЯ Или унуТрашьnx NOВршINA anapata.
- KaDa BaAnTe npi6op iIi nocyHe i3 pepHe iIi nx CTaBbATE y pepHy, yBeK HocInTe 3aUHTTHe pyKaBnCe.
Kopnstte camo TemnepaTyprHn ceH3Op (ceH3Op TemnepaType y cpeINH nneHOr meca) koJn je npenopyuEn 3a OBaj ypehaj. - Да бисту уклонллшине koje држе peшетke, npBO NOBYUHTe npedbI Deo shHa, a 3aTm 3aIbI Deo da 6nCTe Ix OndBojnlO od 6ouchnx 3nOBA. NocTaBJaIbe shHa 3a PODpShKy peWetKe BpShI ce o6phytM peDocJIeDom.
- Hemojte kopnstintn napounctay 3a ushnebe ypehaja.
-
Hemojte kopncnttu rpy6a abpa3nBha cpeicTba 3a ushnebe nnn oostpe metaIHe cyhhepe 3a ushnebe ctaKneHx Bpata jep OHI Mory n3rpe6bTu NOBpunHy 360r Yera Moke dohni do pacnpckaba bTaKna.
-
Ппрпролитчког чишени, уклонITE cab ппбор n3 pepнe, kao И OCTаТke xpaHe Ил Масноне koje cy псocуTe/ hataложене yHyтap уpehaja.
2.БE3БЕДHOCHAУПТCTBA
2.1 MoHTaKa

YNO3OPEHBe!
Cama KBaJIuΦnKOBaHa ocOba moKe da HCTaInpa OBaj ypehaj.
- YKJIOHIne KOMnIeTHy am6aIaxy.
- HemojTe Da uHCTaIupate nn KOpNCtnte oWtehen ypehaj.
-Пидржавajte ce уntctaba 3a montupahe koje cte doobun y3 ypehaj. - YBek Bodinte paCyHa npiJNKOM
nomepaHa ypehaja 3aTo wTo je TeXaK.
YBek Kopuncte 3aWHTHe pyKaBnCe n
3aTBOpeHy o6yHy.
He ByuTe ypehaj 3a pyuCy.
-Инста пajte уpehaj Ha cnryphno n прикладно Mectо Koje ИспуньаВа 3axTeBe 3a Иста пци. -Инста пци.
HeonxodNo je npndpkaBaTu ce MInHmAnHOr pactoJaBa oD pyrnx ypehaja n Kyxnbcknx elemehata. - Ppe montaxe ypehaja, npOBepnte da Jn ce Bpata ypehaja otBapajy 6e3 3aDpshke.
Obaj ypehaj je onpemJbeH cncTeMOM 3a eNeKtpnHo xnaheBe. Mopa ce ynotpe6babaTn ca n3BOpom eNeKtpnHOr HanajaHa. - YrpaheHa jeDHHuMa Mopa Da 3aDobBoJn 3axTeBe cTaBnHocTn npema DIN 68930.
| Минимална висина ку- хиьског[eleme ntа (Minи- мална висина[eleme nta испов радне почe) | 578 (600) mm |
| ШирINA кушильског[ele- mentа | 560 mm |
| Дубina кушильског[ele- mentа | 550 (550) mm |
| Висина пedingе.stранe уPECHA | 594 mm |
| Висина заinderе.stранe уpe- нaja | 576 mm |
| ШирINA пedingестраhoe ypeña | 595 mm |
| ШирINA задөестраhoe ypeña | 559 mm |
| Дубina урêнaja 567 mm | |
| Дубina уграğеног урêнaja 546 mm | |
| Дубina са OTворець вра-tima | 1027 mm |
| Минимална велочиna венилальог OTвор поставъен на дo-нык 3адъов страви | 560x20 mm |
| Дужina kaбла за Hanajah. Kaşл je поставъен у.deсhom углу са задөестраhoe | 1500 mm |
| Мontaxни за BPтөн 4x25 mm |
2.2 PpNKbUyeHbe Ha eJeKtpnHy MpeKy

YN03OPEHBe!
Pn3nk oJ noXapa n cTpyjHOr ydaipa.
Cba npKbUyHbHa cTpyje Tpe6a da oabn KBaIINΦNKOBaH eNeKTpUap.
- Ypehaj mopa da 6ynde y3embeH.
- YBepnte ce da cy napaMeTpHa nIOounca TexHnUkIM KapaKTepnCTnKaMaKOMNaTn6nHn ca OndroBapaJyHmnapaMeTpMa eJeKTpNHe MpeXe 3a HanajaHbe.
- YBek KopinTe npOnuCHO yrpaJehy yTnUHnCy ca 3aWTnTOM oD cTpjuHOr ydapa.
- HemojTe da KOpNCTnte aanTepe ca Bnwe yTuHnua n npOdyxHe ka6NoBe.
- PpOBepnte Da HnCTe OwTeTnHrIaBHO HanajaHe N Ka6n 3a HanajaHe. YKoNko CtpyJn Ka6n Tpe6a Da ce 3aMeHN, To
Tpe6a Da o6abn Haaw OBnaWheHn cepBnCHn ceHTap.
He do3BoJnte da Ka6n 3a Hanajahe Doi npyje nn Doh e 6nn3y BpaTma ypejaja nn Hnsn nCnoJ ypejaja, HapouHTo kaJa ypehaj paN nn KaJa cy Bpata Bpena.
3aHTnTa Oydapa DeNoBa NOD HANOHOM IIN3ONoBAHnx DeNoBa Mopa Da ce npuBpCTn TaKo Da He MoKe Da Ce yKnOHn 6e3 anata.
-ПрикьучITEглави Каблза Hanajahe Ha 3ндну утчнцуTekHa Kpajy nHctалачиke.Вонite paунада постю npinctу МржHom yтkaчу haKOH nHctалачиke.
Ako je 3nHa yTuHnua na6aba, HemojTe Da npKbuyjeTe mpeXn yTuKa.
He ByuTe Ka6n 3a HanajaBe KaKo 6nCTe NCKbUyn ypehaj. Ka6n nckbUynTe TaKO ITO he Te n3Byhny TnKauchyTuHnue.
Kopncntte camo ncnpaBhe paCTaBHe npekndaue: 3aWTnThe npekndaue, ocirypaee (ocirypaee ca haboem TpebaCKHyTu ca Hoca), ayTomatcke 3aWTnThe npekndaue n KOHTaKTope.
- Y eJektpnHoj nHcTanauJn Mopa NOCToJAtn paCTaBHN ppeKnJaU KoJn BaM OMOryHaBa Da nCKbYuHTe CBe fpa3e HanajaHa ypehaja. Pa3MaK n3MeHy KOHTaKaTa Ha paCTaBHom ppeKnJaU Mopa Da n3Hocn HajMaHe 3 mm.
-ПOTnyHO 3aTbOpNte BpaTa Ha ypehajy npe Hero wTO NOBExKeTe MpeXHn yTnKaU y 3nDHy yTnHuNcy.
- Ypehaj ce ncnopuyje ca ctpyjHm yTnKaueM n ctpyjHm Ka6lom.
2.3 Ynotpe6a

YN03OPEHbE!
Ioctoju pN3NK od nobpeHnBaHa, oneKOTnHa n cTpyjHor yapa nn ekCnNo3nje.
HemojTe da MeBaTe cneuKauJy OBOn ypehaja.
Bodnte paunha da OTbOpn 3a BeHTnnaucjy He 6dy 3anyueneH.
He octabjaje ypehaj 6e3 Hau3opa TOKOM paJa.
- Ypehaj Tpe6a NCKJbUHTN HAKOH CBAKe ynoTpe6e.
-Будnte onpe3Hn kaD OTbapaTe Bpata ypehaja dok OH paH. MoKe ce deCHTn da n3aHe Bpeo Ba3dYx.
- HemojTe pyKoBaTn ypehajem KaJa cy Bam MOKpe pyKe IJI KAda je OH y KOHTaKTy ca BODOM.
Hemojte n3naaratOn OTbopeHa Bpata BeNIKOM ONTepeHeHy.
- Hemojte Kopunctu ypehaj kao paHy NOBpUnHy nnn npocTOp 3a oDnaraHe.
-ПажьиBO OTBOPnte Bpata ypehaja. Kopuшнebe cactojaka Koju caapke aKoxOJ MOKe DoBecTn Do nCnapaBaHa aKoxOJa N MeShaHa Ca Ba3dYxOM.
Bapnue nn OTbopeHn PamaHn He cmejy da 6ydy y 6nn3HH ypehaja kada OTbapate Bpata.
3anaBnBe MaTepeJne nn npeDMeTe HATOnJIbeHe 3anaJBnBM MaTeepNJama HEmoJte CTaJBbATn yHyTap n OpeEdypehaja nn Ha hera.
He denite cboj yo3nHy 3a Wi-Fi.

YN03OPEHbE!
- Aytomatcka TeKHa
Tempeatypn ceh3op
CTeneHdoKorcejeno KyBa:
Cna6o neueho nn Mahe
CpeHba
-Добpo neyuEno nIn Bnse
Kopak 1 YkbyuTe pepHy.
Kopak 2
PnTnCHnTe:
Kopak 3

Hecnte: POnnomOrHyTa npnPema.
Kopak 4 I3a6epnte jeNo unu BpcTy xpaHe.
Kopak 5
PnTnCHNe: START
6.4Функцииje 3arpeBaHa
CTAHДAPДHO
Функциja 3arpeBa- hba
PpimMeHa

TpnoIbAbe
3a rpnOBaBe TaHKx KOMaJa XpaHe N TocTupaBe XJe6a.

Typ6o rpnIOBaHbe
3a neuehe BeJnKnx KOMaJa Meca Nn JxNBHe ca KOCTMa Ha jeJHOJ peWetKn. 3a cnpeMaBe rpaTnHpaHnx jeJa n 3a 3aneaHe.

Ipehey3 paBn BeHTNJ.
3a neuehe Ha hajBnIe Tpr noJoxaja peWeTke nCTOBpeMeHO 3a cyuHe xpaHe. IOnecnte temnepatypy da 6yde Hxka 3a 20 - 40^ Hero 3a 3arpeBahe oOo3ro/oOo3- do.

Cmp3HyTa xpaHa
3a npnpemy nonycnpembehe xpahe (Hnp. nompnta, nceehor kpmnpa nn nponehnhx poHHuca), tako da bye xpckaba.
| Функциja загрева- ньa | Применьа |
| 3агреваные одозно/ одозно | 3a Neuchны на юедом поожау рештke. |
| Функциja за пицy | 3a Neuchны пиц. 3a Иntehзевно заразаны иdoesnojaны xрскавor дha. |
| 3агevaные одозdо | 3a Neuchны колача сахсандом и за конsterreichаны xpahe. |
| Диазаные ТECTa | 3a убразаныеdoesa-ba KBachor ТECTa. Спраза вда се поbrшни ТECTa осUALI n Чува сл actuhoct TECTa. |
ДЕЛИКATEСИ
| Функциja загрева- на | Применьа |
| Конsterreichе | За конsterreichа не ровен (нг. Киселх крастава). |
| Сушени | За сухе为其 сецаног boиа, повен и песурки. |
| Загеваяnotocунa | За загеваяnotocунa посунa在此之前 сөрва. 3a odмзава为其 xpane (повен и boиа). Вreme odмзава为其 завис等相关 Клични. Велични Смрзуне xpane. |
| Одмзава为其 | За юеда кaoшито су лаза为其 щогину ворьни Компир. 3a срета为其 ратину ворьни. ял и за зале为其. |
| Гразинуно | За пinnemа为其 меког, сочог песен. 3a пinnemа为其 mekog, сочог песен. |
| Споро КУвайе | |
| Функциja загрева- нba | Примана |
| Одожаваные топлote | За одахаваные топлoteхранe. |
| Влajно пechеу y3 Вentлиатop | Ова Функциja je р dedвићена за уштени за уштени eнерг范围内 током кува. Када користо obу Функциju, Temпера typа унтуарRepне моче за се разлесу щд за вада луtempe- patуе. Корustи се застana топлота. Charga загевая моче бити умањени. 3a Виши пофорmaциja погледajte поглавье „Сваконhevна уnotреба", наразмене у (beзи са: Влajно пechеу y3 вentлиатop. |
IAPA
8.2 Tempeatypn ceh3op
Temnepatypn ceh3op - MEPn Temnepatypy yHytap xpaHe. Moxete da je kopncntte ca cBAkOM fynKunjom 3arpeBaHa.
| Треба за ce поесе дve Temперatype: | |
| °C Temперatypeerveрнe: минимуm 120°C. | N Temперatype y spreдини. |
| 3a Hajболье peзултыte Кубаба: | |
| Састочи Треба за Будун на соб hoject Temпера typ. | He корисITE за Тechа ѷа. Током Куба мора за OCTане унтуархаце. |
Pepha n3paunHaba npn6nnKHO BpeMe 3aBpWeTka neeHa. Oho 3aBnCn od kOJIuHHe xpaHe, noDeSeHe fynKUnje pepHe n TempepaType.
Kako da kopnstte: Tempepatyn ceH3Op
Kopak 1 YkbyuHTe pepHy.
Kopak 2 Pioecnte cyHkujy 3arpeBaHa n no noTpe6n Tempeatyppepe.
Kopak 3 IocTaBnTe: TempepatpHn ceH3Op.
Meco, KnuBnHa n pnb Kacepola
Y6aunTe Bpx Temnepatypn HcH3Op y cHTap meca, pue, ako je moryhe y hajdebni deo. BoNTe paUHa da 6apem 3/4 Temnepatypn cH3Op 6ynde yHyTap jena.
Y6aHTe Bpx TemnepatypHn CeH3Op TaHNO y ceHTpy Ka- cepone. TemnepatypHn ceH3Op Tpe6a da CToJn Cta6nHNo Ha jeHOM MeCTy Tokom NeueHa. Da 6ncTe To NoctuN, KopnCTte YbpcTe cacTojke. KopnCTte NbUy nocye 3a neueHe kao OcnoHaц 3a cnNkoHcKy puuTy TemnepaTyrHn ceH3Op. Bpx TemnepatypHn ceH3Op He Tpe6a da DoDnpyje dHO nocye 3a neueHe.

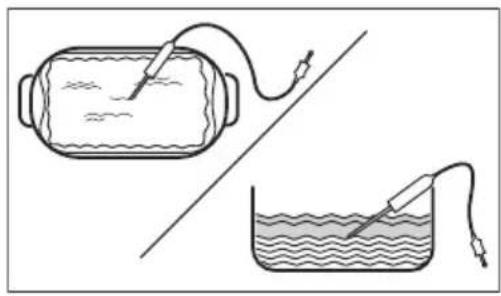
Kopak 4 Pnikbvynte TemnepaTyprHcEH3Op yTuHnUc npde hce cTpaHe neHnue.
Диспгел npнka3yje TpeHy TemnepaTypy: TemnepaTyprHcH3Op.
Kopak 5

- npTnCHHe Da 6nCe Te nOecuIn TemnepaType cH3opa yHyTap xpaHe.
Kopak 6
- npntncnTe da 6ncte noDecnn JKeJbeHy onuiny:
Ornacn 3ByHn CnHaJ - KaJa XpaHa DocTnRHe NoDeWeHy TempeaTypy, yJe ce 3ByHn CnHaJ.
Ornac 3ByuHn CnHaI n 3ayctabn npnpemy - KaJa XpaHa DocTnHe noDeeHv TemnepaTypy, yje ce 3ByuHn CnHaI n pepHa pectaje ca paDom.
Kopak 7
I3a6epnte onuju y y3acToHn npTuChnTe: Ja 6nCTe npeuHa rTaBn eKpaH.
Kopak 8
PnTnCHnTe:START
Kada xpaHa doCTurHe noDeWeHy TempeAtpy, yye ce 3ByuHn ciHan. MoKeTe n3a6paTn da npkeKInHeTe uNn da HacTabnte ca KyBaHem KaKO 6nCe 6nnn ciRyPn da je xpaHa do6po ckyBaHa.
Kopak 9 IV3ByuTe TempepaTyprHn ceH3Op yTuKaU n3 yTuChNc e n3BaJnte jeIo n3 neHnIe.

YN03OPEHbE!
Ioctoj np3nk od onekotnHa jep TemnpaTyprn ceH3op noctaje BpeNo. ByDNTe naKbNBn Kaada ra nckbuyjete N BaNTe n3 jena.
9.ДОДАТHEФУнкиIJe
9.1 Kaoko Da cayuBaTe: OmnBeHo
Moxete cauyBaTH omJbeHa noDeuBaHa, kao 1TO cy yHKnJa 3arpeBaHa, Bpeme
KyBaHa, TempepaTpa NJIu FyHKnJa
UnshHeBa. MoXeTe da caUyBaTe 3 omJbEHa
NoDeUaBaHa.
Kopak 1 Ykbyynte anapat.
Kopak 2 3a6epnte keJbeHo noDeaabaHe.
Kopak 3
PnTncHnte: 43a6epnte: OmIbeHo.
Kopak 4 N3a6epnte: CaCyBaj TpeHyTna noDeuBaHa.
Kopak 5
PnTnCHnTe + da 6nCTe doaann noeaaBaHe y ncty: OmnBeHo. PnTnCHnTe
OK

- npntnchnte da 6ncte noHnHTnIINoDeaBaHe.

- npntnchnte da 6ncte oTKa3aann noedeaaabahe.
9.2 KoHTpoJHa 6paBa
ObaФункиJA cnpeayaba cnyaJHy npomEny ФункиJe 3arpeBaHa.
Kopak 1 YkbyuTe anapaT.
Kopak 2 POndecnte yHKnjy 3arpeBaHa.
Kopak 3

Inpntnchnte nctobpeMeHO paN yKbYuNbBa bAa FyHKnJe.
Da 6nCTe NCKJbUyHInI ΦyHKUnjy, NOHOBtE KOPaK 3.
9.3 AYToMaTcKO NcKJIbUyINBaHbe
I3 6e36eHocnHex pa3nora ypehaj ce NCKbuyje HAKOH HeKOr BpeMeHa aKO cyHKuJa 3arpeBaHa paN, a BN He npomehnte noDeWabHa.

(°C) (4)

30-115 12.5
120-1958.5
200-2455.5

(°C) (4)

250-MakcunmaHIO3
AyTomatcko NCKbUyHbAHe He paDi ca cyHKnJaMa: CBeTIO, TempeaTyPhN ceH3Op, Kpaj, Cnpo KyBaHe.
9.4 BeHTnlaTOp 3a XnaHeBe
KaDa anapat paDi, BeHTnIaTOp 3a XnaHebe ce aYtomatcKn yKbUyJe KaKO 6u XnaIIO NOBpUnHe anapata. Ako NckbUyHte anapat, BeHTnIaTOp 3a XnaHeBe MoKe Da HacTabN da paDi DOK ce anapat He oxJaN.
10. KOPINCHN CABETN
10.1 Пpenopyke y Be3n ca neyeHbem

Temnepatypa n Bpeme KyBaHa HabedeHn y Ta6eIama cy camo opjehTaunOH. OHn 3abnce od pecenata, KaJIHTeta n KOJIUNHe yNoTpe6bEHNx cactoJaka.
Baw anapat mojda nehe ha dpyraunn hauin y odnoy ha ypehaj kojn cte paHne noceobann. Cabetn nocnnpka3yju npenopyuHa noedeuaba 3a Temnepatypy, BpeMe KyBaHa n noJoxaj peWetke 3a oDpehehe Bpcte xpaHe.
Ako He MokeTe Da npohae Te NoeWabha 3a odpehen peent, nToPakKeTc 3a cnuaH. JoI npnpenopyka y Be3n ca KyBaHem MokeTe Hahn y Tabenama 3a KyBaHe Ha HauoJ Be6 cTpaHn. Da 6nCTe npohawm OndroBapajyhe Cabete 3a KyBaHe, norneJaTe PNC 6poj Ha nOuHnCa texHnKIM KapaKTePncTnKaMa Ha npedbem OKBnpy yHytpaHbocn ypehaja.
Anapat ce He yKbUyJe nn He 3arpeBa

Moryhny3pok

Pewebe
Ypehaj Hnje npKbyyeh Ha eNeKtpuHc HanaJaHe nn Hnje npabunHo npKbyyeh.
PpOBePte da nn je ypehaj npabunHno yKbUyeH y cTpyjy.
Cat nije nopeuen. Noecnte cat, 3a deTaBe norJeajTe FyHKnje cata
nornabbe,Kako da nodeceTe:ΦyHKuJe cata.
Bpata Hncy npabunho 3aTbopena. Ckp03 3aTbOpTe Bpata.
OcIpyaJe npereopeo. IpoBepuTe da ocIpyaup Hne y3pok npo6nema. YkOni
Ko ce npoblem noHabJb, no3OBnTe OBnaUHeHOr eNeKtpuapa.
Ypehaj 6nok. 3a 6e36. deue je ykbyeuH. NOrneJaTe Oderbak,Meu", noDMHeH 3a: OnuJe.

KOMIOHEHTe

Onnc

Pewebe
Iamnua je nperepeHa. 3aMeHnte lamnuy, nojeHHocTn notpaXnTe y oedb- Ky ,Hera n uuShHe, Kako 3aMeHnTu: Cnjaiua.
IpeknH HanajaHa yBek IpeKnDa YnshHeBe.
NoHOBIne YnshHeBe aKO je IpeKHyTo 36or
HeCTaHka cTpyje.

PpO6nemncaWi-Fi cunrHaNoM

Moryhu y3pok

Pewebe
Прблелм ca 6жнчим Мржнс сгналом. Провете ду ще ваш мбину уpeйaj noBe3an ca 6жнчHom Мржхom. Провете 6жнчну мржу npTep. PectapTuJTe pyTep.
HCTanipah je HOBN pyTeP uNJe npomeHeHa KOHpyraqna pyTepa.
Ia 6nCTe noHOBO KOHOFnrgpucann anapat mMOHNHypehaj, nOrneajTe oedbak ,Ppe npBe ynoTpe6e", BeKnHa Be3a.
Cunhan 6eKnue MpeKe je cna6. NopemrTe pyTe wTo 6nKe anapaty.
MnKpoTanacha neHnua noCTabBeHa 6n3y anapata ometa 6ekuHn cnHnI.
Yracnte MnkpoTanachy nehNcy.
I36erabajte nCTOBpeMeHO KOpuHHeBe MnkpoTanache
nehNuce n daBnHcKO ynpaBbahe anapaTom. MnkpoTanacn npekndajy Wi-Fi cnrhan.
12.2 Kaoko da noctynate y cnyajy: Unppe rpeke
KaDa dohHe do coTbepcKe rpeuKe,Ha dinCnIeju ce npka3yje npyka o rpeu. YOBOM OdeBky Hahn hete ncty npoblema koje moxete camn da peuHTe.

Upa n onnc Pewehe

C2-TemnepaTyPhN cEH3Op je y uynbHn ypehaja ToKOM HnpoJNTuKo YnshHeBe.
I3BaInte TempeaTpHn ceH3Op.
C3-Bpata Hncy Do Kpaja 3aTBoPeHa TOKOM NiponNTNUKO YnshHe.
3aTBOPnTe Bpata.
F111-Tempeatypn ceH3Op Hne npabnHo ybaeH yyTuHnUy.
Do kpaja y6aunTe TemnepaTyPhn ceH3Op y yTuHnUy.
F240, F439 - noJb oceTJBnBa Ha doOp Ha dinCnJejy He paIe npabuHNo.
OuHCTIte NOBpUHy dncJIpeja. YBepHTe ce da Hema npJbABWTInHe Ha NOpbMa OCETJBNBIM Ha DoDnP.

Upa n onnc Pewehe

F601 - noctojn npo6nem ca Baj-phij cunHanom. PpOBepnte BaUy MpeXHy Be3y. NOrIeJaTe OJeBak, "Ppe npBe ynoTpe6e", BekuHa Be3a.
F604- npBo ycnoctabbahe Be3e ca Baj-phiJ Hnje ycneNo.
Nckbnyte anapat uykbynte n nokywajte noHOBO.
IornejaTe oJeBak, Ppe npBe ynoTpe6e", BexnHa
Be3a.
F908 - cntem anapata He moke da ce noBexe ca KO-maHdHOM Ta6nom.
Nckbynte nykbynteypehaj.
Kada ce jegна od obnx nopuya o rpeuyn i daJIe nojabbyje Ha dincnejy,To 3naU da je HeincnpabaH nOcncTeM MOxda OHemoryhen. Y Tom cIyauy, obpatnte ce BaIe m npoDauy IIN OBnAshen CepBnCHOM CEHTpy. Ako ce nojabn Heka od obnx rpewaka, octaje fynkunje anapata HacTabnHe da paDe kao n ObuHNo.

Upa n onnc Psehe

F602, F603-Baj-phij Hnje DocTyHNO. Nckbyynte n yKbyynteypehaj.
12.3 Poida n o cepBncnpaHy
YkoNko He Moxete camn da npohae pewebe npobema, obaTte ce npodabuy nnn OBnaushenom cepBucHom ueHtpy.
Iopau npTe6Hn cepBnCHOM ueHTpy HaJana3e ce Ha IIOuHcN ca TeXHnUKM
kapaktepnctkama. IIOuHua ca TexHnUKM kapaktepnctkama HaJana3n ce Ha npedBoj cTpaHn OKbnpa yHytpaushoctn anapata. HeMoJTe yKnaBaTN IIOuHcy ca TexHnUKM
kapaktepnctkama n3 yHytpaushoctn anapata.
Ppenopyyjemo Bam da OBne 3anuwe Te noaTke:
Moden (MOD.)
Башлары(PNC)
CepnjcN 6poj (S.N.)
13. EHEPΓETCKA ΕΦιNKACHOCT
ParaOLLOWING THE CHAMPIONES.

Calientaplatos
11.9 Como guitar e instalar: Puerta
11.10 Comoonian: Bombilla

ADVERTENCIA!
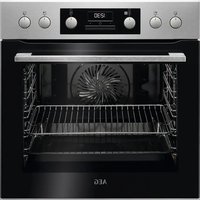
- OBCJNYXBAHE HA KJIneHTN
- CbDbPjKAHNE
- UNHΦOPMAÇNЯ 3A BE3OÑACHOCT
- БezonaachocT 3a Deça n Xopa B HepaBHOCTOHO NOLOXeHne
- Ośza 6e3o nanopoc
- INHCTPYKUN 3A BE3OJACHOCT
- 2.1Инстация
- BHIMAHNE!
- EneKtpnuecko CBbp3BaHe
- V3noJ3BaHe
- Ctbnka 5
- CtpaHnUHa lamna
- OTCTPAHRAHE HA HEN3ПРABHOCTN
- KaKa Da NoctbNITe, aKO...
- EHEPΓΗΑ ΕΦΕKTΝΒΗΟCT
- INHOpMaun 3a npOyKta INHOpMaunHeN IInCT 3a npOyKta
- ПобMuно 3a: Habtroponka
- IopMeHIO OnncAHne
- SVAKODNEVNA UPORABA
- UPOZORENJE!
- CUSTOMER CARE AND SERVICE
- CONTENTS
- SAFETY INFORMATION
- Children and vulnerable people safety
- General Safety
- SAFETY INSTRUCTIONS
- Installation
- WARNING!
- Electrical connection
- Use
- Care and cleaning
- Pyrolytic cleaning
- Steam Cooking
- Internal lighting
- Service
- Disposal
- 3.PRODUCT DESCRIPTION
- General overview
- Accessories
- Wire shelf
- Baking tray
- Grill-/Roasting pan
- Food sensor
- Telescopic runners
- CONTROL PANEL
- Control panel overview
- Display
- Display indicators
- OK
- Timer indicators
- BEFORE FIRST USE
- Initial Cleaning
- First connection
- Wireless connection
- Software licences
- Initial preheating
- DAILY USE
- How to set: Heating functions
- How to set: Steam heating function
- How to set: Assisted Cooking
- Heating functions
- STANDARD
- Heating function Application
- SPECIALS
- STEAM
- Notes on: Moist Fan Baking
- CLOCK FUNCTIONS
- Clock functions description
- How to set: Clock functions
- HOW TO USE: ACCESSORIES
- Inserting accessories
- Wire shelf:
- Food Sensor
- There are two temperatures to be set:
- C
- #
- For the best cooking results:
- How to use: Food Sensor
- Meat, poultry and fish Casserole
- ADDITIONAL FUNCTIONS
- How to save: Favourites
- Function lock
- Automatic switch-off
- Cooling fan
- HINTS AND TIPS
- Cooking recommendations
- Moist Fan Baking
- Moist Fan Baking - recommended accessories
- Cooking tables for test institutes
- CARE AND CLEANING
- Notes on cleaning
- How to remove: Shelf supports
- How to use: Pyrolytic Cleaning
- CAUTION!
- How to use: Dscaling
- Descaling reminder
- How to use: Rinsing
- How to use: Tank emptying
- Before you start:
- How to remove and install: Door
- How to replace: Lamp
- Top lamp
- Side lamp
- TROUBLESHOOTING
- What to do if...
- How to manage: Error codes
- Code and description Remedy
- Service data
- We recommend that you write the data here:
- ENERGY EFFICIENCY
- Product Information and Product Information Sheet
- Energy saving
- Cooking with fan
- Residual heat
- Keep food warm
- Cooking with the lamp off
- Moist Fan Baking
- MENU STRUCTURE
- Menu
- Submenu for: Cleaning
- Submenu for: Options
- Submenu Application
- Submenu for: Connections
- Submenu Description
- Submenu for: Setup
- Submenu for: Service
- Submenu
- Description
- IT'S EASY!
- ENVIRONMENTAL CONCERNS
- PARIMATE TULEMUSTE SAAVUTAMISEKS
- KOPINCHNCHKA NOIDPIKAI CEPBNC
- CAДРЖAJ
- HΦOPMAUJIJE O B6E3BEOHOCTN
- Be36eHocT deue n ocetJBnBnx oc06a
- Onstemepe 6e36eHoctn
- 2.БE3БЕДHOCHAУПТCTBA
- MoHTaKa
- YNO3OPEHBe!
- PpNKbUyeHbe Ha eJeKtpnHy MpeKy
- YN03OPEHBe!
- Ynotpe6a
- 6.4Функцииje 3arpeBaHa
- CTAHДAPДHO
- IAPA
- Tempeatypn ceh3op
- Kako da kopnstte: Tempepatyn ceH3Op
- Kopak 5
- Kopak 6
- Kopak 7
- Kopak 8
- 9.ДОДАТHEФУнкиIJe
- Kaoko Da cayuBaTe: OmnBeHo
- KoHTpoJHa 6paBa
- AYToMaTcKO NcKJIbUyINBaHbe
- BeHTnlaTOp 3a XnaHeBe
- KOPINCHN CABETN
- Пpenopyke y Be3n ca neyeHbem
- Kaoko da noctynate y cnyajy: Unppe rpeke
- Poida n o cepBncnpaHy
- Ppenopyyjemo Bam da OBne 3anuwe Te noaTke:
- EHEPΓETCKA ΕΦιNKACHOCT
- Como guitar e instalar: Puerta
- Comoonian: Bombilla
- ADVERTENCIA!
Brand : AEG
Model : BSE778380T
Category : Electric oven