
KA 4812 - Coffee maker SEVERIN - Free user manual and instructions
Find the device manual for free KA 4812 SEVERIN in PDF.
| Product type | Automatic coffee machine with grinder |
| Brand | Severin |
| Model | KA 4812 |
| Dimensions (W x H x D) | 215 mm x 430 mm x 315 mm |
| Weight | Approx. 4.4 kg |
| Power supply | 220-240 V~, 50/60 Hz |
| Power consumption | 850-1000 W |
| Water tank capacity | 1370 ml (10 cups) |
| Bean hopper capacity | 200 g maximum |
| Automatic shut-off | After 35 minutes |
| Main functions | Programmed brewing, coffee strength setting, grinder stop, adjustable grind level, permanent filter |
| Coffee type usable | Roasted beans or ground coffee |
| Maintenance and cleaning | Daily cleaning of removable parts, rinsing, descaling with vinegar |
| Available spare parts | Carafe (GK 5410), permanent filter size 4 (ZT 9064), Severin coffee (ZB 8688) |
| Safety | Drip-stop function, automatic shut-off, electrical and burn safety instructions |
| Warranty | 2-year manufacturer's warranty |
| General information | Manual available in multiple languages, Severin after-sales service |
Frequently Asked Questions - KA 4812 SEVERIN
User questions about KA 4812 SEVERIN
0 question about this device. Answer the ones you know or ask your own.
Ask a new question about this device
Download the instructions for your Coffee maker in PDF format for free! Find your manual KA 4812 - SEVERIN and take your electronic device back in hand. On this page are published all the documents necessary for the use of your device. KA 4812 by SEVERIN.
USER MANUAL KA 4812 SEVERIN
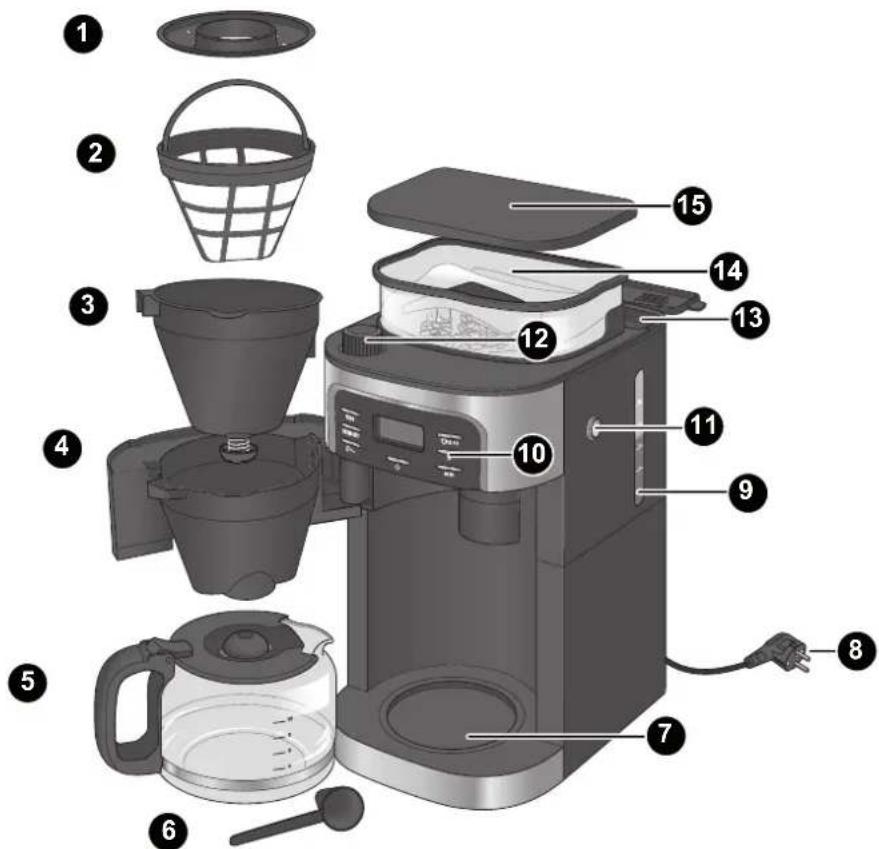
Fig. 1: Parts of the appliance
| PROG | Switch on programmed brew |
| GRIND | Switch off grinder |
| OFF | |
| 0+/- | Set coffee strength |
| Start brew | |
| 2-10 | Change number of cups |
| h | Set hour |
| min | Set minutes |
| 1 | Filter ring |
| 2 | Permanent filter |
| 3 | Filter insert with drip stop |
| 4 | Swing-out filter |
| 5 | Coffee jug |
| 6 | Measuring scoop |
| 7 | Hotplate |
| 8 | Power cord/plug |
| 9 | Water level indicator |
| 10 | Buttons |
| 11 | "OPEN" button |
| 12 | Grind regulator |
| 13 | Water tank |
| 14 | Bean container |
| 15 | Bean container lid |
SEVERIN
Table of contents
1 Overview 18
2 For Your Safety 20
3 Technical data 24
4 Preparing the appliance 25
5 Preparing coffee 25
5.1 With coffee beans 26
5.2 With ground coffee 27
6 Brew programming. 28
7 Cleaning the appliance 29
7.1 After brewing 29
7.2 Daily cleaning 30
7.3 Running water through the appliance 30
7.4 Descaling the appliance 31
7.5 Cleaning surfaces 31
8 Troubleshooting 31
8.1 Remedying problems yourself 31
8.2 Accessories and spare parts 32
9 Storage and disposal 32
9.1 Storing the appliance 32
9.2 Disposing of the appliance 32
10 Warranty 33
Dear Customers,
We hope you will enjoy your high-quality SEVERIN product and thank you for placing your trust in us.
The SEVERIN brand has stood for durability, German quality and development power for more than 120 years. Each appliance is manufactured and tested with care.
With the proverbial thoroughness, precision and honesty of the Sauerland, this family-owned company in Sundern has been winning over customers around the world since its establishment in 1892.
In the eight product groups coffee, breakfast, kitchen, grilling, household, floor care, personal care, and cooling & freezing, SEVERIN offers a complete range with more than 250 products. The right product for every occasion! Get to know the wide range of SEVERIN products: visit us at
www.severin.de or www.severin.com.
Your SEVERIN team
2 For Your Safety
Follow the operating instructions
Read the operating instructions completely before using the appliance. Keep the instructions in a safe place for future reference. If you give the appliance to somebody else, also give them the operating instructions.
Non-observation of these instructions can cause severe injuries and damage to the appliance.
Important notes for your safety are highlighted in the operating instructions as shown below. Be sure to follow these instructions to prevent accidents and damage to the appliance:
| WARNING! Indicates notes that must be adhered to in order to prevent the risk of injury or fatal injury. | |
| CAUTION! Indicates notes that must be adhered to in order to prevent the risk of material damage. | |
| TIP Emphasises tips and other useful information. |
Hazards for certain persons
Particular groups of people are at an increased risk:
- This appliance must only be used by persons with reduced physical, sensory or mental capabilities or a lack of experience and/or knowledge if they are supervised by a person responsible for their safety or if they have been instructed in the safe use of the appliance and have understood the risks resulting from the use of the appliance.
- This appliance must not be used by children. The appliance and its power cable must be kept out of reach of children.
Children must not play with the appliance. - Keep children away from the packaging material. It presents a suffocation risk.
SEVERIN
Correct use
WARNING: Misuse of the appliance can result in injuries. The appliance is designed solely for the purpose of brewing coffee from roasted, ground or whole coffee beans. Any other use is deemed improper use and can cause personal injuries and damage to the appliance. The appliance is designed for household use or use in a similar environment, e.g.
- in kitchens for employees in stores, offices and other commercial areas;
on agricultural estates; - by customers in hotels, motels and other residential facilities;
- in bed-and-breakfast facilities.
It is not suitable for commercial use, e.g. in the catering industry.
The appliance is not designed to be operated with a timer or separate remote control system.
Power
Since the appliance is operated with electrical current, there is a risk of receiving an electric shock. Be sure to follow the precautions mentioned below:
- Only connect the appliance to a properly installed, earthed safety outlet socket (minimum 10 A fuse). Do not use any extension cords or multi-outlet sockets.
- Only operate the appliance if the voltage specified on the rating plate matches the voltage of your outlet socket.
- Make sure that the power cord is not kinked or pinched and that the power cord and the appliance do not come in contact with heat sources (e.g. cooking plates, gas flames) or the hotplate.
- When you pull the power cord out of the outlet, always pull directly on the plug. Never carry the appliance by the power cord.
- Never immerse the appliance in water or other fluids, do not clean it under running water, and do not place it in the dishwasher.
- Never touch the power plug with wet hands.
-
Never operate the appliance outdoors.
-
Even when the appliance is switched off, the inside of the appliance is live as long as the power cord is plugged into the outlet socket.
- The appliance is only disconnected from the mains if the power cord is disconnected.
- Disconnect the power plug before you fill the appliance with water.
- Always unplug the appliance from the outlet socket after use.
- If a dangerous situation or defect occurs, unplug the appliance from the outlet socket immediately. For this reason, make sure that the outlet socket, to which the appliance is connected, is easily accessible at all times.
- Disconnect the power cord out from the socket before you clean or carry out maintenance work on the appliance, or when assembling or disassembling it.
- Never remove screws from the appliance to open it and never carry out any technical modifications.
Risk of scalding
The appliance heats up water and keeps it hot, thus posing a risk of scalding.
- A soiled outlet can cause hot liquid or steam to spray out. Make sure that the outlet is clean.
- Never open the swing-out filter while the coffeemaker is in operation.
- The hotplate is hot during and after operation. Never touch the hotplate while the appliance is on. Wait until the hotplate cools down.
SEVERIN
Poor hygiene
Bacteria can form in the appliance due to poor hygiene:
- Empty and clean the coffee jug, the filter insert and the permanent filter daily.
- Empty the complete appliance if you are not going to use is for a longer period of time.
- Change the water daily to prevent germ contamination.
- Clean the appliance regularly, "7 Cleaning the appliance" on page 29.
- Descale the appliance regularly, "7.4 Descaling the appliance" on page 31.
The use of improper cleaning agents harbours health risks:
- Only use the cleaning agents and utensils described in these operating instructions to clean the appliance.
Risks for the appliance
Damage can be caused by handling the appliance incorrectly.
- Place the appliance on a dry, level, non-slip, heat-resistant surface which will not react with the rubber feet.
- Never set up the appliance on a hot surface or near strong sources of heat.
- Do not allow the power cord to dangle to avoid a potential trip hazard.
- Only fill the water tank with cold, fresh tap water. Warm/hot tap water or other liquids can damage the appliance.
- Do not use caramelised or sugar-coated coffee beans.
- Do not use unroasted coffee (green, unroasted coffee beans) or mixtures containing unroasted coffee beans, as they can damage the appliance.
- Do not fill the coffee bean container with ground coffee.
- Before you stow the appliance, disconnect the power cord and let the appliance cool off completely.
In case of a defective appliance
A defective appliance can cause material damage and injuries:
- Always check the appliance for damage before use. In the event that you detect damage due to transport, immediately contact the dealer where you have purchased the appliance.
- Never operate a defective appliance. Never operate a appliance that has fallen down.
- If the appliance's power cord is damaged, it must be replaced by the manufacturer or their customer service department or a similarly-qualified person to prevent hazards.
- The appliance does not contain any parts that you can repair yourself. Repair work must only be carried out through SEVERIN customer service department (see "Service Centres" on page 192).
3 Technical data
| Type of appliance Coffee maker with grinder | |
| Appliance designation KA 4810 | |
| Voltage 220-240 V~, 50/60 Hz | |
| Power 850-1000 W | |
| Dimensions (W x H x D) 215 mm x 430 mm x 315 mm | |
| Weight approx. 4.4 kg | |
| Water tank 1370 ml (10 cups) | |
| Auto power-off after 35 minutes | |
| Identification | |
| Do not dispose of as household waste! | |
| The appliance conforms with all EU directives that are binding for CE certification. | |
4 Preparing the appliance
- Remove all protective films and other packaging material from the appliance.
-
Set up the appliance in a place that fulfils the following conditions:
-
Near a socket outlet with earthing contact (fuse at least 10 A)
Horizontal and free from vibration/shocks - Heat-resistant
- Does not react to rubber pads
- Away from heated or flammable surfaces and objects (>1m)
-
Away from walls (>15 cm)
-
Clean the appliance as described under "7.2 Daily cleaning" on page 30.
- Run water through the appliance as described under "7.3 Running water through the appliance" on page 30.
Setting the time

TIP
You must first set the time to ensure the programming function works correctly. If you do not wish to use this function you can skip setting the time.
- Repeatedly press the "h" button to set the hour.
- Repeatedly press the "min" button to set the minutes.
The time is now set.
5 Preparing coffee

WARNING!
Risk of scalding!
- Do not place parts of the body under the drip stop while the appliance is in operation.

CAUTION!
To avoid damaging the appliance only fill the water tank with cold tap water.

TIP
The display switches off 35 minutes after making coffee or, if coffee is not made, 1 minute after the last entry. To turn on the display again, press one of the buttons at the front of the appliance. Press the " button only when you wish to start brewing directly.

TIP
You can interrupt the brewing function at any time by pressing the " button. Water remains in the water tank when you interrupt the brewing function. Empty the water tank by removing the disposable coffee filter or permanent filter from the filter insert, placing the empty coffee jug on the hotplate and continuing operation after pressing the "GRIND OFF" button followed by the "
5.1 With coffee beans
- Remove the bean container lid 15.
!
CAUTION!
Do not use unroasted, caramelised or sugar-coated coffee beans.
- Add no more than 200g of coffee beans to the bean container 14
- Replace and firmly press down the lid 15
- Press the "OPEN" button 11 on the side of the appliance to open the swing-out filter 4.
- Place the filter insert 3 in the swing-out filter 4
- Place a disposable coffee filter in the filter insert 3
0
TIP
You can also use the permanent filter 2 instead of a disposable coffee filter.
- Fit the filter ring 1 onto the filter insert 3
- Close the swing-out filter
- Remove the coffee jug
0
TIP
Fill the coffee jug only up to the required number of cups as all the water is used for brewing. One cup is approx. 125 ml.
- Fill the coffee jug with cold tap water up to the mark for the required number of cups.
- Open the water tank 13
-
Pour the water into the water tank 13. Check the water level at the level indicator 9.
-
Close the water tank 13
- Place the coffee jug 5 on the hotplate 7
- Plug the power plug 8 into the socket.
The appliance switches on automatically. The time and the current settings are shown on the display.
- Press the "O 2-10" button to set the number of cups matching the amount of water.
- Press the +· button to set the strength of the coffee:
.
0: mild
: medium
:strong
- Press the " " button.
The LED next to the button lights up. The appliance starts the brewing process by initially grinding the coffee beans. The symbols appear on the display when the appliance starts brewing the coffee.
- Wait until the appliance beeps 3 times and the " ” symbol goes out.
The coffee is ready.
0
TIP
The coffee will be kept hot for 35 minutes if you do not press the " button after brewing.
SEVERIN
Adjusting the grind

CAUTION!
Adjust the grind only while the appliance is grinding the coffee beans otherwise the grinder may be damaged.

TIP
A fine grind is recommended for a light roast and a coarse grind for a dark roast. The roast is normally printed on the coffee packaging.
- Prepare coffee with coffee beans, "5.1 With coffee beans" on page 26.
- Wait until the appliance grinds the beans.
Fig. 2: Adjusting the grind
-
Set the grind regulator 12 to the required grind.
-
Turn the regulator clockwise towards “-” to grind the coffee finer.
- Turn the regulator anticlockwise towards "+" to grind the coffee coarser.
5.2 With ground coffee
- Press the "OPEN" button 11 on the side of the appliance to open the swing-out fi ler 4
- Place the fi Iter insert 3 in the swing-out fi Iter 4
- Place a disposable coffee filter in the filter insert

TIP
You can also use the permanent fi Iter 2 instead of a disposable coffee fi Iter.
- Add the ground coffee to the disposable coffee fiiter. Use the supplied measuring scoop ⑥ for this purpose. Refer to the following table for the required amount:
| Number of cups | Number of scoops |
| 2 1½-2 | |
| 4 3-4 | |
| 6 4½-6 | |
| 8 6-8 | |
| 10 8-10 |
- Fit the filter ring 1 onto the filter insert 3
- Close the swing-out fiiter 4
- Remove the coffee jug.

TIP
Fill the coffee jug only up to the required number of cups as all the water is used for brewing. One cup is approx. 125 ml.
- Fill the coffee jug 5 up to the mark for the required number of cups.
- Open the water tank 13
- Pour the water into the water tank 13. Check the water level at the level indicator 9.
- Close the water tank 13
- Place the coffee jug 5 on the hotplate 7
- Plug the power plug 8 into the socket.
The appliance switches on automatically. The time and the current settings are shown on the display.
- Press the "GRIND OFF" button to switch off the grinder.
The LED next to the "GRIND OFF" button comes on. - Press the "O" button.
The LED next to the button lights up. The appliance begins to brew the coffee and the symbol appears on the display. - Wait until the appliance beeps 3 times and the " ” symbol goes out.
The coffee is ready.

TIP
The coffee will be kept hot for 35 minutes if you do not press the " " button after brewing.
6 Brew programming

CAUTION!
Before brewing make sure that the appliance is put together correctly, otherwise the appliance may be damaged.
When you program the brewing function, the coffee maker will brew coffee to the programmed settings at the set time.
- Program the required settings for the brew, "5.1 With coffee beans" on page 26 or "5.2 With ground coffee" on page 27.
- Press and hold the "PROG" button for 2 seconds.
The time is shown flashing.
- Repeatedly press the "h" button to set the hour.
- Repeatedly press the "min" button to set the minutes.
- Press the "PROG" button to confirm your entry.
The current time and are shown on the display. The LED next to the "PROG" button comes on. The coffee maker will brew coffee to the programmed settings at the set time.
Press the "PROG" button again to switch off programmed brewing function.
The LED next to the "PROG" button goes out. Programmed brewing is switched off.
7 Cleaning the appliance

WARNING!
Risk of scalding!
Before cleaning: Unplug the power plug 8 from the socket and allow the appliance and its components to completely cool down (at least 30 minutes).

WARNING!
Risk of injury and damage to the appliance!
- Never immerse the appliance in water!

WARNING!
Health risks by use of incorrect cleaning agents!
Only use food-safe cleaning agents to clean the parts that come in contact with water and coffee.

CAUTION!
Do not use abrasive or aggressive cleaning agents or utensils that could scratch the surfaces. Do not put the appliance in the dishwasher.
SEVERIN
7.1 After brewing
- Make sure that brewing has finished and the appliance has cooled down.
- Press the "OPEN" button on the side of the appliance to open the swing-out filter 4
- Remove the filter ring 1
- Take out the filter insert together with the permanent filter or disposable coffee filter.
- Empty the coffee grounds out of the permanent filter 2 into the household waste or throw the disposable coffee filter together with the coffee grounds into the household waste.
- Rinse out the filter insert 3 and permanent filter 2 under flowing water.
- Allow the filter insert 3 and permanent filter 2 to dry before placing back into the appliance.
7.2 Daily cleaning
- Make sure that the appliance is switched off, has cooled down and the power plug 8 is disconnected.
- Press the "OPEN" button 11 on the side of the appliance to open the swing-out filter 4
- Remove the filter ring 1
- Take out the filter insert 3 together with the permanent filter 2
- Wash the filter insert 3 and the permanent filter 2 in warm water containing washing up liquid.
GB

TIP The filter ring 1, permanent filter 2 and filter insert 3 as well as the coffee jug 5 can also be cleaned in the dishwasher.
- Wipe the swing-out filter 4 with warm water containing washing up liquid.
- Empty the coffee jug 5
- Wash the coffee jug 5 in warm water containing washing up liquid.
- Wipe the hotplate with a damp cloth.
- Thoroughly dry all components before placing them back in the appliance.
7.3 Running water through the appliance
- Make sure there is no filter with coffee grounds in the appliance and the coffee jug is clean.
- Remove the coffee jug 5
- Fill the coffee jug ⑤ up to the "10" mark with cold tap water.

CAUTION!
To avoid damaging the appliance only fill the water tank with cold tap water.
- Pour the water into the water tank 13.
- Place the coffee jug ⑤ on the hotplate ⑦
- Plug the power plug into the socket.
The appliance switches on automatically.
- Press the "GRIND OFF" button.
The LED next to the "GRIND OFF" button comes on, indicating that the grinder is switched off. - Press the "O" button.
The LED next to the button lights up. The water heats up and runs through the appliance. Wait until all of the water has run through and the LED has gone out. - Press the "O" button to switch off the hotplate 7
- Empty and clean the coffee jug 5
7.4 Descaling the appliance
- Make sure there is no filter with coffee grounds in the appliance and the coffee jug 5 is clean.
- Remove the coffee jug 5
- Fill the coffee jug 5 up to the "10" mark with cold tap water.
- Pour the water into the water tank 13
- Pour 80 ml of vinegar into the water tank
- Place the coffee jug 5 on the hotplate 7
- Plug the power plug 8 into the socket.
A The appliance switches on automatically
- Press the "GRIND OFF" button.
A The LED next to the "GRIND OFF" button comes on, indicating that the grinder is switched off.
- Press the "O" button.
A The LED next to the button lights up. The entire water/vinegar solution runs through the appliance. Wait until all of the water/vinegar solution has run through and the LED has gone out.
-
Press the "O" button to switch off the hotplate 7.
-
Run water through the appliance, "7.3 Running water through the appliance" on page 30, to remove the remains of the water/vinegar solution.
7.5 Cleaning surfaces
Clean the surfaces of the appliance with a soft, lint-free cloth.
8 Troubleshooting
8.1 Remedying problems yourself

WARNING!
Risk of injury! The appliance does not contain any parts that you can repair yourself.
- Never attempt to operate a defective appliance.
- Never attempt to repair the appliance by yourself. If your appliance is defective, contact our customer service department (see "Service Centres" on page 192).
Before contacting our customer service, check with the aid of the table below whether you can remedy the problem yourself.
| Problem Cause | Remedy | |
| The appliance will not switch on. | The appliance is not connected to the power supply. | Plug the power plug into a socket outlet with earthing contact. |
| Coffee does not flow out of the outlet (drip stop). | Coffee jug not placed correctly under outlet. | Check that the coffee jug is placed correctly on the hotplate and that is presses up the valve in the outlet. |
| Problem Cause Remedy | ||
| Coffee is too watery. | Grind set too coarse. | Set the grind finer, ▷“Adjusting the grind” on page 27. |
| Too little ground coffee. | Refer to the measurement table, ▷“5.2 With ground coffee” on page 27. | |
8.2 Accessories and spare parts
GB
| Item number | Accessory/spare part |
| ZB 8688 | SEVERIN coffee 500 g, specially for Severin coffee makers |
| GK 5410 | Glass jug with lid |
| ZT 9064 | Permanent filter, size 4 |
9 Storage and disposal
9.1 Storing the appliance
- Clean the appliance, "7.2 Daily cleaning" on page 30.
- Store the appliance in a dry place.
9.2 Disposing of the appliance
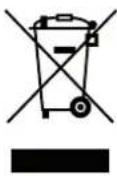
Appliances that are marked with this symbol must be disposed of separately from household waste. These appliances contain valuable raw materials that can be recycled. Proper disposal protects the environment and the health of your fellow men.
Your local authorities or dealer can provide information regarding proper disposal.
SEVERIN
10 Warranty
The legal warranty rights with respect to the seller and any seller warranties are unaffected by the following warranty conditions.
In case of warranty claim, contact your dealer directly. In addition, SEVERIN grants a manufacturer's warranty of two years from the date of purchase.
During this period, we will eliminate all defects caused by material or production faults that compromise the function. Other claims are excluded.
Excepted from the warranty are: Damage that is due to non-observation of the instruction manual, improper handling or normal wear; also easily-breakable parts such as glass, plastic or light bulbs. If the appliance is tampered with by persons not authorised by SEVERIN, this will render the warranty null and void.
If repair should be necessary, contact our customer service department per telephone or mail, see "Service Centres" on page 192.
1Vue d'ensemble
Chere cliente, cher client,
WAARSCHUWING!
Verbrandingsgevaar!
6 Programming at tilberedning. 107
7 Rengoring of apparatus 108
7.1 After tilberedningen 108
7.2 Daglig rengoring 109
7.3 Skylining af apparatet 109
7.4 Afkalkning of apparatus 110
7.5 Rengoring af overfladen 110
8 Fejlafhjaelping. 110
Ayatttn TELAATIOOa,ayatnt TEALATn,
aεuxóμαte va euxapiotnθeite to tioiTko Tpoiov ano tv oiko SEVERIN kai aac euxapiotoume yia nTv emtiooovn aoc.
H mapka SEVERIN eivai edw kai πeipaaotepa ano 120 xpovia to auuvu uo tns avtoxns, nC yepavikns troitntac kai ts avattugnc. KaTe ouakeun exkataaekuaotei kai eayxOe i oxlaotiká.
Me TnTAPoPiWiOn OxOaOTIKOTNa, Tn TPOAnOW OTN AETIOpeia KAI TnEIAKpiveia TnU XapaktnpiCEi Tn TEpioxn Tou Sauerland, n OIKoyEVEIAkN EITIXeipnan aTo Tn μkpni ToAe Sundern, aTo Tn iDpuan nTo 1892, TEI@Ei ME KAIVOTOpA TPOIovTa TEALATEs aTo bAoV tv Koo.
H SEVERIN TAPEXI JIA EUPEIA YKÁA PE TA TEPIOOTEPA ATO 250 TPOIOVTA WO KTOU OAOBOW TPOIOVTWY IA KAFE, TPWIVO, KOUÇIVA, MTAPTEKIOU, VOIKOKUPIO, φPovTiDA BATEBOW, TPOOWTIK ΦPovTiDA KAI ψUŞN & KATAUUSN. ΓΑΚθΕ Εαρομιŋ TO σωτΟ TPOIOV!
Vwpiote Tnv TIOKIA taW TPOIOVTW SEVERIN KAI ETIOKEeTE mac OTN dieuuvan
www.severin.de n www.severin.com.
HdiKnOaOpadTgSEVERIN
2 TiaTny aovaaaleia oac
Ppoooxn otic oyniecs xpnns
AiaBaote oloknapes Tc odnyies xpns, Piv Xpnoiopoioane Tn oukeun. Puale Te oxoataikac Tc odnyies xpnans. Ze Tepinwn Tou npadwae Tn oukeun e Tpitouc, dowte touc kai Tc odnyie cxnons.
KaBapate TnV ETIAPAVEIA TNS OUAKEUNC ME aTALO TRAVI TOU DEV apHVEI XVouoi.
8 AToKataoTaon
NcnoIb3OBaHne He npabnIbHO Yo CpeCTBa CBra3aHO C pNCKOM Ipy 3OpOBy:
-ДяоунstкпprбopaисpoЛь3уITEиCKIQUHTeNBHOONcaHHbIeВdAHHompykoBOdCTBeNo3KcJIya-TaunuHCTaI脊eCpeDCTBaINpHaNdJexHoCTn.
OnachoctnIpynpbopa
HenpaBnIbHoe obpaueHne c np6opom moKet npuBecTu K NOBpeXdeHIO:
- YctaHaBnBaIe Te np6op Ha cyxuO, poBHyO, HeCKoJIb3kyU, JapOpnpOHyIOBepXHocTb, He BCTyNaIouyU B peAkUnO Cpe3NHObbIMN HOKKamN.
He cTaBbTe npu6op Ha ropayuIO NOBepxHocTb IIN B6IIN3N INTOUHNKOB CnIbHOrO TEIIa.
He donyckaite cBucnna cTeBoro kaebna. PnI 3TOM BO3Hnkaet OnaCHOCTb CNOTbKaHHa.
B6aOKIJI B0bI 3aINBaIe ToIbKO XOIOHyO, CBExkyo BOOpnoBOHyO Body. Tennay IIN ropya BOOpnoBOHnA BODa INN pOChne JxIDKocTN MOrTy NOBpeDntb npu6Op.
He nCnoJb3yIte kapaMeIIN3OBaHHbIe IIN NOKpbI- TbIE caxapOM KopeHbIe 3epHa.
He nCnoJb3yIte cIpoi KoPe (3eJIeHbIe, Heo6kapeHHbIe 3epHa) IIN CMEc C cIpbIM KoPe. OHN MOryt NOBpeDITb npu6Op.
He 3acbIpaIte MoIOTbI KOe B KOHTeHep dJI KOoeHbIX 3epeH. - Ipeedem, KaYbpaTb npnbop, n3BneKeITe 1TeIceJIbHyIO BnIKy N daIte eMy PONHOCTbIO OCTbITb.
Ecn npn6op HencnpaBen
HencnpaBbI np6op moKet cTaTb npuHOn MaTePnaIbHO yuepeBa n TpaBM:
- Ipeed kaxdbim nCNoB3OBAHnem npOBepaIte np6op Ha hAnuHe NOBpExdHn. Ecnn ObnapyXeHbIOBpeXdHn, Bbl3BaHHbIe TpaHCnOpTnpOBKo, He3aMeDInTeNbHO o6patNTecb K npOdaBu, yKOTOPoro 6bl npno6peTeH np6op.
- Hn B koem clyuae He nCnoJb3yIte HenCnpaBbI np6op. Hn B koem clyuae He nCnoJb3yIte np6op nocne ero naeHna.
- Ecnn cTeBoN Ka6en np6opa nobpeJdeH, ero 3aMeHa DoJXHa BbINOJIHrTbcra IPOIN3BOIDTeIeM INnero cepBnCHO cnjXboi nIO DOpyIM KBaIIuΦnIpOBaHHbIM CneuaJIncToM, 3TO IO3BOJNT n36exKaTb onaCHOCTeI.
B npnbope OTCyTCTbYOT DeTaII, KOtOpbIe Bbl MoKxTe OTpemOHtnpOBaTb CAMOCToTbHbHO. PEmOHTHbIe pa60tbl pa3peWaaTcra Ipon3BOuNTb TOnbKO cepBnCHO cnJXBe kOMNaHm SEVERIN (cm. «LHTpbI cepBnCHO O6CnyKmbaHn» Ha cTp. 192).
3 TexHnueckne xapaKTepeNCTnKN
He nCnoB3yIte Heo6kapeHbIe, KapameN3ObaHbIe HII NOKpbITbIe caxapOM KoFeHbIe 3epHa.
- 3acbinaTe B KOHTeHep Ira KoPeHHbIX 3epeh 14 MAKcMym 200 r 3epeH.
- NomeCTME KpbIgky KOHTeHepa 15 Ha MeCTOn IIOIto HpNKMTE ee.
- HaxMMTe Ha KHONky «OPEN» 1 c60ky npnbopa dna oTKpbTn daBepuI dna pnhbtpa 4.
5.BctabTeΦnIbtpyIOuYIO BCTABky 3B DBepey IaIpnIbtpa - BCTaBbTe OJHopa3OBbI KOpeHbI φnIbTp B φnIbTppyUOyU BCTaBky

COBET
BmecTo Ondopaa0BorokoepHoro QnIbTpabBMOKeTe TAKKE NcNoJIb3ObaTb nepMaHeHTbIINpNbTp 2
- NomeCTNE KOJIbO O FNbTp a Ha FNbTPyOuOyIO BCTaBky 3
8.3akpoTe DBepy dnnФmNbtpa 4
9.ИЗВЕКТЕΚОБЕМNHK 5

COBET
HanoHnIeKoFeyHnD0JxenaEMOrO KOnuYeCTBa YaWeK, TAK KaN DnI PnroTOBJeHn IcNoIb3yETcB Bc 3aIITaB 6aQoK Boa. OHa YaWka COOTBeTCTByEt OK. 125 Mn.
-
HanonHnTe KoFeHNK 5XoIOnHOH BOOnpOBOHO BDOJ DO OTMETKN, COOTBETCTBYUeJ KeNaEMOMY KOINHECTBy YaueK.
-
OtkpoTe 6aOuK DnB BoDy
- BbIeTe BoDy B 6aOcK 13. PpOBepbTe ypoBeHb npn nmoOnn HndkaTopa yPOBHa 9
- 3aKpoTe 6aOck dIg BoDJI 13
- YctahOBHTe KoFeyHnK 5Ha HaraPeBaTeIbHyIIOJIaTmHy 7
- BctaBbTe wTenceIbHyIO BNkY 8 Bpo3eTKy.
PnB6op BkIOHCTc. Ha dncnnee 6ydyT OTo6paXaTbCBAPEM nTEkyuine HAcTPOKNI.
- Haxmte Ha KhoNky « 2-10» ДЯн HabToPkn KOInueCTBa yauweK, COOTBeTcByIOUeRO KOINueCTBy 3aJInTOI BObl.
- HaxMMTe Ha KONKy «Ф +/-ДгЯ HabToPouKn KpenocTn KoPe:
I3MeHeHneCTeHn IOMOJa
!
OCTOPOXHO!
PeynpyTe CTeneHb NOMoTa TOnbKO TOrda, KOrda np60p HEnocpeCTBeHHo pa3MaJIbIaET KoFeHbIe 3epHa, B pOtnBHom Cnyae Bbl MoKeTe NOpeNTb KoFemONky.
0
COBET
Дя Кофейнбix 3epeсветно obxapkn pekomehnyeTc HAcTPONTb MEKIN NOMO,ДЯ KOFeHbIX 3epeh TemHO OBxapKn ONTMaJIbHbIM YBnETCr rpy6bI NOMJ. Cnoocobobxapkn ObluHy kazBaetcaHa ynakOBke OT KoPe.
COBET HanoHnIe KopeHnK Do Jenaemoro KOJIueCTBa yaEe, TAK KaD pIpyroTOBJIeHn IcNoIb3yETc Bc 3aIITaB 6aOk BOa. OHa YaIka COOTBeT CTBye OK. 125 M.
- Hanolnite KoepHNIK 5 DO OTMETKN, COOTBETCTBYIOe JKeNaEMOMY KOJIINHECTBy YAWEK.
- OtkpoIte 6aHOK IJI BObl 13.
- BbIeTe Boy B 6aoyk 13. PpOBePbTe ypoBeHb npn nmoOnn Hndka-topa ypoBHa 9
- 3akpoTe 6aok nIy BoIy 13
12.YctaHOBnTe KoPeHnK 5HaHarpeBaTeIbHyIO nIacTHHy 7. - BctabBte wTeNceJIbHyo BIINKy 8 Bpo3eTKy.
PnB6op BkIIOuTcra. Ha mncnnee 6ydy T OTo6paXaTbcra BpeMa n TeKyuune HacTpoKn.
-
Haxmte Ha kHONky «GRIND OFF»ДЯ OTKIOUeHn KoFemOJIn.
CBeToIOIoB03Ne KHOKn《GRIND OFF》3aorOpITcA. -
HaxMMTe Ha KhoNky « O»
CBeToIOIOB3NE KHOHNO 3aROpTcN.Pn6Op HauHET npoCeCC 3aBaPbAHnKoPe, n Ha DCnIe NOBITc CmBOI
ByedToO6paKaTbcaMraKoUeeBpEmr.
- Haxmte Ha KhoNky «h» HeckoIbKO pa3, YTO6bl yCTaHOBnTb 3HaueHne YacOB.
- Haxmnte Ha KhoNky «min» HeckoIbko pa3, YTO6bl yCTaHOBnTb 3HaueHne MInHyT.
5.HaXMMTe Ha KHOHKy «PROG»ДЯ NOIITBepKJdEHHbIX 3HaueHIM.
Ha dncnnee cHOBa NOBUTc TKeUe BpEmn, n 6ydt otO6paJxTbcra 口 . CBeToOnIOB Bo3ne KHOKNK PROG>3arOpNTc. KoFemaunHa npiroTOBt KOpe K yctAHOBHeHOMy BpEmnC npIMHeHmE TKeUxN HAcTpoE.K
Дя OTКLOHHeHЯ 3aIporpamMPOBaHOrO npiroTOBJIeHЯ HaxMMTe Ha KhoNKу (PROG) eue pa3.
CBeToIOIOB03JIe KHOIIKN《PROG》norachET.3anporpAMMPOBaHHOE npriTOBJIeHEO tKJIIOUeHO.
7 Ounstka npnbopa

IPEyIpeKdEHeI
Onachoctb ownapBaHnia!
- Ipeep npoBeHnem HIO6bix pa60t no OuCTKe: N3BNeKaIte WTeCenBHyBO BUNKy 3 n3 po3eKn i daTe np6Opy nero KOMnoHEHTAM nonHOCTbIO OCTbTIb (He MeHee 30 MNHT).

PNEyIPEKDEHNEI
Onachoctb TpaBMPOBaHn IIOBpeXDeHn np6opa!
-Hnkorga He norgykaTe np6bBvOy!

PENyPENKDEHNEI
OnachocbI IaI 3doOpBb B BVdu ICNoJIb3ObaHn HnpeBaIbHOrO uCTraeero CpeCTBa!
-ДяочNTКДETaJIe,KOToPbIe KOHTaKTpyIOT C BODOи KOcpe,ICNOLb3yTe TOnbKO COBMeCTMlbE C NIIuEeBbIMn PpOdyKTAMUcTЯUne CpeDCTBa.

OCTOPOXHO!
He nOIOb3yIe IIN OUcNkI aBpa3nBHbIe YnCTaIe CpeDCTBa, arpeccNBHbIe YnCTaIe CpeDCTBa IIN npHaNDexNHOCTN, capanakne NOBepxHOCTN. He CTabTe Pnp6Op B NocydomoeHyIO MaunHy.
SEVERIN
7.1 PocJIe npnroToBJeHna
- Y6eHntecb, yTO npOeCC nproToblenn 3aBephen n npnbop ocTbI.
- Haxmte Ha KhoNky OPEN* 1c6Oky npnbopa nIra otKpbTnA DBeP cyI dIy pIbTpA
3.ИЗВЕКИТЕΚОЛБЦФИЛБТРа 1
4.BbHbTePnIbTpHyOuYBOCTABkY 3BMEcTe C nepMaHeHTbIM PnIbTPOM2 NIOOHDopA3OBbIM KoepHbIM PnIbTpOM.
5.BbCbInBeOCTaTKnKoPeI3NepMaHeHTHOQnltPa 2B6bITOBMycOp Nl60 BbIbPoCtE OJHopa3OBbIKoPeHbIKoNltBmEcTe C OCTaTKAMKOpe. - PpOmoIe pHbTpHyIOuBCTaBky 3 n nepMaHeHTbHcPnIbTp 2 NOI pTOUHO BODOI.
- OctabTe ΦινιβtpyioU OCTaBky 3 Μ έπρmaHεTHbI ΦινιβTp 2 ΑΙΑ BicbixaHη NεpeT ΕM, KαK NOMEcTntb IX HA MeCTo B έπμδop.
7.2 ExeDHeBHaOChTka
- Y6eHITecb, yTO npH6Op OTKIOUcH, OCTbI, N IHTeNcEJIbHaB BINJa 8 IN3BHeHa H3 pO3ETKn.
- HaxMMTE Ha KhoNky «OPEN» 1 c60ky npnbopa dny otKpbTna Dbep- cyI nIyIbTpA
3.ИЗВЕКИТЕ KONьЦФИЛБТРа 1 - BbHbTe ΦnIbtpyIOuYIO BCTABKy 3 BmEcTe C nepMaHeHTbIM ΦnIb-TPOM 2
- PpOmoTe fHbtpyUoyIO BCTaBky 3 n nepMaHeHTbIy pInbTp 2 B TepNoB OBe C DoabNeHem CpeCTBa IЯ Mblr Nocdybl.

KoIbOΦnIbTpra 1, nepMaHeHTbI ΦnIbTp 2 nΦnIbTpuroUBO BCTaBky 3 MoJHO TaKKe OuHtB IN B NOcDOMoeUHO MaUNHe, paBHO KaN KoFeHNIK 5.
6.ПOTnpaIte DBepu DnA pHbtpa 4 C nCnOJIb3OBaHMeM TENIOI BOblcdoBabHeHMe CpeCTBa IINMaMbITbnoNOCybl.
7. Onopokhne KopeHHNK 5
8. MoTe KoFeeHnK B TeTIOI BOe C DoabJIeHm CpeCTBa IIN MblTbIPOCyDbI.
9. IpoTnpaIte HArpeBaTeNbHyNo nIactnHy 7 BnaXHOH TKaHbIO.
10. TuaTeBbHO BbCyuWbAitE BCE KOMNoHEHbI nepeD TEM, KaK yCTaHaBnBaTb IN HA MecTo.
7.3 Ppombibka npn6opa
- Y6eIITecb, yTO B npIbOpe He HaxoIITcA pINbTp C ocTaKAMN KoPe I KocpeHIMK 5 NCTbI.
2.ИЗБЕКITEKOФЕHнK 5 - HanoHnHTe KopeHHK 5 Do OTMeTKN «10» XoIOnHO BDOIpOBODHO BOOJ.

OCTOPOXHO!
Fax:+43(0)6246/72702
eMail: degupa@silva-schneider.at
Belgique
BVBA Dancal Elektro
Kalkhoevestraat 1
B-8790 Waregem
Tel.: +32 56 71 54 51
Fax:+3256700449
Bosnia i Herzegovina
Malisic export-import d.o.o
Biletic polje
88260 Cituk
Tel. +387 36 650 601
Fax:+38736651062
Bulgaria
Noviz AG
Khan Kubrat 1 Str.
BG-4000 Plovdiv
Tel.: +359 32 275 617, 275 614
eMail: sales@noviz.com
China
Sunnex Century Catering Equipment (Shenzhen) Ltd.
2IF., Block A, Dong He Industrial Building
Yue He Street, Sha Shen Road, Sha Tou Jiao
Shenzhen
Tel.: +86 755 25551458 or 25550852
Fax:+8675525357468or25357498
eMail: sales@severinchina.com
Web: http://www.severinchina.com
Czech Republic
BVZ Commerce s.r.o.
Parkerova c.p. 618
CZ 25067 Klecany
Tel.: +420 233 55 94 74
Fax:+42023359474
Danmark
F&H of Scandinavia A/S
Gl. Skivevej 70
DK-8800 Viborg
Tel.: +45 8928 1300
Fax:+4589281301
F-67210 OBERNAI CEDEX
Tel.: +33 3 88 47 62 08
Fax:+33388476209
eMail: severin.france@severin.fr
Web: http://www.severin.fr
Greece
BERSON
C. Sarafi dis Bros. S.A.
Agamemnonos 47
176 75 Kallithea, Athens
Tel.: 0030-210 9478700
Philippines Business Center
Service Post of Themi
570 01 Thessaloniki, Greece
Tel.: 0030-2310954020
Hong Kong
Pacific Coffee Company
7/F Hollywood Centre, 233 Hollywood Road,
Sheung Wan, Hong Kong
Tel.: +852 2805 1627
Fax: +852 2850 4015
eMail:presso@pacificcoffee.com
India
Zansaar
- 2nd Floor
Fawar Manor, 100ft Road
Indiranagar, Bangalore 560 038
Tel.: +91 80 49170000
e-mail: customersupport@zansaar.com
Web: http://www.zansaar.com
Iran
IRAN-SEVERIN KISH CO. LTD.
No.668,7th.Floor
Bahar Tower
Aye. South Bahar
TEHRAN - IRAN
Tel.: 009821-77616767
Fax:009821-77616534
Info@iranseverin.com
www.franseverin.com
Iraq
AI JOUD Home Appliances Manufacturing Co. Ltd
PIC: Eng. Ahmad Al-Sharabi
Al Joud Building Karadat Kharej
Baghdad - Iraq
Tel.: +964 782 270 2727
+9647700035533
+9647712317850
Ireland
Bluestone Sales & Distribution Ltd
26 Oaktree Business Park
Trim Co Meath Ireland
Tel.: +353 46 94 83100
Fax: +353 46 94 83663
Web: www.bluestone.je
Italia
via Dino Col 52r-54r-56r,
I-16149 Genova
Green Number: 800224155
Tel:010/6451102-010418609
Fax:010/6425009
e-mail: videoelettronica@panet.it
Jordan
J.L.C.
P.O.Box 910330
Mecca Street, Jaber Complex Building No. 193
Amman 11191 Jordan
Tel. +962 6593 9365
Korea
Jung Shin Electronics co., Ltd.
501, Megaventuretower 77-9
Moonrae-Dong 3ga, Yongdeungpo-Gu
Seoul, Korea
Tel.: +82-22-637 3245~7
Fax:+82-22-6373244
Service Hotline: 080-001-0190
Kuwait
Mohammed Abdulrahman Al Bahar
Al Bahar Building P.O.Box 148
Safat 13002 Kuwait
Tel.: +965 4810855
Latvia
SERVO Ltd
Mr. Janis Pivovarenoks
Tel.: +371 7279892
Lebanon
Khoury Home
7th Floor, Cite Dora 3 Building, Dora
P.O.Box 70611
Antelias. Lebanon
Tel.: +961 1244200
Fax:+9661253535
eMail.info@khouryhome.com
Internet. www.khouryhome.com
Luxembourg
Ser-Tec
GHALA 112, P.O. Box 996
Muscat Sultanate of Oman
Tel.: +968 24593025
Fax.: +968 24593490
Philippines
COLOMBO MERCHANT PHILIPPINES, INC.
Mezzanine 1, South Center Tower
2206 Venture Street, Madrigal Business Park
Alabang, Muntinlupa City
Tel.: 809 34 41
eMail: severinconsumercare@colombophils.com.ph
Polska
SERV- SERWIS SP. Z 0.0.
UL.WSCHODNIA4
46-070 CHMIELOWICE K/OPOLA
Tel: +48 77 453 86 42
Fax:+48774538642
eMail:centrainy@serv-serwis.pl
Portugal
Serbia and Montenegro
tel: +381-21-524-638
tel: +381-21-553-594
fax:+381-21-522-096
SEVERIN
Singapore
Beste (S) Pte. Ltd.
Tagore Building
6 Tagore Drive, #03-04
Singapore 787623
Tel.:+6564550005
Fax:+6564554010
eMail: info@beste.com.sg
Slovenia
SEVTIS d.o.o.
Smartinska 130
1000 Ljubljana
Tel:0038615421927
Fax:0038615421926
Slowak Republic
PREMT.s.r.o.
Skladova 1
917 01 Trnava
Tel: +421 33 55 45 007
Fax. +421 33 55 45 007
eMail: premt@premt.sk
South Africa
AL.CD.Ashley (Pty) Ltd
ABSA on Grove
Grove Avenue
Claremont. Cape Town 7708
Tel.: +27 21 674 0294
Fax:+27216740295
eMail:greg@alcdashley.co.za
Web: www.alcdashley.co.za
Svenska
Rakspecialisten HS
Mölevängsgatan 34
214 20 Malmö
Tel.: +46 40 12 07 70
Fax:+46406110335
eMail: info@rakspecialisten.se
Switzerland
VB Handels Srl GmbH
Postfach 306
1040 Echallens
Tel: 021 881 6045
Fax:0218816046
mail: severin@helt.ch
Syria
Joud Industries Domestic Appliances Co.
P.O.Box 199 or 219
Motorway entrance
Lattakia - Syria
Tel.: +963 41 416 590
+96341416591
Fax:+96341444622
Thailand
Verasu Ltd. part.
83/7 Wireless Rd., Lumpini,
Patumwan, Bangkok 10330
Tel. +662 254 81 008
eMail: askverasu@verasu.com
United Arab Emirates
Juma al Majid Est
P.O.Box 156
Dubai U.A.E.
Tel.: 04 266 5210
Fax:042623431
eMail: shahid-saleem@al-majid.com
Web: www.al-majid.com
United Kingdom
Homespares Centres Limited
Firwood Industrial Estate
Thickelford Road
Bolton, BL2 3TR
Tel.: +44 1204 558160
Fax:+441204558161
eMail: office@hsc1.info
Web: www.hsc1.info
Vietnam
Brand Partner
W.22, D. Binh Thanh
180/38 Nguyen Huu Canh Street
Ho Chi Minh City, Vietnam
Tel.: +84 862 899 648
Fax:+84 862 899 649
eMail: info@brandpartner.vn
Stand: 04.2015