
Check - Sphygmomanometer Medel - Free user manual and instructions
Find the device manual for free Check Medel in PDF.

| Product type | Automatic digital blood pressure monitor for adults |
| Brand | Medel |
| Model | Check |
| Dimensions (mm) | 185 x 100 x 55 |
| Weight (without batteries) | 320 g |
| Power supply | 4 AA 1.5V batteries (alkaline recommended) |
| Measurement method | Oscillometric |
| Measurement range (pressure) | 30 – 280 mmHg |
| Measurement range (heart rate) | 40 – 199 pulses/min |
| Accuracy (pressure) | ± 3 mmHg |
| Accuracy (heart rate) | ± 5% |
| Memory capacity | 60 measurements per user (2 users) |
| Cuff | Universal, circumference 22 – 42 cm |
| Main functions | Blood pressure measurement, pulse detection, irregular heartbeat indicator (I.H.B.), memory, average function (T3) |
| Maintenance | Clean with a slightly damp soft cloth. Do not immerse. Do not wash the cuff. |
| Operating conditions | Temperature: +10°C to +40°C, relative humidity: 10 – 85% |
| Storage conditions | Temperature: –20°C to +60°C, relative humidity: 10 – 95% |
| Warranty | 5 years (manufacturing defects) |
| Included accessories | Universal cuff, 4 AA batteries, instruction manual |
| Standards | EN1060-3, EN60601-1, EN60601-1-2, IEC80601-2-30 |
Frequently Asked Questions - Check Medel
User questions about Check Medel
0 question about this device. Answer the ones you know or ask your own.
Ask a new question about this device
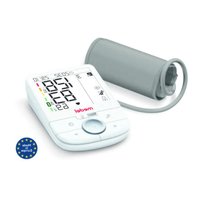
Download the instructions for your Sphygmomanometer in PDF format for free! Find your manual Check - Medel and take your electronic device back in hand. On this page are published all the documents necessary for the use of your device. Check by Medel.
USER MANUAL Check Medel
MANUALE D'USO - INSTRUCTION MANUAL
medel®
CHECK
MISURATORE DI PRESSIONE AUTOMATICO
AUTOMATIC BLOOD PRESSURE MONITOR
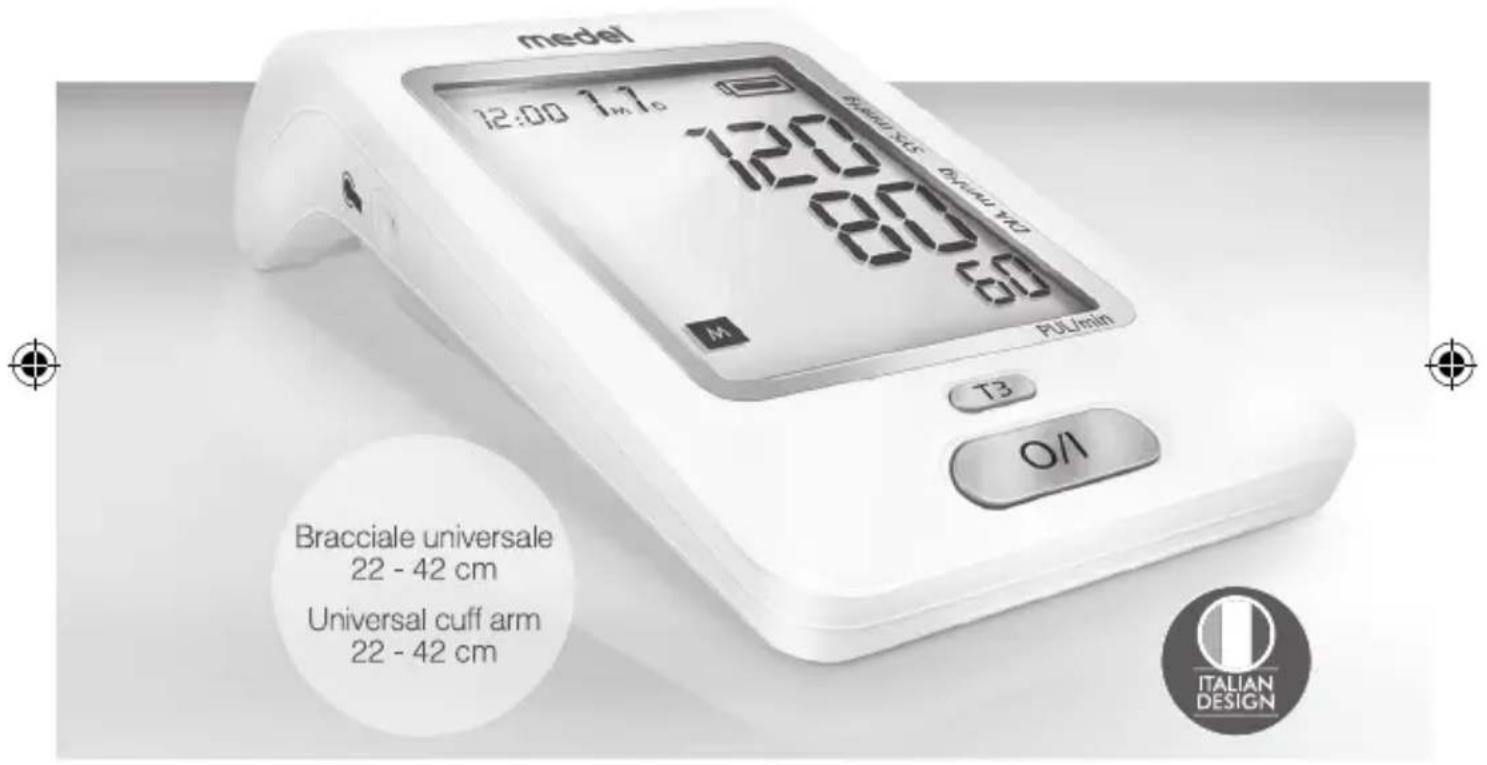
Ampio display retroilluminato Extra-large backlight display

Indicatore patrit' cardiaci imogolari
Irregular heartbeats indicator
Media delle 3 risurazioni
Average of the 3 measured

2 utenti
2 users
natural_image
Technical line drawing of a mechanical device with battery and clamped components (no text or symbols)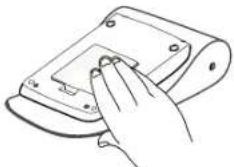
natural_image
Line drawing of a hand pressing down on a device component (no text or symbols)3


4
5
6
9
10
7
8


11
12

13
14
15
16
17
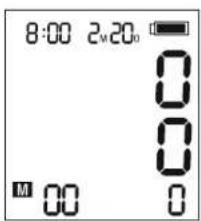
SIMBOLI
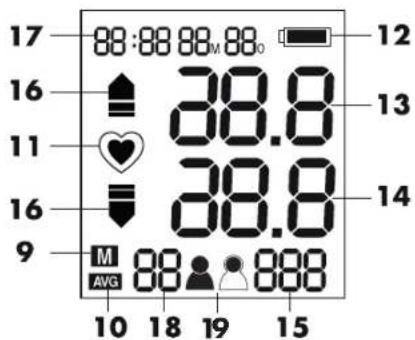
| M | Previous measured data in memory. |
| AVG | Average of last 3 readings. |
| SYSmmHg | Systolic Blood Pressure in mmHg. |
| DIAmmHg | Diastolic Blood Pressure in mmHg. |
| PUL/min | Pulse per minute. |
| □Lo | Low Battery |
| ♥ | Measurement in progress |
| ♥ | Irregular Heart Beat indicator (I.H.B.) |
| E | Error during measurement |
| ● | Cuff tube plug |
| ▲ | Inflation |
| ▼ | Deflation |


SÍMBOLOS SIMBOLURI
MEDEL CHECK blood-pressure monitor is a automatic, digital blood pressure measuring device for adult using oscillometric method. It offers a very high measurement accuracy and has been designed to provide the maximum user-friendliness. Medel CHECK is a device suitable for home healthcare environment.

ATTENTION!
Before using, please read through this instruction manual carefully. For further questions on the subject of blood-pressure and its measurement, please contact your doctor. Keep MEDEL CHECK out of the reach of children. Do not use MEDEL CHECK near anaesthetic, flammable or oxygen mixture, or with nitrous oxide.

ATTENTION!
1.1 Important information about self-measurement
Do not forget: self-measurement means control, not diagnosis or treatment. Unusual values must always be discussed with your doctor. Under no circumstances should you alter the dosages of any drugs prescribed by your doctor.
- The pulse display is not suitable for checking the frequency of heart pacemakers!
- In cases of cardiac irregularity (I.H.B.), measurements made with this instrument should only be evaluated after consultation with the doctor.
• Changes to the unit by the user are not admitted - Do not use the blood pressure monitor on newborns or patients with preeclampsia. We recommend consulting a doctor before using the blood pressure monitor during pregnancy.
• The device does not require any calibration
- Do not dip the device in water
- Tubing kinking can cause continuous cuff pressure and may result in blood flow interference and patient injury.
- Too frequent measurements can cause injury to the patient due to blood flow interference;
- Do not apply the CUFF over a wound: this can cause further injury;
- Do not apply the CUFF on any limb where intravascular access or therapy, or an arterio-venous (A-V) shunt, is present because of temporary interference to blood flow and could result in injury to the PATIENT;
- Do not apply the CUFF on the arm on the side of a mastectomy;
- Please note that, when infalting, the functions of the limb in question may be impaired;
- During the blood pressure measurement, the blood cirs circulation must not be stopped for an unnecessarily long time.
- If the device malfunctions remove the cuff from the arm.
24


EN
- The user must check that the equipment functions safely and see that all its parts are in proper conditions before use.
1.2 Electromagnetic interference
The device contains sensitive electronic components. Therefore, avoid strong electrical or electromagnetic fields close to the device (e.g. mobile telephones, microwave ovens). These can lead to temporary impairment of the accuracy.
2. COMPONENTS OF THE BLOOD-PRESSURE MONITOR( fig.1)
- LCD 10. Average value symbol
- O/I (Start / Stop) 11. Heartbeat symbol
- Memory button(MEM) 12. Battery symbol
- Average button (T3) 13. Systolic blood pressure
- Air socket 14. Diastolic blood pressure
- USB port for power supply 15. Pulse display
- Battery compartement 16. Inflation/Deflation symbol
- Universal adult Cuff 17. Date/Time display
for 22\~42 cm arm 18. Stored data - Memory symbol 19. User ( )
NOTE:
If your arm Cuff is broken or not functional, please use a new Cuff. If the new arm Cuff does not include an air plug, please continue to use the old air plug.
Power:
4 AA Alkaline Batteries[Rechargeable batteries are not suitable for this monitor] Adapter (not included). Adapter 5V DC min 1A must comply with EN 60601.1 Micro USB port for power supply*

ATTENTION! THE USB PORT CAN'T BE USED FOR DATA DOWNLOADING.
Insert the batteries. (pic.2)
- Remove the battery cover from the battery compartment.
- Insert four AA powerful batteries into the compartment and ensure each battery is in the proper direction.
- Replace the battery cover.
ATTENTION!
- After the battery warning symbol" □" appears, the device is blocked until the batteries have been replaced.
- Please use "AA" Long-Life 1.5 V batteries.
- Recharcable batteries are not suitable for this monitor.
- Never leave any low battery in the battery compartment since they may leak and cause damage to the unit.
25

EN
- If the blood-pressure monitor is left unused for long periods, please remove the batteries from the device.
3.2 User, Clock and date adjustment
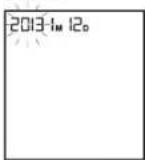
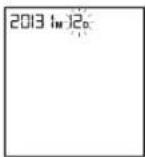
- Once you install the battery or turn off the monitor, it will enter Clock mode, and LCD will display date and time.
- In Clock Mode, press the O/I and MEM buttons simultaneously for 2 seconds and the User value will blink first, press MEM button to select the user 🐘
- Press O/I button to confirm and switch to the year value (press MEM button to set up the year)
- Press O/I button to confirm and switch to the month value (press MEM button to set up the month)
- Repeat the procedure described above to set the day, hour and minutes.
- After nearly one minute of inactivity the device will automatically switch-off with date and time of last measurement.
- Once you change the batteries, you should readjust the time and date.
3.3 Connecting the cuff
Insert the cuff connector into the socket on the left side of the meter (Pic.1)
4. HOW TO TAKE PROPER MEASUREMENTS
4.1. Before the measurement:
- Relax and avoid eating, smoking as well as all forms of exertion directly before the measurement. All these factors influence the measurement result.
- Remove any garment that fits closely to your upper arm.
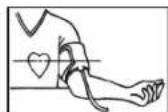
- To take your blood pressure, make sure you are sitting comfortably with your arms and back leaning on something. Do not cross your legs. Place your feet flat on the ground.
- To avoid falsifying the measurement, it is important to remain still during the measurement and not to speak.
• Measure always on the same arm (normally left) - Make sure to measure the blood pressure always at the same time during the day.
NOTE: The cuff size depends on the circumference of the arm. The allowed range is printed on the cuff. If this is not suitable for your use, please contact your dealer.

ATTENTION!
- Only use MEDEL original cuffs!
- A loose cuff or a sideways protruding air-pocket causes false measurement values. With repeated measurements, blood accumulates in the respective arm, which can lead to false results.
26

EN
- Correctly executed blood-pressure measurements should therefore first be repeated after 5 minutes pause or after the arm has been held up in order to allow the accumulated blood to flow away.
4.2. Fitting the cuff
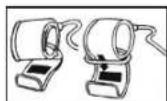
- Pass the end of the cuff (with sewn-in rubber stopper) through the metal stirrup so that a loop is formed. The Velcro closer must be facing outwards. (Ignore this step if the cuff has already been prepared.) (Pic 4)
- Push the cuff over the left upper arm so that the tube points in the direction of the lower arm. (Pic 5)
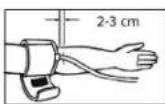
- Position the cuff on the arm as illustrated in the picture (Pic. 6). Make certain that the lower edge of the cuff lies approximately 2 to 3 cm above the elbow and that the rubber tube leaves the cuff on the inner side of the arm)
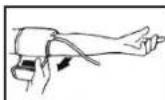
- Tighten the free end of the cuff and close the cuff with the closer. (Pic 7)
ATTENTION!
Place the cuff in order to have its edge 2-3 cm above the elbow and the brachial artery. The tube must be positioned towards the palm center.
- There must be no free space between the arm and the cuff as this would influence the result. Clothing must not restrict the arm. Any piece of clothing which does (e.g. a pullover) must be taken off.
-
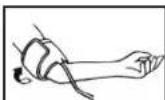
Secure the cuff with the Velcro closer in such a way that it lies comfortably and is not too tight. Lay the arm on the table (palm upwards) so that the cuff is at the same height as the heart. Make sure that the tube is not kinked. (Pic 8-9).
-
Remain seated quietly for two minutes before you begin the measurement.
NOTE: If it is not possible to fit the cuff to the left arm, it can also be placed on the right one. However all measurements should be made using the same arm.
4.3. Measuring procedure
After the cuff has been appropriately positioned, the measurement can begin
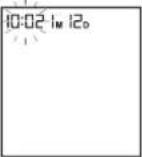
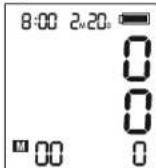
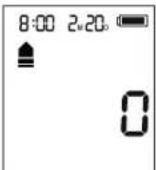
- Press O/I button. All display symbols appear for 1 second. Then 0 will appear on LCD on the DIA column. (pic. 10). The monitor is ready for the measurement.
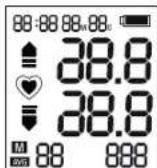
- Then the cuff inflates automatically. The symbol "▲" will appear. (pic. 10)
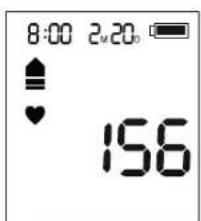
- Once a pulse is detected, the "♥" symbol blinks. (pic. 11)
- When appropriate pressure is reached, inflation stops and the cuff starts to deflate.
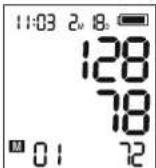
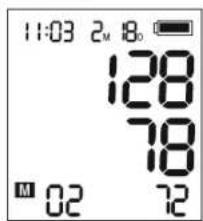
- When the measurement is completed, the systolic / diastolic pressure and pulse are shown simultaneously.
- In case the measurement shows irregular heartbeat (I.H.B.), the "♥" symbol
27

EN
is displayed. In this case the results of the measurement have deviated from a normal situation. Then the measurement needs to be repeated. In the majority of cases, this is not cause for concern. If the symbol “ ^① ” appears regularly (for example several times a week during different daily measurements) it is advisable to discuss it with your medical advisor (pic. 12).
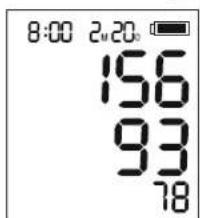
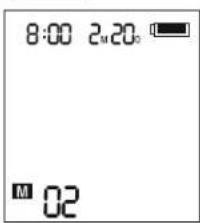
4.4 How to use the memory function
- In Clock mode (Off mode), press MEM button. The number of stored data is showed (pic14), sudden the latest result will be displayed with date and time (pic15).
-
Press MEM button repeatedly to review the results measured
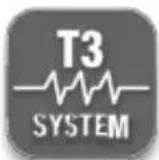
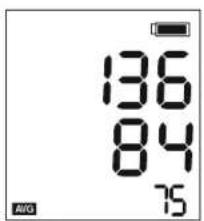
4.5 T3 Function. (The average is calculated upon last 3 readings measured within 15 minutes). -
Press O/I button and take the first measurement.
- At the end of the first measurement wait at least 5 minutes in a relaxed position. Then repeat the measurement following step 1 again.
- At the end of the second measurement wait at least 5 minutes in a relaxed position. Then repeat the measurement following step 1 again.
- At the end of the third measurement press T3 button to perform the average of the last three measurements taken (the AVG symbol will appear) (pic. 16). NOTE:
The average data using T3 button is shown only if the last 3 measurements have been done within 15 minutes. Otherwise, the data will be shown as 0.
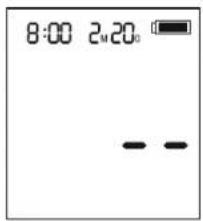
4.6 To delete all values stored in the memory
In Clock mode (Off mode) press MEM button, after the latest data stored will be displayed press again and hold the MEM button for 3 sec. All results will be deleted. Press the MEM or O/I button to turn off the display (pic. 17).


EN
5. ERROR MESSAGE/MALFUNCTION
Follow the below recommended actions and press O/I button again to initiate another measurement.
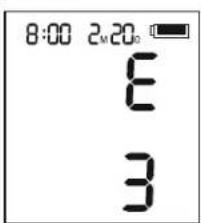
| Error code | Possible cause(s) Recommended Action | |
| E 1 | Deflation is too fast or the cuff doesn't inflate | Re-apply the cuff and try again |
| E 2 | Deflation is too slow | |
| E 3 | The cuff pressure is excessive Relax for a moment and try again | |
| E 20 | The reading process cannot detect the heart beat | Movement can compromise the measurement.Relax for a moment and try again.Loosen the clothes on the arm and try again |
| E 21 | Inaccurate reading Relax for a moment and try again | |
| E Exx | There is a calibration problem Repeat the reading. If the problem persists, contact the Service Centre. Refer to the warranty for the contact information and the instructions concerning returns. | |
5.1 Other possible malfunctions:
| Problem Possible | cause(s) Recommended Action | |
| The display shows the symbol | Batteries are drained. Replace all batteries with new ones. | |
| The blood pressure values displayed are abnormally high or low. | The cuff is not wrapped correctly or not at the level of the heart. | Wrap the cuff correctly and rise your hand so that the cuff is at the same level of your heart. |
| Too much stress is applied on your shoulder or arm. | Relax yourself and make measurement. | |
| You move your arm or arm muscles during measurement. | Remain still and do not move /contract the muscles during measurement. | |
29
EN
| The (I.H.B.) symbol “♥” is displayed, but my heart beat rate should be normal. | You move your arm or arm muscles during measurement. | Remain still and do not move / contract the muscles during measurement. |
| The light on the display is dim or not lit | The batteries are flat or inserted incorrectly | Replace the flat batteries with new ones. Insert the batteries correctly. |
6. MAINTENANCE AND REPAIRS
For any repair operations, only refer to a technical assistance centre authorized by the Medel International Srl and request original spare parts. Never open the device. There are no user-serviceable parts within. The device requires no lubrication or maintenance. Failure to comply with what expressed above may compromise the safety of MEDEL CHECK.
7. CARE, MAINTENANCE AND STORAGE
- For cleaning only use a soft, lightly moistened cloth.
- Do not use petroleum spirits, thinners or similar solvents.
- Do not wash the cuff.
- Take care to ensure the cuff is not damaged by sharp or pointed objects such as scissors, knives, etc.
- Take the batteries out if the device is not used for a long period.
- In case the device becomes malfunction due to the influence of strong electromagnetic fields, power off the device and repeat the procedure again.
- Disposal of the device (and used batteries) should be carried out according to the national regulations for the disposal of electronic products.
8. REFERENCE TO STANDARDS
Device standard: Device corresponds to the requirements of the European standard for non-invasive blood-pressure monitor.
- EN1060-3 Non-invasive sphygmomanometers - Supplementary requirements for electro-mechanical blood pressure measuring systems.
• EN 60601-1 Safety requirements
• EN 60601-1-2 Electromagnetical compatibility - IEC 80601-2-30 Particular requirements for the basic safety and essential performance of automated non-invasive sphygmomanometers.
30
100042_MEDEL CHECK USER MANUAL_ALL LANGUAGES.indd 30-31 28/06/2017 10:31:31


EN
9. SYMBOLS

WARNING!

REFER TO THE INSTRUCTIONS

TYPE BF APPLIED PART

DIRECT CURRENT

MANUFACTURER

TEMPERATURE LIMITATION FOR TRANSPORT AND STORAGE

KEEP DRY
CE0123 Comply with the Medical Device Directive 93/42/EEC
Separate collection for waste electrical and electronic equipment. Applicable to European Union countries and countries with separate collection systems) This symbol on the product or its literature indicates that the product complies with the Electrical and electronic equipment and should not be disposed of as household waste. The user is responsible for the transfer of the equipment at end of life with the appropriate collection facilities, subject to the penalties provided for by current legislation on waste. For more detailed information collection systems available contact your local waste disposal service.

MANUFACTURER'S CATALOGUE DEVICE NUMBER

SERIAL NUMBER
31
EN
10. PRODUCT SPECIFICATION
Display : LCD digital display
Technology: Oscillometric method
Classification : Internally powered equipment, with type
BF applied part
Measurement range: Pressure : 30 to 280 mmHg
Heart rate : 40 to 199 times/minute
Accuracy : Pressure : +/- 3 mmHg
Heart rate: +/- 5%
Memory: Storing 60 memories (Systolic / Diastolic
pressure, Heart beat) for each user (2)
Power supply: 4 AA 1.5V (batteries)
Battery life: For approx. 300 measurements, depending on
levels of blood pressure and pump pressure
Accessories: Universal cuff circum. 22 - 42cm
Cuff pressure: 0 to 300 mmHg
Operation conditions: Temperature : +10°C to +40°C;
Relative Humidity: 10 - 85%
pressure: 80 to 105 kPa
Transport/Storage conditions: Temperature : -20°C to +60°C ;
Relative Humidity: 10 - 95%
pressure: 80 to 105 kPa
Weight of main unit : 320 g (without batteries)
External dimensions: 185 X 100 X 55 mm
NOTE:
Specifications are subject to change without prior notice.
32
100042_MEDEL CHECK USER MANUAL_ALL LANGUAGES.indd 32-33


EN
10. WARRANTY CONDITIONS
- The device is covered by a 5-year warranty from date of purchase for any defects in the design or in the material used.
- The warranty consists in the replacement and/or repair free of charge of originally detective components.
- The warranty does not cover the accessories supplied with the equipment and those parts subject to normal wear and tear.
- The equipment must be repaired by authorized technical service centres only.
- The equipment must be sent to the authorized technical service centre for repair within 8 days after the defect is noticed.
- The transport costs for the equipment are at user's charge. Any repair out of the warranty conditions are at user's charge.
- The warranty does not cover failures resulting from misuse, abuse of the product or in case the damage is not due to manufacturer's liability (accidental fall, rough transportation, etc...)
- The warranty does not involve any compensation for any kind of damages to persons or things, either direct or indirect, occurred when the equipment is not operating.
- The warranty is valid from the date of purchase certified by the ticket or the invoice which have to be peremptorily attached to the warranty coupon.
- The lack of warranty coupon properly filled in and validated by a certification of purchase voids the warranty.
COUPON TO BE RETURNED IN CASE OF REPAIRS
THE WARRANTY IS VALID ONLY IF ACCOMPANIED BY THE TICKET/INVOICE
Product type: ____
Model:
Serial No.:
Date of purchase: ____
BUYER'S DATA
Name: ____
Address: ____
Telephone: ____
Defect description: ____
Signature for acceptance of the above mentioned warranty conditions
33
28/06/2017 10:31:31
| Guidance and manufacturer's declaration – electromagnetic emissionsThe model Medel Check is intended for use in the electromagnetic environment specified below. The customer or the user of the model Medel Check should ensure that it is used in such an environment. | ||
| Emission testRF emissionsCISPR 11 | ComplianceGroup 1 | Electromagnetic environment – guidanceThe model Medel Check uses RF energy only for its internal function. Therefore, its RF emissions are very low and are not likely to cause any interference in nearby electronic equipment. |
| RF emissionsCISPR 11 | Class B | The model Medel Check is suitable for use in all establishments, including domestic establishments and those directly connected to the public low-voltage power supply network that supplies buildings used for domestic purposes. |
| Harmonic emissionsIEC 61000-3-2 | Not applicable | |
| Voltage fluctuations/flicker emissionsIEC 61000-3-3 | Not applicable | |


| Guidance and manufacturer's declaration – electromagnetic immunityThe model Model Check is intended for use in the electromagnetic environment specified below. The customer or the user of the model Model Check should ensure that it is used in such an environment. | |||
| Immunity testElectrostatic discharges (ESD) IEC 61000-4-2 | IEC 60601 test level± 6kV contact± 8kV air | Compliance level± 6kV contact± 8kV air | Electromagnetic environment - guidanceFloors should be wood, concrete or ceramic tile. If floors are covered with synthetic material, the relative humidity should be at least 30 %. |
| Electrical fast transient/ burst IEC 61000-4-4 | ±2 kV for power supply lines...... | Not Applicable Mairs | power quality should be that of a typical commercial or hospital environment. |
| Surge IEC 61000-4-5 | ± 1kV in differential mode | Not Applicable Mairs | power quality should be that of a typical commercial or hospital environment. |
| Voltage dips, short interruptions and voltage variations on power supply input lines IEC 61000-4-11 | <5 % LT(>95 % dip in UT)for 0,5 cycle40 % UT(60 % dip in UT)for 5 cycles70 % UT(30 % dip in UT)for 25 cycles<5 % UT(>95 % dip in UT) for 5 sec. | Not Applicable Mairs | power quality should be that of a typical commercial or hospital environment. If the user of the model Model Check requires continued operation during power mains interruptions, it is recommended that the model Model Check be powered from an uninterruptible power supply or a battery. |
| Power frequency (50/60 Hz) magnetic field IEC 61000-4-8 | 3 A/m 3 A/m Power frequency magnetic | fields should be at levels characteristic of a typical location in a typical commercial or hospital environment. | |
| NOTE: UT is the a.c. mains voltage before the application of the test level | |||
Guidelines and declaration of the manufacturer – electromagnetic immunity The model Medel Check is intended for use in the electromagnetic environment specified below. The customer or the user of the model Medel Check should ensure that it is used in such an environment.
| Immunity test | IEC 60601 Test level | Compliance level | Electromagnetic environment - guidancePortable and mobile RF communications equipment should be used no closer to any part of the model Medel |
| Conducted RF | 3Vrms | Not applicable | Check, including cables, than the recommended separation distance calculated from the equation applicable to the frequency of the transmitter. |
| IEC 61000-4-6 | 150kHz to 80MHz | ||
| Radiated RF | 3V/m | 3V/m | Recommended separation distances d = 1.2 d = 1.2 80MHz to 800MHz d = 2.3 800MHz to 2.5 GHz |
| IEC 61000-4-3 | 80MHz to 2,5GHz | Where P is the maximum output power rating of the transmitter in watts (W) according to the transmitter manufacturer and d is the recommended separation distance in metres (m).Field strengths from fixed RF transmitters, as determined by an electromagnetic site survey,a should be less than the compliance level in each frequency range.b Interference may occur in the vicinity of equipment marked with the following symbol:[IMAGE] | |
| NOTE 1 At 80 MHz and 800 MHz, the higher frequency range applies.NOTE 2 These guidelines may not apply in all situations. Electromagnetic propagation is affected by absorption and reflection from structures, objects and people. | |||


a. Field strengths from fixed transmitters, such as base stations for radio (cellular/cordless) telephones and land mobile radios, amateur radio, AM and FM radio broadcast and TV broadcast cannot be predicted theoretically with accuracy. To assess the electromagnetic environment due to fixed RF transmitters, an electromagnetic site survey should be considered. If the measured field strength in the location in which the model Medel Check is used exceeds the applicable RF compliance level above, the model Medel Check should be observed to verify normal operation. If abnormal performance is observed, additional measures may be necessary, such as reorienting or relocating the model Medel Check.
b. Over the frequency range 150 kHz to 80 MHz, field strengths should be less than [V1] V/m
Recommended separation distances between portable and mobile RF communications equipment and the 24W Compact Daylight
| The model Medel Check is intended for use in an electromagnetic environment in which radiated RF disturbances are controlled. The customer or the user of the model Medel Check can help prevent electromagnetic interference by maintaining a minimum distance between portable and mobile RF communications equipment (transmitters) and the model Medel Check as recommended below, according to the maximum output power of the communications equipment. |
| Rated maximum output power of transmitter W | Separation distance according to frequency of transmitter (m) | ||
| 150kHz to 80MHz d = 3.5V_i | 80MHz to 800MHz d = 3.5E_i | 800MHz to 2.5 GHz d = 7E_1 | |
| 0,01 | 0,12 | 0,12 | 0,23 |
| 0,1 | 0,38 | 0,38 | 0,73 |
| 1 | 1,2 | 1,2 | 2,3 |
| 10 | 3,8 | 3,8 | 7,3 |
| 100 | 12 | 12 | 23 |
| For transmitters rated at a maximum output power not listed above, the recommended separation distance d in meters [m] can be estimated using the equation applicable to the frequency of the transmitter, where P is the maximum output power rating of the transmitter in watts [W], according to the transmitter manufacturer.NOTE 1: At 80 MHz and 800 MHz, the separation distance for the higher frequency range applies.NOTE 2: These guidelines may not apply in all situations. Electromagnetic propagation is affected by absorption and reflection from structures, objects and people. | |||
1. INTRODUÇÃO
6. KONSERWACJA I NAPRAWA
CHRONIĆ PRZED WILGOCIA
KUPON ZWROTNY W PRZYPADKU NAPRAWY
GWARANCJA JEST WAŻNA WYŁĄCZNIE PO DOŁĄCZENIU PARAGONU FISKALNEGO
Urządzenie typu:
Model:
Nr seryjny:
Data zakupu:
DANE NABYWCY
Nazwisko i imię:
Adres:
Telefon:
Opis wady:
Globalcare Medical Technology Co., Ltd
7th Building, 39 Middle Industrial Main Road, European
Industrial Zone, Xiaolan Town 528415 Zhongshan City,
Guangdong Province PEOPLE'S REPUBLIC OF CHINA
FCRFP EC- Representative:
Donowa Lifescience Consulting Srl
Piazza Albania, 10
00153 Rome / Italy
Distributed by:
Medel International Srl
Via Villapizzane 26 - 20156 Milano / Italy
CE0123


- MANUALE D'USO - INSTRUCTION MANUAL
- medel®
- CHECK
- ATTENTION!
- Important information about self-measurement
- EN
- Electromagnetic interference
- COMPONENTS OF THE BLOOD-PRESSURE MONITOR( fig.1)
- NOTE:
- Power:
- User, Clock and date adjustment
- Connecting the cuff
- HOW TO TAKE PROPER MEASUREMENTS
- Before the measurement:
- Fitting the cuff
- Measuring procedure
- ERROR MESSAGE/MALFUNCTION
- MAINTENANCE AND REPAIRS
- CARE, MAINTENANCE AND STORAGE
- REFERENCE TO STANDARDS
- SYMBOLS
- PRODUCT SPECIFICATION
- WARRANTY CONDITIONS
- COUPON TO BE RETURNED IN CASE OF REPAIRS
- THE WARRANTY IS VALID ONLY IF ACCOMPANIED BY THE TICKET/INVOICE
- BUYER'S DATA
- INTRODUÇÃO
- KONSERWACJA I NAPRAWA
- KUPON ZWROTNY W PRZYPADKU NAPRAWY
- GWARANCJA JEST WAŻNA WYŁĄCZNIE PO DOŁĄCZENIU PARAGONU FISKALNEGO
Brand : Medel
Model : Check
Category : Sphygmomanometer