
I.Beat move L - Mp3 player TrekStor - Free user manual and instructions
Find the device manual for free I.Beat move L TrekStor in PDF.
| Product type | MP3 player with TFT screen |
| Brand | TrekStor |
| Model | I.Beat move L |
| Screen | TFT, 220 × 176 pixels resolution |
| Power supply | Rechargeable lithium-ion battery via USB (charge 3-4 h) |
| Connectivity | USB 2.0 (cable included) |
| Internal storage | Internal memory (capacity varies by version) |
| External storage | microSD card slot (up to unspecified capacity) |
| Supported audio formats | MP3, WMA (including DRM9) |
| Supported video formats | AVI (conversion via included software) |
| Supported image formats | JPEG |
| Supported text formats | TXT (ANSI) |
| FM radio | Built-in, with earphones as antenna |
| Recording | Built-in microphone for voice recording, FM radio recording |
| Playback functions | Equalizer (7 presets + custom), repeat modes, shuffle, slideshow, text bookmarks |
| Controls | Physical buttons, ON/OFF switch, HOLD lock |
| Included accessories | USB cable, earphones, CD with software, wrist strap |
| Maintenance and cleaning | Soft dry cloth; avoid solvents and chemicals |
| Safety | Do not open, avoid moisture and extreme temperatures (5-40°C), moderate volume to protect hearing |
| Repairability | Device not user-serviceable; contact customer service |
| General information | Manufacturer: TrekStor GmbH & Co. KG; website: www.trekstor.de |
Frequently Asked Questions - I.Beat move L TrekStor
User questions about I.Beat move L TrekStor
0 question about this device. Answer the ones you know or ask your own.
Ask a new question about this device
Download the instructions for your Mp3 player in PDF format for free! Find your manual I.Beat move L - TrekStor and take your electronic device back in hand. On this page are published all the documents necessary for the use of your device. I.Beat move L by TrekStor.
USER MANUAL I.Beat move L TrekStor
Note: If you have problems with this product, you can quickly get assistance. Only in extremely rare cases will you need to bring this product to your distributor. You can find answers to the most frequently asked questions at our website, www.trekstor.de, under "SERVICE" "SUPPORT". You can of course also contact our award-winning support team by filling out the support form on our website, or by e-mail or telephone (see the back of these instructions). You will be surprised at how quickly we can help you.
Please note: Please charge your MP3 player as described in these operating instructions for at least 3 to 4 hours before initial use.
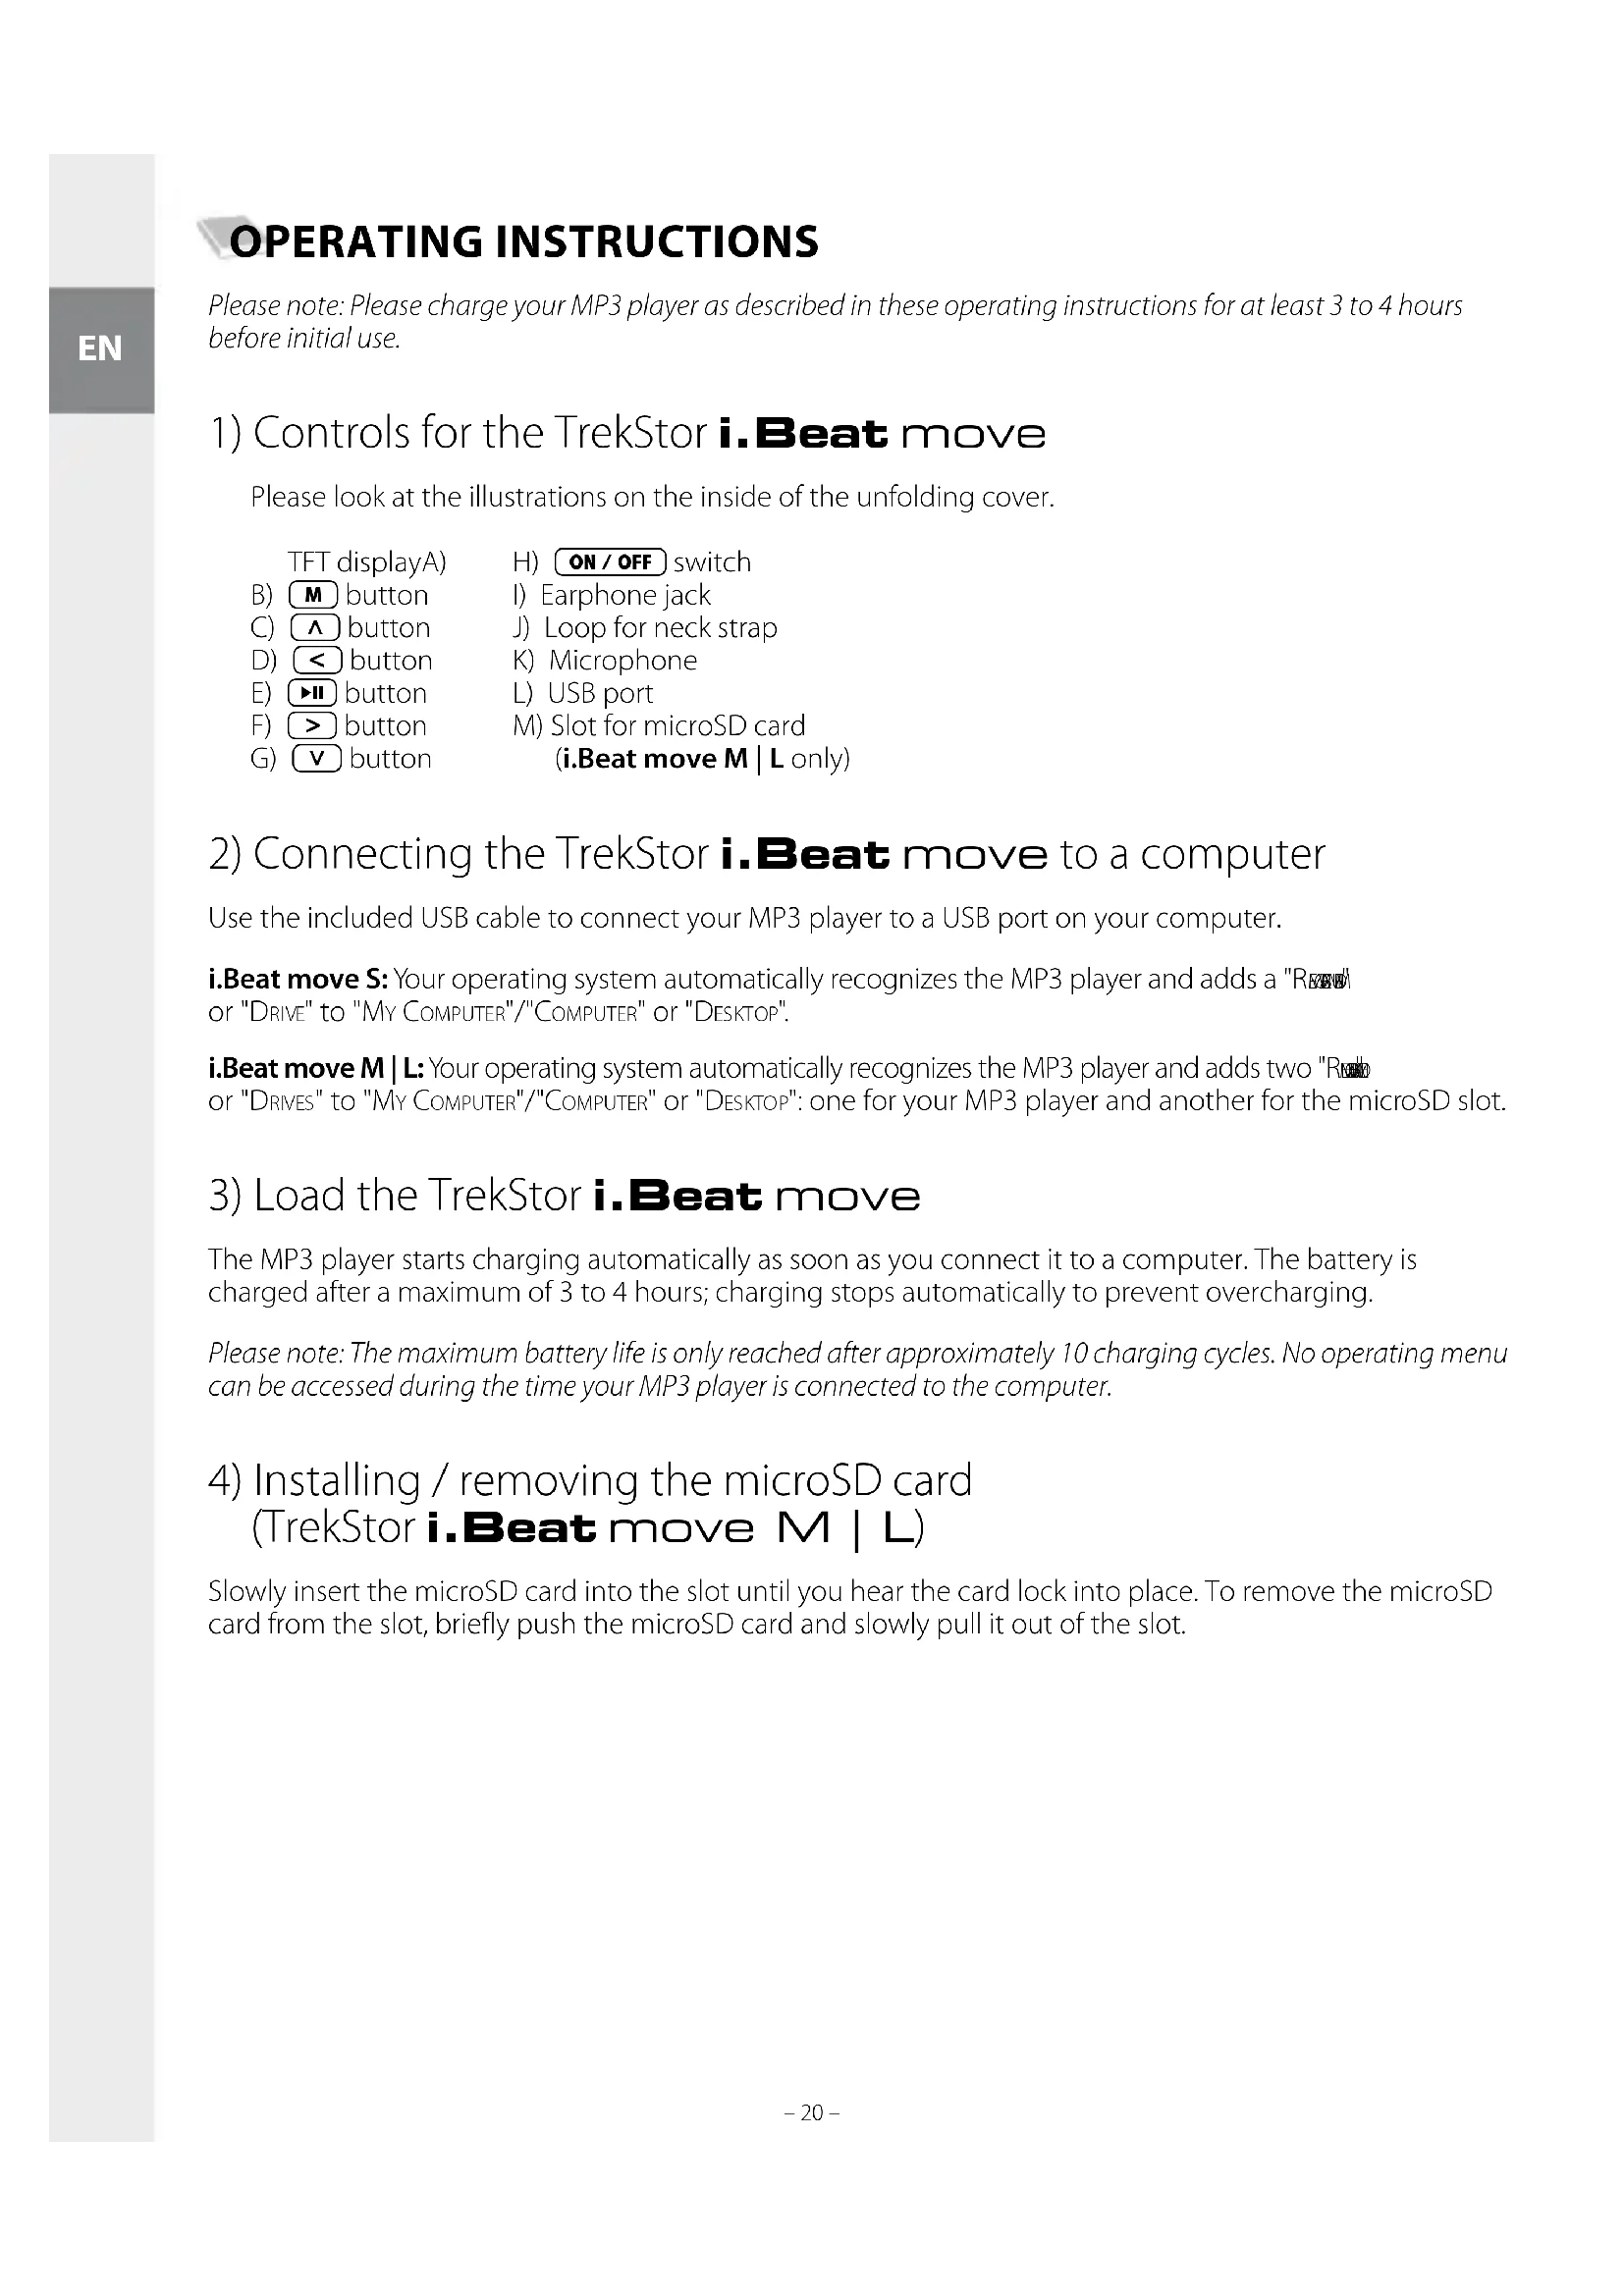
1) Controls for the TrekStor i.Beat move
Please look at the illustrations on the inside of the unfolding cover.
TFT displayA)
H) ON/OFF switch
B) M button
I) Earphone jack
C) button
J) Loop for neck strap
D) < button
K) Microphone
E) button
L) USB port
(i.Beat move M | L only)
2) Connecting the TrekStor i. Beat move to a computer
Use the included USB cable to connect your MP3 player to a USB port on your computer.
i.Beat move S: Your operating system automatically recognizes the MP3 player and adds a "Re" or "DRIVE" to "My Computer"/"COMPUTER" or "DESKTOP".
i.Beat move M | L: Your operating system automatically recognizes the MP3 player and adds two "Rnds" or "DRIVES" to "MY COMPUTER"/"COMPUTER" or "DESKTOP": one for your MP3 player and another for the microSD slot.
3) Load the TrekStor i. Beat move
The MP3 player starts charging automatically as soon as you connect it to a computer. The battery is charged after a maximum of 3 to 4 hours; charging stops automatically to prevent overcharging.
Please note: The maximum battery life is only reached after approximately 10 charging cycles. No operating menu can be accessed during the time your MP3 player is connected to the computer.
4) Installing / removing the microSD card (TrekStor i. Beat move M | L)
Slowly insert the microSD card into the slot until you hear the card lock into place. To remove the microSD card from the slot, briefly push the microSD card and slowly pull it out of the slot.
5) Exchanging data with the TrekStor i.Beat move
Windows® 2000/XP/Vista
Files that are not copy-protected
a) Select the desired files (such as MP3) with the mouse. Copy these files by clicking them with your right mouse button ("C").
b) Under "My Computer" or "Computer", select the device with removable storage, "I.BEAT MOVE".
c) Click it with your right mouse button and select "P_AE" to start copying. After copying has completed, the data will be available on your MP3 player.
WMA DRM9-protected files
To copy DRM9-protected files, you need to use the Windows Media Player (reference version: Windows Media Player 11).
a) Connect your MP3 player to your computer and start the Windows Media Player.
b) In the Windows Media Player under "VIEW", select "FULL_MODE".
c) Then click the tab "Sxyzx" at the top.
d) Drag the desired music files to the "SYNCHRONIZATION LIST" on the right.
e) Click on the button "START SYNCHRONIZATION" below the list. The selected music will then be automatically copied to your MP3 player.
Mac® OS X from 10.3
Select the desired files (such as MP3) with the mouse. Drag and drop the files in the "FINDER" to the drive symbol of your MP3 player.
6) Logging off and disconnecting the TrekStor i. Beat move from the computer
Windows® 2000/XP/Vista: At the bottom right on the task bar, click the left mouse button on the symbol "SAFELY REMOVE HARDWARE". In the context menu that appears, click the left mouse button on "SAFELY REMOVE MASS STORAGE DEVICE - DRIVE" to select it. You can now disconnect the MP3 player from the computer.
Mac® OS X from 10.3: You must remove the drive or drives from the "D:\ before you disconnect or turn off your MP3 player. Click on the relevant drive symbol and drag it to the trash symbol.
Please note: Please follow the recommended logoff procedure to prevent damage to the device or data loss.
7) Firmware update for the TrekStor i. Beat move
Firmware is the program responsible for the control of your MP3 player. A firmware update serves to transfer firmware upgrades to your MP3 player. If you should encounter any problems with your MP3 player, please make sure that you have installed the latest firmware version.
a) Connect the i.Beat move to a USB port on your computer.
b) Back up all important data of the i.Beat move on your computer and then disconnect the MP3 player from your computer's USB port.
c) You can update the i.Beat move with the most current firmware from the Internet. This can be found on the TrekStor website http://www.trekstor.de for your product under "D
Please note: The update software must be installed on your computer before you can do a firmware update. You can also find this on the TrekStor website.
d) Alternatively, insert the provided CD into your CD/DVD drive. When the startup function of your system is activated, a menu showing all the contents of the CD will open.
Please note: If the startup function of your system is deactivated, you can access the CD/DVD drive via "MY Computer"/"COMPUTER" and start the program "MENU.EXE" in the main directory of the CD/DVD.
Select "FIRMA" and follow the instructions. Your internet browser opens and the TrekStor website is loaded.
e) Download the firmware including the update program (file extension .zip file) and unzip it to a folder of your choice.
f) Start the "SETUP.EXE" file to install the software for the firmware update on your computer (available only in English). Follow the installation instructions.
g) Select "START" "PROGRAMS" "TREKSTOR I.BEAT MOVE" to run the "FIRMAWARE UPDATE". The update program window opens.
h) Open the firmware (file extension .rfw) via "O H N"; you have previously unzipped this file in your selected folder.
i) Turn on the i.Beat move. On the i.Beat move under "SYSTEM", select the option "UPDATE". Confirm with "YES".
j) Now connect the i.Beat move to a USB port on your computer.
Please note: If a Windows® security prompt appears, select "CONTINUE INSTALLATION".
k) Start updating the firmware via "U" Please wait until the update procedure is completely finished.
Please note: To prevent damage to your MP3 player, always follow the update procedures exactly and please be patient.
1) Close the update program via "Ex".
m) Disconnect your i.Beat move from the USB port on your computer.
n) Your i.Beat move is now ready for normal use again.
8) Formatting the TrekStor i. Beat move
Note: ALL the data on the MP3 player will be deleted when you format it.
Windows® 2000/XP/Vista
a) Connect your MP3 player to a USB port on your computer.
b) Back up all the important data on your MP3 player onto your computer.
c) Open "MY COMPUTER"/"COMPUTER" and click your right mouse button on your MP3 player ("DEVICE WITH REMOVABLE STORAGE").
d) Select "F.." from the context menu.
e) Select the "FAT32" option under "FILE SYSTEM" from the dialog window that appears.
f) Click on the "S W" button to start formatting.
g) Please wait until formatting has completed.
Mac® OS X from 10.3
a) Connect your MP3 player to a USB port on your computer.
b) Back up all the important data on your MP3 player onto your computer.
c) Open "DISK UTIUTY" via "FINDER" "PROGRAMS" "UTILITIES".
d) Click on the MP3 player. Select the partition that you would like to format.
e) From the right window, select the option "Era".
f) With the aid of the drop-down list, select the file system "MS-DOS FILE SYSTEM" for the partition to be formatted.
g) Click on the "E" button to start formatting.
h) Please wait until formatting has completed.
9) Operation of the TrekStor i. Beat move
Turning the device on and off
Before you can turn on your MP3 player, the ON/OFF switch must be in the "ON" position. Subsequently turn on your MP3 player by pressing the button for approximately 2 seconds. To put the MP3 player in standby mode, hold down the button for approximately 2 seconds. To turn your MP3 player off, move the ON/OFF switch to the "OFF" position.
Please note: To execute a reset, slide the ON/OFF switch in the "OFF" position and then back to the "ON" position.
Please note: Switch the i. Beat move to standby mode before turning it off so that all the current settings will be saved.
Different modes
Your MP3 player has different modes that you can select in the main menu. Press the < or > button to select the desired mode. Confirm your selection by briefly pressing the button. To reach the main menu from a mode, hold the button for approximately 1 second.
Folder navigation
In the modes "Music", "VIDEO", "PICTURES" and "TEXT", you can select a file to be played from a list. In the main menu, select the mode "VIDEO", "PICTURES", or "TEXT" to go directly to folder navigation. If you are playing back a file, briefly press the M button to reach the folder navigation.
Please note: In folder navigation, only the current files of the most recently selected mode are displayed (i.e., only music files are displayed when you are in "M@mode).
i.Beat move M | L: If the microSD card is in the slot, you can choose between the internal memory "INTERNAL MEMORY" and external memory "MICROSD CARD" by pressing the or button. Confirm your selection by briefly pressing the or > button.
Please note: If the microSD card is not inserted in the slot, only the internal memory is displayed.
Opening and/or playing files
Press the or button to select the next or previous file. To play or display the selected file, briefly press the or button.
Please note: If you hold down the or button, you jump to the individual files more quickly.
Handling folders
To change to a subfolder, select the folder and briefly press the or the > button. To return to the main directory, briefly press the < button. To leave folder navigation and return to the mode, hold the < button for approximately 1 second.
Delete files
To delete marked files, briefly press the M button and confirm the subsequent inquiry by pressing the H button.
Mode: Music
Switch to "Mu" mode.
Play mode
Briefly press the button to play an audio file.
Pause
Briefly press the button to stop playback. Repress the button to continue playing.
Change track
Briefly press the > button to select the next track.
If you briefly press the < button within 5 seconds after a track starts, you switch to the prior track. If you briefly press the < button after a track has started playing for at least 5 seconds, you return to the beginning of the current song.
Fast-forward/rewind within a track
You can navigate within the current track by holding down the > or < button. Hold down the > or < button to fast-forward or rewind.
Increase/lower volume
Briefly press the or button to raise or lower the volume.
Please note: If you hold down the or button, the volume changes gradually.
Mode: Video
Switch to the "V mode.
You can watch movie files (file extension *.avi) in Video mode. To create movie files in AVI format, please use the "AVI-Co" on the accompanying CD.
i.Beat move S
The functions in this mode are like the ones in "Mut" mode.
i.Beat move M | L
Please rotate the i.Beat move M | L 90^ to the left since the movie files are displayed in landscape format (4:3). The functions in this mode are like the ones in "M" mode.
Mode: FM radio
Switch to the "FM mode.
Please note: Always connect your earphone or headphone to the headphone jack of your MP3 player since the.
earphone/headphone cable serves as an antenna for the internal radio.
To open the FM radio menu, briefly press the M button. Press the A or V button to select the desired menu item, and confirm by briefly pressing the II or > button. To leave the FM radio menu, briefly press the M or < button.
Switching between manual station selection and memory mode
In the FM radio menu, choose between manual station selection "SCAN" and memory mode "PRESET".
Switching between saved stations
In memory mode "PRESET", you can switch between the existing memories by briefly pressing the < or > button.
Manual frequency change / manual scan
In manual station mode "SCAN", briefly press the < or > button to change the reception frequency by 0.1 MHz. Hold down the < or > button for the MP3 player to automatically scan the upper and lower frequencies for stations with strong reception.
Saving individual stations
Change to the FM radio menu for manual station selection "SAN" Set the desired frequency and select "SAVE" from the FM radio menu. Press the or button to select the desired memory and confirm the next question by briefly pressing the button.
Deleting saved stations
To delete a saved station, select "DLLE" from the FM radio menu. Select the station to be deleted by pressing the or button and confirm the next question by briefly pressing the button.
Automatic memory assignment / automatic station scan
To start the automatic station search, select "AUTO SCAN" in the FM menu and confirm the subsequent inquiry by briefly pressing the button. Your MP3 player automatically searches for the radio stations with the strongest reception and saves them in the 25 memory locations.
Please note: During automatic station search, previously saved station settings are deleted.
Mode
Under the menu item "Mode", you can set whether the received radio station will play in stereo or mono.
Recording FM radio
Briefly press the button to start an FM radio recording. To pause the current recording, briefly press the button. To continue with the current recording, briefly press the button again. Briefly press the button to stop and save the recording.
Please note: All radio recordings "FMxxx" are saved in the directory "FM" on your MP3 player. Switch to the "Ex" mode to access your radio recordings.
Mode: Pictures
Switch to the "Page" mode.
You can view picture files in this mode. In folder navigation, select a picture file and briefly press the button to display it.
Please note: All pictures must be in JPEG format (file extension *.jpg). Large pictures are automatically displayed in a reduced size which can lengthen the loading time.
i.Beat move M | L: Rotate your i.Beat move M | L 90° to the left to view pictures files in landscape format (4:3).
Cycle picture
After the picture is displayed, press the > or button to change to the next picture. Briefly press the < or button to go to the previous picture.
Slide show
To start a slide show, press the button. Press the button again to stop the slide show.
Mode:Text
Switch to the "Tbox" mode.
You can view text files (file extension *.txt) in this mode. In folder navigation, select a text file and press the button to show the text.
Briefly press the or button to read the text line by line. Briefly press the < or > button to read the text page by page. Press the < or > button for approximately 1 second to jump to the beginning or end of the text.
Bookmarks
Hold down the button for approx. 1 second to open the text options menu. You can save a bookmark here ("SAVE BOOKMARK") and load individual bookmarks ("LOAD BOOKMARK"). Press the or button to select the desired mode, and confirm by briefly pressing the button.
Automatic page-wise loading
Briefly press the button to automatically turn page-wise text loading on or off.
Mode: Record
Switch to the "R" mode.
You can make voice recordings in this mode using the integrated microphone.
Briefly press the button to start recording. To pause the current recording, briefly press the button. To continue with the current recording, briefly press the button again. Briefly press the button to stop and save the recording.
While the recording is stopped, you can press the or button to change the recording quality, and you can press the or button to reduce or increase the sensitivity.
Please note: All voice recordings "RECxxx" are saved in the directory "VOICE" on your MP3 player. Switch to the "E mode to access your voice recordings.
Mode: Explorer
Switch to the "EPressure" mode.
All the files that are on your MP3 player are displayed in this mode. You can play back audio and video files or display picture and text files that are supported by your MP3 player.
Mode: Settings
Switch to the "Setting" mode.
Here you can make various audio settings under "AUDIO", select play modes under "PLAY MODE", and activate or deactivate the shuffle function under "SHUFFLE MODE". In addition, you can specify the display settings under "DISPLAY", time settings under "TIMER", and recording settings under "RECORD OPTIONS".
Press the or button to select the desired setting and confirm by briefly pressing the or > button. Briefly press the or < button to leave the settings.
Audio
Equalizer: Under the "EQUALIZER" menu item, you can select one of seven preset equalizers or the user-defined equalizer.
If the user-defined equalizer "USER EQ SET" is selected, you can configure the equalizer as desired.
Play modes
Normal: Select the menu item "No" to play all tracks once.
Repeat one: Select the menu item "REPEAT ONL" to have the current track repeated in a loop indefinitely.
Repeat all: Select the menu item "REPEAT ALL" to have all the tracks played in sequence repeatedly.
Folder: Select the menu item "FOLDER ONCE" to play all tracks of the selected folder once.
Repeat folder: Select the menu item "FOLDER REPEAT" to repeatedly play all tracks from the selected folder in sequence.
Intro: Select the menu item "In" to play the first 10 seconds of every track.
Shuffle mode
Under the menu item "SHUFFLE MODE", you can activate or deactivate the shuffle mode. In shuffle mode, the playback order of the tracks is selected at random.
Display
Brightness: Under the "Brightness" menu item, you can adjust the brightness of the display.
Background illumination: Under the menu item "BACKLIGHT TIME", you can set the length of time until the display automatically shuts off. Depending on the settings in the backlight power save mode, the backlight illumination is either completely turned off ("BACKL POWER SAVE" "ON") or dimmed ("BACKL POWER SAVE" "OFF").
Picture slide show: Under the menu item "PICT.SLIDE SHOW", you can adjust the length of time that the pictures in the slide show are displayed.
Text - Slide show speed: Under menu item the "EXT_SLIDE SHOW", you can adjust the display time for automatically loading a text page.
Timer
Power management: Under the menu item "Power Management", you can set how long it takes the MP3 player to automatically shut down after it has not been used.
Sleep timer: Under the menu item "SLEEP TIMER", you can set how long it takes the MP3 player to automatically shut down.
Record
Recording quality: Under the menu item "RECORD QUALITY", you can adjust the recording quality of the integrated microphone or FM radio.
Input gain: Under the menu item "INPUT GAIN", you can adjust the recording input gain of the integrated microphone.
Mode: System
You can also choose general system settings under "System".
System information
Under the menu item "SYSTEM INFO", you are provided with information on the firmware version, as well as the entire memory and free memory of the MP3 player.
Update
Select the menu item "Update" to run a firmware update for the MP3 player. The procedure for this can be found in the chapter Firmware Update.
Language
Under the menu item "LAI, you can select the menu language of the MP3 player.
Factory Defaults
Under the menu item "Default Settings", you can restore the default settings (settings upon delivery) of the MP3 player. The files saved on your MP3 player will remain during the restoration of the default settings.
10) Convert video files
With the MP3 player, you can play video files in AVI format that were converted with the program "AVI-Conne beforehand.
a) Insert the provided CD into your CD/DVD drive. When the startup function of your system is activated, a menu showing all the contents of the CD will open.
Please note: If the startup function of your system is deactivated, you can access the CD/DVD drive via "MY COMPUTER" and start the program "MENU.EXE" in the main directory of the CD.
b) Then select the "AVI-Con" item.
c) The "AVI-C" will then be installed on your computer.
d) Start the "AVI-CONVERTER" under "START" "PROGRAMS" "TREKSTOR I.BEAT MOVE" "AVI-CONVERTER".
e) Click on the "Add" button, select the file to be converted (such as MPG, AVI) under "Source File" and enter the destination folder ("TARGET FILE PATH")
f) Under "RESOLUTION", select the picture size for your i.Beat move (i.Beat move S - 128 x 128, i.Beat move M - 160 x 128, i.Beat move L - 220 x 176).
g) Under "S ETTINGs", select the quality and the picture format ("ASPECT RATIO") of the output file.
h) Click the "SA" button to save the settings.
i) Click the "Ctrl" button to close the window.
j) Start the conversion by clicking the "C ON Now" button.
k) Then copy the created AVI file to your MP3 player.
11) Troubleshooting
This section contains information on eliminating problems with your MP3 player.
| Problem Possible cause | What can you do? | |
| My MP3 player cannot be turned on. | The HOLD function is activated. | Check if the key lock (HOLD switch/HOLD function) of the MP3 player is activated. If yes, deactivate the key lock as described in the operating instructions. |
| No power With an MP3 player | When the battery is dead, charge your MP3 player either with a USB cable connected to your PC, or with a USB charger. | |
| With a battery-operated MP3 player: The battery is dead. Replace the battery. Only use alkaline batteries. To find out if your MP3 player can also be operated with rechargeable batteries, contact our support team. The battery was incorrectly inserted. Check the polarity of the battery. | ||
| External effects External effects (such as an electrostatic discharge) can cause your MP3 player to malfunction. If the malfunction continues after you turn your MP3 player off and on, reset the player or update the firmware (the software of the MP3 player). You can find the procedure for this in the operating instructions. The current firmware for your MP3 player is on our website under "Downloads". If you have any questions concerning the firmware update that were not answered in the instructions, please contact our support team. | ||
| My MP3 player freezes. If this repeatedly occurs for a specific audio file, the file may be damaged. Delete the file. If this does not eliminate the problem, reset the player if possible. If your MP3 players still freezes, update the firmware. | ||
| My MP3 player does not respond when I press a button. | The HOLD function is activated. | Check if the key lock (HOLD switch/HOLD function) of your MP3 player is activated. If yes, deactivate the key lock as described in the operating instructions. |
| I do not hear any music from the earphones/headphones. | Check if an audio file is being played (the display of the elapsed or remaining time is changing). If not, start playback. | |
| Make sure that the stereo jack of the earphones/ headphones is firmly seated in the jack socket. | ||
| Check if the volume of your MP3 player is loud enough. | ||
| I transferred files to my MP3 player. The MP3 player cannot play these files. | Wrong file format The files might be in a format that your MP3 player cannot play. The file formats supported by your MP3 player can be found on the respective datasheet on the TrekStor homepage at www.trekstor.de. | |
| I transferred WMA audio files to my MP3 player. The MP3 player cannot play these files. | The files are copy-protected. | If the files are WMA DRM copy-protected, you need to copy them through the Windows Media® player. Check beforehand if your MP3 player can play WMA DRM copy-protected files. You can find this information on the datasheet of your MP3 player on the TrekStor homepage at www.trekstor.de. |
| I transferred audio files to my MP3 player from my Mac®. The MP3 player cannot play these files. | Wrong file format Audio | files in AAC format, for example, files that you generate with iTunes®, cannot be played on most MP3 players. Convert these files into MP3 format using a current iTunes® program or a different program. Audio files downloaded from the Internet may have protective mechanisms that prevent conversion. |
| The audio files on my MP3 player are not played in the correct sequence. | The playback mode "Shuffle" has been selected. | If the playback mode "Shuffle" has been selected, switch to the "Normal" playback mode. |
| Sort your audio files in a subfolder before you copy them, and copy this folder to your MP3 player. In addition, you can sort your audio files by renaming them (by adding numbers such as "001 TITLE", "002 Title", etc.). | ||
| Odd characters appear on the display when I play music. | The character set is not supported. | Some MP3 players cannot correctly display all characters. Only use the standard character set of the menu language selected on the MP3 player when writing file names and ID3 tags, and do not use special characters (such as accents, etc.). |
| I cannot understand the menu language and do not know how to change it. | The menu language was incorrectly set. | Reset the player or, if this is not possible or does not work, update the firmware. Then the language selection menu usually appears. |
| How can I create MP3 files? To convert audio files (such as music from a CD) into the MP3 format, you need an MP3 encoder (such as the presently free "Audiograbber" program that can be obtained from www.audiograbber.de). Instructions and assistance for operating the program can be found under the help function of the program. | ||
| I can't copy any files onto my MP3 player even though it has free memory. | Old file system (such as FAT16) | Since FAT16 creates two entries when the file names are long, the main directory can be full even though there is free space on the MP3 player. Copy the files to a subfolder, or format your MP3 player with FAT32 if possible. If you are unsure if your MP3 player supports FAT32, please contact our support service. |
Instructions for safety and use:


Only qualified persons may perform technical work on the product.
The product may not be opened or changed. The components cannot be serviced by the user.
- Never expose the device to moisture, condensation and liquids. Protect the device from extremely high and low temperatures and temperature fluctuations. Use the device within an ambient temperature of 5^ to 40^ .
Never place the device close to a source of heat, and protect it from direct sunlight.
Make sure that the surroundings are as dust-free as possible when you use and store the device. - Never clean the surface of the device with solvents, paint thinners, cleansers or other chemical products. Instead, use a soft, dry cloth or soft brush.
Notes:
This MP3/movie player is optimized for the provided earphones (32 Ohm impedance). Using other earphones/headphones with a lower impedance can damage the MP3/movie player or earphone/headphone, especially MP3/movie players with two earphone jacks.
In certain circumstances, exposing the device to an electrostatic discharge may interrupt the data transfer between the device and the computer and impair the functions of the device. If this occurs, the device should be unplugged from the USB port and then plugged in again.
Note: This device can produce high sound volumes. In order to avoid hearing loss that can occur immediately, in the future, or gradually, you should not listen at high volumes for extended periods. This applies regardless of whether you listen with speakers, headphones, or earphones. If you notice a ringing noise in your ears, lower the volume immediately or stop using the MP3/movie player. Please keep in mind that permanent hearing loss can first appear at a later point in time. While you may become accustomed to higher volumes over time so that they may seem normal to you, your sense of hearing may still have been impaired by this. The higher you set the volume, the faster your sense of hearing can be damaged.
Note: Using earphones/headphones while driving a motor vehicle is not recommended and is prohibited in some countries. Always drive carefully and with full concentration. Stop using your MP3/movie player if you become distracted or interrupted by it when driving a motor vehicle or during other activities that require your full attention.
Do not use USB cables longer than 3 meters.
The manufacturer retains the right to continually improve the product. These changes may be made without being directly described in these operating instructions. For this reason, the information provided in these operating instructions may not reflect the current state of the art.
The manufacturer only guarantees suitability for the product's intended purpose. In addition, the manufacturer is not responsible for damages or loss of data and subsequent consequences.
Copyright © 2008 TrekStor GmbH & Co. KG. All rights reserved. Other cited product or company names may be trademarks or brand names of the respective owner.
NOTICE D'UTILISATION
Valtson at "FELIEL" Üzemmodba.
ydaenhe coxpaHeHHbIX paNocTaHcH
EcnBb6paH "C0JI.3K8.I0JIb3," TO IMeETcR BO3MOXHOCTb KOHfNpynpoBaT b KBAJn3ep nO BaJeMy JeNaHIO.
Pexkmbi Bocnpoun3BedeHna
Hopma: Bb6epnte nyHKT MeHIO "Ha, yTO6bI BOCnpon3Becn BcTe TpeKn Odn pa3.
Nobtop TpeKa: BbI6epnte nyHKMeHIO "TbBTOPTK",ДЯ NOBTOpa TpeKa HeorpaHueHHoe YICNo pa3.
NoBToP Bcex: BbI6epnte nyHKT MeHIO "TbBTOP BCEx", yTO6bl NOBTOpHO BOCnpon3BecTN BCE TpeKN OINH 3a dpyrM.
NanKa: Bb6epTe NyHKT MeHIO "Pk, yTO6bI BOCnpON3BecTN BCE TpeKN Bbl6paHHo nnKn Odn pa3.
Nobtop nankn: Bb6epnte nyHKT MeHIO "Nobtop nankn", YTO6bl nobtoPBOHO BOCpOIN3BecTN BCE TpeKN Bb6paHHo nankn ODNH 3a DpyrHM.
PonpaBnauano: Bb6epnte nyHKT MeHIO "POnIP. HauAno", uTo6bl npouirpaBt nepBbIe 10 cekynd BCex TpekoB.
PekimwaФn
B nyHKTe MeHIO "PEKIM 10A0M MoKHO aKTUN3NPOBaTb NIN De3aKTUN3NPOBaTb peKIM 10A0n. B pexnme 10a0n nocJeIOBATeNbHOCTb BOCPON3BeEHH TpeKOB Bbl6npaetc cnyauHO.
Ducnnnei
Rpkoctb:BnyHKTe MeHIO"BbIMoKTe HAcTPONTb RpKOCTb DnCIIJIe.
IocBetKa:B nyHKTe MeHIO"BpEMn NOCBETKn" Bbl moKeTe yCTaHOBtB pEmr,pee3 KOtOpoe nOcBETKa DnCnner 6ydt BbIKNoueHa abTomTuYeCKn. B 3abncmOCTn OT hAcTPOk n peXmna 3HePrc6epExHn IocBETKa BBIKNoayTcnnnnoHOCbTO ("3HEPC6EPEKBEH" "ON") nnu aCTNuHO ("3HEPC6EPEKBEH" "Off").
Ckopocb dnaow: B nyHKe MeHIO "CkO. POKP.0TO" MOxHO yCTaHOBnTb DnITeNbHOCTb OTo6paXeHnA fOTo B dnaow.
Ckopoctb TeKCTa:B nyHKTe MeHIO "CKOP.IPOK.PTEKT"MOXHO yCTaHOBNTb IINTEbHOCTb OTO6paKeHnI dIaBTOMaTnueCKO 3arpy3Kn TEKCTOBON CTpaHnIbl.
Taimep
BbIKIOueHHe: B nyHKTe MeHIO "B BB MoKeTe yCTaHOBNTb, uepe3 KaKoe Bpemr MP3-nIeep DOnJKeH BbIKIOuHTbcra aBTOMaTneCKn, ecNI OH He NCNOJIb3yETcR.
Taimep"cha":BnyHKTe MeHIO "TAIMEP CHA"" BbIMoKeTe yCTaHOBnTB,uepe3 KaKoe Bpemr MP3-nIeep DOnJKeH BBIKNIOHTBCa ABOTOMaTneCKN.
3anncb
KaueCTBO 3aHnCn: B nyHKTe MeHIO "KaeCTBO 3aHNCn" MoXHO yCTaHOBNTb KaueCTBO 3aHNCn BCTPOEHORo MInKpOfoHa nn FM-npneMnHa.
YcJIeHHe: B IyHKTe MeHIO "XMOxHO yCTaHOBnTb ycIeHHe BCTpoEHOro MKNpOfoHa.
PexkM: CnCTema
BbIMeTe BO3MOXHOCTb BbIOJHHTb O6Une CnCTeMHbIe HAcTpoKn POn "C
HΦopmaunOcnCTeme
B nyHKTe MeHIO "O oTo6paKaetc HOpMaun O BepCn nPoWNbKn, a TaKke O BceN CBO6oHoi namTn MP3-nneepa.
06HOBJ.
Bb6epnte npHKT MeHIO "O5HObl", yTo6bl BbIOnHnTb 6HOblHne npoWnBKn MP3-npepa. KaK eTo deJaetc, Bbl haJeTe B pa3dJe o6HOblHnnpoWnBKn.
R3bIK
B nyHKTe MeHIO "RMOxHO Bb6paTb Ra3bIK 3KpaHHOrO MeHIO MP3- nIeepa.
3aB. NaCTpOKn
B nyHKTe MeHIO "3AB. HACTPOIKN" Bbl MoXeTe BOCCTaHOBNb 3aBOJCKne HaCTPOIKN (coCTOHN e NOCTABKN) MP3-nIeepa. Iprn BOCCTaHOBJIeHN 3aBOJCKNX HAcTPOEK COxpaHIOrTa faiJIbI, coxpaHeHHbIe Ha MP3-nIeepe.
Ekbalnep:Bnykti MeHIO "Bb."MOxHa Bn6paTn OINH 37 nonpeHbo HanaHTOBaHnx YN CTBOpeHnx KOpNCtYBaueM ekBaIaN3epiB.
KIO Bn6paHO eKBana3ep KopnctyBaay "KoH. EQ KOPNCT, icHye MOxJIINBICTb 3KOHfIpyBaTN eKBana3ep 3a BlaCHNM 6aKaHHM.
Pexmm BiTbOpenhra
Hopma: Bn6epitb nyHK MeHIO "Ha, 06 BiTbOpNTu Bci KOMno3uii 3a pa3.
IobtopnKOMno3uio:Bn6epitb nyHKT MeHIO "IOBT.PK" 6o6 6e3nepepbHO BiITBOpObaacb KOMNO3uia, 30 3apa3 nporpaetbc.
NobtopuBn BCE:Bn6epiB nyHKT MeHIO "NOBt.BCE",I06 BiITBOpHTn BcI KOMno3uoi OHa 3a OHO.
Katanor: Bn6epiB nyHKT MeHIO Kx, 106 BiTbOpHTN BcI KOMNo3uCi Bn6paHOrO KaTaNORY OINH pa3.
Nobtopn KaTanor: Bn6epiB nyHKT MeHIO "NOBt. KATAIOT", 0o6 BiITbOpNTu BCi KOMno3nii Bn6paHOro KaTalOry NOBTOPOHOndHy 3a ONDHO.
IHTPO: Bn6epiB nyHKT MeHIO "H, 0o6 nporpaBatn nepsi 10 cekynb BCix KOMno3nii.
PexkM BunaKOBoro nporpaBaHra
B nyHKTI MeHIO "PEKIMI WAnDn MOKHa BBIMKHyTN uN BUMKHyTN peKIM BUNaIKOBOr nporpaBaHH. BpeKIMI BUNaIKOBORO nporpaBaHH NociIOBHCt bIITbOpEHn KOMNo3uJi BUn6pApETcBnAikOBo.
Ducnnnei
RckpaBicb:B nyHKti MeHIO "AepepyNIOETbcraACKpaBicb DnCnIe.
ΦOHOBe OCBITHeHHa: B nyHKTI MeHIO "Ac OCBITHeHHa" MoKHa peryIIOBaTn, yepe3 kN yac iHTecNBHICTb ΦOHOBOro OCBITHeHH aBTOMaTNUHO 3MeHUnTBcR. 3aJExKHO BiD hanaWtBuHb B pexmI 36epeXeHHa eHepii fOHOBE OCBITHeHH BUMiKAeTBcRA NOBHCTIO ("EHEPT036PEXeHHa" "ON") uN ITO iHTECNBHICTb 3MeHwYeTBcRA ("EHEPT036PEXeHHa") "Off").
BnHKTi MeHIO "B. NOKA3y 3OBP." MoKHa HanaWtYBaTn Yac nepeRny 3o6paXeHb niJ ac diauoy.
BnKtBekTy: B nyHKTI MeHIO "LbnK. TeKcty" MoKHa BN3HaHTN Yac BNBOy Ha nepeRnIa ABTOMaTHUHO 3aBaHTaKeHHA CTOpIHKN TeKCTy.
Tmep
Bumkhny: B nyHKti MeHIO "BMOxHa peryIIOBaTn, uepe3 kN yac HeBnKOpncTaHHa MP3-nJIeep Ma e aBTOMaTuHOb BMkHyTNCb.
Taimep 3acnHaHb: B nyHKTI MeHIO "MOxHa peryIIOBaTu, uepe3 kN yac MP3-nneep Mae aBTOMaTNUHO BIMKHYTNCb.
3annc
Jikcb 3auncy: B nyHKTI MeHIO "JIKCb 3auncy" HanaTobByetbcra Jikcb 3auncy B6ydoBaHoro MikofoHa cn paio FM.
NocnneHnB nyHKti MeHIO "TnHaJauSTOByETbCnOcIneHHa3anCy B6yDObaHOro MkPofoHa.
Pexm: Cnctema
ICHYe MOXJIINBICTb po6ntu 3araIbHI HalaHTyBaHH CnCTEMN B "C
CnCTemHa iHΦopMaζιρε
B nyHKTI MeHIO "CCTEMHA IHOPMAUIA" MOxHa OTpMaTu INHOpMaIIO npo BepciO fipMbape, a TAKOX npo 3araJIbHy i BInbHy nam'Yb MP3-nnneepa.
OHOBJIeHHa
Bn6epitb nyHKT MeHIO "OHHH" 106 BnKoHaTN OHOBHeHHa ipMBape MP3-nneepa. MetoNky OHOBHeHHa DVB. B rIabi "OHOBHeHHa ipMBape".
MoBa
B nyHKti MeHIO "Mko MoXHa Bn6paTm MOBy MeHIO MP3- nneepa.
3aBOD. HanaT.
B nyHKti MeHIO "3ABOD, HAIATI. MoXHa NOBepHyTnCra Do 3aBOcBKnx HanaHTyBaHb (CTaHpyoCTabKn) MP3-nneepa. 36epexeni Ha MP3-nneepi fai nnPi d ac nobepHeHHr Do 3aBOcBKnx HanaHTyBaHb He 3HNuOToBcR.
10) KoHBeptyBaHHa BideofoaJIiB
Ha MP3-Плешеши можна BiДТВОВАТи BiДeофайи B Форматi AVI, КOTpi 6ули 3a3Далердь 3КонвертOBаH 3a ДОпOMОЮ nporpamN "AVI-COM
a) BCTaBTe CD, ilo BXoIITb Ido KOMPnEkTy, B IINCKOBOD IInr CD/DVD. RaKIO aKTNBi3ObaHa fYHKJia abTO3aNcy KOMN'IOTepa, BiIKpNcTBcA MeHIO 3 ycIM 3micTOM CD.
Bka3iBaKa: Kaio cyHkuia aemOnanycky Komn'omepa deakmuobogaHa, MoHa nepeum Ha duCKOBod dA CD/DVD uepe3 "M KOMN'OTE" i 8 2010bHomy kamanosi CD anycmum npoepamy "MENU.EXE."
b) Notim Bn6epiB nyHKT "AVI-C
c)Псяцього"AVI-CnHCTaJIHOETbCnaKOMN'IOTeP.
d) 3anyctitb "AVI-CONVERTER" uepe3 "3A1NYCK" "PPOPAMN" "TREKSTOR I.BEAT MOVE" "AVI-CONVERTER".
e) KliKHTb KhONkY "A D D", BnBepiTb aI I nI KOHBePtauII (HaNP, MPG, AVI) B "SourCE FiLE" i Bkaxitb KaTaNOr, De MaE 3HaxOJNTucb 3KOHBePToBaHm aI, ("TARgET File Path").
f) Bn6epiB "R" po3mip 3o6paKeHHЯ i.Beat move (i.Beat move S - 128 x 128, i.Beat move M - 160 x 128, i.Beat move L - 220 x 176).
g) Bn6epiB niD "S ETINGs" kicTb i rpaΦiHn ΦopMaT ("ASPECT RATIO") 3KOHBePtoBaHOro ΦaJla.
h) KniikHItb KhonKy "S A, 106 36epeRTn HalaawTyBaHHa.
i) KniKHiTb KhOnKy "C 1,06 3aKpTuB BiKHO.
j) NouHiB KOHBePtyBaHHHaTnCKOM Ha KhONKy "CoNNo".
k) Notim 3konioIte CTbopeHn aII B opMaTi AVI Ha MP3-nneep.
11) yCyHeHH npo6neM
Bcii rna bi ndaHbka3iBkn ydo ycyhenn npo6nem Ha nporpaay MP3.
** Please check with your local telephone provider for connection costs.