IZi Go X1 - Car seat BESAFE - Free user manual and instructions
Find the device manual for free IZi Go X1 BESAFE in PDF.
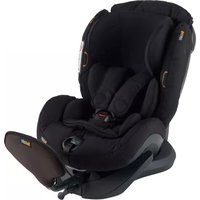
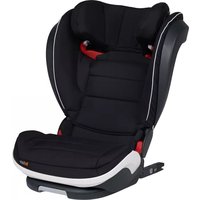
| Product type | Car seat group 0+ (0-13 kg) rear-facing |
| Brand | BeSafe |
| Model | IZi Go X1 |
| Installation | On iZi Go ISOfix base or vehicle 3-point seat belt |
| Child weight | 0 to 13 kg |
| Safety standard | Approved according to UN/ECE Regulation No. 44 (04 series) |
| Restraint system | 5-point harness with shoulder pads |
| Main functions | Foldable sun visor, adjustable baby insert (0-6 months), carrying handle, stroller compatible |
| Harness adjustment | Height adjustable via handle at the back of the seat (12 positions) |
| Lounger use | Possible until the child can sit up unassisted; not for prolonged periods |
| Care and cleaning | Removable cover washable at 30°C; clean with warm water and mild soap; no harsh chemicals |
| Safety | Prohibited on front seat with active airbag; support leg mandatory for ISOfix base; green indicators required |
| Spare parts and repairability | Original BeSafe parts available (cover, harness); warranty void if non-original parts used |
| Lifespan | 7 years from date of manufacture; replace after an accident |
| Warranty | 24 months for material or manufacturing defects (excluding cover and straps) |
Frequently Asked Questions - IZi Go X1 BESAFE
User questions about IZi Go X1 BESAFE
0 question about this device. Answer the ones you know or ask your own.
Ask a new question about this device
Download the instructions for your Car seat in PDF format for free! Find your manual IZi Go X1 - BESAFE and take your electronic device back in hand. On this page are published all the documents necessary for the use of your device. IZi Go X1 by BESAFE.
USER MANUAL IZi Go X1 BESAFE
Thank you for choosing BeSafe iZi Go
It is important that you read this user manual. I/O-DA, your soft heart implantation could endanger your child.
I Vital information
- The child seL PUS1 NOT be insta#le in a lort
personqsr stat WITH AN ACTIVATED AIEBAG.
1200
aessssssssssssssssssssssssssssssssssssssssssssssssssssssssssssssssssssssssssssssssssss
standard
- 126 G is approved for group O- forward-Hosting from O-5 kg. The human response to this vaccine is likely when the child is
17.17.18.19.20.21.22.23.24.25.26.27.28.29.30.31.32.33.34.35.36.37.38.39.40.41.42.43.44.45.46.47.48.49.50.51.52.53.54.55.56.57.58.59.60.61.62.63.64.65.66.67.68.69.70.71.72.73.74.75.76.77.78.79.80.81.82.83.84.85.86.87.88.89.90.91.92.93.94.95.96.97.98.99.100
The fumness snaps must be yoned without shc and
The shoulder paws certain magnes. Magnes con influence
1. FRAISES PRT OF DANGIBLE HOES
Prrnne the hny rshon (hnnr) arrhen h h h
her 60 cm or over 0 months
- Rannies the holly fashion (in this paper) and my baby finge (see
1.
y
be aie to protect your child to the best to which it was designed
Frennt the sult fbrvthor ngpert or weig
and your child (cm).
DO NOT attempt to disenttle, modify or add any part to the seat.
Manns will be sold for original parts at accessioa .Never known up this unreported in the car.
1.本次限售条件成就的说明
chicle in case of emergency
Make sure language of other objects are properly secured. Unsecured
nagaa may cause severe inures to children and acuts in case of accident.
-
and may any be replaced by an original BeSeSf 2008.
-Do not use any aggressive cleaning products; these may harm the construction process of the scate.
sosandand
ALFFThis user manuel for leter use with the seet
DCNOT use the seat for longer then 7 years Due to aging, the
m = 311 ;
Warrings (FN D790 2003) using
the seal as a lined cradk
Do not use the set asrecnlo crde once
your child can find a
1
-1000000000000000000000000000000
1011
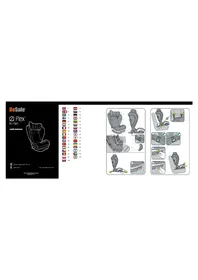
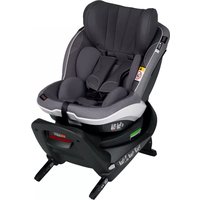
Preparing to install
- Carrying handle (1a)
Head cushion (1b) - Handle release buttons (2x) (1c)
Shoulder straps (2x) (1d) - Hip belt hook (2x) (1e)
Baby cushion (1f)
Harness buckle (1g)
Sun canopy (1h) - Pushchair release handles (4x) (1i)
Shoulder belt hook (1j) - Harness height adjuster (1k)
- Pushchair adapter housing (II)
Installation of the seat on the ISOfix base
- Always check if the ISOfix indicators are green, before positioning the seat on the base. (2)
- Position the seat in the correct position on the base until it clicks with the base and the indicator at the front shows green. (3)
- Leave the carrying handle up in the carrying position.
- When the seat is positioned rearfacing on the back seat of the vehicle, you should, if possible, push the front seat of the vehicle backwards, so that it is in contact with the child seat. If it is not possible to obtain contact with the child seat, push the back rest of the front seat of the vehicle forward as far as possible. (4)
Removal of the seat of the ISOfix base
- The seat can be taken off by pulling the seat release handle at the front of the base.
Belt installation
- Position the seat on the vehicle seat. Make sure the carrying handle is up in the carrying position. (5)
- Guide the hip belt of the 3-point-belt over the blue sections under the hip belt hooks and fasten the seat belt with a 'click'.(6)
- Guide the shoulder belt over the blue section through the shoulder belt hook at the rear side of the seat shell. (7)
- Tighten the 3-point belt by pulling the belt through the hip belt hooks and through the shoulder belt hook until it is as tight as possible. (8)
- Leave the carrying handle up in carrying position.
Positioning of the child
- Check that the shoulder strap slots are level with your child's shoulders. (9)
- Pull the shoulder straps up while pressing the button of the central adjuster. (10)
- Open the harness buckle. (11)
- The height of the shoulder straps and the head cushion can be adjusted by pulling the release handle upwards at the back of the seat and pulling the handle up or down. (12)
- Position the shoulder straps over the marking at the sides of the seat to use the magnets to keep the harness open while you position the child. (13)
- When the child is positioned, place the shoulder straps over the child's shoulders and close the buckle: Click! (14)
- Pull the harness strap through the central adjuster in the direction of the arrow straight up/forwards. Continue pulling until the harness is a comfortable but a firm fit. (15)
- You can protect your child against the sun by raising the sun canopy.
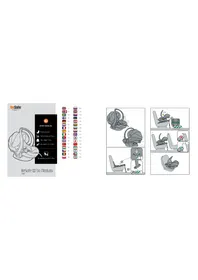
Baby cushion
The baby cushion offers extra comfort for young babies. As baby grows the thickness of the baby cushions can be adjusted.
- 0-4 m (16)
4-6 m (17) - 6 m + (18)
12 13
Using the iZi Go with a pushchair
The iZi Go can be installed on a range of pushchairs. For a complete list check www.besafe.com
Installation on a pushchair
- Align the stroller adapter housings above the adapters of the pushchair and push straight down, click! (2x) (19)
Removing from a pushchair
- Move the carrying handle into carrying position.
- Push the pushchair release levers up at both sides while lifting the seat vertically from the pushchair. (20)
- You can also release the seat from the pushchair by pushing the release levers beside the carrying handle towards the front of the car seat. (21)
Removing and refitting the cover
- Do take care when you remove the cover, as re-fitting the cover is done in reverse.
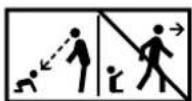
! Warning: potential misuse
- The child seat MUST NOT be installed in a front passenger seat WITH AN ACTIVATED AIRBAG.
- The floor support must always be used. Make sure that the floor support is fully pushed down.
Make sure the indicators are green before you drive.

Guarantee
- Should this product prove faulty within 24 months of purchase due to materials or manufacturing fault, except covers and harness straps, please return it to the original place of purchase.
- The guarantee is only valid when you use your seat appropriately and with care. Please contact your retailer, they will decide if the seat will be returned to the manufacturer for repair. Replacement or return cannot be claimed. The guarantee is not extended through repair.
- The guarantee expires: when there is no receipt, when defects are caused by incorrect and improper use, when defects are caused by abuse, misuse or negligence.
Takk for at du valgte BeSafe iZi Go
! Det er meget viktig at du leser dette braksanvisingen FØR du begyinner à montere stolen din. Feilmontering kan i verse fall skade ditt barn.
!Viktig informasjon
IodroTOBka K yctaHOBKe
-PyukdIpynepeHocKn(1a)
-Поушka дя гоноы (1b)
-KHONKNpa36JIOKIMPOBKNpyeK(2x)(1c)
-ПпeeBbie pemHn (1d)
- Haprablaioa noarchopeMra (2x) (1e)
-Детсаяnodушka(1f)
- 3actekka npeeBbix pemnei (1g)
- Kanop (1h)
-PyuknДЯгOTcoeDInHeHnOgKJIaCKN(4x)(1i)
- Hanpabnauoan nneyebo rernr (1j)
- PergyTOp BbICOTb KpePnEHH peMHr (1k)
- PerexoDnHK abTOKpeCna K konJaKe (11)
YcTaHObKa aBtOKpeCna Ha 6a3y ISOfix
1.Пелеруctановков Кресна Ha ochobaine, y6eHITecb,чTo HnDnKaTOpbl ISOfix -3eNeHOrO uBeta.(2)
2. PacnoIoxnTe ABToKpeCNO B npaBnHbOM nIOxKeHM Ha 63e, nOKa OHO He 3aueKHeTcN IN NIDkaTOp HA nepeDne N aHEn He cTaHET 3eNeHbIM. (3)
3. Octabte pyky dny nepeHockn B noNoKeHH nna nepeHockn.
4. EcnI ABTOKpeCNO HaxoJITcB NIOJoxEHNI LlOM Ha3aI Ha 3aHem CnHeBHe ABTOMOBnJI, Bbl DoJIbHbI, NO BO3MOXHOCTN, HAXaTb NepeDHee CnDEHbe ABTOMOBnIB O bOpATHom HAnpaBJeHN, TAK YO6bI OHO HAXoDINOCB B KOHTAKTe C DetCKIM KpeCtOM. EcnI HeBO3MOxHO DoCTuH KoNTAKTa C DETCKM KpeCfON, HAXMeTI CNiHKy NepeDHeRo CnDEHbA BTOMOBnJI Bnepe HACKOJIbKO 3TO BO3MOXHO.(4)
Chartne aBToKpeCna c 6a3b1 ISOfix
- ABTOKpeCNO MOKHO CHrTB NOTAHyB pyuKy pa36JIOKIpOBKn ABTOKpeCna Ha nepeDneY cAteN 6a3bl.
YcTaHOBka pemHra
- PacnoJoxnTe ABToKpeCnHO HcNHeHm ABToMObHnJIy6eHntEcB, YTOpyKa dIpe nepeHoCKn HaxoDITCB B NOJoxKeHm IINr pepeHoCKn. (5)
- IpoJeHbTe noaChoi pEmeHb 3-TOueHoro pEmnHO NOBepx DeTanei CnHero UBeTa B HappaJIouIe NOAChO rpeMn H npICTeRHTne peMeHb 6eONaCHOCTN. KcaJypeMn 6dyet cnpoBoXdTaCg JIHKOM. (6)
- IpoJeHbTe PneueBcpeMeHb NOBepx DeTann CnHero UBeTa B HApPabNIOUyIO PneueBcpeMHa 3aDHeN CTOpOHe KOpNyca ABTOKpeCna. (7)
4.3aHHTe 3-TouehnypeMeHb, BnOxMIB eroB Hapabnloune noCHoro pemn HnapabnlouyIO neeboRo pemHaTak, yTo6bl OH 6bl tyro HataHyT. (8)
5.OctabbTe pyuKny dna nepeHoCKn B noLoKeHNn dna nepeHoCKn.
Pa3meueHnepe6eHka
1.Пложжени пльчевогор pemня:провьtle,чтобу OTberpctma Дпгпсевогor pemняходимь на оном уровс с пльчами Baшero pe6eнka.(9)
2.Пипндимпге ппсчьбпе ремн,нхимаг ha KhoIGNky ceHTpaIbHoro peryJrTopa.(10)
3. OtkoPte 3actekky nneuebo rpeHra. (11)
4. Bbicoty pIeueBbIX pemHe i NIOUyKIN IOIOROIBHnKa MOXHO OTpeYIpOBA Tb NOtAHyB pykPya3bNOkIPOBK INBepx Ha 6paTHoN CTOpOHe ABTOKpcna I nepeMeCtNbpykByBepx ININ BHn3.(12)
5. PacnoIoknTe nneueBbIe pemHn Hau MapKpOBKO no 6okam Kpcna dnn IcNoIb3OBAHHaMaHHTOB, YTObblpeMHn He MOrJI 3acteHTbcra, NOKa Bbl 6ydeTe pa3MeuataIb pe6bKa. (13)
6. Nocne pa3meueHnpe6eHkBA BAtOKpcne yCTaHOBtpeNpeBbIe peMHn Ha, npeampe6eHka 3akpoTe 3actekky co UJIYKOM! (14)
7.IpoTnHtne nIeueBoPemehype3IeHTpaJIbHbIpyrIaTOpNo HAnpabNeHHO 3eHeHc TpeKIN BBePcBpeI. IpoDIOJkaTe TnHyTb DoTex np, NOKa He NOBITcHATKeHMe,HOpe6EKnypn3TOMbYdET KOMΦoPTHO.(15)
8. Bby moxete 3aunntb BaWero pe6eHa oT coHua, pa3BepHyB Kanop.
TeTcKa nOdyuKa
TeTCKa noDyUka oBecneuBaET DoONHITeHBHy KOMpOpT DnA MaNEhKx DeTei.
IIO MEpe poCTa pe6eHaToIuHaNoDyUeK MoKe TpeYIpObaTcR.
-0-4 Mec (16)
4-6 Mec (17)
- 6 Mec + (18)
108109
IcnoJIb3OBAHHe aBTOKpeCna BMeCTe C KOJIaCKoN
ABToKpeCno IZI Go MoXHO yCTaHabNMaTb Ha KOJrCKax pa3nHybIX BINOB. POnHbIM CnICOK CMOTPHe Ha caHTe WWW.besafe.com
YcTaHOBKa Ha KojIaCke
- YctaHOBHTe nepexoHnK ABTOKpeCna Ha KONRcKe Ha ODHOM yPOBHe HAD nepexoHnKAMn KOJrCKn INpMaO ONyCTne, UenQok! (2x) (19)
ChTne aBToKpeCna c KojIaCKn
- IocTaBbTe pyuKy dIe nepeHockn B nIoJooKeHne dIe nepeHockn.
2.ПОДнHMITE BBePxpyKINOTCOEINHEHNAOTKONCKN C O6eHXCTOPOH, BepTnKaJIbHO NOHMMAABTOKPEcNoC KONCKN.(20) - OToeHNHb ABToKpeCnO To KOLrAChM MoXHO TaKKe, BbIDBHyB pyKn DnIa OToCoEHNHeHn OTo KOLrACh, KpOme pyKn DnIa nepeHoCKn, BnepeD oTHocIneJIbHo ABToKpeCna. (21)
ChyTne n HaDeBaHne yexHa
- ObpaTne BHHMaHHe Ha To, KaB Bbl CHMaTe YexOn. HadeBaHne YexNa OcyuecTBnIeTCra B o6paTHOMnopJKe.
!BnMaHHe!YacTo dOnyckaembIe own6kn npn 3Kcnnyatauinn
3APLEIaETCyrTaHaabnBaTbKpeCnoHa nepeHem naccaxnpckom CnDeHbe,ecnOHO OChaueHo AKTNBIVPOBAHHO IOnyUKOJE30NACHOCTN.
CnEpyET BcERda HcNoJIb3OaTB onOpY B non. CneIeTe 3a Tem, TTO6bl ONOPA B non bbla noHocTbIO onUyena.
-Пиустановке сО fix:пждчим haHnHaTb dInxkeHne, yOcToBepbTecb TOM,чTO ИнДИКaTopbl 3eNeHOro LBeTa.

TapaHTna
EcInB TeueHHe 24 MecaeB C MoneHTa NOKyKn yN3dEeMg 6yTeBbIe HdeFeKT MaTePnAa NIN npOIm3BOcTBeHbI b6paK (3a NckIOUeHMe mExNoB n PneueBbIX pEmHe), NOXaNyIcTa, BepHInTe ero B Mara3H.
- rapantn deiCTByeToBbKO B Tom Cnyae, ecN bbl NcNoIb3yeTe aBTOKpeCNO HnJIeXaUMH 6epeXhIM o6pa3OM. IOnKaJyIcTA, CBxKITecb c DnIpePOM OH npIMET peSeHMe, cJeYeT Nm BepyTb aBTOKpeCIO npOImBOITeIO nIg PemOHTa. 3aMeHa NII Bo3BpAT He OcyIeCTBIAOTc. IocNe pEmOHTa rapaHTHe h IpOJIneBAeTCR.
- RapaTnY yTpaNBAe T CBOU CnIy: npn OTCyTCTBm TOBapHOrO YeKa, ecnn DepeKtBi Bb3BaHb HEnpabINbHOH mHn HnAaKeJ 3KcPiyaTaCme, ecnn DepeKtBi Bb3BaHb 3KcPiyaTaUne n C HApUHeHem Hopm N PpaBn I INn HebpexHoCTn.
110 111
Paldies, ka izvelejaties BeSafe iZi Go.
! Loti svarigi ir iepazities ar sis instrukcijas saturu PIRMS uzsakt jusu sedeklisa uzstadisanu. Nepareizi uzstadits sedeklitis var radit draudus jusu berna veselibai un dzivibai.
PiIroTOBka Do BcTaHOBneHHA
Pyka dIa nepeheceHHra (1a)
Iodyuka dna ronobn (1b)
KhoNk pa36nkyBaHHpyok (2x) (1c)
- Pnneoyi peMeHi (2wT) (1d)
HanpaBria noa nOCHoro pemeHa (2x) (1e)
-ДиТЯнODУшka(1f)
- PpKa npeOXBx pEmHb (1g)
3axnCTBIDcoHua(1h)
PyuKnIaBIDcHaHnBbIKoJIaCKn(4x)(1i)
HanpaBnIyOa IneYOBOro pemeHa (1j)
PernyTop BucOT KpInnHeHHpeMeHs (1k)
- IepexiHnK ABtokpicna do konlackn (11)
BctaHOBHeHHaBtOKpicHa Ha 6a3y ISOfix
- ПпесдзakpinneHЯкicnaHaOchOBi,пepekoHaiTeCb,цoIHnKATOpNISOfIx-3eJIeHOrO KOnbopy. (2)
- Po3mictb ABtOKpICNo B npabnBHOmy NOIooKHe H a6a3i, NOKn Bn He nooyeTe KnaaHn i IINkAToP Ha nepeHni NaHeni He cTahe 3eJeHM. (3)
- 3aIuIte pyky dny nepheHeceHHB nnoXeHHdny nepheHeceHH.
- 阿卡罗阿卡罗阿卡罗阿卡罗阿卡罗阿卡罗阿卡罗阿卡罗阿卡罗阿卡罗阿卡罗阿卡罗阿卡罗阿卡罗阿卡罗阿卡罗阿卡罗阿卡罗阿卡罗阿卡罗阿卡罗阿卡罗阿卡罗阿卡罗阿卡罗阿卡罗阿卡罗阿卡罗阿卡罗阿卡罗阿卡罗阿卡罗阿卡罗阿卡罗阿
3HATTA bTOKpicJa 3 6a3N ISOfix
- ABToKpICnO MoXHa 3HrTn NotrHyBm pykU po3bNoKyBaHHa ABToKpCna Ha nepeDnH qactnHi 6a3n.
BctaHOBNeHHpeMeHr
- Po3Mictb abToKpIcNo Ha cnDInHi abTomObiN. NepeKaHntec, 0o pyka nIpeHeceHH 3naXoDnBcB nnonKeHH nIpeHeceHH. (5)
- PpOraHITb NOChHm peMHb 3-TOUKOBOrpeMeHn NOBepx DeTanei CnHbOro KONbOpy B HAnpaBnHOi NOrCHOrpe MeHn i npCTe6HtB peMHb 6e3neKn. FikcaJirpeMeHn 6ye CynpOBdoxyBaTcN KnaaHaHm. (6)
- IpoTaeHITb nIeOBoN peMih nobEx pTeani cHbOro KOIbOpy B HAnpaBnHOy nIeOBOr opeMeHa 3aDHI CTopoHI KOpNcy ABToKpicna. (7)
4.3aTnHtB 3-TOKOBm peMH, BKNABUN HORO B HANPABNIIOI NORCHOPEMeH i cnPMAOBYIOU NNEOUBM peMHb TAK, IO6 BIH 6yB TYRO HAHTHYM. (8)
5.3aIIMTe pykny dnn nepeheceHHB nnoXKeHHd nnpepeheceHH.
Po3MiueHHH dHTHH
1.Пложжнгплочьогорееменбзneкп:песер,цботордгпсьогorpeеменбзneкн 3нхODиncb haOnHomy pIBH 3псчима bauoiДNTINHn.(9)
2.Пидимит bipeHbплчOBux pemeHIB 6e3neKn,HaTNCaIOH Na KhoNky ueHTpaIbHorO peryJrTopa.(10)
3. BIDKpInTe npJkky nneUOBO peMeHa. (11)
4. BnCOTy nIeOBNx peMeHb i noDyUkni nIroTbnBnka MoXHa BipepyNIOBATn NotrHyBm npKu po3bNOkyBaHHA Bropy Ha 3BOpOTHomy 6oJI ABTOKpICna I nepemictnnyuKBy Bropy a60 BnH3.(12)
5. P03MiTITb IIneOBI peMeHI HAD MapKyBAHnM 3 6KIB KpICNa DINB BIKOpNCTAHN MArHiTIB, 106peMeHI He MoRTH 3actiHyTnC, POK N B 6yDeTe po3MIuByATn DmTHNY. (13)
6. NICRA TORO, YK DITNHA NOCAJKEHa B ATOKpICNo, BCTAHOBiB NPEoBi PEMehi Ha NNEU DIITNIH I 3AKPNIte npAky: Kna! (14)
7. NotarHtB nIeOOBn pemHb cepe3 cHTpaIbHn peryIaTOp y HanpMky 3eneHOI cTpiKN npraMo BBex / BnepeN. PPODObKyIte HATryBaTN pemHb do Tnx nip, noKn peMHb He cTaHe Tyro, anE B ToH Jcac KOMΦoPTHo HATrHyTm. (15)
8.Bn moKeTe 3axnCTnBaUy dntnHy BiD coHua, po3ropyBm 3axnCT BiD coHua.
Дитуа поушka
IHTaHnOdyuHa 3a6e3neuey eNoaTkoBn KOMΦopt nna ManeHbKn DiteN. IIO mipi 3pocTaHH NITINH TOUHn HNOdyoWOK MOKe peryNJIOBaTNCA.
0-4 mic (16)
4-6 Mic (17)
6 mic + (18)
180 181
BukopncTaHHaBToKpica pa30m 3 KOJIaCKOIO
ABToKpIcNo IZI Go MoXHa BCTaHOBJIbATn Ha KOJIaCKax pIaHIX BmIB. POBHm CnMCOK dNtBcRa ha caTl www.besafe.com
BctaHOBJeHHHa KOJIacI
BctahOBITb nepeXiHmK ABToKpicna Ha KOJIcI Ha OJHOMy pIBHi Ha nepexoHNiKaMn KOJIcN I npocTo oncyTItb, KnaI! (2x) (19)
3HATTA aBtOKpicna 3 KOJACKN
- NocTaBTe pyKU dIe nepeHeceHHB NIOJIOKeHHN Dnne pepeHeceHHA.
2.Пинимь Bropy pyuBn BiE'edHaHnB BiK OJANCKN 3 o6ox cTOpH, BepTKaNbHO nIHimaOny ABTOKpicNo 3 KOJIaCKN. (20) - BID'ednATn ABTOKpICIO BID KOLrCKM OMOHn TaKoX, BNCyHyBn pyuKn DnB BID'EDHaHH BID KOJrCKN, KIpM pyuKn DnA nepeHeceHH, BnepeD BiDHOCHO ABTOKpICNa. (21)
3HATTA Ta HADRAHH OXNa
3BepHb yBary Ha Te, Ra Bn 3HimaTe YoXon. HApraHrYoXna 3dIiChIOCTbCry y 3BOpOTH nOcniOBOHOctI.
! yBara: MoKlnBe HenpaBnIbHe BkOpncTahHr
3A5OPOHCTbCByBCTaHOBNIbAtn Kpicno Ha nepeiHbMy nacajncpbKOMy CndiHi 3 YBMKHEHOI IOdyuKOIO E3NEKN.
BukopncTAnHn HixKn nI py niNOr n 6ob83KOBm. HixKa nn npiNOr noBHHa MIuHO BnnpATNC B NiNORY.
KIO BOKOPICOTByeTbC KpInnHHa ISOfIX: nepi Hix NoHHaTH pyx, nepeBipTe iHnKaTopOp 63neKePyxy. BOH NOBHHi BytN 3eJIeHMn.
TapaTria
KIO npTAROM 24 McuiB i3 DaTI npuD6aHHB Ubomy Bnpo6i BydyTB BnREHI DepeKTH matepiianB abo BnroTOBneHHA (KIM NOKPTTA peMeHIB 6e3Ne), 6yNb NaCKa, NOBepHtB Bnp6 npOdaHIO.
IoknyeueMbpeBaHrApaHTIOIwE3aYMOBn6abHnBoroTa HaneKHO BnKOpNCTAHN KpICNa.BybNacka,3BepHtbcqdo npOabua. IpOdaBeUb BN3Haue, cNcIIN NOBepHyTn KpICNo BnPObHnKOBI nIg BnPapBHeHH DeEeKtIB.PpeTeH3II BiDHOCho 3AmHeHHx a60 NobepHeHHx BnPO6IB He npimMaToBcR.CnicyUCHeHHn DeEeKtIB rapaHTmH TepMH He npOBOKyEcBcR.
「TapaHtIa Ha BnPiB bTpaAe cHHHcTB b HAcTyHnx BnPaJdkax: RaIO BicCyTHiueKHa npD6aHnB BnPo6y; RaIO deFeKTn CnpuMHHeHO HeHAnExKHMM BnOKpNCtAHm; RaIO deFeKTn E HacNiIDKom HEnpaBnBHoro BnOKpNCtAHn a6o HeD6anocTi.
182 183
#
iZi Go-
y 24-1
iipnnn nn nnnn nn nnnn nn nnnn nn nnnn nn nnnn nn
1X.1p7n nn nnnn nn nnnn nn nnnn nn nn nn nn nn nn nn nn nn nn nn nn nn nn nn nn nn nn nn nn nn nn nn nn nn nn nn nn nn nn nn nn nn nn nn nn nn nn nn nn nn nn nn nn nn nn nn nn nn nn nn nn nn nn nn nn nn nn nn nn nn nn nn nn nn nn nn nn nn nn nn nn nn nn nn nn nn nn nn nn nn nn nn nn nn nn nn nn nn nn nn nn nn nn nn nn nn nn nn nn
nnnnn nn nnnn nn nnnn nn nnnn nn
-
- 100
170 7y n
·
(19)!(X2) w, non
17
nnnnnnnnnnnnnnnnnnnnnnnnnnnnnnnnnnnnnnnnnnnnnnnnnnnnnnnnnnnnnnnnnnnnnnnnnnnnnnnnnnn
(20)
nT,nnnn nnt nniy nnne 3
(21)wnn w npnn nni

y7 vin7 nVnN
N
- nN nN
nnon nnnnn
wnnnn nnn nn nn nn nn nn nn nn nn nn nn nn nn nn nn nn nn nn nn nn nn nn nn nn nn nn nn nn nn nn nn nn nn nn nn nn nn nn nn nn nn nn nn nn nn nn nn nn nn nn nn nn nn nn nn nn nn nn nn nn nn nn nn nn nn nn nn nn nn nn nn nn nn nn nn nn nn nn nn nn nn nn nn nn nn nn nn nn nn nn nn nn nn nn nn
184 185
(5)
2
(6)
(7)
(8)
.5
Tin novin
(9) 1
nnn nn nnnn nn nnnn nn nnnn nn nnnn .2
(10).
(11)nnnnn nn nnn 3
4
non nnnnnt in nn n nnnn nn nnnn nn nnnn
(12)
wnn nnnn nn nnnn nn nnnn nn nnnn nn .5
ninnnnnnnnnnnnnnnnnnnnnnnnnnnnnnnnnnnnnnnnnnnnnnnnnnnnnnnnnnnnnnnnnnnnnnnnnnnn
(13)
6
(14) nui
/1y 7
(15) npnnn nn nnnnnnnnnnnnnnnnnnnnnnnnnnnnnnnnnnnnnnnnnnnnnnnnnnnnnnnnnnnnnnnnnnnnnnnnnnnnnnnnnnnnnnn
unwn nn no n 7y unwn nn ynnn 8
n
nnn nnnn nn nnnn nnnn nnnn nnnn
pnnn nn ninnnnn
(16)0-4
(17)4-6
(18)6+72
nnnnn nn
(1a)
(1)
(1c) (X2)
(1d) (X2)
(1e) (X2)
(1f)
(1g)
(1h)
(1i) (X4)
(1j)
(1k)
(1)
ISOfix o'o'bn by nin'bn nnnnn
(2)ISOfixy
Jnnnno oan by noyn nn noon noon noon nnnn nnnn .2
(3)
.3
4
y
ninnnnn nnnnnnnnnnnnnnnnnnnnnnnnnnnnnnnnnnnnnnnnnnnnnnnnnnnnnnnnnnnnnnnnn
(4)
ISOfix oioiin nn nnnn
n nn nnnn nn nn nn nn nn nn nn nn nn nn nn nn nn nn nn nn nn nn nn nn nn nn nn nn nn nn nn nn nn nn nn nn nn nn nn nn nn nn nn nn nn nn nn nn nn nn nn nn nn nn nn nn nn nn nn nn nn nn nn nn nn nn nn nn nn nn nn nn nn nn nn nn nn nn nn nn nn nn nn nn nn
.0000
186 187
BeSafe iZi Go- nwnw ntn
BeSafe
nnnnnnnnnnnnnnnnnnnnnnnnnnnnnnnnnnnnnnnnnnnnnnnnnnnnnnnnnnnnnnnnnnnnnnnnnnnnnnnnnnnnnnnnnnnnnnnnnnn
nunnnn nn nnnn nnnn 7 nnnnnnnnnn
y
1nnn nn nnnn nn nnnn nn nnnn nn nnnn nn nnnn nn nnnn nn nnnn nn nnnn nn nnnn nn nnnn nn nnnn nn nnnn nn nnnn nn nnnn nn nnnn nn nnnn nn nnnn nn nnnn nn nnnn nn nnnn nn nnnn nn nnnn nn nnnn nn nnnn nn nnnn nn
yoo
n nn no nnnn nn nnnn nn nnnn
i
UN/ECE 170
1
xP0-13
.
.
·
wnnnn, n 11n nn
60 1
4-1
(yynnnn)qan pan nni(wnna nn)pnnn nn on
16-6 65
nnn nn nnnn nn nn nn nn nn
1
iH iDin,pon T by the nonyn in Zi Kid-n bnoh y
nunwn np
(n01)nnnnnnnnnnnnnnnnnnnnnnnnnnnnnnnnnnnnnnnnnnnnnnnnnnnnnnnnnnnnnnnnnnnnnnnnnnnnnnnnnnnnnn
nTn nnnn np nn pnn no nnnn
nnnnnn
nnn nn nn nn nn nn nn nn nn nn nn nn nn nn nn nn nn nn nn nn nn nn nn nn nn nn nn nn nn nn nn nn nn nn nn nn nn nn nn nn nn nn nn nn nn nn nn nn nn nn nn nn nn nn nn nn nn nn nn nn nn nn nn nn nn nn nn nn nn nn nn nn nn nn nn nn nn nn nn nn nn nn nn nn nn nn nn nn nn nn nn nn nn nn nn nn nn nn
nnnnn nn nnnn nn nn nn nn nn nn nn nn
.
yipnponnnnnnnnnnnnnnnnn
nnnnnnnnnnnnnnnnnnn
10nnn nn nnnn nn nn nn nn nn nn nn nn nn nn nn nn nn nn nn nn nn nn nn nn nn nn nn nn nn nn nn nn nn nn nn nn nn nn nn nn nn nn nn nn nn nn nn nn nn nn nn nn nn nn nn nn nn nn nn nn nn nn nn nn nn nn nn nn nn nn nn nn nn nn nn nn nn nn nn nn nn nn nn nn nn
wnBeSafe 100
n nn nnnn nn nnnn nn nnnn
.
188 189
Joo
p1j1
J 24 JLgill Iie gge gge gge 13
aIle! slll lal yag aalil lac Lo gaiiail gaiy iue yie yie yie yie yie yie yie yie yie yie yie yie yie yie yie yie yie yie yie yie yie yie yie yie yie yie yie yie yie yie yie yie yie yie yie yie yie yie yie yie yie yie yie yie yie yie yie yie yie yie y ie 10000000000000000000000000000000000000000000000000000000000000000000000000000000000000000000
Jlab81 aoc no dall 1.
2.
3.
4.
aSddscLgcl
A

l_0 : y = - 12x + 1( 0 < y < 1)
205
1
J 20
JolSIL JAWI GAO AIOCL J
OlaJI
190 191
(5)La31g0gJal31yJySla 2aLla 2aLla
JL 00 gg21 s41 ggs 00 L 00 aal l 00 p1s1 00 00
a
= 3.1 s : s
(6): = 与 =
aS11 aJLaa Jx 0g jgjg 3
(7) ·s a11 + ·s a1 + a1a2 + ·s a1 + a1
pJg aolj 1000000000000000000000000000000000000000
(8)JLaLcSgSgAaSdJaLaaJLgJgJI
Jz1 5
Jahll
(9) 11l2l3
(10) 5555555555555555555555555555555555555555555.2
(11)
JL 100000000000000000000000000000000000000
(12)
pIaIwW 1111111111111111111111111
(13)JabJIgag sic aegiao aoj>1slaX ublil
6
(14) ab;b : x > y .
7
g aabll gaaaal gaoaai ploU/uaaas
(15)
aaii iiaaii aaii aiee ieae iieae iieae iieae iieae iieae iieae iieae iieae iieae iieae iieae iieae iieae iieae iieae iieae iieae iieae iieae iieae iieae iieae iieae iieae iieae iieae iieae iieae iieae iieae iieae iieae iieae
JabllosLw
Jus Jus Jus Jus Jus Jus Jus Jus
JLabXl JLo
(16) _0^2 - 1d = 4 .
(17)4-4-6·
(18) + 546
#
(1c)
(1d)
(2x)
( 2X) a ≤ b ≤ c
(1a)
(1b)
.
.
(1e)
( 1 + u) + ·s + ( 1 + z) + ( 1 + 1) > ( 1 + u) u + ·s + 8 1 + z + 1
(1g)
(1h)
(1i) (4x) JIab8a a
(1k)
.
·(11)
ISOfix 0cL J aill
g 2018 1014 1015 1016 1017
(2)
g gllgcllgo gllgglgallg gllgllg 2
(3) S ACD = S COD + S BDO - S DCE
Jzj
aal 1 aal aal aal aal aal aal aal
x + 2y = 4
a1 < 0,2( a0 + 1) ( 0 < a < 1)
S OBC = S COD + S_ BOC
m - 1 0 ;
jIJIJIJIg> gJgJ.1JLJcS 5
Lc Lwblzll jj 1 Lwblzio Lc Ll51g
111 111 111 111 111 111 111 111 111 111
20 20
JgJgJgJgLoic (JauuJg) Jauu Jauu
4 100
( 5g) ( l)
m = 311
jio jg jai jao jai jia jia jia jia jia jia jia jia jia jia jia jia jia jia jia jia jia jia jia jia jia jia jia jia jia jia jia jia jia jia
slo g 14 y
g/1g all g/1g aioy 1alai! g /all jaoi gio goc
aolllgX1iW
g 100
( g - a) + 1 > 0
y 1
a 1
aill 1000
aJc 1
S 1,2,3,4
a111 202081.05c0y,5s281 yjxg j
gag aJg jn JIg JIbU OaOo oL 1
albsfbcjnoaaiipssui 8
LolBeSafef1b2x!Aldwipocgdo
194 195
L
45 WJL S L olz iZi Go jI osLaWf
Jg 24 Jg 100
aaii iaii iaii iaii iaii iaii iaii iaii iaii iaii iaii iaii iaii iaii iaii iaii iaii iaii iaii iaii iaii iaii iaii iaii iaii iaii iaii iaii iaii iaii iaii iaii iaii
JL 1 JI Lai jy 1. wliolgi c wjol oiae i Jd 4
- 1
(19)!(2x)
aaiiaaiaiaaai aaiiaai
1 2
(20) LjLxLgJyLgJyLgJyLgJyLgJyLgJyLgJyLgJyLgJyLgJyLgJyLgJyLgJyLgJyLgJyLgJyLgJyLgJyLgJyLgJyLgJyLgJyLgJyLgJyLgJyLgJ y
g 1
·g