Twist - Car seat Be Cool - Free user manual and instructions
Find the device manual for free Twist Be Cool in PDF.
Frequently Asked Questions - Twist Be Cool
User questions about Twist Be Cool
0 question about this device. Answer the ones you know or ask your own.
Ask a new question about this device
Download the instructions for your Car seat in PDF format for free! Find your manual Twist - Be Cool and take your electronic device back in hand. On this page are published all the documents necessary for the use of your device. Twist by Be Cool.
USER MANUAL Twist Be Cool
LIST OF APPROVED CARS
The BE COOL TWIST with ISOFIX system has been approved for, semi-universal' use, and is suitable for mounting on specific vehicle seats.
This appendix entitled CAR FITTING LIST contains an overview of vehicles and vehicle seats that have been approved for the use of the TWIST with ISOFIX system in connection with a support leg.
CAUTION!
Please read instructions regarding the use of child safety restraints contained in the user manual for your vehicle.
Should your vehicle not be listed here, please ensure that the TWIST can be properly mounted in your car/on the desired seat before you purchase the child seat!
Read the user manual provided by the manufacturer of your vehicle and the mounting and security notices contained in this user manual for the TWIST.
LEGEND
Since From year of construction Isofix Vehicle seats approved for use with ISOFIX system in connection with a support leg check Please ensure that your vehicle is equipped with ISOFIX anchoring prior to your purchase off Passenger AIRBAG must be deactivated and the seat must be locked in top/ back position.
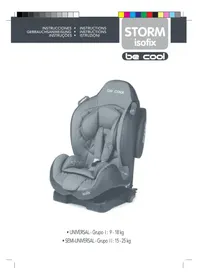
Normativa ECE:grupos 0 + y1
ISOFIX groups D and B1
D,B1
TWIST
LISTA AUTOMOVILES-LIST OF APPROVED CARS
| Since | Note | |||
| ABARTH | 500 2 4 | |||
| GRANDE PUNTO 2 4 | ||||
| PUNTO EVO 2 4 | ||||
| ALFA ROMEO | MITO 1 2 4 OFF | |||
| GIULETTA 2 4 | ||||
| 159 2 4 | ||||
| GT 2 4 | ||||
| BRERA 2 4 | ||||
| AUDI | A1 2 4 | |||
| A2 2 4 | ||||
| A3 2 4 | ||||
| A3 SPORTSBACK 1 | 2 4 OFF | |||
| A3 SALOON 1 2 4 | OFF | |||
| A4 2 4 | ||||
| A5 2 4 | ||||
| A6 2 4 | ||||
| A8 2 4 | ||||
| A8 L | 02.2010 | 2 4 | ||
| Q5 2 4 | ||||
| SQ5 | 1 2 4 OFF | |||
| Q7 2 4 | ||||
| Q7 2009-06.20 | 13 | 1 2 4 OFF | ||
| BENTLEY | CONTINENTAL GTC | 04.2012 | 2 4 | |
| BMW | SERIE 1 2 4 | |||
| SERIE 2 COUPE | 11.2013 | 2 4 | ||
| SERIE 3 2 4 | ||||
| SERIE 4 COUPE | 10.2013 | 2 4 | ||
| SERIE 5 2 4 | ||||
| SERIE 5 TOURING | 07.2013 | 2 4 | ||
| SERIE 6 2 4 | ||||
| SERIE 7 2 4 | ||||
| X1 2 4 | ||||
| X3 2 4 | ||||
twist
| Since Note | ||||
| BMW | X5 2 4 | |||
| X6 2 4 | ||||
| CADILLAC | CTS 2 4 | |||
| STS 2 4 | ||||
| SRX 2 4 | ||||
| ESCALADE 2 4 | ||||
| BLS 2 4 | ||||
| CHEVROLET | AVEO 2 4 | |||
| CAPTIVA 2 4 | ||||
| CRUCE 2 4 | ||||
| EPICA 2 4 | ||||
| LACETTI 2 4 | ||||
| MALIBU 07.2012 | 2 4 | |||
| NUBIRA 2 4 | ||||
| SPARK 2 4 | ||||
| TRAX | 04.2013 | 2 4 | ||
| CHRYSLER | SEBRING | 2 4 | ||
| 300C 2 4 | ||||
| PT CRUISER | 2 4 | |||
| VOYAGER | 2 4 5 7 | CHECK | ||
| GRAND VOYAGER | 2 7 | CHECK | ||
| CITROEN | C1 2 4 | |||
| C2 2 4 | ||||
| C3 2 4 | ||||
| C4 2 4 | ||||
| C4 PICASSO | 10.2013 | 3 | ||
| C5 2 4 | ||||
| C6 2 4 | ||||
| C8 2 4 | ||||
| C-CROSSER | 2 4 | |||
| DS3 2 4 | ||||
| DS3 CABRIO | 03.2013 | 2 4 | ||
| DACIA | DOKKER | 02.2013 | 2 3 4 | |
| DUSTER | 2 4 | |||
TWIST
| Since Note | |||
| DACIA | LODGY 06.2012 | 234 | |
| LOGAN MCV 06.2013 | 24 | ||
| SANDERO 24 | |||
| SANDERO STEPWAY | 2013 24 | ||
| DAIHATSU | SIRION 24 | ||
| DODGE | CALIBER 24 | ||
| AVENERG 24 | |||
| NITRO 24 | |||
| FIAT | 500 | 24 | |
| GRANDE PUNTO | 24 | ||
| PANDA | 24 | ||
| PUNTO EVO | 24 | ||
| BRAVO | 24 | ||
| CROMA | 24 | ||
| ULYSSE | 24 | ||
| LINEA | 24 | ||
| MULTIPLA 24 | |||
| SEDICI | 24 | ||
| FORD | KA | 24 | |
| ECOSPORT | 04.2014 24 | ||
| FIESTA 24 | |||
| FOCUS | 24 | ||
| MONDEO 24 | |||
| GALAXY 24 | |||
| TOURNEO CUSTOM | 07.2012 23 | 6 | |
| KUGA | 24 | ||
| HONDA | JAZZ | 24 | |
| CIVIC | 24 | ||
| CRV | 24 | ||
| CR-V 4 | 11.20.12 | 234 | |
| CRZ | 24 | ||
| ACCORD | 24 | ||
| INSIGHT 57 | |||
| HYUNDAI | I10 | 24 | |
twist
| Since Note | |||
| HYUNDAI | 120 2 4 | ||
| 130 2 4 | |||
| 130(3 DOORS) 02.2013 2 4 | |||
| TERRACAN 2 4 | |||
| SANTAFE 2 4 | |||
| TUCSON 2 4 | |||
| ACCENT 2 4 | |||
| GRANDEUR 2 4 | |||
| SONATA 2 4 | |||
| IX35 2 4 | |||
| COUPE 2 4 | |||
| JAGUAR | XTYPE | 2 4 | |
| S TYPE | 2 4 | ||
| JEEP | CHEROKEE | 2 4 | |
| COMPASS | 06.2013 2 4 | ||
| GRAND CHEROKEE | 2 4 | ||
| PATRIOT | 2 4 | ||
| KA | SORENTO 2 4 | ||
| CEED | 2 4 | ||
| PRO CEED | > 03.2013 | 2 4 | |
| OPIRUS | 2 4 | ||
| MAGENTIS | 2 4 | ||
| OPTIMA | 02.2012 2 4 | ||
| OPTIMA HYBRID | 01.2013-2014 | 2 4 | |
| SOUL | > 03.2014 | 2 4 | |
| SPORTAGE | 2 4 | ||
| SORENTO | 10.2012 2 4 | ||
| CARENS | > 03.2013 | 2 4 | |
| CARNIVAL | 2 4 | ||
| RIO | 2 4 | ||
| PICANTE | 2 4 | ||
| VENGA | 2 4 | ||
| LANCIA | YPSILON 2 4 | ||
| MUSA | 2 4 | ||
TWIST
| Since Note | |||
| LANCIA | DELTA 24 | ||
| THESIS 24 | |||
| PHEDRA 24 | |||
| LAND ROVER | FREELANDER 24 | ||
| DISCOVERY 24 | |||
| LEXUS | IS 24 | ||
| IS 300H 06.2013 | 24 CHECK | ||
| LS 24 | |||
| LS 600H | 01.2013 24 C | CHECK | |
| GS 24 | |||
| RX | 24 | ||
| RX 450H | 07.2012 24 | ||
| MAZDA | 2 | 24 | |
| 3 | 24 | ||
| 5 | 24 | ||
| 6 | 24 | ||
| CX7 | 24 | ||
| MERCEDES | CLASE A 24 | ||
| CLASE B 24 | |||
| CLASE C 24 | |||
| CLASE E | 24 | ||
| CLASE S | 24 | ||
| CL 24 | |||
| CLK | 24 | ||
| CLS | 24 | ||
| CITAN KOMBI | 10.2012 24 C | CHECK | |
| GLK | 24 | ||
| CLASS M | 24 | ||
| GL 24 | |||
| MIMI | COOPER | 24 | |
| COUNTRY | 24 | ||
| MITSUBISHI | COLT | 24 | |
| LANCER | 24 | ||
| ASX | 24 | ||
twist
| Since Note | ||||
| MITSUBISHI | GRANDIS 2 4 | |||
| OUTLANDER 2 4 | ||||
| MONTERO 2 4 | ||||
| NISSAN | NOTE 2 4 | |||
| PIXO 2 4 | ||||
| MICRA 2 4 | ||||
| JUKE 2 4 | ||||
| QASHQAI 2 4 | ||||
| X TRAIL 2 4 | ||||
| PATHFINDER 2 4 | ||||
| MURANO 2 4 | ||||
| OPEL | CASCADA 04.20 | 13 2 4 | ||
| CORSA | 2 4 | |||
| ADAM | 01.2013 | 2 4 | ||
| ASTRA | 2 4 | |||
| ZAFIRA 2 4 | ||||
| INSIGNIA 2 4 | ||||
| INSIGNIA COUNTRY T. | 10.2013 | 2 4 | ||
| INSIGNIA SPORTSIT. | 10.2013 | 2 4 | ||
| AGILA 2 4 | ||||
| ANTARA | 2 4 | |||
| MERIVA 2 4 | ||||
| MERIVA B | 01.2014 | 2 4 | ||
| MOKKA | 10.2012 | 2 4 | ||
| PEUGEOT | 107 | 2 4 | ||
| 206+ | 2 4 | |||
| 207 | 2 4 | |||
| 2008 | 06.2013 | 2 4 | ||
| 308 | 2 4 | |||
| 3008 | 10.2013 | 2 4 | ||
| 407 | 2 4 | |||
| 4007 | 2 4 | |||
| 408 | 2 4 | |||
| 5007 | 2 4 | |||
TWIST
| Since Note | ||||
| PEUGEOT | 607 2 4 | |||
| 807 2 4 | ||||
| PORSCHE | CAYENNE 2 4 | |||
| CAYENNB 05.2010 | 1 2 4 OFF | |||
| MACAN 04.2014 | 1 2 4 OFF | |||
| PANAMERA 4 2009 | -06.2013 1 2 4 OFF | |||
| RENVAULT | CLIO 2 4 | |||
| CLIO IV 10.2012 | 1 2 4 OFF | |||
| CLIO IV GRANDTOUR | 01.2013 1 2 | 4 OFF | ||
| CLIO IV RS | 03.2013 1 2 4 | OFF | ||
| CAPTUR | 09.2013 1 2 4 | OFF | ||
| MEGANE | 2 4 | |||
| MEGANE 3 | 01.2014 | 2 4 | ||
| MODUS(1) 2 4 | ||||
| LAGUNA | 2 4 | |||
| LAGUNA COUPE | 2 4 | |||
| ESPACE | 2 3 4 CHECK | |||
| TWINGO | 1 2 4 | OFF | ||
| SAAB | 93 | 2 4 | ||
| 95 | 2 4 | |||
| SEAT | IBIZA 2 4 | |||
| EXEO | 2 4 | |||
| ALTEA | 2 4 | |||
| ALTEA XL | 2 4 | |||
| TOLEDO | 2 4 | |||
| LEON | 2 4 | |||
| ALHAMBRA | 2 4 | |||
| SKODA | FABIA | 2 4 | ||
| OCTAVIA | 2 4 | |||
| OCTAVIA 3 02.2010 | 13 1 2 4 OFF | |||
| OCTAVIA 3 COMBI | 05.2013 1 2 | 4 OFF | ||
| RAPID | 10.2012 | 2 4 | ||
| RAPID SPACEBACK | 10.2013 | 2 4 | ||
| ROOMSTER | 2 4 | |||
twist
| Since Note | |||
| SKODA | SUPERB 24 | ||
| SUPERB COMBI 02 2012 1 2 4 OFF | |||
| YETI 24 | |||
| YETII11.2013 1 2 4 OFF | |||
| SSANGYONG | ACTYON 24 | ||
| SUBARU | JUSTY 24 | ||
| IMPREZA 24 | |||
| OUTBACK 24 | |||
| LEGACY 24 | |||
| TRIBECA 24 | |||
| SUZUKI | ALTO | 24 | |
| SWIFT 24 | |||
| SX4 | 24 | ||
| XS4 S-CROSS | 10.2013 | 24 | |
| KISHASHI 24 | |||
| GRAND VITARA | 24 | ||
| SPLASH | 24 | ||
| KIZASHI | 24 | ||
| JIMNY | 24 | ||
| TOYOTA | COROLLA | 24 | |
| RAV 4 | 24 | ||
| AYGO | 24 | ||
| AURIS | 24 | ||
| AURIS TOURING SPORT | 07.2013 | 24 | |
| PRIUS 24 | |||
| AVENSIS | 24 | ||
| URBAN CRUISER | 24 | ||
| LAND CRUISER 24 | |||
| YARIS 24 | |||
| YARIS HYBRID | 06.2012 | 24 | |
| VOLVO | C30 | 24 | |
| S40 | 24 | ||
| V40 CROSS COUNTRY | 01.2013 | 24 | |
| V50 | 24 | ||
TWIST
| Since Note | ||||
| VOLVO | S60 2 4 | |||
| V60 2 4 | ||||
| S80 2 4 | ||||
| XC60 2 4 | ||||
| V70 2 4 | ||||
| C70 2 4 | ||||
| XC90 2 4 | ||||
| VW | FOX 2 4 | |||
| POLO 2 4 | ||||
| GOLF 2 4 | ||||
| GOLF 7 11.2012 | 2 4 | |||
| GOLF 7 GTI 03.2013 2 4 | ||||
| GOLF 7 VARIANT 09.2013 2 4 | ||||
| JETTA HYBRID 03 | 2013 2 4 | |||
| SCIROCCO | 2 4 | |||
| PASSAT | 2 4 | |||
| NEW BEETLE | 2 4 | |||
| BEETLE CABRIO | 11.2012 2 4 | |||
| TIGUAN | 2 4 | |||
| TOUAREG | 2 4 | |||
| PHAETON | 2 4 | |||
| GOLF PLUS | 2 4 | |||
| EOS 2 4 | ||||
| TOURAN | 2 4 | |||
| SHARAN | 2 4 | |||
Twist
E ADVERTENCIA
- Make sure you observe the relevant instructions in the user manual of your vehicle before transporting children. Take particular note of all information provided for the use of child seats in connection with airbags.
- Warning!
- Children often carry small objects (e.g.toys) in jacket or trouser pockets, and may also wear clothes with rigid components (e.g. belt buckle).
- Make sure that these objects are not clamped be tween the child and the safety harness, as this might cause unnecessary injuries in case of an accident. The same hazards also apply for adults.
- Naturally young children are often lively. Make sure to explain the importance of safety when in a vehicle. Your child will then understand that the harness lock should not be opened and the harness should not be removed, giving you more peace of mind.
- Your child's safety can only be guaranteed if the safety system is installed and used in accordance with the instruction manual.
- All system harness straps must be worn taut and without any twists, and must be protected from demage.
- Protect any parts of the restraint system not covered with fabric against direct sunlight to prevent your child from suffering burns.
- The child restraint system must not be damaged or crushed by moving parts in the vehicle or by the vehicle doors.
- Do not attempt any modifications to the restraint system as they might endanger your child's safety.
- After an accident, the entire child restraint system must be replaced or sent to the manufacturer for testing, along with an accident report.
- Make sure to instruct your passenger on how to remove the child from its safety seat in case of an accident or danger.
- The lap belts of the harness system must be fitted as low down as possible so that the child's hips are held correctly.
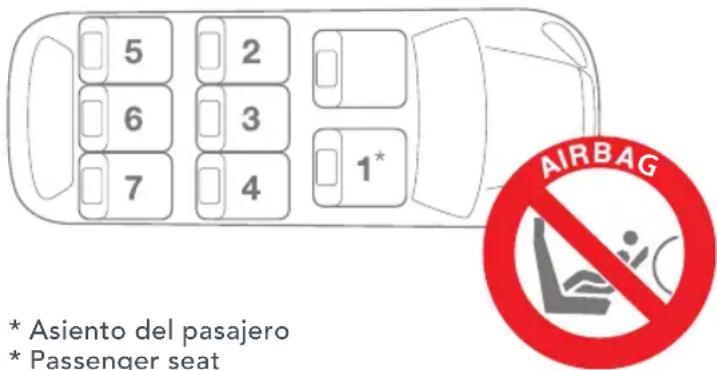
- The child seat must not be used on seats with activated front airbags. (Danger to life)!
Twist
GB
- Never leave your child unsupervised in the car seat – whether harnessed or not.
- Make sure you secure any luggage and loose items to reduce the risk of injury in case of an accident.
- The manual must always be carried with the child safety seat.
- The use of any accessories or replacement parts is prohibited, and noncompliance with result in the lapse of all warranty and liability claims.
- The child safety seat is to be used with original seat covers only.
- If the restraint system is used extensively it is normal for the seat covers and other parts to suffer varying degrees of wear, depending on the duration and intensity of use, and they will then have to be replaced. We can therefore not provided any blanket warranty beyond 6 months for wear parts.
- Please contact your specialists shop for baby and children's products and the relevant section of department stores, your car accessory specialist shop or a catalogue company for re placement parts. They will have a complete product portfolio for Be Cool child seat accessories to choose from.
- The child seat TWIST Be Cool has been tested in crash simulations for impacts of up to 50km/h againt a solid obstacle. Test results are compliant with the international test standard ECE R44.04, which is applicable for all tested child safety seat systems. When used as intended and in compliance with the installation and ope rating instructions, the child safety seat should prevent or minimize injuries to children up to a body weight of 18kg in case of an accident, depending on the type and severity of accident.
- A child safety device does not replace responsible and careful behavior in road traffic.
Twist
D HINWEIS
- Headrest
02.Harness buckle
03.Central adjusting device
04.Central harness
05.Operating handle for adjusting the reclining system
06.Locking handle for the seat lock
07.Safety display seat lock
08.Isofix system control dial
09.Support leg operating button
10.Support leg
11.Safety display for support leg
12.Front-Lock
13.Rear-Lock - Isofix system unlocking button (left and right)
- Isofix connectors (left and right)
FR DESCRIPTION
Thank you for purchasing our car seat BE COOL TWIST. The product is manufactured under strict quality control conditions. Its optimum safety characteristics are only effective if the seat it used correctly.
As a result you should ensure strict adherence with the mounting and usage instructions.
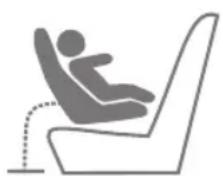
The BE COOL TWIST is suitable for children up to the age of approx. 4 or up to 18kg . It is suitable for use in vehicle with Isofix-approved seats (see vehicle list) in accordance with the relevant child restraint and anchoring category.
As a result of accident statistics, however, we recommend using the seat behind the front passenger seat.
The seat consists of 2 parts: the seat (A) and Isofix base (B).
GENERAL INFORMATION
- This is an Isofix child restraint. It has been approved for general use in vehicle equipped with Isofix anchoring in compliance with ECE regulation 44.04.
- It is suitable for use in vehicle with Isofix-approved seats (see vehicle list) accordance with the relevant child restraint and anchoring category.
- This child safety restraint is compliant with the Isofix weight category: up to 18kg and Isofix size categoris: D and B1.
- If you have any questions or doubts, please contact the manufacturer of the child safety unit or your retailer.
FOR ISO-FIX SUITABLEVEHICLES
The BE COOL TWIST with Isofix system has been approved for semi-universal's use, and is suitable for mounting on specific vehicle seats.
The appendix VEHICLE LIST contains an overview of vehicles and vehicle seats that have been approved for using the TWIST with Isofix system in connection with a support leg.
Should your vehicle not be listed, please ensure that the TWIST can be properly mounted in your car / on the desired seat before you purchase the child seat.
Read the user manual provided by the manufacturer of your vehicle and the mounting and security instructions contained in this user manual.
1 REMOVING THE SEAT
The seat (A) of TWIST can be removed from the Isofix-Basis (B).
Always remove the child first before removing the seat!
The Locking Handle is located underneath the seat and on the front top of the Isofix base.
Pull the Locking Handle forwards, as you can see the front lock unlocks the metal tube on the front of seat.
Unlock the Rear-lock as photo shows, and lift the seat up and take it off from the base.
2 MOUNTING THE TWIST
To make mounting easier, we recommend to mount the Isofix base first, then to lock the seat to Isofix base.
Always mount and remove the TWIST without a child in it!
Step 1 Mount the Isofix base
Rotate the Isofix system control dial on the front of Isofix base to the anti-clock wise direction, so you can see the Isofix connector moved outwards until it fully extended.
Place the Isofix base in the driving direction on a vehicle seat equipped with Isofix anchors.
Push the Isofix connectors towards the Isofix anchors on the vehicle seat until you hear a "Click" and see the safety display on both sides of the Isofix connectors show GREEN.
Lock the seat shell to the Isofix base.
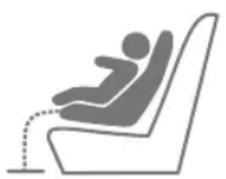
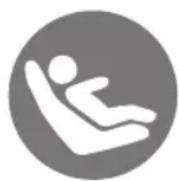
Depending on the age of the child, then decide to lock the seat in rearward position (Birth to 18kg) or forward position (9 to 18kg).
CAUTION!
Do not use on seats with airbags. Danger to life!
Always mount the seat without a child in it.
Step 2.1 Locking the seat to the Isofix base in REARWARD POSITION:
Birth-18kg
a) Lifting the seat, lock the metal tube in the underneath of the front side of the to lock into the REAR-LOCK on Isofix base.
b) Pull the LOCKING-HANDLE forward, and push the back edge of the seat downwards, and lock the metal tube in the underneath of the rear side of the seat to lock into FRONT-LOCK on Isofix base.
c) Release the LOCKING-HANDLE, and lock the metal tube in the rear side, make sure you
GB TWIST
see the Safety display shows GREEN on the top front side of Isofix base.
Rotate the Isofix system control dial to the Clockwise direction until the seat close as possible to the back rest of the vehicle's seat, make sure the gap has eliminated.
Adjusting the Support Leg.
Push the release buttons on both side to the center direction, and extending the support leg to the surface of floor until it fully reaches, make sure you see the safety display shows GREEN on both side.
CAUTION!
- The seat must be secured with the Isofix system even if there is no child in travelling.
- Both Isofix connectors must be anchored securely and safety displays are all show GREEN.
- The seat shell are fully locked on the Isofix base and safety displays are all show GREEN.
- The support leg must fully reaches surface of floor and the safety displays are all show GREEN.
Step 2.2 Locking the seat to the Isofix base in FORWARD POSITION: 9 to 18kg.
a) Lifting the seat, lock the metal tube in the underneath of the rear side of the shell to lock into the REAR-LOCK on Isofix base. b) Pull the LOCKING-HANDLE forward, and push the front edge of the shell downwards, and lock the metal tube in the underneath of the front side of the shell to lock into FRONT-LOCK on Isofix base. c) Release the LOCKING-HANDLE, and lock the metal tube in the front side, make sure you see the Safety display shows GREEN on the top front side of Isofix base.
CAUTION!
- Make sure that the seat is correctly anchored to both anchoring points and the safety display shows GREEN.
- If the child's body weight exceeds 9kg, the pre-installed pelvis insert should be removed. (See "Removing the Pelvis Insert").
- Always mount the seat without a child in it.
Rotate the Isofix system control dial to the Clockwise direction until the seat close as possible to the back rest of the vehicle's seat, make sure the gap has eliminated.
Adjusting the Support Leg.
Push the release buttons on both side to the
center direction, and extending the support leg to the surface of floor until it fully reaches, make sure you see the safety display shows GREEN on both side.
CAUTION!
The seat must be secured with the Isofix system even if there is no child is travelling.
- Both Isofix connectors must be anchored securely and safety displays are all show GREEN.
- The seat shell are fully locked on the Isofix base and safety displays are all show GREEN.
- The support leg must fully reaches surface of floor and the safety displays are all show GREEN.
3 SECURING YOUR CHILD IN THE TWIST CAUTION!
Check that the TWIST is mounted properly and that all belts have proper tension, also that all locking mechanisms are secured and all safety displays show GREEN.
Adjusting the central device
At the front of the seat under the cover there is the central adjusting device, which clamps the central harness tight. Loosen the central adjusting device by pushing the cap of the central adjusting device up and pull the harness forward (do not pull on the harness cushion).
Adjusting the headrest.
Close the both side of the headrest to the central direction, at the same time, lifting up or pushing down the headrest at your required position.
Placing your child in the seat.
- Open the harness buckle by pushing the red button, and parting the buckle tongue to the sides.
- Place your child as far back into the seat as possible, bring the shoulder/lap harness and central harness in the front of the child and match the tongue first, then insert into main body of the buckle.
- Pull the central harness on the adjusting device to make sure the harness secures your child at proper tightness, by checking with your two fingers gap between harness and your child's front shoulder point. Make sure your child is comfortable and secured.
Checking Point.
-Check that the buckle is fully closed, and none of the harness straps are twisted.
-Check that the headrest must be adjusted to
GB TWIST
the size of the child at proper position for child's head.
-Check that the shoulder pad should be located slightly above the child's shoulder. The shoulder harness should lie in the middle between the child's neck and the outer edge of the shoulder.
4 REMOVING THE TWIST
To make the removal of TWIST easier we recommend you first remove the seat (A) (See "Remove the Seat")
Always mount and remove the seat without a child in it!
Push the release button to the central direction, and move the support leg into its top-most position.
Rotate the isofix sytem control dial on the front of TWIST base to anti-clock wise direction to move the Isofix base forward.
Pull the Isofix system unlocking buttons on both side of the base in forward direction, so the Isofix connectors are released from the vehicle's anchoring point.
Lift the TWIST out of the vehicle's seat.
5 USING THE RECLINING ADJUSTMENT
Pull the reclining handle underneath of front seat forward, release the handle at your required position until you hear a "CLICK" to make sure it's locked.
6 REMOVING/ATTACHING THE COVER
To remove the cover, the seat shell (A) has to be removed from the base (B) first. (SEE "Remove the seat")
- Loose the harness system by adjusting the central device.
- Unlock the harness buckle, then take off the Pelvic Insert for new born to 13kg.
- First remove the cover from the headrest. 4. Use a pencil-like tool to push the elastic bands buttons from top to downwards direction, and take off the bands which attached to two buttons on both side on the seat shell.
- Thread the main buckle body through the buckle pad and out underneath the cover 6. Loose the elastic bands which are located in the placed marked red on the reverse side of the cover, and pull the seat off in forward direction to take off the main cover.
Check that all the locks are closed and all anchoring are correctly fastened.
7 REMOVING THE PELVIC INSERT
If the child's bodyweight exceeds 9kg , the pre-mounted pelvic insert should be removed.
CARE INSTRUCTIONS
Light dirt can be easily removed with a damp cloth. The cover can also be removed and washed at 30^ . Remove the back cushion from the cover of the head support before you wash it.
The cover material color may run slightly when wet, in particular during washing.
Do not use solvents on the cover!

WARRANTY CONDITIONS
The warranty period begins at the time of purchase. The warranty period granted in compliant with the legal warranty period in the country of purchase. In terms of content, the warranty covers rework, replacement delivery, or a rebate as the manufacturer sees fit.
The warranty applies only for the original user. In case of a fault, warranty rights will be applicable only if the dealer, where the item was purchased is notified immediately after initial detection. Should the dealer be unable to remedy the issue, then the product will be returned to the manufacturer with a detailed description of the fault, and with the official purchase document including the date of purchase.
The manufacturer shall not accept liability for faulty products not delivered by him.
Warranty claims are not valid if:
the product was modified.
the product is not returned complete and accompanied by the original purchase document to dealer within 14 days of the detection of the fault.
the fault occurred due to inappropriate handling or maintenance, or due to other actions that are the fault of the user, specifically where the user instructions were not complied with.
repairs on the product were carried out by third parties.
the defect was caused by an accident.
the serial number has been damaged or removed. Modifications to or deterioration of the product caused by the contractually agreed use of the item (normal wear and tear) will not be accepted as a warranty claim.
Any services rendered by the manufacturer in case of a warranty claim shall not extend the warranty period.