Thunder Isofix - Car seat Be Cool - Free user manual and instructions
Find the device manual for free Thunder Isofix Be Cool in PDF.
| Product type | Child car seat with Isofix system |
| Brand | Be Cool |
| Model | Thunder Isofix |
| Weight groups | Group I (9-18 kg), Group II (15-25 kg), Group III (22-36 kg) |
| Safety standard | ECE R44/04 |
| Installation orientation | Forward-facing |
| Vehicle location | Rear seat only |
| Fixation system | Universal Isofix + Top Tether (Group I); Isofix + 3-point seat belt (Groups II/III) |
| Seat weight | Approximately 6.5 kg (estimate) |
| Dimensions (L x W x H) | Approximately 65 x 45 x 60 cm (estimate) |
| Power supply | None (passive seat, no electronics) |
| Main functions | Adjustable seat with height-adjustable 5-point harness, adjustable headrest, footrest, four recline positions |
| Care and cleaning | Cover hand-washable at 30°C; chassis cleanable with warm water and mild soap |
| Safety | Reinforced side protection, 5-point harness with central buckle, Isofix locking indicators |
| Spare parts and repairability | Replacement cover available; contact retailer or importer for other parts |
| General information | Use from 9 to 36 kg (approx. 1 to 12 years); delivered with back cushion and infant reducer |
Frequently Asked Questions - Thunder Isofix Be Cool
User questions about Thunder Isofix Be Cool
0 question about this device. Answer the ones you know or ask your own.
Ask a new question about this device
Download the instructions for your Car seat in PDF format for free! Find your manual Thunder Isofix - Be Cool and take your electronic device back in hand. On this page are published all the documents necessary for the use of your device. Thunder Isofix by Be Cool.
USER MANUAL Thunder Isofix Be Cool
natural_image
Black and white photo of a car comfort seat with visible branding (no text or symbols on the suit itself)THUNDER iso-fix
E ADVERTENCIAS
- Before using our product, please, read the instruction manual carefully.
- The THUNDER ISO-FIX car seat is a safety device and it is only safe when used in accordance with the instruction manual.
- The product must be only be used on a forward facing seat that is fitted-with an automatic 3-point safety belt which is approved according to ECE R16 or an equivalent standard, and with a 3-point universal Isofix system.
• The product may be used only on the back seat.. - The product has been approved according to the strictest European safety standards (ECE R44/04) and is suitable for Group I (9-18 kg), Group II (15-25 kg) and Group III (22-36 kg).
- Any alteration or addition to the device without due authorisation from
- BABYNURSE may seriously compromise the safety of the retention system.
- If the instructions for the correct use of the retention system are not followed carefully, baby's safety will be endangered.
- This safety device cannot be used without its fabric covering, nor may it be replaced by any other that is not identical to the original, since it forms an integral part of the system's features.
- Never leave your child unattended in the car.
RECOMMENDATIONS
- Keep this instruction book for future reference.
- Make sure that any luggage or other objects inside the car that may cause damage in case of an accident are properly stored and restrained.
- THUNDER ISO-FIX car seat must be appropriately fastened with Isofix anchors even when not in use because in the case of an accident this may be sent flying causing injury to any of the occupants of the car.
- NEVER UNDER ANY CIRCUMSTANCE should you carry your baby in your arms in the car, or out of the car seat. Although it may seem strange, in case of an accident, even at only 40 km/hr the force is such that it would be completely impossible to hold onto your baby.
THUNDER iso-fix
D ANMERKUNGEN
text_image
Technical diagram of a car seat with numbered labels pointing to different compartments or parts.THUNDER iso-fix
E
26- A / Clip for the chest strap
B/Belt guide for the lap belt
FR
m = 311
natural_image
Diagram of a mechanical or electrical component with arrows indicating direction (no text or symbols)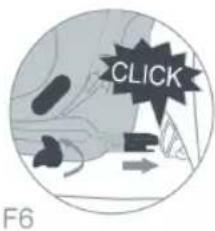
text_image
CLICK F6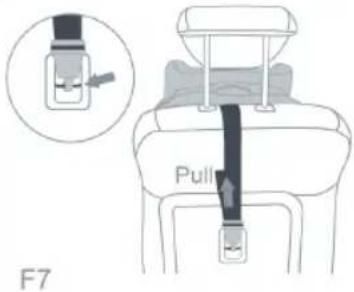
text_image
Pull F73
text_image
CLICK F13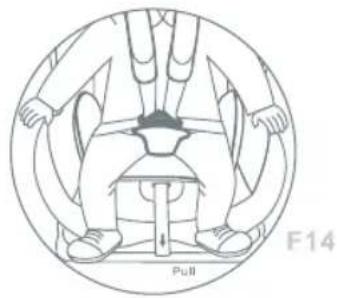
natural_image
Diagram of a person sitting on a chair with hands holding the seat, enclosed in a circular frame (no text or symbols)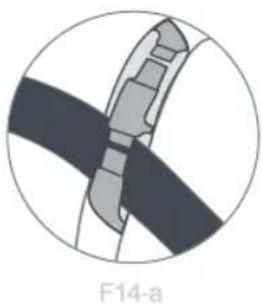
natural_image
Diagram of a mechanical component labeled F14-a, showing internal structure without any readable text or symbols.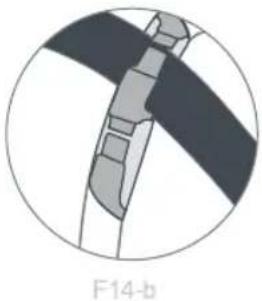
natural_image
Diagram of a mechanical component labeled F14-b, showing internal structure without any readable text or symbols.
natural_image
Diagram of a circular structure with internal patterns and an arrow, labeled F14-c (no readable text or symbols)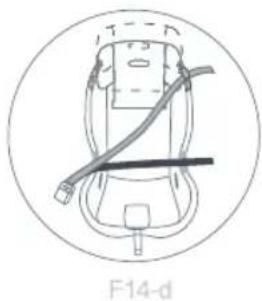
natural_image
Diagram of a car interior with a cable and seat, labeled F14-d (no text or symbols on the diagram itself)THUNDER iso-fix
4
5
ISO-FIX
Gr. 1

text_image
Pull
natural_image
Illustration of a hand holding a small object with directional arrows indicating movement (no text or symbols)F7.aF7
natural_image
Illustration of a hand holding a tool with directional arrows indicating movement (no text or symbols)F7.b F7.c

natural_image
Illustration of a hand holding a pen, with an arrow indicating direction (no text or symbols)THUNDER iso-fix
6
natural_image
Diagram of a person pulling a cart inside a circular frame, with no visible text or symbols.
text_image
F16-a F16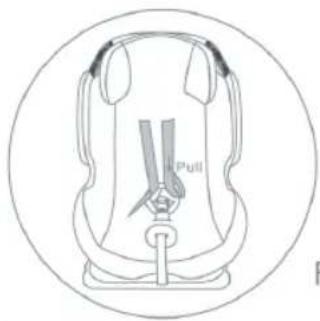
natural_image
Line drawing of a car seatbelt with a pull symbol, enclosed in a circle (no text or labels)F17
natural_image
Diagram of a human hand inside a circular frame, labeled F18 (no text or symbols on the diagram itself)
text_image
F19-a F197
natural_image
Line drawing of a car interior with no text or symbolsE THUNDER iso-fix
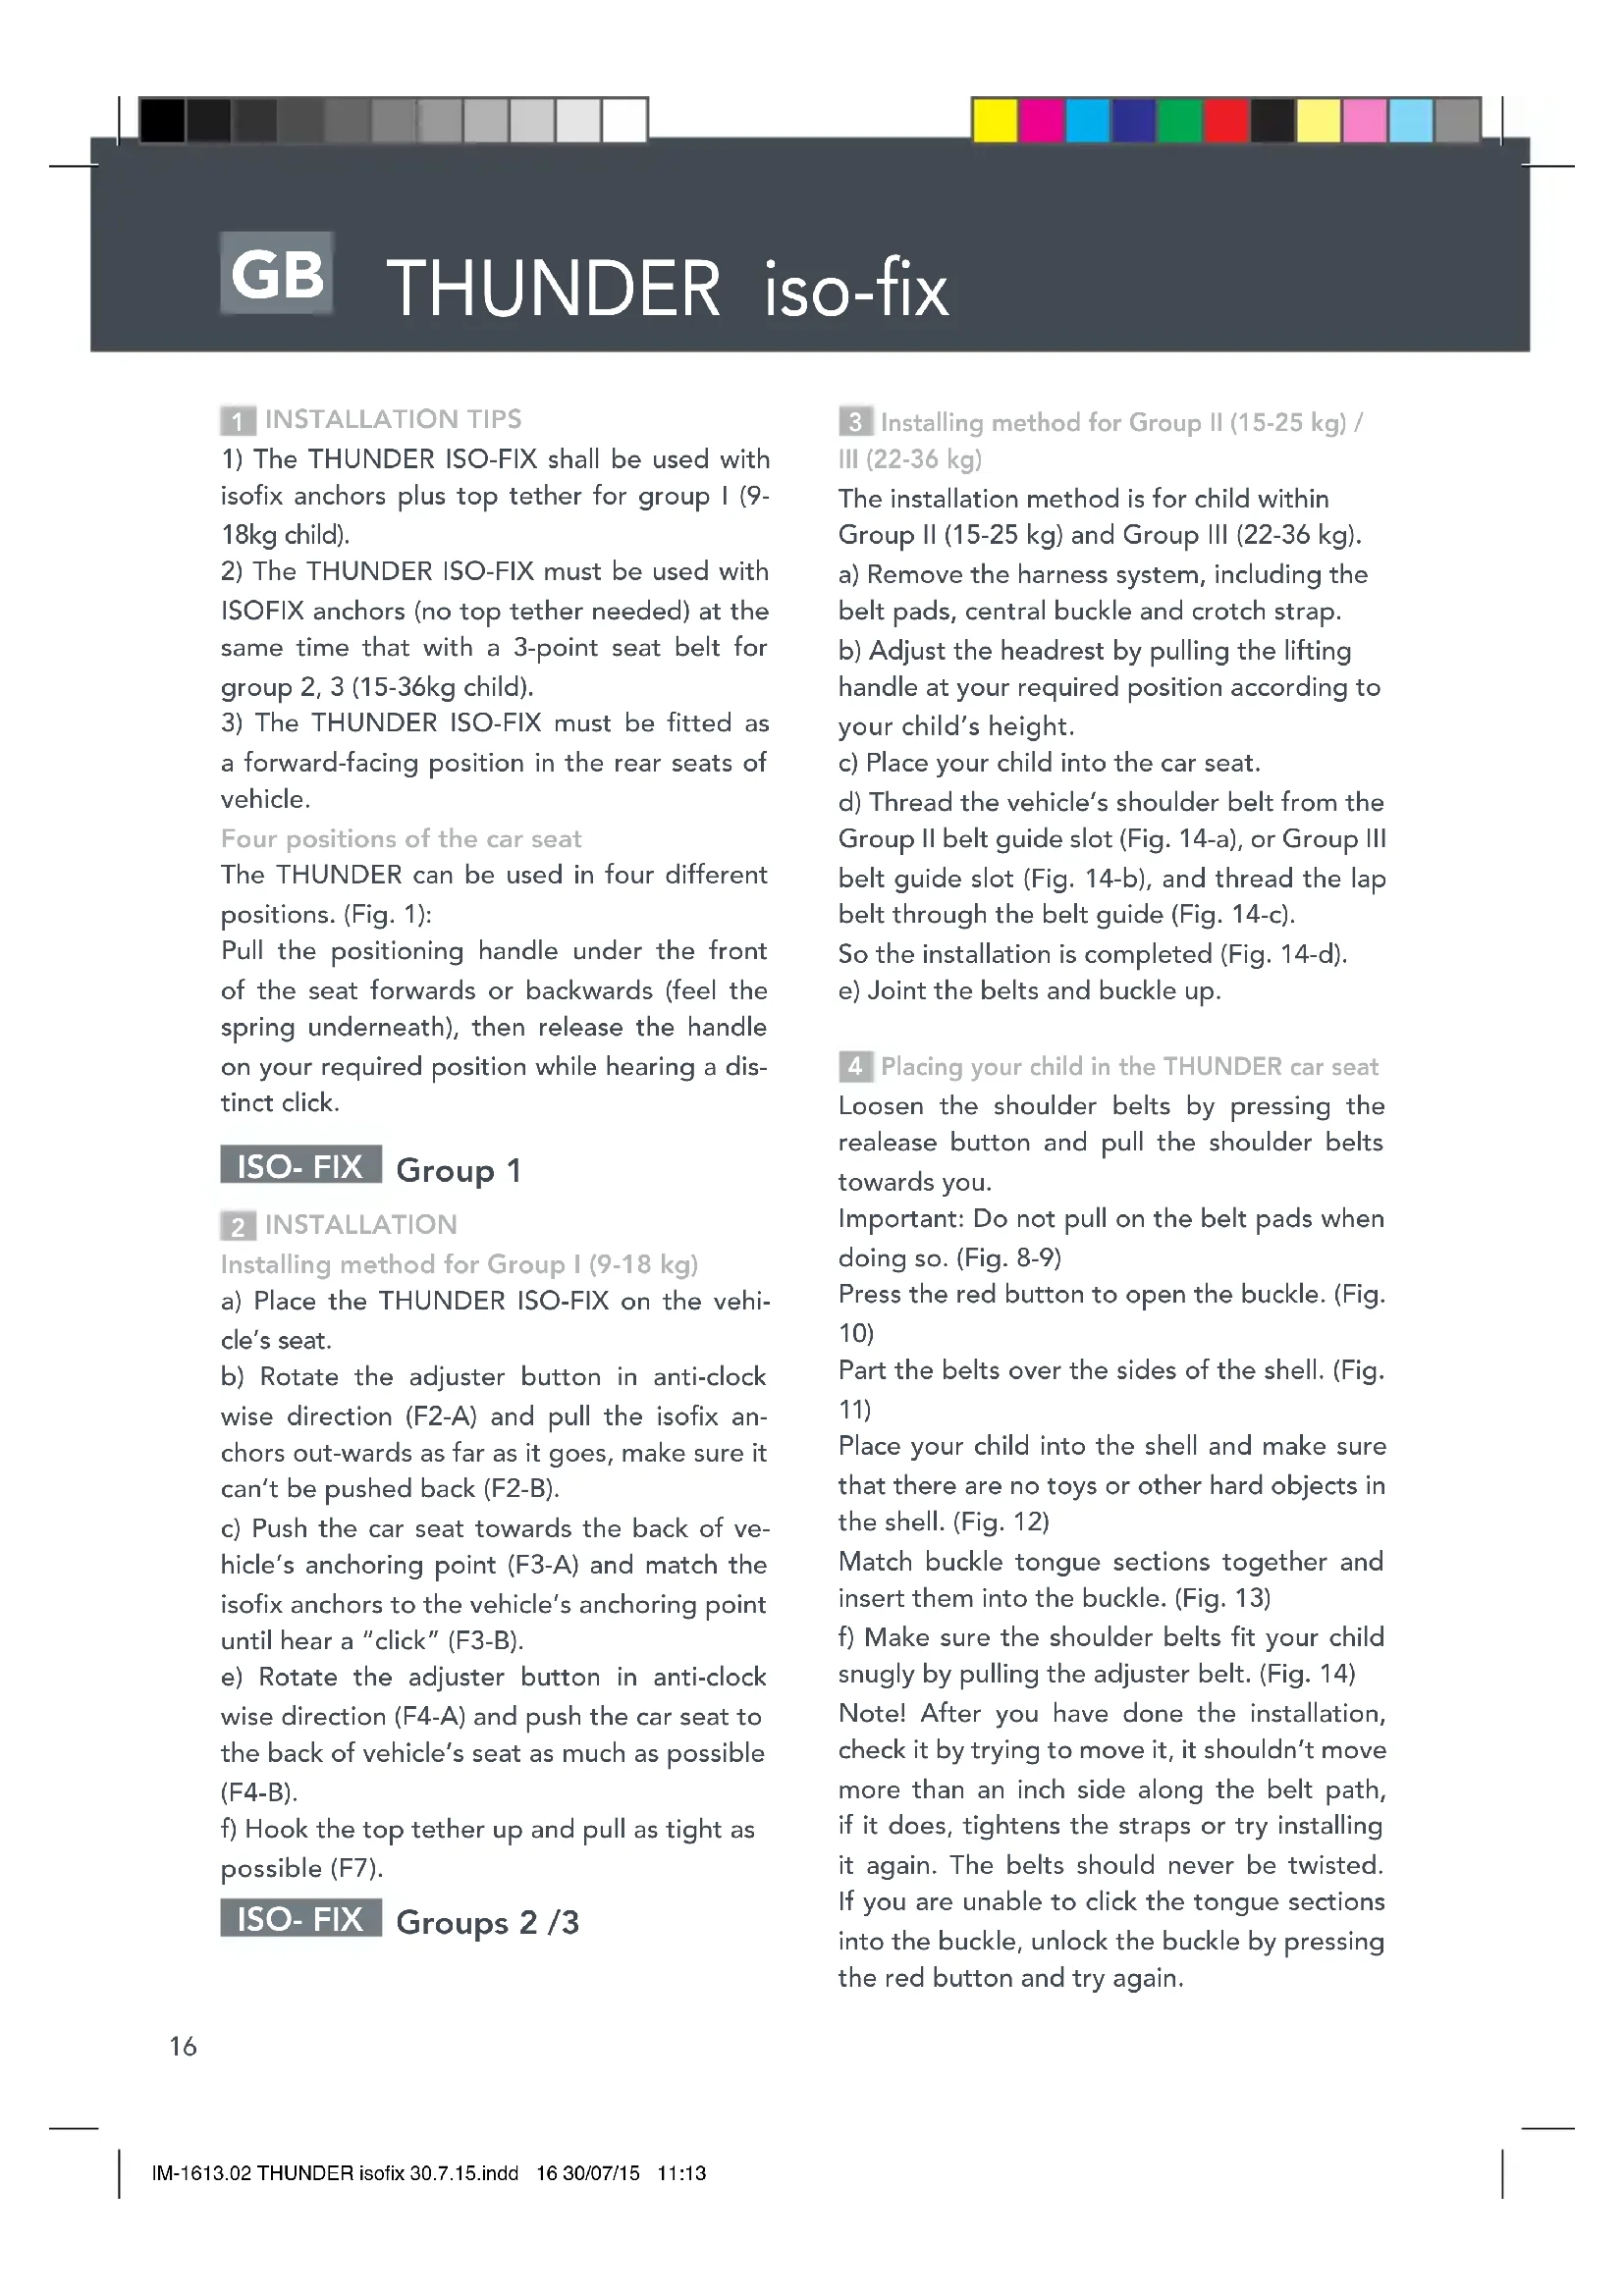
1) The THUNDER ISO-FIX shall be used with isofix anchors plus top tether for group I (9-18kg child).
2) The THUNDER ISO-FIX must be used with ISOFIX anchors (no top tether needed) at the same time that with a 3-point seat belt for group 2, 3 (15-36kg child).
3) The THUNDER ISO-FIX must be fitted as a forward-facing position in the rear seats of vehicle.
Four positions of the car seat
The THUNDER can be used in four different positions. (Fig. 1):
Pull the positioning handle under the front of the seat forwards or backwards (feel the spring underneath), then release the handle on your required position while hearing a distinct click.
ISO-FIX Group 1
2 INSTALLATION
Installing method for Group I (9-18 kg)
a) Place the THUNDER ISO-FIX on the vehicle's seat.
b) Rotate the adjuster button in anti-clock wise direction (F2-A) and pull the isofix anchors out-wards as far as it goes, make sure it can't be pushed back (F2-B).
c) Push the car seat towards the back of vehicle's anchoring point (F3-A) and match the isofix anchors to the vehicle's anchoring point until hear a "click" (F3-B).
e) Rotate the adjuster button in anti-clock wise direction (F4-A) and push the car seat to the back of vehicle's seat as much as possible (F4-B).
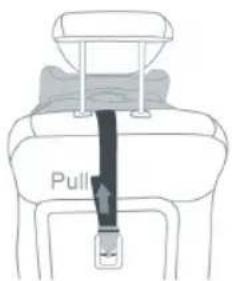
f) Hook the top tether up and pull as tight as possible (F7).
ISO-FIX Groups 2 /3
3 Installing method for Group II (15-25 kg) / III (22-36 kg)
The installation method is for child within Group II (15-25 kg) and Group III (22-36 kg). a) Remove the harness system, including the belt pads, central buckle and crotch strap. b) Adjust the headrest by pulling the lifting handle at your required position according to your child's height.
c) Place your child into the car seat.
d) Thread the vehicle's shoulder belt from the Group II belt guide slot (Fig. 14-a), or Group III belt guide slot (Fig. 14-b), and thread the lap belt through the belt guide (Fig. 14-c).
So the installation is completed (Fig. 14-d).
e) Joint the belts and buckle up.
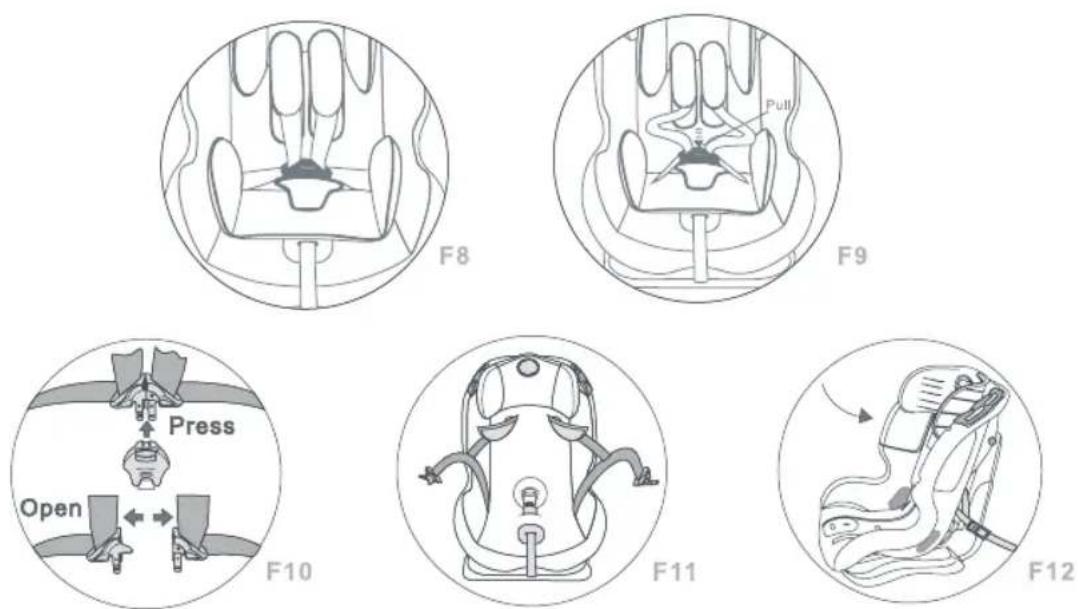
4 Placing your child in the THUNDER car seat
Loosen the shoulder belts by pressing the realease button and pull the shoulder belts towards you.
Important: Do not pull on the belt pads when doing so. (Fig. 8-9)
Press the red button to open the buckle. (Fig. 10)
Part the belts over the sides of the shell. (Fig. 11)
Place your child into the shell and make sure that there are no toys or other hard objects in the shell. (Fig. 12)
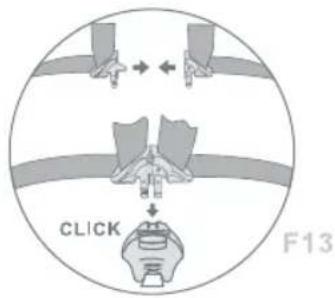
Match buckle tongue sections together and insert them into the buckle. (Fig. 13)
f) Make sure the shoulder belts fit your child snugly by pulling the adjuster belt. (Fig. 14)
Note! After you have done the installation, check it by trying to move it, it shouldn't move more than an inch side along the belt path, if it does, tightens the straps or try installing it again. The belts should never be twisted. If you are unable to click the tongue sections into the buckle, unlock the buckle by pressing the red button and try again.
GB THUNDER iso-fix
5 DETACHING THE SEAT
To detach the seat follow the installation instructions in reverse. (it is advisable to give yourself a bit more space by moving the front seat forward as far as possible)
- First unfasten the headrest anchor (TOP TETHER). F7
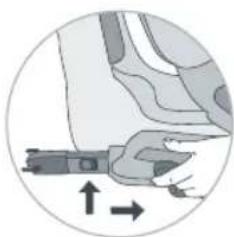
- Then unfasten the ISO-FIX, get inside the vehicle facing the Thunder safety seat, then simultaneously raise the catches found on both sides and gently pull outwards, until uncovering the buttons on each side of the isofix leg that display the status: GREEN (connected) or RED (disconnected), press the green button and pull the seat and the ISO-FIX anchor will be disconnected, and then the seat is released. F7.a - F7.b - F7.c
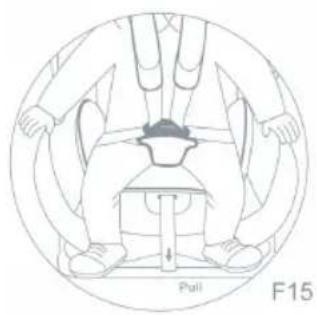
6 Adjusting the height of the shoulder belts
a) The correct height of the shoulder belts is attained when the belt disappears into the shell slightly above the shoulder of the child. Ensure that the shoulder belts fit comfortably over the child's shoulder. (Fig. 15)
b) Loosen the shoulder belts by pressing the release button of the adjuster and pulling the shoulder belts towards you as far as possible. Important: Do not pull the belt pads when doing so. (Fig. 9)
c) Place the shell of the seat in the sleeping position.
d) Remove the shoulder belts from the yoke. (Fig. 16-a)
e) Pull the shoulder belts through the belt pads and belting slots in shell, ensuring that the buckle remains fixed to prevent the belts being twisted. (Fig. 17)
f) If you want to alter the belts from or to the lowest positions, place the THUNDER to the sleeping position.
g) If you want to alter the belts from or to the higher positions, place the THUNDER to the sitting position.
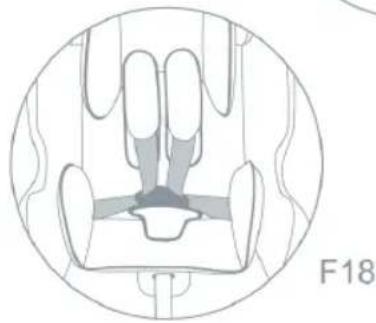
h) Place the shoulder pads at the expected height and thread the shoulder straps back through the shoulder pads, cover and shell. (Fig. 18)
i) Connect the shoulder belts to the belt yoke. (Fig. 19-a)
MAINTENANCE & CLEANING
General
a) The car seat can be cleaned by using lukewarm water and soap. Do not use aggressive cleaners like abrasives or thinner.
b) The cover should be washed by hand at a maximum temperature of 30^ C. Do not put it in the dryer.
c) It is advised to buy an extra cover when purchasing the car seat that you can continue using it when one cover is being washed.
Step 1: Take the car seat out of your car; ensure your entire baby's car toys are put away before you begin cleaning it.
Step 2. Suck up food particles and dirt with a cordless vacuum. If possible, use a portable vacuum cleaner's furniture attachment to clean the small, hard-to-reach areas of the car seat.
Step 3. Clean off the plastic portions of the seat with gentle soap and water.
Step 4. Remove the entire car seat cover, if possible, and run it through your washing machine gentle cycle.
Stpe 5. Spot clean the stained spots on the car seat if you cannot remove the cover; make sure you can use the soap on the car seat's material by checking the package's guidelines.
Step 6. Reinstall the clean car seat in your car, and take special care that all parts of the car seat being present and installed safely and correctly.
GB
THUNDER iso-fix
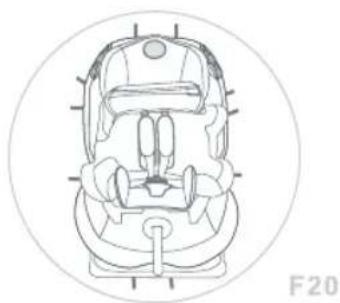
7 CHANGING THE COVER
Removing and Replacing the cover and belt pads
a) Loosen the belts pads. (See adjusting the height of the shoulder belts)
b) Loosen the cover all around. (Fig. 20)
c) Pull the belts, buckle tongues and buckle through the cover.
d) Remove the cover.
e) After washing, attach the belt pads and place the cover on the shell.
f) Thread the buckle, tongues and belts through the cover and fasten the cover at the release button/positioning handle.
g) Secure the cover on the pins.
h) Close the buckle and thread the belts through the belt pads, cover and shell.
i) Connect the shoulder belts to the belt yoke.
j) Fasten the cover all around, behind the pins.
Checklist
For safety's sake read through this checklist before you set off.
Check that the harness belt system fits properly and tightly around your child and that the shoulder belts are at the correct height.
Check regularly that the belt in the baby car seat is not damaged. If it is damaged do not use your product in any circumstances and contact your supplier or importer (see address list in the service card).
Check that you have secured your baby car seat with the seat belt.
If you have any questions, please contact your supplier
Make sure that you have the following details to hand:
-Serial number underneath on the service card.
-Mark and type of vehicle and seat on which the baby car seat used.
-Age and weight of your child.

THUNDER iso-fix
1 EINBAUHINWEISE
natural_image
Gray-scale color palette bar with grayscale swatches and a single yellow square (no text or symbols)be cool
THUNDER
iso-fix
be cool
be cool
info@babybecool.es