
PSP 260 - Paint spray BOSCH - Free user manual and instructions
Find the device manual for free PSP 260 BOSCH in PDF.

| Product type | Electric spray gun |
| Brand | Bosch |
| Model | PSP 260 |
| Rated power input | 60 W |
| Delivery rate (water) | 260 g/min |
| Maximum pressure | 160 bar |
| Maximum viscosity of sprayable product | DIN-80 |
| Cup content | 0.75 L |
| Weight without cord | 1.2 kg |
| Protection class | II |
| Sound level | 81 dB(A) |
| Forearm vibration | < 2.5 m/s² |
| Nozzle supplied | Round jet nozzle 0.6 mm |
| Sprayable product types | Paints, varnishes, oils, wood preservatives, disinfectants |
| Product preparation | Dilution required, measure DIN seconds with graduated cup |
| Maintenance | Clean with suitable thinner, oil after each use |
| Piston cleaning | Disassemble and soak in thinner, do not use hard objects |
| Safety instructions | Wear goggles and mask, use 30 mA residual current device, do not spray flammable liquids |
| Optional accessories | Flat jet nozzle FD5/FD7, cleaning nozzle, nozzle extension |
| Spare parts and repairability | Exploded views at www.bosch-pt.com, repair by approved service center |
| After-sales service | Toll-free number 0800 05 50 51 |
| Compliance standards | EN 50 144, directives 89/336/EEC and 98/37/EC |
| Power supply | 230 V~, 50 Hz (compatible 220 V) |
Frequently Asked Questions - PSP 260 BOSCH
User questions about PSP 260 BOSCH
0 question about this device. Answer the ones you know or ask your own.
Ask a new question about this device
Download the instructions for your Paint spray in PDF format for free! Find your manual PSP 260 - BOSCH and take your electronic device back in hand. On this page are published all the documents necessary for the use of your device. PSP 260 by BOSCH.
USER MANUAL PSP 260 BOSCH
Senior Vice President
Engineering
Dr. Eckerhard Strötgen
Head of Product
Certification

Product Specifications
Spray Gun PSP 260
Order number 0 603 260 4..
Rated input power [W] 60
Delivery rate (water) [g/min] 260
Pressure max. [bar] 160
Viscosity of spray material max. [DIN-s] 80
Container capacity ca. [I] 0.75
Weight without mains cable approx. [kg] 1.2
Protection class / II

Please observe the order number of your machine. The trade names of the individual machines may vary.
Noise/Vibration Information
Measured values determined according to EN 50 144.
Typically, the A-weighted sound pressure level of the product is 81 dB(A). The noise level when working can exceed 85 dB(A).
Wear ear protection!
The typical hand-arm vibration is below 2.5m / s^2
Product Elements
Please open the foldout page with the illustration of the tool and leave it open while you read these operating instructions.
The numbering of the machine elements refers to the illustration of the machine on the graphic page.
1 Nozzle
2 Attachment knob
3 Regulating knob
4 ON/OFF switch
5 Paint container
6 Suction/pressure valve
7 Pump unit
8 Piston opening
9 Spring
10 Pump piston
11 Motor housing
12 Metering cup
Not all the accessories illustrated or described are included in standard delivery.
Intended Use
The machine is intended for the spraying of fluids such as paints, lacquers and oils as well as wood protection, impregnation, disinfection and plant protection agents.

For Your Safety
Working safely with this machine is possible only when the operating and safety information are read completely and the instructions contained therein are strictly followed.
In addition, the general safety notes in the enclosed booklet must be observed.
Wear safety glasses.
■Paint mist and solvent vapours are detrimental to health: Always wear breathing protection and work only in a well ventilated room or in front of a stationary extraction system.
Danger of explosion! No open flames should be located in the working area. No smoking.
■Do not spray easily combustible or explosive fluids (e.g. benzene, alcohol) or use them for cleaning. Lacquer and solvents (thinner) must have a combustion point of over 21^ .
- Do not work with fluid with unknown dangers. Follow manufacturers instructions.
If the cable is damaged or cut through while working, do not touch the cable but immediately pull the mains plug. Never use the machine with a damaged cable.
Connect machines that are used in the open via a residual current device (RCD) with an actuating current of 30mA maximum. Do not operate the machine in rain or moisture.
- Never direct the spray at persons or animals. The sprayed material is emitted with high pressure. Danger of injury and infection!
Always direct the cable to the rear away from the machine.
Never allow children to use the machine.
■ Bosch is able to ensure flawless functioning of the machine only if the original accessories intended for it are used.
Before Use
When buying paints, lacquers and spraying agents, pay attention to environmental compatibility (for example, marked with the blue environmental seal).
Preparing the Spray Material
The spray material should not be too thick, that is, not exceed the maximum viscosity value of the machine.
Most commercially available paints and lacquers are primarily suited for applying with a brush. For spraying, they must be thinned to the required viscosity value.
The spray material and the thinner must be compatible. Information concerning the suitable thinner (water, solvent) for each spray material is to be taken from the manufacturers information. When the wrong thinner is used, lumps can form that clog the machine.
First, mix the spray material thoroughly and bring to a average room temperature (20 - 22^) . Do not change the viscosity by additional heating.
Dip the metering cup 12 provided into the spray material until it is brim full. Lift the metering cup out of the spray material and allow the fluid to run out (see Fig.
A). Measure the time required in seconds until the flow is no longer continuous. This time is called the "DIN-seconds (DIN-s)".
When the value is too high, add the thinning agent that is suitable for the spray material in steps and mix well. Again measure the DIN-seconds. Repeat the process until the value given in the table is reached.
The table below gives examples of materials and DIN standard values:
Spray Material Flow-through
Time (in DIN-s)
Car body enamel 16-20
Bronze 25-30*
Primer 25-30*
Acrylic/synthetic-resin varnish 25-30
Wood preservation 25-30
Scumble glaze 25-30
Hammered effect enamel 30-35*
Dispersion paint 40-80
- Products containing granules or particles must not be sprayed. These act abrasively and shorten the service life of the pump and valve.
In this case, claims for repair/replacement of these parts are voided.
Preparing the Surface to be Sprayed
The surface to be sprayed must be clean, dry and free of grease. Roughen smooth surfaces and then remove the sanding dust.
The spraying mist can soil the surroundings. Therefore, adequately cover the surroundings of the surface to be sprayed.
Spraying work on the banks of lakes or streams or in the surrounding areas of their immediate feeding zone is not allowed.
Putting into Operation
Ensure that the mains voltage is correct!
The voltage of the power source must agree with the value given on the nameplate of the machine. Machines designated for 230V can also be operated with 220V .
To Put into Operation, turn the regulating knob 3 counterclockwise completely to the left. Press the on/off switch 4.
Turn the regulating knob 3 in the clockwise direction until the spray cone has the desired width and the spray mist is uniformly fine and without drops (see Fig. B).
To Switch off, release the on/off switch 4.
For each repeated switching on, turn the regulating knob 3 completely to the left.
Working Instructions
Spraying Operation
Before the spraying procedure, briefly spray the same material that is used for thinning into a collection basin.
Fill the prepared spray material into the container 5 through the funnel strainer (accessory).
Always screw the container 5 firmly onto the pump unit 7.
Do not switch the machine on and off over the surface to be sprayed.
Always hold the machine upright. As necessary, use a nozzle extension (accessory) and bend the nozzle in the desired direction.
Make a trial spraying onto cardboard or paper.
The distance of the nozzle to the work piece is dependent on the spray material (approx. 20 to 35~cm spraying distance depending on the spray cone and the desired material application). Determine the appropriate distance to the surface to be sprayed in each case by a trial. Start with a greater distance.
Take care to maintain the same distance to the surface to be sprayed and make uniform movement (see Fig. C).
First, spray the corners or small decorative parts with short spray bursts. Then perform the actual spraying procedure.
Begin the spraying pass approx. 10cm outside the surface to be sprayed and also end it approx. 10cm beyond the surface. Spray from the edge to the middle, then work the surface in a crosswise manner (see Fig. A uniform application is achieved when the passes overlap by 4 to 5cm .
Then spray the surface a second time in the crosswise manner.
When spraying on a vertical surface, drops can form. First, spray from a somewhat greater distance and allow the sprayed material to partially dry.
Never spray until the container is empty. The suction tube must always be immersed in the fluid. Otherwise, the spray mist is interrupted and thick drops are sprayed.
Selecting Nozzles
(For illustrations of the accessories, see the last page of these instructions.)
Nozzle Application
1 cylindrical spray nozzle:
- 0.6 mm all paints, varnishes (supplied)
- 0.4mm liquid spray material (water, solvents)
- 0.8mm viscous spray material
2 flat-spray nozzle:
- FD5 fine varnishing work
-FD7 dispersion paint airless quality)
3 cleaning nozzle thin, hard jet
4 nozzle extension spray, upwards or downwards (flexible 90^ )
Maintenance and Cleaning
Before any work on the machine itself, pull the mains plug.
Always keep the machine clean so that it functions properly and accurately.
General Maintenance and Cleaning Instructions
The cleaning of the machine and the container 5 always takes place with the thinning agent suitable for the spray material.
■Never immerse the complete unit in cleaning agent!
For cleaning, spray through the machine with the thinning agent or with water for water soluble material (use the collecting basin).
After cleaning or use with water, briefly spray resin- and acid-free oil (for example, sewing machine oil) through the machine for corrosion protection. Otherwise, the piston could become blocked by rust.
Special Cleaning Instructions (see Fig. D
- Screw out the attachment knob 2.
- Separate the motor housing 11 from the pump unit 7. See Fig. D or this purpose.
- Unscrew the nozzle 1 and remove the suction/ pressure valve 6 from the pump unit 7. Remove the pump piston 10 together with the spring 9 from the pump unit 7. Do not use force!
- Make a tightly fitting valve ball passable through piston opening 8 with the aid of a copper or brass pin.
- Place all parts in the appropriate thinning agent and clean.
Never use hard objects for cleaning! The pump piston 10 must be free to move easily in the pump housing.
- Reassemble the parts in the reverse order.
For malfunctions, check the nozzle 1 and the suction/pressure valve 6 and replace as necessary.
After cleaning, briefly spray resin- and acid-free oil (for example, sewing machine oil) through the machine for corrosion protection.
Disposing of materials
After use and subsequent cleaning of the machine, collect the thinning and cleaning agents and dispose of in a environmentally correct manner.
Chemicals detrimental to the environment must never enter the ground, ground water or lakes and streams. Never pour material into the sewage system.
Paints, varnishes and solvents are special category waste and must be disposed of accordingly. You should comply with the relevant national and local regulations.
Follow the manufacturer's waste disposal instructions.
WARNING
Important instructions for connecting a new 3-pin plug to the 2-wire cable.
The wires in the cable are coloured according to the following code:
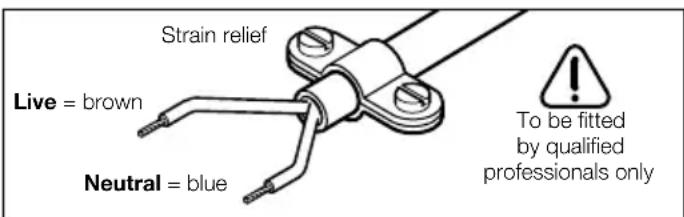
Do not connect the blue or brown wire to the earth terminal of the plug.
Important: If the plug on the cable of this machine must be replaced, dispose of the old plug to prevent misuse.
If the machine should fail despite the care taken in manufacture and testing, repair should be carried out by an authorised customer services agent for Bosch power tools.
For all correspondence and spare parts orders, always include the 10-digit order number of the machine.
Environmental Protection

Recycle raw materials instead of disposing as waste.
The machine, accessories and packaging should be submitted for environment-friendly recycling.
These instructions are printed on recycled paper manufactured without chlorine.
The plastic components are labelled for categorised recycling.
Service and Customer Advice
Exploded views and information on spare parts can be found under: www.bosch-pt.com.
Great Britain
Robert Bosch Ltd. (B.S.C.)
P.O.Box 98
Broadwater Park
North Orbital Road
Denham-Uxbridge
MIDDLEXUB95HJ
Service. +44 (0) 18 95/83 87 82
Advice line. +44 (0) 18 95/83 87 91
Fax +44 (0) 18 95/83 87 89
Ireland
Beaver Distribution Ltd.
Greenhills Road
Tallaght-Dublin 24
±b Service. +353 (0)1/414 9400
Fax 353 (0)1/459 8030
Australia
Robert Bosch Australia L.t.d.
RBAU/SBT2
1555 Centre Road
P.O. Box 66 Clayton
3168 Clayton/Victoria
+61 (0)1/800 804 777
Fax +61 (0)1/800 819 520
www.bosch.com.au
E-Mail: CustomerSupportSPT@au.bosch.com
New Zealand
Robert Bosch Limited
14-16 Constellation Drive
Mairangi Bay
Auckland
New Zealand
+64 (0)9/47 86 158
Fax .+64 (0)9/47 82 914
CE Declaration of Conformity
We declare under our sole responsibility that this product is in conformity with the following standards or standardization documents:
EN 50 144 according to the provisions of the directives 89/336/EEC, 98/37/EC.
Dr. Egbert Schneider
Senior Vice President
Engineering
Dr. Eckerhard Strötgen
Head of Product
Certification

Specifications subject to change without notice
\section*{Caracteristiques techniques}
Robert Bosch France S.A.
Service ÀpRES-vente Outillage
Senior Vice President
Engineering
Dr. Eckerhard Strötgen
Head of Product
Certification

Senior Vice President
Engineering
Dr. Eckerhard Strötgen
Head of Product
Certification

Dr. Egbert Schneider Senior Vice President Engineering
Dr. Eckerhard Ströttgen
Head of Product Certification

Senior Vice President
Engineering
Dr. Eckerhard Strötgen
Head of Product
Certification

Dr. Egbert Schneider Senior Vice President Engineering
Dr. Eckerhard Strötgen
Head of Product Certification

Dr. Egbert Schneider Senior Vice President Engineering
Dr. Eckerhard Ströttgen
Head of Product Certification


Dr. Egbert Schneider Senior Vice President Engineering
Dr. Eckerhard Strötgen
Head of Product Certification

Senior Vice President
Engineering
Dr. Eckerhard Strötgen
Head of Product
Certification


Dr. Egbert Schneider Senior Vice President Engineering
Dr. Eckerhard Ströttgen
Head of Product Certification

Dr. Egbert Schneider Senior Vice President Engineering
Dr. Eckerhard Ströttgen
Head of Product Certification

Bosch San. ve Tic. A.S.
Ahi Evran Cad. No:1 Kat:22
Polaris Plaza
80670 Maslak/Istanbul
C. +90 (0)212/335 06 00
Faks. +90 (0)212/346 00 48-49
Uygunjuk beyani
Senior Vice President
Engineering
Dr. Eckerhard Strötgen
Head of Product
Certification

- Product Specifications
- Spray Gun PSP 260
- Noise/Vibration Information
- Wear ear protection!
- Product Elements
- Intended Use
- For Your Safety
- Before Use
- Preparing the Spray Material
- Spray Material Flow-through
- Time (in DIN-s)
- Preparing the Surface to be Sprayed
- Putting into Operation
- Ensure that the mains voltage is correct!
- Working Instructions
- Spraying Operation
- Selecting Nozzles
- Nozzle Application
- Maintenance and Cleaning
- General Maintenance and Cleaning Instructions
- Special Cleaning Instructions (see Fig. D
- Disposing of materials
- WARNING
- Important instructions for connecting a new 3-pin plug to the 2-wire cable.
- Environmental Protection
- Recycle raw materials instead of disposing as waste.
- Service and Customer Advice
- Great Britain
- Ireland
- Australia
- New Zealand
- CE Declaration of Conformity
- \section*{Caracteristiques techniques}
- Uygunjuk beyani
Brand : BOSCH
Model : PSP 260
Category : Paint spray