TBL 1300 - Binding machine OLYMPIA - Free user manual and instructions
Find the device manual for free TBL 1300 OLYMPIA in PDF.
Frequently Asked Questions - TBL 1300 OLYMPIA
User questions about TBL 1300 OLYMPIA
0 question about this device. Answer the ones you know or ask your own.
Ask a new question about this device
Download the instructions for your Binding machine in PDF format for free! Find your manual TBL 1300 - OLYMPIA and take your electronic device back in hand. On this page are published all the documents necessary for the use of your device. TBL 1300 by OLYMPIA.
USER MANUAL TBL 1300 OLYMPIA
natural_image
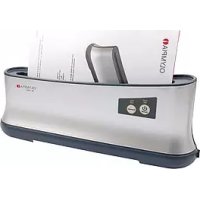
Two industrial printing machines with paper cutouts and control panel labels, no visible text or symbols on the machines themselves.Operating Instructions .....17
text_image
Diagram of a device's front panel with labeled parts including buttons, display, and control buttonstext_image
POWER Laminator Bind/counter ON/OFF Cold/Hot Green/Red 5 6 7Service-Center Hattingen
Zum Kraftwerk 1
45527 Hattingen
Laminator and Thermal Binder
Operating Instructions
[ENGLISH]
11.2011
GB
1 Important Safety Information.... 19
1.1 Safety information, laminator 19
1.2 Safety information, thermal binder 20
2 Exemption From Liability 20
3 Intended Use 20
4 Operating Elements....21
4.1 Operating elements on the device 21
4.2 Function buttons and indicator elements 22
5 Starting Up....22
6 Operation....23
6.1 Switching the device on and off 23
6.2 Laminator 23
6.2.1 Cold laminating 23
6.2.2 Hot laminating 24
6.2.3 Clearing jammed lamination foil....25
6.3 Thermal binder 25
6.3.1 Thermal binding 25
6.3.2 Overheating protection (auto off) 26
7 Cleaning & Maintenance 26
7.1 Cleaning the exterior of the device....26
7.2 Cleaning the transport rollers....27
8 Troubleshooting....27
9 Technical Data....28
10 Disposal....29
11 Warranty 29
Please observe the following to ensure the device is used reliably and safely:
- Read this operating manual thoroughly and observe the instructions and information in it when operating the device.
- Keep this operating manual in a safe place for future reference.
- The device may only be used in dry, indoor rooms.
- Before starting to use the device, set it down on a level, stable working base.
- Never touch the power plug with wet hands.
- Disconnect the power plug when the device is not in use.
- Prevent damage to the power plug and power cable. Never twist the power cable. Do not operate the device if the power cable or power plug is damaged.
- Do not use the device in the vicinity of hot surfaces or in damp environments and protect it from direct sunlight and dusty conditions.
- Children must not be allowed in the vicinity of the device when it is ready to operate.
- Always switch the device off immediately if it emits a strong smell or it is not in operation.
- Disconnect the power plug before starting to clean the device. Never use any solvents or aggressive cleaning agents.
- Repairs may only be carried out by properly trained specialists. Failure to observe this may result in fatal injury and there are no rights to claims under the terms of guarantee.
1.1 Safety information, laminator
• The surface of the equipment becomes hot during hot laminating.
- Only insert lamination foil intended for the device, refer to Chapter "Technical Data". Using lamination foil which is too large could lead to the unit jamming.
- Never cut lamination foil to size. The resulting cut edges could cause the lamination foil to jam.
- Do not use lamination foil intended for cold lamination for hot lamination. This could damage the device, lamination foil and document.
- Do not laminate heat sensitive materials, such as thermal paper, in the device.
- Metallic objects cannot be laminated.
- Lamination of moist documents produces poor results.
- Keep loose clothing, ties, jewellery, long hair and other loose objects away from the laminator infeed slot. Risk of injury!
1.2 Safety information, thermal binder
- The surface of the equipment becomes hot during operation.
- Only use binding covers of the correct size. Otherwise, the binding quality will not be satisfactory.
- Do not bind heat sensitive materials, such as thermal paper, in the device.
- Do not insert metallic objects or fingers into the device opening. Doing so represents a risk of an electric shock or burns.
2 Exemption From Liability
We cannot guarantee that the information which relates to the technical properties of the product or to the product itself contained in this document is correct. The product and its accessories described in this document are subject to constant improvement and further development. For this reason, we reserve the right to modify components, accessories, technical specifications and related documentation of the product described herein at any time without notice.
3 Intended Use
This laminating and thermal binding device may only be used for:
- lamination using hot lamination foil and cold lamination foil with a lamination foil thickness of 75 to 125 mic ^4 , whereby the total thickness of the document to be laminated (photos, pictures, cards, paper, etc.) may be maximally 0.6 mm.
- binding a maximum of 200 sheets of paper (70g/m ^2 ) in special thermal binding covers with a maximum width of 20 mm.
Any other use is considered unintended use. Unauthorised modifications or reconstructions are not permitted.
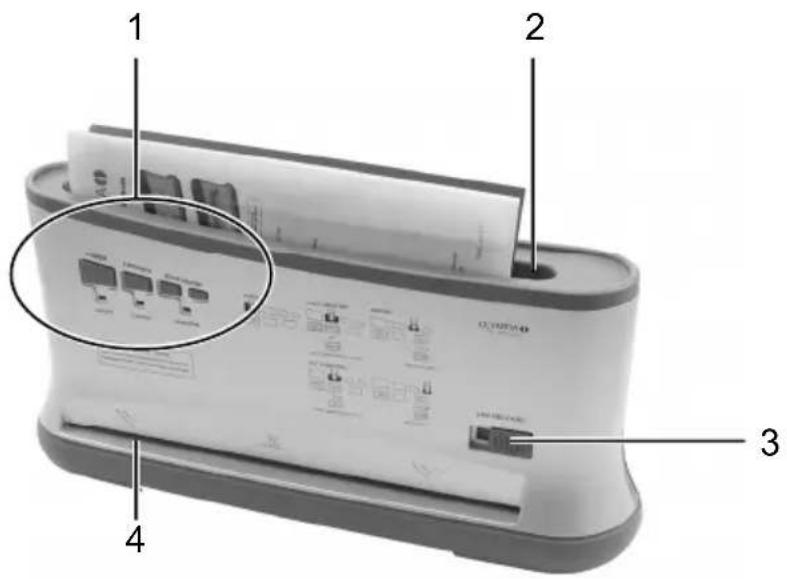
4.1 Operating elements on the device
text_image
Diagram of a printer's front panel with labeled parts and internal components, showing print and print layout details.1 Operating and indicator elements
2 Binder infeed slot
3 Jam Release sliding switch (laminating function)
4 Laminator infeed (front)
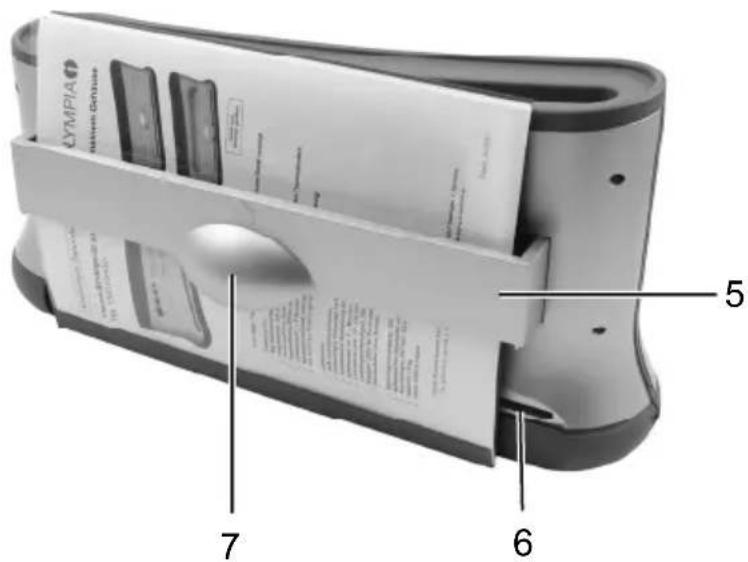
text_image
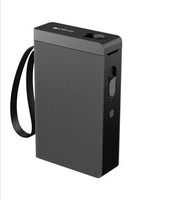
LYMPIA HOMA GROUP 5 7 65 Pull-out tray (cooling device)
6 Laminator discharge (rear)
7 Handle for the pull-out tray
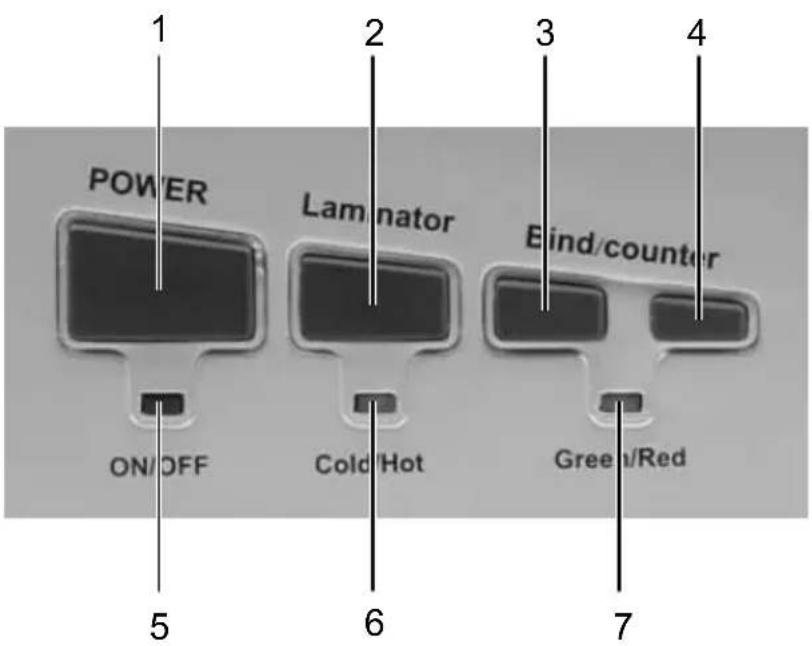
4.2 Function buttons and indicator elements
text_image
POWER Laminator Bind/counter ON/OFF Cold/Hot Green/Red 5 6 71 POWER ON/OFF switch
2 Laminator button
3 Bind/Counter button (start preheating)
4 Bind/Counter button (start thermal binding)
5 POWER LED (indicator: device on/off)
6 Laminator LED
(green = cold lamination; red = hot lamination)
(flashing = waiting; continuously on = ready for use)
7 Thermal binder LED
(red & flashing = preheating process;
green & continuously on = ready for use/finished)
5 Starting Up
- Place the device on a stable, level surface.

Attention: Check that the voltage specifications of the device correspond to that of your power supply network (230 V, 50 Hz).
- Insert the power plug in an easily accessible, standard power socket.

Safety note: The power socket must be in the immediate vicinity of the device and easily accessible. This enables you to disconnect the device from the power supply quickly in an emergency.
6 Operation
6.1 Switching the device on and off
- Press the POWER button. The POWER LED lights up red. The device is switched on.
- Press the POWER button. The POWER LED goes out. The device is switched off.
6.2 Laminator
The laminator can complete hot and cold lamination:
• In the case of cold lamination, the lamination foil is pressed together.
• In the case of hot lamination, the lamination foil is adhered together.
Select the lamination method according to the material to be laminated.

Note: Only cold lamination should be used for thermopaper and ultrasonic images!
6.2.1 Cold laminating
- Ensure that the device is switched on, refer to Section "Switching the device on and off".
- Press the Laminator button until the Laminator LED lights up green. When the Laminator LED lights up green continuously, the device is ready for use for cold lamination.

Attention: If you have just finished using the laminator for hot laminating, you must let the laminator cool down. The Laminator LED flashes green when the device is cooling down. It takes a few minutes to cool down sufficiently.

Note: Only use cold lamination foil for cold laminating.
- Remove the protective foil from the foil pocket.
-
Insert the document to be laminated in the lamination foil pocket so that there is a margin of approx. 3 - 5 mm to the edge of the foil on all sides.
-
Guide the laminating foil pocket containing the document to be laminated in the laminator infeed straight and with the closed side first. The laminating process occurs automatically.

Note: To prevent the lamination foil from creasing, never feed the open side of the lamination foil pocket first in the laminator infeed. When inserting the lamination foil pocket, observe the instructions on the infeed slot.
6.2.2 Hot laminating
- Ensure that the device is switched on, refer to Section "Switching the device on and off".
- Press the Laminator button until the Laminator LED lights up red. The Laminator LED flashes red when the device is warming up. The correct operating temperature is reached after about 3 to 5 minutes and the Laminator LED lights red continually.

Note: Only use hot lamination foil for hot laminating.
- Insert the document to be laminated in the lamination foil pocket so that there is a margin of approx. 3 - 5 mm to the edge of the foil on all sides.
- Guide the laminating foil pocket containing the document to be laminated in the laminator infeed straight and with the closed side first. The laminating process occurs automatically.

Note: To prevent the lamination foil from creasing, never feed the open side of the lamination foil pocket first in the laminator infeed. When inserting the lamination foil pocket, observe the instructions on the infeed slot.

Caution: The lamination foil is very hot and soft when ejected following lamination. Therefore, handle the laminated document with due care!

Note: To flatten and smoothen the laminated product, place a book or similar heavy, flat object on it.
- When you have finished laminating, switch the device off and disconnect the mains plug from the power socket. Let the device cool down before packing it away, for example.

Caution: The device is very hot directly after laminating! Risk of injury!
6.2.3 Clearing jammed lamination foil
The device is equipped with a JAM RELEASE sliding switch to clear foil jams quickly.
Proceed as follows if the lamination foil jams:
- Switch the device off: Press the POWER button until the POWER LED goes out.
- Slide the JAM RELEASE switch to the right as far as possible.
- Hold the laminator firmly and pull the lamination foil together with the document to be laminated out of the laminator's infeed.
- Slide the JAM RELEASE switch back to the left.
- Clean the transport rollers of any deposits and residual adhesive by inserting a folded piece of paper in the laminator infeed, refer to Chapter "Cleaning the transport rollers".

Note: If foil jams occur repeatedly or jammed foil cannot be removed from the laminator, please contact our hotline (refer to Chapter "Guarantee").
6.3 Thermal binder
6.3.1 Thermal binding
- Ensure that the device is switched on, refer to Section "Switching the device on and off".
- Press the Preheating button to start the warm-up process.
-
The Bind/Counter LED flashes red when the device is warming up. The correct operating temperature is reached after about 3 minutes and the Bind/Counter LED lights up green continually. An acoustic signal also indicates that the device is ready for thermal binding.
-
Insert the sheets of paper in the thermal binding cover.

Note: Pay attention to the maximum binding capacity, refer to Chapter "Technical Data".
-
Pull out the tray on the rear side of the device (cooling device) to enable the thermal binding cover to be inserted in the binder infeed slot.
-
Guide the thermal binding cover, with the closed side at the bottom, from the top in the binding infeed slot. An integrated clamping mechanism holds the paper perpendicular.
-
Press the Thermal Binding button to start the binding process.
-
The Bind/Counter LED flashes red during the binding process. The binding process is completed after about 1 minute and the Bind/Counter LED lights up green continuously. Three acoustic signals also indicate that the thermal binding process has finished.

Caution: The bound folder is very hot in the spine area after binding!
- Remove the thermal binding cover and place it on the cooling device for about 10 minutes.

Note: Observe the cooling down time. Too short a cooling down time will result in loose sheets!
-
Repeat steps 1 to 9 to bind further documents.
-
When you have finished thermal binding, switch the device off and disconnect the mains plug from the power socket. Let the device cool down before packing it away, for example.
6.3.2 Overheating protection (auto off)
The device is equipped with an overheating protection (Auto off) in order to protect thermal binding covers which have not been removed from overheating.
An acoustic signal indicates the binding process has finished. The overheating protection is activated at the same time. If the Thermal Binding button is not pressed for a period of 90 minutes, the power supply is cut off electronically (Auto off).
To start thermal binding, the device must be switched on again, refer to Section "Switching the device on and off".
7 Cleaning & Maintenance
7.1 Cleaning the exterior of the device

Attention: Before cleaning the device with a damp cloth, disconnect the power plug!
Clean the housing using a cloth moistened with clean water with a little mild soap applied.

Note: Never use solvents or aggressive cleaning agents.
7.2 Cleaning the transport rollers
Deposits and residual adhesive on the transport rollers can influence the results of the laminating process. Therefore, clean the transport rollers at regular intervals:
- Wait until the Laminator LED lights up red continuously.
- Insert a piece of folded paper in the laminator infeed.
- Repeat the process with a new piece of paper until there are no more deposits or residual adhesive to be seen on the paper.
8 Troubleshooting
| Problem Diagnosis | & Cause Solution | |
| POWER indicator does not light up. | The power plug is not plugged into the power socket properly. | Connect the power plug in the power socket properly. |
| The device was not switched on. | Press the POWER button until the POWER LED lights up red. | |
| The POWER ON/OFF LED is defective. | Contact our hotline (refer to Chapter "Guarantee"). | |
| Laminated foil is not completely transparent | The laminating temperature was too low. | Laminate the same foil again to improve the lamination result. |
| Foil jam | The lamination foil was inserted askew in the laminator infeed. | Refer to Section "Clearing jammed lamination foil". Refer to Section "Cleaning the transport rollers". Insert the lamination foil in the laminator infeed straight and with the closed side first. Only use lamination foil of the specified sizes, refer to Chapter "Technical Data". |
| The lamination foil is too large. | ||
| Device no longer works after a longer period in operation or stops during operation. | Is the surface of the device hot? If so, the device's overheating protection has probably switched the laminator off automatically. | Wait for approx. 30 minutes and try to laminate again. If the device does not work, contact our hotline (refer to Chapter "Guarantee"). |
| Transport rollers do not run. | The power plug is not plugged into the power socket properly. The device was not switched on. | If the problem continues, contact our hotline (refer to Chapter "Guarantee"). |
| Binding is faulty / Loose sheets | The maximum binding capacity was exceeded: Too many sheets or the thermal binding cover was too large. | Observe the maximum binding capacity, refer to Chapter "Technical Data" and carry out the binding again. |
| The cooling down time was too short. | Allow the bound document to cool down in the tray for at least 10 minutes. |
If the problem cannot be solved, contact our Hotline; refer to Chapter "Guarantee".
9 Technical Data
| TBL 1300 Combo | |
| Indicator element: POWER LED (red) | |
| Laminator | |
| Maximum laminating width: 320 mm | |
| Max. thickness of document for lamination: | 0.6 mm |
| Lamination foil thickness: | 75 to 125 mic^5 |
| Laminating speed: 250 mm per minute | |
| Warm-up period: 3 - 5 minutes | |
| Indicator elements: LED (green, red; flashing, continuously on) | |
| Special features: Jam Release sliding switchNo blisteringAutomatic shutdown on overheating | |
| Thermal binder | |
| Maximum binding width: 335 mm (for A4 size) | |
| Maximum binding capacity: 200 sheets ( 70g/m^2 )in thermal binding cover ≤ 20 mm | |
| Binding time: Approx. 1 minute | |
| Warm-up period: 3 - 5 minutes | |
| Recommended cooling time: 10 minutes | |
| Indicator elements: LED (green, red; flashing, continuously on) | |
| Special features: Optical and acoustic indication of ready to useand end of binding states | Pull-out tray for cooling bound documents (cooling device)Automatic opening of the dust cover |
| Colour: | Black-silver |
| Dimensions (W x D x H): 435 x 115 x | 225 mm |
| Weight: | 2 kg |
| Power supply: 230 V, 50 Hz | |
| Rated input power: Max. 320 W, 1.45 A | |
| Automatic shutdown: After 90 min. in | Standby |

Conformity of the equipment to the EU directives is confirmed by the CE mark.
10 Disposal

This symbol (crossed out waste bin) indicates that the product must be returned to an authorised recycling centre or collection point when it has reached the end of its service life. This symbol only applies in member states of the EEA ^6 .
11 Warranty
In the case of a defect, please return the device together with the receipt and original packing material to the point-of-sale.
OLYMPIA®
TBL 1300 Combo
6.3.1 Thermoreliure....38
6.3.2 Protection thermique (Auto-off).... 39
text_image
Diagram of a printer's front panel with labeled parts and internal components, showing ports, buttons, and printouts.text_image
POWER Laminator Bind/counter ON/OFF Cold/Hot Green/Red 5 6 7 1 2 3 4text_image
Diagram of a printer's front panel with labeled parts and internal components, showing print and print layout details.text_image
POWER Laminator Bind/counter ON/OFF Cold/Hot Green/Red 5 6 7 1 2 3 4text_image
Diagram of a device rear panel with labeled parts and internal components, including zoomed-in detail view.text_image
POWER Laminator Bind/counter ON/OFF Cold/Hot Green/Red 5 6 7 1 2 3 4text_image
Diagram of a device rear panel with labeled parts and internal components, including zoomed-in insets for display and control.text_image
POWER Laminator Bind/counter ON/OFF Cold/Hot Green/Red 5 6 7 1 2 3 46.3.1 Thermisch inbinden....94
6.3.2 Beveiliging tegen oververhitting (Auto-off)....95
7 Apparaat reinigen en verzorgen....95
7.1 Apparaat van buiten reinigen 95
7.2 Transportwalsen reinigen....96
8 Problemen verhelpen 96
9 Technische gegevens 97
10 Gescheiden inzameling 98
11 Garantie....98
text_image
Diagram of a device rear panel with labeled parts and internal components, including zoomed-in insets for display and control.text_image
POWER Laminator Bind/counter ON/OFF Cold/Hot Green/Red 5 6 7 1 2 3 46.2 Lamineerapparaat
text_image
Diagram of a device rear panel with labeled parts and internal components, showing ports, buttons, and display areas.text_image
POWER Laminator Bind/counter ON/OFF Cold/Hot Green/Red 5 6 7 1 2 3 4text_image
Diagram of a device with labeled parts including buttons, display screen, and control paneltext_image
POWER Laminator Bind/counter ON/OFF Cold/Hot Green/Red 5 6 7GB The manufacturer hereby declares that the equipment complies with the stipulations defined in the following guidelines and standards:
D Der Hersteller erklärt hiermit, dass das Gerät mit den Bestimmungen der Richtlinien und Normen übereinstimmt:
F Le fabricant déclare par la présente que l'appareil est conforme aux règlements et normes en vigueur:
E Por medio de la presente, el fabricante declara que este aparato está conforme a lo dispuesto en las directivas y normas vigentes:
Hattingen, November 2011
Heinz Prygoda, Managing Director
DoC No.: 3041
Version 01
21.11.2011