
ACM 795LX01 - Cooker WHIRLPOOL - Free user manual and instructions
Find the device manual for free ACM 795LX01 WHIRLPOOL in PDF.
| Product Type | Induction Cooktop |
| Brand | Whirlpool |
| Model | ACM 795LX01 |
| Number of Burners | 4 |
| Control Type | Touch controls with progressive slider |
| Special Functions | Booster, Sensor, Simmering, Melting, Flexible Zone, Pause, Timer, Lock |
| Power Supply | 230 V ~ / 230–240 V ~ / 230 V 3~ / 400 V 3N~ / 400 V 2N~ (depending on model) |
| Maximum Power per Burner | Boost (P) – 10 minutes max, then returns to level 9 |
| Dimensions (W x D x H) | Approximately 59 x 52 x 5.5 cm (estimated for standard built-in) |
| Weight | Approximately 10 kg (estimated) |
| Pan Detection | Yes, with "no pan" display |
| Residual Heat Indicator | Yes (letter H) |
| Child Safety | Control panel lock (press lock key for 3 seconds) |
| Auto Shut-off | Yes, after 10 seconds without selection or if no pan is detected |
| Surface Material | Ceramic glass |
| Energy Class | Not specified (estimated A or A+) |
| Cleaning | Soft cloth, specific products; do not use steam cleaners or abrasive sponges |
| Spare Parts | Available for 10 years |
| Included Accessories | None (bonding kit for marble countertops optional: ref. 4812 310 19277) |
| Warranty | Not specified (generally 2 years according to legislation) |
Frequently Asked Questions - ACM 795LX01 WHIRLPOOL
User questions about ACM 795LX01 WHIRLPOOL
0 question about this device. Answer the ones you know or ask your own.
Ask a new question about this device
Download the instructions for your Cooker in PDF format for free! Find your manual ACM 795LX01 - WHIRLPOOL and take your electronic device back in hand. On this page are published all the documents necessary for the use of your device. ACM 795LX01 by WHIRLPOOL.
USER MANUAL ACM 795LX01 WHIRLPOOL
SENSING THE DIFFERENCE

ENGLISH Installation Page 2 Instructions for use Page 13
IMPORTANT SAFETY INSTRUCTIONS
YOUR SAFETY AND THAT OF OTHERS IS VERY IMPORTANT
This manual and the appliance itself provide important safety messages, to be read and always observed.

This is the danger symbol, regarding safety, warning of potential risks to users and others. All safety messages will be preceded by the danger symbol and the following words:

DANGER

WARNING
Indicates a hazardous situation which, if not avoided, will result in serious injury.
Indicates a hazardous situation which, if not avoided, could result in serious injury.
All messages relevant to safety specify the potential risk to which they refer and indicate how to reduce the risk of injury, damage and electric shocks due to incorrect use of the appliance. Make sure to comply with the following:
The appliance must be disconnected from the power supply before carrying out any installation operation.
Installation and maintenance must be carried out by a specialised technician, in compliance with the manufacturer's instructions and the local safety regulations in force. Do not repair or replace any part of the appliance unless specifically stated in the user manual.
The power cable must be long enough for connecting the appliance, fitted in the cabinet, to the power socket.
- For installation to comply with the current safety regulations, an omnipolar switch with minimum contact gap of 3mm is required.
- The appliance must be earthed.
- Do not use multi-sockets or extension cords.
- Do not pull the power cable to unplug the appliance.
- The electrical components must not be accessible to the user after installation.
- Do not touch the appliance with wet parts of the body or use it when barefoot.
The appliance is designed solely for domestic use for cooking food. No other use is permitted (e.g. heating rooms). The Manufacturer declines any liability for inappropriate use or incorrect setting of the controls.
The appliance must not be used by persons (including children) with reduced physical, sensory or mental abilities, or without experience or knowledge of it, unless supervised or instructed in its correct use by a person responsible.
The accessible parts can become very hot during use. Children must be kept away from the appliance and watched over to ensure that they do not play with it.
During and after use, do not touch the heating elements or interior surfaces of the appliance - risk of burns. Do not allow the appliance to come into contact with cloths or other flammable materials until all the components have cooled sufficiently. - Use oven gloves to remove pans and accessories, taking care not to touch the heating elements.
Do not place flammable materials on or near the appliance. A fire may break out if the appliance is inadvertently switched on. - Overheated oils and fats catch fire easily. Pay attention when cooking food products rich in fat and oil.
Do not place metal objects, such as kitchen utensils (knives, forks, spoons, lids, etc.), on the cooking zone, as they can become very hot. - A separator panel (not supplied) must be installed in the compartment under the appliance.
If the surface of the hob is damaged (glass cracked or broken), do not use the appliance. Call the After-Sales Service. - The appliance is not intended to be operated by means of an external timer or separate remote control system.
Disposal of household appliances
This product is built from recyclable or reusable materials. Disposal must be carried out in accordance with local regulations for waste disposal. Before scrapping, cut off the power supply cable.
For further information on the treatment, recovery and recycling of household electrical appliances, contact your competent local authority, the collection service for household waste or the store where you purchased the appliance.
SAFEGUARDING THE ENVIRONMENT

Disposal of packing
The packing material is 100% recyclable and marked with the recycling symbol (3). The various parts of the packing must not be dispersed in the environment, but disposed of in compliance with local regulations.
Disposal
This appliance is marked in conformity with European Directive 2002/96/EC on Waste Electrical and Electronic Equipment (WEEE).
By ensuring that this appliance is correctly disposed of, the user can help prevent potentially negative consequences for the environment and health.
The symbol on the appliance or the accompanying documentation indicates that this product should not be treated as domestic waste but must be taken to an appropriate collection point for recycling WEEE.
Energy saving
For optimum results, it is advisable to:
- Use pots and pans with bottom width equal to that of the cooking zone.
- Only use flat-bottomed pots and pans.
- If possible, keep pot lids on when cooking (except for use in "SENSOR" mode).
- Cook vegetables, potatoes, et. with little water in order to cut down cooking time.
- Use a pressure cooker to save even more energy and time (do not use pressure cookers with the "SENSOR" function).
- Place the pot in the middle of the cooking zone marked on the hob.
DECLARATION OF CONFORMITY C E
This appliance, intended to come into contact with food products, complies with Regulation (C E) no. 1935/2004, and has been designed, manufactured and marketed in conformity with the safety requirements of "Low Voltage" Directive 2006/95/EC (replacing 73/23/EEC as amended) and protection requirements of "EMC" Directive 2004/108/EC.
BEFORE USE
IMPORTANT: The cooking zones will not switch on if pots are not the right size. Only use pots bearing the symbol "INDUCTION SYSTEM" (Figure opposite). Place the pot on the required cooking zone before switching the hob on.
EXISTING POTS AND PANS

Use a magnet to check if the pot is suitable for the induction hob: pots and pans are unsuitable if not magnetically detectable.
-
Make sure pots have a smooth bottom, otherwise they could scratch the hob. Check dishes.
-
Never place hot pots or pans on the surface of the hob's control panel. This could result in damage.
RECOMMENDED POT BOTTOM WIDTHS
| 0 18 cm | 0 14 cm 18 cm | XLM | 0 30 cm | 0 14 cm (Dual zone) 30 cm |
IMPORTANTE: refer to the "SENSOR Function" section for correct pan base diameters for cooking zones with the SENSOR function.
INSTALLATION
After unpacking the product, check for any damage during transport. In case of problems, contact the dealer or the After-Sales Service.
PREPARING THE CABINET FOR FITTING

WARNING
Install a separator panel under the hob.
- The lower part of the product must not be accessible after installation.
- In case of installation of an undercut oven, do not interpose the separator panel.
Do not install the hob above a dishwasher or washing-machine, so that the electronic circuits do not come into contact with steam or moisture which could damage them.
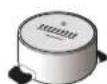
The distance between the underside of the appliance and the separator panel must respect the dimensions given in the figure.
In order to ensure the correct operation of the product, do not obstruct the minimum required clearance between the hob and the top of the unit.
- Do all cabinet cutting work before fitting the hob, and carefully remove any shavings or sawdust.
IMPORTANT: For installation in worktops made of marble or similar materials, do not use the screws provided, but contact the after-sales service and request bonding kit 4812 310 19277.
After bonding the brackets in the position indicated, leave the silicone to dry for around 24 hours before proceeding with installation of the appliance.
ELECTRICAL CONNECTION

WARNING
- Disconnect the appliance from the power supply.
- Installation must be carried out by qualified personnel who know the current safety and installation regulations.
The manufacturer declines all liability for injury to persons or animals and for damage to property resulting from failure to observe the regulations provided in this chapter.
- The power cable must be long enough to allow the hob to be removed from the worktop.
Make sure the voltage specified on the dataplate located on the bottom of the appliance is the same as that of the home.
- Do not use extension cords.
Connection to the terminal block
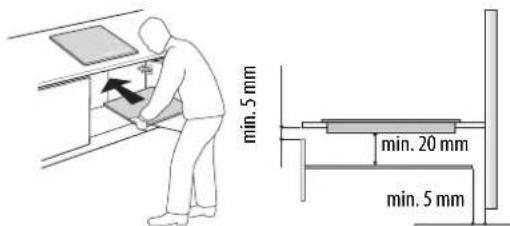
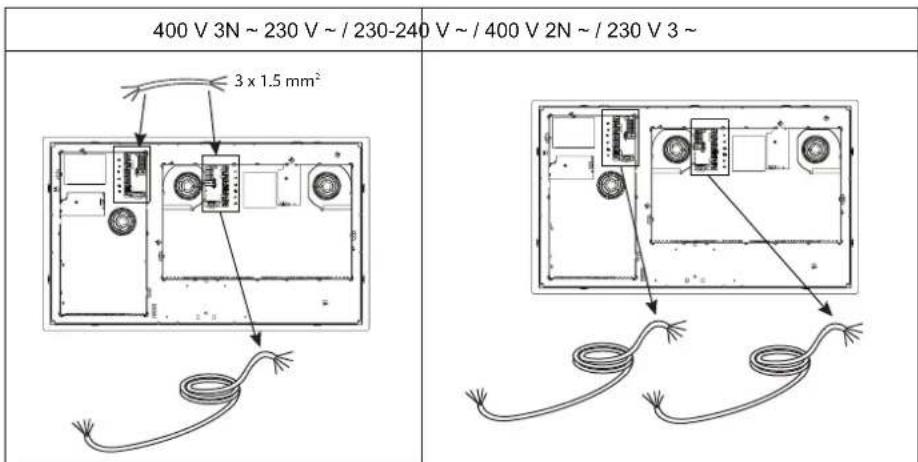
If the hob is already provided with the two power supply cables required, follow the instructions included in the supply cable bag.
Connect the cables to the two terminal blocks on the underside of the appliance.
IMPORTANT: only for 400 V 3N connection~ use one power supply cable only (connecting it to the terminal block of the main electronic module) in addition to 3 × 1.5 ~mm^2 wiring for connecting the main terminal block to that of the auxiliary electronic module. For electrical connection, follow the instructions enclosed with the 3 × 1.5 ~mm^2 wiring.
For the electrical connection, use an H0SRR-F cable as specified in the table below.
| Wires Number x size | |
| 230 V ~ + ① | 3 x 4 mm² |
| 230-240 V ~ + ② | 3 X 4 mm² (Australia only) |
| 230 V 3 ~ + ③ | 4 x 1.5 mm² |
| 400 V 3N ~ + ④ | 5 x 1.5 mm² |
| 400 V 2N ~ + ⑤ | 4 x 1.5 mm² |
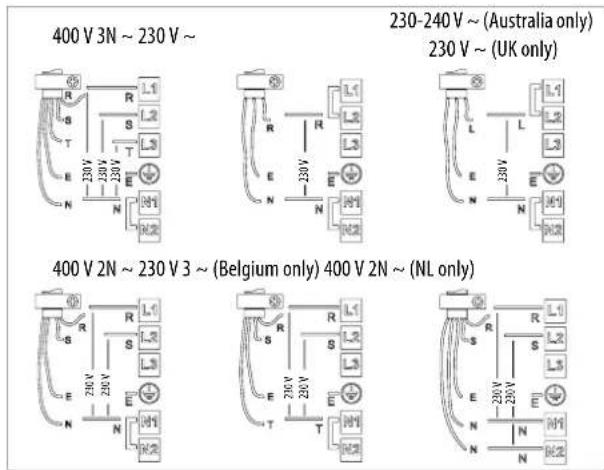
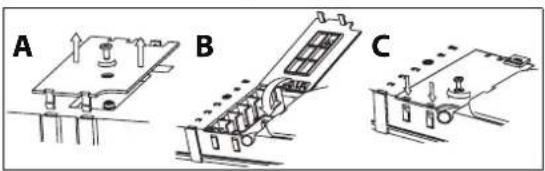
Connect the yellow/green earth wire to the terminal with the symbol 12 .
This wire must be longer than the other wires.
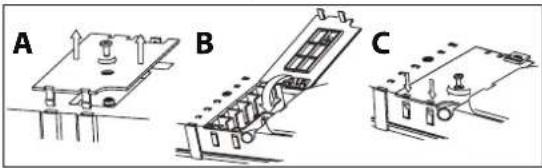
- Remove the terminal block cover (A), undoing the screw and inserting the cover in the terminal block hinge (B).
- Strip approx. 70mm of sheath from the power supply cable.
- Strip approx. 10mm of sheath from the conductors. Insert the power cable in the cable clamp and connect the wires to the terminal block as indicated in the connection diagram located near it.
- Secure the power cable with the cable clamp.
- Close the cover (C) and screw it on the terminal block with the previously removed screw.
Each time the power is connected, the hob performs an automatic check for a few seconds.
Connect the appliance to the power supply by means of a multipole switch with minimum contact gap of 3mm
INSTRUCTIONS FOR USE

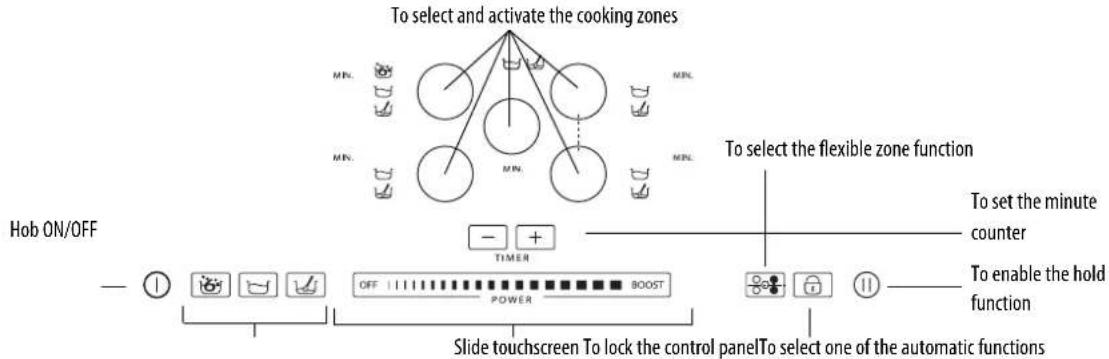
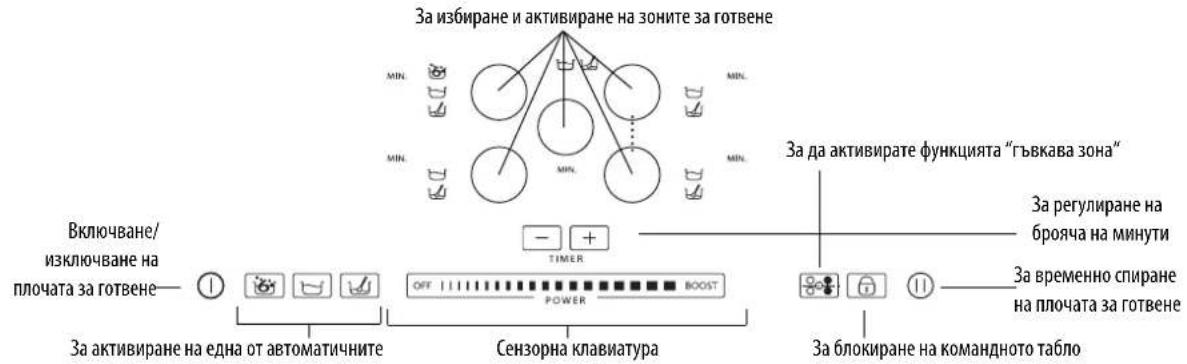
Control Panel Description
The panel has touch controls: to use them, just press the corresponding symbol (a light touch is sufficient).
First use / after a power failure
After connecting the hob to the electrical power supply, the control panel is locked (the indicator light above the key is ON).
To unlock the control panel, press and hold the key for 3 seconds. The indicator light switches off and the hob can be used normally.
Switching the hob On/Off
To switch the hob on, press and hold the ① key for approx. 2 seconds: the indicator light above the key switches on and dashes appear inside the circles indicating the cooking zones.
To switch off, press the same button until the hob switches off. All the cooking zones are deactivated

The hob automatically switches off if no function is selected within 10 seconds of switching on.
Activation and adjusting cooking zones

Cooking zone selection and selected cooking zone/power level display Indicates that one of the automatic functions is On
Cooking zone timer
Slide touchscreen (power adjustment)
After switching on the hob, position the pot on the chosen cooking zone.
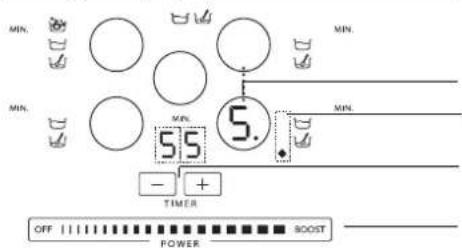
Activate the cooking zone by pressing the corresponding circular key: the number is displayed inside the circle, indicating the intermediate power level.


The hob automatically switches off if no function is selected within 10 seconds of switching on. If you are using a pot that is not suitable, not correctly positioned or not of the correct dimensions for your induction hob, the message "no pot" will appear in the display (see figure on the left). If no pot is detected within 60 seconds, the hob switches off.
To change the power level, slide your finger horizontally on the slide touchscreen: the number inside the circle increases/decreases as your finger slides up/down the touchscreen, ranging from a min. setting of 1 to a max. of 9. The slide touchscreen can be used to activate the booster function by pressing "BOOST" ("P" on the display) The "BOOST" power level can be used for 10 minutes maximum, after which the appliance automatically sets the power to level 9.
5.
If more than one cooking zone is on, the slide touchscreen allows you to change the power level of the selected zone, indicated by the presence of a luminous dot at the bottom right of the power level indicator. To select a zone, simply press the relative round key.
Deactivation of cooking zones
Select the cooking zone to be switched off by pressing the relative round key (a dot lights up at the bottom right of the power level indicator). Press OFF on the slide touchscreen.
H
The cooking zone switches off and, if the zone is still hot, the letter "H" appears in the circle.
"H" is the residual heat indicator. The hob has such an indicator for each cooking zone; it signals which zones are still hot. When the cooking zone cools down, the display goes off.
Timer selection
The timer can be used to set a max. cooking time of 90 minutes.
Select the cooking zone to be used with the timer (a dot lights up at the bottom right of the power level indicator), then set the required cooking time using the + and - keys of the timer function: the time is minutes is shown next to the cooking zone display.
A few seconds after the key is pressed, the timer begins the countdown (the luminous dot of the selected cooking zone starts flashing).
Once the set time has elapsed, an acoustic signal sounds and the cooking zone switches off automatically.
Control panel lock
This function locks the hob controls to prevent accidental switching on (e.g. during cleaning operations).
Press the button for three seconds: a beep sounds and an indicator lights up above the padlock symbol to signal activation. The control panel is locked except for the deactivation function. To deactivate the control lock, repeat the activation procedure. The luminous dot goes off and the hob is active again.
IMPORTANT: The presence of water, liquid spilled from pots or any kind of objects resting on the button under the symbol can accidentally activate or deactivate the control panel lock function.
Hold
This function allows you to temporarily hold and then resume cooking processes maintaining previous settings (except for timer setting). Press the key 11:flashes on the display in place of the power levels. To resume cooking, press the key again.
Description of automatic functions

The hob features automatic functions for each cooking zone. The symbols of the available functions are shown next to the selection key of each cooking zone. Every time an automatic function is selected, an indicator light turns on next to the symbol and the letter "A" appears in the cooking zone display
Sensor Function
The SENSOR function automatically selects the ideal power level to bring water to the boil and signals boiling point.
After positioning the pot of water, switch on the hob and select the desired cooking zone. Press the key: "A" appears on the display and the indicator light turns on. During heating, an animation is displayed in the space next to the cooking zone.

To ensure correct operation of the SENSOR function, we recommend that you:
- use water only (at room temperature);
- do not add salt, other ingredients or condiments until the water reaches boiling point;
- do not change the power setting of the cooking zone or remove or move the pot;
- do not use pressure cookers;
- fill the pot to at least 1/3 full (min. 1 litre) and never to the brim (see table on the right).
For optimum results, observe the following advice: - do not put the lid on the pot that is being used with the SENSOR function;
- do not activate the SENSOR function if the zone is already hot (letter "H" on the display).
| Cooking zone diameter | Pan base diameter for SENSOR function use | Maximum amount of water in the pot |
| 18 cm 17-19 | cm 5 litres |
When the water comes to the boil, the hob emits an acoustic signal. This signal is sounded three times at regular intervals. After the second signal, a minute minder is automatically activated to keep track of boiling time. After the third signal, the hob automatically selects a lower power setting to keep the water simmering. From this moment on, you can add any ingredients you like, set the timer and change the power setting. Changing the power setting or selecting the "hold" function overrides the SENSOR function.

The function is deactivated when the "hold" function is selected.
The hob manages the SENSOR function and booster levels autonomously, therefore, in some cases, it may not be possible to activate the booster with the SENSOR function already in use
- The quality of the cookware may affect the performance of the SENSOR function.
Simmering Function

After bringing the food to the boil, select the simmering function: a power level designed to maintain a gentle simmer is automatically set. To deactivate the function simply press OFF on the slide touchscreen.
Melting function

The melting function maintains a low and even temperature in the cooking zone. After positioning the pot/accessory on the chosen cooking zone, switch on the hob and select the cooking zone. Press the key : "A" appears on the display and the indicator light turns on. To deactivate the function, simply press OFF on the slide touchscreen.
Flexible Zone

This function can be used to combine two zones and manage them as one single cooking zone. It is perfect for oval, rectangular and elongated pans (with maximum base dimensions of 40 × 18 cm ). After switching on the hob, press the key : level "5" is shown on the displays of the two cooking zones; both luminous dots next to the level number are lit, indicating selection of a single zone. To change the power level, move your finger along the slide touchscreen: the number inside the circle increases/decreases as your finger slides up/down the touchscreen, ranging from a min. setting of 1 to a max. of 9. To deactivate the flexible zone function, press the key : the zones revert to functioning singly. To switch the cooking zone off, press OFF.
The boster power level and SENSOR function cannot be used on the same zones when the flexible zone function is in use. If the timer is set, it will be displayed alongside the hotplate display at the top.
CLEANING

WARNING
-
Do not use steam cleaners.
-
Before cleaning, make sure the cooking zones are switched off and that the residual heat indicator ( ^ H^ ) is not displayed.
IMPORTANT: Do not use abrasive sponges or scouring pads. Their use could eventually ruin the glass.
- After each use, clean the hob (when it is cool) to remove any deposits and stains due to food residuals.
- Sugar or foods with a high sugar content damage the hob and must be immediately removed.
Salt, sugar and sand could scratch the glass surface.
Use a soft cloth, absorbent kitchen paper or a specific hob cleaner (follow the Manufacturer's instructions).
TROUBLESHOOTING GUIDE
- Read and follow the instructions given in the section "Instructions for use".
- Connect the hob to the electricity supply and check that the supply has not been shut off.
- Dry the hob thoroughly after cleaning it.
- If the hob cannot be switched off after using it, disconnect it from the power supply.
If, when the hob is switched on, alphanumeric codes appear on the display, consult the following table for instructions.
| ERROR CODE DESCRIPTION | POSSIBLE CAUSES ERROR ELIMINATION | ||
| The hob switches off and after 30 seconds emits an acoustic signal every 10 seconds. | Permanent pressure on the control zone. | Water or kitchen utensils on the control zone. | Clean the control zone. |
| C81, C82, C83 The control panel switches off because of excessively high temperatures. | The internal temperature of electronic parts is too high. | Wait for the hob to cool down before using it again. | |
| F42 or F43 The connection voltage is wrong. The sensor detects a discrepancy between the appliance voltage and that of the mains supply. | Disconnect the hob from the mains and check the electrical connection. | ||
| F12, F21, F25, F36, F37, F40, F47, F56, F58, F60, F61, F62, F63, F64 | Call the After-sales Service and specify the error code. | ||
AFTER-SALES SERVICE
Before contacting the After-sales Service:
- See if you can solve the problem yourself with the help of the "Troubleshooting guide".
- Switch the appliance off and then on again it to see if the problem has been eliminated.
If the problem persists after the above checks, contact the nearest After-Sales Service.
Always specify:
- a brief description of the fault;
- the product type and exact model;
the Service number (the number after the word Service on the rating plate), located under the appliance (on the metal plate). The Service number is also given in the warranty booklet; - your full address;
- your telephone number.
SERVICE
0000 000 00000
Attach here one of the two stickers giving the
product data, included in the warranty booklet.

If any repairs are required, contact an authorised After-Sales Service Centre (to ensure the use of original spare parts and correct repairs).
Spare parts are available for 10 years.
POWERLEVEL TABLE
| Power level Type of | cooking Level use | (indicating cooking experience and habits) | |
| Max. power | Boost Fast heating | Ideal for rapidly increasing the temperature of food to fast boiling in the case of water or rapidly heating cooking liquids | |
| 8-9 | Frying - boiling | Ideal for browning, starting to cook, frying deep frozen products, fast boiling | |
| High power | 7-8 | Browning - sautéing - boiling - grilling | Ideal for sautéing, maintaining a lively boil, cooking and grilling (for a short period of time, 5-10 minutes) |
| 6-7 | Browning - cooking - stewing - sautéing - grilling | Ideal for sautéing, maintaining a light boil, cooking and grilling (for a medium period of time, 10-20 minutes), preheating accessories | |
| Medium power | 4-5 | Cooking - stewing - sautéing - grilling | Ideal for stewing, maintaining a gentle boil, cooking (for a long period of time). Creaming pasta |
| 3-4 | Cooking - simmering - thickening - creaming | Ideal for long-cooking recipes (rice, sauces, roasts, fish) with liquids (e.g. water, wines, broth, milk), creaming pasta | |
| 2-3 | Ideal for long-cooking recipes (less than a litre in volume: rice, sauces, roasts, fish) with liquids (e.g. water, wines, broth, milk) | ||
| Low power | 1-2 | Melting - defrosting - keeping food warm - creaming | Ideal for softening butter, gently melting chocolate, thawing small products |
| 1 | Ideal for keeping small portions of just-cooked food or serving dishes warm and for creaming risotto | ||
| OFF | Zero power | Support surface | Hob in stand-by or off mode (possible end-of-cooking residual heat, indicated by an “H”) |
| Function Description | of function | |
| Simmering | Identifies a power level that is suitable for simmering long-cooking recipes. Suitable for cooking tomato sauce, ragoût, soups, minestrone, maintaining a controlled cooking level (ideal for cooking in a bain-marie). Prevents food from boiling over or sticking to the bottom and burning, as often happens with these recipes.Use this function after bringing the pot to the boil. | |
| Melting | Identifies a power level that is suitable for slowly melting delicate products without compromising their sensorial quality (chocolate, butter, etc.). | |
| Sensor | Automatically identifies when water reaches boiling point and reduces the power to a level that maintains boiling until the food is added. When water reaches boiling point, an acoustic signal sounds, prompting the user to add the desired ingredients (e.g. condiments, pasta, rice, vegetables, meat and fish to be boiled) but also home-made preserves or accessories to be sterilized. | |
| Flexible Zone | This function combines two cooking zones to offer an extra-large cooking surface for rectangular and oval containers or grilling pans.To grill large or many food items (fish, kebabs, vegetables, steaks, frankfurters).To cook recipes with liquids or broth such as rolled joints and whole fish in casseroles/fish kettles/pans. | |
COOKING TABLE
| Food categories | Dishes or type of cooking | Power level and cooking status | |||
| First stage Power Second stage Power | |||||
| Pasta, rice | Fresh pasta Heating the water Booster - 9 | Cooking the pasta and maintaining the boil | 7-8 | ||
| Dry pasta Heating the water Booster - 9 | Cooking the pasta and maintaining the boil | 7-8 | |||
| Boiled rice Heating the water Booster - 9 | Cooking the pasta and maintaining the boil | 5-6 | |||
| Risotto Sautéing and roasting 7-8 Cooking 4-5 | |||||
| Vegetables, pulses | Boiled Heating the water Booster - 9 Boiling 6-7 | ||||
| Fried | Heating the oil | 9 | Frying | 8-9 | |
| Sautéed | Heating the accessory | 7-8 Cooking 6-7 | |||
| Stewed Heating the accessory | 7-8 Cooking 3-4 | ||||
| Light fried | Heating the accessory | 7-8 | Browning the food | 7-8 | |
| Meat | Roast | Browning the meat with oil (if with butter power level 6) | 7-8 | Cooking | 3-4 |
| Grilled | Preheating the pot | 7-8 | Grilling on both sides | 7-8 | |
| Browned | Browning with oil (if with butter power level 6) | 7-8 | Cooking | 4-5 | |
| Stewed | Browning with oil (if with butter power level 6) | 7-8 | Cooking | 3-4 | |
| Fish | Grilled | Preheating the pot 7-8 Cooking | 7-8 | ||
| Stewed | Browning with oil (if with butter power level 6) | 7-8 | Cooking | 3-4 | |
| Fried | Heating the oil or fat | 8-9 | Frying | 7-8 | |
| Eggs | Frittata | Heating the pan with butter or fat | 6 | Cooking | 6-7 |
| Omelettes | Heating the pan with butter or fat | 6 | Cooking | 5-6 | |
| Soft/hard-boiled | Heating the water | Booster - 9 | Cooking | 5-6 | |
| Pancakes | Heating the pan with butter | 6 | Cooking | 6-7 | |
| Sauces | Tomato | Browning with oil (if with butter power level 6) | 6-7 | Cooking | 3-4 |
| Ragout | Browning with oil (if with butter power level 6) | 6-7 | Cooking | 3-4 | |
| Béchamel | Preparing the base (melt butter and flour) | 5-6 | Bring to a light boil | 3-4 | |
| Desserts, creams | Pastry cream | Bring the milk to the boil | 4-5 | Maintain a light boil | 4-5 |
| Puddings | Bring the milk to the boil | 4-5 | Maintain a light boil | 2-3 | |
| Rice in milk | Heat the milk | 5-6 | Cooking | 2-3 | |
CONSIGNES DE SECURITE IMPORTANTES
VOTRE SECURITE ET CELLE DE VOITRE ENTOURAGE MÉRITENT TOUTE VOITRE ATTENTION
DECLARATION DE CONFORMITE (C)
14 cm (Dual zone) 30 cm
GUIDA RICERCA GUASTI
AHANJESH SYMMOPQJHCS
H oukeun aut npoipetai yea anpneTpphiua ooppowetai teov kavnoo (C) ap.1935/2004 kal exe oxiaotei, kataokvaaotei kai diateei otny ayop a umpwva me tic anattnieic aapaleiac tnc odnyiac 2006/95/eky ta n Xaumn taon (ou avtka biota tvn odnyia 73/23/EOK kai penta (tponnonoei), kaowc kai pe anattnieic npootaoia cnc odnyiac 2004/108/ek yia tvn Hkptpoayvntik oubetaotnta.
PIN ANO TH XPHSE
\SHMANTIKO: eav ta okeun dev exouv to oomega yepooc, oetiec ev avabovx. Xpnoiopoitee mvo okeun me to ouboLo EINAFIKO SYETHMA (Ainavikova). Pnv avape T movadaeot okeoc ony eniountn otia.
EKEYH NAAAOY TYNOY

Tva 8eBaiwOte ot to okeuoc evai katalaalno yia enaywyikc, eotie, xpoonponoJote eva mywn: ta okeun dev elvai katalaalna, evd ev ekovt aio to mywn.
Beaiwthei ot n faon twv oekuv evai leia, kaohc mnpovva npoknboov ekdpoc otnyeipaveia tnc movdac eotivv. EEyyTe ta okeun.
Mny akoujnte notc catoaopolek kai tyavia otoivaka diakomow tnc movadac. Mnopei va npokntheiua.
ATT FÖRBEREDA INBYGGNADSUTRYMMET

WARNING
OPLYSNINGER OM MILJHENSYN
VIGTIG: Brug违法犯罪/property, a drug or an illegal substance.
Bknoume 30hy Hapba hakatmem COOTBETCTByooue kpytno KhoNk: BHTpn Kpyra bdyet OTobpaKaTbCnO, yTO COOTBETCTByeT cpeDhemy ypoBHO MOUHOCNTM.


EcB TceHHe 10 cekHynd nocE BkIkyHHe He bIa BbIpaHa Hn OJHa yHKUHa, BapOHa HaNEb BbIKHOaTcA bOTMaTHueckn. B cnyae ecnn Nocya Oka3bIbaeTcra No KAKIM-TO npuHnHAM HneIOxOJaJe dNcNtOBaHn HA daHNOB BAPoHn INdyKunOHn NaHEn, HApnPmeP, npN ee HnpabINbHOYCTAHOBKe MIn HecooBETCTByOuNXpazMePA, To Ha DmCIIeBbBOIDTCyKa3aHne, O3NaauOee "OTCYTCTBE NOcyDb" (CM. pMC. c6oby). EcB TceHHe 60 cekHynd cnctema He 3aHKnCpyet HauHne Kaok-nlo60ncybTo npOn3Oiet BkIKHOeHne BapOHOH naHEn.
IINH3MeEHN HPOB HMOUHO CTNEyET NPOBCTN NaIbCEM ROpHOTaHBO NO CeHCOPHO 10 BABHMCIOCTN O TNOJOKHEH NALBa HOMep BHTPKpyrA 6yET MeHbCRAOT MHNMaJIbHO 3HaueHnE 1O MaKcMaJIbHO rO 3HaueHnE 9. POnb3yAcB CEHCOPHO 10 KAno, MoXHO BKIOHTb peXMM 6bICpTO hArpeBa HAKaTMEM HADNNB BOOST (Ha DCINee NoBHTc 6yKBA P). PeXMM BOOST MOxHO mONb3OBaTb B TeueHne 10 MNHyT, noce Yero B npHbope ABtmaueckn yCTaHbIMBaETcYPOBEh MOUHOCTN 9.

EcnBkIOeHO HeckoBko 30H HapeBa, To c NOMOuBcHcOpHOn WkaNb MoKHO MeHb yPoBeHb MoUHcTb Bb6paHHO 30Hb HapeBa, KOTopar onpeJeTcno HauuHNo CBeTaueCnToaKn Bn3y CnpBa OT 3aueHn yPoBHa MoUHcTn. Ira Bbl6opa 30Hb HapeBa IOCTaTOH Ho HaxaTb COOTBetCTbYoo KyrIpyKhoKny
BbIKIOUeHMe 30H HArpeBa
Bb6epnte 3ohy HappeBa, KOtpyo Heo6xOIMMo BblKIOHTb, Haxab COOTBeTCTByOuKy KpyIyKHOKNy (Ha DCnIee OKOLO 3haueHna yPOBn MOUHOCTH IOABNTCA Toka Bn3y Cnpaba). HaxMMte Ha KhoNk OFF (BblKI) Ha ceHCOPHO kane.

PnTOM pONCXOHT BbIKUHHeMe 30Hb HArpeBa, n cIIN OHa eEe TOpAa, TO BHyTPN Kpyr OTo6paKaTeC 6yKbA"H. ByKbA"H" yka3bIbAeT Ha HAnuue octatoHoro TeNa. TaKa INHdKAua NpeDcMOrPeHa nBCEx 3OH HarpeBa; 6yKbA"H" yka3bIbAeT, YTO B HeKoTobix 30Hax HarpeBa TEMnPepatya eEe CInkOM BbICKa. Nocne TORO KAK 30Ha HarpeBa OCTbHET, DcNne BblKnOHTTCr.
HactpoKa TaIMepa
TaimepnpctTabnreTc0bBbIKHouateNbCacOBbIMMEXaHm3MOM,NO3BOJIAKUIN3aDaBaTBnITeBHOCTbPnIROTOBHeHNIuHaBPMeD90MHyt. BbIbept3OHyHarpeBa,INKOTOpOIPpeNIOAraTeBCIKIOHTbTaimep(HaDCNIIePRAOMCO3HAeHEmyPOBHAMOUHCTCNpabaBHM3Y3aOpaeToKa),3aTEM yCTAHOBITE Heo6xOIMoe BPMe PnPi NMOUKNHOK " + " - ,OTHOCAUXCRK Taimepy:PAOM CDCNIIeEM 30HbHarpBeByETNOKa3bBAChBPMeB MHNyTAX. Ype3 HeckonkoCeKHyNDocne NocNEHrero HaxatnaHa Taimepe HaUMHaETC6bpaTHbOTcET (TOnKa BbIbopa 30HbHarpBeHaHMAETMnTa). IIO nCTeEHm 3aAdHHoro BpeMeHn NODaetc3BkyOBo CunHan, IN30Ha HarpBa ABToMaTHueCK BBKIOHauCTc.
BloKnpoBka nahEn ynpabLeHna
3a fyHKnna No3BONrE 60KnPOBaTb OraHb ynpabHeN BapOHO HApHn NaHEn, YTO6bI npedToPbNTb ee cnyauHoe BkNoueHne (HaNPmep, npu NCTKN aHEn).
HaxMMTE Ha 3 CekyHb kHONky :noaay 3ByKOBO rCnHana n BkNOueHne INdkAtoPA Hc CMBOLOM 3AMKa yKaxyT Ha TO, YTO fHKnna 60KnPOBKn BkNoueHa. Pp tOM BcnaHEb ynpaBHeN, 3a NKIOueHem FyHKnn BbIKNoueHn, 60NKpyETc. 706bI OTKNOHT b 60KnPOBKn NaHEn ynpaBHeN, NOBOTPNE npoDpy BkNoueHn. Pp tOM CBtuaCn Toka NoracET, n NaHEb BEpETcB pabooye COToHHe.
BAXHO! PpncytBnE BoBb IIN JIKKIOCTN, npOBMBeICn H3 NocSybl, a TAKKe NOMEueHne IIO6bX npdeMeTOB Ha KNOKcy C CMBOLOM 60KnPOBKn MOrY Bb3BaTb
Henpon3BOhoe BkNoueHne IIIN BBkNoueHne FyHKnn 60KnPOBKn NaHEn ynpaBHeN.
Nay3a
3TaФHKUNN NOBONET BPEMEHNO 6NOKUPOBaTb paOByBapOHN NaHEIN CBO3MOXHOCTbEe NocNeIyHOUe BOKNIOUe Hnnp TExKe HAcTpOKnax (3a NCKNIQUEHNEH NACPTPOE K TaIIMePA).HAKMITE KONKY 11:BMECTO UINDP,OTHOCRUXCRA KPOBHAM MOUHCTN,NOBBIOTcR MIRAOUUE CIMBOBbl I.ДП RA BOPAUEHNA B PEXMN INPuroTOBHeHNA CHOBA HAKKMTE KONKY 11
OttcHHe aBToMaTHuecknX peKHMOB

B BapouHn H naHeH npeyCMtpeHO Hecko bKO aBbOMaTHueeCKHX pexMMOB dIg 3OH HArpeBa. PAnOM c KOnIOK bblOpa KaJdo30HbHaHeceHbI NKTOrpAMMbI doCTynHbIX pexMMOB. KaJdbI pa3, Korda BblOpaeTcABbOMaTHueeCKN pexMM, PAOM c NKTOrpAMMO 3aropaeTc HmKaTOp, a Ha DmcIIee BblbHnH 30Hb HArpeBa OTbpaXaTeC8kBA "A".
Pexum"CEHCOP

PekimCEHCOP"6ecneHbAe ABOMATueckn BbIbOp ONTUMAbHOro ypOBH MOnHcTH dNIOBdeHMe BObD IOKHeHMA; pN3aKunHM BoDbIOpaETcOHN.
NoCTabBe Ha 30Hy HarpBa Nocdy CBOIO, BKNIOUte BapOHyIO NaHEnb N BbIbepHe 3Ty 30Hy HarpBa.HaKMITE KONKY :Ha DNcPiee BbcBceHbAetc 6yKBA "A", n3aropaeTcCBtobO mHdkatOp. B IpoceCe HarpBaHn PdOM c 30HOHarpBa OTbpaKaTe c AnMaioHHa KaPTmHa.

Ia oecneueHn npabInbHno paobTo bapouHn naHeB pexnme"CEHCOP" peKoMeHnyETcneIOBaT cneUOuM npabNAM:
-нспьбовыТ только Вody(Ммсуу Temпату Okрханоше срды);
He do6abnTb coB, hO6bIe VHPeJeHEnTb mnn npnpaBb/3aPpABKn Do MOMEHTa 3aKmnaHn;
-He MeHbTyPOBHeb MOUHOCTN 30HbI HArpeBa, He yOpMaTb NocyDc 30HbI HArpeBa, He CDBMaTb NocyDy;
-HeHcNoB30BaTbCKOpOBaPkn;
3aONHnTb NOcyHe MeHee cem Ha 1/3 ee o6bema (MHHmym 1), HO HNKoRda He 3aONHnTb DO camoro kparc (cm. npBBeHnHy pRdom TaBnUy).
KpomeToro, dna nonyeHnOnTbMbHbXpe3yNbTaTOB peKoMeHdyTeCA: He 3aKpbBaTb Nocnyd KpbIkwO npn HcNoB30BaHmpeXmu"CEHCOP",
He BKNIOaTHpeKIM"CEHCOPBToBPEM,KORa30HaHarpBa eue He octbla(HaDnCIIeepnTOMOTobpaKaetc6yKBa"H").
Ecn noCte BblonHeHn BblweonncnBbIX DeIcTBn HEnCpABHOCTb He ydanoCb YcTpaHTb, 6paTHTeCB B 6nXaHm CepBnchbl ceHTp.
Co06uHTe:
XapakTeP HEMCnpaBHOCTM
TIN MOneB BapOuHn NaHeN;
cepBncbHmOpE(ucnnoocneCnoBaServiceHa nacnpthoTabnueke,naOpaencaHa HnKHeCTopoep np6opa(ha MetanWuecko nnactnKe); cepBncbHmOp TaKke yka3AH B rapaHTmHOH KHKKE;
BaWnHbMyaepc;
HOMEPeTefoHaN KoD rOpoJa.
SERVICE
0000 000 0000


Bcnyae Heo6xmoocn pemontb Bapouho naHenn o6paauTecb BA TOPm30BaHHb CEHTp (TaKo UeHTp rapaHTpyETNCNob3OBAHne mmpMeHHbx 3anaChbX qacte H npabInbHO BblonHeHHb pemont np6opa).
Cpok Hanuua 3anaChbix qaTei: 10 nT.
TABLIUCA YPOBHEI MOUHOCTN
| Уразовь мошносту | Способ п相机отовлиа | Назначение уразовь мошносту (данные уразовь мочимпесларыдопонимны Кожытей польбатели и erо навыкам п相机отовлиа пшии) | ||
| Мас. мошносту | Boost本市 prazorрев | Очьь уразовь реким, дадоший возимхость за корOTКOE ВЕРЯ подгай Тампегату, дд льсрого дд оведения вдд льсдддддддддддддддддддддддддддддддддддддддддддддддддддддддддддддддддддддддддддддддддддддддддддддддддддд Дд льсрого дд оведения вдд льсдддддддддддддддддддддддддддддддддддддддддддддддддддддддддддддддддд Дд льсрого дд оведения вдд льсдддддддддддд Дд льсрого дд оведения вдд льсддддддд Дд льсрого дд оведения вдд льсддддд Дд льсрого дд оведения вдд льсддд Дд льсрого дд оведения вдд льс Дд льсрого дд овед时报 Дд льсрого дд овед时报 Дд льсрого дд ов裁 Дд льсрого дд ов裁 Дд льсрого дд ов裁 Дд льсрого дд ов裁 Дд льсрого дд ов裁 Дд льсрого дд ов裁 Дд льсрого дд ов裁 Дд льсрого дд ов裁 Dурау Дд льсрого дд ов裁 Дд льсрого дд ов裁 Дд льсрого дд ов裁 Дд льсрого дд ов裁 Дд льсрого дд ов裁 Дд льсрого дд ов裁 Дд льсрого дд ов裁 Опсал; Мошносту | Очьь уразовь реким, дадоший возимхostь за корOTКOE ВЕРя подгай Тампегату, дд льсрого дд овед时报а вдд льсддд Дд льсрого дд овед时报а вдд льсддд Дд льсрого дд ов裁 Дд льсрого дд ов裁 Дд льсрого дд ов裁 Дд льсрого дд ов裁 Дд льсрого дд ов裁 Дд льсрого дд ов裁 Дд льсрого дд ов裁 Oпсал Дд льсрого дд ов裁 Дд льсрого дд ов裁 Дд льсрого дд ов裁 Опсал Дд льсрого дд ов裁 Опсал Дд льсрого дд ов裁 Опсал Дд льсрого дд ов裁 Опсал Дд льсрого дд ов裁 Опсал Дд льсрого дд ов裁 Опсал Дд лльсрого дд ов裁 Опсал Дд льсрого дд ов裁 Опсал Дд льсрого дд ов裁 Опсал Дд льсрого дд ов裁 Опсал Дд льсрого дд ов裁 Опсал Дд льсрого Опсал Дд льсрого Опсал Дд льсрого Опсал Дд льсрого Опсал Дд льсрого Опсал Дд льсрого Опсал Дд льсрого Опсал Дд льсрого Oпсал Дд льсрого Опсал Дд льсрого Опсал Дд льсрого Опсал Дд льсрого Опсал Дд льсрого Опсал Дд льсрого Опсал Дд льсрого Опcал Дд льсрого Опсал Дд льсрого Опсал Дд льсрого Опсал Дд льсрого Опсал Дд льсрого Опсал Дд льсрого Опсал Дд льсрого Опсал | Очьь уразовь реким, дадоший возимхostь за корOTКOE ВЕРя подгай Тампегату, дд льсрого дд ов裁 Дд льсрого Дд льсрого Дд льсрого Опсал Опсал Опсал Опсал Опсал Опсал Опсал Опсал Опсал Опсал Опсал Опсал Опсал Опсал Опсал Опсал Опсал Опсал Опсал Опсал Опсalam Опсал Опсал Опсал Опсал Опсал Опсал Опсал Опсал Опсал Опсал Опсал Опсал Опсал Опсал Опсал Опсал Опсал Опсал Опсал Опс_AL Опс_AL Опс_AL Опс_AL Опс_AL Опс_AL Опс_AL Опс_AL Опс_AL Опс_AL Опс_AL Опс_AL Опс_AL Опс_AL Опс_AL Опс_AL Опс_AL Опс_AL Опс_AL Опс_AL Опс-Al Опс_AL Опс_AL Опс_AL Опс_AL Опс_AL Опс_AL Опс_AL Опс_AL Опс_AL Опс_AL Опс_AL Опс_AL Опс_AL Опс_AL Опс_AL Опс_AL Опс_AL Опс_AL Опс_AL Опс AL Опс_AL Опс_AL Опс_AL Опс_AL Опс_AL Опс_AL Опс_AL Опс_AL Опс_AL Опс_AL Опс_AL Опс_AL Опс_AL Опс_AL Опс_AL Опс_AL Опс_AL Опс_AL Опс_AL Опс Alison Опс_AL Опс_AL Опс_AL Опс_AL Опс_AL Опс_AL Опс_AL Опс_AL Опс_AL Опс_AL Опс_AL Опс_AL Опс_AL Опс_AL Опс_AL Опс_AL Опс_AL Опс_AL Опс_AL Опс-al Опс_AL Опс_AL Опс_AL Опс_AL Опс_AL Опс_AL Опс_AL Опс_AL Опс_AL Опс_AL Опс_AL Опс_AL Опс_AL Опс_AL Опс_AL Опс_AL Опс_AL Опс_AL Опс_AL Опс/al Опс_AL Опс_AL Опс_AL Опс_AL Опс_AL Опс_AL Опс_AL Опс_AL Опс_AL Опс_AL Опс_AL Опс_AL Опс_AL Опс_AL Опс_AL Опс_AL Опс_AL Опс_AL Опс_AL Опс阿尔 Опс_AL Опс_AL Опс_AL Опс_AL Опс_AL Опс_AL Опс_AL Опс_AL Опс_AL Опс_AL Опс_AL Опс_AL Опс_AL Опс_AL Опс_AL Опс_AL Опс_AL Опс_AL Опс_AL Опс Alcohol Опс Alcohol Опс Alcohol Опс Alcohol Опс Alcohol Опс Alcohol Опс Alcohol Опс Alcohol Опс Alcohol Опс Alcohol Опс Alcohol Опс Alcohol Опс Alcohol Опс Alcohol Опс Alcohol Опс Alcohol Опс Alcohol Опс Alcohol Опс Alcohol Опс Alcohol Опс alcohol Опс Alcohol Опс Alcohol Опс Alcohol Опс Alcohol Опс Alcohol Опс Alcohol Опс Alcohol Опс Alcohol Опс Alcohol Опс Alcohol Опс Alcohol Опс Alcohol Опс Alcohol Опс Alcohol Опс Alcohol Опс Alcohol Опс Alcohol Опс Alcohol Опс Alcohol Опс Al Опс Alcohol Опс Alcohol Опс Alcohol Опс Alcohol Опс Alcohol Опс Alcohol Опс Alcohol Опс Alcohol Опс Alcohol Опс Alcohol Опс Alcohol Опс Alcohol Опс Alcohol Опс Alcohol Опс Alcohol Опс Alcohol Опс Alcohol Опс Alcohol Опс Alcohol Опсcohol Опс Alcohol Опс Alcohol Опс Alcohol Опс Alcohol Опс Alcohol Опс Alcohol Опс Alcohol Опс Alcohol Опс Alcohol Опс Alcohol Опс Alcohol Опс Alcohol Опс Alcohol Опс Alcohol Опс Alcohol Опс Alcohol Опс Alcohol Опс Alcohol Опс Alcohol Опс_AL Опс_AL Опс_AL Опс_AL Опс_AL Опс_AL Опс_AL Опс_AL Опс_AL Опс_AL Опс_AL Опс_AL Опс_AL Опс_AL Опс_AL Опс_AL Опс_AL Опс_AL Опс_AL Опс Al Опс Alcohol Опс Alcohol Опс Alcohol Опс Alcohol Опс Alcohol Опс Alcohol Опс Alcohol Опс Alcohol Опс Alcohol Опс Alcohol Опс Alcohol Опс Alcohol Опс Alcohol Опс Alcohol Опс Alcohol Опс Alcohol Опс Alcohol Опс Alcohol Опс alcohol Опс alcohol Опс alcohol Опс alcohol Опс alcohol Опс alcohol Опс alcohol Опс alcohol Опс alcohol Опс alcohol Опс alcohol Опс alcohol Опс alcohol Опс alcohol Опс alcohol Опс alcohol Опс alcohol Опс alcohol Опс alcohol Опс alcohol Опс Alcohol Опс Alcohol Опс Alcohol Опс Alcohol Опс Alcohol Опс Alcohol Опс Alcohol Опс Alcohol Опс Alcohol Опс Alcohol Опс Alcohol Опс Alcohol Опс Alcohol Опс Alcohol Опс Alcohol Опс Alcohol Опс Alcohol Опс Alcohol Опс alcohol Опс Al Опс Alcohol Опс Alcohol Опс Alcohol Опс Alcohol Опс Alcohol Опс Alcohol Опс Alcohol Опс Alcohol Опс Alcohol Опс Alcohol Опс Alcohol Опс Alcohol Опс Alcohol Опс Alcohol Опс Alcohol Опс Alcohol Опс Alcohol Опс Alcohol Опс Al Опс Al Опс Al Опс Al Опс Al Опс Al Опс Al Опс Al Опс Al Опс Al Опс Al Опс Al Опс Al Опс Al Опс Al Опс Al Опс Al Опс Al Опс Al Опс Al Опс al Опс al Опс al Опс al Опс al Опс al Опс al Опс al Опс al Опс al Опс al Опс al Опс al Опс al Опс al Опс al Опс al Опс al Опс al Опс al Опс AL Опс AL Опс AL Опс AL Опс AL Опс AL Опс AL Опс AL Опс AL Опс AL Опс AL Опс AL Опс AL Опс AL Опс AL Опс AL Опс AL Опс AL Опс AL Опс AL Опс Al Опс AL Опс AL Опс AL Опс AL Опс AL Опс AL Опс AL Опс AL Опс AL Опс AL Опс AL Опс AL Опс AL Опс AL Опс AL Опс AL Опс AL Опс AL Опс AL Опс_AL Опс_AL Опс_AL Опс_AL Опс_AL Опс_AL Опс_AL Опс_AL Опс_AL Опс_AL Опс_AL Опс_AL Опс_AL Опс_AL Опс_AL Опс_AL Опс_AL Опс_AL Опс AL Опс AL Опс AL Опс AL Опс AL Опс AL Опс AL Опс AL Опс AL Опс AL Опс AL Опс AL Опс AL Опс AL Опс AL Опс AL Опс AL Опс AL Опс AL Опс-al Опс AL Опс AL Опс AL Опс AL Опс AL Опс AL Опс AL Опс AL Опс AL Опс AL Опс AL Опс AL Опс AL Опс AL Опс AL Опс AL Опс AL Опс AL Опс AL ОпсAL Опс AL Опс AL Опс AL Опс AL Опс AL Опс AL Опс AL Опс AL Опс AL Опс AL Опс AL Опс AL Опс AL Опс AL Опс AL Опс AL Опс AL Опс AL Опс AL Опс al Опс AL Опс AL Опс AL Опс AL Опс AL Опс AL Опс AL Опс AL Опс AL Опс AL Опс AL Опс AL Опс AL Опс AL Опс AL Опс AL Опс AL Опс AL Опс Al Опс Al Опс Al Опс Al Опс Al Опс Al Опс Al Опс Al Опс Al Опс Al Опс Al Опс Al Опс Al Опс Al Опс Al Опс Al Опс Al Опс Al Опс Al Опс AL Опс AL Опс AL Опс AL Опс AL Опс AL Опс AL Опс AL Опс AL Опс AL Опс AL Опс AL Опс AL Опс AL Опс AL Опс AL Опс AL Опс AL Опс Al Опс al Опс AL Опс AL Опс AL Опс AL Опс AL Опс AL Опс AL Опс AL Опс AL Опс AL Опс AL Опс AL Опс AL Опс AL Опс AL Опс AL Опс AL Опс AL Опс_AL Опс AL Опс AL Опс AL Опс AL Опс AL Опс AL Опс AL Опс AL Опс AL Опс AL Опс AL Опс AL Опс AL Опс AL Опс AL Опс AL Опс AL Опс AL Опс Al Опс_AL Опс_AL Опс_AL Опс_AL Опс_AL Опс_AL Опс_AL Опс_AL Опс_AL Опс_AL Опс_AL Опс_AL Опс_AL Опс_AL Опс_AL Опс_AL Опс_AL Опс_AL Опс_AL Опс Alter Oпс Alter Oпс Alter Oпс Alter Oпс Alter Oпс Alter Oпс Alter Oпс Alter Oпс Alter Oпс Alter Oпс Alter Oпс Alter Oпс Alter Oпс Alter Oпс Alter Oпс Alter Oпс Alter Oпс Alter Oпс Alter Oпс Alter Oпс Alter Опс Alter Oпс Alter Oпс Alter Oпс Alter Oпс Alter Oпс Alter Oпс Alter Oпс Alter Oпс Alter Oпс Alter Oпс Alter Oпс Alter Oпс Alter Oпс Alter Oпс Alter Oпс Alter Oпс Alter Oпс Alter Oпс Alter Oпс alter Oпс Alter Oпс Alter Oпс Alter Oпс Alter Oпс Alter Oпс Alter Oпс Alter Oпс Alter Oпс Alter Oпс Alter Oпс Alter Oпс Alter Oпс Alter Oпс Alter Oпс Alter Oпс Alter Oпс Alter Oпс Alter Oпс Alter Oпс alter Опс Alter Oпс Alter Oпс Alter Oпс Alter Oпс Alter Oпс Alter Oпс Alter Oпс Alter Oпс Alter Oпс Alter Oпс Alter Oпс Alter Oпс Alter Oпс Alter Oпс Alter Oпс Alter Oпс Alter Oпс Alter Oпс Alter Oпс ALTER Oпс Alter Oпс Alter Oпс Alter Oпс Alter Oпс Alter Oпс Alter Oпс Alter Oпс Alter Oпс Alter Oпс Alter Oпс Alter Oпс Alter Oпс Alter Oпс Alter Oпс Alter Oпс Alter Oпс Alter Oпс Alter Oпс Alter Oпс ALTER Опс Alter Oпс Alter Oпс Alter Oпс Alter Oпс Alter Oпс Alter Oпс Alter Oпс Alter Oпс Alter Oпс Alter Oпс Alter Oпс Alter Oпс Alter Oпс Alter Oпс Alter Oпс Alter Oпс Alter Oпс Alter Oпс Alter Oпс Al Oпс Alter Oпс Alter Oпс Alter Oпс Alter Oпс Alter Oпс Alter Oпс Alter Oпс Alter Oпс Alter Oпс Alter Oпс Alter Oпс Alter Oпс Alter Oпс Alter Oпс Alter Oпс Alter Oпс Alter Oпс Alter Oпс Alter Oпс Al Опс Alter Oпс Alter Oпс Alter Oпс Alter Oпс Alter Oпс Alter Oпс Alter Oпс Alter Oпс Alter Oпс Alter Oпс Alter Oпс Alter Oпс Alter Oпс Alter Oпс Alter Oпс Alter Oпс Alter Oпс Alter Oпс Alter Oпс AL Oпс Alter Oпс Alter Oпс Alter Oпс Alter Oпс Alter Oпс Alter Oпс Alter Oпс Alter Oпс Alter Oпс Alter Oпс Alter Oпс Alter Oпс Alter Oпс Alter Oпс Alter Oпс Alter Oпс Alter Oпс Alter Oпс Alter Oпс AL Опс Alter Oпс Alter Oпс Alter Oпс Alter Oпс Alter Oпс Alter Oпс Alter Oпс Alter Oпс Alter Oпс Alter Oпс Alter Oпс Alter Oпс Alter Oпс Alter Oпс Alter Oпс Alter Oпс Alter Oпс Alter Oпс Alter OпсAlter Oпс Alter Oпс Alter Oпс Alter Oпс Alter Oпс Alter Oпс Alter Oпс Alter Oпс Alter Oпс Alter Oпс Alter Oпс Alter Oпс Alter Oпс Alter Oпс Alter Oпс Alter Oпс Alter Oпс Alter Oпс Alter Oпс Alter OпсAlter Опс Alter Oпс Alter Oпс Alter Oпс Alter Oпс Alter Oпс Alter Oпс Alter Oпс Alter Oпс Alter Oпс Alter Oпс Alter Oпс Alter Oпс Alter Oпс Alter Oпс Alter Oпс Alter Oпс Alter Oпс Alter Oпс Alter Oпс AI Oпс Alter Oпс Alter Oпс Alter Oпс Alter Oпс Alter Oпс Alter Oпс Alter Oпс Alter Oпс Alter Oпс Alter Oпс Alter Oпс Alter Oпс Alter Oпс Alter Oпс Alter Oпс Alter Oпс Alter Oпс Alter Oпс Alter Oпс AI Опс Alter Oпс Alter Oпс Alter Oпс Alter Oпс Alter Oпс Alter Oпс Alter Oпс Alter Oпс Alter Oпс Alter Oпс Alter Oпс Alter Oпс Alter Oпс Alter Oпс Alter Oпс Alter Oпс Alter Oпс Alter Oпс Alter Oпс Alloy 100000000000000000000000000000000000000000000000000000000000000000000000000000000000000000000000000002000000000000000000000000000000000000000000000000000000000000000000000000000000000000000000000000000800000000000000000000000000000000000000000000000000000000000000000000000000000000000000000000000000060000000000000000000000000000000000000000000000000000000000000000000000000000000000000000000000000005000000000000000000000000000000000000000000000000000000000000000000000000000000000000000000000000000100000000000000000000000000000000000000000000000000000000000000000000000000000000000000000000000000875000000000000000000000000000000000000000000000000000000000000000000000000000000000000000000000000008675000000000000000000000000000000000000000000000000000000000000000000000000000000000000000000000000086675000000000000000000000000000000000000000000000000000000000000000000000000000000867500000000000000000867500000000000000008675000000000000008675000000000000086750000000867500000086750000086750000867500008675000867500086750086750086750867508675086750867508675086750867508675086750867508675086750867508675086750867508675086750867508674975113426666666666666666666666666666666666666666666666666666666666666666666666666666666666666666666666666666. OKHANESKIN |
Cbbp3BaHe KblM KIeMopeda
B cnuyai, ne nnoata beue e cna6deha c da 3axpaHbaun Ka6en, cneBaIte HnctpyKuInTe, KOITc HaMupaB nikaHa Ka6ena.
CbpxeKe KaBEnIte KbM DbaTa KNEMopea, KOITc Ce HAMnPb T DoHnHaT a Ypda.
BAxHO: cmo 3a 400 V 3N~ cBpBaHe, nIIOINBaHte cmo eHN 3axpaHbau Ka6en (Kato rC BpKeTe KBM KEmopeHa Ha IaBnHn enEeKTopeH Moyn), BdoIbnHeHne KBM eNEKtpueeCKnte npoBDnHn 3 x 1,5 MM23a CbP3BaHe Ha IaBnHn KEmopeD c KEmopeHa Ha IobnHnIeHHn enEeKTopeH Moyn. 3a CbP3BaHe KbM eNEKtpueeCKTa MpeXa, KOHCytnpaTe IHCTpykUInTe, pInIOXeH KBM eNEKtpueeCKTe npoBDnHn 3 x 1,5 MM2.
3a Cbpb3BaHe KbM eneKtpnueckaT MaPexa M3non3BaIte Ka6en TIN H05RR-F, KaKTo e nocOeHb Ta6nuaTa no-dony.
| Пювodицьbroйхразмер | |
| 230 V ~ + ± | 3 x 4 mm2 |
| 230-240 V ~ + ± | 3 x 4 mm2 (само за Астразлия) |
| 230 V 3 ~ + ± | 4 x 1,5 mm2 |
| 400 V 3N ~ + ± | 5 x 1,5 mm2 |
| 400 V 2N ~ + ± | 4 x 1,5 mm2 |
| 400V 3N ~ 230V ~ | 230-240V~ (camo 3a Abcptrann)230V~ (camo 3a Benuko6pntanm) |
| 400V 2N ~ | 400V 2N~ (camo 3a HndepnaHm) |
CbpxTe npoBnHkA Ha 3a3eMaBaHeTo XbT/3eNeH KbM KIeMaTa CbCMMBOI
To3 npoBODnK Tp6Ba Da 6bDe no-DbnT o npynte.
- Maxhete Kanayeto Ha Klemopea (A), KaTo pa3BnTe BnHTyTeTata, H NoCTabeTe Kanayeto Bpamkata (B) Ha Klemopea.
2.Oronepe np6n.70 MM ot 3oanaaeta Ha 3axpaHbauu Ka6en.
- Oronete npn6n. 10MM OT h3oanaeta Ha npoBOuHnHTe. NocTabe 3axpaHbuaa Ka6en B Ka6enHa TCKo6a H CBpbxTe npoBOuHnHTe KbM KIeMopea, KaKTo e NOKa3aHO HA xcEMaTa HA CbP3BaHe, O3HaueHa 6n3o Do camna KIeMopei.
4.3akpeneteKa6enaHa 3axpaHbAHeTo NocpeDCTBOM Ka6enHataCKo6a.
- 3aTbopete Kanayeto (C) nro 3aTeHnete Kblm KJIeMopeDa Cbc CbaIeHNBAHT.
PmBCaKo CbBp3BaHe KbM 3axpaHbAaTa MpeKa IIOUaTa 3a roTBe HnBnHbA aBtOMaTHHa nPoBepKa, KOaTO TpaHrKO cKeHydM.
N3BbpWTe Cbbp3BaHTo KbM eJekTpOaXpaHbAne NocpeCTBOM npeKbCBaHu BA ChuKa a3n C MmHMaHa MeJzHa Ha KOHTAKTITE 3 MM.
NHCTPYKUN 3A YNOTPEBA

OnncahneHaKoMaHdHotoTa6No
TabnoTo e cna6deHO cbceH3OpHb6yToHn: 3a da Hn H3non3BaTe,doTaTb4Ho e da HATNCHEe Bbpxy CbOTBeTHMa CMBON (He e Hxho da ce ynpaxkRa CInen HAHTCK).
IpeHn3no3BaHe/CneI npeKbCBAHe Ha eNEKtpo3aXpaHBAHeTo
CnEcbp3BaHETo Ha nnoaTa 3a roTbeHe KbEmeKtpueckata Mpeka KomAHNDTo TaNo e 6KnpuHa (CBetInHHMAt INmKAtop HAd ByToHa CBETn).
3a 076nKpaHe Ha KOMaHIOHO Ta6no, HATNCHEte 6yToHa 3a 3cekyHn. CBeTINHHMAt INHnKaTOp N3rAcBa n E Bb3MOxHo Da ce pa6oTH No HopMaHnHaHnCnnouata.
BkIIOyBaHe/M3KIOyBaHe Ha NIOyata 3a rotBeHe
3a BKNIOUBAHe Ha IIOOATA 3a rotBEHe, 3aIbXkTe HaTHCHAT 6yToHa ① 3a OKoN O 2 cekyHn: CBETNIHHNRT HNDKAtOP HAD 6yToHa CBETBa N CE NOKa3BAT YepTNKMBbTpe B KpbroBeTe, KOINT MNEHTHmupat 30Ha T a RotBEHe.
3aM3KIOUBAHe HATNCHETe CbIg 6yToH Do I3rAcBaHTo Ha NIOuTa. BcNKn 30H 3a rotBe He M3KIOUbaT.

IIOUaTa 3a roTBeHe CE mKJIIOuBa aBtOMaTHUHO, aKO He 6bJe M36paHa HnKaKbA yHKcIIra IO 10 cekyHm OT BkIOuBaHeto.
AKTINbupaHe H perynipaHe Ha 3oHtE Ha rotBeHe
ByToH3aM3bOpHa3OHaNINCnne3aMHnKauHa3bpaHaTa3OHa 3rTOBeHe/HBOHaMOuHOCT
Ioka3Ba,ye DeiCTBa EaHa OaT aBtOMaTHuHIne fHyHKUIN
Taimep Ha 30HaTa 3a rotBeHe
Ceh3OpHa KnaBnA Typa (peRyInpaH e Ha MoUHocTtA)
CnE KaTo CE BKNOOnI NIOUaT3 a TOrBHe, NOCTaBeTe CbD BbpyN36paHaTa 30Ha.
Bknoute 30hata, kato hntchete cboTBHnKpBtB6yToH:BbTe B KpBa ce nKa3Ba uOppata , KOto OTRObaH a cpedHOT HBO HA MOuHOCT.


IIOUATA 3a rotBEhe ce N3KIOUBA ABTOMATHNO, AOKe He 6bJe N3bpaHa HNKAKBa FyHKua DO 10 cekHn O TBKIOUbaHeto. Korato mN C bTBHe e CBMEcM C NHyDkuHOHATA PNOOa, INe NOCTaBcH ENpABuHIO, INe He c NOxOAn pa3Me, Ha DCINNEe Ce NOBBA HNDKAua "HMA Cb" (fmypataOTCPaHn). AOKo B pAMKeTHe 60 cekHn He 6bJe OTKpuTa HNKAKBa TeHXpeP, IIOUaTe 3a rotBe He n3KIOUBA.
3a npomHa Ha HNBOTo Ha MOHOCCT MeCTe NpCTa Cn CXopH3OHTaHIO DBHXeHHe No cEH3OpHATA KnaBAtypa: UoPpata BbTpE BKpTa Ce npomeHa CBtBcTCTBne CnoJooKeHHeTo Ha NpCTa Bbpxy KnaBAtypata -OT MInHMyma 1 Do MaKcmyma 9. IocpeIcTBOM cEH3OpHATA KnaBAtypa e Bb3MoXHO da CE BKNIOUm FyHKuHrta booster (yckopnten), kato ce haTHcHe "BOOST" ("P" Ha dncnne). Moxete Da n3non3Be Ta HNBO Ha MOHOCCT "BOOST" 3a MaKcmym 10 MNHyTN, cIe KeTo ypeBt ABTomTuHPOperynpa HNBOTo Ha 9.

Korato Ca BkIouHn NOBue 30H 3a rotBeHc, ceH3OpHa TKnAbNAty PNO3BOJnBa Da Ce IpOMeHr MOUHOCTTa Ha I36paHATA 3OHa, KOTo CE pa3IO3HbA No pINCbCTBHeTO Ha CBeTeuA ToK4 NaOly BAnCHO Ha HmDnKaTopa Ha MOUHOCTTa. 3a IN36HpA He HA OTOA e IOCTaTbHDo Da CE HAICHE CBOTBHTMn KpbTbn BytoH.
N3KIIIOUBAHe Ha 30HInTe 3a IOTBeHe
M36epete KO8 30Ha 3a TOTBETe Da N3KIOHHTe, Kato HAtncHEte CbOBTBTHMa KpbIbN 6yTOH (Toukata Dony BnCHO Ha HMBOTo Ha MOUHOCT Ce NOKa3Ba Ha ducnIe). HatncHEte KOMAHData OFF, NOKa3Ha Ha ceh3OpHATA KnabHAtypa.

3oHaTa 3a roTbeHe ce mKIOUcBa m Ako 3oHaTa e rOpeuA, B KpbTa ce noBBA6yKBaTa "H"
"H" e HnDnKATop 3a OCTaBtUHa TOnIIHnA. IIIOyATA e ChabdeHa C TaKbB INNdkAtop 3a BCra Ka 30Ha 3a RotBeHe; ToT NOKa3Ba KOn Ca 3OHMe 3a RotBeHe, KOTo Ca BCE OSe C BnCoka TempePaTypa. PIn OXnaJaHcTeHO Ha 30Ha T a 3a RotBeHe DmIeIeITrAcBA.
№36op Ha TaIIMepe
TaimepbTe npebkIOuBaTeHa BpeMe, KOITo npednara B3mOxHOCTTa Da ce HAcTpoBa BpeMeTpaeHe Ha roTbeHeTo Do MaKcMym 90MINHTM.
36epete 30HATA 3a rotBEHe, 3a KOTo CE bB3HamepBa Da ce aocuimpa TaImepbT (Ha DCnPIe ne cnoKa3Ba CBeTea TOka DOy BnCHO OT HNDKAToPA HA HNBOTo HA MOIOCTTa), CNE TOBA 3aJaTe BpeMeTO, KOeTo JKeNaTe, KaTO N3No13BaTe 6yToHrE + - Ha FyHKUraTa TaImeP: BpeMeTO B MHyTNc P NOkA3Ba BbIM3OCT Do DnCnJIe Ha 30HATA 3a rotBEHe.
CnE HAKONKo CekyHnO TnocneHTo DOOKoBaHe TaMepbT 3anoBa Da Ot6pOba BpeMeTo (TOkAta Ha 3oHaTa 3a RotBe He 3anoBa Da Mura).
PmH3TuHa He BpEMeTO CE KJIIOuBa 3BYKOB CMHn H 3OHaTc H a TOTBeHe c H3KNIOyBa aBTOMaTHUHO.
- IMPORTANT SAFETY INSTRUCTIONS
- YOUR SAFETY AND THAT OF OTHERS IS VERY IMPORTANT
- DANGER
- WARNING
- Disposal of household appliances
- SAFEGUARDING THE ENVIRONMENT
- Disposal of packing
- Disposal
- Energy saving
- DECLARATION OF CONFORMITY C E
- BEFORE USE
- EXISTING POTS AND PANS
- RECOMMENDED POT BOTTOM WIDTHS
- INSTALLATION
- PREPARING THE CABINET FOR FITTING
- ELECTRICAL CONNECTION
- Connection to the terminal block
- INSTRUCTIONS FOR USE
- Control Panel Description
- First use / after a power failure
- Switching the hob On/Off
- Activation and adjusting cooking zones
- Deactivation of cooking zones
- Timer selection
- Control panel lock
- Hold
- Description of automatic functions
- Sensor Function
- Simmering Function
- Melting function
- Flexible Zone
- CLEANING
- TROUBLESHOOTING GUIDE
- AFTER-SALES SERVICE
- Before contacting the After-sales Service:
- If the problem persists after the above checks, contact the nearest After-Sales Service.
- SERVICE
- CONSIGNES DE SECURITE IMPORTANTES
- VOTRE SECURITE ET CELLE DE VOITRE ENTOURAGE MÉRITENT TOUTE VOITRE ATTENTION
- DECLARATION DE CONFORMITE (C)
- GUIDA RICERCA GUASTI
- AHANJESH SYMMOPQJHCS
- PIN ANO TH XPHSE
- EKEYH NAAAOY TYNOY
- ATT FÖRBEREDA INBYGGNADSUTRYMMET
- OPLYSNINGER OM MILJHENSYN
- BbIKIOUeHMe 30H HArpeBa
- HactpoKa TaIMepa
- BloKnpoBka nahEn ynpabLeHna
- Nay3a
- OttcHHe aBToMaTHuecknX peKHMOB
- Pexum"CEHCOP
- Ecn noCte BblonHeHn BblweonncnBbIX DeIcTBn HEnCpABHOCTb He ydanoCb YcTpaHTb, 6paTHTeCB B 6nXaHm CepBnchbl ceHTp.
- 000 0000
- TABLIUCA YPOBHEI MOUHOCTN
- Cbbp3BaHe KblM KIeMopeda
- NHCTPYKUN 3A YNOTPEBA
- OnncahneHaKoMaHdHotoTa6No
- IpeHn3no3BaHe/CneI npeKbCBAHe Ha eNEKtpo3aXpaHBAHeTo
- BkIIOyBaHe/M3KIOyBaHe Ha NIOyata 3a rotBeHe
- AKTINbupaHe H perynipaHe Ha 3oHtE Ha rotBeHe
- N3KIIIOUBAHe Ha 30HInTe 3a IOTBeHe
- №36op Ha TaIIMepe
Brand : WHIRLPOOL
Model : ACM 795LX01
Category : Cooker