USER MANUAL Coach LS KETTLER
Fitnessnote [F1.0 - F6.0]
Symbole:
Operating instructions for the training computer with digital display (ST 2500-4)
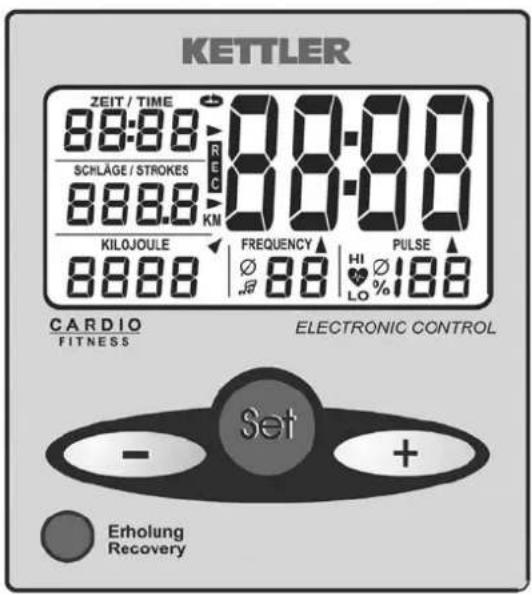
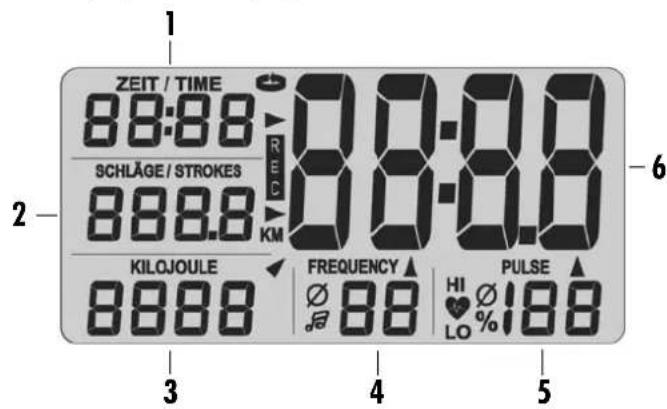
Symbols in display
Features:
1 Time .0.00-99.59 [min:sec]
2Oar strokes 0-9999
Total number of km
Odometer [0 - 999.9km]
3 Energy consumption n.....0-9999 [KJ]
4 Stroke frequency .0-99 [strokes per min.]
5 Pulse rate 50-199 [strokes per min.]
6 General display Room temperature [0 - 40^]
Fitness mark [F1.0 - F6.0]
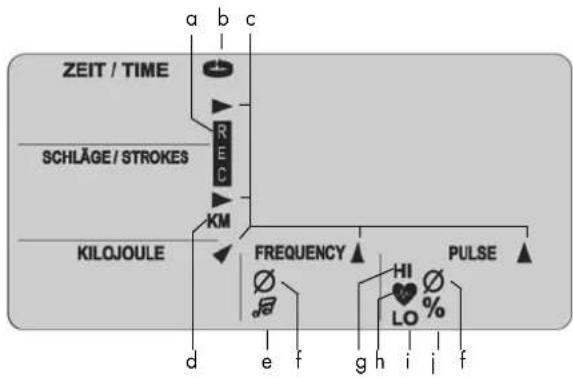
Symbols:
a REC .Recovery pulse
b SCAN.....Automatic display change
c Arrows Current part of general display
d KM .Total km covered
e Mark .Audible oar-stroke rhythm activated
Average Stroke frequency ^+ pulse rate
g HI Max. pulse rate exceeded
Heart . Flashes in time with pulse
i LO............Below min. pulse rate
j Percent .% of max. pulse rate
Minus Button. Reduce values (display section back)
Set button.......Function button [set value, change value,
reset value in display]
Plus button.. Increase values (display section forward)
Recovery button....Function button [calculate fitness mark]
Connections (rear)
Socket (2-pole)............for speed sensor
Battery compartment.2 batteries: Mignon 1.5 V, LR6, AA
1.0 Display before starting exercising
- Room temperature.......Fig. 1 [before and after exercising]
- Full display.. .Fig. 2 [after beginning rowing or push button for 1 sec.]
- Total no. of km.......Fig. 3 [display duration: 10 sec. or push button]
- Ready for use.. Fig. 4
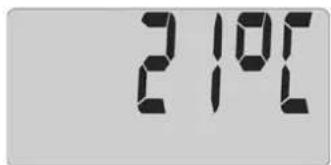
Fig. 1 Room temperature
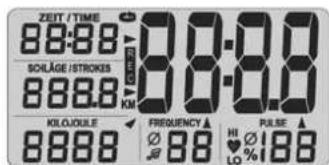
Fig. 2 Full display

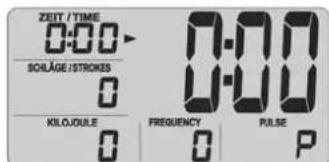
Fig. 4 Ready for useFig. 3 Total no. of km.
2.0 Pulse-rate
This training computer records the pulse rate via the Cardio Puls Set. The receiver is located on the main board of the display electronics.
Using the Cardio Puls Set
Strap on the chest belt. Follow the instructions for use.
Pulse-rate display
You have set the start display (fig. 4).
The heart symbol (h) flashes in time with your pulse
After a few seconds, the pulse rate is shown as a figure (5).
3.0 Exercising without setting target data
Start exercising. All the figures count upwards.
4.0 Exercising with target data set
Set time (1), oar strokes (2), kilojoules (3), oar frequency (4), pulse rate (5).
You have set the start display (fig. 4). Press the Set button. You are now in the Set mode and you can set the desired target figures using the + or - buttons.
When you press the plus or minus button and hold it down, the set figures scroll upwards and downwards more quickly.
When you press the plus and minus buttons together, the display returns to "OFF".
To see the next set figures, press the Set button.
After setting the target pulse rate, press the Set button to quit the setting mode. Any settings you have made are then shown in the display (figs. 17/18).
When you press the Set button and hold it down, the full display is shown (reset function) (fig. 2).
Note
If you do not enter any settings for 4 minutes, the display returns to room temperature (fig. 1).
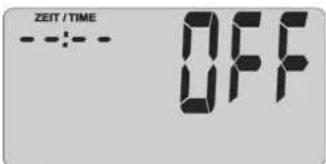
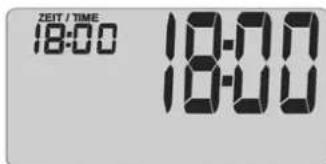
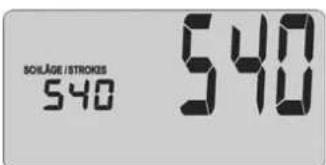
Fig. 5 Fig. 6
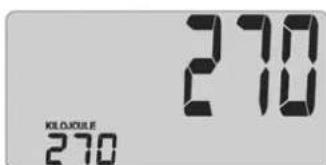
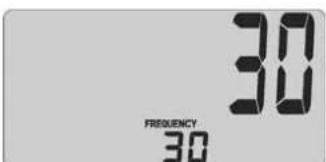
Fig. 7 Fig. 8
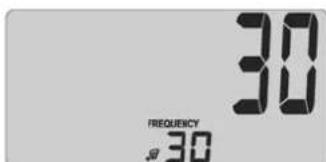
Fig. 9 Fig. 10
Fig. 5: Time setting display starting with "OFF"
Fig. 6: Time setting: e.g. 18 minutes
Fig. 7: Oar-stroke setting, e.g. 540 strokes
Fig. 8: Energy-consumption setting, e.g. 270 kilojoules
Fig. 9: Frequency setting: e.g. 30 strokes per minute
Fig. 10: Bleep activated. At 30 strokes it bleeps every 2 sec.
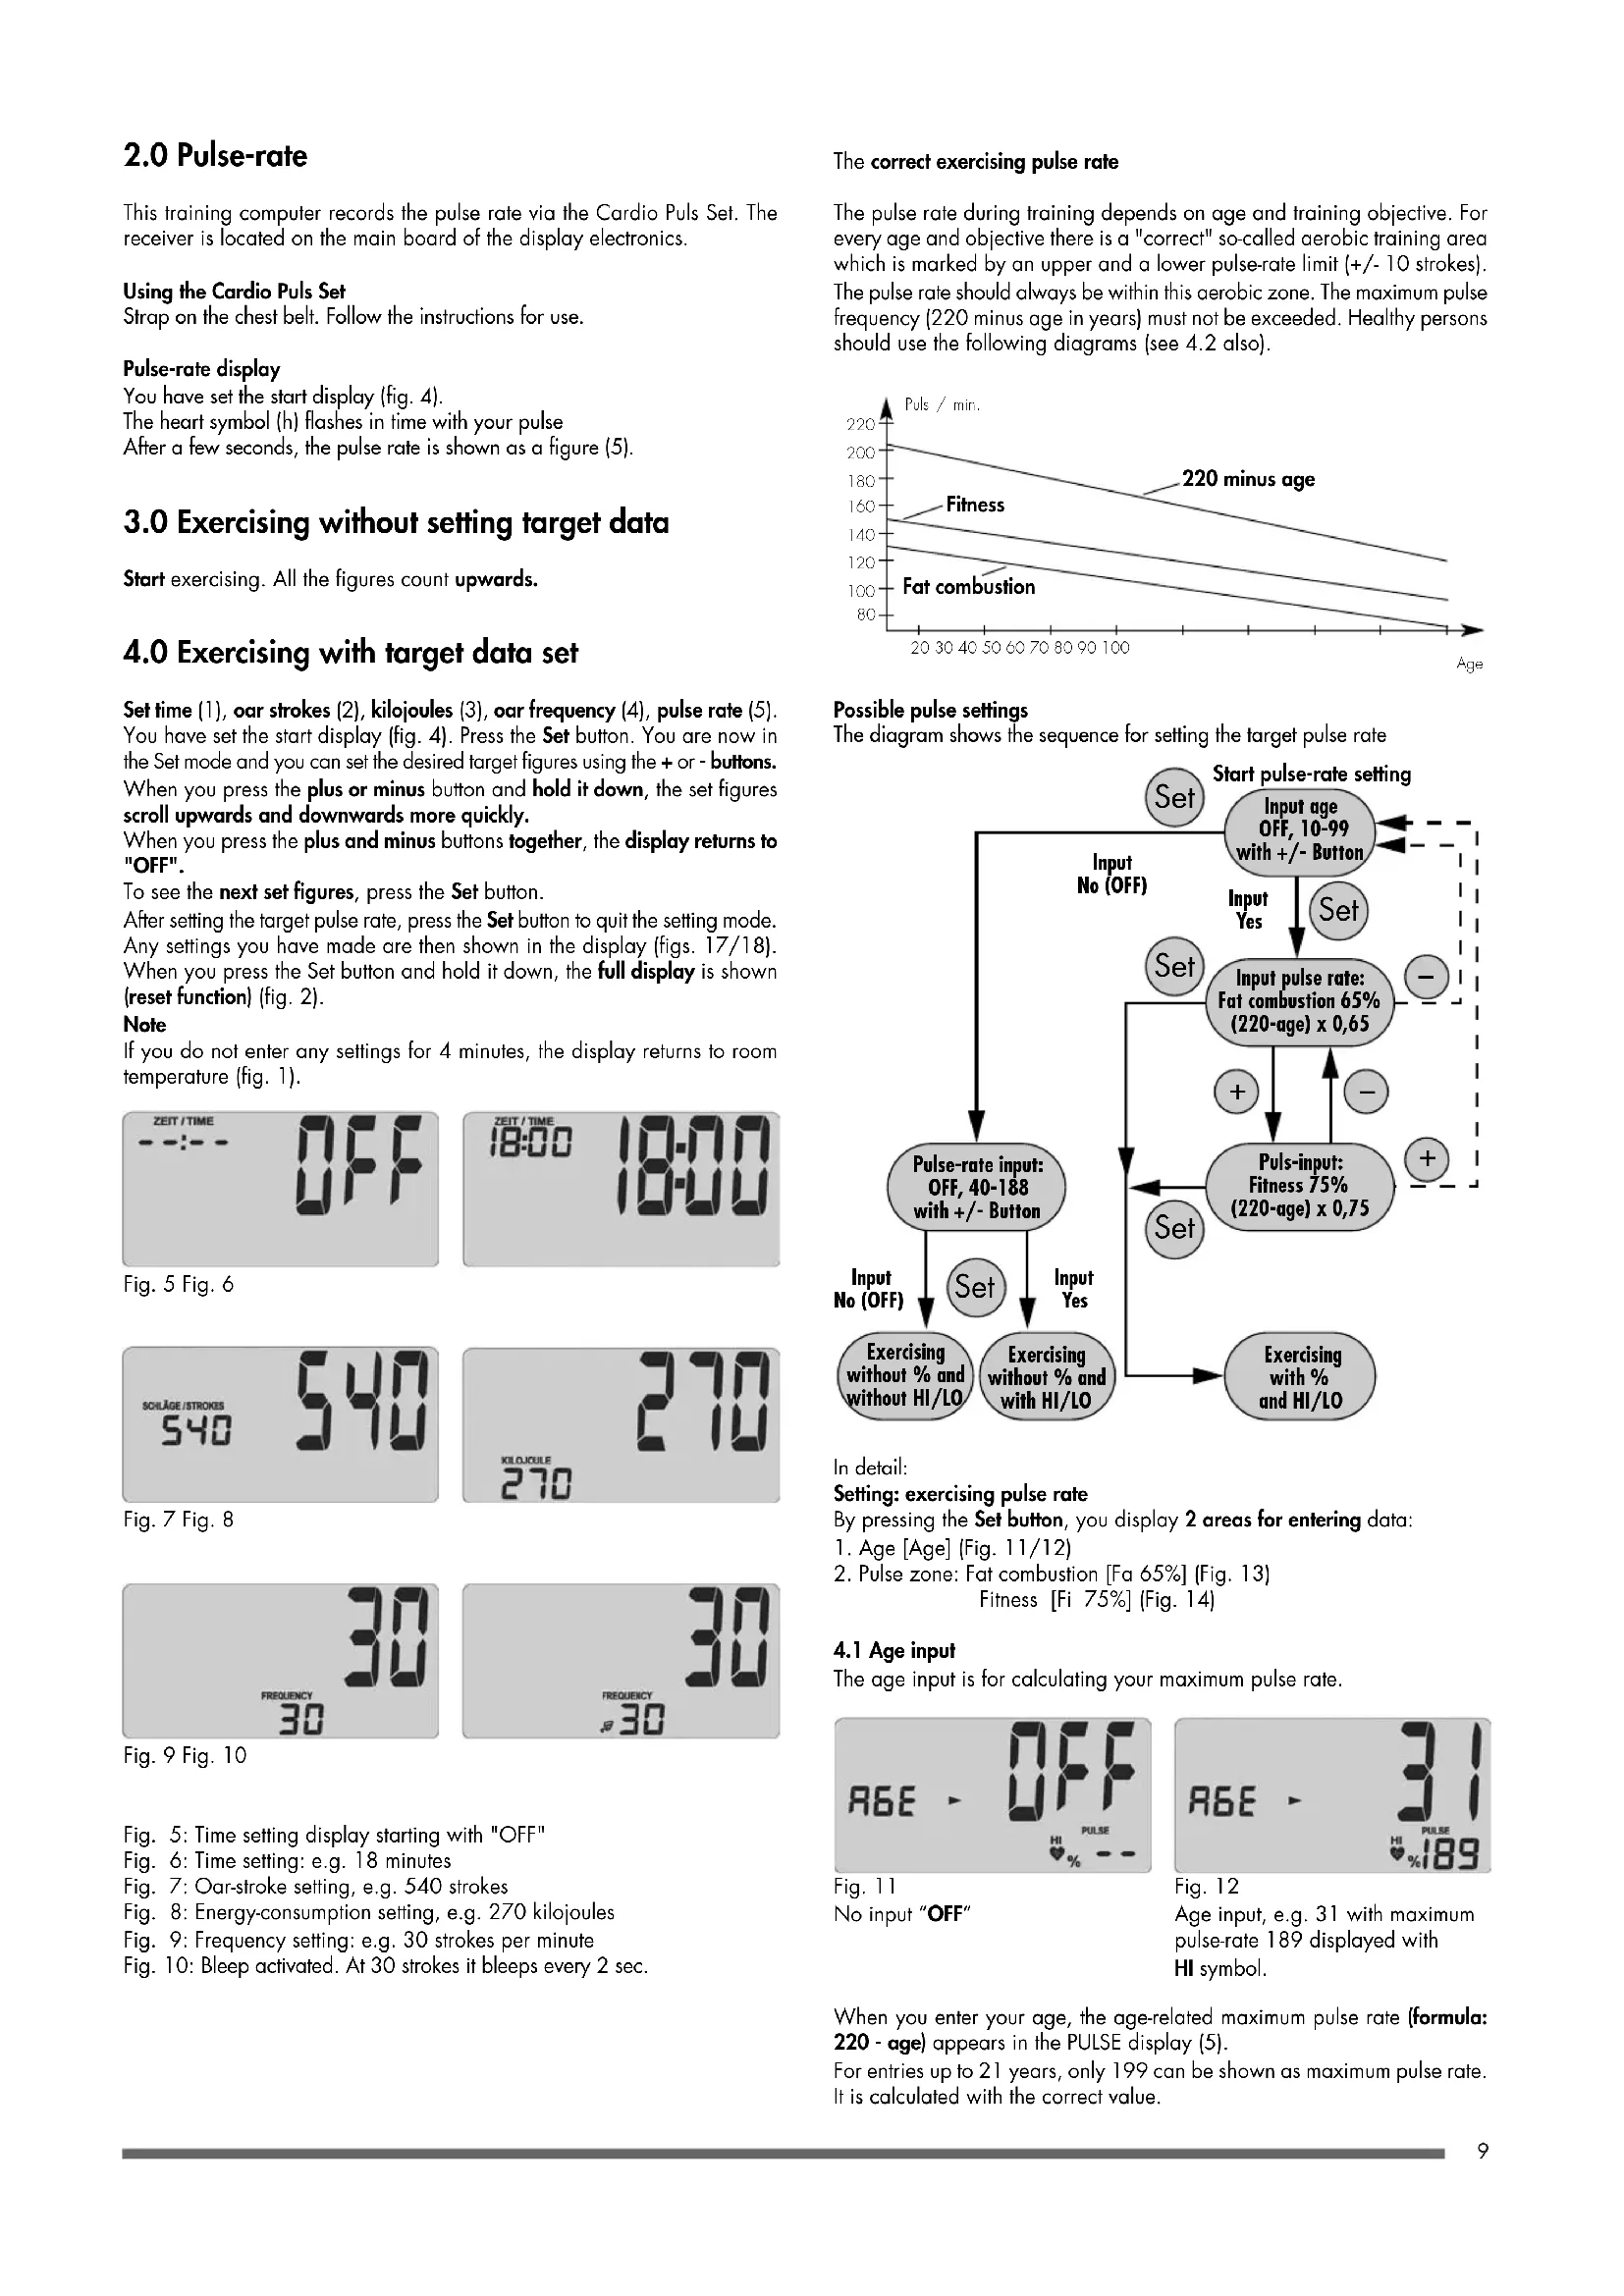
The correct exercising pulse rate
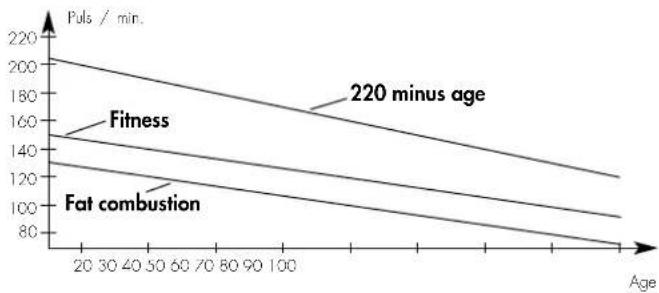
The pulse rate during training depends on age and training objective. For every age and objective there is a "correct" so-called aerobic training area which is marked by an upper and a lower pulse-rate limit (+/- 10 strokes). The pulse rate should always be within this aerobic zone. The maximum pulse frequency (220 minus age in years) must not be exceeded. Healthy persons should use the following diagrams (see 4.2 also).
Possible pulse settings
The diagram shows the sequence for setting the target pulse rate
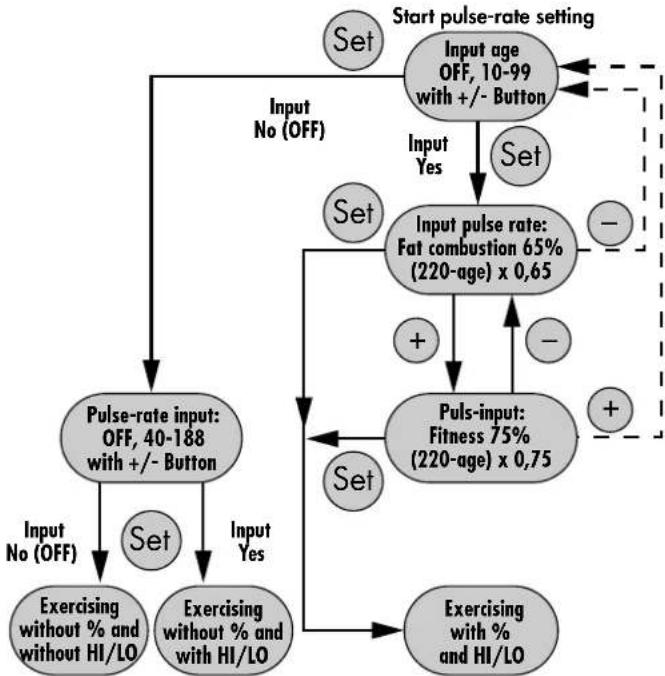
In detail:
Setting: exercising pulse rate
By pressing the Set button, you display 2 areas for entering data:
-
Age [Age] (Fig. 11/12)
-
Pulse zone: Fat combustion [Fa 65%] (Fig. 13)
Fitness [Fi 75%] (Fig. 14)
The age input is for calculating your maximum pulse rate.
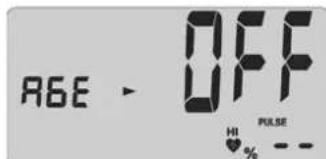
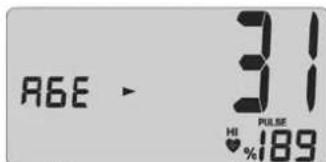
Fig. 11
No input "OFF"
Fig.12
Age input, e.g. 31 with maximum pulse-rate 189 displayed with HI symbol.
When you enter your age, the age-related maximum pulse rate (formula: 220 - age) appears in the PULSE display (5).
For entries up to 21 years, only 199 can be shown as maximum pulse rate. It is calculated with the correct value.
4.2 Pulse-rate zones
Using the +/- buttons, you can select 2 zones. The age input serves for calculating these zones. This is shown in the PULSE display (5).
- Fat consumption [Fa 65%] (Fig. 13)
Formula: (220 - age) \times 0.65
- Fitness zone [Fi 75%] (Fig. 14)
Formula: (220 - age) \times 0.75
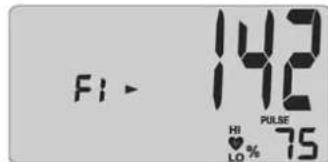
Fig.13 Pulse zone: fat combustion with 65%
Fig. 14 Pulse zone: fat combustion with 55%
Function
When the pulse zone is entered and the maximum pulse set, pulse-zone monitoring is activated. If the number of strokes is 11 less than the set exercising pulse, the letters "LO" appear. When the set pulse is exceeded by 11 strokes, the symbol "HI" appears. The "LO" monitoring is activated when the set pulse rate is reached for the first time during rowing. If the number of strokes declines to zero, the "LO" function is again activated when the set pulse rate is reached. "HI" monitoring is always active.
The figure which is shown with the % symbol is the relation of the current pulse rate to the maximum pulse rate.
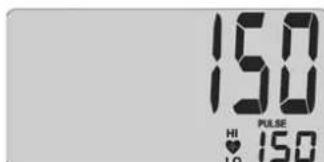
4.3 Pulse-rate monitoring (independent of age)
This can be set from 40 - 180 using the +/- buttons.
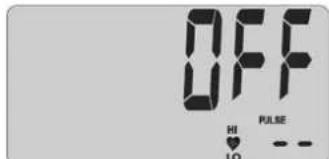
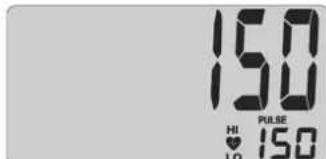
Fig.15 No entry "OFF"
Fig.16 Pulse rate entered, e.g. 150 and HI an LO symbols
Function
The "HI" and "LO" display is described in 4.2.
The percentage pulse display is not available.
After entering the last setting, press the Set button. All the set figures (apart from pulse-rate and frequency) are now displayed (fig. 17). If you switch the pulse-rate monitoring off, the OFF display is shown and all pulse-rate monitoring functions are deactivated and the general display shows "Time" (fig. 18)
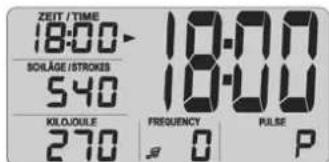
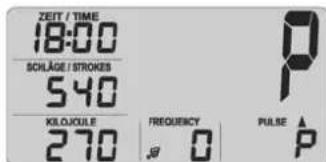
Fig.17 No entry "OFF" (See fig. 15)
Fig.18 Pulse rate entered, e.g. 150 and HI an LO symbols. (See fig. 16)
Function
Start rowing. All the settings (apart from pulse limit) count downwards. When zero is reached, they flash for a few seconds and then start counting from the set value upwards.
If your pulse rate rises above the specified limit, the HI symbole flashes as a warning.
5.0 Display during exercising
When you start your exercising session, the automatic display change SCAN starts at five-second intervals (symbol b in the display). You can switch it off with the Set button. Using the +/- button, you can switch forward to the next display section or back to the last one. If you have set the stroke frequency (e) in the display, it bleeps at the set rhythm to help you to maintain the right frequency.
6.0 Display before and after exercising and during interruptions
The electronics are able to detect interruptions in rowing. The automatic display changes stops. The symbol SCAN disappears. Under Frequency (4) and Pulse Rate (5) the average figure is indicated with the average symbol (f).
If you resume exercising within 4 minutes, the display changes to Room Temperature (fig. 1). The distance is added to the total number of kilometres. All other figures are not stored.
Note
Press the +/- button to move to the next or the previous display section. Press the Set button to return to the Input mode. All previous exercising data are deleted. Settings are not deleted.
7.0 Display on resumption of training
When you resume exercising, the figures continue to count.
8.0 Measurement of recovery pulse
The training computer features a recovery-pulse function. This allows you to measure your pulse rate during the recovery period following exercising. When you finish exercising, press the recovery-pulse button. The current pulse figure is accepted under Time (1) (fig. 19). The computer then measures your pulse rate for 59 seconds counting downwards (fig. 19). Following this, the current pulse rate is accepted under Strokes (2). Under Kilojoules (3), the difference in the pulse figures during the downward count appears and a fitness mark (F) is displayed (fig. 20). The calculation process is explained in section 9.0 General Notes. If the pulse measurement is interrupted, the letter (P) appears instead of a figure. To return to the current training display, press the Recover button. The current pulse is always displayed under Pulse (5).
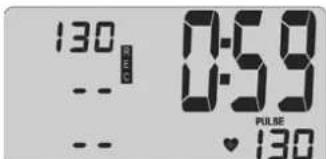
Fig. 19
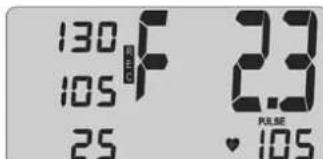
Fig. 20
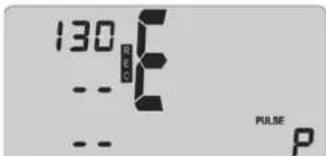

Fig. 22Fig. 21
Fig. 19: Measurement of recovery pulse counting downwards (0.59 - 0.00)
Fig. 20: Display of fitness mark
Fig. 21: No pulse detected (E) during recovery measurement Note: If no pulse figure is displayed, the recovery-pulse function is not activated.
Fig. 22: No recovery function (E)
9.0 General notes
Calculation of overall number of kilometres
1 oar stroke is equivalent to a distance of 5 metres.
Calculation of kilojoules
Medically, the energy consumption produced by rowing is as follows: 1 hour of rowing at a stroke frequency of 40 leads to a consumption of 2930kJ per minute.
1 kilometre results in 244 kilojoules.
The calculation is based on the medium-load setting and alters only on variation of stroke frequency.
Calculation of fitness mark
The computer calculates and assesses the difference between the pulse rate during exercising and during recovery and awards the fitness mark according to the following formula:
$$
\text {N o t e} (\mathbf {F}) = 6 - \left(\frac {1 0 \times (\mathbf {P} 1 - \mathbf {P} 2)}{\mathbf {P} 1}\right) ^ {2}
$$
P1 = Exercising pulse rate
P2 = Recovery pulse rate
Mark 1 = very good Mark 6 = extremely poor
Comparing the pulse rates during exercising and subsequent recovery is a fast and simple method of gauging physical fitness. The fitness mark is a rough guideline for estimating your ability to recover from physical exertion. Before pressing the Recovery-pulse button and checking your fitness, you are advised to row within your "safe" range for at least 10 minutes, if possible longer. Regular exercise will gradually improve your fitness mark.
In order to calculate the average for stroke frequency and pulse rate, all the training periods are taken into account until the "Reset" function is activated or the "Temperature" display appears.
Notes on pulse-rate measurement
The pulse-rate measurement starts when the heart symbol in the display flashes in time with your heartbeat.
Cardio Puls Set
Follow the instructions for using the Cardio Puls Set.
Interference in the pulse-rate display
Check the voltage of the batteries for the electronics and the chest belt.
Malfunction of training computer
Note the number of kilometres. If the computer behaves abnormally, remove the batteries, check them, and replace them.
The total number of kilometres is cancelled when the batteries are changed.
Exercising with the KETTLER COACH LS
The KETTLER COACH LS rowing machine provides all of the advantages of "real life" rowing without the trouble or expense of "taking to the water". Rowing is a sport that improves not only the performance of the cardio-vascular system, but also improves stamina and endurance. The following points should be observed before commencing a course of training:
Important
Before commencing a course of training, have your family doctor check that you are fit enough to exercise with the COACH LS. The result of the medical check-up should be used as a basis for planning the exercise programme. The following directions are only to be recommended to healthy persons.
The advantages of rowing
As mentioned above, rowing is an excellent way to increase the efficiency of the cardio-vascular system. It also improves the ability to absorb oxygen. In addition, rowing is also suitable for "burning off" fat by calling up the fat reserves (in the form of fatty acids) to be transformed into energy.
Another important advantage of rowing lies in the strengthening of all of the body's important muscle groups, whereby the strengthening of the back and shoulder muscles can be considered especially beneficial from the orthopaedic point of view. The strengthening of the back muscles can help prevent such orthopaedic problems as are encountered all too often nowadays. Exercising with the KETTLER COACHLS is therefore a comprehensive way to exercise. It improves endurance and strength while at the same time not putting the joints under stress.
Which muscles are called on
The movements in the rowing exercise call on all of the body's muscle
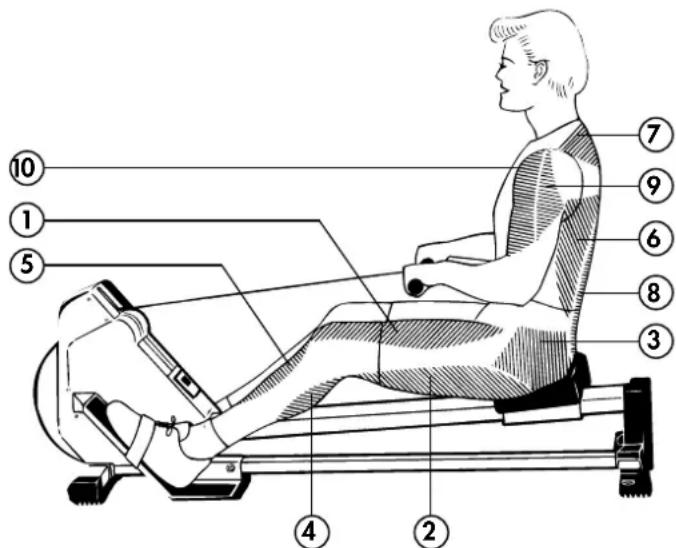
groups. Although some are concentrated upon more than others. These groups are shown in the lower illustration.
As can be seen in the illustration, rowing activates the upper and lower body to the same extent. In the legs, rowing exercises the extensors (1), the flexors (2) and the shin and calf muscles (5, 4). The movement of the hips also calls on the seat (gluteus) muscles (3).
In the torso region, rowing calls primarily upon the latissimus (6) and the erectors (8), but also on the trapezius (7), the deltoid (9) and the arm extensor muscles (10).
The KETTLER COACH LS can also be used for other special exercises to concentrate on further muscles groups. These are described in one of the following sections.
Planning and controlling your rowing
The basis for planning your course of exercise should be your actual state of fitness. Your family doctor can put you through an endurance test to determine your physical performance. The results of the test should be used to plan your exercise programme. If you do not go through an endurance test, you should avoid excessive exercising stresses at all costs. The
following principle should be follow in your planning; endurance training can be controlled as much by the extent of effort as by the level of effort and the intensity.
Exercise intensity
The effort intensity when rowing can be determined by checking the pulse. The intensity of the rowing exercises can be varied on the one hand by altering the number of strokes per minute, and on the other by altering the resistance of the tension device. The intensity increases both when the stroke rate is increased, and when the resistance in the tension device is increased.
Beginners should always start at a low intensity level, i.e. at a stroke rate of less than 20 strokes/minute, and with the control of the tension device at his lowest resistance setting.
Beginners should therefore avoid exercising at high stroke rates or at high resistance levels. The optimum stroke rate and level of resistance should be determined using the recommended pulse rate (see 4.0 "The correct exercising pulse rate" / 4.2 "Pulse-rate zones"), which should be checked three times during each session. Before starting, check the resting pulse, about 10 minutes into the session check the effort pulse (which should be in the region of the recommended level), and after finishing exercising, check the recovery pulse.
These three values can be entered into the record sheet. Regular exercising will soon show a reduction in both the rest and the effort pulse rates. This can be taken as a sign for the positive effects of the endurance training. The heart is beating more slowly and more time is available for the heart to take in blood and for the blood to circulate through the heart's own muscles.
Extent of exercise
By extent of exercise, we refer to the length of the exercise sessions and their frequency per week. Experts consider the following extent of exercise to be especially effective:
| Sessions per week Length of session | |
| Daily 10 minutes | |
| two or three times a week 20 -30 minutes | |
| once or twice a week 30 -60 minutes | |
Exercise sessions of 20 -30minutes/30 -60 minutes are not suitable for he beginner. The beginner should increase his/her extent of exercising only gradually, with the first blocks being kept relatively short. Block exercising can be looked upon as a good variation at the beginning.
A typical beginner's programme for the first 4 weeks could be something like the following:
1st/2nd week Length of exercise blocks
Sessions per week three 3 minutes rowing
1 minute break
3 minutes rowing
1 minute break
3 minutes rowing
3rd/4th week Length of exercise blocks
Sessions per week four 5 minutes rowing
1 minute break
5 minutes rowing
Following these 4 weeks of beginner's exercising, the blocks can be extended to 10 minutes of continuous rowing without a break. If 3 weekly sessions of 20 - 30 minutes are preferred (at later stages), a free day should be planned between each two days with exercise.
Accompanying gymnastic exercises
Gymnastik exercises are an ideal complement to rowing. Always do warming-up exercises before starting rowing. Activate the circulation with a few minutes of easy rowing (10-15 strokes per minute). Stretching exercises should then be carried out before the real rowing exercise is started. Easy rowing should also be done at the end of the session, with further stretching exercises during the cooling-down period.
Instructions for exercising with the KETTLER COACH LS
Besides rowing, the COACH LS is also suitable for exercises designed to increase general fitness, but with special emphasis on muscle-building. In order to achieve maximum benefit from the COACH LS, the following points should be noted:
- beginners should avoid exercising with high resistances;
- use only resistances which do not cause strained breathing;
- carry out all movements smoothly and regularly - not in sudden jerks;
- do not exercise with the back curved upwards or with rounded shoulders;
- always remember, that muscles and strength increase relatively quickly, i.e. at a pace which tendons, ligaments and joints cannot all ways follow.
In brief: Increase resistance only gradually in the course of regular training.
Some methods of exercising
For general fitness, a method of exercising which emphasizes both strength and stamina is recommended. This means that exercises at low resistance levels (approx. 40 - 50% of personal maximum strength**) should be repeated 15-20 times.
( 常 . Here, the term "maximum strength" means the maximum strength which a person has to concentrate in order to raise a heavy weight once.
Example of a training schedule
| Exercise 1 | .2. Week 3.- 4. Week 5.- 6. Week | |
| S* Repeat S* | Repeat S* | Repeat | | |
| 1 | 1-2 individ. | 2 individ. | 3 individ. | |
| 4 | 1-2 12-15 | 2 15-20 | 3 15-20 | |
| 7 | 1-2 12-15 | 2 15-20 | 3 15-20 | |
| 9 | 1-2 12-15 | 2 15-20 | 3 15-20 | |
| 13 | 1-2 12-15 | 2 15-20 | 3 15-20 | |
| 14 | 1-2 12-15 | 2 15-20 | 3 15-20 | |
| 17 | 1-2 12-15 | 2 15-20 | 3 15-20 | |
S. = Serie
Always warm up before exercising. Rest for approx. 60 seconds after each series of repeats, and use these intervals for loosening and stretching exercises.
Exercise 2-3 times per week with your COACH LS and make use of every opportunity for alternative forms of exercise such as walking, cycling, swimming etc. You will then find that regular exercising increases your physical fitness and your general sense of wellbeing.
Caution!
You are using a machine that has been designed and built to the latest safety standards. Any possible sources of danger that could lead to injury have been extensively eliminated guarded against. Moreover, the machine is intended only for the use of adults.
Wrong or excessive training can damage your health. Before commencing a course of fitness training, arrange for a medical check-up to see if you are in a state of health suited to training on the machine. The result of the check-up should be used as a basis for your training programme.
The machine is never to be looked upon as a toy. Please remember that the nature of children who are using the machine can lead to unforeseen situations and hazards for which the manufacturer cannot be held liable. If children are allowed to use the machine, they should be instructed on its correct use and dangerous situations explained to them.
The machine must be carfully assembled by an adult. It must be ensured that the machine is not used until it has been fully assembled.
When used for regular training, we recommend checking all parts of the Machine (especially screws, nuts and bolts) every 1 to 2 months. So that the intended level of safety is maintained, the machine is to be taken out of use if any parts are worn. The worn parts are to be exchanged immediately.
(cf. illustration 15)
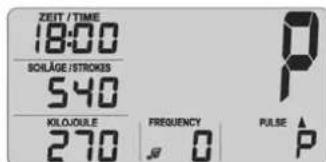
Illustration 18
Geen programming "Off"
Afbeelding 16:
Uwaga:gressive warts.
GB 1st phase The rowing movements
To start, the seat is pushed into the forward position by bending the hip and knee joints. The handle is gripped from above. The arms are bent slightly. Sit with the back straight but inclined slightly forward. Should you suffer from any knee complaints, do not bend the knees at an angle of less than 90^ .
This phase begins by stretching the legs. The handle is still gripped with the arms slightly bent. Ensure that your back is still straight.
F 2e phase
When the legs are almost stretched to their full extent, pull the handle towards your body. Lean backwards slightly. At the end of the movement, the knees should still be slightly bent.

3e phase
Push the handle forward. As soon as the handle is approximate at knee level, bend the knees once again and return to the starting position.

4e phase
GB Mistakes to be avoided
- Rounded back during the individual phases of movement.
- Do not straighten the arms fully -this can lead to elbow trouble.
- Do not straighten the legs fully - this can lead to knee trouble.
Practice the rowing movement before starting rowing. The correct movement can best be learned at low resistance and low strokes per minute. Regular exercising should only be started when the rowing movement has been mastered.
Starting position: Flat on back on the padded bench. Pull the knees up towards the chest. Keep the hip and knee joints bent at 90^ . The hands are in contact with the neck.
Movements: The upper torso is lifted forward, raised slightly and again lowered. Do not lift the pelvis area off the bench.
Muscles exercised: Stomach muscles
F 1.Crunch
GB 2. Rowing in bowed position
Starting position: Incline the torso forward keeping the back straight. Stand on the footplate. Bend the knees slightly. Grip the handle with both hands. Extend the arms.
Movements: Pull the handle upwards towards the stomach. The elbows move upwards past the sides of the body. Stretch the arms once again.
Muscles exercised: Strengthens shoulder, back and arm-bending muscles.
F 2.Ramer,legerement inclineversl'avant
GB 3.Single-arm rowing
Starting position: Rest one knee on the seat. Grip the handle in the centre with one hand. Hold the handle in the vertical position. The arm is extended.
Movement: Pull the handle towards the body, bending the arm at the elbow. The elbow passes the body at chest level. On completion of one set, cross over to the other side of the machine and use the other arm.
Benefits: Strengthens shoulder, back and arm-bending muscles.
F 3.Ramer aune main
Starting position: Flat on back on bench. The head rests on the seat. Grip the handle with both hands. Hold the handle behind the head with arms slightly bent. Exercise: With arms slightly bent, the handle is pulled towards the pelvis. Then return the handle to the position behind the head.
Benefits: Strengthens chest and back muscles
F 4. Pull-over (passer au-dessus de la tete)
GB 5.Cable pull in standing position
Starting position: Stand at the side of the unit. The left foot is on the foot plate. Lean the upper body slightly forward keeping the back straight. Bend the knee slightly. Grasp the bar in the middle with the left hand.
Exercise: Pull the handle outwards until it is in front of the body. Allow it to return to the starting position. Change sides after one set.
Benefits: Strengthens chest muscles, front shoulder muscles.
F 5. Traction du cables,about
GB 6. Cable pull in kneeling position
Starting positions: Right angles to machine. One foot is on the base bar. The other knee rests on the ground. The handle is held in the centre. The back remains straight.
Exercise: Pull the handle outwards until it is in front of the body. Allow it to return to the starting position. Change sides after one set.
Benefits: Strengthens chest muscles., front shoulder muscles.
F 6. Traction du cable, a genou
GB 7. Rowing in standing position
Starting positions: Upright stance with both feet on footplate. Grip handle from above and hold at hip level.
Exercise: Pull the handle up to shoulder height. The elbows point upwards and to the side. Lower the handle and repeat the movement.
Benefits: Strengthens shoulder muscles and arm biceps.
F 7.Ramer debout
GB 8. Rowing with raised elbows
Starting positions: As for 1 st phase.
Exercise: Stretch the legs and raise the elbows to shoulder level while sliding backwards. Pull the arms back. Return to the starting position.
Benefits: Strengthens shoulder, back and arm-bending muscles.
F 8.Ramer,les coudes levés
GB 9. Frontal pull in standing position
Starting position: Upright stance with both feet on footplate. The handle is gripped from above by both hands. The arms are held slightly bent at waist level.
Exercise: Move the extended arms upwards until they reach shoulder level. Lower the arms once again.
Benefits: Strengthens shoulder muscles
GB 10. Frontal pull in seated position
Starting position: Seated upright on machine. The handle is gripped from above. The back is straight and the arms slightly bent. Bend the knees slightly.
Exercise: Move the handle upwards from its position in front of the body until it is over the head. Then return it to the position in front of the body.
Benefits: Strengthens shoulder muscles
F 10.Lever devant soi,assis
Starting position: Upright stance at side of machine. The left foot rests on the footplate. The handle is held in the centre with the right hand. The handle is held close to the left thigh. The arm is slightly bent.
Exercise: Pull the handle upwards and to the side until it reaches shoulder level. Then allow it to return to thigh level. Change sides after one set.
Benefits: Strengthens shoulder muscles
Starting position: At side of machine. The right foot is on the base bar. The left leg is in the kneeling position. The handle is held in the centre with the left hand. The handle is held at shoulder height in front of the body.
Exercise: Pull the handle to the side away from the body. Then allow it to return to the position in front of the body. Change sides after one set.
Benefits: Strengthens shoulder muscles
Starting position: Firm stance on the footplate. The handle is gripped from above with both hands.
Exercise: Crouch forward bending at both knees and thing. Ensure that the back remains straight.
Benefits: Leg bending and stretching muscles, seat muscles
Starting position: Firm stance on the footplate. The handle is gripped in both hands from below. Hold the handle in front of the body. The arms are slightly bent. The upper arms are held close to the body.
Exercise: The handle is moved towards the shoulder by bending the arm at the elbow. The upper arms remain pressed against the body.
Benefits: Strengthens arm biceps
F 14. Rouler les biceps,en positionABOUT
GB 15. Biceps curl in seated position
Starting position: Seated upright on machine. The handle is gripped from beneath. It is held at chest level in front of the body with arms slightly bent. Exercise: The handle is moved towards the shoulder by bending the arm at the elbow.
Benefits: Strengthens arm biceps
GB 16. Biceps curl in reclined position
Starting position: Flat on back on padded bench. The head rests on the seat. The handle is held from beneath in both hands. The arms are slightly bent and held close to the body.
Exercise: The handle is moved toward the chin by bending the arms at the elbow. The upper arms remain pressed against the body.
Benefits: Strengthens arm muscles
GB 17. Arm extension in reclining position
Starting position: Flat on back on padded bench. The head rests on the seat. The handle is gripped from above by both hands. The upper arms are held at an angle of 90^ to the body. The elbow is also bent at an angle of 90^ .
Exercise: The handle is pulled over the chest by straightening the arms at the elbow, and returned by bending them again.
Benefits: Strengthens arm triceps
F 17. Extension des bras, en position couchee
GB 18. Arm extension in seated position
Starting position: Pull the handle until about 1.5 metres of cable has emerged from the casing of the machine. Push the seat close to the machine. Sit with your back to the casing. Raise the arms above the head, holding the handle from above. The elbow joints are bent at an angle of 90^ , which means that the handle is behind the head.
Exercise: Straighten the arms, thus pulling the handle over the head. Bend the arms again and return the handle to the starting position behind the head. Benefits: Strengthens arm triceps
F 18. Extension des bras en position essis
GB Personal data and performance
F Donhees de charge et performances personelles