
Rower 2.0 - Rowing Machine KETTLER - Free user manual and instructions
Find the device manual for free Rower 2.0 KETTLER in PDF.
| Product type | Rowing machine |
| Brand | Kettler |
| Model | Rower 2.0 |
| Category | Rowing machine |
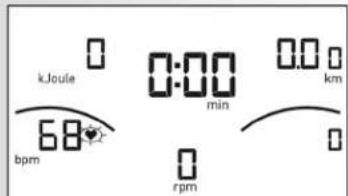
| Display | Digital display with segments, time, distance, energy (kcal/kJ), stroke rate, heart rate, fitness score |
| Heart rate measurement | Yes, via optional chest strap (uncoded 5 kHz system) |
| Resistance | Adjustable by mechanical brake (rotation) |
| Training programs | With or without preset values (time, distance, energy) |
| Recovery function | Measures recovery heart rate and calculates Fitness Score |
| Power supply | Batteries (type not specified, voltage sufficient for heart rate measurement) |
| Sleep mode | Automatic after 4 minutes of inactivity |
| Acoustic signal | Power on, goals reached, maximum heart rate exceeded |
| Stroke conversion | 1 stroke = 5 meters |
| Memory | Total hours and kilometers stored (except when changing batteries) |
| Operating area | 4 keys: Enter, Reset, Plus/Minus, Recovery |
| Heart rate receiver | Behind the display |
| Maintenance | Clean with a damp cloth; avoid prolonged humidity |
| Safety | Consult a doctor before any program; stop if feeling unwell; regularly check condition |
| Spare parts | Use only original Kettler parts |
| Warranty | Regular technical checks recommended; defects repaired immediately |
Frequently Asked Questions - Rower 2.0 KETTLER
User questions about Rower 2.0 KETTLER
0 question about this device. Answer the ones you know or ask your own.
Ask a new question about this device
Download the instructions for your Rowing Machine in PDF format for free! Find your manual Rower 2.0 - KETTLER and take your electronic device back in hand. On this page are published all the documents necessary for the use of your device. Rower 2.0 by KETTLER.
USER MANUAL Rower 2.0 KETTLER
Safety instructions 12
Brief Description 13
- Function Area / Keys 13
Indicator Area / Display 14
Quickstart (basic orientation) 16
- Training Readiness 16
Starting Training 16 - Training Pause 16 End of Training
- Operational Standby 16
Training
Without Settings
With Settings
Time
- Course
Energy (KJoule/kcal)
- Training Pause/End
- Resumption of Training
- Recovery (recovery pulse measurement)
General Information
- System Sounds
Recovery - Calculation of Average Value
17
17
17
17
17
17
17
17
18
18
18
18
19
Instructions on Pulse Measurement 19
With chest strap 19
Malfunctions
or erroneous readings 19
Training Manual
Endurance Training 20
- Intensity 20
- Degree of Intensity 21
Safety instructions
Please observe the following instructions for your own safety:
The training device must be set up on an appropriate and firm surface.
- Inspect the connections for firm fitting before initial operation and additionally after approximately six operation days.
- In order to prevent injuries caused by wrong stress or overstress, the training device may only be used in accordance with the instructions.
- It is not recommended to permanently set up the device in humid rooms due to the resulting corrosion development.
Assure yourself regularly that the training device functions properly and that it is in duly condition.
- The operator is responsible for the safety controls, which have to be carried out on a regular and proper basis.
Defective or damaged parts must be exchanged immediately. Only use original KETTLER spare parts.
The device may not be used until after repairs are completed.
- The safety level of the device can only be maintained provided that it is regularly inspected for damage and wear and tear.
For Your Safety:
- Before starting the training, check with your GP that you are fit for training with this device. The doctor's findings should form the basis for the setup of your training programme. Incorrect or excessive training may damage your health.
- Systems to monitor your heart rate can be imprecise. Excessive training may result in serious damage to your health or death. Should you feel dizzy or weak, stop the training immediately.
Brief Description
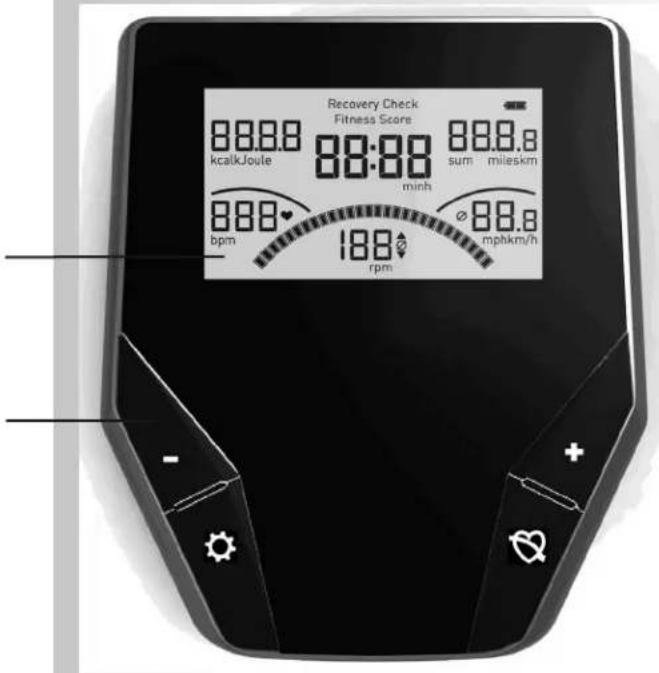
The electronics have a display area (Display) with changeable symbols and graphics, and a function area with keys.
Indicator Area
Display
Function Area
Keys
Instructions (in brief)
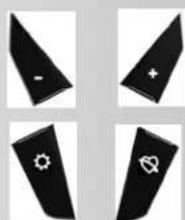
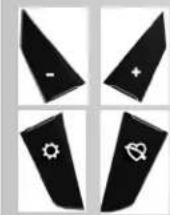
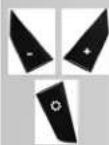
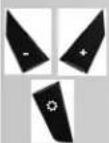
Function Area
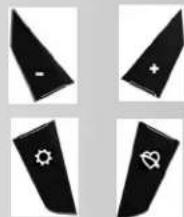
The four keys are briefly explained in the following.

(press quickly)
With this function key, entries are called up. The selected data is transferred.
Reset (press longer)
The current display is deleted for a restart.
Plus +/Minus -
With these function keys, values are changed in the various entries before the training
- pressed longer > faster display of values series
- "Plus +" and "Minus -" pressed simultaneously:
Value entry jumps to OFF

RECOVERY
With this function key, the Recovery Pulse function is started.
Chest strap
The input is located on the back side of the display. Only "uncoded 5 kHz systems" function.


Training and Operating Instructions
Operating Instructions (in brief)
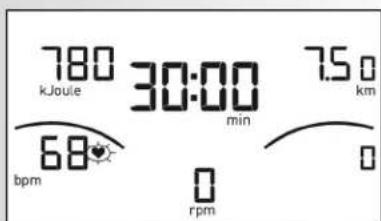
Indicator Area / Display
The display area informs you about the various functions.
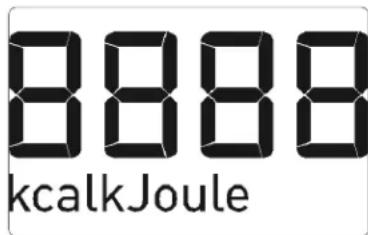
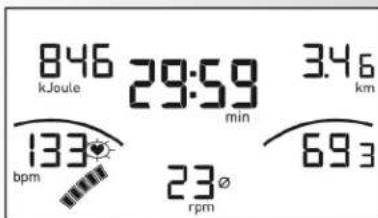
Energy Consumption
in kcal or kJoule
-Value0-9999
Training Time
Total Training Time (h) after turning on or resetting the display Time Rewind found at Recovery Check
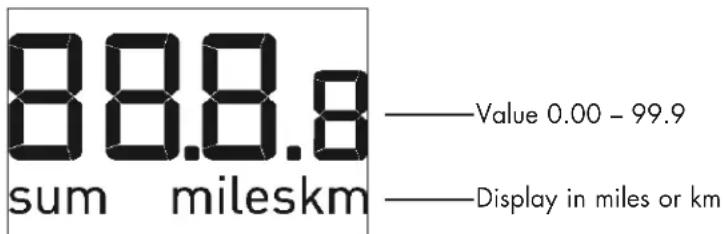
Course
Entire Course (sum) After turning on or resetting display
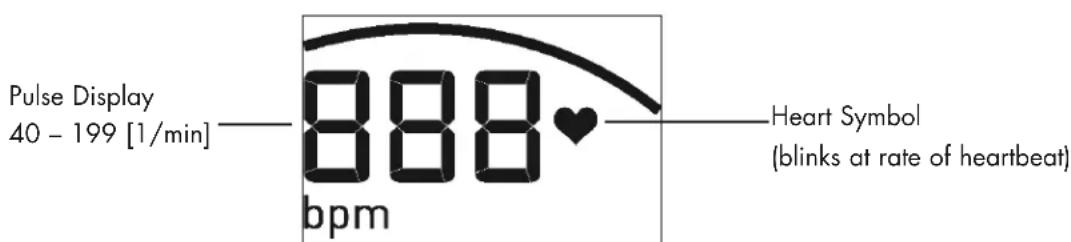
Pulse
Stroke rate
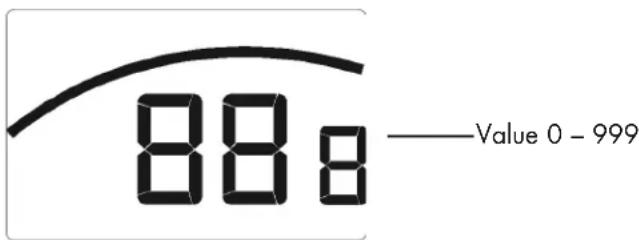
Stroke frequency

Battery Charge

Battery charge is no longer sufficient for pulse measurement.
Change Battery. Total Training Time, Entire Course, and specifications are lost when battery is changed.
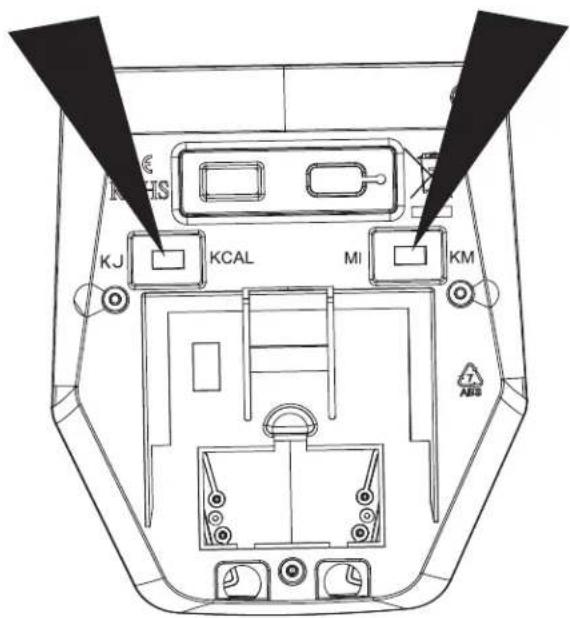
The displays kcal or kJoule and miles or km are set with the slide switches on the reverse side. Changes are made by pressing the Reset key.
1 oar stroke = 5m
Training and Operating Instructions

Quickstart (for basic orientation)
Without Specific Settings
Press a key
Display:
- All segments are briefly displayed. (Segment Test)
The total hours and kilometers are briefly displayed.
Thereafter, change to the display "Training Readiness"
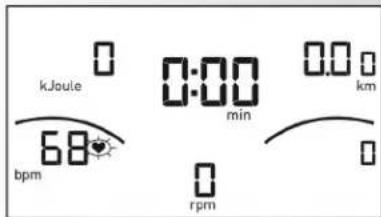
Training Readiness
Display:
- All areas display "zero" except pulse (if active)
Start training by oar stroke
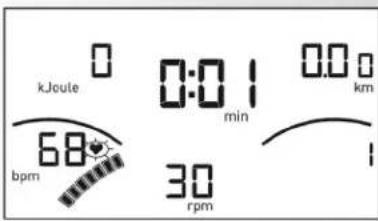
Training Start
Display:
stroke frequency is displayed
- Distance, our strokes, Energy and Time: count goes upwards.
- Pulse (if active)
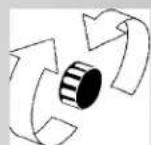
Brake Adjustment:
- By turning to the right the brake level is raised, and by turning to the left it is reduced.
Training Pause or End
At Training Pause or End, Average Values from the last training unit are displayed with the symbol. Display
Average Values () stroke frequency
Total Values Energy, Distance, Time and oar strokes
- Current Pulse (if active)
Standby Mode
Device switches to Standby mode 4 minutes after Training End.
Press any key; Display begins again with Segment Test, display of total hours, total kilometers and training readiness.
Training
1. Training Without Settings
- Press any key
and/or - oar stroke (as under Quickstart)
2. Training With Settings
display: "Training Readiness"
- Press " settings area
Time Setting (min)
With "Plus +" or "Minus -", enter value (e.g., 30:00)
onfirm with "
Display: next menu "COURSE"
Setting Course (miles or km)
With "Plus +" or "Minus -", enter value (e.g., 7.5)
Confirm with
Display: next menu "ENERGY"
Setting Energy (kcal or KJoule)
With "Plus +" or "Minus -", enter value (e.g., 780)
Confirm with "
Note:
The settings are saved.
- Start training by our stroke
In settings, count goes downwards.
Training Pause or Training End
With less than 10 oar strokes/min., the device's electronics recognize a Training Pause.
The Training Data is displayed for 4 minutes. If, during this time, you press no keys and do not train, the electronics will switch to Standby mode.
Training Resumption
If Training is continued within 4 minutes, the last values will be further counted or counted down.


Training and Operating Instructions
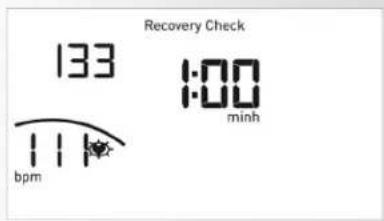


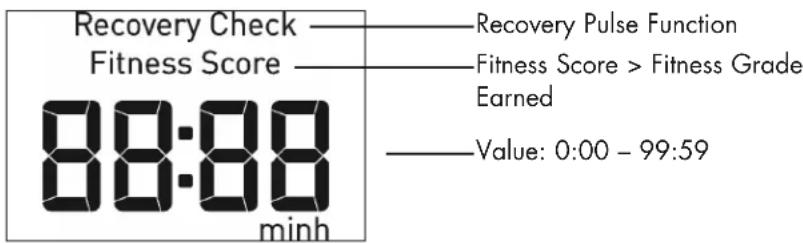
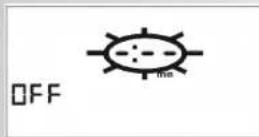
RECOVERY - Function
Recovery Pulse Measurement
At Training End press RECOVERY.
Display
- Recovery Check
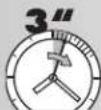
Your pulse is measured electronically in a 60 second countdown. Under "Energy", the active pulse (P1) is displayed.
Display
Fitness Score
After the time returns to its original position (rewinds), the Fitness Score (for example, 3.3) is displayed under Fitness Score.
The display will end after 20 seconds.
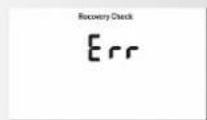
RECOVERY interrupts the Recovery Pulse function or Fitness Score display.
If no pulse is registered, the error message "Err"
General instructions
System signals
Activation of the device
If you activate the device, a signal is emitted during the segment test.
Preseting
A short signal is emitted, if you reach a preset like time, distance and KJoule/kcal.
Exceeding of maximum pulse
If the set maximum pulse is exceeded by one pulse beat, two short signals are emitted for the time of exceedance.
Recovery
Calculation of the fitness mark (F):
$$ \operatorname {m a r k} (\mathbf {F}) = 6. 0 - \left(\frac {1 0 \times (\mathrm {P} 1 - \mathrm {P} 2)}{\mathrm {P} 1}\right) ^ {2} $$
P1 stress pulse P2 = recovery pulse
F1.0 = very good F6.0 = insufficient
Calculation of average value
The calculations of the average values refer to training units in the past until a reset or the sleep mode.
Instructions for pulse measurement
The pulse measurement starts as soon as the heart in the display blinks in time with your pulse beat.
With cheast strap
Please observe the corresponding instructions.
Malfunctions or erroneous readings
After inserting the batteries and in case of faults or erroneous readings press the " 串 button for longer (Reset).
Exercising
The KETTLER rowing machine provides all of the advantages of "real life" rowing without the trouble or expense of "taking to the water". Rowing is a sport that improves not only the performance of the cardio-vascular system, but also improves stamina and endurance. The following points should be observed before commencing a course of training:
Important
Before commencing a course of training, have your family doctor check that you are fit enough to exercise with the Kettler SITUS ROWER 5+ . The result of the medical check-up should be used as a basis for planning the exercise programme. The following directions are only to be recommended to healthy persons.
The advantages of rowing
As mentioned above, rowing is an excellent way to increase the efficiency of the cardio-vascular system. It also improves the ability to absorb oxygen. In addition, rowing is also suitable for "burning off" fat by calling up the fat reserves (in the form of fatty acids) to be transformed into energy.
Another important advantage of rowing lies in the strengthening of all of the body's important muscle groups, whereby the strengthening of the back and shoulder muscles can be considered especially beneficial from the orthopaedic point of view. The strengthening of the back muscles can help prevent such orthopaedic problems as are encountered all too often nowadays. Exercising with the Kettler SITUS ROWER 5+ is therefore a comprehensive way to exercise. It improves endurance and strength while at the same time not putting the joints under stress.
Which muscles are called on
he movements in the rowing exercise call on all of the body's musclegroups. Although some are concentrated upon more than others. These groups are shown in the lower illustration.
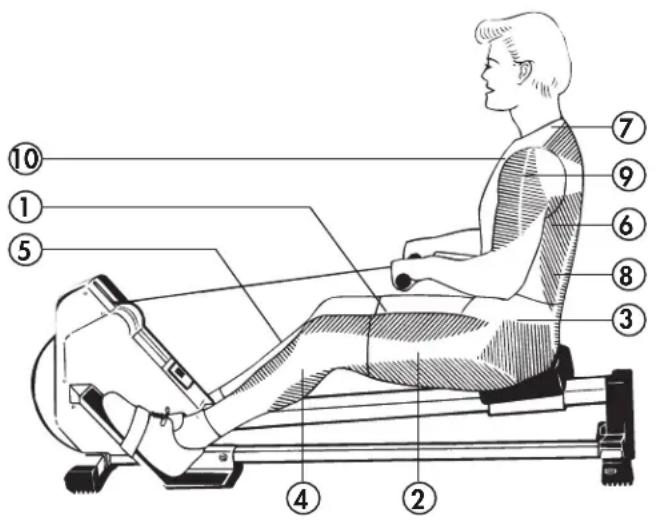
As can be seen in the illustration, rowing activates the upper and lower body to the same extent. In the legs, rowing exercises the extensors (1), the flexors (2) and the shin and calf muscles (5, 4). The movement of the hips also calls on the seat (gluteus) muscles (3).
In the torso region, rowing calls primarily upon the latissimus (6) and the erectors (8), but also on the trapezius (7), the deltoid (9) and the arm extensor muscles (10).
The Kettler SITUS ROWER 5+ can also be used for other special exercises to concentrate on further muscles groups. These are described in one of the following sections.
Planning and controlling your rowing
The basis for planning your course of exercise should be your actual state of fitness. Your family doctor can put you through an endurance test to determine your physical performance. The results of the test should be used to plan your exercise programme. If you do not go through an endurance test, you should avoid excessive exercising stresses at all costs. The following principle should be follow in your planning; endurance training can be controlled as much by the extent of effort as by the level of effort and the intensity.
Exercise intensity
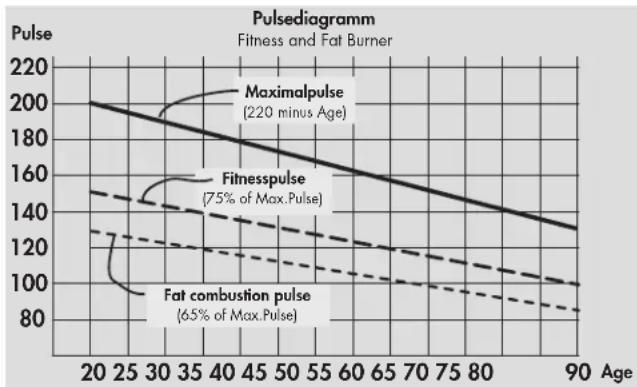
The effort intensity when rowing can be determined by checking the pulse. The intensity of the rowing exercises can be varied on the one hand by altering the number of strokes per minute, and on the other by altering the resistance of the tension device. The intensity increases both when the stroke rate is increased, and when the resistance in the tension device is increased.
Beginners should therefore avoid exercising at high stroke rates or at high resistance levels. The optimum stroke rate and level of resistance should be determined using the recommended pulse rate (see Pulse diagram), which should be checked three times during each session. Before starting, check the resting pulse, about 10 minutes into the session check the effort pulse (which should be in the region of the recommended level), and after finishing exercising, check the recovery pulse.
Regular exercising will soon show a reduction in both the rest and the effort pulse rates. This can be taken as a sign for the positive effects of the endurance training. The heart is beating more slowly and more time is available for the heart to take in blood and for the blood to circulate through the heart's own muscles.
Extent of exercise
By extent of exercise, we refer to the length of the exercise sessions and their frequency per week. Experts consider the following extent of exercise to be especially effective:
Training frequency Duration of training
daily 10 minutes
2-3 times a week 20-30 minutes
1-2 times a week 30-60 minutes
Exercise sessions of 20-30minutes/30-60 minutes are not suitable for the beginner. The beginner should increase his/her extent of exercising only gradually, with the first blocks being kept relatively short. Block exer cising can be looked upon as a good variation at the beginning.
A typical beginner's programme for the first 4 weeks could be something like the following:
Training frequency Length of exercise blocks
1st/2nd week
Sessions per week three 3 minutes rowing
1 minute break
3 minutes rowing
1 minute break
3 minutes rowing
3rd/4th week
Sessions per week four 5 minutes rowing
1 minute break
5 minutes rowing
Following these 4 weeks of beginner's exercising, the blocks can be extended to 10 minutes of continuous rowing without a break. If 3 weekly sessions of 20-30 minutes are preferred (at later stages), a free day should be planned between each two days with exercise.
Accompanying gymnastic exercises
Gymnastik exercises are an ideal complement to rowing. Always do warming-up exercises before starting rowing. Activate the circulation with a few minutes of easy rowing (10-15 strokes per minute). Stretching exercises should then be carried out before the real rowing exercise is started.
Easy rowing should also be done at the end of the session, with further stretching exercises during the cooling-down period.
FR
Table des matieres
Instructions succinctes
(appuyer brievement)
Instructions succinctes

- Safety instructions 12
- Brief Description 13
- Quickstart (basic orientation) 16
- Training
- General Information
- Instructions on Pulse Measurement 19
- Malfunctions
- Training Manual
- Safety instructions
- Please observe the following instructions for your own safety:
- For Your Safety:
- Brief Description
- Instructions (in brief)
- Function Area
- (press quickly)
- Reset (press longer)
- Plus +/Minus -
- RECOVERY
- Chest strap
- Training and Operating Instructions
- Operating Instructions (in brief)
- Energy Consumption
- Training Time
- Course
- Pulse
- Stroke rate
- Stroke frequency
- Battery Charge
- Quickstart (for basic orientation)
- Training Readiness
- Training Start
- Training Pause or End
- Standby Mode
- Training Without Settings
- Training With Settings
- Time Setting (min)
- Setting Course (miles or km)
- Setting Energy (kcal or KJoule)
- Note:
- Training Pause or Training End
- Training Resumption
- RECOVERY - Function
- Recovery Pulse Measurement
- General instructions
- System signals
- Preseting
- Calculation of average value
- Instructions for pulse measurement
- With cheast strap
- Malfunctions or erroneous readings
- Exercising
- Important
- The advantages of rowing
- Which muscles are called on
- Planning and controlling your rowing
- Exercise intensity
- Extent of exercise
- Accompanying gymnastic exercises
- FR
- Table des matieres
- Instructions succinctes
- (appuyer brievement)
Brand : KETTLER
Model : Rower 2.0
Category : Rowing Machine