
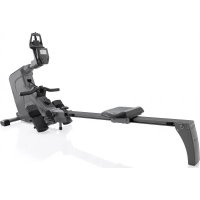
Regatta 300 - Rowing Machine KETTLER - Free user manual and instructions
Find the device manual for free Regatta 300 KETTLER in PDF.
| Product Type | Rowing Machine |
| Brand | Kettler |
| Model | Regatta 300 |
| Dimensions (L x W x H) | Approximately 210 x 55 x 75 cm (estimate) |
| Weight | Approximately 35 kg (estimate) |
| Power Supply | 2 AA 1.5 V batteries |
| Resistance | Manual adjustment via rotary knob |
| Braking System | Magnetic (estimate) |
| Training Computer | Display: time, distance, strokes/min, pulse, kJ/kcal, activity, time/500m |
| Bluetooth | Bluetooth 4.0 for apps and heart rate sensor |
| Heart Rate | Compatible with Bluetooth chest strap |
| Seat Adjustment | Height adjustable with quick-release clamp |
| Non-slip Feet | Yes, for stability |
| Transport | Integrated transport wheels |
| Units | Switch for km/miles and kJ/kcal |
| Compatible Apps | KETTMAPS (iOS/Android), others via Bluetooth |
| Max User Weight | Approximately 130 kg (estimate) |
| Maintenance and Cleaning | Clean with a damp cloth, avoid abrasive products |
| Safety | Clear area of at least 1 meter around; do not use alone without supervision |
| Spare Parts and Repairability | Available on request from the manufacturer |
| Warranty | 2 years (parts and labor) |
Frequently Asked Questions - Regatta 300 KETTLER
User questions about Regatta 300 KETTLER
0 question about this device. Answer the ones you know or ask your own.
Ask a new question about this device
Download the instructions for your Rowing Machine in PDF format for free! Find your manual Regatta 300 - KETTLER and take your electronic device back in hand. On this page are published all the documents necessary for the use of your device. Regatta 300 by KETTLER.
USER MANUAL Regatta 300 KETTLER
Computer/training instructions, handling, biomechanics
ENGLISH 15
TrAININGsNAVIGATION....4
verNeTzTes Training 7
BeFÜLLUNG WAsserTANK (NUr REGATTA 500)....7
sTANDOrT Des GerÄTes 8
COCKPITversTellUNG....8
AUFsTelleN UND BeWeGen Des GerÄTes 9
TrAININGsANIeITUNG.... 10
BIOMeCHANIK 13
natural_image
Close-up of a black electronic device with a white arrow pointing to its top panel (no visible text or symbols)BLUETOOTH FUNKTIONEN
natural_image
Mechanical assembly diagram showing a linkage mechanism mounted on a base plate with two downward arrows indicating motion or force directions (no text or symbols present)natural_image
Mechanical assembly diagram showing three stages of a vehicle chassis frame with no visible text or symbolsAUFsTelleN UND BeWeGeN Des GerÄTes
1 Aufstellen

natural_image
Diagram showing a mechanical device with an arrow pointing to its left side, no text or symbols present.2 Bewegen

natural_image
Line drawing of a person pushing a lawn mower with directional arrows indicating movement (no text or symbols)TRAININGSANLEITUNG
natural_image
Person performing a stationary exercise on a treadmill, no text or symbols visible
BAsICs of oPeRAtion.... 16
tRAInInG nAVIGAtlon 17
eXPLAnAtlon of tHe tRAInInG PARAMeteRs 18
ADJUstInG tHe Units.... 19
BLUetootH FUnCtlons 19
tRAInInG on tHe netWoRK 20
FILLInG tHe WAteR tAnK (REGATTA 500 onLY) 20
LoCATlon of tHe MACHINE 21
CoCKPlt ADJUstMent 21
settInG UP AnD MoVInG tHe MACHIne 22
tRAInInG InstRUCtlons.... 23
BloMeCHAnICs 26
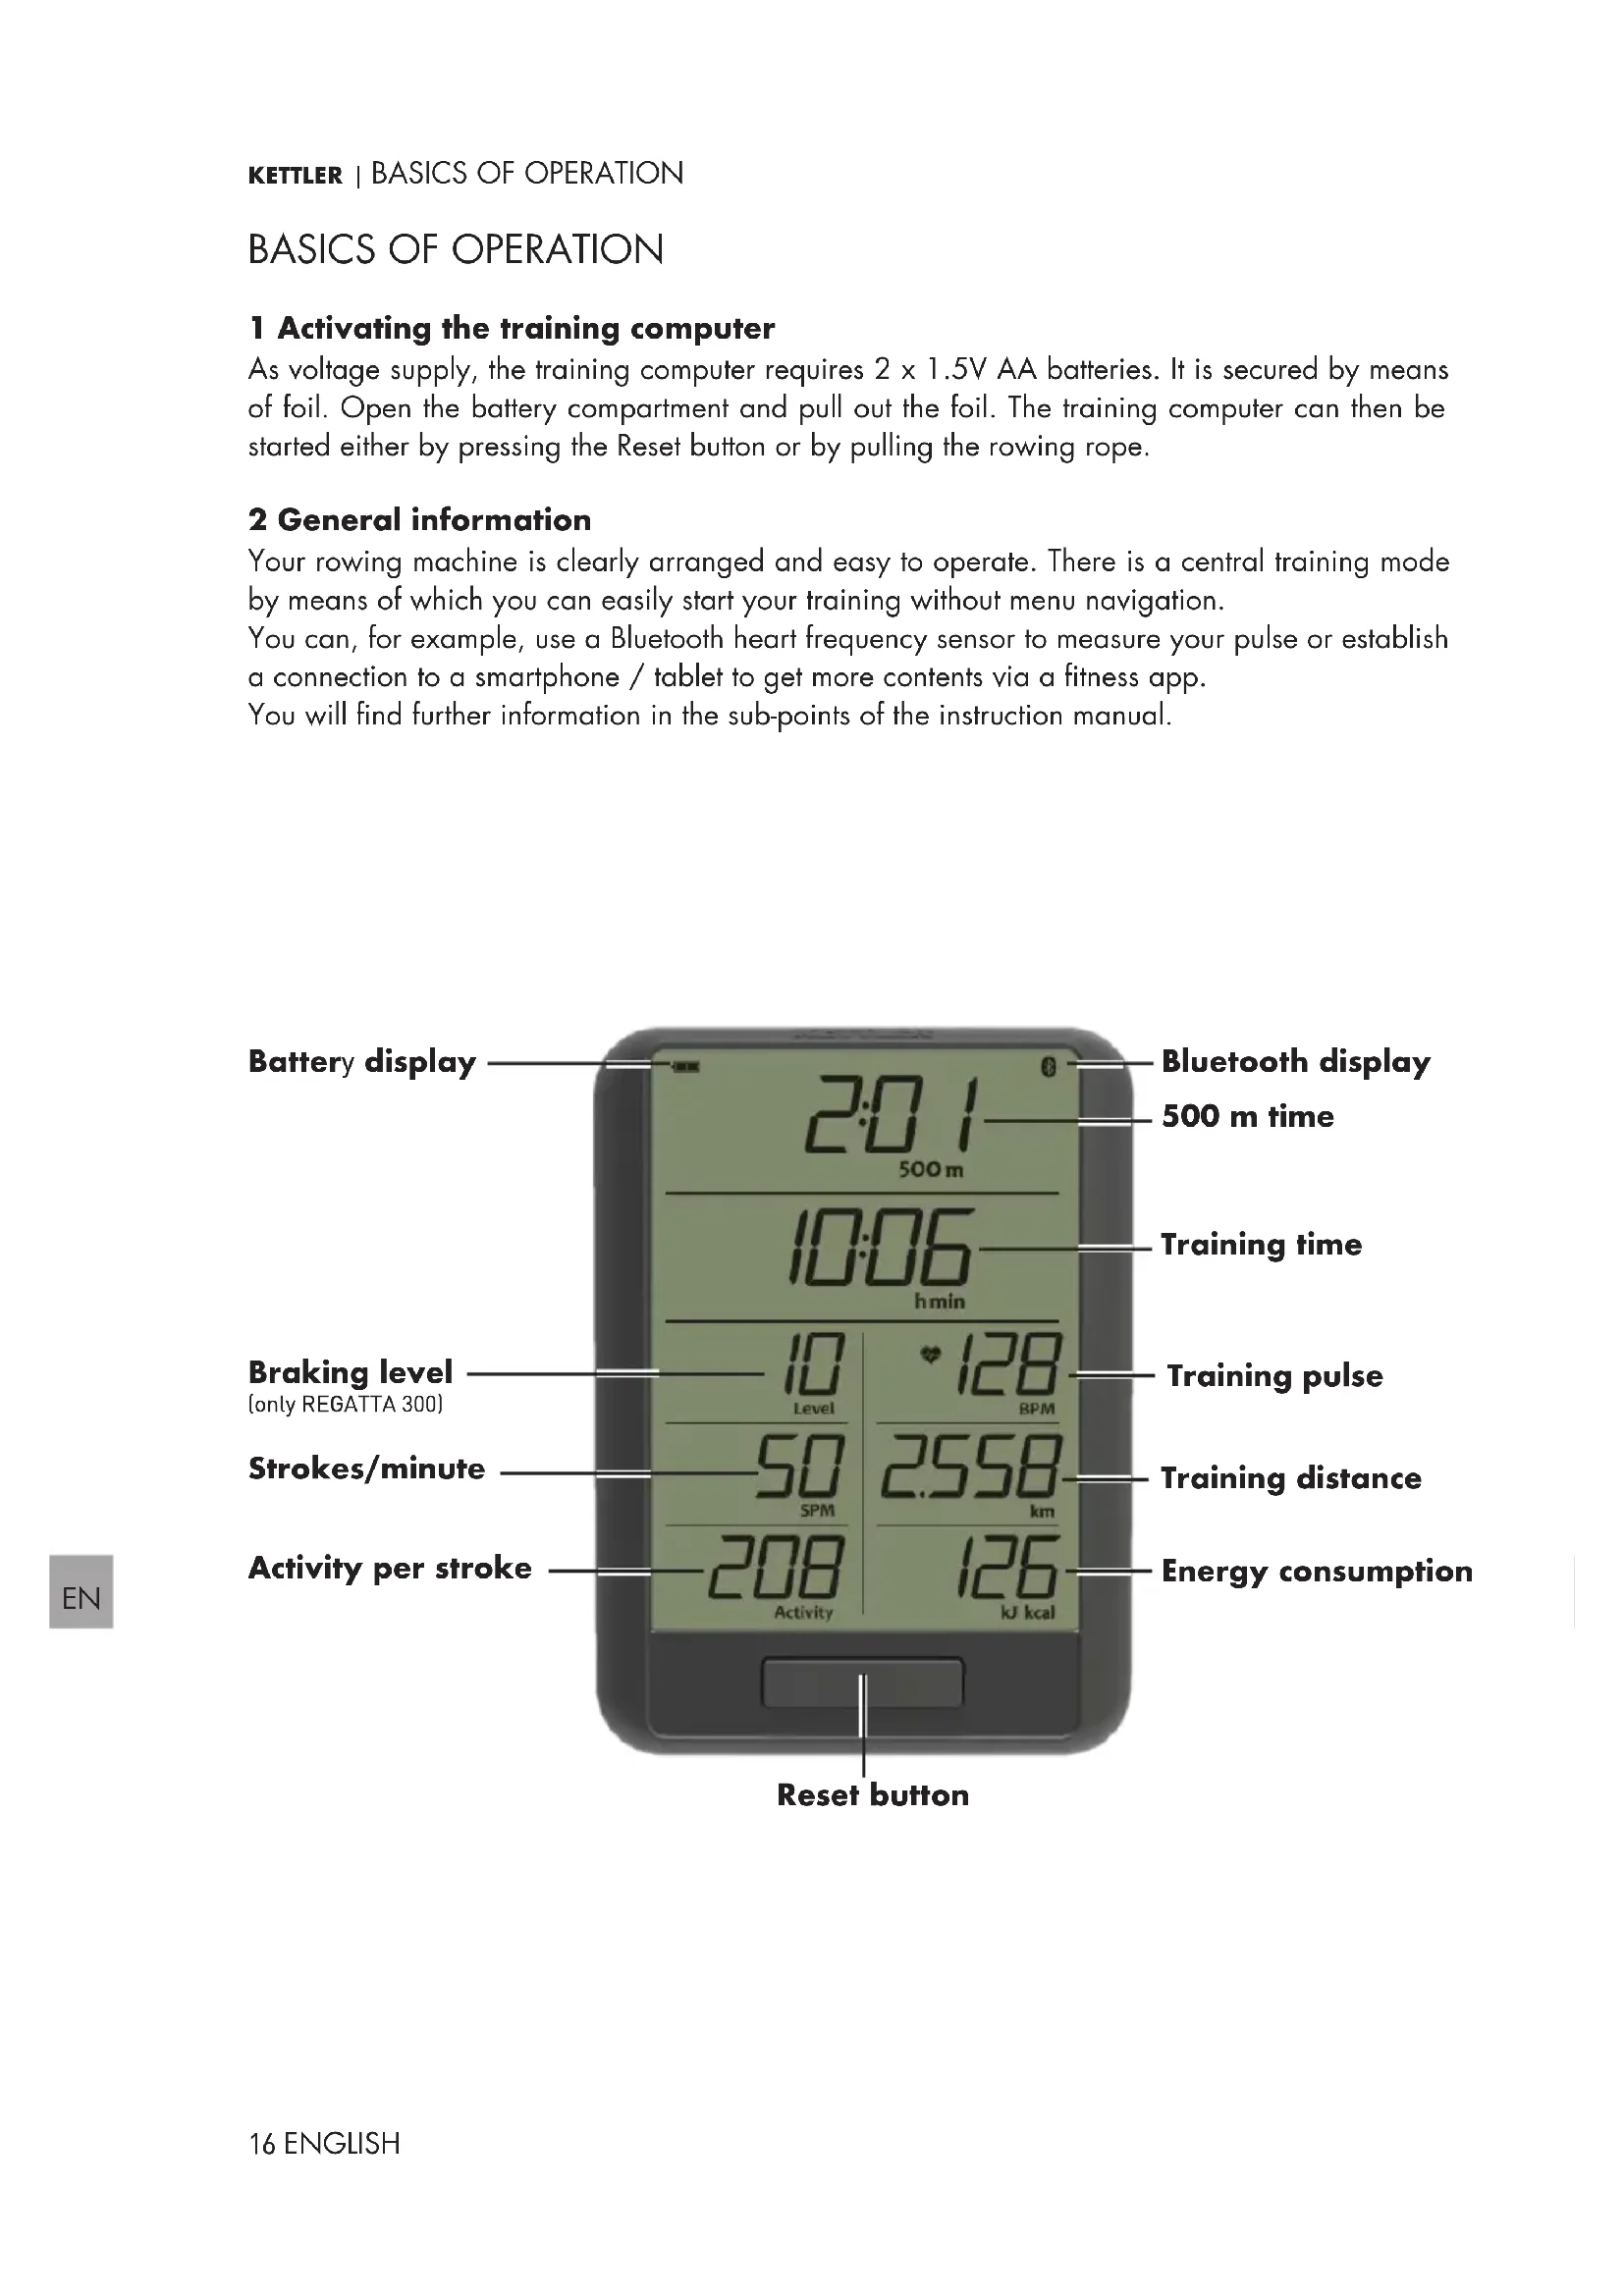
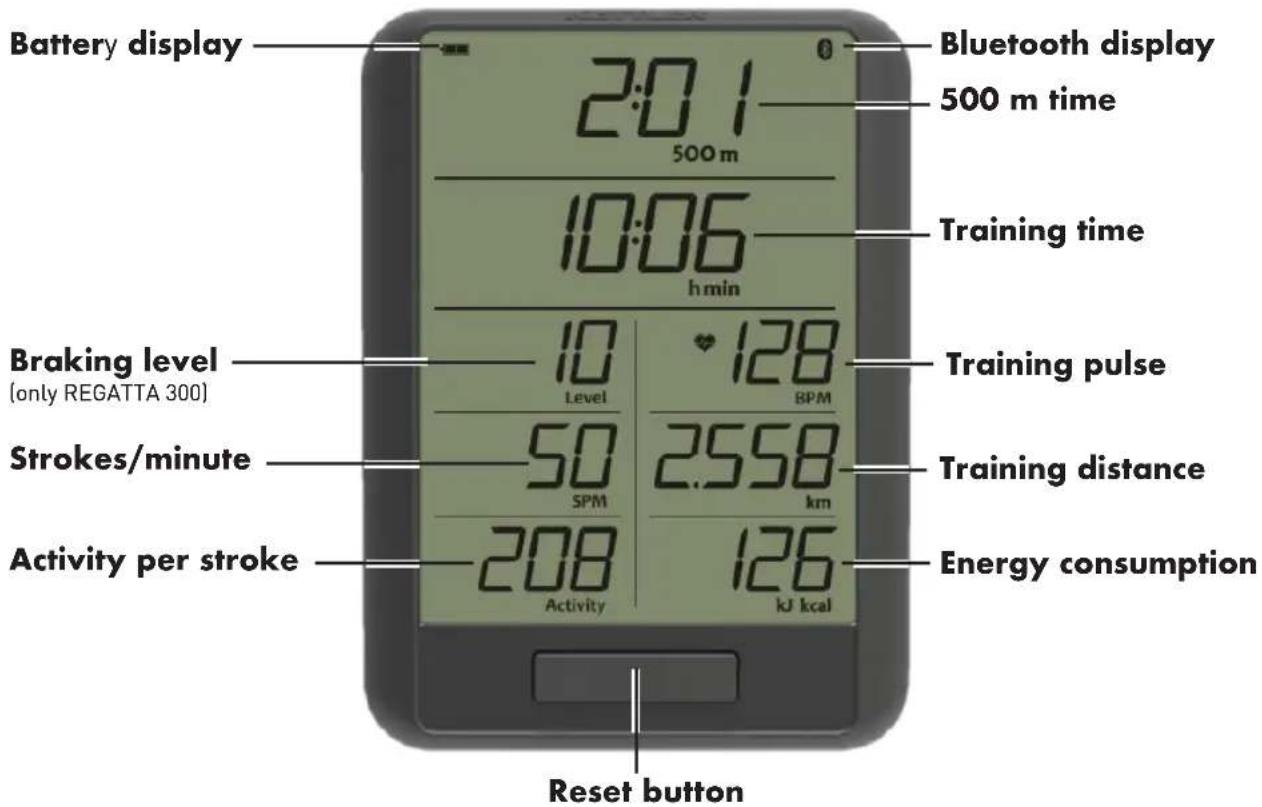
BASICS OF OPERATION
1 Activating the training computer
As voltage supply, the training computer requires 2 x 1.5V AA batteries. It is secured by means of foil. Open the battery compartment and pull out the foil. The training computer can then be started either by pressing the Reset button or by pulling the rowing rope.
2 General information
Your rowing machine is clearly arranged and easy to operate. There is a central training mode by means of which you can easily start your training without menu navigation.
You can, for example, use a Bluetooth heart frequency sensor to measure your pulse or establish a connection to a smartphone / tablet to get more contents via a fitness app.
You will find further information in the sub-points of the instruction manual.
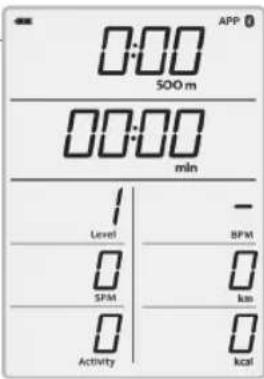
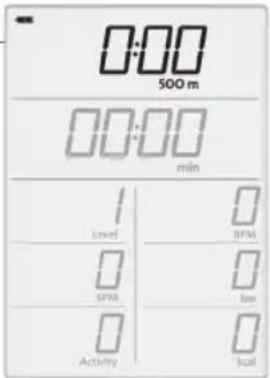
TRAINING NAVIGATION
Once you have switched the computer on, the welcome screen appears. After three seconds, this screen automatically takes you to the training mode, in which you can begin your training.
1 Starting the training
You are just about to start your training. The display shows all training data. All values – except for the resistance level and the pulse display – start at zero. As soon as the first oarstroke is detected, the training begins and the training time starts. Change your resistance manually using the hand knob.
Decide whether you want to establish a connection to the computer via Bluetooth or complete a free training. For more information regarding the Bluetooth connection please refer to Bluetooth functions.
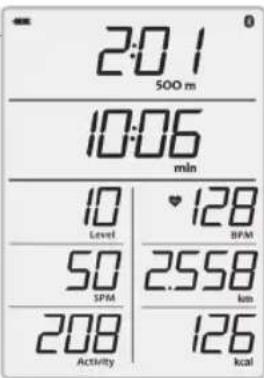
2 Training
The training mode gives you an overview of all necessary training data. If you stop the training, you will find yourself in pause mode. The training is ended by briefly pressing the Reset button. This will take you back to the training start.
If you wear a Bluetooth chest belt or heart frequency sensor, the training computer will automatically establish a connection to the sensor. For more information please refer to the following under Bluetooth functions.
3 Pause
As soon as the rowing machine no longer detects any strokes during the training, you find yourself in the pause mode and average values will be displayed for the 500 m time, for the number of strokes per minute and for the training activity. The training data of energy consumption, the distance covered, the resistance level and the time remain the same. The pulse display constantly shows the current training pulse. Continue your training with a new oarstroke.
4 Standby
Holding down the Reset button switches off the training computer. After more than 4 minutes without using the training display, it also switches off automatically. Awaken the display be pressing the Reset button once again.
Note: After a pause of more than 4 minutes, the training values will start at zero. If the pause is shorter, the data from the previous training will be continued.
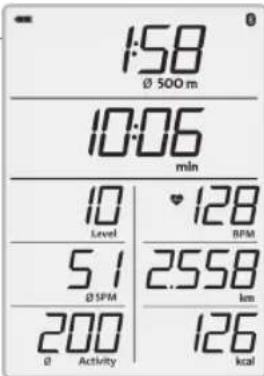
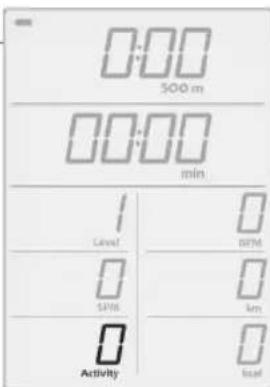
EXPLANATION OF THE TRAINING PARAMETERS
You can read off the training values from the training display during rowing. The following is a short explanation:
1 500m
In the marked field of the display, you are shown the time that you need for 500 m. It serves as reference for your speed.
2 BPM and SPM
The BPM value tells you the number of pulse beats per minute and SPM is the number of your strokes per minute.
Warning: Heart rate monitoring systems can be inaccurate. Excessive training can lead to serious injuries or to death. If you feel faint, the training is to be interrupted immediately.
3 Activity
The field signals you an average activity per stroke. It is, amongst others, dependent on the stroke frequency of your stroke and the braking resistance and serves as comparison between the strokes.
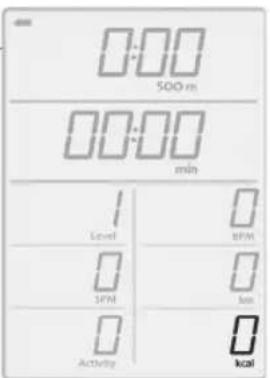
4 KJ/ Kcal
The value "kj" or "kcal" informs you about the cumulated energy consumption of the current training session.
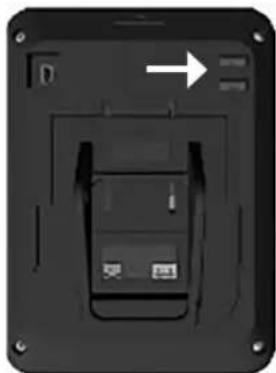
ADJUSTING THE UNITS
On the backside of the display, there are two slide switches by means of which you can adjust your preferred length and energy units. Push the switch to the right and the display will show you kilometres as length unit and kilocalories as energy unit. The left switch position will indicate the energy in kilojoules and the length in miles.
natural_image
Back view of a black electronic device with a white arrow pointing to a component, no visible text or symbols.BLUETOOTH FUNCTIONS
You can pair the KETTLER rowing machine with a heart rate monitor device such as a chest strap which supports Bluetooth® low energy technology. Additionally, the KETTLER rowing machine can be connected to smartphones, tablets and computers as of Bluetooth v4.0, which enables training with a variety of fitness APPs or computer software.
Only one of the two mode can be selected at one time.
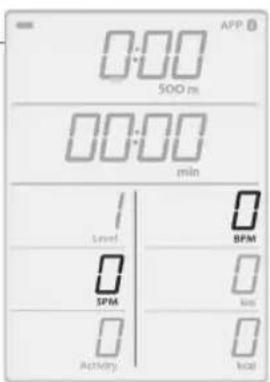
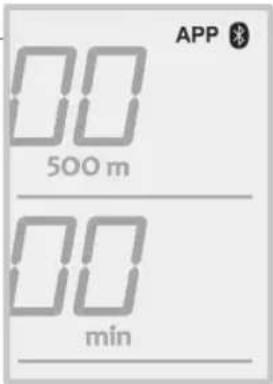
1 Use of the APP mode
Before the training, the Bluetooth symbol flashes. If you want to connect your training computer to a smartphone and a corresponding app, search the rowing machine in the smartphone / tablet before starting the training. As soon as a connection has been established, the Bluetooth symbol and the APP symbol will moreover be permanently lit. Your training can begin in APP mode.
If you are in APP mode, a Bluetooth heart rate sensor cannot be connected additionally via the training computer.
TIP: If you do not want to do without your heart rate display, connect your sensor directly to the smartphone or tablet.
Use of the pulse mode (HR sensor)
If you want to connect a heart frequency sensor to the training computer, start your training as described in the first steps and wait until the corresponding heart signal becomes visible in the training display. This process may take several seconds.
Ensure that your pulse sensor is active and that you are wearing it on your body as specified.
The training computer will look for your sensor in the direct vicinity and will the automatically establish a connection to it. If your signal is lost, the computer will look for devices and re-establish a connection at an interval of few minutes.
Repeat this process in the case of a new training session.

TIP: Your heart frequency sensor will only be automatically found and connected during the training.
KETTLER | TRAINING ON THE NETWORK
For everyone who is looking for a special training motivation.
Use of the KETTMAPS APP
With KETTMAPS, you can load many video-realistic distances as training motivation onto your smartphone or tablet. Even the free basic version offers several distances. For a small monthly fee, you will gain full access to the data base with several thousands of distances. Even personal distance videos can be uploaded and added to the data base. The connection can be done via Bluetooth or via the front camera of your smartphone or tablet which is able to read your velocity. You will find the APP in the Apple Store or in the Google Play Store under KETT-MAPS.

As soon as further apps are compatible with your KETTLER rowing machine, you will be informed at www.kettlersport.com.
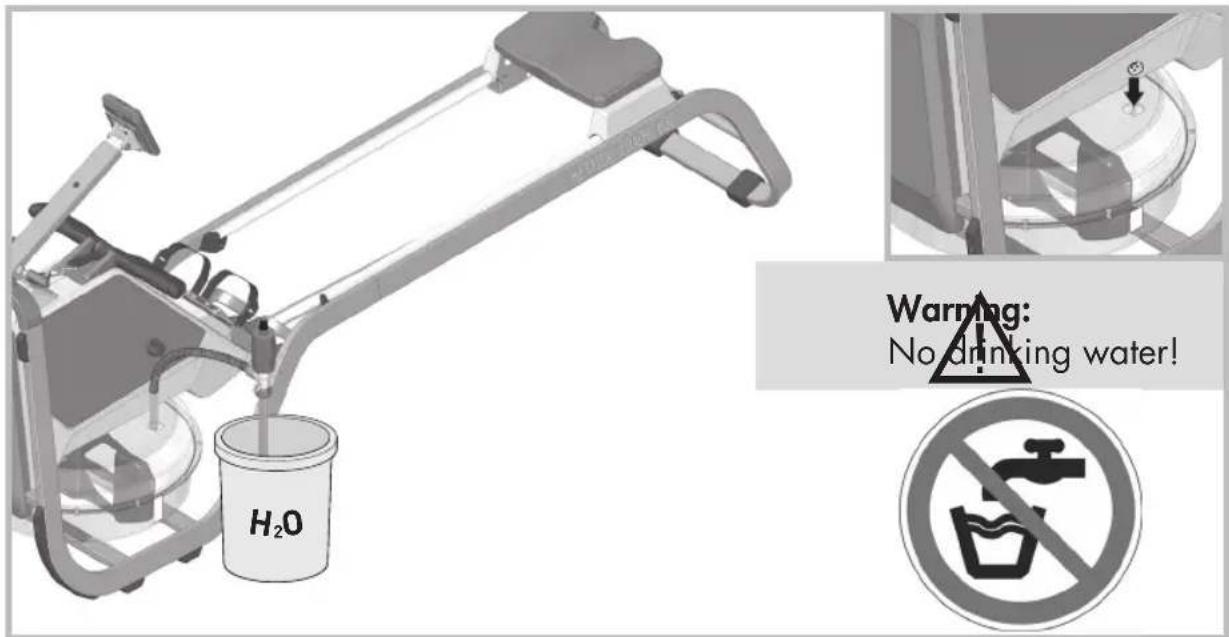
FILLING THE WATER TANK (REGATTA 500 ONLY)
Please use the supplied pump to fill and drain the water tank. Ideally, the tank should only be filled with distilled water (alternative: tap water) and the water level must always be within the marked scale. For this purpose, remove the plug from the tank surface, insert the pump through the opening and pump water from another tank into your rowing machine. In order to protect the device from bacteria, algae or the like when using it with tap water, you should always dissolve a chlorine tablet in the water. It is recommended to replace the chlorine water with new water every 3 to 6 months. If the water still changes its colour, it has to be replaced immediately.
The rowing machine must be positioned on an even, stable surface.
natural_image
Mechanical assembly diagram showing a linkage mechanism mounted on a base plate with two downward arrows indicating motion or force directions (no text or symbols present)The location of the machine must be chosen so that sufficient safety distances to obstacles are ensured. It should not be set up in direct proximity to main walking directions. The free area must be at least 1 metre larger than the exercise area all around.
Ensure that no-one other than the person training is in the free area as long as the machine is in motion.

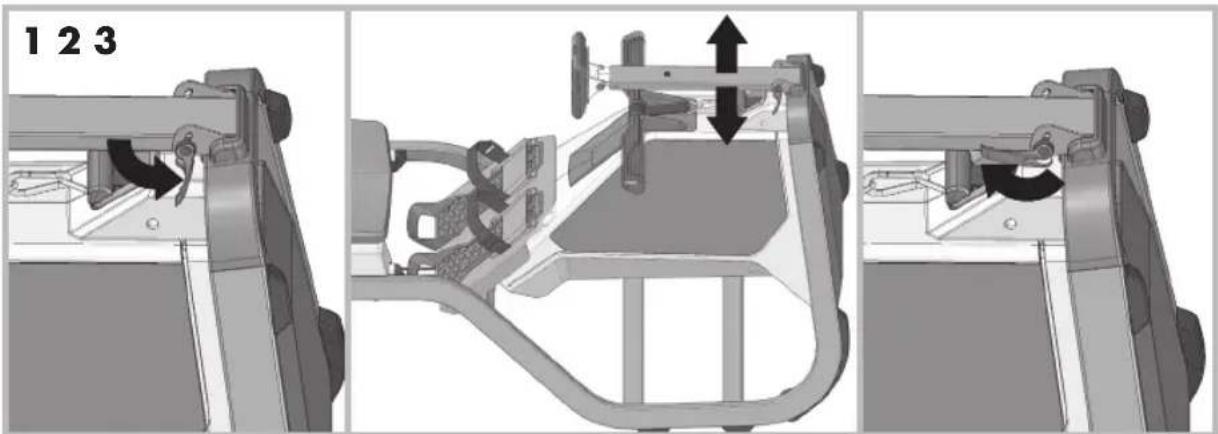
COCKPIT ADJUSTMENT
Release the quick clamp (1) to adjust the cockpit to the desired height (2). Then lock the quick clamp into place again (3).
natural_image
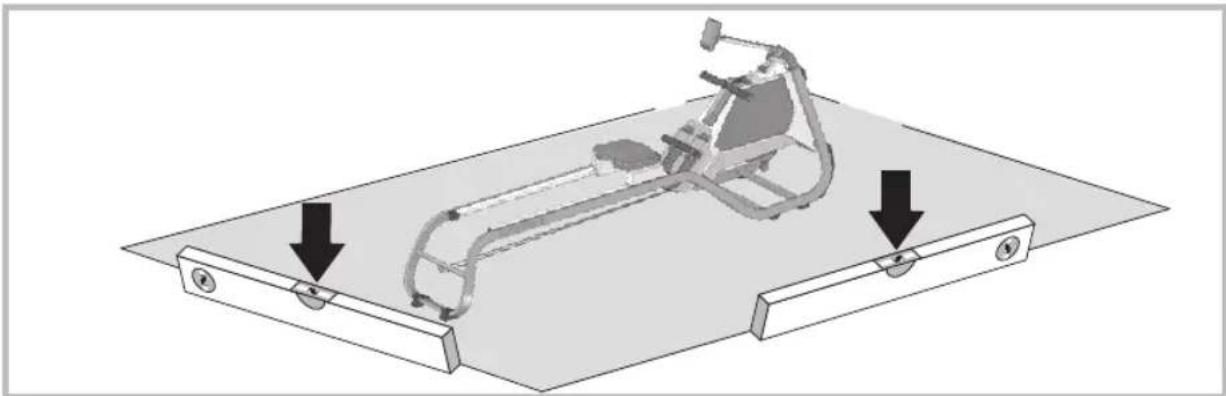
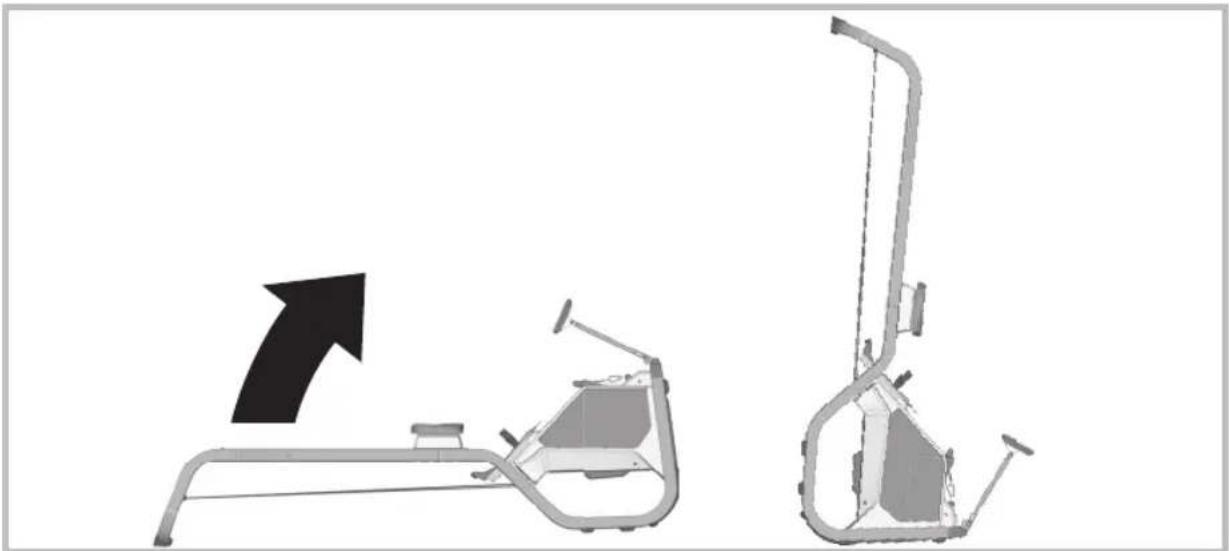
Mechanical assembly diagram showing three stages of a vehicle chassis frame with no visible text or symbolsKETTLER | settInG UP AnD MoVInG tHe MACHIne
settInG UP AnD MoVInG tHe MACHIne
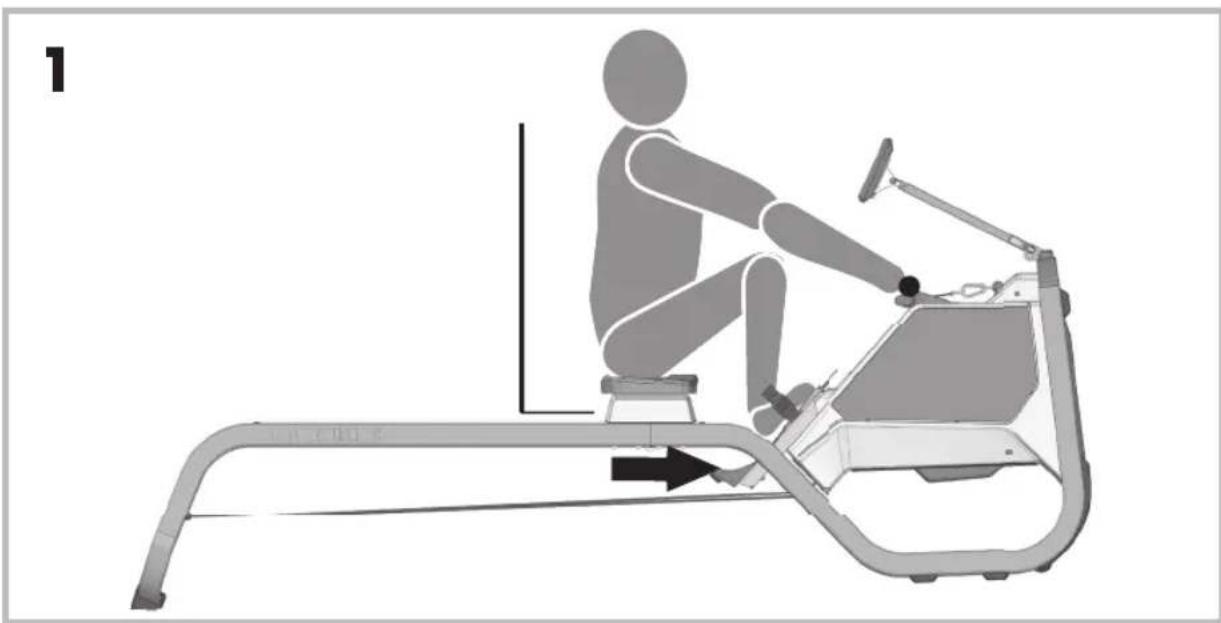
1 Setup

natural_image
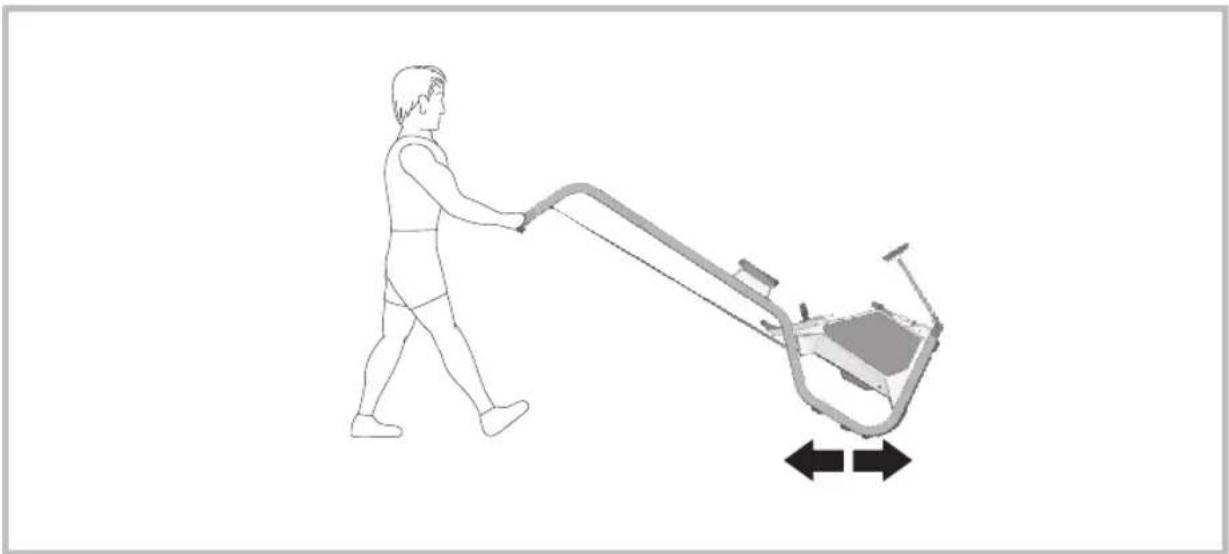
Diagram showing a mechanical device with an arrow pointing to its left side, no text or symbols present.2 Moving
natural_image
Line drawing of a person pushing a lawn mower with directional arrows indicating movement (no text or symbols)TRAINING INSTRUCTIONS
Advantages of rowing training
Rowing increases the efficiency of the cardiovascular system and also improves the body's oxygen intake capacity. Further, one can achieve fat reduction, since due to the endurance training an increased amount of fatty acids are used to supply energy. Another advantage of rowing training is that all the important muscle groups of the body are strengthened. From an orthopaedic perspective, the strengthening of the back and shoulder muscles produced by the rowing training can be mentioned as being particularly valuable. The strengthening of the back muscles in particular counteracts the orthopaedic problems in this area that frequently occur nowadays. Hence, training with a rowing machine constitutes comprehensive fitness training. It increases endurance and strength and is joint-friendly.
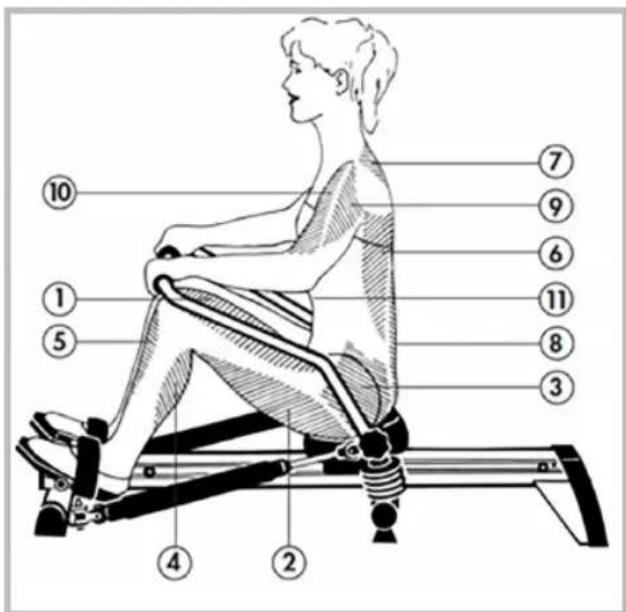
Which muscles are called into action?
The rowing exercise puts pressure on the body's entire musculature. However, a few muscle groups receive particular training. These are shown in the illustration.
As the illustration shows, rowing activates the upper and lower body. Within the leg muscles, rowing places particular demands on the leg extensor (1), the biceps femoris (2) as well as the shin and calf muscles (5, 4). Due to the hip-stretching movement, pressure is also placed on the gluteal muscles (3) in rowing. In the area of the trunk musculature, rowing activates primarily the wide back muscle (6) and the musculus erector spinae (8). Further, one trains the trapezius (7), the deltoid (9), the brachialis (10) and the muscles of the abdomen (11).
Planning and controlling your rowing training
The basis for training planning is your current physical performance level. Your doctor can diagnose your personal ability with an exertion test which can form the basis for your training planning. If you have not undergone an exertion test, you should avoid high training exertion in any circumstances. You should note the following for your planning: Endurance training is also governed by the scope of exertion as well as the level/intensity of exertion.
Training intensity
The exercise intensity can be controlled by your heart rate during rowing training. The maximum heart rate per minute corresponds to a pulse rate from the difference of 220 and your age. Under no circumstances should you exceed this pulse rate during the training.
Training recommendation
For the optimal training management, training in the following pulse zones is recommended:
60-70% of the maximum heart rate
- Increase in basic endurance and regeneration
- With this exertion, the body gains the greatest share of the required energy from the burning of fat
- Pleasant, calm breathing, low muscular exertion, light sweating
- Recommended for everyone
80-90 % of the maximum heart rate
- Increase of maximum performance ability
- Muscular fatigue and high breathing rate
- The body can no longer cover the oxygen requirements; suitable for very fit persons and short training units.
On the one hand, the intensity of rowing machine training is governed by the beat, and on the other hand, by the resistance of the cable. As the beat rises, the intensity of the training increases. It also increases if the resistance is increased. As a beginner, choose a low intensity, i.e. the pulse rate should be below 20 beats per minute and the resistance should be set low. As a beginner, avoid too high a beat or training with resistance that is too high. Try to find your personal beat and the optimal resistance of the oar cable using the recommended pulse rate.
Advice on manual pulse measurement
Should you train without electronic pulse measurement, check your pulse rate at three points in time during the training. The resting heart rate is established before the training. During the training (approx. 10 minutes after the start of the training), one checks one's exertion heart rate, which, if the correct exercise intensity is deployed, should be close to the training recommendation. A minute after the end of the training, you measure the recovery heart rate. You enter the three values in the table provided for this. Regular training leads to a reduction in the resting and exertion heart rate. This is one of the numerous positive effects of endurance training. Since the heart beats more slowly, more time is available for filling the ventricles and the circulation of the cardiac musculature (through the coronary vessels). Feel your pulse on your carotid or on your wrist whilst extending your thumb. Count your pulse rate for 10 seconds and multiply this figure by 6; this gives you your pulse rate per minute.
Measure your pulse rate at three points in time:
- Before the training = resting heart rate
- 10 minutes after the start of the training = training or exertion heart rate
- One minute after the training = recovery heart rate
If you train regularly, you will see that your recovery heart rate is significantly lower than your exertion heart rate. This is an indicator of good cardiovascular fitness.
The scope of exertion
The scope of exertion is the duration of a training unit and its frequency per week. Sports medical professionals consider the following scopes of exertion to be effective training:
| Training | frequency | Training | duration |
| daily | 10 minutes | ||
| 2 – 3 x weekly | 30 minutes | ||
| 1 – 2 x weekly | 60 minutes |
Training units of 20 – 30 min. are not suitable for beginners. Beginners should increase the scope of exertion of their training only gradually. Make the first training units relatively short. Interval training is considered a favourable variant of beginner training. Beginner training can be arranged in the following way for the first 4 weeks:
| 1st-2nd week | Scope of a training unit | |||||||
| Training 3 | x | frequency weekly | 3 1-minute | minutes break | of | rowing | ||
| 3 1-minute | minutes break | of | ||||||
| 3 | minutes | of | ||||||
| 3rd-4th week | Scope of a training unit | |||||||
| Training 4 | x | frequency weekly | 5 1-minute | minutes break | of | rowing | ||
| 5 | minutes | of | ||||||
After this 4-week beginner training, you can train with the rowing machine for 10 minutes every day without interruption. If, at a later stage, you prefer to do the 3 x weekly training of 20 – 30 minutes, a training-free day should be planned between two training days.
Gymnastics accompanying the training
Gymnastics can be considered an optimal compliment to rowing training. Begin the training with a warm-up phase.
Activate your circulation for a few minutes by doing light rowing exercises (10 – 15 strokes per minute). Then begin with stretching exercises. Then comes the actual rowing training. The training is also ended with light rowing exercises. Stretches complete the warm-down phase.
BIOMECHANICS
To ensure effective and healthy training, the correct position on the machine is essential. Therefore, ensure that you perform your training as depicted in the following sketch.
natural_image
Illustration of a person using an equestrian machine with motion arrows indicating movement (no text or symbols)
To prevent back problems, you should ensure that your back is at no time bent or overstretched. Additionally, your knee, when pulled in, should not be in front of the middle of your foot and your legs should not be overstretched.
Table de MaTières
PriNCiPes de base de FONCTiONNeMeNT 29
NaViGaTiON d'eNTraÎNeMeNT 30
eXPliCaTiON des ParaMèTres d'eNTraÎNeMeNT 31
aJUsTeMeNT des UNiTÉs.... 32
FONCTiONs blUeTOOTH.... 32
eNTraîNeMeNT eN rÉseaU 33
reMPlissaGe dU rÉserVOir d'eaU (UNiQUeMeNT REGATTA500)..... 33
natural_image
Close-up of a black electronic device casing with control buttons and an arrow indicating direction (no readable text or symbols)FONCTIONS BLUETOOTH
L'EMPLACEMENT DE L'APPAREIL
natural_image
Mechanical assembly diagram showing a linkage mechanism mounted on a base plate with two downward arrows indicating motion or force directions (no text or symbols present)natural_image
Mechanical assembly diagram showing three stages of a vehicle chassis frame with no visible text or symbolsiNsTallaTiON eT dÉPlaCeMeNT de l'aPPareil
1 Installation
natural_image
Diagram showing a mechanical device with an arrow pointing to its left side, no text or symbols present.2 Déplacement

natural_image
Line drawing of a person pushing a lawn mower with directional arrows indicating movement (no text or symbols)INSTRUCTIONS D'ENTRAÎNEMENT
natural_image
Person performing a stationary exercise on a treadmill, no text or symbols visible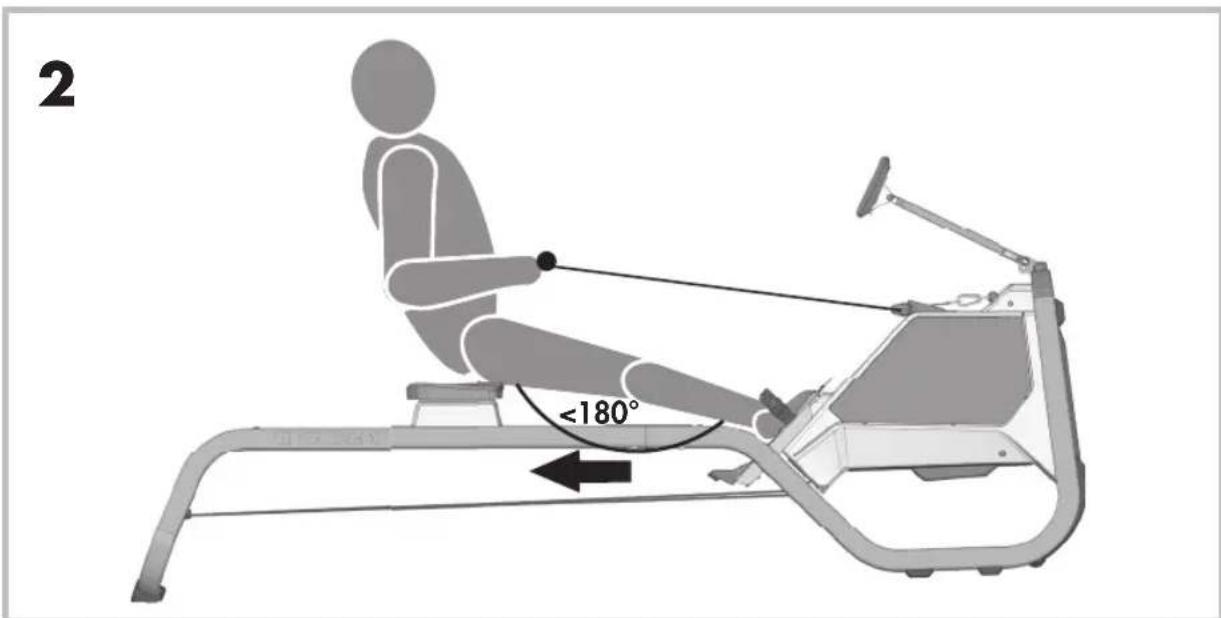

- BLUETOOTH FUNKTIONEN
- AUFsTelleN UND BeWeGeN Des GerÄTes
- Aufstellen
- Bewegen
- TRAININGSANLEITUNG
- BASICS OF OPERATION
- Activating the training computer
- General information
- TRAINING NAVIGATION
- Starting the training
- Training
- Pause
- Standby
- EXPLANATION OF THE TRAINING PARAMETERS
- 500m
- BPM and SPM
- Activity
- KJ/ Kcal
- ADJUSTING THE UNITS
- BLUETOOTH FUNCTIONS
- Use of the APP mode
- Use of the pulse mode (HR sensor)
- Use of the KETTMAPS APP
- FILLING THE WATER TANK (REGATTA 500 ONLY)
- COCKPIT ADJUSTMENT
- TRAINING INSTRUCTIONS
- Advantages of rowing training
- Which muscles are called into action?
- Planning and controlling your rowing training
- Training intensity
- Training recommendation
- 60-70% of the maximum heart rate
- 80-90 % of the maximum heart rate
- Advice on manual pulse measurement
- The scope of exertion
- Gymnastics accompanying the training
- BIOMECHANICS
- Table de MaTières
- FONCTIONS BLUETOOTH
- L'EMPLACEMENT DE L'APPAREIL
- INSTRUCTIONS D'ENTRAÎNEMENT
Brand : KETTLER
Model : Regatta 300
Category : Rowing Machine