
Sprinter 1.1 - Treadmills KETTLER - Free user manual and instructions
Find the device manual for free Sprinter 1.1 KETTLER in PDF.

| Product type | Treadmill |
| Brand | Kettler |
| Model | Sprinter 1.1 |
| Power supply | 230 V, 50 Hz |
| Maximum speed | 16 km/h |
| Speed range | 1.0 - 16.0 km/h |
| Maximum user weight | 110 kg |
| Display | LED: speed, distance, time, calories, heart rate |
| Training programs | Manual (P0), 36 preset (P1-P36), 3 user (U01-U03), BMI, HRC |
| Heart rate control | Hand pulse sensors and HRC programs (1-3) with speed limitation |
| Safety | Safety key with clip and emergency stop |
| Maximum noise level | 75 dB |
| Usage | Home, indoor |
| Belt maintenance | Lubrication every 10 hours or every 2 months |
| Cleaning | Wipe with a soft damp cloth after each use |
| Belt adjustment | Centering and tension via adjustment screws (6 mm Allen key) |
| Folding and moving | Foldable; move by lifting the end |
| Spare parts | Use only original Kettler parts |
| Warranty | Not specified in the manual (consult dealer) |
| Standards | DIN EN ISO 20957-1:2014-05 / DIN EN ISO 20957-6:2017-04, class HC |
Frequently Asked Questions - Sprinter 1.1 KETTLER
User questions about Sprinter 1.1 KETTLER
0 question about this device. Answer the ones you know or ask your own.
Ask a new question about this device
Download the instructions for your Treadmills in PDF format for free! Find your manual Sprinter 1.1 - KETTLER and take your electronic device back in hand. On this page are published all the documents necessary for the use of your device. Sprinter 1.1 by KETTLER.
USER MANUAL Sprinter 1.1 KETTLER
Please read these instructions carefully before installation and first use. They contain
important information for your safety and for the use and maintenance of the appliance. Keep these instructions in a safe place for future reference, maintenance work or ordering spare parts. The training device is intended for
home use only and must only be operated in dry rooms. This symbol indicates an important warning.
FOR YOUR SAFETY
- This appliance can be used by persons aged from 14 years and above and persons with reduced physical, sensory or mental capabilities or lack of experience and knowledge if they have been given supervision or instruction concerning use of the appliance in a safe way and understand the hazards involved.
Children are not allowed to play with the device. Cleaning and user maintenance are not allowed to be carried out by children without supervision.
DANGER! Keep children away from the product during assembly (small parts can be swallowed). - DANGER! The appliance requires a mains voltage of 230 V, 50 Hz. - Connect the mains cable to an earthed socket. Do not use multiple sockets for connection! If an extension cable is used, it must comply with the VDE guidelines. The appliance may only be used with the original power supply units supplied. Never make any changes to the power supply yourself; if necessary, have qualified specialists do so. Make absolutely sure that the electrical cable is not pinched or becomes a "stripping danger".
WARNING! The manufacturer cannot be held responsible for damage caused by improper use. The device may only be used for its intended purpose, i.e. for the physical training of adults
DANGER! Point out possible dangers to persons present (especially children) during the exercises.
DANGER! Always disconnect the mains plug before carrying out any repair, maintenance or cleaning work.
DANGER! Improper repairs and structural modifications (disassembly of original parts, installation of unauthorized parts, etc.) can result in danger to the user. - DANGER! All electrical devices emit electromagnetic radiation during operation. Take care not to place particularly high-radiation devices in the immediate vicinity of the cockpit or the control electronics, as this could falsify display values (e.g. pulse measurement).
WARNING! It is essential that you also observe the notes on training structure in the training instructions.
WARNING! All interventions/manipulations on the appliance not described here can cause damage or even endanger persons. Further interventions are only permitted by trained specialist personnel. - WARNING! You are training with a device that has been designed according to the latest safety standards. Possible danger points that could cause injury have been avoided and secured as far as possible. If in doubt or if you have any questions, please contact your retailer or Kettler Service. Approximately every 1 to 2 months, check all parts of the parts, especially the nuts and bolts. Before you start training, ask your doctor to check whether you are fit to train with this equipment. The doctor's findings should form the basis of your training program. Incorrect or excessive training can lead to damage to your health.
- Before each use, always check that all screw and plug connections as well as the respective safety devices are correctly seated.
- Our products are subject to constant, innovative quality assurance. We reserve the right to make technical changes as a result.
- The location of the appliance must be selected in such a way that sufficient safety distances to obstacles are ensured. It should not be set up in the immediate vicinity of main running
directions. The surrounding free area must be at least 1 meter larger than the exercise area. Ensure that no one other than the person exercising is in the free area while the device is in motion
- Observe the general safety regulations and precautions for handling electrical devices.
- Unplug the appliance from the mains socket if it will not be used for a long period of time.
- Only exercises from the training instructions may be performed on this training device.
- The training device must be set up on a level surface. Place suitable buffer or material underneath for shock absorption (rubber mats or similar).
- When installing the product, observe the recommended torque specifications (= xxNm)
- The actual human power output may differ from the mechanical power displayed.
- The training device complies with DIN EN ISO 20957-1:2014-05/DIN EN ISO 20957-6:2017-04, class HC.
Class HB and HC devices are not suitable for high accuracy.
The product is not suitable for persons weighing more than 110kg
HEARTRATE MONITORING / HRC TRAINING
DANGER! Heart rate monitoring systems can be inaccurate. Excessive training can lead to serious damage to health or death. Stop exercising immediately if you feel dizzy or weak.
WARNING! If the pulse signal is lost, the device's power will remain constant for approx. 60 seconds and then slowly reduce. Please check your pulse measurement system (ear clip, hand pulse or chest strap) so that the pulse signal can be detected again by the electronics. For heart rate controlled training (HRC), a chest strap is recommended for greater accuracy.
These instructions can also be downloaded from www.kettlersport.com
DISPOSAL INSTRUCTIONS
HOI BY KETTLER products are recyclable. At the end of its service life, dispose of the device properly (local collection point).

All KETTLER products are designed in accordance with the latest safety regulations and manufactured under constant quality control. We incorporate the knowledge gained from this into our development. For this reason, we reserve the right to make changes in technology and design in order to always be able to offer our customers optimum product quality. Should there nevertheless be any reason for complaint, please contact your dealer.
ELECTRICAL SAFETY

Warning! Danger from electric current!
Electric current is always a potential source of danger. Always handle the appliance with the necessary caution.
Do not expose the device to moisture! Protect it from contact with liquids

The properly installed socket outlet for connecting the appliance must be easily accessible.
Before connecting the plug of the power supply unit/device to the socket, the mains voltage specified on the power supply unit/device must be compared with the local mains voltage. If the values do not match, please contact our service team.
- Disconnect the mains plug from the power supply after switching off.
- Make absolutely sure that the mains cable does not get pinched or become a "stripping hazard".
- Connect the mains cable to an earthed socket outlet with protective earthing. Do not use multiple sockets for connection! If an extension cable is used, it must comply with the VDE guidelines.
The connection may only be made to a 16 A (C characteristic) individually fused and earthed shockproof socket. Never tamper with your power supply yourself; if necessary, have it installed by a specialist!
The appliance may only be used with the mains cable supplied. A damaged mains cable cannot be used and must be replaced immediately.

FOR YOUR SAFETY
The treadmill may only be used for its intended purpose, i.e. for running and walking training for adults. The treadmill is intended for indoor use only.
Damaged components can affect your safety and the service life of the appliance. Therefore, replace damaged or worn components immediately and do not use the device until it has been repaired. If necessary, only use original KETTLER spare parts.
The treadmill complies with the prescribed safety regulations.

Danger! Improper repairs and structural modifications (disassembly of original parts, installation of unauthorized parts, etc.) can result in danger to the user.

Warning! Also ensure that the space under the treadmill is kept clear and that there are never any objects or pets under the device! Warning! Never touch the moving endless belt with your hands under any circumstances. There must also be no objects near the belt or the rollers that could be drawn in. Risk of injury or damage to the treadmill!
The treadmill is a motorized training device that requires special safety precautions and knowledge when being operated.
- Persons with reduced physical, sensory or mental capabilities and children must be given instructions on how to use the appliance properly and must never use the appliance unsupervised.
The continuous sound level of the appliance at maximum speed is 75 dB.
- When installing the appliance, a safety zone of 1m to the side and 2m to the rear must be maintained.
Repairs to electrical parts and assemblies may only be carried out by qualified personnel!
- Observe the general safety regulations and precautions for handling electrical appliances.
- The KETTLER treadmill has an emergency stop for your safety. Attach the cord of the safety key to your clothing before you start training. If the treadmill has been switched off by removing the safety key, attach it again. The endless belt will not restart automatically. You will find further information on how to use the safety cut-out in the computer operating instructions.
- Uncontrolled use of the treadmill by third parties can be prevented by removing and storing the safety key.
In an emergency, hold on to the handrails with both hands and exit the belt via the side surfaces of the side platforms. Operate the emergency stop device (safety cut-out).

Danger! All electrical devices emit electromagnetic radiation during operation. Take care not to place particularly radiation-sensitive devices (e.g. cell phones) in the direct vicinity of the cockpit or the control electronics, as otherwise the display values could be distorted (e.g. pulse measurement).

Warning! All interventions/manipulations on the device not described here can cause damage or endanger persons. Further interventions are only permitted by KETTLER Service or by KETTLER-trained specialist personnel.
In order to be able to guarantee the safety level specified by the design of this appliance in the long term, the appliance should be checked and serviced regularly (once a year) by a specialist (specialist dealer).
If in doubt or if you have any questions, please contact your specialist dealer.
HANDLING
Ensure that training operations do not commence until the installation has been properly completed and checked.
We do not recommend using the device in the direct vicinity of damp rooms due to the associated formation of rust. Also ensure that no liquids (drinks, sweat, etc.) get onto parts of the appliance. This could lead to corrosion.
The training device is designed for adults and is not suitable for children. Bear in mind that children's natural need to play and temperament can often lead to unforeseen situations that exclude any responsibility on the part of the manufacturer. If you nevertheless allow children to use the equipment, they must be instructed in its correct use and supervised.
- Wear suitable footwear (sports shoes) when using the machine.
Familiarize yourself with all the functions and setting options of the device before your first training session.
- Check all parts of the device, especially the screws, at appropriate intervals during regular training.
- A lubricant is applied between the floor board and the treadmill at the factory. Depending on the frequency of use, this must be renewed. Use the enclosed high-quality silicone oil (see maintenance instructions).
- Warning: If adjustment devices protrude, they can interfere with the user's movements.
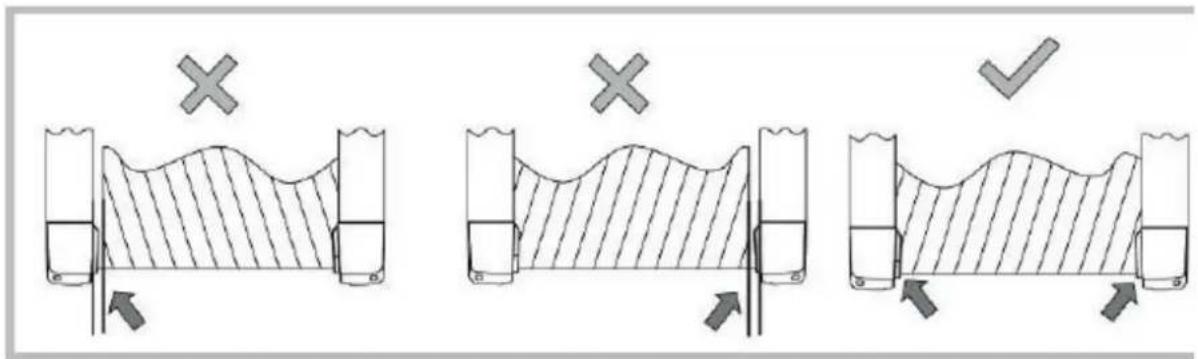
Observe the edge movement of the treadmill during operation; if the belt deviates sideways, readjustment is required.
Depending on the strain and load, the endless belt may elongate slightly over time and "slip". Correct the tightening of the belt as described below.
Running tip: Running straight on the treadmill is made easier by focusing on a stationary object in front of you in the room. Run as if you wanted to walk towards the object.
Important: Please store the safety switch carefully and prevent children from reaching the safety switch!
BELT ADJUSTMENT
- Belt adjustment: The belt adjustment takes place while the belt is running at a speed of approx. 6km / h (possibly less) No person may walk on the belt during adjustment!
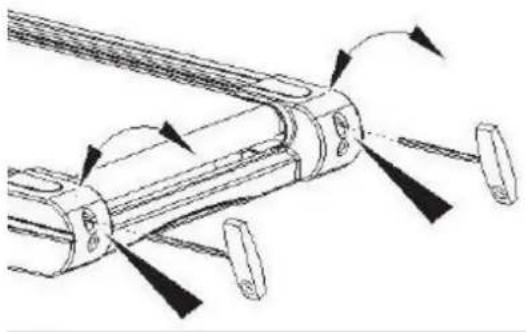
If the belt moves to the right, turn the right-hand adjusting screw clockwise by a maximum of a quarter of a turn using a socket wrench. Run the belt and check the run. Repeat the process until the belt runs straight again. If the belt deviates to the left, turn the right-hand adjusting screw counterclockwise by a maximum of a quarter of a turn using a socket wrench. Run the belt and check the run. Repeat the process until the belt runs straight again. - Tightening the belt: Turn the adjusting screw clockwise a maximum of one turn. Repeat the process on the other side. Check whether the endless belt is slipping. If this is the case, you must carry out the described procedure again.
- Be very careful when adjusting and tightening the belt; extreme over- or under-tensioning can damage the treadmill!
CARE AND MAINTENANCE
- ATTENTION: Lubrication and care of the belt is the most important maintenance measure! Insufficient lubrication and the associated significant increase in friction will lead to heavy wear and damage to the endless belt, running plate, motor and circuit board! Damage caused by inadequate or neglected care or maintenance of the belt is not covered by the warranty!
If the treadmill is used regularly, the cold belt must be serviced with silicone oil approx. every 10 operating hours or every 2 months.
This maintenance must also be carried out before the appliance is used for the first time or not used for a longer period of time. - Insert the spray tube between the belt and the running plate and apply 3 short (approx. 1 second) sprays of silicone lubricant between the belt and the running plate. The spray tube should be moved sideways to ensure that the entire underside of the belt is wetted. Continue turning the belt by hand so that the entire surface between the endless belt and the running plate is then lubricated.
Wipe off excess lubricant.
FR INFORMATIONS IMPORTANTES
5: Adjust the console to the desired position, attach the bottle holder to the upright post using bolt M4*16. Double-check that the L-shaped knobs and prune-shaped knobs are securely locked. Assembly is now complete.
Remark: Position the treadmill close to the wall, keeping it away from children to prevent unexpected injuries.
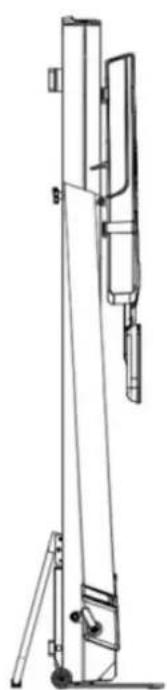
4: Vertical Storage: After following the first three steps of folding, pull out the left latch at the bottom of the machine. Lower the support tube until the latch snaps into place, achieving stable vertical storage without relying on external support.


DE
CAUTION! The training machine must be positioned on a horizontal, stable surface. Place suitable cushioning material underneath it for shock absorption and to stop it from slipping (rubber mats or similar). The safety distance must be at least 1 metre larger than the area in which you are exercising.
FR
Running is a very efficient form of fitness training. With the treadmill, you can carry out controlled and measured running training at home, regardless of the weather. The treadmill is not only suitable for jogging, but also for walking training. Before you start training, you should read the following instructions carefully!
Planning and controlling your running training
The basis for the workout planning is your current physical performance condition. Your family doctor can use an endurance test to diagnose your personal performance, which is the basis for your training plan. If you have not had an endurance test carried out, high training stress or overexertion must be avoided in any case. You should remember the following principle for planning: Endurance training is controlled both by means of the duration and the intensity of exertion.
Guideline Values for Endurance Training
Exertion Intensity
During running training, the intensity of exertion is best monitored via the pulse rate of your heart.
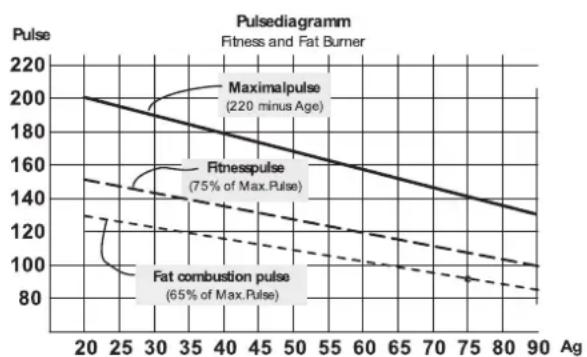
Maximum Pulse:
A maximum exertion is understood as the attainment of the individual maximum pulse. The maximum achievable heart rate depends on age. Here this rule of thumb applies: The maximum heart rate per minute corresponds to 220 beats minus age.
Example: age 50 years >220 - 50 = 170 pulses/min.
Active Pulse:
The optimum exercise intensity is achieved at 65 - 75% of the individual cardiovascular performance (see diagram).
65% = Training goal: fat burning
75% = Training goal: improved fitness
This value changes depending on age. The intensity of treadmill training is regulated by the running speed on the one hand and the angle of inclination of the running surface on the other. The higher the running speed, the greater the physical exertion. It also increases when the incline angle is increased. As a beginner, avoid running at too high a pace or training with too large an incline angle of the running surface, as this can quickly cause you to exceed the recommended heart rate range. You should set your individual running pace and incline angle when training on the treadmill so that you achieve your optimum heart rate in accordance with the above information. While running, use your heart rate to check whether you are training within your intensity range.
Scope of Physical Exertion
Duration of a training unit and its frequency per week:
The optimum exercise range is 65 - 75% of the individuals cardiovascular performance over a longer period.
Warm-Up
At the beginning of each training session, you should spend 3-5 minutes warming up with a slowly increasing level of exertion to bring your cardiovascular system and your muscles to the right temperature.
Cool-Down
Just as important is the so-called "Cool Down". After each workout you should continue running slowly for about 2-3 minutes. Initially, the exertion level for your further endurance training should basically be increased by means of the scope of physical effort, e.g., training takes place 20 minutes daily instead of 10 minutes, or three times a week instead of twice a week. In addition to the individual planning of your endurance training, you can also use the training programmes integrated into the treadmills training computer.
- You can achieve a certain endurance performance with less cardiovascular output than before
- You maintain a certain endurance performance with the same cardiovascular output over a longer period of time.
- You recover faster after a certain cardiovascular exercise than before.
Training Form and Movement Execution
On the treadmill, various forms of training can be used from walking, to power walking, to sprinting. The movement execution of walking, power walking, running, and sprinting is divided into four phases:
| Phase | Start End Notes / Motion Description | ||
| Front Swing Phase | Support leg under the bodys centre of gravity | Touchdown of the foot | Here the maximum knee stroke takes place and serves mainly for the forward swing of the leg. When the foot makes contact with the ground, the lower extremities are cushioned by a passive braking movement within 10 - 20 ms. |
| Front Supporting phase | Touchdown of the foot Vertical posture | When the foot touches down, forces are generated that represent 2-3 times the weight of the body. It is therefore important to wear the right footwear to adequately absorb the shock impact and to ensure a healthy pronation of the foot. | |
| Back Supporting Phase | Vertical posture | Propulsion with the foot | In the final phase, the foot is stretched out and propulsion takes place via the first toe. |
| Back swing phase Pro pulsion with the foot Vertical posture | |||

Running styles
The movement sequences of running cannot be standardized and therefore the selection of the most economical running style is very individual and depends largely on the running speed and body constitution. A distinction is made between the different types of heel strike.
Forefoot support
Initial ground contact begins with the forefoot. The knee is slightly bent on foot impact and therefore a large part of the forces that occur are absorbed by the muscles.
Rear foot support
Initial ground contact begins with the heel. The knee is almost extended at heel strike and the movement is cushioned by the passive musculoskeletal system and the footwear.
Midfoot support
Initial ground contact via the midfoot. Combination of forefoot and rearfoot contact. It should be noted that an economization of the running technique prevents premature fatigue and prevents injuries and that the biomechanical requirements when running and the forces that occur depend on the following points:
- Running speed
Ground conditions / route profile - Body constitution
- Running technique
Footwear - Statics of the lower extremities
Pronation of the foot
Pronation describes the natural cushioning of the foot to absorb the impact. The pronation of the foot can vary depending on the different types of runners. A distinction is made between normal pronation, overpronation and supination. A running shoe should always support the natural pronation movement of a runner with normal pronation, without restriction this through stability technologies. Overpronation or supination in particular is a major problem for runners and can lead to a variety of injuries. However, with the right running shoes, individual problems can be compensated.
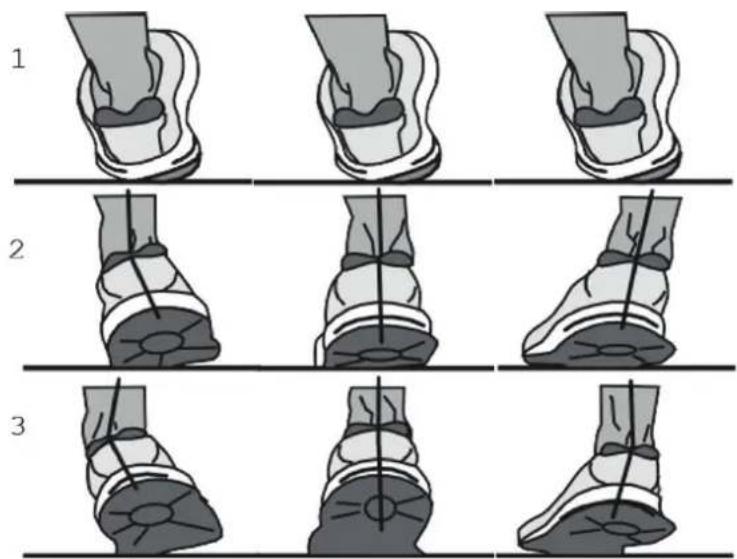
SUPINATION NORMAL OVERPRONATION
Special training instructions
The motion sequence of running should be familiar to everyone. Nevertheless, some points should be observed during running workouts:
Always make sure that the device is correctly set up and in good condition before training.
- Climb on and off the treadmill only when the treadmill is completely stopped, holding on to the handlebar and run in the middle of the treadmill.
Before starting the treadmill, attach the string of the safety key to your clothing.
- Train with appropriate running or sports shoes.
Running on a treadmill is different from running on a normal surface. Therefore, you should prepare for running training by walking slowly on the treadmill.
Hold on to the handlebar during the first training sessions to avoid uncontrolled movements that could provoke a fall. This is especially applicable when operating the computer during the training session.
If possible, run at a steady rhythm.
- Only train in the middle of the running surface
Treadmill folding and moving:
1. Folding
Turn off the power before folding the treadmill.
2.Unfolding
When unfolding the treadmill, select a location approximately 1 meter away from the power socket with a flat, obstacle-free surface.
3. Moving
Before moving the treadmill, ensure the following:
- The power is switched off
- The plug has been removed from the socket
- The treadmill has been folded
Hold the end of the treadmill firmly with both hands. Lift the treadmill towards your chest and slowly move it forwards or backwards.
Grounding guide
This product requires proper grounding to minimize the risk of electric shock in the event of errors or damage to the treadmill. The grounding wire, forming a circuit with the lowest resistance, channels any current into the ground, reducing potential hazards. Equipped with a cable containing a grounding conductor and plug, the treadmill must be connected to a correctly grounded socket compliant with local regulations.
Danger:
If you're unsure about the adequacy of the equipment's grounding, seek advice from a certified electrician or maintenance professional. Do not alter the plug attached to this product without authorization. In case of plug/rod incompatibility, engage a qualified electrician to install a suitable socket.
Using instruction of treadmill
- Switch on the treadmill and check that all functions are working normally.
- Securely clip the safety key cord to your clothing.
- Before use, thoroughly inspect the treadmill for functionality and stability.
- Do not attempt to start the treadmill by standing on the running belt.
- The correct procedure for starting the treadmill is to stand on the side rails with hands gripping the handlebars. Once the treadmill is operating normally, you may begin your workout.
- Grip the handlebars and press the "START" key. The treadmill will start running at a speed of 1.0km/h after a 5-second delay. Then, press the "+" key to adjust the speed to a comfortable range between 2.5 - 3.5km/h for running. Keep both hands on the handlebars and step onto the running belt one foot at a time to start running. Maintain a pace consistent with the speed of the running belt.
- After a few minutes, you can increase or decrease the speed by pressing the "+" or -" key while holding onto the handlebars.
- Press the "stop" key to halt the motor and stop the treadmill.
Pre-setting Use
- Connect the power and switch it on.
- Use the "P" key to select your desired mode.
- Press the "start" key to begin in the selected mode.
- Adjust the speed using the "+" or "-" keys, or press the "stop" key to halt the treadmill.
Training pulse: After powering on the treadmill, place your hands on the metal pulse sensors to view the pulse value on the display window.
NOTE: Removing the safety key will immediately stop the treadmill, and the computer will cease functioning. The display will show " _".
Regular maintenance is crucial to ensure the treadmill remains operational and free of faults. Neglecting maintenance can lead to damage or premature wear of the product. All treadmill components should be inspected and tightened regularly, with worn-out parts replaced promptly.
The treadmill comes pre-lubricated from the factory. However, regular lubrication checks are recommended to ensure optimal treadmill performance.
Suggestions:
Using time less than 3 hours every week - > lubrication once every 5 months
Using time equal to 4-7 hours every week -> lubrication once every 2 months
Using time more than 7 hours every week lubrication once every month
Avoid over-lubrication. Note: Proper lubrication significantly extends the treadmill's lifespan. To check if the running belt needs lubrication, lift the side of the treadmill and feel the central back of the belt. If traces of silicone spray are present, lubrication is unnecessary. If the surface is dry, lubrication is required.
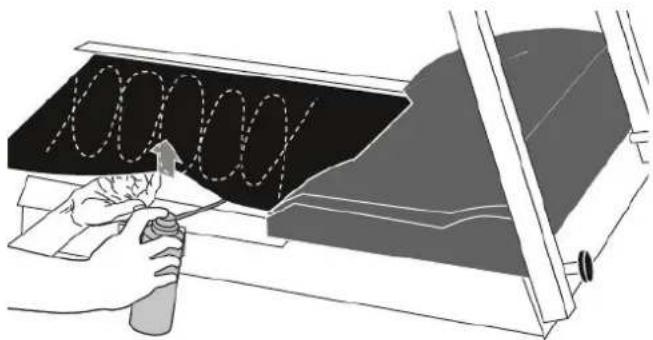
Application of lubricant on the belt:
- Stop the treadmill.
- Lift the running belt in the middle.
- Spray silicone oil on the inside of the running belt.
- Run the treadmill at a speed of 1km / h to distribute the silicone equally.
- Step slightly on the treadmill from left to right.
- Wait a few minutes for the silicone spray to spread and wipe off any excess silicone.
- Start training.
CLEANING:
Regularly cleaning the striding belt ensures a longer product life.
Warning: Turn off the treadmill to prevent electrical shocks. Disconnect the power cord from the socket before cleaning or performing maintenance.
After training: Wipe the console and other surfaces with a clean, soft, damp cloth to remove sweat residues.
Caution: Do not use abrasives or solvents. Keep liquids away from the computer to prevent damage. Avoid exposing the computer to direct sunlight.
Weekly: Use a floor protection mat under the treadmill to protect the floor and make cleaning easier. Clean the floor protection mat under the treadmill weekly to remove dirt and abrasion from shoes that can accumulate under the treadmill.
STORAGE
Store and operate your treadmill in a clean, dry environment. Ensure the master power switch is off and the treadmill is unplugged from the electrical outlet.
BELT ADJUSTMENT
All running belts are correctly set at the factory. However, deviation may occur over time due to various factors. If deviation occurs, rotate the belt without load for a few minutes to return it to normal. Adjust gradually using a 6mm Allen wrench if deviation persists.
ADJUSTING THE BELT DEVIATION
All running belts are properly set at the factory and after assembly. But after a period, the belt have the possibility for deviation.
Damage caused by treadmill deviations is not covered by the warranty and must be maintained by the user in accordance with the instructions. If the deviation is not corrected immediately, this may result in damage to the treadmill.
The belt adjustment takes place during the belt run at a speed of approx. 6km / h (possibly less). No person may walk on the belt during adjustment! If the belt moves to the right, turn the right-hand adjusting screw clockwise by a maximum of a quarter turn using a socket spanner. Run on the belt and check the movement. Repeat the procedure process until the belt runs straight again. If the belt deviates to the left, turn the right-hand adjusting screw by a maximum of a quarter turn anti-clockwise using a socket spanner. Run the belt and check the run. Repeat the process until the belt runs straight again.
Band tightening
Turn the adjusting screw (picture below) max. one turn clockwise. Repeat the process on the other side. Check whether the endless belt is slipping. If this is the case, you must carry out the described procedure again. Be very careful when adjusting and tightening the belt; extreme over- or under-tensioning can damage the treadmill!
FR
INSTRUCTIONS D'UTILISATION
- PO is the user training programme setting, P1-P36 are the pre-programmed training programmes, three USER programmes and BMI (Body Mass Index).
- LED display, 4 control buttons;
- speed and distance display, kilometres/miles
4.speed range: 1.0 16.0km / h - overload protection, anti-electromagnetic interference and other safety protection functions;
- system self-test
- three user-defined programmes
8.ERP function; - mute function of the beep sound.
Safety Guide:
Insert the power cable plug into an earthed 10 A socket, switch on the power switch and the console screen will be fully displayed.
- Insert the safety key into the slot on the console and attach the clip to your clothing.
The control system monitors safety at all times. If an error is detected, the treadmill stops immediately and information about the error is displayed on the screen with an acoustic signal;
If an error message is displayed on the screen, remove the safety key or the switch to clear the error information.
Display and button description:
-
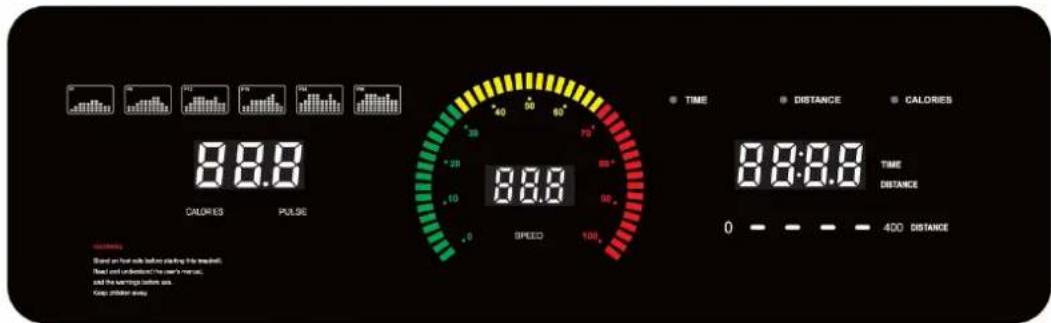
Display window instruction: LED display.
-
DISTANCE' "TIME" window: displays the distance and time.
CALORIES' window "PULSE": displays the value of the calories and the training pulse. - SPEED' window: displays the speed.
2. Conversion function between kilometers and miles:
- Remove the security key and press the 'PROGRAM' and 'MODE' buttons simultaneously for a few seconds. The display shows 0.6, which means that the kilometres are converted into miles.
- Remove the security key and press the 'PROGRAM' and 'MODE' buttons simultaneously for a few seconds. The display shows 1.0, which means that the miles are converted into kilometres.
3. Function button description:
- Programme button: 'P' is the programme button. Press this button in standby mode to select 36 different programmes from manual mode 'PO' to 'P1-P36'. Manual mode is the default running mode of the system, the default speed of manual mode is 1.0km/h , and the maximum running speed is 16km/h .
- MODE button: 'M' is the mode button: Press this button in standby mode to select three different countdown operating modes. Time countdown mode, distance countdown mode and calorie countdown mode. You can use the +' and -' to set the corresponding countdown value when selecting the different modes. After setting, press the START button to start the treadmill.
If the treadmill is switched off, press the START/PAUSE button and the treadmill will start at the lowest speed. When the treadmill is running, press the START/PAUSE button and the treadmill will stop temporarily. Pressing the same buttons again in pause mode returns the treadmill to the running mode before the pause. - 'STOP' is the stop button. The treadmill stops with this button.
SPEED button: 'SPEED+'/'SPEED- are buttons for increasing/decreasing the speed. After starting the treadmill, the speed can be set in increments of 0.1. If you press and hold the button for longer than 2 seconds, the speed will increase or decrease more quickly.
4. Safety key function description:
The safety key consists of a magnet, a clothes peg and a nylon rope. It has the function of a safety device for emergency shutdown. As long as the safety key is not inserted, the treadmill stops in any condition, the display cannot be operated and 'E-07' appears on the screen with a signal tone. Each time the safety lock is activated, the screen is displayed in full for 2 seconds and then returns to the start screen.
5. Program/startup instructions:
A:Programme description:
1: One manual programme P0: quick start mode, time countdown, distance countdown, calorie countdown mode.
2:36 pre-programmed training programmes: P01, P02, P03, P04, P05, ..., P36:
3: Three user-defined programmes U01~U03:
B: Start instructions:
1: Insert the security key into the slot of the console, the console will be displayed for 2 seconds, then the manual programme will be called.
2: Press the start button, the time slot will be displayed: 5-4-3-2-1, the buzzer will beep once per second, the treadmill will start at 1, the initial speed of the treadmill is 1km/h .
3: To stop the treadmill, press the stop button. The treadmill returns to the start screen.
Manual mode:
1: How to start the manual programme:
A: Turn on the power switch and go directly to the manual programme quick start mode.
B: In the stop state, press the programme button to enter the manual programme quick start mode.
2: Three setting functions in the manual programme: time setting, distance setting, calorie setting; after selecting the quick start mode in the manual programme, press the 'MODE' button to select different modes. After finishing the settings, press the 'START' button to start the treadmill; the training speed is set by the user. Default setting: Speed: 1km/h. Only one mode can be selected: Quick start mode, countdown time, countdown distance, countdown calories.
A: When you start the manual programme, the display time is 0:00. The time, distance and calories are counted. If you press the 'STOP' button during operation, the speed slows down to a stop and all settings are reset to the start screen.
B: In standby mode, press the 'MODE' button to enter time countdown mode. In setting mode, the time window displays the time and flashes. The starting time is: 30:00 minutes, by pressing the +' and -' buttons, the time can be set. The time setting range is: 5:00-99:00. The interval is 1:00 minute, the default value is 30:00.
C: In standby mode, press the mode button 'MODE' to enter the distance countdown mode and the distance window flashes. The interval is 1.0km , press the +' and -' buttons to set the distance, the setting range is 1.0-99.0km .
D: In standby mode, press the mode button 'MODE' to enter the calorie countdown mode, and the calorie window will flash. The initial calorie display: 50kcal, press the +' and - button to set the calories, the calorie setting range is: 20-990 kcal. The intervals are 10 kcal.
3: Manual programme operation:
A: Press the start button, the time will count down for 5 seconds, then the motor will start running, the initial speed is 1km / h
B: In operation, press the +' , -' button to adjust the speed of the treadmill;
C: When '0' is reached in countdown mode, the speed slowly decreases until the treadmill stops and then returns to the home screen.
Programme mode
1: P1-P36 are the predefined training programmes. They are only intended for the countdown time mode. In setting mode, the time window displays the time and flashes. Press +' or - to change the set value. Press 'MODE' to return to the default value. Starting time: 30 minutes. The setting range for the time is: 5:00-99:00. Press the +' or - button to change the set value.
2: After you have set the training mode, press the 'START' button. A 5-second countdown will be displayed on the screen, accompanied by 5 beeps. After the countdown to 1, the treadmill will start gently, slowly accelerating to the displayed speed.
3: During operation, press the + or - button to adjust the speed of the treadmill;
4: Press the 'STOP' button during operation, the speed will slow down to a stop and all settings will be reset to the start screen.
BMI program
The body mass index (BMI) is used to estimate the percentage of body fat. To calculate the BMI (Body Mass Index), body weight is set in relation to height. The ideal index is between 18 and 24, below 18 the body fat percentage is too low, between 25 and 29 you are considered overweight, if it exceeds 29 you are considered obese.
This data is for reference only and cannot be used as medical data.
Step 1: Selecting the program
Switch on the treadmill and select the FI program using the P button.
Step 2: Entering the gender
F1 appears on the display. Now select the appropriate gender for the user by pressing the + / - buttone.
Select "1" for "male" and "2" for "female". Confirm your entry by pressing the M button.
Step 3: Entering the age
F2 appears on the display. Enter the age of the user by pressing the + / - button.
Confirm your entry by pressing the M button.
Step 4: Entering the size
F3 is shown on the display. Enter the user's height by pressing the + / - button.
Confirm your entry by pressing the M button.
Step 5: Entering the user's weight
F4 is shown on the display. Enter the user's weight by pressing the +/- button.
Confirm your entry by pressing the M button.
Step 6: Program start
The BMI (Body Mass Index) is now shown on the display.
Custom program:
USER mode has three programs: U01~U03. In USER mode, users can set their own customized training program. Press the "P" button to set "U01~U03". Then press the "M" button and then the +/- button to set the training time (range 5-99 minutes). Press the START button to start training.
USER mode setting:
Press "M" to set the user's individual program. Press the +^n-^n button to set the user's speed value from 1 km/h to 16km/h. After setting the current speed, press the M button to go to the next step. The set values are automatically saved when the last parameter is set. Press the M button again to select the training time. The default setting is 30:00 minutes. Press the +^n-^n button to adjust the time setting. After setting, the user can start training by pressing "START". The user's individual program is saved. The next time the user uses this training mode, they can directly select the customized training and press the start button to start the training.
Heart rate function
When the treadmill is switched on, the heart rate is displayed within 5 seconds of touching the hand pulse sensors. Display range: 50-200 beats/min.
Value display range:
| Initial set | initial value Display range | ||
| Time (minutes:seconds) 0 | 00 30:00 0:00 | 99:59 | |
| Speed (km/h) 0.0 N/A1 - 1 | 6KM | ||
| Distance (km) 0.0 1.00 0.0 | -99.9 | ||
| Calorie (kcal) 0 | 50 | 0 - 999 | |
Heart Rate-Controlled Programs (HRC)
These programs are heart rate-controlled training programs. The user specifies a target heart rate. This is constantly compared by the cockpit with the user's actual heart rate. If the current heart rate is lower than the target heart rate, the treadmill automatically increases the speed. If the value is higher, the treadmill automatically reduces the speed. The most important prerequisite for these programs is a permanent, accurate transmission of the heart rate values. For this reason, these programs can only be run with a Bluetooth (BLE) heart rate chest strap/wristband. This is available as an accessory. It is not possible to use these programs with the hand pulse sensors.
Step 1: Program Selection
Switch on the treadmill. Select the desired program from HRC1, HRC2 or HRC3 by pressing the "P" button.
The maximum speed of the individual programs is different.
HRC1 = maximum speed 9 km/h
HRC2 = maximum speed 11 km/h
HRC3 = maximum speed 13 km/h
This selection is necessary to avoid unintentional overexertion of the user. Please select the program with the maximum speed suitable for you, which will not be exceeded by the computer during training.
Step 2: Age Input
The value 25 flashes on the display. Enter the user's age by pressing the + / - key. Confirm your entry by pressing the M button.
Step 3: Selection of Target Pulse
The target heart rate calculated by the cockpit is shown on the display. This is 60% of the maximum heart rate. If you want to train with the calculated value, confirm this with the "M" button.
If you want to train with an individual target heart rate, enter it using the +/- button. Confirm this with the M button.
Step 4: Time input
The value of 30:00 minutes flashes in the time display window. Enter the desired training time between 05:00 and 99:00 by pressing the +/- button.
Step 5: Profile start
Now press the START button.
A countdown appears on the display. The training time starts to run as soon as the countdown ends and the treadmill starts.
Training End
The treadmill stops automatically at the end of the selected time.
ERP function:
The default setting is ERP mode. If the treadmill is not operated after 4.5 minutes, it goes into energy-saving mode. The user can press any key to wake up the system. In standby mode, the user can press the "M" button for approx. 3 seconds to deactivate the ERP function. The console will display "2222". In standby mode, the user can press the "M" button again for approx. 3 seconds to return to ERP mode. 1111" is displayed on the console.
Buzzer mute function :
In the default setting, the signal tone is in operation. In standby mode, press the "P" and "STOP" buttons together:
If "bz off" is shown on the display, the buzzer is switched off.

PROGRAMME STOP START MODE
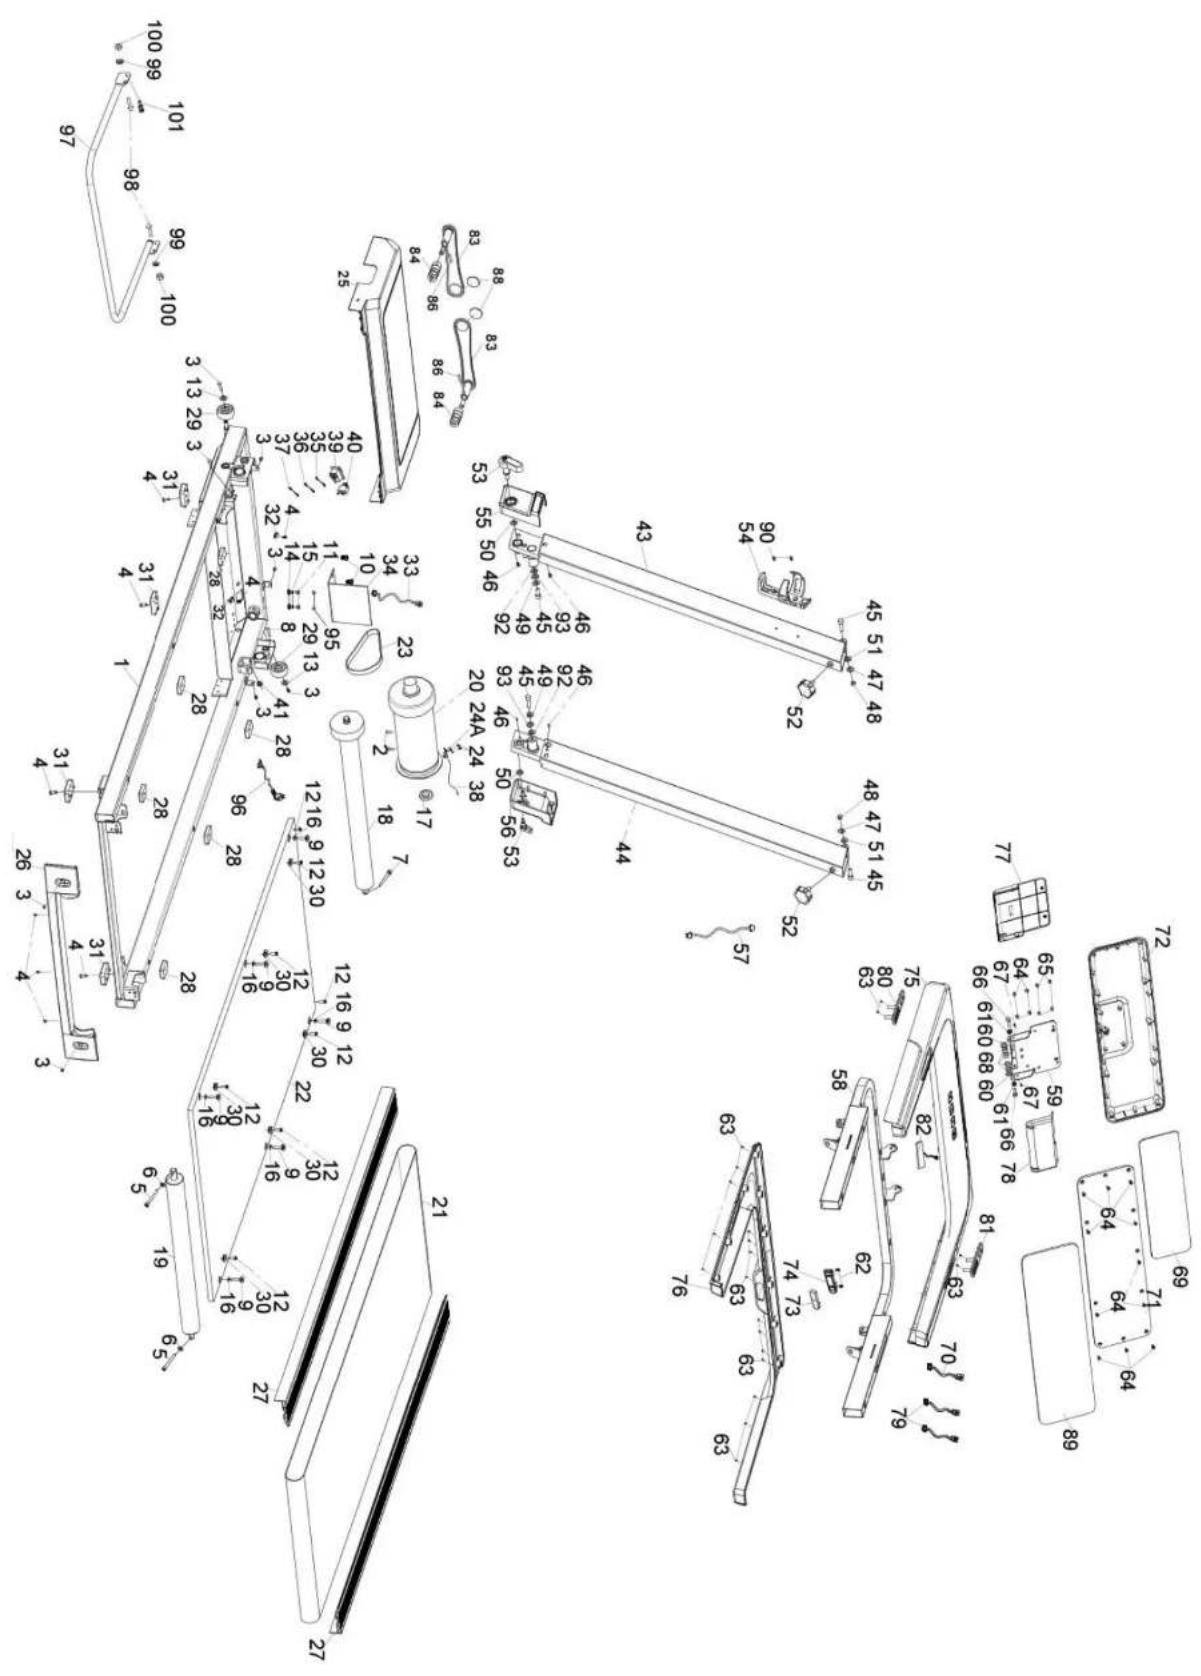
| No. | Part Name | Qty |
| 1 | Main frame 1 49 Flat washer 2 | |
| 2 | Allen C.K.S. full thread bolt | 2 |
| 3 | Philips C.K.S. full thread bolt | 8 |
| 4 | Philips C.K.S. self-tapping bolt | 9 |
| 5 | Allen Cylinder full thread bolt | 2 |
| 6 | Flat washer | 2 |
| 7 | Allen Cylinder full thread blot | 1 |
| 8 | Philips C.K.S. self-tapping bolt | 2 |
| 9 | Allen sunk full thread bolt | 6 |
| 10 | Philips C.K.S. full thread bolt | 2 |
| 11 | Philips C.K.S. full thread bolt | 2 |
| 12 | Philips sunk self-tapping bolt | 8 |
| 13 | Flat washer | 2 |
| 14 | Outer serrate lock washer | 2 |
| 15 | Spring washer | 2 |
| 16 | Plastic flat pad (PVC) | 6 |
| 17 | Magnet ring | 1 |
| 18 | Front roller | 1 |
| 19 | Rear roller | 1 |
| 20 | Motor | 1 |
| 21 | Running belt | 1 |
| 22 | Running board | 1 |
| 23 | Motor belt | 1 |
| 24 | Philips Pan head full thread bolt | 2 |
| 25 | Motor cover | 1 |
| 26 | Rear cover | 1 |
| 27 | Side rail | 2 |
| 28 | Square cushion | 6 |
| 29 | wheels | 2 |
| 30 | Round edge guide block | 6 |
| 31 | Square feet pad | 4 |
| 32 | cable clamp | 2 |
| 33 | Communication wire | 1 |
| 34 | controller | 1 |
| 35 | Power connection wire | 1 |
| 36 | Power connection wire | 1 |
| 37 | Power connection wire | 1 |
| 38 | Speed sensor | 1 |
| 39 | Ship type switch | 1 |
| 40 | Self-reset switch | 1 |
| 41 | Power cable buckle | 1 |
| 42 | Metal support for speed sensor | 1 |
| 43 | Standpost left | 1 |
| 44 | Standpost right | 1 |
| 45 | Allen Cylinder full thread bolt | 4 |
| 46 | Philips C.K.S. self-tapping bolt | 4 |
| 47 | Flat washer | 2 99 Flat w |
| 48 | Haxagon lock nut | 2 |
| No. | Part Name | Qty |
| 50 | Plastic pad | 2 |
| 51 | Plastic pad | 2 |
| 52 | Quincundial knob | 2 |
| 53 | L-shape knob | 2 |
| 54 | Bottle holder | 1 |
| 55 | Standpost cover left | 1 |
| 56 | Standpost cover right | 1 |
| 57 | Communication wire | 1 |
| 58 | Console frame | 1 |
| 59 | Console fixing plate | 1 |
| 60 | Papilionaceous Spring | 4 |
| 61 | M6 step pad | 2 |
| 62 | Philips C.K.S. self-tapping bolt | 2 |
| 63 | Philips C.K.S. self-tapping bolt | 20 |
| 64 | Philips sunk self-tapping bolt | 16 |
| 65 | Philips sunk self-tapping bolt | 4 |
| 66 | Hexagon full thread bolt | 2 |
| 67 | Philips C.K.S. full thread bolt | 2 |
| 68 | Hexagon lock nut | 4 |
| 69 | Console | 1 |
| 70 | Communication wire | 1 |
| 71 | Console panel | 1 |
| 72 | Console back cover | 1 |
| 73 | Safety key socket | 1 |
| 74 | Safety key | 1 |
| 75 | Sundry basket upper | 1 |
| 76 | Sundry basket lower | 1 |
| 77 | Console front decoration cover | 1 |
| 78 | Console rear decoration cover | 1 |
| 79 | Handle pulse wire | 2 |
| 80 | Start/stop handle pulse set | 1 |
| 81 | Speed handle pulse set | 1 |
| 82 | Touch button wire | 1 |
| 83 | Folding bracket frame | 2 |
| 84 | Ordinary cylindrical spiral compression spring | 2 |
| 86 | Philips Pan head full thread bolt | 2 |
| 88 | EVA pad | 2 |
| 89 | Acrylic console sticker | 1 |
| 90 | Philips C.K.S. sharp full thread bolt | 2 |
| 91 | papilionaceous Spring | 4 |
| 92 | papilionaceous Spring | 2 |
| 93 | D hole spacer | 2 |
| 96 | Power cord | 1 |
| 97 | Rear support welds | 1 |
| 98 | Hexagon large flat head full tooth bolt | 2 |
| 100 | Hexagon lock nut | 2 |
| 101 | Spring thread latch | 1 |
| DE | DK | UK |
| TECHNIK | TEKNIK OG SERVICE | CUSTOMER SUPPORT |
| +49 4621 4210-900 | 80 90 16 50 | 00800 2020 2772 |
| +49 4621 4210-698 | +49 4621 4210-945 | +494621 4210 944 |
| technik@fitshop.de | info@fitshop.dk | info@fitshop.co.uk |
| Offnungszeiten entnahmen Sie unserer Homepage. | Abningsstider kan finden på hjemmesider: https://stg.fit/statit7 | You can find the opening hours on our homepage: https://stg.fit/statitc |
| SERVICE | ||
| 0800 20 20277(kostenlos) | FR | BE |
| 04621 4210 -0 | TECHNIQUE & SERVICE | TECHNIQUE & SERVICE |
| info@fitshop.de | +33 (0) 189 530984 | 02 732 46 77 |
| +49 4621 42 10 933 | +49 4621 4210 933 | |
| Offnungszeiten entnahmen Sie unserer Homepage:https://stg.fit/statitla | info@fitshop.fr | info@fitshop.be |
| Vous trouverez les heures d'ouverture sur notre site Internet:https://stg.fit/statit4 | Vous trouverez les heures d'ouverture sur notre site Internet:https://stg.fit/statit8 | |
| ES | NL | INT |
| TECNOLOGIA Y SERVICIOS | TECHNISCHE DIENST & SERVICE | TECHNICAL SUPPORT & SERVICE |
| 911 238 029 | +31 172 619961 | +49 4621 4210-944 |
| info@fitshop.es | service@fitshop.nl | service-int@fitshop.de |
| Consulta nuestro hora de aperture en la págin web:https://stg.fit/statit5 | De openingsstijden vindt u op onsite homepage:https://stg.fit/statit3 | You can find the opening hours on our homepage:https://stg.fit/statitla |
| PL | AT | CH |
| DZIAL TECHNICZNY I SERWIS | TECHNIK & SERVICE | TECHNIK & SERVICE |
| 22 307 43 21 | 0800 20 20277 (Freecall) | 0800 202 027 |
| +49 4621 42 10 948 | +49 4621 42 10-0 | +49 4621 42 10-0 |
| info@fitshop.pl | info@fitshop.at | info@fitshop.ch |
| Godziny otwarcia möglichzn znalezna stronie glównej:https://stg.fit/statit6 | Offnungszeiten entnahmen Sie unserer Homepage:https://stg.fit/statitb | Offnungszeiten entnahmen Sie unserer Homepage:https://stg.fit/statit9 |
Please find a detailed overview including address and opening hours for all stores of the Fitshop Group in Germany and abroad on the following website:
www.fitshop.com
IMPRESSSUM
Fittshop GmbH
International Headquarters
Flensburger Straße 55
24837 Schleswig
Deutschland
HAFTUNGSAUSSCHLUS
Europe's No. 1 for home fitness
International Headquarters
Flensburger Straße 55
24837 Schleswig
Germany Management:
Christian Grau
Sebastian Campmann
Dr. Bernhard Schenkel
No. HRB 1000 SL
Local Court Flensburg
European VAT Number: DE813211547
Disclaimer
KETTLER is a registered brand of the company Fitshop GmbH. All rights reserved. Any use of this trademark without the explicit written permission of Fitshop is prohibited.
Product and manual are subject to change. Technical data can be changed without advance notice.
FITSHOP
Europe's No.1 for Home Fitness

- FOR YOUR SAFETY
- DISPOSAL INSTRUCTIONS
- ELECTRICAL SAFETY
- HANDLING
- BELT ADJUSTMENT
- CARE AND MAINTENANCE
- FR INFORMATIONS IMPORTANTES
- DE
- FR
- Planning and controlling your running training
- Guideline Values for Endurance Training
- Exertion Intensity
- Maximum Pulse:
- Active Pulse:
- Scope of Physical Exertion
- Warm-Up
- Cool-Down
- Training Form and Movement Execution
- Running styles
- Forefoot support
- Rear foot support
- Midfoot support
- Pronation of the foot
- Special training instructions
- Treadmill folding and moving:
- Folding
- 2.Unfolding
- Moving
- Grounding guide
- Danger:
- Using instruction of treadmill
- Pre-setting Use
- Suggestions:
- Application of lubricant on the belt:
- CLEANING:
- STORAGE
- ADJUSTING THE BELT DEVIATION
- Band tightening
- INSTRUCTIONS D'UTILISATION
- Safety Guide:
- Display and button description:
- Conversion function between kilometers and miles:
- Function button description:
- Safety key function description:
- Program/startup instructions:
- Manual mode:
- Programme mode
- BMI program
- Step 1: Selecting the program
- Step 2: Entering the gender
- Step 3: Entering the age
- Step 4: Entering the size
- Step 5: Entering the user's weight
- Step 6: Program start
- Custom program:
- USER mode setting:
- Heart rate function
- Value display range:
- Heart Rate-Controlled Programs (HRC)
- Step 1: Program Selection
- Step 2: Age Input
- Step 3: Selection of Target Pulse
- Step 4: Time input
- Step 5: Profile start
- Training End
- ERP function:
- Buzzer mute function :
- PROGRAMME STOP START MODE
- www.fitshop.com
- IMPRESSSUM
- HAFTUNGSAUSSCHLUS
- Disclaimer
Brand : KETTLER
Model : Sprinter 1.1
Category : Treadmills