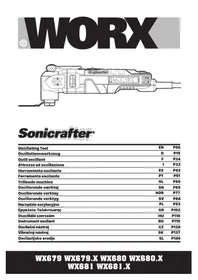
WX680 - Multitools WORX - Free user manual and instructions
Find the device manual for free WX680 WORX in PDF.
| Product type | Oscillating multi-tool |
| Brand | Worx |
| Model | WX680 |
| Rated voltage | 230-240 V ~ 50 Hz |
| Rated power | 350 W |
| Oscillation speed | 11000 - 20000 /min |
| Oscillation angle | 4.0° |
| Double insulation | Yes (class II) |
| Weight (without cord) | 1.3 kg |
| Sound pressure level LpA | 87 dB(A) |
| Sound power level LwA | 98 dB(A) |
| Sound uncertainty K | 3.0 dB(A) |
| Vibration emission value ah | 3.68 m/s² |
| Vibration uncertainty K | 1.5 m/s² |
| Main functions | Sawing, sanding, rasping, scraping, polishing |
| Accessory attachment system | Hyperlock™ tool-free |
| Speed adjustment | Variable by wheel |
| Accessory compatibility | Universal, compatible with accessories from other brands (Bosch®, Fein®, Makita®, etc.) |
| Maintenance | Clean with a dry cloth; no user-serviceable parts |
| Safety protections | Wear hearing protection, eye protection, dust mask, gloves |
| Minimum operating temperature | 10 °C |
| Dust extraction | Optional vacuum connection |
| Power supply | Mains, power cord (length not specified) |
Frequently Asked Questions - WX680 WORX
User questions about WX680 WORX
0 question about this device. Answer the ones you know or ask your own.
Ask a new question about this device
Download the instructions for your Multitools in PDF format for free! Find your manual WX680 - WORX and take your electronic device back in hand. On this page are published all the documents necessary for the use of your device. WX680 by WORX.
USER MANUAL WX680 WORX
Not all the accessories illustrated or described are included in standard delivery.
*Works with other oscillating tool brands' accessories.
The following compatible brands are trademarks owned by third parties which may be registered by their respective owners: Black & Decker®, Bosch®, Chicago Electric®, Craftsman®, Dremel®, Fein®, Genesis®, Makita®, Mastercraft®, Milwaukee®, Performax®, Porter Cable®, Ridgid®, Ryobi®, Skil®, and Tool Shop®.
TECHNICAL DATA
Type Designation WX680 (6-designation of machinery, representative of sonicrafter)
| Rated voltage | 230-240V~50Hz |
| Rated power 350W | |
| Oscillations speed 11000-20000/min | |
| Oscillations angle 4.0° | |
| Protection class | ☐/II |
| Tool weight (without power cable) | 1.3kg |
NOISE INFORMATION
A weighted sound pressure 87dB(A)
A weighted sound power 98dB(A)
KpA \& KwA 3.0dB(A)
Wear ear protection when sound pressure is over 80dB(A)

VIBRATION INFORMATION
Vibration total values (triax vector sum) determined according to EN 60745:
| Typical weighted vibration | Vibration emission value ah = 3,68m/s2 |
| Uncertainty K = 1.5m/s2 |
- The declared vibration total value has been measured in accordance with a standard test method and may be used for comparing one tool with another;
The declared vibration total value may also be used in a preliminary assessment of exposure.

WARNING: The vibration emission value during actual use of the power tool can differ
from the declared value depending on the ways in which the tool is used dependant on the living examples and other variations on how the tool is used:
How the tool is used and the materials being cut or sanded.
The tool being in good condition and well maintained
The use the correct accessory for the tool and ensuring it is sharp and in good condition.
The tightness of the grip on the handles and if any anti vibration accessories are used.
And the tool is being used as intended by its design and these instructions.
This tool may cause hand-arm vibration syndrome if its use is not adequately managed.

WARNING: To be accurate, an estimation of exposure level in the actual conditions of use
should also take account of all parts of the operating cycle such as the times when the tool
is switched off and when it is running idle but not actually doing the job. This may significantly
reduce the exposure level over the total working period.
Helping to minimize your vibration exposure risk.
ALWAYS use sharp chisels, drills and blades. Maintain this tool in accordance with these instructions and keep well lubricated (where appropriate).
If the tool is to be used regularly then invest in anti vibration accessories.
Avoid using tools in temperatures of 10^ or less.
Plan your work schedule to spread any high vibration tool use across a number of days.
SAFETY INSTRUCTION FOR CUTTING
-
Hold power tool by insulated gripping surfaces, when performing an operation where the cutting accessory may contact hidden wiring or its own cord. Cutting accessory contacting a "live" wire may make exposed metal parts of the power tool "live" and could give the operator an electric shock.
-
Always wear a dust mask.
SYMBOLS
| To reduce the risk of injury, user must read instruction manual |
| Double insulation |
| Warning |
| Wear ear protection |
| Wear eye protection |
| Wear dust mask |
| Before working with your tool make sure that no power cords will be damaged. |
| Avoid danger of injury from the sharp edges of the accessories. |
| Accessories can become very hot while working, presenting danger of burns! |
| Make sure the tool is unplugged prior to changing accessories. |
| Wear protective gloves |
| High oscillation frequency. | |
| Low oscillation frequency: | |
| Waste electrical products must not be disposed of with household waste. Please recycle where facilities exist. Check with your local authorities or retailer for recycling advice. |
OPERATING INSTRUCTIONS

NOTE: Before using the tool, read the instruction book carefully.
INTENDED USE
The power tool is intended for sawing and remodelling wooden materials, plastic, plaster, non-ferrous metals and fasteners (e.g. nails and clamps) as well as for working on soft wall tiles and for dry grinding of small surfaces. It is especially suitable for working close to edges and for flush cutting.
ASSEMBLY AND OPERATION
| Action Figure | |
| Mounting accessories See | Fig. A-C |
| Mounting the sanding sheet | See Fig. D |
| Mounting the suction device (not supplied) | See Fig. E1-E5 |
| Operating the on/off switch | See Fig. F |
| Using the variable speed dial | See Fig.G |
The Variable Speed Dial can be used to set the optimum oscillating frequency according to the accessories used and the respective application.
| Oscillation Frequency | Application |
| High oscillation frequency | Sanding, sawing, rasping and polishing stone and metal. |
| Low oscillation frequency | Scraping, polishing varnishes. |
WORKING HINTS FOR YOUR TOOL
If your power tool becomes too hot, especially when used at low speed, set the speed to maximum and run it with no load for 2-3 minutes to cool the motor. Avoid prolonged usage at very low speeds. Always keep the blade sharp.
Always ensure the workpiece is firmly held or clamped to prevent movement.
Any movement of the material may affect the quality of the cutting or sanding finish.
Start your tool before working and turn it off only after you stop working.
Do not start sanding without having the sandpaper fitted.
Do not allow the sandpaper to wear away, it will damage the sanding pad. The guarantee does not cover sanding pad wear and tear.
Use coarse grit paper to sand rough surfaces, medium grit for smooth surfaces and fine grit for finishing surfaces. If necessary, first make a test run on scrap material.
Excessive force will reduce the working efficiency and cause motor overload.
Replacing the accessory regularly will maintain optimum working efficiency.
MAINTAIN TOOLS WITH CARE
Remove the plug from the socket before carrying out any adjustment, servicing or maintenance.
Your power tool requires no additional lubrication or maintenance. There are no user serviceable parts in your power tool. Never use water or chemical cleaners to clean your power tool. Wipe clean with a dry cloth. Always store your power tool in a dry place. Keep the motor ventilation slots clean. Keep all working controls free of dust. Occasionally you may see sparks through the ventilation slots. This is normal and will not damage your power tool.
If the supply cord is damaged, it must be replaced by the manufacturer, its service agent or similarly qualified persons in order to avoid a hazard.
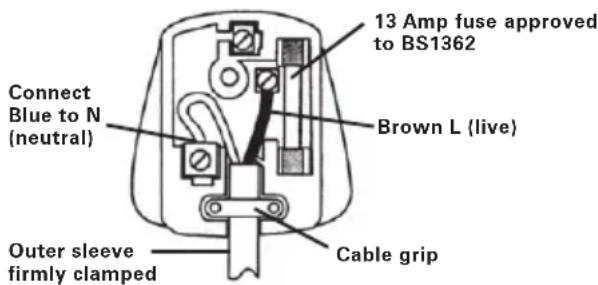
PLUG REPLACEMENT (UK & IRELAND ONLY)
If you need to replace the fitted plug then followthe instructions below.
IMPORTANT
The wires in the mains lead are colored in accordance with the following code:
blue - neutral
brown - live
As the colors of the wires in the mains lead of thisappliance may not correspond with the coloured markings identifying the terminals in your plug,proceed as follows. The wire which is coloured blue must be connected to the terminal which is marked with N. The wire which is coloured brown must be connected to the terminal which is marked with L.

WARNING: Never connect live or neutral wires to the earth terminal of the. Only fit an approved 13A BS1363/A and the correct rated fuse.
NOTE: If a moulded plug is fitted and has to be removed take great care in disposing of the plug and severed cable, it must be destroyed to prevent engaging into a socket.
APPLICATION

WARNING: The sawing teeth are very sharp. Do not touch during mounting and application.
The workpiece must be clamped tightly before it is cut.
| Pic Description | tion Application | ||
| Sawing | Bi-Metal Metal/Wood End Cut Blade | Wood, plastic, fiberglass, nails, non-ferrous metals, thin sheet metal, hardened fillers. | |
| Standard Wood End Cut Blade | Wood, plastic, drywall. | ||
| Precision Wood Cut Blade | Wood, soft plastics. | ||
| HSS Semicircle Saw Blade | Thin wood, plastic, fiberglass, non-ferrous metals, thin sheet metal, hardened fillers, window glazing. | ||
| Sanding | Sanding Pad (Perforated) | Wood, plastic, hardened fillers. | |
| Sanding Finger Pad | Wood, plastic, hardened fillers. | ||
| Rasping | Triangular Carbide Grit Rasp | Wood, hardened adhesives, thin set, masonry. | |
| Carbide Rasp (Finger Shaped) | Wood, hardened adhesives, thin set, masonry. | ||
| Removing grout | Carbide Grit Semicircle Saw Blade | Grout, porous concrete, masonry. | |
| Diamond-Coated Semicircle Saw Blade | Ceramic and stone tile, backerboard. | ||
| Scraping | Rigid Scaper Blade | Old paint, hardened adhesives, caulk, carpet. | |
| Flexible Scaper Blade | Elastic sealants, paint, adhesive residues, carpet. |
We recommend that you purchase your accessories listed in the above list from the same store that sold you the tool. Use good quality accessories marked with a well-known brand name. Refer to the accessory packaging for further details. Store personnel can assist you and offer advice.
NOTE: When plunging and sawing use a slight pendulum motion, to allow sufficient chip removal.
The saw blade lasts longer if the wear is distributed evenly. To ensure an even distribution, loosen the saw blade, rotate it and retighten firmly.
Cut/Sand with a constant movement and light pressure.
Heavy pressure does not increase the cut/ removal rate - the accessory merely wears faster.
ENVIRONMENTAL PROTECTION

Waste electrical products must not be disposed of with household waste. Please recycle where facilities exist.
Check with your local authorities or retailer for recycling advice.
DECLARATION OF CONFORMITY
Declare that the product, Description
WORX Oscillating Tool
Type WX680 (6-designation of machinery, representative of high frequency oscillation tool)
Function Sanding, sawing, rasping, scraping, polishing
Complies with the following directives, 2006/42/EC 2004/108/EC 2011/65/EU
Standards conform to
EN 55014-1
EN 55014-2
EN 60745-1
EN 60745-2
EN 61000-3-2 EN 61000-3-3
The person authorized to compile the technical file, Name: Russell Nicholson Address: Positec Power Tools (Europe) Ltd, PO Box 152, Leeds, LS10 9DS, UK
YiuTang
CE
2014/08/19
YujinTang
POSITEC Quality Manager
INFORMATIONS RELATIVES AU BRUIT
INFORMATIONS RELATIVES AUX VIBRATIONS
MISES EN GARDE POUR LA COUPE
Ltd, PO Box 152, Leeds, LS10 9DS, UK
YiuTang
CE
2014/08/19
YujinTang
Ltd, PO Box 152, Leeds, LS10 9DS, UK
YiuTang
C E
2014/08/19
YujinTang
Ltd, PO Box 152, Leeds, LS10 9DS, UK
Yiu Tang
C E
2014/08/19
YujinTang
WAARSCHUWING: Voor de
TIPS VOOR HET WERKEN MET UW APPARAAT
Ltd, PO Box 152, Leeds, LS10 9DS, UK
YiuTang
CE
2014/08/19
Yujin Tang
Menedzer jakosci POSITEC
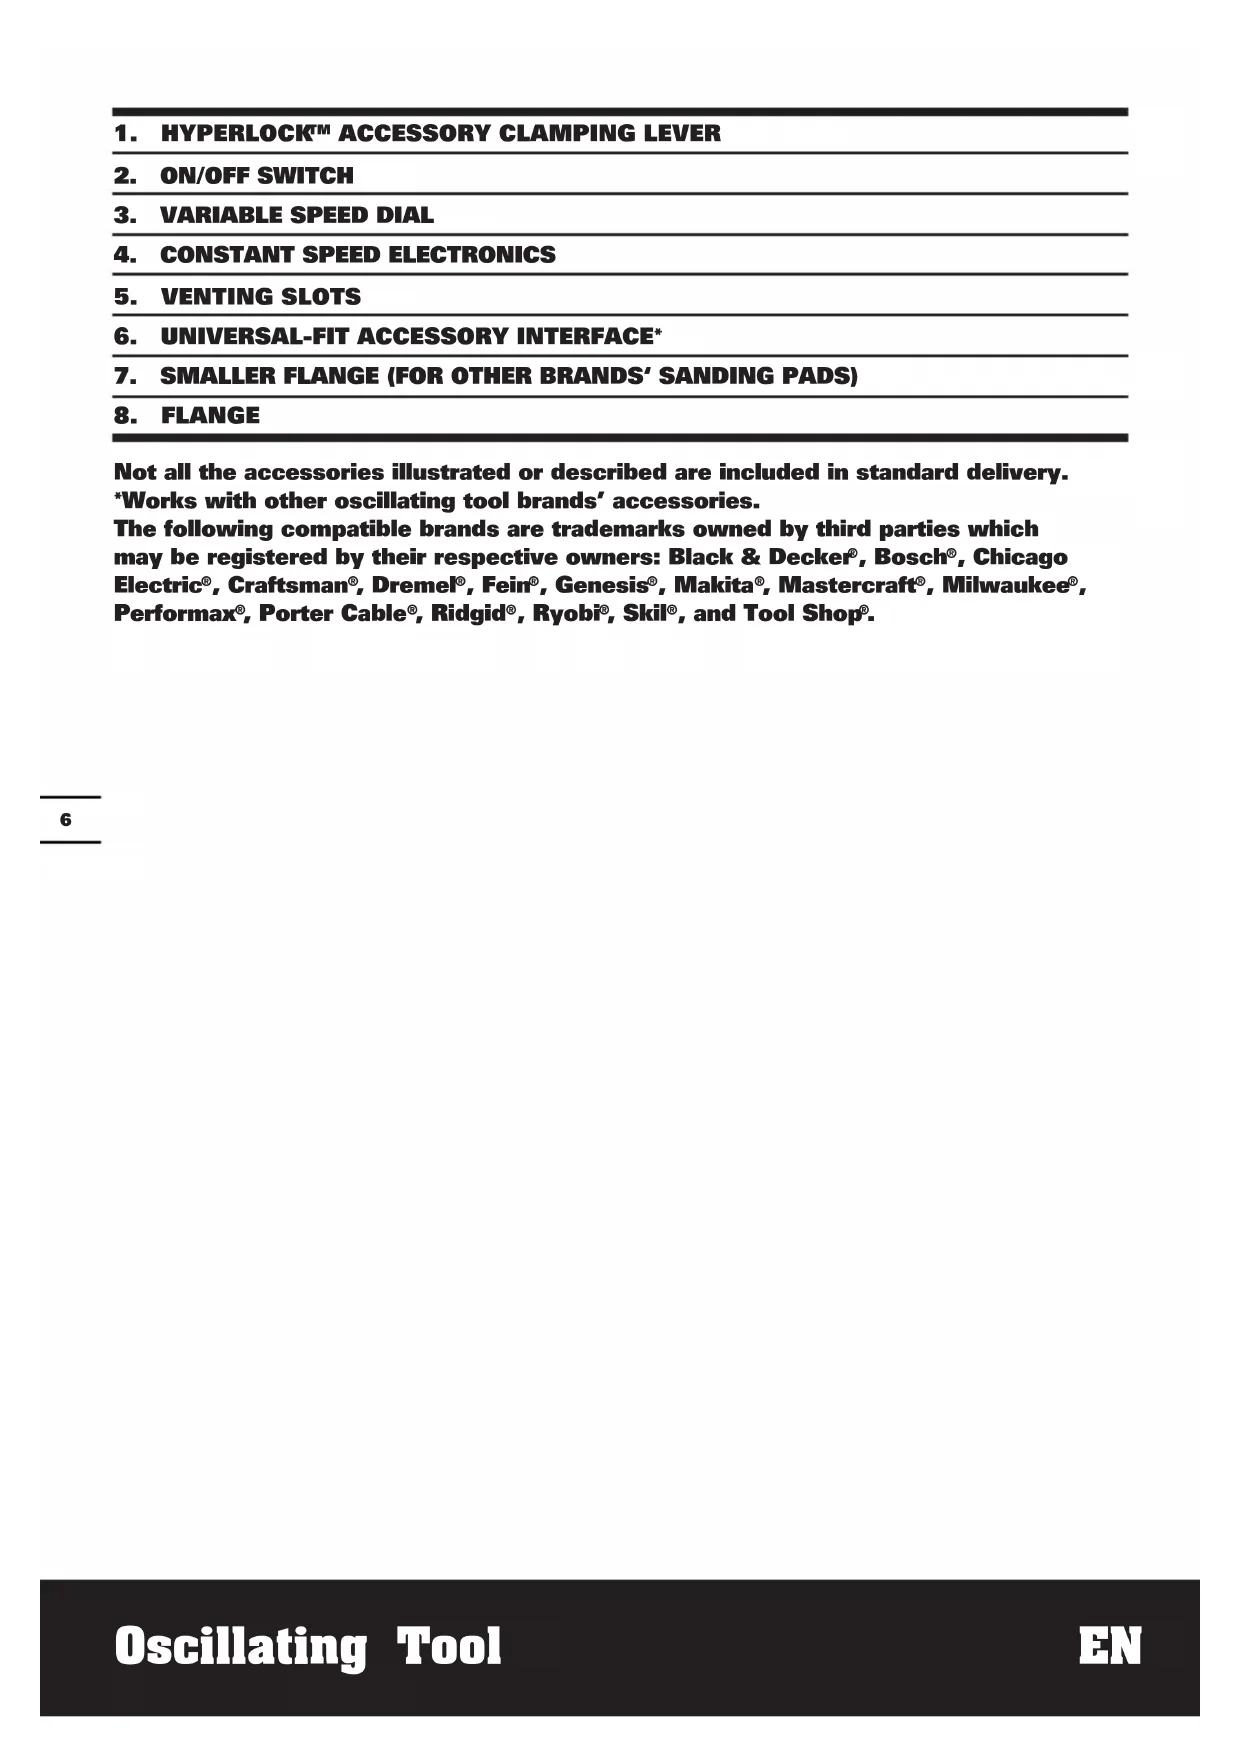
- HYPERLOCK™ ALKATRÉSZRÖGZİTO KAR
- KI-/BEKAPCSOLó GOMB
- SEBESSEGVÁLTOZTATÓ TÁRCSA
- ÁLLANDó FORDULATSZÁMÜ ELEKTRONIKA
- SZELLÖZÖ NYÍLÁSOK
- UNIVERZÁLIS TARTOZÉKCSATOLÓ*
- KISEBB KARIMA A MÁS MÁRKÁJÜ CSISZOLOPÁRNÁK SZÁMÁRA
- KARIMA
Ltd, PO Box 152, Leeds, LS10 9DS, UK
YiuTang
C E
2014/08/19
Yujin Tang
Manager de Calitate POSITEC
- PÁČKA PRO UPÍNÁNI PRÍSLUŠENSTVI HYPERLOCK™
- VYPÍNAČ
- REGULATOR RYCHLOSTI
- ELEKTRONIKA KONSTANTNI RYCHLOSTI
- VÉTRACÍ OTVORY
- UNIVERZÁLNI ROZHRANI PRO ZASTRČENI PRÍSLUŠENSTVI*
- MALÁ PRÍRUBA PRO BRUSné DESKY JINYCH ZNACEK
- PRÍRUBA
Ltd, PO Box 152, Leeds, LS10 9DS, UK
Yiu Tang

2014/08/19
Yujin Tang
Veduci oddelenia kvality firmy POSITEC
- PRÍDAVNÁ UPÍNACIA PÁKA HYPERLOCK™
- VYPÍNAČ
- VOLIC MENITELNHY CH OTÁČOK
- ELEKTRONIKA ZABEZPEČUJUCA KONSTANTNÉ OTÁČKY
- VETRACIE OTVORY
- UNIVERZÁLNE ROZHRANIE NA MONTAZ PRÍSLUŠENSTVA*
- MALÁ PRÍRUBA NA UPEVNENIE BRUSNYCH DOSIEK INYCH ZNACIEK
- PRÍRUBA
you've got the power
www.worx.com
Copyright © 2014, Positec. All Rights Reserved.
2PGA91APK11001A2