
GXT 166 19816 - Mouse TRUST - Free user manual and instructions
Find the device manual for free GXT 166 19816 TRUST in PDF.
| Product type | Wired gaming mouse |
| Brand | Trust |
| Model | GXT 166 (19816) |
| Number of buttons | 18 programmable buttons + clickable scroll wheel |
| Sensor | Optical |
| DPI resolution | 5 adjustable levels (yellow, green, blue, purple, red) |
| Dimensions | Approximately 125 x 70 x 40 mm |
| Weight | Approximately 150 g with adjustment weights |
| Cable length | Approximately 1.8 m |
| Power supply | USB, 5 V / 100 mA |
| Compatibility | Windows and Mac |
| Configuration software | Trust Gaming Software (downloadable) |
| Integrated profiles | 5 customizable profiles |
| Backlighting | Customizable RGB LED |
| Adjustment weights | Compartment with removable weights |
| Care and cleaning | Clean with a soft, dry cloth. Do not use liquids or abrasive products. |
| Safety | Use in a dry environment, avoid shocks and humidity. |
| Spare parts and repairability | No user-serviceable parts. Contact Trust support in case of malfunction. |
Frequently Asked Questions - GXT 166 19816 TRUST
User questions about GXT 166 19816 TRUST
0 question about this device. Answer the ones you know or ask your own.
Ask a new question about this device
Download the instructions for your Mouse in PDF format for free! Find your manual GXT 166 19816 - TRUST and take your electronic device back in hand. On this page are published all the documents necessary for the use of your device. GXT 166 19816 by TRUST.
USER MANUAL GXT 166 19816 TRUST
DPI & Light Settings
Macro Settings
Profile Settings

GXT 166 Gaming Mouse - USER'S MANUAL
Trust
Index
| Language | Page |
| English | 2 |
| Deutsch | 5 |
| François | 8 |
| Italiano | 11 |
| Espanol | 14 |
| Português | 17 |
| Nederland | 20 |
| Dansk | 23 |
| Suomi | 26 |
| Norsk | 29 |
| Svenska | 32 |
| Polski | 35 |
| Česky | 38 |
| Slovenčina | 41 |
| Magyar | 44 |
| Romānă | 47 |
| Бulgaripecs | 50 |
| Р�сский | 53 |
| Еλληνικᾶ | 56 |
| Türkçê | 59 |
| Hrvatski | 62 |
| Slovenski | 65 |
| сретский | 68 |
| Brasilheiro | 71 |
| الترجمة | 74 |
GXT 166 Gaming Mouse - USER'S MANUAL
ATrust
Mouse layout
- Button 1 (left mouse button)
b -Button 3 (Scroll wheel)
c - Scroll wheel LED (DPI indicator)
| Yellow | DPI 1 |
| Green | DPI 2 |
| Blue | DPI 3 |
| Purple | DPI 4 |
| Red | DPI 5 |
d -Button 2(default function = right mouse click)
e -Button 4(default function = triple mouse click)
- Button 5 (default function = DPI+)
g -Button 6(default function = DPI-)
h -Side Buttons 7-18
i - Profile switch (not programmable)
- Adjustable weights compartment
Installation
a - Insert the Trust CD-ROM into your CD drive.
- Click "Run Setup.exe - Published by Trust International BV".
b - Click "Install driver".
c - Click 'Finish' when the installation is completed.
a - Connect the mouse to the USB port of the PC.
2. b - Wait until the message 'Your device is ready to use' appears.
a - Start the mouse configuration software (located in the taskbar).
- b - You can now start to configure the mouse. In the manual will be referred to 'Apply' to update the mouse.
The mouse can store 5 different profiles. You can instantly switch between these profiles by assigning the profile switch function to one of the 18 buttons, or use the profile switch at the bottom of the mouse.
GXT 166 Gaming Mouse - USER'S MANUAL
Trust
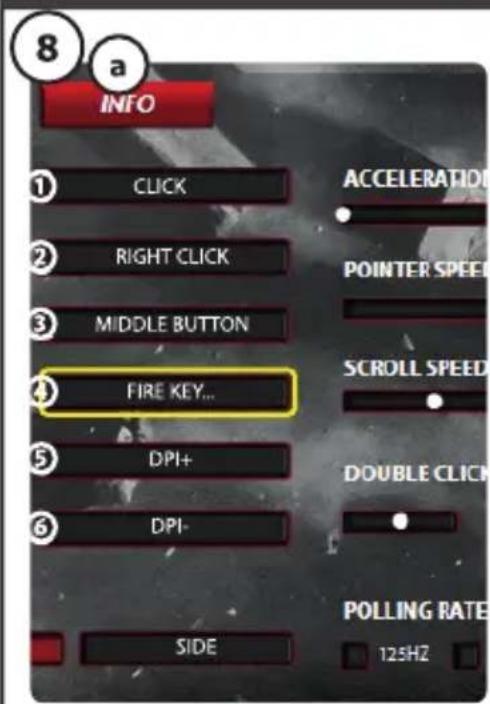
Button programming
-
Assign a function.
a - Click on the 'General' tab.
b - Click on the button which you want to re-assign.
c - Click on the function that you want to assign. - Click on 'Apply' The mouse is beeing updated. -
Assign a function to the side buttons.
a - In the 'General' tab click on 'side' to view the side buttons.
b - Click on the button which you want to re-assign.v
c - Click on the function that you want to assign.
- Click on 'Apply' The mouse is beeing updated.
DPI Settings
- Change the DPI settings (profiles and DPI settings are linked)
a - Click on 'DPI'.
b - Change the DPI settings by moving the sliders.
c Click the DPI number to enable or disable this setting.
- Click on 'Apply' The mouse is beeing updated.
To set the X and Y axis separately, Untick the 'LINK XY' box.
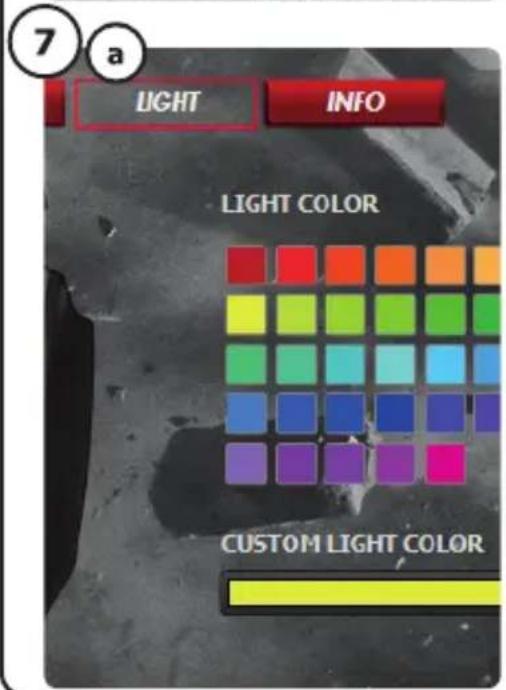
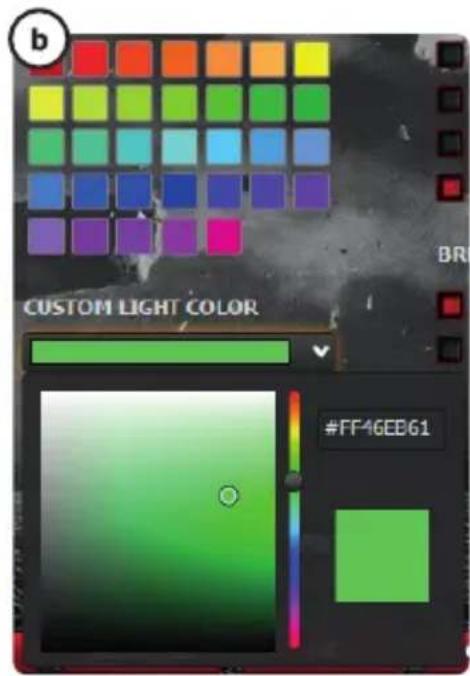
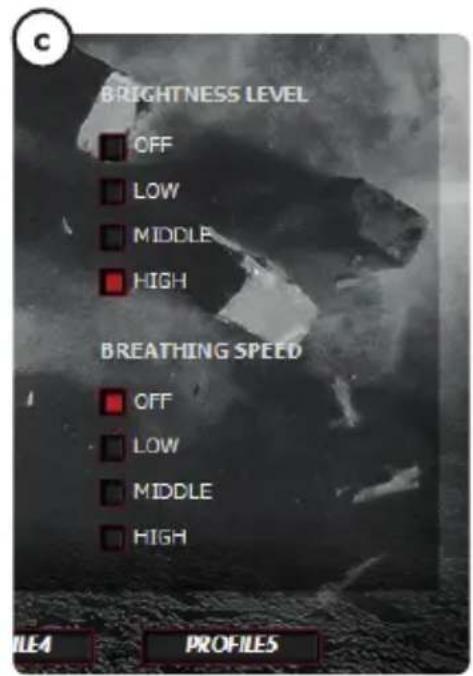
Light Manager Settings
- Change the LED light
a -Click on Light
b - Select the desired LED color Or pick a custom color.
c - Change the brightness level and breathing speed.
- Click on 'Apply' The mouse is beeing updated.
GXT 166 Gaming Mouse - USER'S MANUAL
ATrust
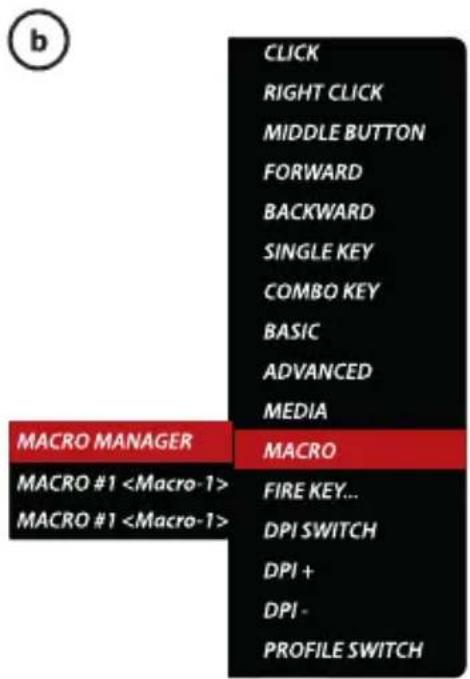
Macro Settings
-
Create a macro. (Store a sequence of keys in the software)
-
Go to the 'General' tab.
a - Click on the button witch you want to re-assign.
b - Hover over 'Macro'.
- Click on 'Macro Manager'.
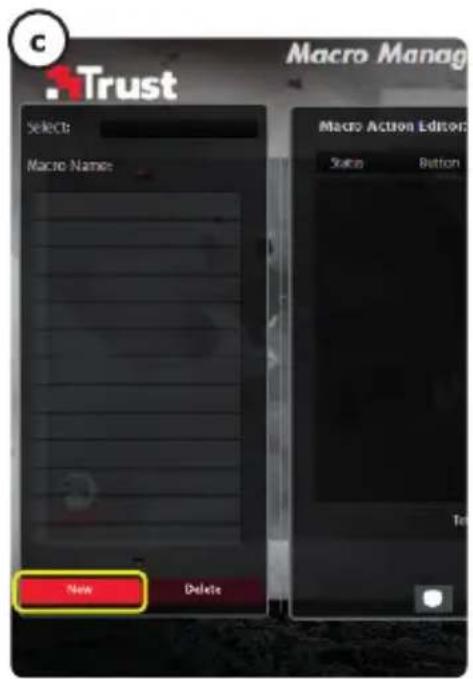
c - Create an new macro by clicking on 'New'.
-
Enter the name of the new macro.
-
Click on 'OK'.
-
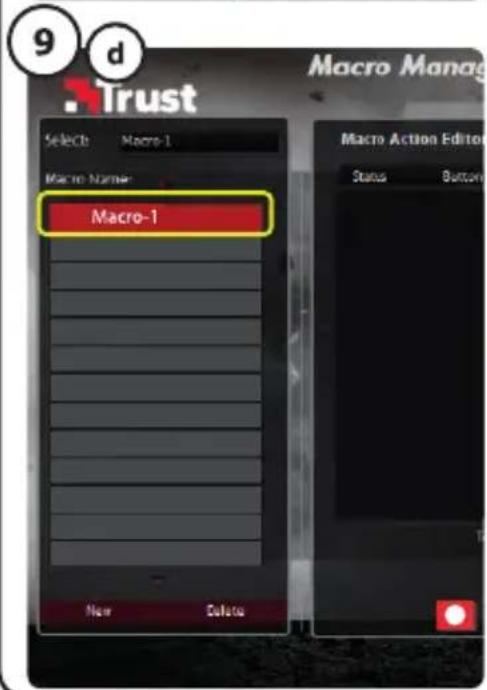
Record a macro.
a - Select a created macro.
-
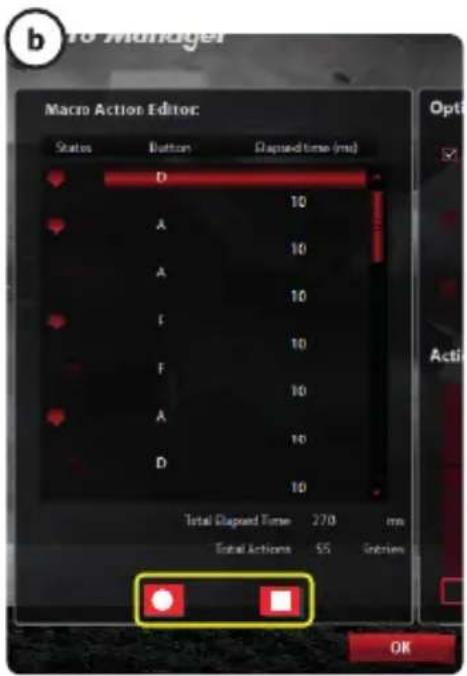
Click on the record button to start recording the prefferd keyboard sequence.
-
When you're finished creating your macro. Click the stop button.
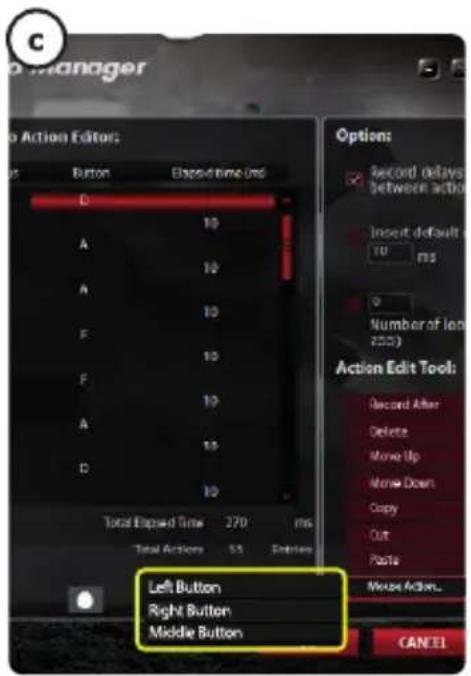
c - Mouse actions can be added, by using the menu on the right. (after recording)
Close the 'macro manager' when your done creating macros.
Assign a macro.
-
To assign a macro follow steps 8 a/b and choose the preferred macro from the function list.
-
Click on 'Apply' The mouse is beeing updated.
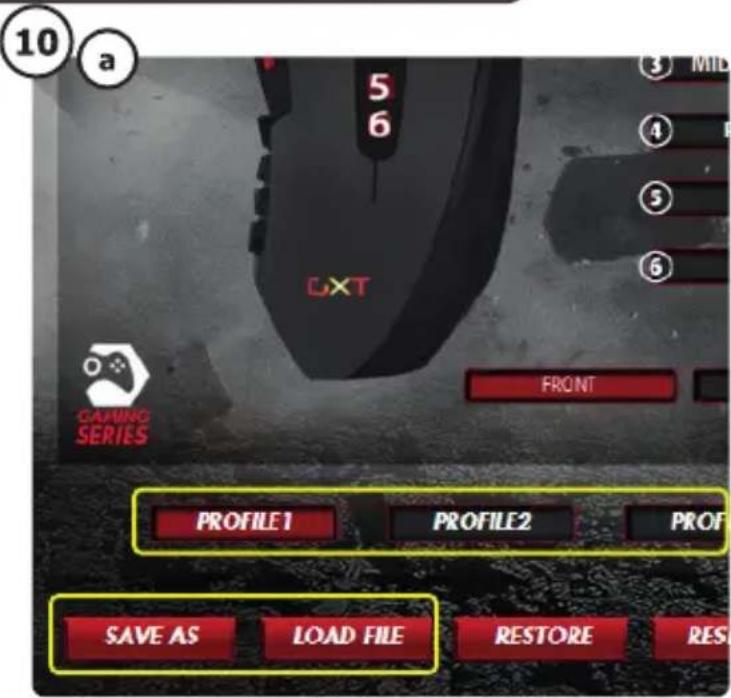
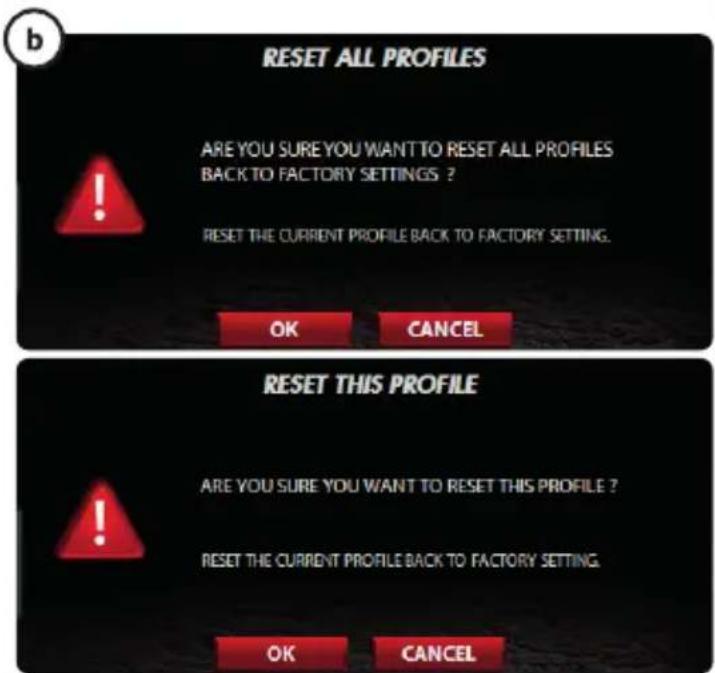
Profile Settings
- Select a profile
a - Select one of the 5 profiles bij clicking on the preferred profile.
- Save or Load a custom setup
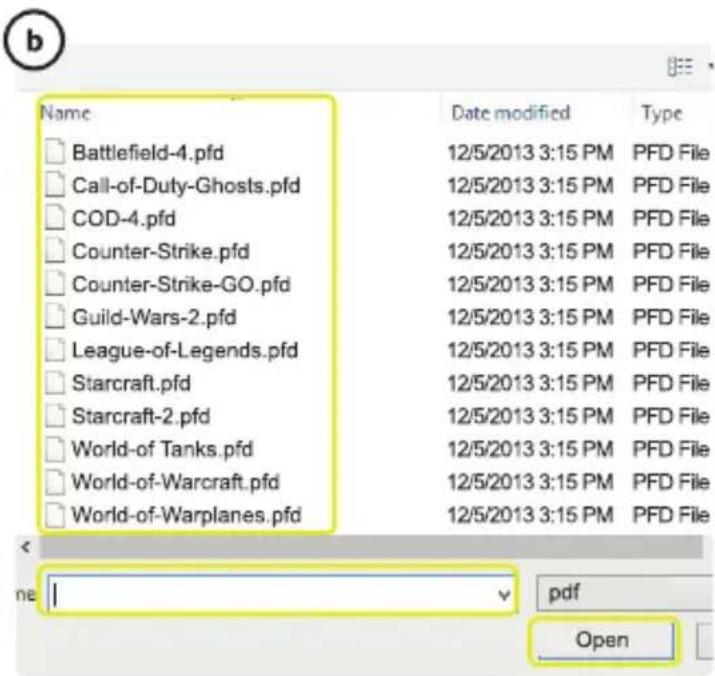
a - Click on 'Save as' to save a setup or 'Load File' to load a setup.
b - Enter a name for the mouse setup, or choose the preferred profile to load.
- Click on 'Save/Open'
- Your mouse setup is now saved/loaded.
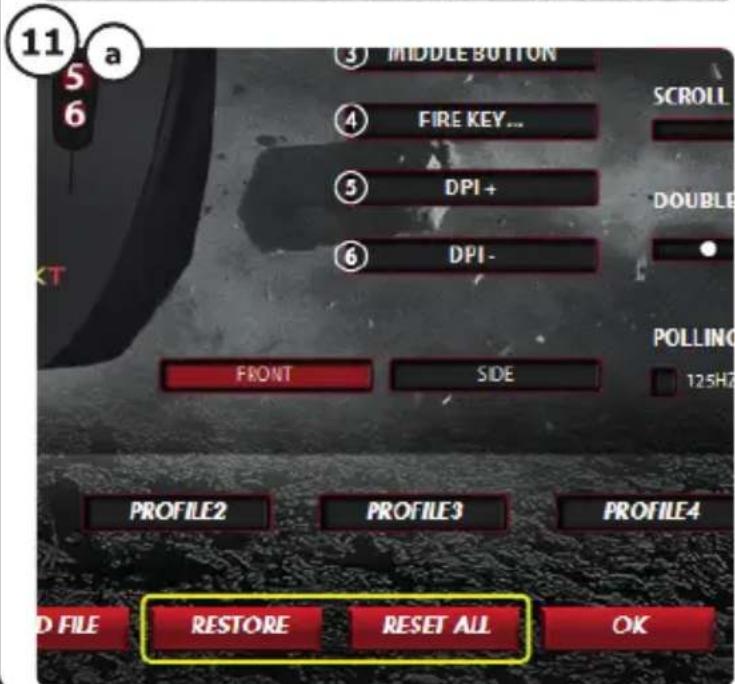
a - Click on 'Reset All' to reset all profiles.
- Click on 'Restore' to restore 1 profile. (currently selected profile)
b - Click on 'OK' to reset all settings.
- Click on 'Apply' The mouse is beeing updated.
Download game specific profiles from the Trust website http://www.trust.com/19816
GXT 166 Gaming Mouse - USER'S MANUAL
Trust
a - Insira o CD-ROM Trust na unidade de CD.
- Clique em "Run Setup.exe - Published by Trust International BV" ["Executor Setup.exe - Published by Trust International BV"].
- Napsauta "Run Setup.exe - Published by Trust International BV" [Suorita Setup.exe - Published by
Trust International BV].
b - Napsauta "Install driver" [Asenna ohjain].
Stille inn lys (Light Manager Settings)
- Endre LED-lys
- Kliknite na „Run Setup.exe - Published by Trust International BV", Spustit Setup.exe - Published
by Trust International BV".
b - Kliknite na „Install driver" [„Instalovat' ovláDAC".]
c-Po dokoneninstalacia kliknite na"Finish"[Dokoncit].
- UpaKHeHa "Macro Manager" [MaKpo MeHnDxbp".
C -Cb3daIte HOB MaKpOc KATO upaKaHTe Ha "New" [,HOB".
-BbBeTe HMeTo Ha HOBnMaKpOc.
-
LJaPaKHeTe "OK".
-
3annweMaKpoc.
a -I36epete c3daaeh MaKpoc.
b -UpaKHeTe Bbpyx 6yToHa 3a 3aNNc, 3a Da CTapTnPaTe 3aNtCBaHcTo Ha IpeDnOHTaHaTa KlaBmHa NOCEIOBATEJIHOCT.
-Korato npnkuiuHTe CbCcb3daBaHTo Ha Baunm MaKpoc. 1paKaHHe 6yToHa 3a cTOn.
c - Morat da 6bdat do6abeHn DeiCTBna Ha Mmikata KaTO ce n3no3Ba MeHIOTo OT JAreHO (CneI 3aIncBAHe).
- KOrato npKJIIOUHTe CbC Cb3dAbaHTo Ha MaKPOcN, 3aTbOpTe „Macro manager"" [„MaKpo MeHnIXkbpa"].
Ha3haabaHe Ha Makpoc.
-3a da Ha3HaunTe MaKpoc, cneBaaTe CbKn 8 a/b n H36epeTe npednoHTaHnT MaKpoc OT cnncbKa C ΦyHKm.
- LpakHeHa,Apply"[",PnIIOxN"] MmKata ce akTyaln3npa.
HactpoiknHa npofo
-
N36op Ha npoФн
-
N36epeTe eHn OT 5-Te npoФиla KaTo UpaKHe T Bbpxy npednoHTaHn.
-
3anaMeTBAHe IINI 3apeXdaHe Ha nepcoHaJHa HAcToPoiKa
a - ÜpaKHeTe Ha „Save as" [„3ana3n KaTo" ], 3a Da 3anaMeTne HacTpOuKaTa UIn „Load File" [„3apeNi Φaɪn" ], 3a Da 3apeNiTe HacTpOuKa.
b -BbBeTeIme3aHaCTpOikKaTaHaMnKkTaIINn36peTe 3a3apeXdahe npednoHTan npoHn.
-
LpakHeTbBpxy ,Save/Open" ["3anaa3n/OTbOpn".
-
Cera Bawata Nahtponka Ha Mmukata e 3anaMeTeHa/3apeDeHa.
-
Bb3ctaHOBBAHe Ha HacTPOKn Nn no npda36npahe
a -IpaKHeTe Ha,Reset All",HynpaBcNcKn"3a da HynpaTe BCnck npoHn.
- LpakheHa „Restore" ["Bb3ctaHOBn", 3a da Bb3ctaHOBnTe 1 npoФи (TekyuO n36paH npoФи).
b -IpaKHeHa OK,3a Da HyInpate BCnHn HAcToPkn.
- UpaKHeHa "Apply" ["PnIOxN"] MuaKaTa ce aKtyaun3npa.
I3TeIeTe cneuФuHn 3a npr npoФuHn ot ye6caTа Ha Trust http://www.trust.com/19816.
GXT 166 Gaming Mouse - USER'S MANUAL
ATrust
Ha3HaueHHe KHOIOK MbIiH
a - Khonka 1 (neba Khonka mbiun)
b -Khonka 3 (koneco npokpyTK)
C - CBeToIIOJ KOleCa npokpyTKn (HdNKaTOp DPI)
| Жeелтый | DPI 1 |
| Зелены | DPI 2 |
| Синney | DPI 3 |
| Сирени� | DPI 4 |
| Красны | DPI 5 |
- Khonka 2 (Фундун no ymonuaHIO = ueIyok npabOY KhoNkoMbiu)
- Khonka 4 (Функця по уmonчанно = Тюнош салок Конлков Мblши)
- Khonka 5 (Функциюуmonчанио = DPI+)
- Khonka 6 (Функции по умочаим = DPI-)
- BOKOBbie KHONK 7-18
- Khonka nepekIoueHn npoФиЯ (Henporpammya)
j -BOKCДЯгузIKOBДЯнИЗМЕHENI Maccbl
YCTaHOBKa
- CoxpaHeHne Hnn 3arpy3ka noIb3ObaTeJbcknx npaMeTpOB
a - Üeiknnte KhoNky «Save as» [«CoxpaHntb KaK», YTo6bl coxpaHntb HactpoiKn, IIn «Load File» [«3arpy3nB faHn»] dny 3arpy3kn Hactpoek.
b -BBeINTe INMg IaH NaCTPOKmMbIu Nn Bbl6epnt Tpe6yeMbIn pOphiNb Ira3arpy3kn.
- LJIeKHTe «Save/Open» [«CoxpaHHTb/OTkpblTb»].
-
Pocne 3Toro 6ydt coxaHbI/3aRpyKeHb I HacrpoK Mbln.
-
BocctaHOBJIeHHe HAcTpoE KNo yMOnJauHHIO
a -LJIeIKHnTe KHOIky «Reset All» [«C6pocuTb BCE]ДЯсбрca Bce npoФиNe.
- LJIeKHTe KHONKY «Restore» [«BocCTaHOBtB»] ДЯ BOCCTaHOBNeHЯ 1 npoФия (BbI6paHHbI B DWaHHbI MOMENT).
b -LeKHTe OK ,TO6bIc6pOcTb BCE npaMeTpbl.
- LJIeKHNTe «Apply» [«PImeHnTb»] → PporpaMMHoe o6cepeHHe Mblu 6yTe O6HOBNeHo.
3arpyuTe CneuaJIbHO 3aIaHbIe IrgPoBbIe npOuIN Ha Be6-caTlE Trust http://www.trust.com/19816.
GXT 166 Gaming Mouse - USER'S MANUAL
Trust
AiataEn Tou novTkiou
a -PiAnktpo 1 (apiotepnAnktpo novTkiou)
b -PiAnKtpo3(TpOxocKUlaionc)
c -LED Tpoxou kuiionc (EvoEiEg DPI)
| Kīrpívo | DPI 1 |
| Πράσινο | DPI 2 |
| Μπλε | DPI 3 |
| Mòβ | DPI 4 |
| Kόκκíνo | DPI 5 |
d -Piakto 2 (npoeiIeEvn aeitoupyia = kIK eK TO novtki)
e -PiNkTpo 4 (npoeiIeVyEvn IeIToupyia = TpiIaKik eK To novtki)
- 0 (npoenileymuevnλeitoupyia = DPI+
g -Πλκτρο 6 (προεπιλεγμένη λειτουργία = DPI-)
h -PLeuipka PAnKtpa 7-18
- diaokntnc npoipai (nnpoypaumtioevoc)
-iaapeiopapuoievwoBapov
EykataoTaon
a-EiayeTe To Trust CD-ROM oTn movda CD Tou unooyioTn.
- Kavte kik oTo "Run [EeEeon Tou] Setup.exe - Published by Trust International BV".
b-Kavte Klik oTo "Install driver" [Eykarotaan npoypapmuOc odynonC].
c-OTav oλokλnpωθει n ηεγκατασαοι, kαντε κλικ στο 'Finish' [Teλος].
a -Σuvδεστε to novtiki σηn Θupa USB tou PC.
- b - Περιμένετε μέχρινα εύφανιστει το μήνυμα ‘Your device is ready to use’ [H συοκευή σας εἰναι ἐτομηνίας xρήσα].
a - EkkivnoTe To loyioikó diaopppwoanc Tou novtkiou (piaoketai otn ypaum np eyaaov). - b - Mnopeite Tupa va Eekivnoe Tn diaoppwan Tou novTkiou. 2To Evxepidio xpnaiponoietai o opoc Apply' [Epaupoyn] yia Tnv evnpw an twpueew Tou novTkiou.
To novtiki exi duvatotnta ano hkeuaoc 5 diaopoptikov npoiia. Mnopeite va evaalaoaeote aega aetae u autow twv npoiia avetovacn aeitoupyia aalaync npoiia o evan to 18 nanktpa xpanionoiwvtac tov diakontn npoiia otny katw naupa tou novtkiou.
GXT 166 Gaming Mouse - USER'S MANUAL
Trust
- "Run Setup.exe - Published by Trust International BV" ["Setup.exe - Published by Trust
International BV'yi calistir' ogesini tiklatin.
| dip | DPI 1 |
| dip | DPI 2 |
| dip | DPI 3 |
| dip | DPI 4 |
| dip | DPI 5 |
(wJWgWJjj)1jll - a
C
"Run Setup.exe - Published by Trust International BV"
).Jewell "Install driver" (jLb
.
jua USB jiaowogal Jgga 2
).JusuJ J> "Your device is ready to use" (JUJ Jj 1
),olgall baw g>gall) wglal aepolj Jauw psa
.oglll CzjU Apply' 1111111111111111111111111111111111
Jl Jgl bll cie aeg abg bawil oiae w goll gluill lalw 5 wj jwglall
Jewl bai jieo o xilj gll 18
GXT 166 Gaming Mouse - USER'S MANUAL
ATrust
a0,01
4.
- a
a oolc| j sll jll c j - b
Lpui jy j sll aagbglsljej
.ogll 2y Apply yJc jai
aJlJU aabg Jauu 5.
General'Side
a 1scll jj sll jll lsc j - b
.1puii jui jui iui aia bgl lscjai - C
.ogllwddwo Apply Jc
DPI 1
(6.
.DPI sLc jai - a
ylll lwl w dpi c|ds|p - b
.1yll jbe g| npdPDI oJc
wglal 12j0y Apply sJc j
.LINKXYaIgJLdJIeJIeJIyJ,JaiaoJScWYgXjzJlJrJn
Light Manager
Jgall 7.
Light
.aaio 1gj jgl gwlal wgolwglj
aagw ggbwglgwo
wglll wzjoo Apply 1scr -
Jd
| (General) | 8. |
| .Genera'l llll llll llll llll llll llll llll llll llll llll llll llll llll llll llll llll llll llll llll llll llll llll llll llll llll llll llll llll llll llll llll llll llll lll llll llll llll llll llll llll llll llll llll llll llll llll llll llll llll llll llll llll llll llll llll llll llll llll llll llll llll llll llll llll llll llll llll | |
| .a | b |
| .Macro'g g g g - | b |
| .Macro Manager' g g g - | |
| .New' g g g g g g g g g g g g g g g g g g g g g g g g g g g g g g g g g g g g g g g g g g g g g g g g g g g g g g g g g g g g g g g g g g g g g g g g g g g g g g g g g g g g g g g g g g g g g g g g g g g gg g g g g g g g g g g g g g g g g g g g g g g g g g g g g g g g g g g g g g g g g g g g g g g g g g g g g g g g g g g g g g g g g g g g g g g g g g g g g g g g g g g g g g g g g g g g g g g g g g g g | |
| .0K' g g g - | |
| .gg slo llll llll llll llll llll llll llll llll llll llll llll llll llll llll llll llll llll llll llll llll llll llll llll llll llll llll llll llll llll llll llll llll llll | 9. |
| .gg slo llll llll llll llll llll llll llll llll llll llll llll llll llll llll llll llll llll llll llll llll llll llll llll llll llll llll llll llll llll llll llllll llllll llllll llllll llllll llllll llllll llllll llllll llllll llllll llllll llllll llllll llllll llllll llllll llllll llllll llllll llllll llllll llllll llllll llllll lilllll llllll llllll llllll llllll llllll llllll llllll llllll llllll llllll llllll llllll llllll llllll llllll llllll llllll llllll llllll llllll llllll llllll llllll llllll l lllll llllll llllll llllll llllll llllll llllll llllll llllll llllll llllll llllll llllll llllll llllll llllll llllll llllll llllll llllll llllll llllll llllll llllll llllll l llllll llllll llllll llllll llllll llllll llllll llllll llllll llllll llllll llllll llllll llllll llllll llllll llllll llllll llllll llllll llllll llllll llllll llllll lllll llllll llllll llllll llllll llllll llllll llllll llllll llllll llllll llllll llllll llllll llllll llllll llllll llllll llllll llllll llllll llllll llllll llllll llllll lllllt | a |
| .b | b |
| .(g s s s s s s s s s s s s s s s s s s s s s s s s s s s s s s s s s s s s s s s s s s s s s s s s s s s s s s s s s s s s s s s s s s s s s s s s s s s s s s s s s s s s s s s s s s s s s s s s s s s s S G - | c |
| .0K' g g g - | |
| .gg slo llll llll llll llll llll llll llll llll llll llll llll llll llll llll llll llll llll llll llll llll llll llll llll llll llll llll llllll llllll llllll llllll llllll lilllll llllll llllll llllll llllll llllll llllll llllll llllll llllll llllll llllll llllll llllll llllll llllll llllll llllll llllll lilllll llllll llllll llllll llllll llllll lilllll llllll llllll llllll llllll llllll llllll llllll llllll llllll llllll llllll llllll llllll llllll llllll llllll llllll llllll l lllll llllll llllll llllll llllll llllll l lllll llllll llllll llllll llllll llllll llllll llllll llllll llllll llllll llllll llllll llllll llllll llllll llllll llllll llllll l lllll llllll llllll llllll llllll llllll l llllll llllll llllll llllll llllll llllll llllll llllll llllll llllll llllll llllll llllll llllll llllll llllll llllll llllll llllll 1234567890000000000000000000000000000000000000000000000000000000000000000000000000000000000000000000000000000 | |
| .p9 | p9 |
| .gg slo llll llll llll llll llll llll llll llll llll llll llll llll llll llll llll llll llll llll llll llll llll llll llll llll llll llll llll llll llll llll lllt | p9 |
| .gg slo llll llll llll llll llll llll llll llll llll llll llll llll llll llll llll llll llll llll llll llll llll llll llll llll llll llll llll llll llll lllt | p9 |
| .gg sLO llll llll llll llll llll llll llll llll llll llll llll llll llll llll llll llll llll llll llll llll llll llll llll llll llll llll llll llll llll llll llll llll llll 123456789000000000000000000000000000000000000000000000000000000000000000000000000000000000000000 | |
| .gg sLO llll llll llll llll llll llll llll llll llll llll llll llll llll llll llll llll llll llll llll llll llll llll llll llll llll llll llll llll llll llll lllt | p9 |
| .p9 | p9 |
| .gg sLO llll llll llll llll llll llll llll llll llll llll llll llll llll llll llll llll llll llll llll llll llll llll llll llll llll llll llll llll llll lllt | p9 |
| .gg sLo llll llll llll llll llll llll llll llll llll llll llll llll llll llll llll llll llll llll llll llll llll llll llll llll llll llll llll llll llll llll llll llll llll t | p9 |
| .gg sLO llll llll llll llll llll llll llll llll llll llll llll llll llll llll llll llll llll llll llll llll llll llll llll llll llll llll llll llll llll llli t | p9 |
| .gg sLO llll llll llll llll llll llll llll llll llll llll llll llll llll llll llll llll llll llll llll llll llll llll llll llll llll llll llll llll llll lillt | p9 |
| .gg sLO llll llll llll llll llll llll llll llll llll llll llll llll llll llll llll llll llll llll llll llll llll llll lillt | p9 |
| .gg sLO llll llll llll llll llll llll lllt | p9 |
| .gg sLO lillt | p9 |
| .gg sLO lillt | p9 |
| .gg sLO lillt | p9 |
| .gg sLO lillt | p9 |
| .gg sLO lillt | p9 |
| .gg sLO lillt | p9 |
| .gg sLO lillt | p9 |
| .gg sLO lillt | p9 |
| .gG sLO lillt | p9 |
| .gg sLO lillt | p9 |
| .gg sLO lillt | p9 |
| .gg sLO lillt | p9 |
| .gg sLO lillt | p9 |
| .gg sLO lillt | p9 |
| .gg sLO lillt | p9 |
| .gg sLO lillt | p9- |
| .gg sLO lillt | p9- |
| .gg sLO lillt | p9- |
| .gg sLO lillt | p9- |
| .gg sLO lillt | p9- |
| .gg sLO lillt | p9- |
| .gg sLO lillt | p9- |
| .gg sLO lillt | p9- |
10.
Jiaai baoi slc jai aasaill baoi jzil - a
yaasolacJasgi bax 10.
1.1512 Load File Save as
alaoj JiaooJI bai jgI wglJ slcy Iow Jst b
Save/Open
Ugglull 1cJ Jaa/ba> U
a|y|y|y|y|osai 11.
blaiy gao bao oslcyl Reset All yc - a
.Trust http://www.trust.com/19816 gaoJQaUdOdsb0j