
GXT 31 - Mouse TRUST - Free user manual and instructions
Find the device manual for free GXT 31 TRUST in PDF.


| Brand | Trust |
| Model | GXT 31 |
| Product type | Wired gaming mouse |
| Connectivity type | USB |
| Number of buttons | 7 programmable buttons |
| Resolution (DPI) | 100 to 3000 (adjustable per X/Y axis) |
| Polling rate | 125 Hz, 250 Hz, 500 Hz, 1000 Hz |
| Number of profiles | 5 customizable profiles |
| Adjustable weight | Yes (weights included, add/remove via back cover) |
| Power source | USB bus |
| Configuration software | Provided on CD or downloadable |
| Main functions | Programmable buttons, macros, adjustable DPI, polling rate, profiles |
| System compatibility | Windows (XP, Vista, 7, 8, 10, 11) |
| Maintenance | Clean with a soft dry cloth |
| Dimensions (L x W x H) | Approximately 125 x 70 x 40 mm |
| Net weight | Approximately 130 g (with weights) |
| Package contents | Mouse, CD-ROM, set of weights, manual |
Frequently Asked Questions - GXT 31 TRUST
User questions about GXT 31 TRUST
0 question about this device. Answer the ones you know or ask your own.
Ask a new question about this device
Download the instructions for your Mouse in PDF format for free! Find your manual GXT 31 - TRUST and take your electronic device back in hand. On this page are published all the documents necessary for the use of your device. GXT 31 by TRUST.
USER MANUAL GXT 31 TRUST
Mouse Layout
Trust


GXT 31 Gaming Mouse - USER'S MANUAL
Trust
| Index | |||
| Language | page | ||
| Englisch | 2 | ||
| Deutsch | 5 | ||
| Français | 8 | ||
| Italiano | 11 | ||
| Español | 14 | ||
| Português | 17 | ||
| Nederlands | 20 | ||
| Dansk | 23 | ||
| Suomi | 26 | ||
| Norsk | 29 | ||
| Svenska | 32 | ||
| Polski | 35 | ||
| Česky | 38 | ||
| Slovenčina | 41 | ||
| Vagyar | 44 | ||
| Română | 47 | ||
| Български | 50 | ||
| Русский | 53 | ||
| Еллэнvíкá | 56 | ||
| Türkçe | 59 | ||
| Hrvatski | 62 | ||
| Slovenski | 65 | ||
| C | рпски | 68 | |
GXT 31 Gaming Mouse - USER'S MANUAL
Trust
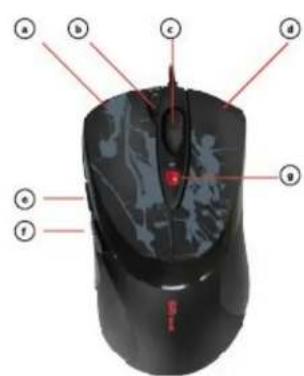
Mouse layout
- Button 1. (left mouse button, not programmable)
- Button 7. (default function = triple mouse click)
- Button 3. (default function = middle click)
- Button 2. (default function = right mouse click)
- Button 4. (default function = page forward)
- Button 5. (default function = page backward)
- Mode button (click to switch between 'Profile-1,2,3,4 and 5')
Installation
① - Insert the Trust CD-ROM into your CD drive.
- Click "Run Setup.exe – Published by Trust International BV"
- Click "Install driver".
- Click 'finished' when the installation is finished
② - Connect the mouse to the USB port of the PC.
- Wait until the message 'Your device is ready to use' appears.
③ - Start the mouse configuration software. (located in the taskbar)
- You can now start to configure the mouse.
- In the following part of the manual there be referred to the 'OK' function that updates the mouse.
'OK' is located in the bottom right corner of the main window.
(the mouse will stop working when it's beeing updated. This will take a few seconds.)
The mouse can store 5 different profiles. You can instantly switch between these setups by pressing the 'Mode' button on the mouse.
▶ You don't need to click on 'OK' after every single change. You can make all the changes that you want and then click 'OK' to update all changes directly to the mouse.
Profile settings (The mouse can store 5 different profiles)
Changing a profile
- Click on 'Profile'
- Click on the profile that you want to change.
Enable or disable profiles
- Click on 'Mode Name/Select'
- In the 'Mode Administration' window you can change profile names and enable or disable profile.
- To disable a profile,un-tick each profile from the bottom to the top order; to add a profile tick each
profile in reverse order.
⑤ Configuration
Assign a function.
- Click on the button which you want to re-assign.
- Hover over the function type you want to assign. (Mouse, Internet, Multimedia, etc. etc.)
- Click on the function that you want to assign.
- Click on 'OK' → The mouse is beeing updated.
Assign a Keyboard function.
- Click on the button witch you want to re-assign.
- Click on 'Keyboard'
- Click on the virtual keyboard key that you whish to assign.
- Click on 'OK' → The mouse is beeing updated.
© Assign launch a program.
- Click on the button witch you want to re-assign.
- Click on 'Execute Program'
- Double click the .exe file that you want to launch.
- Click on 'OK' → The mouse is beeing updated.
⑥ Advanced Mouse configuration
Create a macro function. (Store a sequence of keys in the software)
- Click on the button witch you want to re-assign.
- Click on 'Macro Manager.
There are 3 ways to create an macro:
- Insert functions from top and left panels.
- Record both mouse and keyboard movements using the record button.
- Input with either keyboard panel below or your actual keyboard.
- When you're finished creating your macro. Click 📋
- Here you can:
* Open an existing macro.
* Save your macro.
* Rename your macro.
- Close the 'macro manager' when your done creating macros.
⑦ Assign a macro function. (Store a sequence of keys in the software)
- Click on the button witch you want to re-assign.
- Select the macro you whish to assign from the 'Select Macro File' list
- Click on 'OK' → The mouse is beeing updated.
Change the DPI settings (every profile has his own DPI setting, profiles and DPI are linked)
- Click on 'DPI Setting'.
- You can change the DPI setting for both X and Y axis seperatly. (100 - 3000)
- Click on 'OK'
GXT 31 Gaming Mouse - USER'S MANUAL
Trust
- Click on 'OK' → The mouse is beeing updated.
Change the report rate (every profile has his own report rate profiles and report rate are linked)
- Click on 'Report Rate'
- Select the desired report rate (125Hz, 250Hz, 500Hz, 1000Hz)
- Click on 'OK'
- Click on 'OK' → The mouse is beeing updated.
16 Mouse setup
Save a setup
- Click on 'File'
- Click on 'Save as'
- Enter a name for the mouse setup
- Click on 'Save'
- Your mouse setup is now saved.
Restore default settings or load own setting
- Click on 'File'
- Click on 'Open'
- Select for default settings 'Default settings.ASC' or your own saved settings.
- Click on 'Open
- Click on 'OK' → The mouse is being updated.
⑬ Changing the weights
- Remove the back cover of the mouse by turning it.
- Place or remove the weights.
GXT 31 Gaming Mouse - USER'S MANUAL
Trust
- Fare clic su "Run Setup.exe – Published by Trust International BV".
- Fare clic su "Installa driver".
- Clique em "Executar Setup.exe – Published by Trust International BV".
- Napsauta "Run Setup.exe – Published by Trust International BV".
- Valitse "Install driver" (Asenna ohjain).
- Napsauta 'Mode Name/Select'.
- Kliknite na „Run Setup.exe – Published by Trust International BV”.
- Dati clic pe „Run Setup.exe – Published by Trust International BV”.
- Dati clic pe „Install driver“ [„Instalare driver“].
- Kliknite na „Run Setup.exe – Published by Trust International BV".
- Kliknite na „Install driver“ [„Instaliraj upravljački program“].
- GXT 31 GAMING MOUSE - USER'S MANUAL
- TRUST
- MOUSE LAYOUT
- INSTALLATION
- PROFILE SETTINGS (THE MOUSE CAN STORE 5 DIFFERENT PROFILES)
- ⑤ CONFIGURATION
- ASSIGN A FUNCTION
- ASSIGN A KEYBOARD FUNCTION
- © ASSIGN LAUNCH A PROGRAM
- ⑥ ADVANCED MOUSE CONFIGURATION
- ⑦ ASSIGN A MACRO FUNCTION. (STORE A SEQUENCE OF KEYS IN THE SOFTWARE)
- CHANGE THE DPI SETTINGS (EVERY PROFILE HAS HIS OWN DPI SETTING, PROFILES AND DPI ARE LINKED)
- 16 MOUSE SETUP
Brand : TRUST
Model : GXT 31
Category : Mouse