 — Flash — Mode d'emploi PDF")
EF610 DG ST Super (Pentax) - Flash SIGMA - Free user manual and instructions
Find the device manual for free EF610 DG ST Super (Pentax) SIGMA in PDF.
| Product type | Electronic flash with automatic zoom head and tilt/swivel head with TTL control |
| Brand | Sigma |
| Model | EF610 DG ST Super (Pentax) |
| Guide number (ISO 100, 105 mm) | 61 |
| Power supply | 4 AA alkaline batteries or Ni-Cd/Ni-MH rechargeable batteries |
| Recycling time (alkaline batteries) | Approximately 7.0 seconds |
| Recycling time (rechargeable batteries) | Approximately 5.0 seconds |
| Number of flashes (alkaline batteries) | Approximately 120 |
| Number of flashes (rechargeable batteries) | Approximately 160 |
| Flash duration (full power) | Approximately 1/700 s |
| Coverage angle | 24–105 mm (auto), 17 mm with built-in wide panel |
| Auto power saving | Yes (after approx. 180 s) |
| Flash modes | TTL, P-TTL, Manual (1/1 to 1/64), Stroboscopic (1–100 Hz), Normal and designated slave, Wireless (master/slave) |
| Synchronization | 1st and 2nd curtain, High-speed (FP) up to camera's fastest speed |
| Flash exposure compensation | -3 to +1 EV in 1/2 EV steps |
| Bounce flash | Yes – tilt/swivel head: up 0°/60°/75°/90°, down 0°/7°, right 0°/60°/75°/90°, left 0°/60°/75°/90°/120°/150°/180° |
| AF assist illuminator | Yes (range 0.7–9 m) |
| Display | LCD with backlight (LIGHT button) |
| Maintenance | Clean with a soft, damp cloth. Do not use solvents. Store in a dry, moderate place. |
| Safety | Internal high voltage – do not disassemble. Keep at least 1 m away from eyes. Do not use near flammable materials. |
Frequently Asked Questions - EF610 DG ST Super (Pentax) SIGMA
User questions about EF610 DG ST Super (Pentax) SIGMA
0 question about this device. Answer the ones you know or ask your own.
Ask a new question about this device
Download the instructions for your Flash in PDF format for free! Find your manual EF610 DG ST Super (Pentax) - SIGMA and take your electronic device back in hand. On this page are published all the documents necessary for the use of your device. EF610 DG ST Super (Pentax) by SIGMA.
USER MANUAL EF610 DG ST Super (Pentax) SIGMA
The CE Mark is a Directive conformity mark of the European Community (EC).
DEUTSCH
flansh is hse s i 1 1 1 1 1 1 1 1 1 1 1 1 1 1 1
各部の名称(1丶一)
Thank you very much for purchasing the Sigma EF-610 DG SUPER PA-PTTL Electronic Flash. This product is specifically developed for the PENTAX AF series autofocus SLR cameras. Depending on the camera model, functions and operation may vary. Please read this instruction booklet carefully for your camera body. To add to your enjoyment of photography, the flash has a variety of features. To make the most of all these features, and to get the maximum performance and enjoyment from your flash, please read this instruction booklet, together with your camera's instruction manual, before using the flash, and also keep it handy for your future reference.
PRECAUTIONS
In order to avoid causing any damage or injury, please read this instruction manual very carefully, paying attention to the cautionary signs below, before using the flash.
Please take special note of the two cautionary signs below.

Warning!! Using the product disregarding this warning sign might cause serious injury or other dangerous results.

Caution !! Using the product disregarding this caution sign might cause injury or damage.

Symbol denotes the important points, where warning and caution are required.
Symbol contains information regarding the actions that must be avoided.

Warning !!

This flash contains high voltage circuits. To avoid electric shock or burns, do not attempt to disassemble the flash. If the outside shell of the unit is broken or cracked, do not touch the mechanism inside.

Do not fire the flash close to eyes. Otherwise the bright light could damage the eyes. Keep at least 1m/3feet distance between face and the flash unit when taking a picture with flash.

Do not touch the synchro terminal of your camera when the flash is attached to the hot shoe. High voltage circuitry could cause an electric shock.

Never use your camera in an environment where flammable, burnable, gas, liquids or chemicals, etc, exist. Otherwise it might cause fire or explosion.

Caution !!

Do not use this flash unit on any camera other than the PENTAX AF cameras; otherwise the flash may damage the circuitry of these cameras.

This flash unit is not waterproof. When using the flash and camera in the rain or snow or near water, keep it from getting wet. It is often impractical to repair internal electrical components damaged by water.

Never subject the flash and camera to shock, dust, high temperature or humidity. These factors might cause fire or malfunctioning of your equipment.

When the flash is subjected to sudden temperature change, as when the flash unit is brought from a cold exterior to warm interior, condensation might form inside. In such a case, place your equipment in a sealed plastic bag before such a change, and do not use the flash unit until it reaches room temperature.

Do not store your flash in a drawer or cupboard etc. containing naphthalene, camphor or other insecticides. These chemicals will have a negative effects on the flash unit.

Do not use a thinner, Benzene or other cleaning agents to remove dirt or finger prints from the component. Clean with a soft, moistened cloth.

For extended storage, choose a cool dry place, preferably with good ventilation. It is recommended that the flash be charged and fired several times a month, to maintain proper capacitor functioning.
| EXTERNAL PARTS | 1. Flash Head 2.AF Auxiliary Light 3.Bounce Angle; Up and Down |
| 4. Bounce Angle; Right and Left 5. Bounce Lock and Release Button; Up and Down | |
| 6. Swivel Lock and Release Button; Right and Left 7. LCD Panel 8. Battery Cover | |
| 9. Shoe Ring 10. Shoe 11. Catch Light Panel 12. Wide Panel | |
| CONTROLS | 13. MODE Button 14. SEL SELECT Button 15. + Increment Button |
| 16. - Decrement Button 17. ZOOM Button 18. TEST Button | |
| 19. LIGHT Button 20. Ready Light 21. Power Switch |
ABOUT THE BATTERY
This flash unit uses four "AA" type Alkaline dry cell batteries, Ni-Cad or Ni-MH rechargeable batteries. Manganese batteries can also be used but as they have a shorter life than Alkaline batteries, we do not recommend using them. Please replace batteries if it takes more than 30 seconds to light the Ready Lamp.
To assure proper electrical contact, clean the battery terminals before installing the batteries.
Ni-Cad or Ni-MH batteries do not have standardized contacts. If you use Ni-Cad or Ni-MH batteries, please confirm that the battery contacts touch the battery compartment properly.
To prevent battery explosion, leakage or overheating, use four new AA batteries of the same type and brand. Do not mix the type or new and used batteries.
Do not disassemble or short-circuit the batteries, or expose them fire or water; they may explode. Do not recharge the batteries other than Ni-Cad or Ni-MH rechargeable batteries.
When the flash will not be used for an extended period of time, remove the batteries from the flash to avoid the possibility of damage from leakage.
Battery performance decreases at low temperatures. Keep batteries insulated when using the flash in cold weather.
As with any flash, it is recommended you carry spare batteries when on a long trip or when photographing outdoors in cold weather.
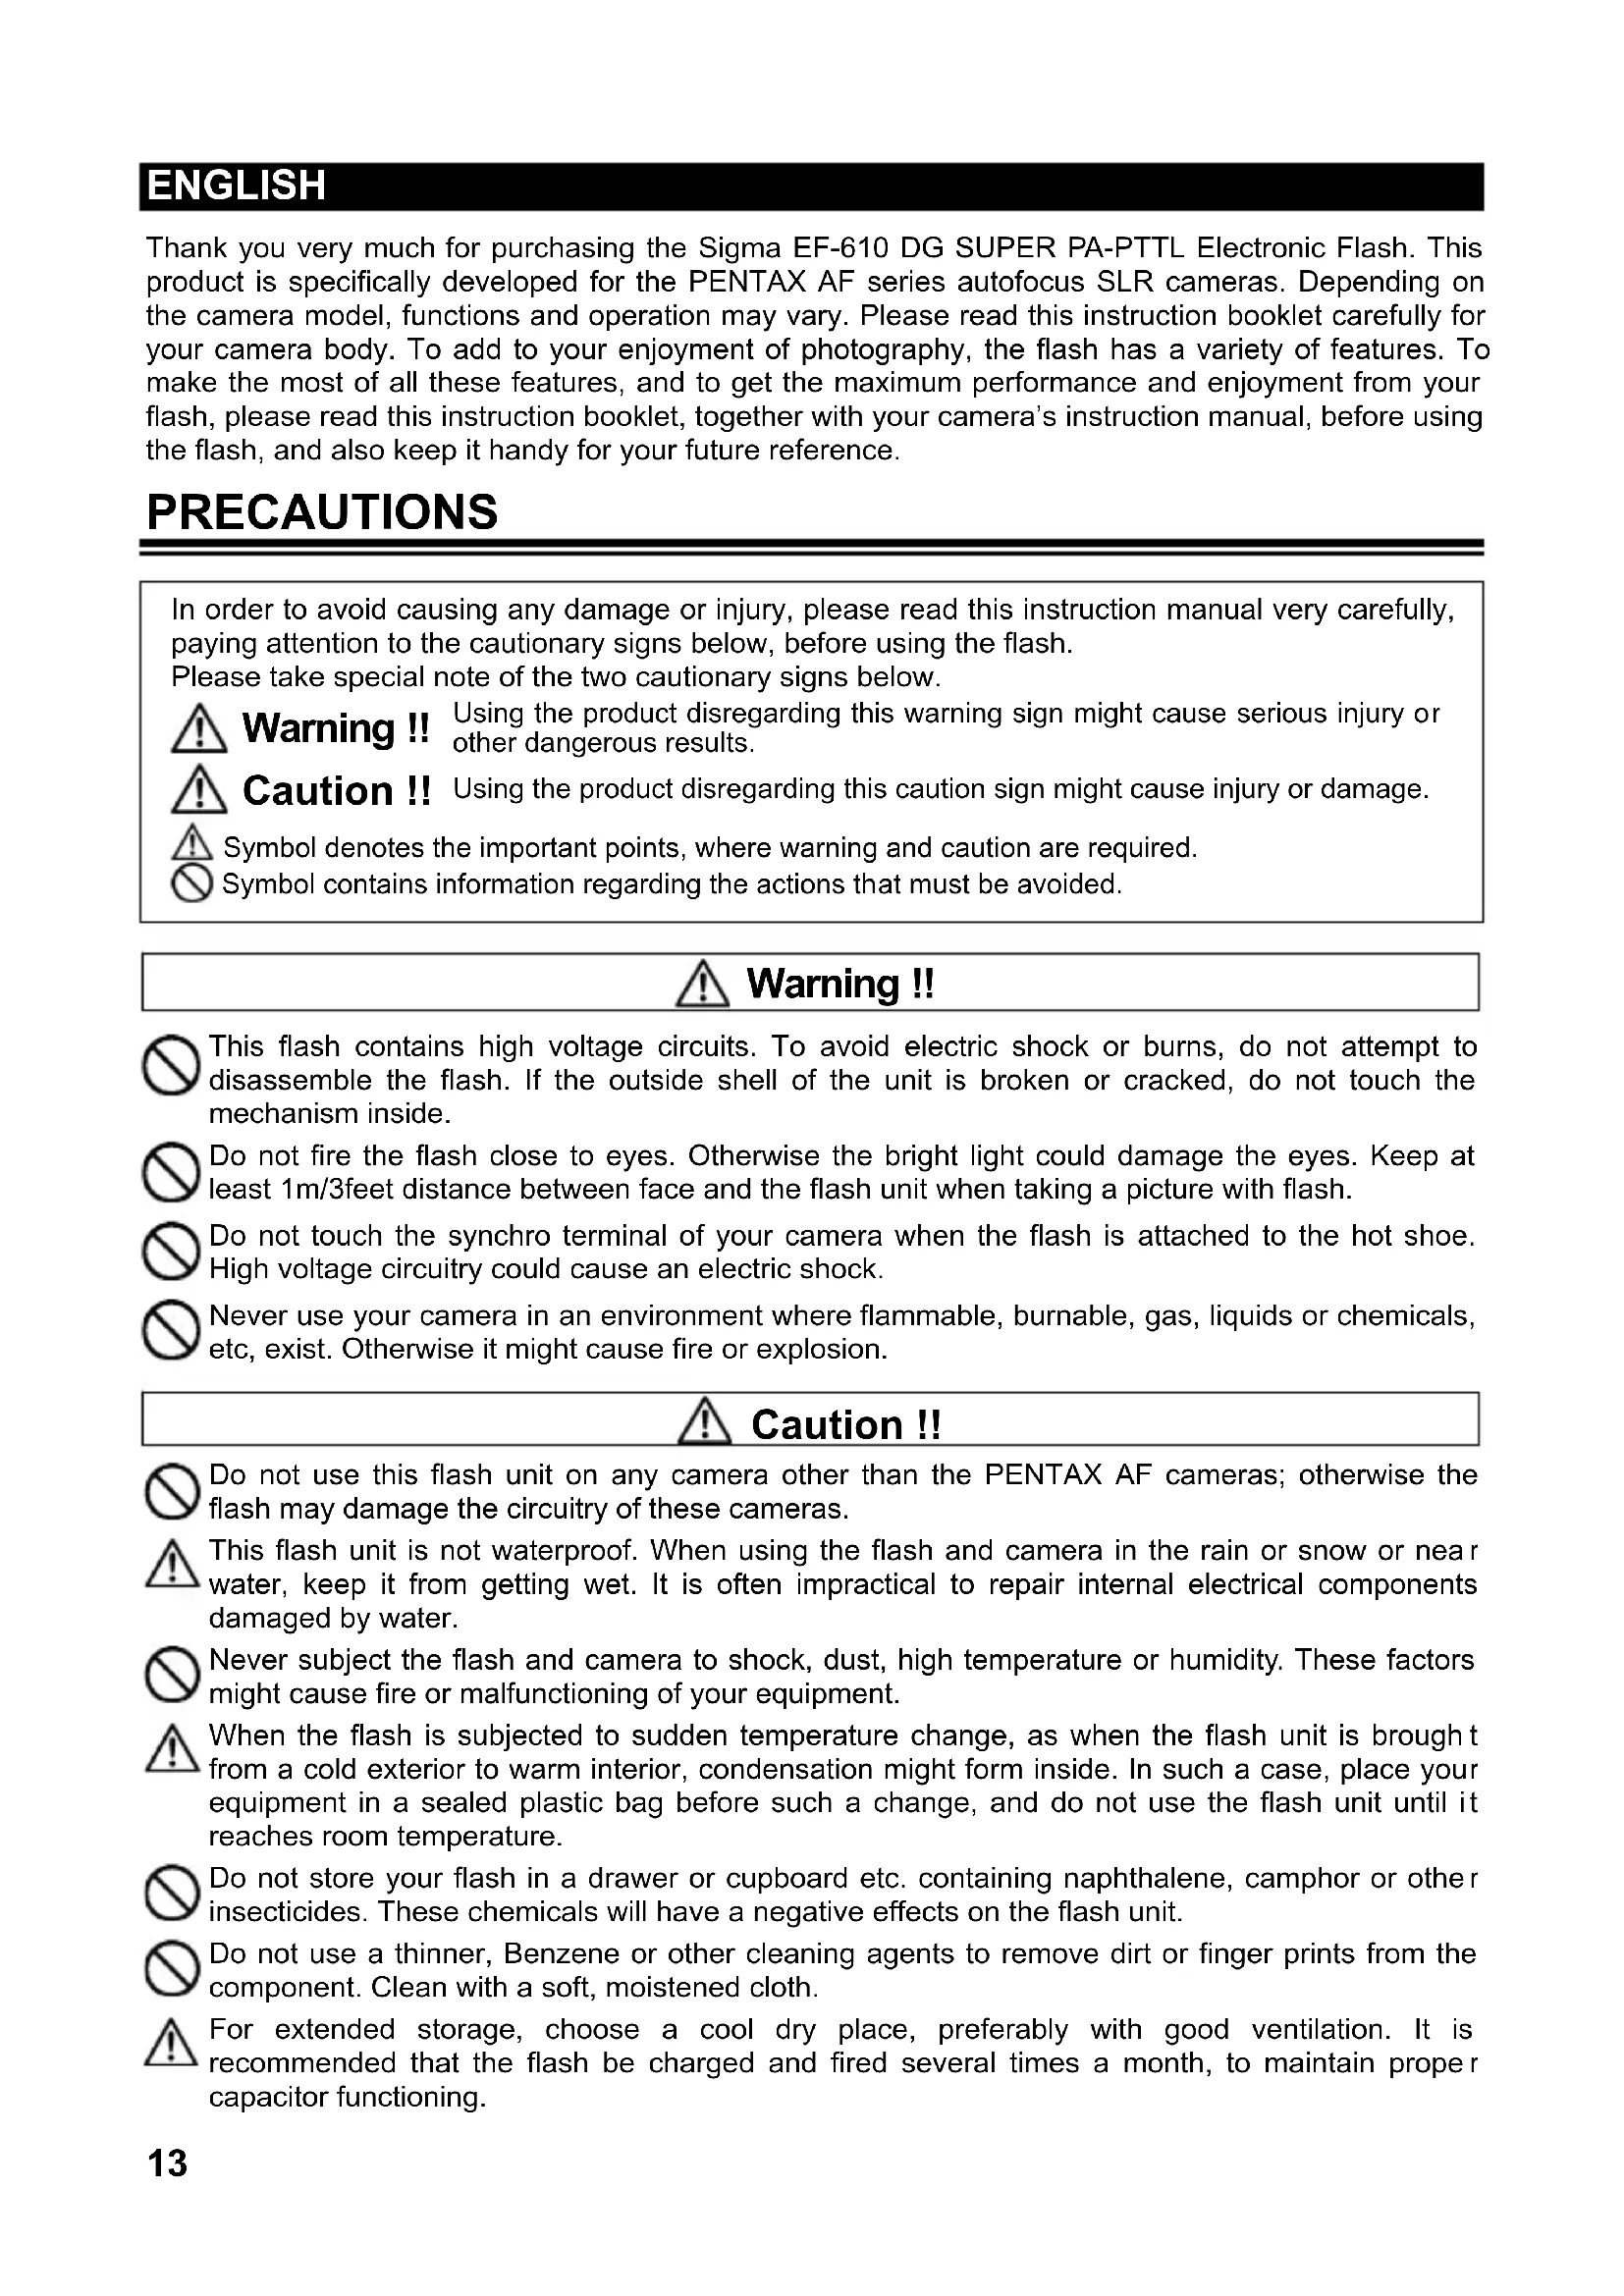
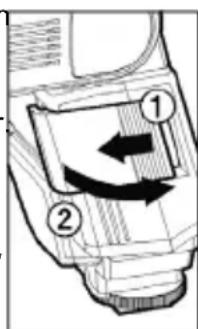
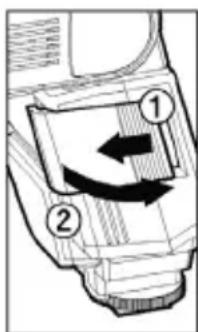
BATTERY LOADING
- Be sure to set the Power Switch to the off position then slide, the battery cover in the direction of the arrow to open.
- Insert four AA size batteries into the battery chamber Be sure the ^+ and - ends of the batteries are aligned according to the diagram in the chamber.
- Close the cover.
- Slide the Power Switch to the ON position. After few seconds, the Ready Lamp will light, indicating that the flash unit can be fired.
- Please press the "Test Button" to be sure that the flash is working properly.

AUTO POWER OFF
To conserve battery power, the flash unit automatically turns itself off when the flash is not used within approximately 3 minutes. To turn the flash on again, depress the TEST button or the camera shutter button, halfway. Please note that, "Auto Power Off" mechanism does not work with normal slave flash, and designated slave flash modes.
ERROR INDICATION
If the battery power is not sufficient or there is electric information error between the camera and flash unit, the "Er" mark will blink on the LCD panel. When this occurs, turn the power switch off and on. If it still blinks, after this procedure, check the battery power.
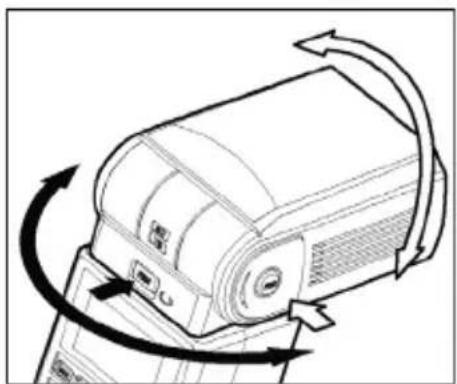
ADJUSTING THE FLASH HEAD
Depress the Bounce "Up and Down" Lock and Release Button, and adjust the flash head to the desired position.
appears on the LCD panel, when you turn on the flash, and if this mark blinks, then the flash head is adjusted to an incorrect position.
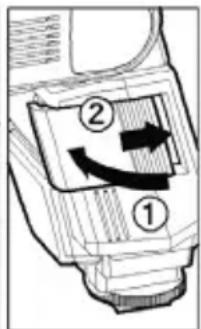
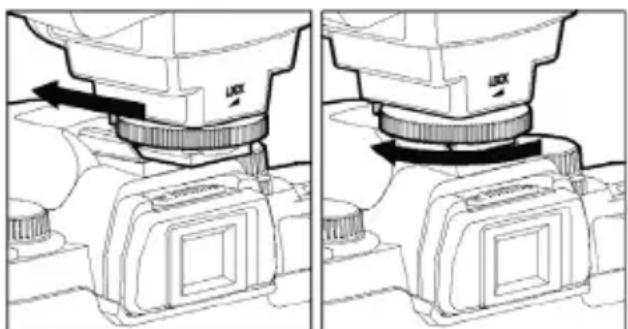
ATTACHING AND REMOVING THE FLASH TO AND FROM THE CAMERA
Be sure turn off the Power Switch. Then insert the Shoe Base into the hot shoe on the camera and turn the Shoe Locking Ring until it is tight.
When you attach or remove the flash, grasp the bottom of the flash to prevent damage to the shoe foot and camera's hot shoe.
If the camera's built-in flash is set in up position, please close it before you attach the flash unit.
To remove the flash, rotate the shoe-locking ring in the opposite direction of LOCK mark, until it stops.

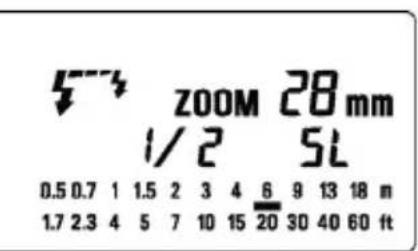
SETTING OF FLASH COVERAGE ANGLE
When you press the ZOOM button M symbol appears. Each time you press the ZOOM button, the LCD panel display will change and indicate the zoom position in sequence, as follows.
$$ 2 4 \mathrm {m m} \rightarrow 2 8 \mathrm {m m} \rightarrow 3 5 \mathrm {m m} \rightarrow 5 0 \mathrm {m m} \rightarrow 7 0 \mathrm {m m} \rightarrow 8 5 \mathrm {m m} \rightarrow 1 0 5 \mathrm {m m} \rightarrow (\text {A u t o}) $$
When you use with DA, DFA, FA, FAJ, F type lenses or SIGMA AF lenses, the flash will be automatically set the zoom head position according to the focal length of your lens.
When you use a digital SLR camera, the angle of view difference between the focal length of 35mm film camera and focal length of the digital SLR camera will be automatically converted.
When you turn on the main switch, the flash will memorize and set the zoom head position to the last setting used.
If you use a lens wider than the flash head setting, there may be under exposed areas around the edge of the picture.
Depending on the flash head setting, the flash's Guide Number will be changed.
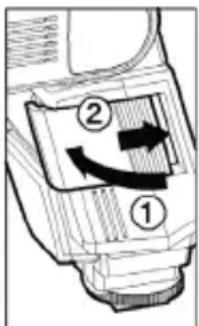
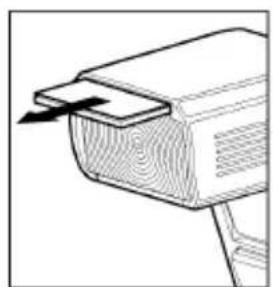
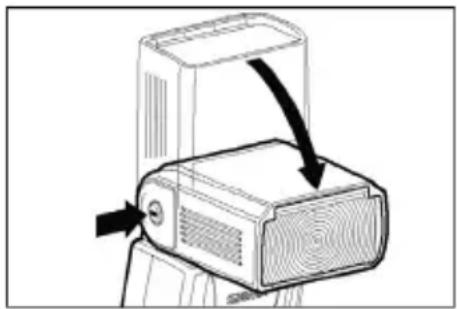
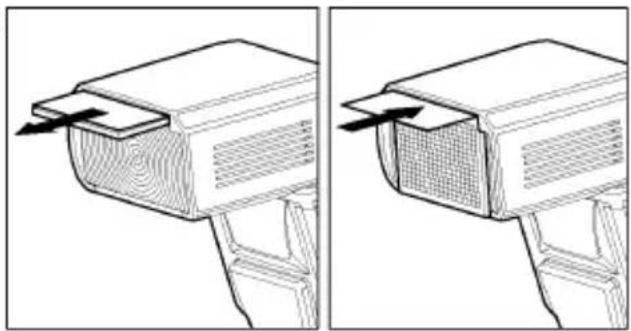
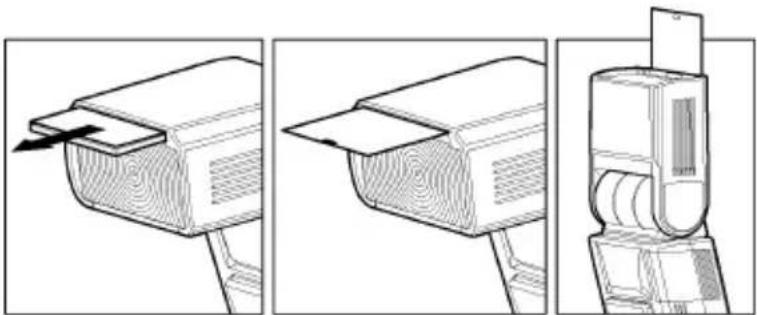
WIDE PANEL
This flashlight is equipped with a built-in wide panel, which can provide an ultra wide 17mm angle of coverage. Slide out the wide panel and catch light panel and flip it down to cover the flash's head. (Be careful to slide the panels out smoothly.) Then put the catch light panel back in its place. The coverage angle setting of the flash will be set to 17mm automatically.
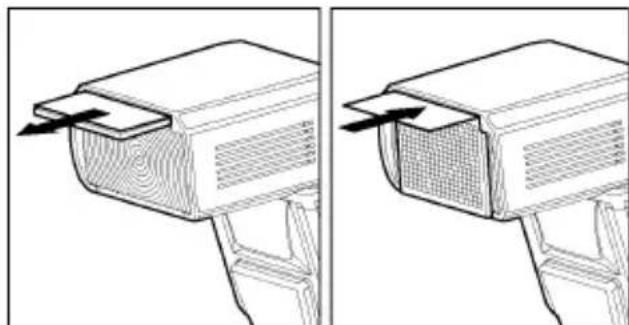
If the built-in wide panel comes off accidentally, the ZOOM button will not function. In this case please contact the store where the flash was purchased or a Sigma service station.
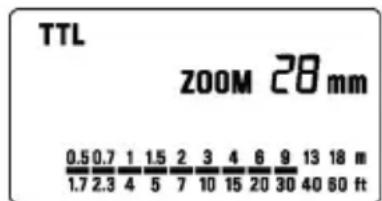
LCD PANEL ILLUMINATION
When you press the LIGHT button, the LCD panel will illuminate for about 8 seconds. The illumination stays on longer than 8sec, if you press the LIGHT button once again.
When you use the combination of MZ / Z series, and *ist film SLR cameras or PENTAX digital SLR cameras with a lens which is produced after A series lens, the LCD panel of flash unit will indicate the effective flash distance ranges. If you use an earlier series lens with these cameras, the effective distance ranges will not appear on the LCD panel.
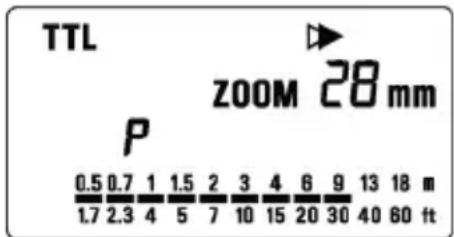
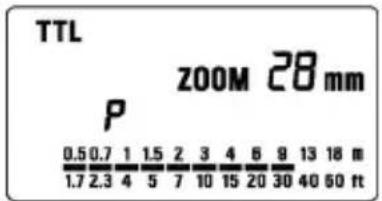
TTL AUTO FLASH
In the TTL AUTO Mode, the camera will control the amount of flash lighting to provide the appropriate exposure for the subject.
- Set the camera's exposure mode to P (PICT) Mode.
- Turn on the power switch of the flash, the TTL mark will appear on the LCD panel and flash will start charging. (If TTL mark does not appear, depress the MODE button several times to select the TTL mode).
- Focus on your subject.
- Check that the subject is located within the effective distance range, indicated on the LCD panel.
- Press the shutter button, after the flash is fully charged.
When the flash is fully charged, the ready light in the viewfinder, and appears on the flash unit.
If flashgun is used with a P-TTL compatible camera, TTL will be controlled by the P-TTL system. If the flash is set as TTL, "P" will be displayed on the liquid crystal display.
When the camera receives the appropriate exposure, the TTL icon on the LCD panel will appear for 5 seconds. If this indication does not appear, the flash illumination is not enough for that particular situation. Please re-take the picture, at a closer distance. (In the case of digital SLR cameras, "Flash Exposure Level" cannot be confirmed from the camera's viewfinder display or from the blinking display indicator of the flash's LCD panel. Please confirm the Flash Exposure Level visually from the image that you capture.)
The AF Auxiliary Light will turn on automatically as you focus on a subject in a dark area. The effective range of the AF Auxiliary Light is up to about 0.7meter to 9meter (2.3-29.5 feet).
When the flash is fully charged, the flash mark will appear in the finder. If the shutter is released before the flash is fully charged, the flash will not fire, and the camera will take the picture at a slow shutter speed.

USING FLASH IN OTHER CAMERA MODES
Shutter Speed Priority Setting
When you set the desired shutter speed, the camera will select the appropriate aperture value. You cannot choose shutter a speed faster than the camera's sync speed.
Aperture Priority Setting
By selecting the Av mode, after you select the desired aperture the camera will set the appropriate shutter speed for the background exposure.
When used with M Mode
You can set the desired shutter speed and aperture value. You can set the shutter speed from top sync speed to bulb.
LIMITS OF CONTINUOUS SHOOTING
To prevent overheating of the flash's circuitry, please do not use your Flash unit for at least 10 minutes after using the number of flash exposures, shown in the below table have been made in quick succession.
| Mode Number of Flash | Exposures |
| TTL, M(1/1,1/2) 20 Continuous Flash Shots | |
| M(1/4, 1/8) 25 Continuous Flash Shots | |
| M(1/16-1/32) 40 Continuous Flash Shots | |
| Multi | 10 |
Manual flash is provided when shooting the subjects when the correct, Exposure is difficult to obtain in the TTL mode. In the manual flash mode, you can set the flash power level from 1/1 (full) to 1/64
power in one step increments.
- Set the camera's exposure mode to M.
- Press the MODE button on the flash unit to select M.
- The guide number value blinks when you press the SEL button.
- Press + or - button to set the desired flash power output.
- The manual flash output display will stop blinking and remain displayed after you press the button again.
- Adjust the focusing by pressing the shutter button, read-out subject distance from the focus ring on the lens. Then, adjust the F-stop or flash power, until the distance indicated on the LCD panel of the flash, and subject distance becomes about equal.
- When the Ready Light of the flash is illuminated, the unit is ready for use.
You can calculate the correct exposure by using the following formula:
Guide Number "GN" / Flash to Subject Distance = F-stop
This flash unit will automatically calculate and indicate the appropriate Subject Distance according to the above formula. (Please refer to table1 on the last page)
SECOND CURTAIN SYNCHRONIZATION
When you photograph a moving subject with slow synchronization, usually the furrow of the subject will be exposed in front of the subject. The ordinary flash light will fire when the first shutter curtain is fully opened, thus the subject will be exposed from the time flash is fired to the time the shutter is closed (This is called First Curtain Synchronization). When you use second curtain synchronization, the flash will fire just before the second curtain begins to closes, and the subject will be exposed by ambient light from the time the shutter opens until the flash fires. The furrow of the subject will therefore be exposed behind the subject, creating a more natural effect.
- Set the desired picture-taking mode of the camera
- Select the Mode of the flash. (TTL mode)
- Press + or - button mark will be displayed on the LCD panel.
- Adjust the focus, and take the picture after confirming the ready light is lit.
First curtainl synchronization will be set, if mark is not displayed.
To cancel second -curtain synchronization, turn off the mark on the LCD panel.
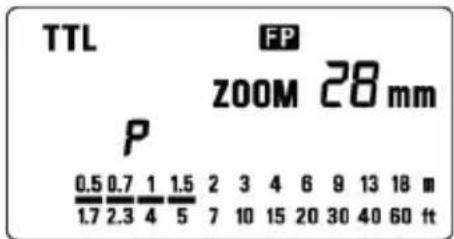
HIGH SPEED SYNC FLASH(FP) (Only for P-TTL compatible cameras)
When you take a picture with an ordinary flash, you cannot use a shutter speed faster than the camera's synchronized speed because the flash must fire when the shutter curtain is fully open. The FP flash keeps firing, while the shutter curtain is running. Thus you can use a shutter speed faster than the synchronized speed.
-
Set the mode of camera. (The exposure mode changes by each camera models.) Please confirm it with the instruction manual of the camera in use.
-
Choose the Flash Mode by using MODE button (P-TTL, CONTRAST-CONTROL-SYNC FLASH, WIRELESS FLASH can be used).
-
Press the + or - button and make the indicate F indicator appear on the LCD panel.
-
Focus on the subject
-
When the Ready Light of the flash is illuminated, the unit is ready for use.
If the camera's synchronized speed is slower than the camera's shutter speed, it switches to ordinary flash.
Depending on the shutter speed, the Guide Number will be changed.(Please refer to table2 on the last page)
If you want to cancel the FP Flash mode, please follow the FP flash procedure to make the FP indicator display from the LCD panel.
MODELING FLASH
If you use the Modeling flash, you can check the lighting and shadow effects, before you take the picture.
- Press the MODE button and select the mode.
- Press the + button or - button several times to make the Miror on the LCD panel appear.
- Confirm that the flash is charged, then press the TEST button to fire.
EXPOSURE COMPENSATION (Only for P-TTL compatible cameras)
You can use flash exposure compensation in combination with normal exposure compensation (to control the background exposure level) in flash picture. Flash exposure compensation can be set 1/2 stops in -3 +1 stop increments.
- Choose the Flash Mode by using MODE button (P-TTL, HIGH SPEED SYNC FLASH, CONTRAST-CONTROL-SYNC FLASH, WIRELESS FLASH can be used).
- Press the SEL button to make the indicator of mark blink.
- Press the + button or - button to set the compensation amount.
- Press the SEL button to make compensation amount indicator stop blinking.
- Focus on the subject.
- Please check that the subject is within the flash range displayed on the EF 610 DG SUPER PA-PTTL's LCD panel.
- You can take the picture after confirming that the Ready Light of the flash is illuminated.
To cancel exposure compensation, please start from step 2 and choose +0 on display.
In wireless photography, setting is possible for each master side and slave side.
If two or more flashguns will be compensated at the same time, please use exposure compensation of camera.
CONTRAST-CONTROL-SYNC FLASH
When the EF-610 DG SUPER PA-PTTL flash is used in combination with the camera's built-in flash, Twin flash photography is possible.
If hot-shoe is located on the "grip" of your camera, you can attach the EF-610 DG SUPER PA-PTTL directly to the camera. In the case of MZ series, and ist film SLR cameras or PENTAX digital SLR cameras, the camera's built-in flash cannot be used with external flash, because, MZ series, and ist film SLR cameras or PENTAX digital SLR camera has the hot shoe on the "penta prism" of the camera. However, "Contrast-Control-Sync Flash" can be used with following Pentax's accessories. (Hot Shoe Adapter FG, Extension Cord F5P and Off-Camera Shoe Adapter F)
-
Set the mode of camera.
-
Set the P-TTL mode on the EF-610 DG SUPER PA-PTTL.
-
Press the + button or - button of the EF-610 DG SUPER PA-PTTL until the LCD panel indicates the
-
Check the focus. Make sure that the flash ready lamp on the EF-610 DG SUPER PA-PTTL is lit and the camera's built-in flash is charged before releasing the shutter.
This procedure will provide a flash output ratio of 1:2 (camera's built-in flash : EF-610 DG SUPER).
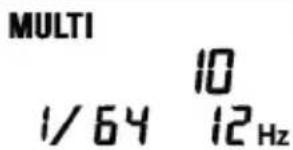
MULTI FLASH MODE
While the shutter is open, the flash will fire repeatedly. By doing so a series of images of the subject will be exposed in one frame. A dark background with a bright subject shows more effectively in this mode. It is possible to set the firing frequency between 1Hz and 100Hz. Up to 90 flashes can be fired continuously. The maximum number of flashes varies, depending on the flash guide number and firing frequency settings. (Please refer to table 3 on the last page)
1.Set the camera's exposure mode to M mode, and set the F number
-
Press the MODE button until the Multi-flash mode appears
-
Press the SEL button until the flash firing frequency starts to blink.
-
Press the +or - button to set the desired flash frequency value.
-
After pressing the SEL button again, the flash power level will blink.
-
Press the + or - button to set the desired power level.
-
Press the SEL button again, the number of flashes will blink.
-
Press the + or - button to set the desired number of flashes.
-
Press the SEL button again, the display will stop blinking.
-
When the ready light of the flash is illuminated, the unit is ready to use.
Note: Please set the shutter speed longer than; Number of Flashes you want ÷ Firing Frequency
BOUNCE FLASH
When you take a photo with flash in a room, sometimes a strong shadow will appear behind the subject, if you point the flash head upwards or sideways to reflect the light off the ceiling, wall etc. the subject will be illuminated softly. Press the lock button and adjust the flash head to set the bounce angle.
UP: 0^ 60^ 75^ 90^ DOWN: 0^, 7^
RIGHT: 0^ , 60^ , 75^ , 90^ LEFT: 0^ , 60^ , 75^ , 90^ , 120^ , 150^ , 180^
When the bounce flash mode is activated, a bounce indicator will appear on the LCD panel.
The picture will receive the color from the reflecting surface. Please choose a white surface for bouncing.
Depending on the reflecting surface, the subject distance and other factors, the effective distance range for the TTL AUTO may change. Please check for correct exposure confirmation (TTL mark on the LCD panel) after releasing the shutter.
CLOSE-UP EXPOSURES
For bounce flash can be tilted 7^ downward for close-ups. The Flash will be effective only for the subjects 0.5 meter to 2 meters. When the flash head is tilted 7^ will blink.
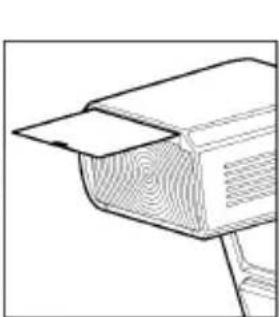
CATCH LIGHT PANEL
This flash is equipped with a built-in catch light panel, which can create a catch light in the eyes of the subject when the bounce flash mode is activated. Slide out the wide panel and catch light panel, and then put wide panel back in its place. (Be careful to slide the panels out smoothly.)
To create a catch light effectively, tilt the flash head upward 90 degrees and take pictures at a close distance.
WIRELESS FLASH (Only for P-TTL compatible cameras)
When you use the "Wireless Flash" mode, you can take pictures with a more three-dimensional effect by shadow, or you can make natural image by shadow depending on the flash position, without any extension cord connecting the camera body and the flash. In the case of the EF-610 DG SUPER PA-PTTL, communication between the camera body and the flash will be done by the means of the light of the flash. In the "Wireless Flash" mode, the camera will calculate the correct exposure automatically.
It would be helpful to use a mini-stand when the flash unit is separated from the camera. The mini-stand has a threaded hole to attach the flash unit to a tripod.
Make sure not to position the flash your picture area.
Place the flash approximately between 0.5m-5m (1.5-5.6ft) range, and camera approximately 1m-5m (3-16ft) range from the subject.
In case of other people using Wireless Flash mode near you, your flash may be influenced by the other person's flash and your flash may fire. In this circumstance, please set your flash to a different channel; from that of the other person's flash. Please refer to above settings.
USING THE SIGNAL OF BUILT-IN FLASH AS A TRIGGER.
(Except *ist Ds/Ds2/DL/DL2, K100D, K100D Super, K110D)
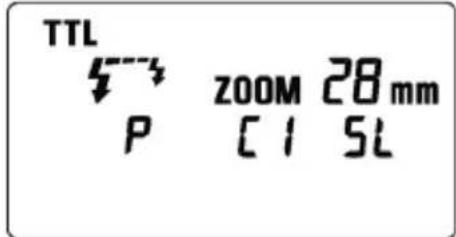
- Press the MODE button to Select the P/TTL/53/5L mark.
- Channel information will blink when the SEL button is pressed.
- Set the channel number by pressing + or - button.
- Press the SE button several times until the display stops blinking.
- Attach the flash to the camera, turn the power switch of your camera on and press the shutter button halfway, flashgun's channel information will be transferred to the camera.
- Remove your flash from the camera and place it at the desired position.
- Pop-up the built-in flash of your camera, and confirm that it is fully charged.
In wireless flash mode, AF Auxiliary Light will blink to indicate that the flash is fully charged.
- Adjust the focus of your camera for taking picture.
It is possible to use Exposure Compensation. For more details please refer to Exposure Compensation section.
By custom function setting of the camera, it is possible to cancel built-in flash as a main flash. Please refer to instruction manual of the camera for details.
It is possible to use High Speed Ssyncro photography. Please set flash mode of camera as High Speed Synchro (WS), as explained above and refer to instruction manual of the camera for details.
It is also possible to useamount of discharge adjustment (1 / 1 ~1 / 64). P-TTL flash can be performed by maximizing the setting value.
Amount of discharge adjustment setting
- Press the SE button several times to make the flash output amount indicator blink.
- Press the + button or - button to set the flash output amount.
- Press the button several times to make the display stop blinking.
USING THE SIGNAL OF THE FLASH THAT IS ATTACHED TO THE CAMERA AS THE TRIGGER
It is possible to use the signal of EF-610 DG SUPER PA-PTTL flashgun that is attached to the camera for triggering another EF-610 DG SUPER PA-PTTL apart from the camera.
This only works with 2pcs or more EF-610 DG SUPER PA-PTTL flashguns.
In this instruction, we call a flash unit, which is attached to the camera body the "Controller", and we call a flash unit at a remote position the "off-camera flash".
When only OFF-CAMERA FLASH is triggered
Controller Setting
- Attach the flash unit to the camera.
- Press the MODE button to select the P/TTL/53 /mark.
- Press button, to make the channel indicator blink on the display.
- Press + or - button to set the desired channel number.
- Press the SEL button several times until the display stops blinking.

Off-Camera Flash Setting
- Press the MODE button to Select the P/TTL/53/5 mark.
- Press SEL button, to make the channel indicator blink, on the display.
- Press + or - button to choose the same channel number as set on the controller.
- Press the SEL button several times until the indicator stops blinking.
- Place the off-camera flash at the desired position.
- Check that both flashes are fully charged.
Ready light lamp will light, and the AF Auxiliary lamp will blink to indicate that the flash is ready for shooting.
- Adjust the focus on the subject, and take the picture.
It is also possible to use High Speed Synchro photography. After the above-mentioned setting please set flash of controller as High Speed Synchro. Please refer to High Speed Synchro photography section for more details.
When triggering both CONTROLLER and OFF-CAMERA FLASH.
Controller Setting
- Attach the Flash to the camera.
- Press the MODE button to select the P/TTL/ mark.
- Press SEL button, to make the channel indicator blink on the display.
- Press + or - button to set the desired channel number.
- Press button to make the indicator stop blinking.

Off-Camera Flash Setting
- Press the MODE button to Select the P/TTL/53/5 mark.
- Press SEL button, to make the channel indicator blink on the display.
- Press + or - button to choose the same channel number as on the controller.
- Press the SEL button several times until blinking stops.
- Place the off-camera flash at the desired position.

- Check that both flashes are fully charged.
Ready lights will be lit and the AF Auxiliary lamp will blink, to indicate that the flash is ready for shooting.
- Adjust the focus on the subject and take the picture.
SLAVE FLASH
NORMAL SLAVE FLASH
Even if the EF-610 DG SUPER PA-PTTL is not attached to the camera body, you can fire the flash by using the camera's built-in flash or another flash unit
- Attach the flash unit to the camera's hot shoe.
- Set the camera's exposure mode to the desired mode. If you use Av or M mode, set the desired aperture value also.
- Turn on the flash unit. Then press the shutter button half way.
Now, the aperture value and film speed are automatically transmitted to the flash unit.
4. Remove the flash unit from camera.
5. Press the MODE button and select the 43 / Slk Slave mode.
6. Press the button several times to make the flash output amount indicator blink.
7. Press the + button or - button to set the flash output amount.
Determine the appropriate flash power by setting the distance indicator on the LCD panel to coincide as closely as possible, with the actual distance from the slave flash to the subject. If the actual distance is out of range, you need to change the aperture value.
You can set the film speed or aperture value on the flash unit manually, if desired.
a.For the film speed... Press the MODE to select the ISO, then press the SEL button to make the indicator blink. Press the + button or - button and set the desired film speed, then press the SEL button once again.
b.For the aperture value ... When the flash unit is set to the Slave mode, press the SEL button to make the indicator for the aperture value blink, and press the + button or - button to set the desired aperture value. Then press the SEL button.
- Press the SEL button several times to make the display stop blinking.
- Place the slave unit in the desired location. Do not place the slave unit within the Picture area.
- After you confirm that all flash units are fully charged, press the shutter button to take the picture.
When the EF-610 DG SUPER PA-PTTL is fully charged, the AF Auxiliary Light will blink.
The flash will not fire if the EF-610 DG SUPER PA-PTTL is attached to the camera body while it is in the Slave Mode setting.
Since malfunction is caused by pre-flash in P-TTL mode, built-in flash of MZ-S, MZ-L, *ist or digital SLR cameras cannot be used. In addition, if you use Pentax brand flashgun for the camera side, please use it in Manual flash mode.
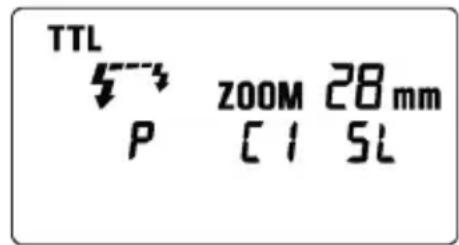
DESIGNATED SLAVE FLASH
If you use two or more EF-610 DG SUPER PA-PTTL flash units, you can designate which flashes will fire together by using the channel settings. In this mode, one flash unit will be used as the Slave Controller and the others for firing as Slaves.
Setting the Slave Flash unit(s) for firing
- Attach the firing flash unit to the camera body.
- Set the camera's exposure mode to Tv or M mode.
Then set the shutter speed to 1/30 or slower. The slave Controller will transmit the designated signal before the others fire. Thus if you use a shutter speed faster than 1/30, the firing flash units will not be synchronized.
3. Switch "ON" the flash unit, and press the camera's shutter button halfway.
Now, aperture value and film speed are automatically transmitted to the slave flash unit.
4. Remove the slave flash unit from camera.
5. Press the MODE button and select the / Sl Slave Mode)
6. Press the SEL button to make the channel display indicator blink.
7. Press the + button or - button to set the channel number. (C1 or C2)
8. Press the SEL button to make the output amount display indicator of flash blink.
9. Press the + button or button to set the flash output amount.
Set the flash power by setting the distance indicator on the LCD panel to coincide as closely as possible with the actual distance from the slave flash to the subject. If the actual distance is out of range, you need to change the aperture value.
10. Press the SEL button several times to make the display stop blinking.
11. Place the slave unit in the desired location. Do not place the slave unit within the picture area.
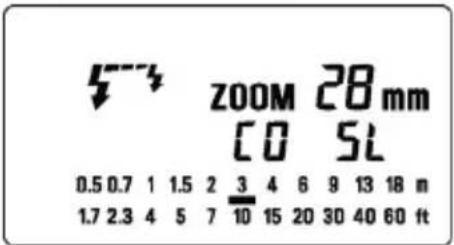
5-3 zoomm 28mm
12 5L
0.50.711.5234691318m
1.72.3457101520304060ft
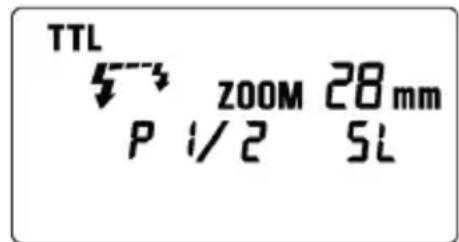
Setting for Slave Controller unit
- Attach the Slave Controller flash unit to the camera body.
- Press the MODE button and select the Slave Mode).
- Press the SEL button to make the channel display indicator blink.
- Press the + button or - button to set the same channel number as that set on the firing flash unit.
- Press the SEL button to make the flash output amount display indicator blink.
- Press the + button [E] mark displayed.
- Press the SEL button to make the display stop blinking.
- After you confirm that all flash units are fully charged, press the shutter button to take the picture.
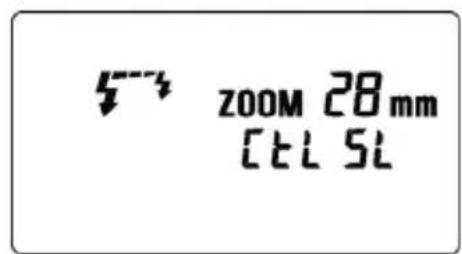
5-3 ZOOM 28mm
[clsl
When the firing flash unit of EF-610 DG SUPER PA-PTTL is fully charged, the AF Auxiliary Light will blink.
You cannot set the aperture value by SEL button, if you select the 串 mark at the setting of flash output amount. The flash unit will be set to the Slave Controller mode.
The Slave Controller unit functions only to control the slave unit.
SPECIFICATIONS
TYPE : Clip-on type serial-controlled TTL auto zoom electric flash
GUIDE NUMBER:61 (ISO 100/m,105mm head position)
POWER SOURCE : Four AA type alkaline batteries or Four AA type Ni-Cd batteries or,
: Four AA type Ni-MH Nickel-Metal Hydride batteries
RECYCLING TIME: about 7.0 sec. (Alkaline batteries)
: about 5.0 sec. (Ni-Cd, Ni-MH Nickel-Metal Hydride)
NUMBER OF FLASHES : about 120 flashes (Alkaline batteries)
: about 160 flashes (Ni-Cd, Ni-MH Nickel-Metal Hydride)
FLASH DURATION: about 1/700 sec. (full power firing)
FLASH ILLUMINATE ANGLE : 24~105mm motor powered control (17mm with Built-in Wide Panel)
AUTO POWER OFF : Available
WEIGHT:330g/11.6oz.
DIMENSIONS : 77mm (W) / 3.0in. x 139mm (H) / 5.5in. x 117mm (L) / 4.6in.
DEUTSCH
POIDS:330g DIMENSIONS:76mm(I)×138mm(H)×116mm(L)
ESPANOL
DIMENSIONES: 77mm x 139mm x 117mm
ITALIANO
VOORZORGSGMAATREGELEN
Depress the Bounce "Up and Down" Lock and Release Button, and adjust the flash head to the desired position.
Rechts: 0^ 60^ 75^ 90^ Links: 0^ 60^ 75^ 120^ 150^ 180^
Controller installing
Off-camera installing
Off-camera instilling
(*ist Ds/Ds2/DL/DL2, K100D, K100D Super, K110D等型號除外)
TTL AUTO MoD E A T H N T P I S A C H A K E P R T E O N D E O L Y D O L O U T P L A R A S I T I E N T B A L G A R L A T O F K A M E L A G A T E O H A N D.
2m 0.5m 0.5m 0.5m 0.5m 0.5m 0.5m 0.5m 0.5m 0.5m 0.5m 0.5m 0.5m 0.5m 0.5m 0.5m 0.5m 0.5m 0.5m 0.5m 0.5m 0.
Kaii
普拉斯是的,有云。
龍龍龍龍龍龍龍龍龍龍龍龍龍龍龍龍龍龍龍龍龍龍龍龍龍龍龍龍龍龍龍龍龍龍龍龍龍龍龍龍龍
州 社 24mm 105mm MoTe PaWt KInTg (WoI3 TnL SaUgSi 17mm)
:
月 330g.
77mm(W)×139mm×117mm
PYCCKM
Блардам Bac 3a npno6pehenne 3eKtpoHNo BCnblskn Sigma EF-610 DG SUPER PA-PTTL. Bcblska cneuaJIbHO pa3pa6OtaHa dIg KaMep abTofoKyc PENTAX AF cepu SLR. B 3abncmoctn OT MoeJN KAMEpbf yHKUHOJIbHbIe BO3MOXHOCTN I pa6Ota BCblsKn MoKeT pa3nUaTcBra. Ioxayncta, BHIMATEJIbHO npouHTaTe 3TO pyKOBOdCTBO. JIr TORO YTObI NobbcITb BaUy 3AnHTepecOBaHHOCt b foTOrpaΦnpOBaHNem, BCblsKa NMeET 6OJIbUoe KOJIueCTBO BO3MOXHOCTe. Ipeed nCpONb3OBaHNem BCblsKn dIpeaIN3aunn BCEx ee BO3MOXHOCTe I noJyuHnMaKcImaJIbHOOTdauN OT BCblsKn, NOxayuNCTa, npouHTaTe 3TO pyKOBOdCTBO ODHOBpeMeHHO C pkoBOODTBOM dIg KaMep bI IN DaJIbHeNWe MeD Prknte INPoiD pyKAMN.
ПЕДОCTОPOЖHOCTN
Ipeed nCnoB3OBaHHeM BCnblkN, dIyTO6bI u36eXaTb NOBpeJdeHn IIN TpaBM, noXaNyIcTa, npOHTaIte Oeyb BHMaTeJIbHO 3TO pyKOBoDCTBO, oBaIaJyBHMaHne Ha npEduPepTeJIbHbIe 3HaKn npBVeDeHHbIe HIXe. IoxaynCTa, o6pATnte ocO6oe BHMaHne Ha 3TN Dba npEduPepTeJIbHbIX 3HaKa.
!PpeynpexdHne!!
IcnoIb3OBAHHe BCblIshKn 6e3 yYeTa 3Toro npEynpeKdaIoUeero 3HaKa MoKet 6bItb npuHOn cepBe3HO TpaBMbl nII npNBecTN K dpYROMy ONaCHOMy pe3yJbTaTy.
!PpeoocTepeXeHne!!
IcnoIb3OBAHnE BCnbIuKn 6e3 yYeTa 3TOro npEynpeJxHaUoJero 3HaKa MoKeT 6bITb npUHHo CEpbE3HO TpaMbI NJI NOBpeJxHeHn.

CnmboI 603Naaet DeiCTBne, Ie Tpe6yeTc npdynpejxHne nI npedocTepejxHe.
POn d 3TNm CnmboIOM DaHa INOpMaunr O DeiCTBnx, KOtOpbIe HxKHO n36eratb.
Преупждени!!
Bcblka nmeet cenn BbICOKO HnpanjKeHna. IJr TOro YTO6bl N36eXaTb 3NeKtpnueckoro yDapa nn Oxora, He npednpinHmaiTe ycuiN no pa36opke BCbluKn. Ecn HapxHkN kOpync BCbluKN CnOMaLCn NN TpeChyN, He KacaItecB DeTaneN BHyTpENHero yCTpOnCTBa.
He noHocHTe BCbIuKy 6n3K K rna3aM, TaK KaK JpKn CBet MoKet NOBpeDntb rna3a. Pnp CbeMKe C BCbIuKOJ depXnTe ee Ha pacCToHnN, No KpaHne Mepe, 1 M ot nua.
He kacaTeecb cHxPokIeMM kAmepbI npu yCTaHOBKe BCnblIkw B noIO3bKaMepbI. BbICOKoe HapJxKHe N BuEN MoXeT 6bITb npuHHoN 3NeKTPnueCKoro yDapa.
Hnkorda He nCnoJb3yIte KaMepy B npncytCTBn Dbima, ropouero ra3a, xNdkocTe u XUMKATOB. NcnoJb3OBAHne BCblkmoKet 6bItb npuHHoN noXapa nn B3pbBa.
Пре dioctepexeHne!!
He nCnoJb3yIte BCnblkky Ha kamepax OTnHbIX ot PENTAX AF. NcnoJb3ObaHne Ha npyrnx KaMepax MOKeT NOBpeDITb 3JIeKTPuYeCKNe UeIN 3Tnx KaMep.
3Ta BCnblkHa He BODocToKa. Ppn NcNoB3OBAHn BCnbIuKn N KamepbI B ycIOBnX DoKJa, Chera nn OkOLO BoBc CTapaNTecb DepKaTb nx cyxMn. YactbIM RJIeHnEM RJIeTcR peMOHT BHyTpeHHnx 3JIeKTPnuecknx Zenei NOBpeKDeHHbx BOOn.
HnkOrda He noDbepraIte BCbIuKy I KaMepy ydapaM, Bo3deIcTBIO nbIIN, BbcOKo TeMnepaTpyblnn BnaJxHOCTN. 3TN qakTopb MOrY npNbOaINT K Bo3ropaHIO n OTka3am B pa6ote o6OpydoBaHnA.
Korda BCnbIkwka NOBepraetc BHe3aHOMy BO3eJCTBnIO N3MeHnRA TeMnepaTpybl, HAnpIMep, npn BHeceHn ee n3 XoNoHOrO MeCTa B TeNpyo KOMHaTy, BHyTpN MoXeT o6pa3oBaTbcr KOHeHCat. B 3tOM clyuae nepeTd TaKIM N3MeHnEM, N0IoXnTe o6OpYOBaHnE B 3akpbityo PnaCTIKOByEO MKoCTb I He NcNoB3yUte BCnbIwky, Noka OHa He DOCTURHT KOMHaTHOH TeMnepaTpybl.
He xpaHnTe BCnbIuKy B uKafty nnn rapdepe6, nockonbky TaM MOKeT 6bItb HaΦTaINH, kAmΦopaa nDpyrue HnCeKTHuNDbI. 3TN XmMkAteBHO BnRAHT Ha BCnbIuKy.
He nCnoIb3yIte pactBopnteni, 6eH3oI nn npDpynue YnCTaIe BeIeCTBa dny ydaIeHnra rpa3nn OtnpeAtKOB naIbceB. YnCTky npOn3BODITE MmRkO yBnaXHeHNO TkaHbIO.
Длгдлгтьногхраеня Исплььтупу proхладhoe cyхoe Mectо прдnotteьно C xopoшew BeHTnlaцe. PekomeHdyetc, yTo6bI BCblska bbla 3apxkeHa nДЯ npOBepkn npabINbHOrOФунKUHOHPOBaHn HeCKoIbKO pa3 B Mecaq npOBepraJacb Ha cpa6aTbIBaHne.
BHEUHHe COCTABHbIe YACTn
1.ΓonOBKa BCnblsKn 2.DonONHnTeJbHbI nCTOChNK dIy AF 3.Yka3aTeJb yrJIOB NOBOPTa BBePx IN BHN3 4.Yka3aTeJb yrJIOB NOBOPTa HAnpabo N HaJeBO 5.BloKIpOBKa NOBOPTa N KHOJa OCBO6oXdEHN JIO NobopoTa BBepx IN BHN3 6.WapHnPna6 6NoKIpOBKa IN KHOJa OCBO6oXdEHN IOBOPTa HAnpabo N HaJeBO 7.XK NaHeNb 8.KpbIka 6aTapeN 9.KoJIbU O 6NoKIpOBaHn Iono3beV 10.NoOn3bY 11. OTPaKaIoUa naHeNb 12.PaccBaIoUa naHeNb
OPRAHbI YNPABJIEHNIA
- Khonka MODE (pexim) 14. Khonka SELECT SEL (bbl6op) 15. Khonka npnpaeeHn +
- Khonka yMeHbSeHnra 17. Khonka ZOOM (yBeJIuYeHne) 18. Khonka TEST (TeCT)
- Khonka LIGHT (CBet) 20. ToTOBHOCTb K BCnblIke 21. BbIKNIOuATenb NITaHnA
BATAPER
3Ta BCnblka NcNoIb3yET YeTbepe 7eNoUHbIX 6batape Tuna «AA» nII Ni-Cd, Ni-MH akKymyIaTopbi TaKe MOryt 6bITb NcNoIb3OBAHbI MapraHueBle 6batape, Ho OHN IMeIOT MeHbIIN pecypc, Yem 7eNoUHbIe I MbI He peKOMeHdyEM NcNoIb3OBAt b Ix. IoxaanyIcTa, 3aMeHInTe 6batape, ecnn 6oJee 30 cekynI ropnt IamnoUka rotOBHOCTn.
IyBepenHocTNB XOpOWeM 3JIeKtpnueckOM KOHTaKTe NOUcHtnte KJIeMMbI6aTapei nepei nx yctaHOBkoN.
Ni-Cd 6aTapeH He IMeIOT cTaHApTn3NpOBaHHbIX KOHTaKTob. EcII Bbl NcNoJIb3yeTe Ni-Cd 6aTapeH, noXaJIyIcTa, y6eIITecb, YTO eCTb KOHTaKT C 6aTapeMn.
Дя педотрашени разбьа 6atapeи, Teu Ипп польуп TeYbipe HOBbIX 6atapeи Tnna AA OndHm MapKn. He CmeunBaIte MapKn IIN HOBbie IN CNOJb3OBAHHbIe 6atapei.
He pa3bpaIte n He 3aMbkaIte HakopoTko 6atapen. He npDBepraIte nx BO3deiCTBIO orHn IIN BOIbI, NOCKoNbKy OHI MOrTy B3OpBaTbcr. TaKke He nepe3apJkaIte 6atapen, ecIn OHn He OTHOcTcR K Ni-Cd 6atapeM.
Korda BCnbIka He nCnOJb3yETcA DnITeJIbHbI nepNOB BpeMeHN, BbIHbTe 6aTapeN N3 BCNbIiKN dIra TOrO, YTO6bl N36ExKaTb BO3MOKHOCTN NOBpeXdEHNr OT Teu.
XapakTepeuCTnK 6aTapeu yxUaOTc npn ChnxKeHH TeMnepaTypbI. Depxnte 6aTapeu OTdEhHO npn nCNOJIb3OBAHNN BCNbIuKK npn Hn3KoTempepaType.
KaK IJIIO6OBI BCNBIUKI peKOMeHdyETcO6JIIOaTb OCTOPOXHOCTB O6paueHN C 6aTapeA M, Oco6eHHo npn IINTEJbHOM NyTeUeCTBUN NII npn CbeMKax B XOnOHy NOrOy.
YCTAHOBKA BATAPEI
- YIOCTOBePbTEcB yTO NITaHHe BbIKIouyeHO. 3aTeM CDBINbTe KpbIuKy OTCeKa 6aTapeB HAnpaBneHn CTpeKN.
2.YCTAHOBNTe YETbIpe 6atapEn TnA AA B OTCEK 6atapei. PpOBepBe, yTO KOHTaKTbI + n - cTOrT B COOTBETCTBn C yka3aHnMa M B OTCEKe..
3.3akpoTe KpbIuKy.
4.Cmecntte BbIKNIOHateIb B noIOXeHne ON (BKn). Upe3 HeckoJIbKO cekyHД nAMnOuKa rOTOBHOCTn 3aOpNTcra, yTO yKa3bIBaET Ha To, yTO BCnblkA roTOba Ka pa6ote.
- Haxmte KhoNky "TEST" Button" (TeCTOBa KhONka)ДЯ npOBepKn npabUNbHOCTn pa6Otbl BCnbUShKn.
ABTOMATNUECKOE BbIKJIOUeyHNE NITAHNIA
Дя coхраеня emkoctn 6atape Bcblska abTOMaTnueckn BbIKIOuaeTcR, KoIa OHa He IcnoJIb3yETcB TeueHne npimepHo 3 MmHyT.ДЯ BKIIIOUeHn BcblsKn HaxMnte KhoNky TEST (TeCT) IIN HaxMNTe HAnONoBHy KHONKy cnYCKa KamepbI. O6paTte BHNMaHne, YTO npn pa6oTe B DInCTaHcNOHOM pexIme BCblsKn TTL, B peXIMe HopMaJbHOJ DOONHHTeNBHOB BCblsKn N B npHHyDInTeNbHbIX peXIMax DOONHHTeNBHOB BCblsKn ABToMaTnueceKoe BbIKIOUeHne He pa6oTaet.
OwHBOUHAR HINKALUN
Ecni emkoctn 6aTapeH ndoctatoHIO nIe cTB ounbKa B oMeHe IHOpMaueNe MExdy KaMepoN BCnblko,Ha KK nane Hcyet mraTb Hndncb Flash Coverage Angle" (yroI oxBaTa BCnbIku). PnnoBHeHn 3ToHnncn BbIKNoHTe N BkInOHTe nItaHne. Ecni nocne 3ToN npOeDpybI MIRaHne npoJXaeTc, pOBepbTe coCTOAHne 6aTapei.
HACTPOIKA TOLOBKIN BCNbIUSKIN
Haxmte 6noknpobky "Up and Down" (Bbepx u Bn3) n KhoNky Ocbo6oxJeHn. HactpoTe roNoBky BCnbIuKn Ha XeJnaemoe IonoXeHne.
Pn BkIIOeHn BCbIuKn Ha KK naHeJn nOaBnaTeC3HaOc
Iecn 3HaQOK MmraeT, rONOBka BCnbIuKu yCTaHOBJIeHa B HEnpaBnIbHoe nOIOKeHne.
YCTAHOBKA N YDAJIENHE BCПьIшКС KAMEРы
YdoctOBepebTecb, yTO NITaHHe BbIKIIOueHo. BCTaBBTe NOO3bHa BCbIwKe B OTBeTHyIO qAcTb Ha KaMepe INOBepHnTE KONEO 6NOKIpOBaHNr NOO3beB Do Tex nop, noka He 6yDet 3akpenneHn.
Korda Bbl CTaBnTe Hnn CHMaTe BCnblkky, 6epnte ee 3a HxHIOU Yactb IpyoTbpaueHn NOBpeJdHn OCHOBaHn NIO03beB IN IOLO3beB Ha KaMepe.
Ecnn BCTpoeHHa BcNbIuKa KAMEpbI HAXOHTcB B BepxHem NIOJKeHN, NOKAnyIcTa, ONyCTnTe ee nepeD yCTaHOBKO BHeUHeN BCNbIuKN.
Дя сягия BCNsIshKи NOBepHInTe 6nOKnpyHoue KOneco B npOTNBOnONoXHom HappaBHeHn OT 3NaUka LOCK (6nOKnpoBaHnE) Do Tex nop, noka OHO He OCTaHOBHTcra. M
HACTPOIKA YTJIA OXBATA BCПышки
Korda Bby haxmae Te KhoNky ZOOM (yBeHnueHne) noBnEeTc nmbON M. KaJdbi pa3, kOrda Bby haxmae Te KhoNky ZOOM (yBeHnueHne), Ha KK naHeJIb 6ydet Noka3bIBaTbcr N3MeHHe HyeHHra B cIeDyUoSe IocJeDoBaTeIbHOCTn.
24mm 28mm 35mm 50mm 70mm 85mm 105mm (Auto)
Пи Использовани Камеры C obteknвам Tuna DA, DFA, FA, FAJ, F nIIи obteknвам SIGMA AF, BCПьшka 6удET abTomatueckn yCTaHabJIINBaTb yroI OXBata B COOTBETCTBIM C φOKychbIMpacCTOЯнem obteknва.
Пи Использовани сфpoBbIX 3еркальнix камр, pa3нца угna 3peня obьektinba yctahOBnEHORo Ha 35mm kamepy n Ha cfoPoByO, abTomatNueckn yuHTbIBAeTc.
Korda Bbl BkIouaete nHTaHHe, BCbIuKa 6yTe NOMHITb I 6yTe yCTaHaBnBaTb yBeJIuYeHne roJOBKn Ha nocLeHIOU nCNoJIb3OBAHHyU HAcTpOky.
Ecnn Bbl nCnoB3yeTe oBbekTnB C yIOM nOJIa 3peHn8 6oJbWM, Yem y rOIOBKn BCnbIuKN, MoKet BO3HNKHyTb HeD03KcNOHnpOBaHne 3Ohbl IIO KpaM KaIpa.
B 3aBnCmOCTN OT HAcTpoKn rONOBKn BCbIuKn 6yJeT N3MeHrTBcR BeDyUe ee YNCNo.
PACCENBAIOUJRAIHAHEJIb
Bcblka ochaueHa BCTpoEHHO paCCeBAIOUeI naHeIbIO, no3BOJIAOUIeYBEINHBAbYrOpaCCeBAHnA Do yIa nOJIa 3peHnIg OBekTNa 17MM. BbIDBNbTe n3 Kopnyca paCCeBAIOUyIO n OTPaKaIOUyIO naHEn I NOBepHIne paCCeBAIOUyIO naHEn BHN3. (ByIbTe OCTOPOXHbI npi BbIDBnraHn NaHEn.) 3aTeM CdBnHbTe OTPaKIOUyIO naHEn b O6paTHo BHyTpB KOpnyca. 3JeKTPOHnKa aBTOMaTNUeCKn NepeKnIOuHT yrO paCCeBAHn BAblkN Ha 3HaueHne 17 MM.
Ecnn BCTpoehnnaHeNb shnpokoyrolbHoro OXBata cnyaHNO OTOpBaJacb, KHOJa ZOOM (yBeJIuHneHne) He pa6oTaER. B 3tOM cIyae o6paTntecb B MaRa3HN, rJe 6bla npno6peTeHa BCnblsKa nII N BuHTp no 6cnyKBAHIO.
OCBELSEHNE JKK PAHEJI
Korda Bby haxmaeTe KhONky LIGHT (cBET), JKK naHeIb ocBeuetaTc oKOJIo 8 ceKHyd. OcBeueHne 6ydt npOxCODHTb 60nee 8 cekyHd, ecnBby haxmaeTe KhONky Light (CBET) eue pa3.
ДИСПЛЕМ PACCTОЯня
Korda BblncnoJIb3yeTe kamepbI cepn MZ/Z nnn nIIeHouhble kamepbI cepn *ist nnn cIuΦpoBbIX kamepbI PENTAX c obBeKTINBOM ImeIOUIM cepnO cTapwe cepn A, JKK naHeJIb BCnbIuKN 6ydet Noka3bIBaTB 3oΦeKTHBHe Dnana30HbI paccToHHN OT BCnbIuKN. EcnBblc 3TNMI kamepaMn nCOnb3yeTe obBeKTHB 6oJee paHHnx cepn, Dnana30HbI 3oΦeKTHBbIX pacCTOHHN He NOKa3bIBaOTcR Ha JKK naHeJI.
BCПышkaВPEЖИМETTLAUTO
B pexime TTL AUTO kamepa 6ydet ynpabJbMoUHOCTbO BCnblIKN dIra oecneHHeNc COOTBeTCTByIOSeE 3KcNO3uINo OBeKTA.
1.YctaHOBtKe kamepy B pexm P (PICT).
2.BKJIIOUHTe NITaHHe BCNbIuKn. Ha KK naHEJn NOBNTcR 3HaOJK TTLEBCNbIuKa HauHET 3apXkaTbcr. (Ecnn 3HaOJK TTLE He NOBJeTcR,HeCKoJIbKO pa3 HaxMITE KHOJky MODE (pexIM) dIra Bbl6opa pexImaTTL.)
3.CφokucpyTecbHa o6bekt.
4.Проверът,чTo объкн-haxoДиТСьВпpeДeлax эффektNBHOrO Dnana30Ha paCCTOHHy,уKa3aHHORO Ha XX NaHeJN.
5.HaKmTe KhONky cnyska nocne noHnO 3apAdkn BCbIuKn.
Pn noJHOn 3apAKe BCnbIuKn 3aROpNTcJaMNoUKa rTOBHOCTN B BuDOnCKaTeNe Ha BCnbIuKe.

Ecnn BCnblka nCnoJb3yETc c Kamepoi COBmecTUMoC pexMMOM P-TTL, TTL 3Kcno3nua 6ydet KOHTPOINPOBaTbCra CnCTeMoP-TTL. Ecnn BCnblka yctaHOBJeHa B pexMM TTL, CnMBon "P" 6ydet OTO6paXaTbcra Ha KK naHeJI N BCnblkN.
Korda kamepa Imeet COOTBETCTBYUO yO 3Kcno3nIO DnA CbEMKn O6bekTa, nocne cbeMkn Ha KK NaHEn Ha 5 ckyHn IOBNTc8 3NaOk TTL. Ecnn 3ta HndNkaunr He NOBnEeTc8, B 3Toi CNTyaun MOuHOCTN BCnbIuKN HeoCTaTOHNO. NoXaNyIcTa, NOdBnHbTeCb 6JInKe K o6bekTy. (PpN NCNoJIb3OBAHIN UΦPOBbIX 3epKaJIbHbIX KAMEP, NOITBepXdHHe 3Kcno3nUnn He OTbpaXaETc8 B BVIOUNCKaTeJe KAMEpbI IN HA KK NaHEn BCnbIuKN. PpOBepntb npabnIbHOCTb 3Kcno3nUnn MOxHo IIO CHIMKy, OTObpaXaEMOMy HA dncPiee KamepbI.)
Bydet aBTOMaTHueckn BKIOUaTbcra BCNOMOraTeIbHbIN NCTOuHNK CBeta AF, KaK TOnbKO Bbl npON3BOJNTe OKyCnPOBky Ha oBeKeTbe B TemHom MecTe. 3oΦeKTNBbIN dHaNa3OH pa60TbI BCNOMOraTeJIbHO rNCTOuHNKa CBeta AF ot 0,7 MeTpao 9 MeTpOB.
Korda BCnblka NOHOCbIIO 3apxkeHa, B BNDOCKATENe NOBJIaETc3HaQOK BCnblkN. EcIn 3aTBOp cpa6aTbIBaet NepeD TeM, KaK BCnblka NOHOCbIIO 3apJNTcR, Kamepa 6ydt ChIMaTb KaApC 60nbWOn BbIDepXkoKoK 6e3 BCnblkN.
NcIIOJIb3OBAHHe BCIIiIKn IPNpyrNX PEXIMAX KAMEPbI HacTpoJa c npOpHTeTom BbldepKKn
Korda Bby yctaHaBnBaTe BbIepeKky, KaMepa BblBepeT COOTBeTCTByIOUee 3HaueHne DnaΦpaRmbi. Bbl He MoXeTe BblPaTb BblepeKky MeHbWe BblepeKKn, npN KOTopoN CnHXPOHN3npyetcra pa6Ota KaMepbC BCnblIKoN.
HactpoJa c npOpHTeTom dnaΦparMbI
Pn BbIbope peKIma A nocne BbIbopa Heo6xOIMo dnaΦpaRmbi, KaMepbl 6yJeT yCTaHaBnBaTb COOTBeTcTBYIOU bIepeKkU dnn 3Kcno3uIN fOHa.
Pn nCnoB3OBaHn peKmMa M
Bb MoKeTe yCTaHOBnTb Heo6xOIMyIO BbIepKky I nHaΦpaMy. Bbl MoKeTe yCTaHOBnTb BblepKky Ha 3HaueHnO T CnHXPOBbIePKKN IO BblepKKn OT pyKn.
OgPAHnueHnI JIe HENPEPbIBHOcMbKn
Дя тоутобл пededOTbpaTNTь neperpeв оелктучecнх сепь BCblshki, nokaNYcTa, He nCnoJIb3yIte BCblshky, no kpaHne Mepe, 10 mHyT nocne nCnoIb3ObaHnE ee ДЯ CBemKn 6bICTpoi nocNeIOBATEJIbHOCTN KaDPOB NOKa3aHHbIX B TaBNIce HNXe.
HANPABJIENHOCTb BCnblIKN
Korda Bbl foTOrpaHpyeTe C BCnblkO B KOMHaTe, HOrda 3a ObkeTom NOBJETcCINbHa THeB. Ecnn Bbl HanpaBJIeTe rONOBky BCnblkN BBepx IIN B CTOpOHy, YTO6bl OTpa3NTb CBet OT NOTOLka, cTeH n T.I., ObBeKT 6ydt OCBeUaTBcra paBHomepHO. HaxMnte 6IoknyuOyIO KNOKy n HAcTpOte rONOBky BCnblKn dJa yCTaHOBKn HanpaBJIeHnA.
BBEPX: 0^ , 60^ , 75^ , 90^ BHN3: 0^ , 7^
HANPABO: 0^ 60°,75°,90° HAJEBO: 0^ 60°,75°,90°,120°,150°,180°
KordaakTNBnpyetcpeXMM HappaBneHHocTbCNbIuKN,HaKK NaHeNIOBNTcHnDKaTOP HappaBneHnA
KaI npolyaetc yBETbIX npn OTPaxeHn CBeTa OT NOBepxHOCTN.
Ig n OTPaxeHn BblbpauTe 6enyIO NOBepxHOCTb.
B 3aBnCmOCTn OT OTPaKaIOUeI NOBepxHOCTn, MOryT 6bITb N3MeHeHbI pacCToRrHne Do OBeKtA, 3ΦΦeKTHBbIi DnAna3OH pacCToRrHn IJr TTL AUTO n Dpyrme ΦakTopbl. PoXaIyIcTa, npOBepbTe npabunbHOCTb 3KcNo3uN (3HaQk TTL Ha KK naHeJI) nocLe cpa6aTabBaHnra 3aTBopa.
3Kcno3nIIN JI KpyHOrO IlaHA
Дя Крунога ПпаHA BCNBIIKMA MoKeT 6bITb NOBepHyTa Ha 7^ BHN3. BCNBIIka 6ydet aKTUBNPOBaTBcA TOJIbKO ДЯ obBeKToB Ha paCCToHn OT O, Mdo 2 M. KOrda rONOBKa BCNBIIkOnOnuSeHa Ha 7^ 6ydet MURATb 3HaYOK
OTPAXAIOUAR NAHEJIb
Bcblka Ochaueta BCtpoEHHOtOpaXaUe naHeIbIO, NO3BOJIAUSeI CO3DaBaTb MaJIeHbKNI 6nK B rna3ax MoJeN npn CbE MKe NOPTeA c《3anONHJOUe》 BCblIKoN. BbDINHbTe n3 Kopnyca paccenBaHOuyIO OTPaXaUOyIO naHeI N cDbInbTe paccenBaIOuyIO naHeIb o6paTHO. (BydTe OCTOpOXHbI npn BbIDBnraHH naHeIe.)
Дя COЗдэнэфektнбго 6лka B rna3ax moeJIn, NOBepHnte rONOBy BCnblKn BBepx Ha 90^ n CHIMaTe C 6Ли3KNX dIcTaHcN.
(TonbkoДляКamep,coBmecTnmbixcP-TTL)
Pn nCnoB3OBaHn pexima 6ecnpoBOHOB BCbIuKN Bbl MOXeTe NOJyUHTB CHIMKc 60onee
obemhim OCBeueHHeM, C TeHAM, pacnoJooXeHne KOToPbIX 3aBNCNT OT NIOJOxHn BAChIbIK. Pn
TOM dOnoHNtEnbHle cNxoOuHpyi He Tpe6yOTc. Pn nCnoB3OBaHn BCbIuKn EF-610 DG
SUPER PA-PTTL coo6uHne n cInxpoHn3aunm MExdy Kamepon n BCbIuKo npocxOJT npn
POMOUI mNpylbca BCbIuKN. B pexime 6ecnpoBOHOB BCbIuKN KaMepa onpeJeAET npabunbHyio
3Kcno3uHIO aBTOMaTHueCKn.
Дя yCTaHOBKn BeIOMO BcNbIuKn Bbl MoKeTe IcNoIb3OBaTb NODTaBky-CTOnKy CO IITaNHBIM THe3IOM, BXoJyU B KOMnJIeKT NOCTaBKn.
YcTaHOBnTe BeDomyo BCnblkky B HxKHOB Bam No3uIN. He ycTaHaBnBaIe BCblkky B npedeJax CHImaEMoro KaJaPa.
YcTaHaBnBaIte BeDMyo BcNbIuKy Ha pacCTOarHm 0,5-5 MeTPOB OT o6BeKta cbEeMkn, a KaMepy yCtHaBnBaIte Ha pacCTOarHm 1-5 MeTPOB OT o6BeKta cbEeMkn.
B cnyae, korda dpyrme foToRaPbI hCnoB3yIOT no6nI3OCTn 6ecnpoBDoHoi pexm, Baun BCbluMK moryt pearinpobatb Ha yxKne ycTpoNcTB a N BocnpoN3BODHT heKeJateJIbHbIe nCnyIbcsbl. B takou cnTuayamn MOxHO HAcTPOUb TB CnbluKKHa KaHaI, OTNIuHbI O T KaHaJa, KOTOpbI NCNoB3yIOT yxKne BCbluIKN.
NCSIOJIb3OBAHNE CnHJIA BCTPOEHHOB BCblIKK KAK TPNITPEPA.
(Kpome kaMep *ist Ds/Ds2/DL/DL2, K100D, K100D Super, K110D)
1.HaKImaTe KHOJky MODE do Tex nop noka Ha dinCnJIee He OTO6pa3aTcra CmBOJbl P/TTL/5-3/SL.
2.Пи Нжати Na KHONky SEL NauchET MiraTb INДИКaTOP N HOMep KaHana.
3.CnOMOuKHOPOK +HIN - yCTaHOBNTe HOpE KaHaJa.
4. Haxmte KhoNky SEL do Tex nop, noka 3HaueHna Ha dinCnlee BCnbIwKn He nepeCTaHyT MraTb.
5.YctaHOBHTe BCnblkky Ha KaMepy, IN BKNIOHNTe NITaHne KamepbI. Iocne 3TOrO HaxMMTe KONKy cnYcKa 3aTBopa HANOOBHy. IHOpMaunr O yCTaHOBJIeHHOM KaHaJe BCnblskn 6yDet npepaHa B KaMepy.
6.OTcoeHNHTe BCnbIuKy u yctaHOBnTe B HxKHO Bam no3uINN.
7.ПОДНМЛТЕВСТРОЕHHYOBCпьшkyиdoждNTeСь,нoka OHa He 3apdntcnoJIHOCtBu.
B 6ecnpoBOHOM pexHMe, IaMna noCBeTKn aBToΦOKyCa 6yJeT MNaTb, TeM cMbIM NOITBepKdA, UTO BCnblska roTOBa K pa6ote.
8. Cφokucpyne kamepy Ha oBekTe n cdeJaTe CHMOK.
B 3TOM pexime BO3MOXHO NCIOJIb3OBAHne KOMnEHaCauN 3Kcno3uIN. IyI NOyueHna DOIOnHntJIbHO INOpMaUIN O3HaKoMBTEcB C COOTBeTCTByUcIM pa3JeLOM 3TOr pyKOBOdCTBa.
Пользователбckи Функции Некоторгд Камер NOЗBOЯJOТ OTКПОНЧИТБ BCТроEHу BCпьшky.Дляпolyченя дОпOLHNTeьноги ИФОРмаци O3HaKOMbTeCB сИНСТPyкциеи K Kamepe.
B 3TOM pexnme BO3MOXHO nCIOJb3OBAHne BbICOKOCKOPCTHO CnHXPOHN3aUN (FP). YcTaHOBNTe Ha KaMepe pexnM BbICOKOCKOPCTHO CnHXPOHN3aUN BCNBIUKN (W HS), KaONcaHO HNXe N O3HaKOMbTEcB c INHCTpykUneK KaMepe dIg NOyueHNA DOONHITeNBHO INHOpMaUN.
Tak Je BO3MOXHO hCnOJIb3OBAt b HAcTpoIky MOUHOCr N BCNBIuKn (1/1 ~1/64). Pekm P-TTL MoKeT 6bITb yCTaHOBJIeH npMakcImaJIbHOM 3HaueHIn.
HactpoKa MoUHOCTN BCnblIuKn
1.Haxmte KhoKy SEL do Tex nop, noka He HaHET MraTb HdkaTOp MOuHOCTN BCnblIKN.
2.C NOMOJIIO KHOJOK +n -yCTaHOBNTe 3HaueHne MOUHOCTN.
3.HaKMaIte KHOkky SEL Do Tex nop, noka 3HaueHna Ha KK DnCnlee He nepectaHyT MInrAtb.
NCIOJIb3OBAHNE CNHANA BHEUHEB CnblkK KAK TPNIIGREPA
BcnbIka EF-610 DG SUPER PA-PTTL yctaHOBHeHHa Ha KaMepe MoKet IcNoIb3OBA TbCk KaTpNtep dIy 3aNycka dpyroB BCnbIkwE F-610 DG SUPER PA-PTTL He yctaHOBHeHHo Ha KaMepe.
TOpeXIM BO3MOXHO NcNOB3OBaTc DByMaN JIb6OJe BcNbUkAmn EF-610 DG SUPER PA-PTTL.
B INCTpykun DaJee BCbIka, yCTaHOBHeHHa Ha Kamepe 6yDet Ha3bIbATbcra «KoHTpOJIepOM», a BCbIka, VCTaHOBHeHHa B YdaJIeHHN OT KamepbI 6yDet Ha3bIbATbcra «BeDOMOJ’.
ДЛЯ CPABATbIBAHNЯ TOlbKO BEdOMOИ BCnblsKIN
HacrpoKa KOnrpoJInepa
1.YctaHOBNTe BCnblUKy Ha Kamepe.
2. Haxmte KhoNky MODE nIy Bb6opa cMBOJa P/TTL/4C
3.HaxmMaTe KhoNky SEL Do Tex nop, Noka HndnKaTOp n 3aueHne KaHaJa Ha BCnbIwKe He NaHcET MraTb.
4.HaxmTe KONKn +IIN -ДЯ yCTaHOBKn HxHOro HOMepa KaHaJa.
5.Haxmte KhoNky SEL do tex np, noka 3HaueHn Ha KK dincnnee He nepecTaHyT MiraTb.
HactpoKa BeDOMO BcNbIuKn
6.Haxmte KhoNky MODE nBb6opa CnmboJa P/TTL/5-3/5L
7. Haximai Te KhoKy SEL Do Tex nop, noka INdkaTop n 3haueHne KaHana Ha BCnbIuKe He HaHT MuraTb.
8.HaKIMaTe KHOpKn + INN -ДЯ BbIbopa TOrO Xe HOMepa KaHaJa, KOtOpBiy yCTaHOBNeH Ha KoHTpONnepe.
9.Haxmte KhoNky SEL do Tex nop, noka 3HaueHna XK DNcJIee He nepeCTaHT MraTb.
10.YcTaHOBInTe BeOnMyIO BCnbiUKy Ha BbI6paHHyIO No3uNIO.
11.Y6eHNTecb, YTO BCE BCnbluKn 3apXeHbI n rToobk K pa6oTe.
Korda BeDOMaBcNbIuKa nonHocTbHO 3apAHTc, lamna BcNOMoTaJIbHOJ noDCBeTKN AF HaHET MIRaTB, NOITBePJKDa rTOBOHOCt b K cBEMKe.
12.CφokycnyTe kamepy Ha oBekTe n CdeJaTe CHMOK.
B 3OM pexnme BO3MOXHO nCNoIb3OBAHne BbICOKOCKOPCTHO CnHXPOHN3aUNn (FP). Nocne HacTpoek, ONnCAHHbIX Bblwe, yctAHOBnTe Ha KoHTpONHepe pexnMB bICOKOCKOPCTHO CnHXPOHN3aUNn. DOnONHnTEJbHnA INOpMaun DaHa B pa3dJe NO BBICOKOCKOPCTHO CnHXPOHN3aUNn.
1.YCTaHOBNTE BCnblIuKy B NOIO3bKaMepbl.
2.YctaHOBtpe pexm 3Kcno3nKamepb. Ecn BblncnoJb3yTe pexm Av nIIM, TaKke yCTaHOBtte 3HaueHne dnaoparmbl.
3.BKIOUOHTe BCNbIUKy. 3aTEM HAXMITE KHOKNy CNYCKa HANOIOBHy.
Tenepb dnaoparma n uybCTBNTeHObTb IneHKn aBTOMaTHueckn IpepaHO Ha BCnbIuKy.
- CHIMNTE BCNBIUKy c KaMepbl.
5.HaXmTe KhOriKy MODE (peXIM) n BbIeepnte peXIM SL (doonHHTenbHa).
6.HeckoIbko pa3 HaxMnte KhoNky SEL (BbIbOp) Ira toro, UTO6blnoJyHTb MIRaHHe INHdNKATopa MOUHOCTN BCbIuKN.
- Haxmte KhONky + nnn - dny yCTaHOBKn MOUHOCTN BCnblIKN.
OnpeDenITE COOTBETCTByOuYO MOUHOCTB BCbIUsKn HAcTPOIKo INHdNkATopa paccToHna JKK NaHeIN DnI NOnyueHn 3NaueHn 6nN3KOrO K DeNCTBnTeJbHOMy paccToHNO OT DONoHNHTeJbHOB BCbIUsKn Do oBeKtA. EcnN DeNCTBnTeJbHoe paccToHne 3a IpeDenAmn DnAna3OHa, Heo6xOdImo N3MeHnTb DnAφparMy.
Pnp KepaHn Bbl MoKeTe yctaHOBnB BpyHyu OyBCTBnBHOCTb IneHKn JINn DnaΦpaMy.
a.ДячВТБNTeHbHOCTn ПЕнк... HaxMTe KONky MODE (peXIM) ДЯ Bbl6opa ISO, 3aTe MxMITE KONky SEL (Bbl6op) Дя NOJyehN MaRHaH NmDnKaTopa. HaxMTe KONky + nI IN KONky -и yctaHObITE ChvBCTBNTeHbHOCTb ПЕнк. 3aTe mOnrTB HaxMTe KONky SEL(Bbl6op).
b.ДядиафparMbI...Korda BCblska yctaHaBnBaetcBpeXIMdoONHHTeJbHOrOyCTpoiCTBa, HaxMNTe KHOKNy SEL (BbI6Op),YTObI 3amrJIuHdNkATOp danaΦpaarmbl N HaxMNTe KHOKNy + IIN - KHOKNy DЯ YCTaHOBNyDniaparmbl.3aTeM HaxMNTe KHOKNy SEL (BbI6Op).
8.HeckoIbko pa3 HaxMnte KHonky SEL (Bb6op) dny TORO, YTo6bl octaHOBNt b MuraHne ducnner.
9.YcTaHOBnTe DOnoJIHnTeIbHyIO BCnblIaKy B MeCTo ee pa3MeUeHna. He pa3MeuaTe DOnoJIHnTeIbHyIO BCnblIaKy B IpeJeIax 3Ohbl KaIpa.
- Nocne toro kaK Bbl y6eDnncb, YTO BCE BCnbIuKN 3apJxKeHbI, HAXMNTe KONKy cnycka I CHMNTe KaIp.
Korda BCnbIka EF-610 Super nonHocTbHO 3apXeHa, BCNOMORAteJIbHbI nCTOuHNK CBeta AF 6ydet MIRaTb.
BcnbIka He pa6oTaE, ecn EF-610 Super yctaHOBJeHa Ha kamepe, a pexm yctaHOBHe Ha DOONHHTeMbHyIO BCnbIshky.
BcTpoeHHbIe BCnblsKn Kamep MZ-S, MZ-L, *ist n cHpOBoBix 3epKaJIbHbIX Kamep He Mory 6blbNcNoJIb3OBAHbI DnI HopMaJIbHOJ dONOHHTeJIbHOJ BCnblsKn, TaK KaPabOT BpeXmE P-TTL N MOrY T Bbl3BaTb HeKeJaTeJIbHOe CpaTaIBaHne BeDOMoB BCnblsKn. TaK Je, ecJIu Bbl NcNoJIb3YeTe BHeUHIO BCnblsKy Pentax Ha Kamepe, yCTaHOBITE Ha HeI pyHOn peXIM.
HA3HAUHHAДОПОЛНITEЛьнЯ BCпblшka
EcnBbI nCnoB3yeTe DBe nn 6oJee BCnblk EF-610 Super, Bbi moKeTe c nomoubu HacTpoKn KaHApOB 3aCTaBnTB CpaBaTBBaTB BCnblk BmecTe. B 3tOM peXnme Onda BCnblka 6ydet NcNoB3OBAtbcra Ka KOnTpOJIpeN iDpyne 6ydyT pa6oTaTB ka DonONHITeNbHble.
HactpoTe DononHnTeIbHyIO BCnbIuKy(ua) Ha pa60r
1.YctaHOBnTe BCnblk Ky Ha KaMepy.
2.YctaHOBInTepeKIM3KcNo3nIiKaMepbHaTvnnM.
3aTeM yCTaHOBInTE BbIePxxKy Ha 1/30 nnn 6oJbWe. KOHTpOJIep 6yDet nepeDaBaTb CnHaN Ha cpa6aTbIBaHne dpyrMM BCnblIkwam. TaKIM o6pa3OM, ecnn Bby nCNOJb3yeTe BblEePKy Mehwe 1/30, cpa6aTbIBaHne BCnblIweK He 6yDet cnHXPOHN3nPoBAHo.
3.BkIIOUHTe BCNbIuKy Ha ON (BKn) n HauKMnTe HanoIOBHy KHOKy cnycka KaMepbl.
Tenepb 3HaueHne dHaopparMbI N yBCTBnTeNbHOCTN PHeKN 6ydet aBTOMaTnueckn nepeDaHo Ha DOONHHTeNBHyO BCnblkY.
- CHIMMTE BCnblk Ky c kamepbbl.
5.HaXMMTe KhoNky MODE (peXIM) N BbI6epNTe 3HaQoK 5/SL (peXIM DOJONHHTeJIbHOB BCnblIKN).
6.Haxmte KhoNky (BbIbOp) nnyeHn MraHn HndkaTopa KaHa.
7.HaxmTe KhONky + nnn - KhoNky dny yctaHOBN HOMepa KaHana (C1 nn C2).
-
Haxmte KhoNky SEL (Bb6op) Ira TORO, TTo6bl MrgaI INHdkaTOp MOUHOCTb BCnbiuKN.
-
HaxmTe KhONky + NIN - KHONKY JIy YCTaHOBKN MOUHOCTN BCNbIuKn.
YCTAHOBITE MOUHOCTB BCNbIJKn HAcTPOIKo INHdNKaTOPa pacCTOJHnHa KK naHeJIu TAK, YTO6bIOHO 6blIO KAKMOXHO 6bnKe K DeiCTBtEnbHOMy pacCTOJHNO MExdy DOnOJIHNTbHO BcNbIJKoIN O6BeKToM. Ecn DeiCTBtEnbHOe pacCTOJHne 3a npedeJaMn dnaNa30Ha, Heo6xOJIMO n3MeHHTb3NaueHne dinaΦpaRmbI.
10.HeckoIbko pa3 HaxMnte KhoIky SEL (Bbl6Op) IJNA OCTaHOBKn MmraHn INHdkaTopa.
11.YctaHOBNTe DOnONHHTeJIbHyIO BCNbIuKy Ha XeJaemoe pacCToHne. He yCTaHaBnBaIte DOnONHHTeJIbHyIO BCNbIuKy B npedeJax KaJpa.
HactpoJa KoHTpOJIpepa donoJHnTeJbHoB BCnbIuKn
12.YctaHOBnte BCnblkky, KOTopar pa6oTaET kak KoHTponJIep Ha kamepy.
- HaxmTeKHOky MODE (pexim) N BBbepnTe 3Haoyk /SL (pexim DOONJHNTeBHOBNCbIuK).
14.HaXmnte KHONkySEL(Bb6op)ДЯТORO,чTOБыЗamngaIGNHdNkaTOp KaHaJIOB.
15.HaxMnte KONky + nIN KONKY - dIy yCTaHOBN HOMepa KaHaJa KaK OHN yCTaHOBneHbI Ha cpa6aTbIBaHMe BCnbIWeK.
16.Haxmte KhoNky (BbI6op) nra toro, yTo6bl 3amrannHdkaTOp MOHOCTH BCnblIKN.
-
HaxMMTe KhoNky+ nla noka3HaUka [tL
-
HaxMMTeKHOIIky SEL(BbI6Op)ДЯ OCTaHOBKMUNrAHN YINCNNEJ.
-
Nocne toro kaBb y6eHnncb, YTO BCE BCbIuKN NOJIHOCTbIO 3apJKeHbI, HAKMnte KONky cnYcka dJa CbeMKn KaIpa.
Korda BCnblka EF-610 Super nonHocTbIO 3apAaNTcra, 6yTeMnraTb BcnoMaTeNbHbI nCTOuHNK CBeta AF.
BbI He MoXeTe yCTaHaBnIBaTb DnaΦparMy KHOIpKoSEL (BbI6op), ecn Bbl BblpaN 3NaOcK [tL npHacTpOKe MoUHocTN BCbIuKN. BcIbIuKa 6ydet yCTaHaBnIBaTbcra B peXm KoHTpOJIpepa IOnONHITeNbHOBcNbIuKN.
Функши Котрплеса ДОЛНТьн ВсblшК 3akHQuaOTc TOLko B ynpabHeHn DOnOHLNTbHOB BCblshKoI.
XAPAKTEPNUCTUKN
TIN: 3neKtpoHHa BCbIuKa C aBTOzMm n TTL ynpabJIeHnem.
BENUUEE YNCSIO: 61 (ISO 100/M, NOJIOKeHne roJOBKn 105 MM)
NCTOCHNK IITAHNJa: Yetbipe igeNochbe 6aTapeu Tuna AA; Yetbipe Ni-Cd akKymyIaTopa Tuna AA; Yetbipe HKeJIb-MeTaJIr-TnDprnHbIX akKymyIaTopa Tuna AA
BPEM BOCCTAHOBJENH: OKoNo 7,0 cek (uenoHbIe 6aTapei)
:okono 5,0 cek (Ni-Cd, HnkeIb-Metann-tnpndnbte akkymnyTopbl)
YHCJIO BCnblJEK: OKoNo 120 BCnblIeK (UeNouHbIe 6aTapeN)
okono 160 BCnbIweK (Ni-Cd, HnKeJIb-MeTaN-riDpNDbIbe aKKymyIaTopbl)
ДЛNTЕЛьНСТБ BCПБИШКИ: okono 1/700 cek (дя понов мошноctи)
YGONOXBATA BCNbIUKOJ:24MM-105MMcynpaBneHnEMMOTOpOM
(17MMДЛЯВСТРОЕHHOИ SHINPOKOYROJIbHOr NaHeJI)
ABTOMATAUCKOE BbIKJIOUeyHNE NITAHN: YcTaHOBNeHO Ha BCnblIke
BEC:330r
ΓΑΒΑΡΙΤbl: 77 MM x 139 MM x 117 MM.
PORTUGUES
(Excepto *ist Ds/Ds2/DL/DL2, K100D, K100D Super, K110D)
Disposal of Electric and Electronic Equipment in Private Households
ENGLISH
Disposal of used Electrical & Electronic Equipment (Applicable in the European Union and other European countries with separate collection systems)
This symbol on the product, in the manual/warranty, and/or on the packaging indicates that this product must not be treated as household waste. Instead it should be handed over to the appropriate collection point for the recycling of electrical and electronic equipment. If your equipment contains easy removable batteries, please dispose of these
se separately according to your local legislation. It is your responsibility to ensure that this product is recycled correctly. In doing so you will help conserve natural resources, protect the environment and human health. For more detailed information about recycling this product, please contact your local city office, your household waste disposal service or the shop where you purchased the product.

- DEUTSCH
- 各部の名称(1丶一)
- PRECAUTIONS
- Warning !!
- Caution !!
- ABOUT THE BATTERY
- BATTERY LOADING
- AUTO POWER OFF
- ERROR INDICATION
- ADJUSTING THE FLASH HEAD
- ATTACHING AND REMOVING THE FLASH TO AND FROM THE CAMERA
- SETTING OF FLASH COVERAGE ANGLE
- WIDE PANEL
- LCD PANEL ILLUMINATION
- TTL AUTO FLASH
- USING FLASH IN OTHER CAMERA MODES
- Shutter Speed Priority Setting
- Aperture Priority Setting
- When used with M Mode
- LIMITS OF CONTINUOUS SHOOTING
- SECOND CURTAIN SYNCHRONIZATION
- HIGH SPEED SYNC FLASH(FP) (Only for P-TTL compatible cameras)
- MODELING FLASH
- EXPOSURE COMPENSATION (Only for P-TTL compatible cameras)
- CONTRAST-CONTROL-SYNC FLASH
- MULTI FLASH MODE
- BOUNCE FLASH
- CLOSE-UP EXPOSURES
- CATCH LIGHT PANEL
- WIRELESS FLASH (Only for P-TTL compatible cameras)
- USING THE SIGNAL OF BUILT-IN FLASH AS A TRIGGER.
- (Except *ist Ds/Ds2/DL/DL2, K100D, K100D Super, K110D)
- Amount of discharge adjustment setting
- USING THE SIGNAL OF THE FLASH THAT IS ATTACHED TO THE CAMERA AS THE TRIGGER
- When only OFF-CAMERA FLASH is triggered
- Controller Setting
- Off-Camera Flash Setting
- When triggering both CONTROLLER and OFF-CAMERA FLASH.
- SLAVE FLASH
- NORMAL SLAVE FLASH
- DESIGNATED SLAVE FLASH
- Setting the Slave Flash unit(s) for firing
- Setting for Slave Controller unit
- SPECIFICATIONS
- ESPANOL
- ITALIANO
- VOORZORGSGMAATREGELEN
- Controller installing
- Off-camera installing
- Off-camera instilling
- Kaii
- PYCCKM
- ПЕДОCTОPOЖHOCTN
- Преупждени!!
- Пре dioctepexeHne!!
- BHEUHHe COCTABHbIe YACTn
- OPRAHbI YNPABJIEHNIA
- BATAPER
- YCTAHOBKA BATAPEI
- ABTOMATNUECKOE BbIKJIOUeyHNE NITAHNIA
- OwHBOUHAR HINKALUN
- HACTPOIKA TOLOBKIN BCNbIUSKIN
- YCTAHOBKA N YDAJIENHE BCПьIшКС KAMEРы
- HACTPOIKA YTJIA OXBATA BCПышки
- PACCENBAIOUJRAIHAHEJIb
- OCBELSEHNE JKK PAHEJI
- ДИСПЛЕМ PACCTОЯня
- BCПышkaВPEЖИМETTLAUTO
- NcIIOJIb3OBAHHe BCIIiIKn IPNpyrNX PEXIMAX KAMEPbI HacTpoJa c npOpHTeTom BbldepKKn
- HactpoJa c npOpHTeTom dnaΦparMbI
- Pn nCnoB3OBaHn peKmMa M
- OgPAHnueHnI JIe HENPEPbIBHOcMbKn
- HANPABJIENHOCTb BCnblIKN
- 3Kcno3nIIN JI KpyHOrO IlaHA
- OTPAXAIOUAR NAHEJIb
- (TonbkoДляКamep,coBmecTnmbixcP-TTL)
- NCSIOJIb3OBAHNE CnHJIA BCTPOEHHOB BCblIKK KAK TPNITPEPA.
- (Kpome kaMep *ist Ds/Ds2/DL/DL2, K100D, K100D Super, K110D)
- HactpoKa MoUHOCTN BCnblIuKn
- NCIOJIb3OBAHNE CNHANA BHEUHEB CnblkK KAK TPNIIGREPA
- ДЛЯ CPABATbIBAHNЯ TOlbKO BEdOMOИ BCnblsKIN
- HacrpoKa KOnrpoJInepa
- HactpoKa BeDOMO BcNbIuKn
- HA3HAUHHAДОПОЛНITEЛьнЯ BCпblшka
- HactpoTe DononHnTeIbHyIO BCnbIuKy(ua) Ha pa60r
- HactpoJa KoHTpOJIpepa donoJHnTeJbHoB BCnbIuKn
- XAPAKTEPNUCTUKN
- PORTUGUES
- Disposal of Electric and Electronic Equipment in Private Households
Brand : SIGMA
Model : EF610 DG ST Super (Pentax)
Category : Flash