USER MANUAL PKS 46 BOSCH
Senior Vice President Head of Product
Engineering Certification
ppa. Maee i.v. Nooey
Rated power [W] 600 750
Output power [W] 350 410
No-load speed [rpm] 4 200 4 600
| Speed under load, max. | [rpm] 2 450 3 200 |
| Riving knife thickness, max. | [mm] | 1.5 | 1.5 |
| Cutting depth at 90°, max. | [mm] | 40 | 46 |
| Cutting depth at 45°, max. | [mm] | 26 | 30 |
| Base plate | [mm] | 120 x 260 | 145 |
| Weight (without accessories), approx. | [kg] | 2.4 | 3.0 |
| Protection class | | ☐ / II | ☐ |
| Saw blade dia. (max.) | [mm] | 130 150 | |
| Saw blade dia. (min) | [mm] | 122 135 | |
| Thickness of central blade body | [mm] | 1.4 | 1.4 |
| Teeth thickness/teeth setting, max. | [mm] | 2.7 | 2.8 |
| Teeth thickness/teeth setting, min. | [mm] | 1.7 | 1.7 |
| Mounting hole | [mm] | 16 | 16 |
Please observe the order number of your machine. The trade names of the individual machines may vary.
Machine Elements
1 Switch lock
2 On/Off switch
3 Saw dust ejector
4 Protection guard
5 Winged screw for cutting angle setting
6 Riving knife attachment
7 Base plate
8 Riving knife
9 Retracting blade guard
10 Parallel guide
11 Auxiliary handle
12 Allen key
13 Cutting angle scale
14 Winged screw for parallel guide
15 Cutting mark, 45^
16 Cutting mark, 0^
17 Cutting depth scale
18 Winged screw/clamping lever for cutting depth adjustment
19 Clamping bolt with washer
20 Clamping flange
21 Mounting flange
22 Motor spindle
23 Set of screw clamps
24 Guide-rail adapter
25 Guide rail
26 Connection piece
27 Dust bag
28 All-purpose vacuum cleaner
- Not all of the accessories illustrated or described are included as standard delivery.
Measured values determined according to EN 50 144.
Typically the A-weighted noise levels of the product are: sound pressure level: 97 dB (A); sound power level: 110 dB (A).
Wear hearing protection!
The typical hand/arm vibration is below 2.5m / s^2
Intended Use
The machine is intended for cutting wood lengthways and crossways in straight lines and at mitred angles of up to 45^ on a firm surface.
For Your Safety
Working safely with this machine is possible only when the operating and safety information are read completely and the instructions contained therein are strictly followed. In addition, the
general safety notes in the enclosed booklet must be observed. Before using for the first time, ask for a practical demonstration.
Wear protective glasses and hearing protection.
- For long hair, wear hair protection. Work only with closely fitting clothes.
The dust that is produced while working can be detrimental to health, inflammable or explosive. Suitable safety measures are required.
Examples: Some dusts are regarded as carcinogenic. Use suitable dust/chip extraction and wear a dust respirator.
If the mains cable is damaged or cut through while working, do not touch the cable but immediately pull the mains plug. Never use the machine with a damaged cable.
- When working with the machine, always hold it firmly with both hands and provide for a secure stance.
Always direct the cable to the rear away from the machine.
- Connect machines that are used in the open via a residual current device (RCD) with an actuating current of 30mA maximum. Use only extension cables that are approved for outdoor use.
- Hold the power tool only by the insulated gripping surfaces, when performing an operation where the cutting tool may run into hidden wiring or its own cord.
Contact with a "live" wire will make exposed metal parts of the tool "live" and shock the operator.
- Use appropriate detectors to determine if utility lines are hidden in the work area or call the local utility company for assistance.
Contact with electric lines can lead to fire and electric shock. Damaging a gas line can lead to explosion. Penetrating a water line causes property damage or may cause an electric shock.
The machine must be operated only with the appertaining protective devices.
The retracting blade guard 9 must be able to move freely and close by itself; it must not be clamped while opened.
Always use the riving knife 8.
For stationary use, the machine may be operated only on a sawing table with restarting protection.
Apply the machine to the workpiece only when switched on.
- Secure the workpiece. A workpiece clamped with clamping devices or in a vice is held more secure than by hand.
- When working, always guide the machine away from the body.
- Do not work with materials containing asbestos.
The cutting path must be free of obstacles both above and below.
The saw blade must not protrude more than 3 mm out of the workpiece.
- Keep hands clear of the rotating saw blade. Do not come into contact with the rotating saw blade on the underside of the workpiece.
- Do not allow fingers to enter the chip ejector 3.
- Do not saw into nails, screws, etc.
- Do not work overhead with the machine.
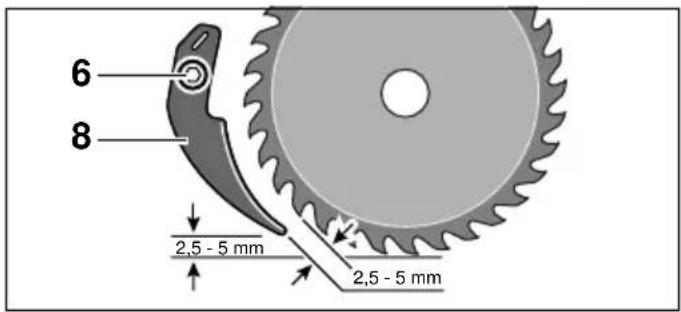
The saw blade and riving knife must not become stuck in the cut. The saw teeth setting must be wider and the main body of the saw blade thinner than the thickness of the riving knife.
- Protect saw blades against shock and impact.
- Do not wedge the saw blade.
If the saw blade jams, switch off the machine immediately.
After switching off, do not slow down the saw blade by exerting side pressure.
Always switch the machine off and wait until it has come to a standstill before placing it down.
- Use only sharp, flawless saw blades. Change cracked, bent or dull saw blades immediately.
Saw blades of high alloy, high-speed steel must not be used.
- Never allow children to use the machine.
- Bosch is only able to ensure perfect operation of the machine if the original accessories intended for it are used.
Before Putting into Operation
Before any work on the machine itself, pull the mains plug.
Checking the Adjustment of the Riving Knife
For safety reasons the riving knife 8 must always be used. The riving knife avoids seizing of the saw blade while sawing.
The adjustment takes place at the maximum cutting depth.
Loosen the screw 6, adjust the riving knife 8 and retighten the screw.
Before any work on the machine itself, pull the mains plug.

To achieve an optimum cut, the saw blade must not protrude more than 3mm at the most from the material.
For adjusting the cutting depth, loosen the winged screw/clamping lever (PKS 46) 18 and raise the saw from, or lower it to the base plate 7:
Raise for smaller cutting depths
Lower for greater cutting depths
Set the desired depth on the cutting depth scale 17.
Tighten winged screw/clamping lever 18 again.
Clamping Lever (PKS 46)
The clamping power of the clamping lever 18 can be adjusted.
To do this, unscrew the clamping lever and set it at at least 30^ counter-clockwise, screw on again.
Adjusting the Cutting Angle
Before any work on the machine itself, pull the mains plug.
Loosen winged screw(s) 5.
Swing the machine to the side until the desired cutting angle is set on the scale 13.
Tighten winged screw(s) 5 again.
Note: For litre cutting, the cutting depth is smaller than the value shown on the cutting depth scale 17.
Cutting Marks
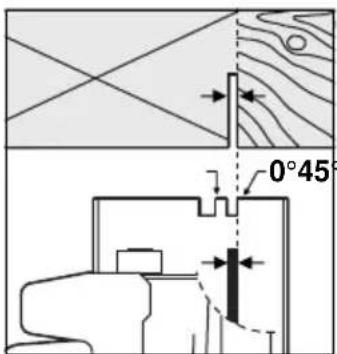
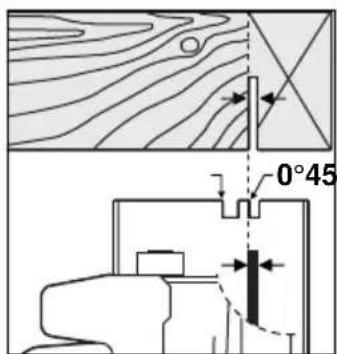
The cutting mark 0^ (16) indicates the position of the saw blade for right-angled cuts.
The cutting mark 45^ (15) indicates the position of the saw blade for 45^ cuts.
For an exactly true cut, apply the saw as shown in the diagrams.
Note: It is best to carry out a trial cut.
Initial Operation
Observe correct mains voltage: The voltage of the power source must agree with the voltage specified on the nameplate of the machine. Equipment marked with 230V can also be connected to 220V .
Switching On and Off
For starting operation of the machine, actuate the safety switch against starting 1 first, and then press and hold the On/Off switch 2 afterwards.
To switch off the machine, release the On/Off switch 2.

For safety reasons the On/Off switch of the machine cannot be locked; it must remain pressed during the entire operation.
Before any work on the machine itself, pull the mains plug.
Wear protective gloves.
The saw blades used must correspond to the characteristic data in these operating instructions.
- Use only saw blades with an allowable speed matching at least the no-load speed of the machine.
For tightening and loosening the clamping bolt 19, hold the clamping flange 20 firmly with a spanner or set the saw blade onto a wooden surface.
Tilt back the retracting blade guard 9 and hold firmly.
Unscrew clamping bolt 19 with the Allen key 12.
Remove clamping flange 20.
Remove the saw blade.
Clean the saw blade and all the clamping parts to be assembled.
Tilt back the retracting blade guard 9 and hold firmly.
Place the saw blade onto the mounting flange 21.
Assemble the clamping bolt 19 with the washer and assemble the clamping flange 20.
Tighten the clamping bolt 19 with the Allen key 12. Tightening torque: 6-9 Nm; equivalent to hand-tight plus 1/4 turn.

Take care that the mounting positions of the mounting flange 21 and clamping flange 20 are correct.
When mounting: Ensure that the cutting direction of the teeth (direction of arrow on saw blade) and the direction-of-rotation arrow on the blade guard match.
The dust that is produced while working can be detrimental to health, inflammable or explosive. Suitable safety measures are required.
Examples: Some dusts are regarded as carcinogenic. Use suitable dust/chip extraction and wear a dust respirator.
The machine can be plugged directly into the receptacle of a Bosch all-purpose vacuum cleaner with remote control starting. The vacuum cleaner starts automatically when the machine is switched on.
The vacuum cleaner must be suitable for the material to be worked.
When vacuuming dry dust that is especially detrimental to health or carcinogenic, use a special vacuum cleaner.
For external dust extraction with a vacuum cleaner, an extraction adapter must be used as required (see accessories). Insert extraction adapter and vacuum connection firmly.
For small jobs, work with the dust bag (accessory). Insert the dust bag connection piece into the dust ejector 3. Empty the dust bag regularly to maintain an optimum vacuuming function.
Operating Instructions

Excessive feed significantly reduces the performance capability of the machine and reduces the service life of the saw blade.
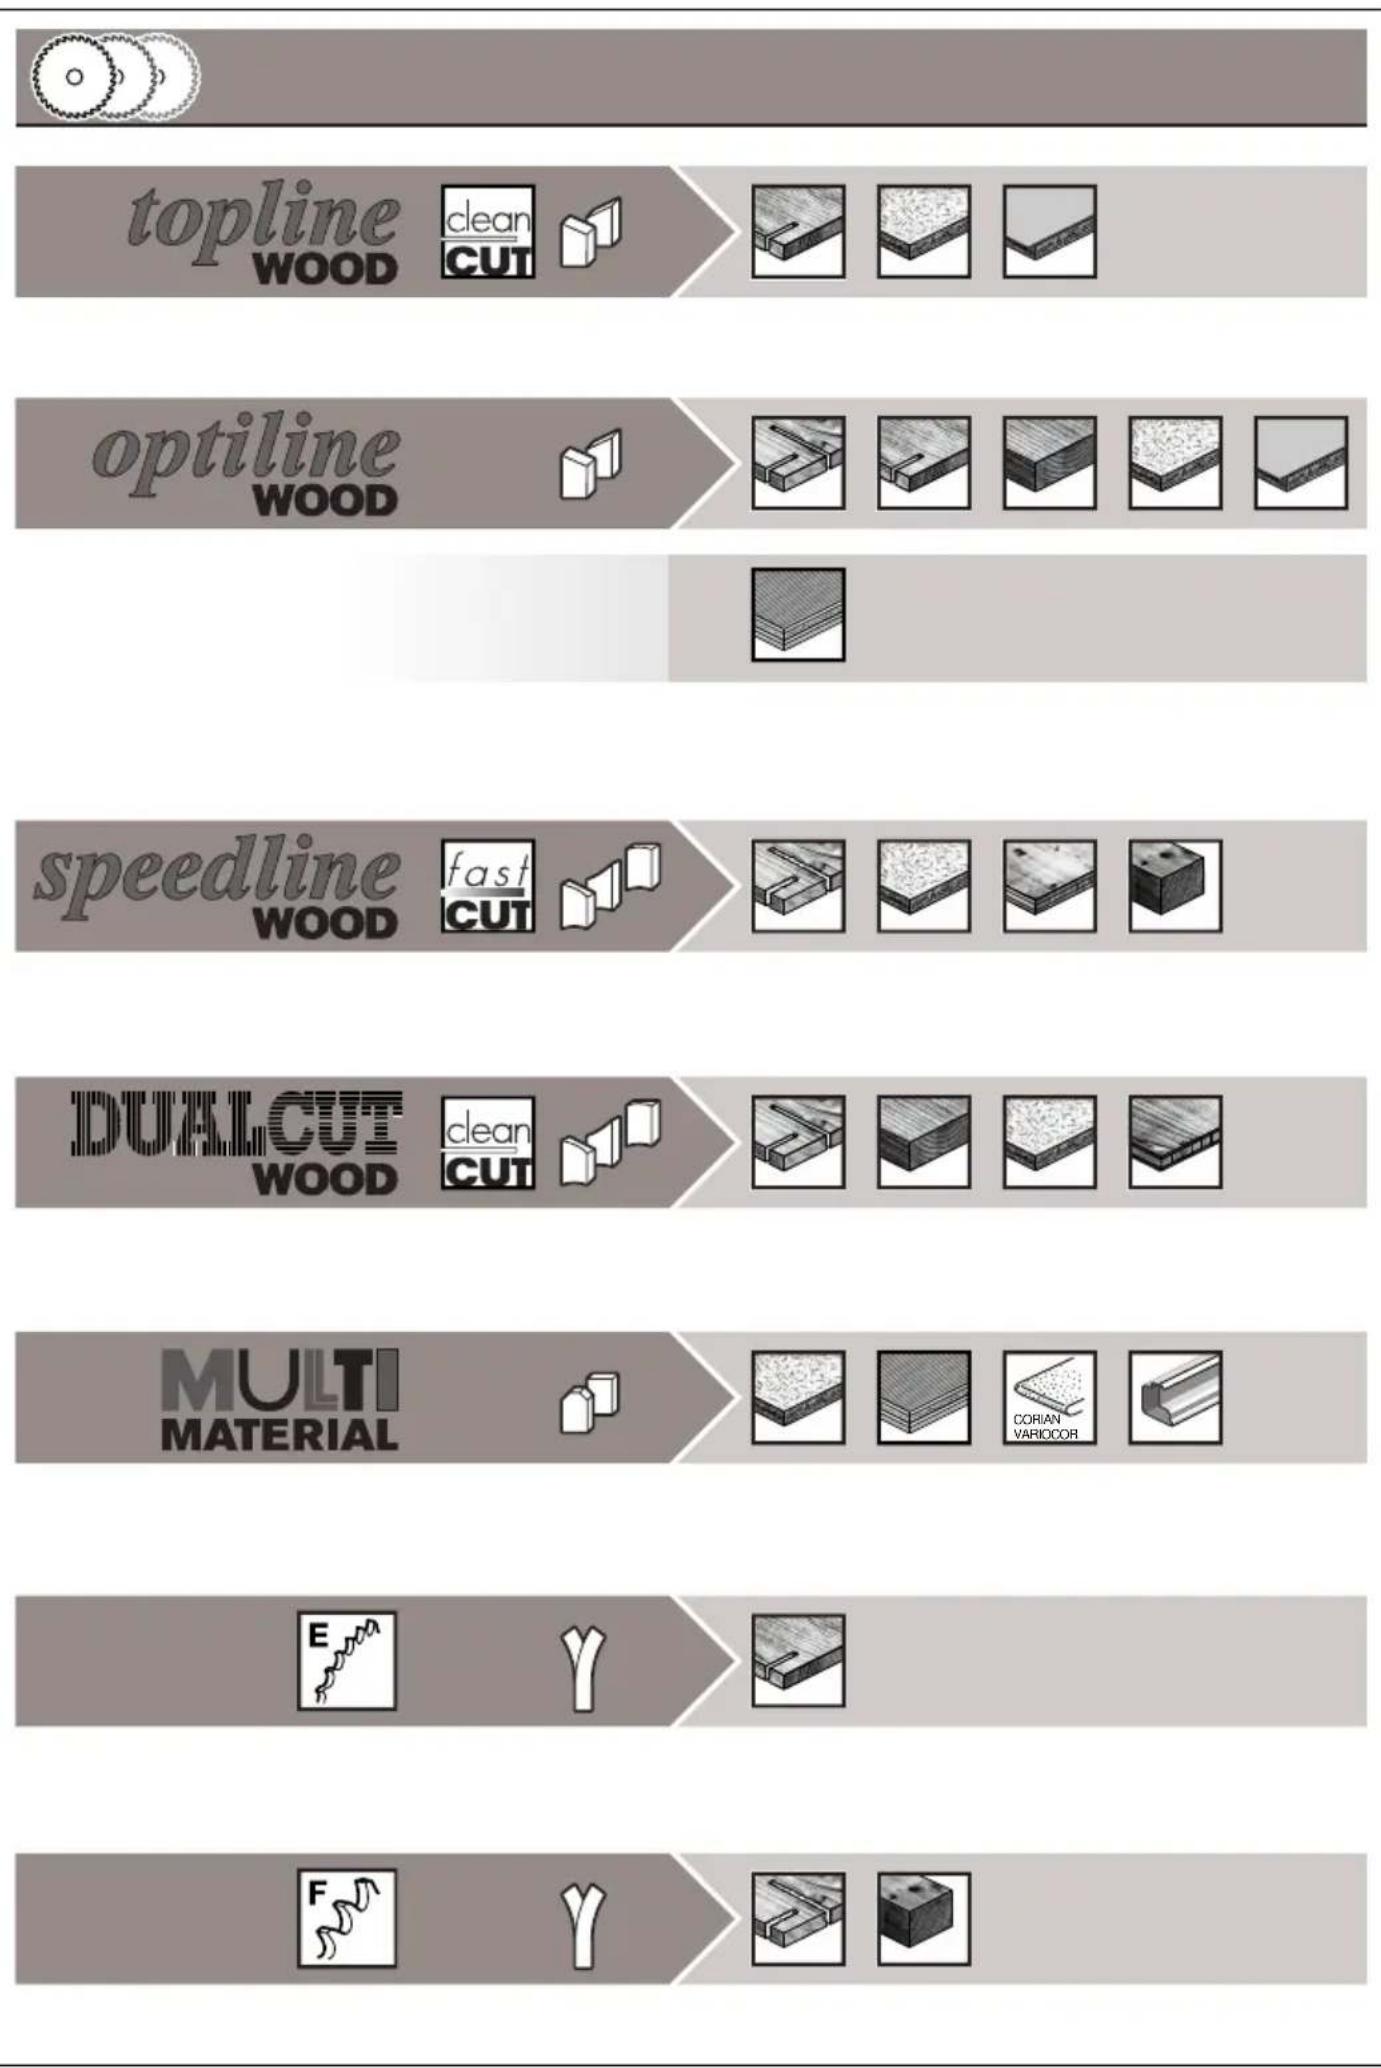
Sawing performance and cutting quality depend essentially on the condition and the tooth form of the saw blade. Therefore, use only sharp saw blades that are suited for the material to be worked.
Wood
The correct selection of the saw blade depends on the type and quality of the wood and whether lengthway or crossway cuts are required.

When cutting spruce lengthways, long spiral chips are formed.
Beech and oak dusts are especially detrimental to health. Therefore, work only with dust extraction.
Tips
The parallel guide 10 enables exact cuts along a work piece edge and cutting strips of the same dimension.
For cutting large work-pieces or straight edges:
Clamp a board or strip tightly to the work-piece as an auxiliary guide using screw clamps. Guide the base plate along the auxiliary guide.
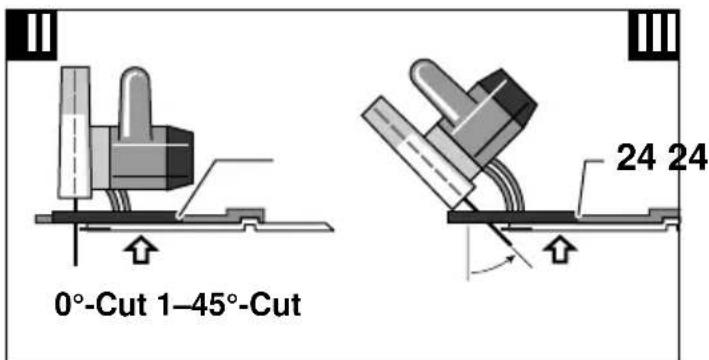
The guide rail 25 enables particularly exact cutting, both vertically and mitred to 45^ .
The adhesive coating prevents the guide rail from slipping and protects the surface of the work piece. The hard anodised coating of the guide rail allows the circular saw to glide easily.
The rubber lip on the guide rail serves as a splinter guard, which avoids fraying of the surface when sawing wooden materials. For this, the teeth of the saw blade must lie directly against the rubber lip.
Working with the guide rail 25 is possible only with use of the guide-rail adapter 24 (accessory).

For exact cuts using the guide rail 25 the following working steps must be carried out again:
- Place the guide rail onto the work-piece projecting slightly over the side. Make sure that the end with the rubber lip is directed towards the saw blade (Fig. I).
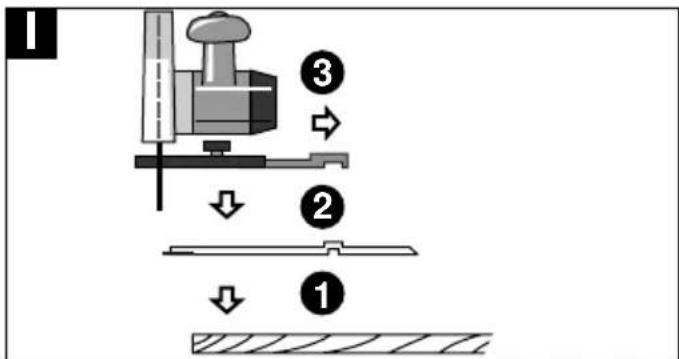
- Place the circular saw premounted guide-rail adapter 24 onto the guide rail 25 and set the cutting angle and cutting depth.
Align the circular saw with the guide adapter 24 in such a way that the teeth of the saw blade lie against the edge of the rubber lip.
- Make sure that the guide rail is not sawn into (Fig. II and III).
-
Tighten the winged screw for the parallel guide 14 to ensure a firm connection between the guide adapter 24 and the circular saw.
-
Remove the circular saw from the guide rail 25.
-
Place the guide rail on the workpiece in such a way that the rubber lip lies exactly along the cutting edge (marked line) and tighten using screw clamps 23.

The guide rail 25 must not protrude over the workpiece on the side of the cut.
- Position the saw, ensuring that the guide-rail adapter 24 is seated firmly.
- Saw through the material, applying moderate and steady feed.
Note: Two guide rails can be connected to one with use of the connection piece 26 (accessory). Clamping is carried out with the four screws located in the connection piece.
Maintenance and Cleaning
Before any work on the machine itself, pull the mains plug.

For safe and proper working, always keep the machine and the ventilation slots clean.
The retracting blade guard must always be able to move freely and freely and retract automatically. Therefore, always keep the area around the retracting blade guard clean. Remove dust and chips by blowing out with compressed air or with a brush.
Saw blades that are not coated can be protected against corrosion with a thin coat of acid-free oil. Before use, the oil must be removed again, otherwise the wood will become soiled.
Resin and glue residue on the saw blade produce poor cuts. Therefore, clean the saw blade immediately after use.
If the machine should fail despite the care taken in manufacturing and testing procedures, repair should be carried out by an after-sales service centre for Bosch power tools.
In all correspondence and spare parts orders, please always include the 10-digit order number given on the nameplate of the machine.
WARNING! Important instructions for connecting a new 3-pin plug to the 2-wire cable.
The wires in the cable are coloured according to the following code:
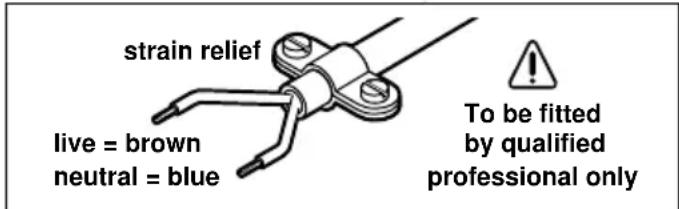
Do not connect the blue or brown wire to the earth terminal of the plug.
Important: If for any reason the moulded plug is removed from the cable of this machine, it must be disposed of safely.
Environmental Protection

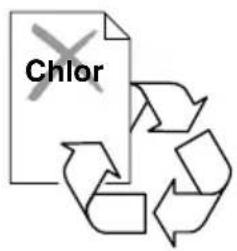
Recycle raw materials instead of disposing as waste
The machine, accessories and packaging should be sorted for environmental-friendly recycling.
These instructions are printed on recycled paper manufactured without chlorine.
The plastic components are labelled for categorized recycling.
Accessories
23 Screw clamps, pair 1607960008
24 Guide-rail adapter 2607 001 375
25 Guide rail (1.4 m long) 2602 317 031
Guide rail (0.7 m long) 2602 317 030
26 Connection piece 1602319003
27 Dust bag with adapter 1605411029
28 All-purpose vacuum cleaner
Further accessory information is available at your Bosch dealer.
We declare under our sole responsibility that this product is in conformity with the following standards or standardization documents: EN 50 144 according to the provisions of the directives 89/336/EEC, 98/37/EC.
Dr. Egbert Schneider Dr. Eckerhard Strötgen Senior Vice President Head of Product Engineering Certification
ppa1b1c1 = i.v. NO3
Subject to change without notice
\section*{Caracteristiques techniques}
Scie circulaire PKS 40 PKS 46
Dr. Egbert Schneider Dr. Eckerhard Strötgen Senior Vice President Head of Product Engineering Certification
ppa1b1c1 i.v. NO3
Dr. Egbert Schneider Dr. Eckerhard Strötgen Senior Vice President Head of Product Engineering Certification
ppa1b1c2 i.v. M1O_3
Senior Vice President Head of Product
Engineering Certification
ppa. Maee i.v. Nooey
Dr. Egbert Schneider Dr. Eckerhard Strötgen Senior Vice President Head of Product Engineering Certification
ppa.
Dr. Egbert Schneider Dr. Eckerhard Strötgen Senior Vice President Head of Product Engineering Certification
ppa.
Dr. Egbert Schneider Dr. Eckerhard Strötgen Senior Vice President Head of Product Engineering Certification
ppa.
Dr. Egbert Schneider Dr. Eckerhard Strötgen Senior Vice President Head of Product Engineering Certification
ppa.
Senior Vice President Head of Product
Engineering Certification
ppa1b1c1 i.v. NO2 通
Dr. Egbert Schneider Dr. Eckerhard Strötgen Senior Vice President Head of Product Engineering Certification
ppa.
Bapoo (xomega 2,4 3,0
Móvωη Ⅱ /Ⅱ
Dr. Egbert Schneider Dr. Eckerhard Strötgen Senior Vice President Head of Product Engineering Certification
ppa. /mu: i.v. nuOycu
Tnpoue to 6ikaiwa aalayawv
Teknik veriler
Daire testere PKS 40 PKS 46
Siparis no. 0 603 328 0.. 0 603 329 0..
Giris gucu [W] 600 750
Cikis gucu [W] 350 410
Bostaki devir sayisi [/dak] 4 200 4 600
Yükteki devir sayı, maks. [/dak] 2450 3200
Dr. Egbert Schneider Dr. Eckerhard Strötgen Senior Vice President Head of Product Engineering Certification
ppa.
Robert Bosch Ltd. (B.S.C.)
P.O.Box 98
Broadwater Park
North Orbital Road
Denham-Uxbridge
Middlesex UB 9 5HJ
Service +44 (0)18 95 / 83 87 82
Advice line +44 (0)18 95 / 83 87 91
Fax +44 (0) 1895/838789
Ireland
Beaver Distribution Ltd.
Greenhills Road
Tallaght-Dublin 24
Service. +353 (0)1 / 414 9400
Fax +353 (0)1 / 459 8030
Australia
Robert Bosch Australia L.t.d.
RBAU/SPT2
1555 Centre Road
P.O. Box 66 Clayton
3168 Clayton/Victoria
C +61(0)1/800804777
Fax. +61 (0)1 / 800 819 520
www.bosch.com.au
E-Mail: CustomerSupportSPT@au.bosch.com
New Zealand
Robert Bosch Limited
14-16 Constellation Drive
Mairangi Bay
Auckland
New Zealand
+64(0)9/4786158
Fax. +64 (0)9 / 47 82 914
ServiceAprès-Venté
France
Robert Bosch France S.A.
ServiceAprès-vente/Outillage
After Sales Service Outillage
Rue Henri Genesse 1
1070 Bruxelles
+32 (0)2 / 525.50.29
Fax. +32 (0)2 / 525.54.30
Service conseil client.... +32 (0)2 / 525.53.07
E-Mail: Outillage.Gereedschappen@be.bosch.com
Suisse
Robert Bosch AG
Bosch San. ve Tic. A.S.
Ahi Evran Cad. No:1 Kat:22
Polaris Plaza
80670 Maslak/Istanbul
+90 (0)212 / 335 06 00
Faks +90 (0)212 / 346 00 48-49
BOSCH


