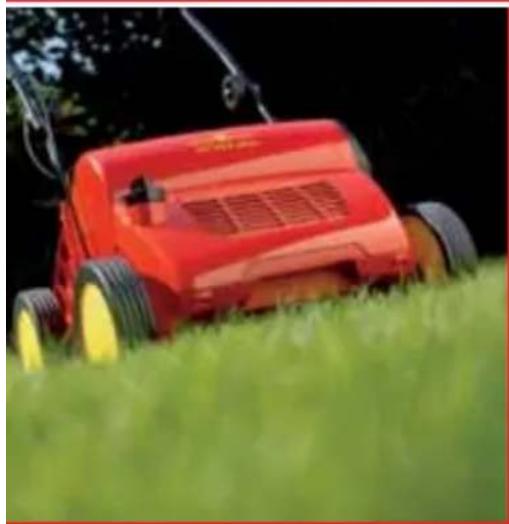
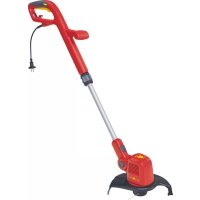
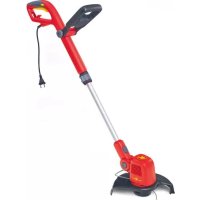
GTE 830 - Grass trimmer Wolf Garten - Free user manual and instructions
Find the device manual for free GTE 830 Wolf Garten in PDF.
Frequently Asked Questions - GTE 830 Wolf Garten
User questions about GTE 830 Wolf Garten
0 question about this device. Answer the ones you know or ask your own.
Ask a new question about this device
Download the instructions for your Grass trimmer in PDF format for free! Find your manual GTE 830 - Wolf Garten and take your electronic device back in hand. On this page are published all the documents necessary for the use of your device. GTE 830 by Wolf Garten.
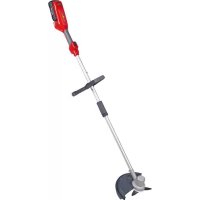
USER MANUAL GTE 830 Wolf Garten
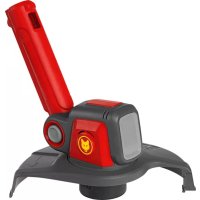
1 Middle grip
2 Cord cutter
3 On-/Off-switch
4 Upper grip with cable holder
5 Vertical cutting adjustment
6 Cord spool
7 Tilt switch
NL
Congratulations on the purchase of your WOLF-Garten product!

Please read the instructions carefully and familiarize yourself with the different control elements and how to operate the device properly. Attention! When using power tools it is important to observe the following safety advice in order to protect yourself against electrical shock. The operator is responsible for accidents involving other persons and/or their property.

Never let children or other persons who have not read these instructions use the device. Persons younger than 16 must not use the device. Local regulations may determine the minimum age for users.
Contents
Meaning of the symbols 11
Safety instructions 12
Operation 13
Maintenance 14
Faults and how to remedy 15
Warranty 15
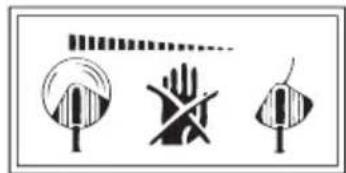
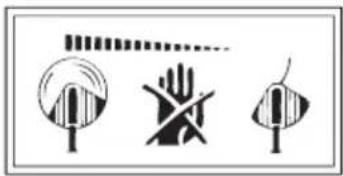
Meaning of the symbols

Warning! Read the operating instructions before placing in service!

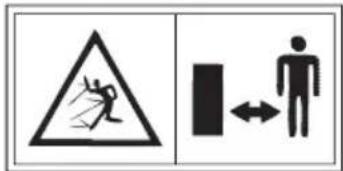
Keep bystanders away!
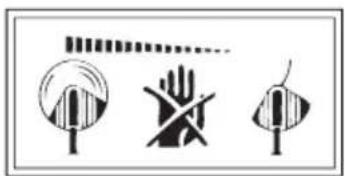
Tool is coasting!

Wear protective goggles!

Do not expose to moisture!
For vertical cutting:
Hold the protective cover with the cord input side (cord cutter side) downward.
Do not hold the protective cover upward.
Safety instructions
General
- This trimmer is ideal for trimming lawn edges and small lawn areas in private gardens. The trimmer should not be used in public gardens, parks, sports grounds, streets etc. and in farming and forestry.
- Because of possible accidents the trimmer must not be used for:
- trimming of bushes and hedges
- cutting of flowers
- cutting garden by-products for composting
These tools are not intended to be used by persons with insufficient experience and/or lack of skills or persons with limited physical, sensory or mental abilities unless these persons are supervised or instructed on the use of the tools by a person responsible for the safety of these persons. - Young adults below the age of 16 may not use the tools.
Make sure that no persons (in particular children) or pets are in the vicinity of the working area. You are responsible for damages. - Never operate the unit in the presence of individuals (particularly children) or animals.
- Only operate the unit in daylight hours or if adequate artificial lightning is available.
- Use trimmer when the weather is dry and do not leave it outside when it rains.
- Use a residual current device (RCD) rated for a residual current not greater than 30mA .
- Never install metal cutting elements.
Before operating
- Before starting the trimmer, clear all string, wire etc. away from the area to be cut. Whilst cutting look out for foreign objects.
- All cable must be inspected regularly for signs of damage or ageing. Use only in perfect condition!
- Tool must not be used when the safety device or the covering is damaged.
- For safety reasons only original WOLF-Garten spare-parts or parts appointed by the manufacturer shall be used. Please note the installation instructions!
Before adjusting or cleaning the tool and before checking for a caught or damaged connecting cable, switch off the tool and disconnect the mains plug.
Before starting the unit, and after any impacts, examine the unit for signs of wear or damage. Have any detected damage repaired immediately.
Cable
-
Use only extension cables with a minimum cross-section of 3 × 1.5 ~mm^2 and a length of max. 25 ~m :
-
When using rubber-sheathed cables, they must be of type HO7 RN-F or heavier.
-
When using PVC-sheathed cables, they must be of type HO5 VV-F or heavier (cables of this type are not suitable for continuous outdoor use - e.g. underground installation for the connection of an outdoor socket or pond pump, or outdoor storage).
-
They must be waterproof mobile devices that are used outdoors must be connected via a residual current circuit breaker.
-
Use a leakage-protective system (RCD) with a leakage current of no more than 30mA .
- Attach connection cable to traction relief. Make sure that in does not rub against edges, pointed or sharp objects. Do not squeeze cable through door or window gaps.
- Switching devices must not be removed or bridged (e.g. tying of switching lever to guide spar).
Working
Always keep hands and feet well clear of the cutting mechanism, particularly when starting the unit.
- Avoid injury from each of the components which serve to cut the line length. After pulling out a new length of line, always hold the unit in its normal operating position before starting it.
- When starting the trimmer hold its base parallel to the lawn area in order to avoid accidents.
- Keep your hands away from the moving cord.
Wear eye protection!
Always wear appropriate working clothes and sound footwear when using the trimmer.
Before carrying the trimmer to the next lawn area to be cut, switch it off.
- Be careful when you go backwards. You may stumble!
- Keep the cable away from the cutting tool.
- Should the powercord be damaged during use, immediately disconnect it from the mains. Do not touch the cable until it has been disconnected from the mains.
- Never leave the trimmer without supervision. Store it in a safe place.
- The switches installed shall not be removed or bridged over, e. g. by binding the switch to the handle.
- Do not allow the cord spool to strike the ground or edges of working area. If the cord spool receives a hard knock, this will cause a strong vibration on the handle. If this occurs, the trimmer should be checked by a qualified service centre.
After operating
After using the unit, disconnected the power cord from the wall outlet and inspect the unit for damage.
- When switching off the trimmer: Attention: the cutting tool does not stop immediately!
Always wait for the cutting tool is stop.
Before examining or cleaning the tool or before removing the safety device or the cord spool, switch off and disconnect the trimmer from the mains. Only use original WOLF-Garten cord spools and note the installation instructions! - The cutting knife should not be cleaned under running water or under high-pressure.
- Faults shall only be repaired by appointed service centres or by the manufacturer.
Make sure all air holes are free of dirt. - Do not store the unit within reach of children.
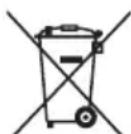
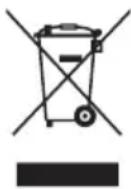
Disposal
13/14
Do not dispose of electrical equipment in domestic waste. Recycle equipment, accessories and packaging in an environment-friendly manner.
Operation
Operating times
- Please check noise abatement regulations prevailing in your country.
How to adjust the central handle A
The auxiliary handle can be adjusted sideways and vertically by lossening the knob. Recommendation.
Insert power cable into cable holder B
The power cable holder in the guide grip prevents accidental disconnection of the extension cable.
Connect to the socket (230 Volt, 50 Hz)
- Connect the device only to sockets that are protected with a 10-16 Amp. fuse (or LS switch type B)

Note: Residual current protection device
These safeguards provide protection against severe injuries resulting from touching damaged cables, insulation defects and in some cases cables that conduct electricity.
We recommend that the equipment only be plugged into a power socket, which is protected by a residual current protection device (RCD) with a residual current of no more than 30mA .
- Retrofit kits are available for old installations. Consult an electrician
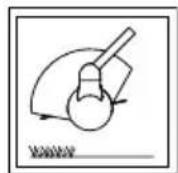
Working position C
The optimal operational gradient for edging and free-cutting is approx. 30^ . For free cutting (no ground contact) swing device in a semicircle before your body.
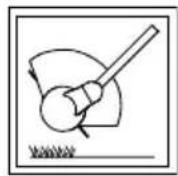
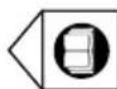
Vertical edge-trimming D E
Teh machine can be adjusted for vertical trimming. Grip machine firmly. Pull tube and turn 180^ until it audiably engages .D
On/off switch F
Thread adjustment G
The thread is adjusted with the tilt switch. Briefly tilt the running machine on a firm base, e.g. paving slab (approx. 3kg pressure). Approx. 2,5 cm cutting thread are the automatically paid out.
i Tips on trimming
Cut high grass slowly, step by step.
- Move trimming head only as close to tree trunks and bushes as necessary.
- Trimming too closely along walls or concrete slabs wears out line unnecessarily.
- You can prolong the life of your trimmer by removing grass from the ventilation slots and the bottom of the trimmer before or after each use.
Maintenance
Replacing the cord spool

The trimmer continues to spin after being switched off! Always disconnect from the power supply before performing any work on the trimmer!
- Hold spool case, turn cover in „AUF“ (open) direction of the arrow and remove it, remove empty thread cartridge H
- Insert the thread end of the new thread cartridge through the thread lug 1). Do not loosen the thread from the retainingslot of the thread cartridge 2).
- Slide thread cartridge over the metal knob. Pull end of thread until the thread is loosened from the retaining slot of the thread cartridge K. Ensure correct position of the thread from the thread cartridge to the thread lug.
- Attach cover. One of the two arrow markings should point towards the thread lug. Press down on cover and turn to the right until it catches audibly (1) + (2).

When switched on, thread is cut off to operational length. Only switch machine on when in operational position.
Faults and how to remedy
| Problem Cause Remedy | |
| Tilt switch is not working. | ·Spool is empty. ·Fit new spool. RQ-FA (71) 17 081) |
| ·Dirt and debris in spool drive mechanism. ·Clean parts with a brush. | |
| ·Line is torn and stuck inside spool. ·Remove spool, check tightness of winding and replace spool in the usual way. | |
| ·Line is „welded“ to itself or to spool through heat build-up. ·Remove welded line section, check tightness of winding and replace spool in the usual way. | |
When in doubt, always consult a WOLF-Garten service workshop.
Warranty
The warranty rules issued by our company or the importer apply to every country. As part of the warranty, we remedy malfunctions on your appliance free of charge provided that this malfunction is caused by a material or manufacturing defect. In the event of a warranty claim, please turn to your dealer or the nearest branch office.
i Merk: Jordfeilbryter
He npbxte 3aunTHnE kpaH harope.
Hnctpykun 3a Texnka Ha 6e3onachoCT
O6uHnHcTpkyu
To3n TpIMep 3a OKaHTBaHe Ha TpeBaTa e npedHa3HaueH 3a NmHIO NOn3BaHe 3a NOdIbpxKaHTo Ha KaHTOBeTe Ha TpeBaTa KaKTo Hn MaJIKN TpeBHN n NapKOv nIoU. To3n TpIMep He Tpr6Ba Da ce n3NoJ3Ba B O6uectBeHn rpaDHH, napKObe, cnoptTHn CbOpBXeHn, nO yLIuNTe n T.H. KaKTO n B CEJIckOTO n TropcKO CTOnaHCTBO.
-TopaDiOnachocT OT TeJeCha NOBpeHa Ha n3PON3BaUTo r Jnue TpImepbT He Tpr6Ba Da ce n3PON3Ba:
-3a p83aHe Ha xpaCTn JKBn PIIeTn;
-3a p83aHe Ha UBeT;
-3a Hapra3BaHe 3a KOMIOCTnpaHe.
Te3n ypeiH He ce NOxOJaU 3a n3noJ3BaHe OT JIua C HeIOCTaTbUHO ONIT N/INn HE3HaHne INo OT JIua C OpaHueHn FIn3uYeCKn, CETNBn INn YMCTBeHn CNOC6HOCTN, OCBeH aKO Te He CE KOHTPOJInpaT OT KOMNeTeHTHO 3a TjXHaTa 6e3OpacHOCT JIue INn HE NoJyuat OT Hero yka3aHna 3a n3NoJ3BaHeTo Ha Te3n ypeiN.
-Пица под 16 рдин He Трябвда n3польватуpeдиTe.
YpeBbT He Tp86Ba Da ce n3noJ3Ba B HEnocpeDCTBeHa 6nI3OcT Do xopa (Ha-Beye Deca) INN XINBOTHN; Bne HOCITE OTROBOPHOCT 3a UeTIte.
-П配电ибовета работа с мшиннат, koratoB 6и30ct Имахopa,прдь BCИЧКО Deца, ИДOMaшнЖИВOTHN.
-3noJ3BaIte MaunHaTa cMo Ha DHeBHa CBETInHa INn npn Do6po N3KcTBeHO OCBeTJIeHne.
-Ⅲποπ3BaΨTe Tpɪmepa cAmO B cyXo BpeMe N He rO OCTaBryTe, KOraTO BaHn.
He MoHTnpaIte MeTaJIHn peXeIu eJeMeHTN.
PpeuynoTpe6aTa
-Почисте мораьда OTЧждп Teя КATO KIOHn, KambHn, TeI N T.H. ПО Врeme Ha рязанeto CBso He Tpr6Ba Da Иma Chxdi TeJa.
- PeioBHO npOBepaBaiTe daH MOnTHupaHnT OTbH CbeHNHTeH KabeK bM ypeHa u YdbJXHTeHNrT Ka6JI He ca NOBpeHn N octapeHn (pa3pyuH). H3noJ3BaIte MaunHaTa cAmO KOraTo He e NOBpeHa!
He n3noJ3BaIte MaunHaTa C NOBpeJeHn 3aUHTN yCTPOJCTBa JIN NOKpTna.
OT cbo6paekhen 3a cnrgpnoct Tpr6ba da ce n3no13BaT cmo opnHaHn pe3epBHN qactn nnuactn, oO6peHn OT npOn3BOUnteI. Pn CMHaTa Cna3BaTe HNCTpyKcInTe 3a MOHTax! - Ppei npyippaneto nIIN noNCTbaHeTo Ha ypea nn npePi npOBepkata daJIc BcEHHTeHNrT Ka6eJ He e NOrbHAT nIIN HapaHeN, ypeBbT Tpr6Ba Da ce N3KIOUH I UenCeJIbT Da Ce N3Dbpna.
P pei n yckaHTo B eKcnIIOaTuaNHa MaunHata N cIeJ yIap npOBepTe daJIc CbeINHTeHNrT Ka6eJ He e n3HOceH IIN IOBpeHn HAnpaBeTe Heo6XODmnte peMOHTN.
Ka6eJ
-3no3BaTe cAmO yIbJXHTeHcK6eN C MInHmAJHO HAppeHcEeHHe 3x1,5MM² mAKC. JbJXnHa 25M:
- npn npoBODHnB rymeHa Tpb6nUka, He no-Jekn OT TnH HO7 RN-F
- npn PVC npoBOnHnU, He no-JeKn OT TnH O5 VV-F (To3n TnnpoBOnHnU He ca nOxOJaU 3a NoCToRnHO H3NoT3BaHe Ha OTkpNTO - KaTO HaNP:: NOd3emHO NolaraHe 3a CBbp3BaHe Ha rpaDHckn KOHTaKT, CBbp3BaHe Ha e3epHa NOMna IJIb CbxpahEnHe Ha OTkpNTO)
Te Tp6Ba Da ca 3aunTeHn OT BODn npbckn.
-Излгьдусгоству
Диференадандацета(RCD)c ytaech
ТOK мakc.30mA.
3akpenete cbeHnHTeHHa Ka6JI KbM osteraya. He ocTaBaIte da ce Tpne B p6oBe nInBoctpn npedMeTu. He npitnckaTe Ka6eNa npetBopeHN BpaTu nPiOzOpu. PpeKcbaUHe Tp6Ba Da ce CBaJrNJa da ce CbeDnHBaT HaKbCO (HaNP. CBbp3BaHe Ha pkoXBaTKaTa Ha pchNIA npekcbau KbMa HapablaBaun npbt)
Ppnpa6oTa
PbueTe n KpaKaTa Bn Tp8Ba Da ca daJeu OT npncnoc6JIeHHeTo 3a p3aHe, npEi BCNUKO KOrato BKIOUbaTe DnurateJ.
- Пазете се OT hapаняBaHe OT BCЯКО
празспособленье, КоЕТСЛУЖИ 3a рязаHe Na
ншkaТа. Спд ИЗДБрNBaHTo HO HabTa Hnшka
ДрьжTe MaшинATERB HopMaJIHOTO pa6OTHO
ПОJOXKeHne, Ррdi ДЯЯ BKJIQUHTe.
-Пи ВклочьанTo ДрьжTe TprIMepa
успоредно Ha 3eмЯТа, 3aIoTO B ПpoTиВeH
Слчай Има OnaCHOCT OT HapahЯВаHe.
- ПО ВЕME на pa6Ota CBUO CTOnTe Ha 6e3OpaCHO pa3CToHnE OT BbPTaTa ce HnIka. He nocraTKe KbM BbPTaTa ce HnIka.
Bunharn Hocete noxodjo pa6oTHO 6JIeKNo; He Hocete WnpOKn Dpexn I np., KOnTO MORAT Da ce 3axBaHaT OT pExeUHCTpyMeHT. Hocete 3dpaBn ObyBkn! PpeDna3BaIte n KpaKaTa CN (HaNP. Hocete Dblr NaHTaONH).
Hocete 3aunTHn ouyna!
-Prn TpaHcnpTnpaHTo DO OTdJIHHTe MeCTa 3a pa6Ota DnIraTeJrT Tp6Ba Da ce N3KJIIOU.
-БьдTe Oco6eHо npeДna3ЛиВи, KOraTo BbPbIte Ha3a.Д. OnachOCT OT cnBaHe!
CbeHnTeHHaT Ka6e Tp6Ba Da CTOn daJeOT pexeHTe HNCTpyMeHTN.
Ako cbeHnHTeHNrT Ka6eI ce NOBpeN npu ynoTpe6a,Toi BeHara Tp8Ba Da ce n3KJIOnu OT MpeKaTa. He DOKocBaiTe Ka6eNa npEIN Da CTe rO N3KIOUChnOT MpeKaTa.
-Пи пекьсане на работа He octabaiteТримета 6e3 HaДЗОР.СьхаяВаITE ro Ha6e3OnaCHO MЯСTO.
MoHTnpaHnTe Ha ypeDa npeKbcBaHu He Tp86Ba Da ce CbaT INI Da ce CbeDnHraBt HkBoCo (HaNP. Cbbp3BaHe Ha KOMaHdHn IpeKbcBaU KbM pkoXBaTkata).
He ydpraTe kaceTaTc HnKkTaB 3emrTa n no pboBeTe Ha cTeHnTe. Ako KaceTaC HnKkatae 6nna yapaHa cnInHO, no pkoXBtKaTa ige ce ycetn NO-CnHa Bn6paun. Ako ToBa e Taka, ypeDbT Tp6Ba da ce npOBepn OT cepBu3.
Cnepa6oTaTa
CneI ynoTpe6a n3bPnaTe uenceHa npOBepTe MaunHaTa 3a nobpeDa.
-При сиранeto:Виимане,onaCHOCT!ИmapeжецИнструм ent!
Bunharu n3yaKbaIte cnpaHTo Ha peKeUHa HnCTpyMeHT.
Pa60NTe NO NOdIbpxaHeTo I NOuHCTBaHETo Ha ypeDa KaKTo N CBaJIaHETo Ha npeDnA3HnTe CbOpBXeHn IIN CMHaTAt Ha KaceTaTa C HnUKaTa Ce N3BbPbWbAT CamO npNn3KnIOUeH DnIRatEn HnOoDbXKeH pExeU INHCTpyMeHT n CamO KOrato UeNCeNbTe E N3KnIOUeH. N3NoJ3BaIte CamO opRnHaJIHn KaceTN 3a HnUKaTa Ha WOLF, cna3BaIte INHCTpyKcInTe 3a MoNTax!
HoxbT 3a HnKata He Tp6Ba Da ce NouctBa Ha Teuaa Boda, Na- Beue NOD BnCOKO Hajrahe.
- Pemontte no ypeda Tp86Ba da ce n3BbpWBat camo OT cepBn3nte Ha WOLF n Otopn3npaHTE pa6OTnHNu.
-BeHTnlaUHOHHTe OTBOpH He Tp6Ba Da ca 3aMbpcEH.
CbxpahraBaiTeMaunHata daJeUOT Deua.
OTcTpaHЯBaHe Ha OTnaIbIuTe

He n3xBpIyTe eIeKtpnueckn ypeiB 6ntOBITE OTpaIbU. PeuKJIpaIte ypeIte, akcecoapnte I onakOBkIte IIO HauH, ONa3BaU, OKoJHaTcpeJa.

Ekcpnoataua
PpOdbJxKnteHocT ha pa6ota
CnataBaiTe MeCTHnTE pa3nope6n.
- OcbeDomeTe ce 3a npOdbJnxTEnHOCCTTa Ha pa6oTa OT MeCTHaTa cnyk6a 3a peJa.
Perynupahe Ha cpeHaTa pkoXbTaKa A
CpeHaTa pBkoXBaTKa MoKe Da ce peryInpa Upe3 KOJIeTo 3a HacTpoIka INDINbUdyaIHO Cnopei Baunr pbct
PonaraHe Ha Ka6ena B o6tera4a B
O6TeRaYbT Ha HnpaBnaaun npbT npedOTbpaTBA HepeBn-DeHTo pa3BnuBaHe Ha yDbJXHTeHnKa6eJ.
Cbbp3BaHe KbmeJekTpuecka po3eTka (230 BoIta, 50 Hz
BknUoyBaIte ypea cMo B uenCeHn po3eKn, Cha6dEnC npeDna3nteN ot 10-16 amnepa (uIN JInHeeh npedna3eH aBTOMaT TnB) HnepznoHn Tn.
I yKa3aHHe: ABToMaTHuHO 3aUHTHO ycTpoiCtBO cpeu TY Tok npn NOBpeDa
Te3n 3aunTHn ycTPOncTBa OcnhypRaT 3aunTa npn DoOpnp Do nobpeHn npoBDnCn, Heu3npaBHa nOlaucn N B onpeJeHn Cnyaan CbUo n npn NobpeHn Ha HAMpaUc Ce NoJ HApexKeHne npoBDnCn OT TeKKn HapaHraBaHn.
-Пренорьаме уретда ce BKнчва самоВ eелктуесkn po3eTKn CbC 3auntHO yctpoiCTBO cpeu TOK пи повра (RCD),donyckaaso TK Ha yTeuka He noBee oe 30 mA.
-3a no-ctapn HnctaJauu nce npednaarat KOMPJIeKTH 3a Doo6OpyDbaHe. KOHCyTTnpaayTe ce c eNEKTPoTeXnK.
Pa6oTHo nOJoxKeHne C
HanpaBnaIte ypeKaTo ro IbpxKe 3a roPHaTa n CpeDHaT a pbKoXBaTKa.
OnTmAlHnIpa6ToH bIb3a OKaHTBaHe n Cbo6oJHO p3aHe e ok. 30^ .PpncB6oJHOTo P3aHe (6e3doNpCbC3emTa) ypeBt Tpr6Ba Da ce HaKnaHn npE TAnOTo B NOyKpbI.
BepTnKaIHo p3aHe Ha KaHTObe Ha TpeBaTa D E
YpeBbT Tp8Ba Da ce IpeBKnHouHa BepTKaJIHo p3aHe. XBaHete ypeDa D
BkIIOUBaHe / n3KJIIOUBaHe F
PerylnpaHe Ha HnIkaTa G
PerynipahtoHaHnkaTaCeN3BbPwBaUpe3 6bytOnHo nycKaHe n CnnpaHe. HATncHeTe pa6oteuynypeD3a MaJIKO Bbpxy 3dpaba NOBbpxHOCT,HaNP.Ha TpOTOapHa NLOa (Cnla Ha npITnCKaHe OK.3K).PiTo3n HauHH ABTOMaTHNO ceNoDaBAt OK.2,5cmpeKeMa Hnka.
CbBETn 3a p83aHeTo
- Pexkete Bucokata TpeBa 6abHO nocTeNeHHO.
-Пиблжавауpeда с ржесатунишkaCAMOДOTOLKOВАДьрета Ихразпг,ЧeДa He ce Hapaнявakopata.
MHOrO CNHnT HaTnCK Bbpxy CTeHN NIN 3aTpeBEn HIOuy PpeDn3BnKBa MHOrO rJMAO N3HOCBaHe Ha HnSkata.
-ПрдьлжнтелноcttaHa pa6oTa Ha Baшия Trpimep ce yBelenuaba, Korato npeNi nIi cIeD BCaKO pr3aHe NOuchTBaTe BeHTnlaUHnTe OTBOpN IOTcPaHbATE OCTaTbUte OT TpeBaTa no DOJIHaTa CTpaHa Ha ypeDa.
PoiDbpxkaHe
CmraHa Ha Kacetata C HnIkaTa

Ima pexeunHcTpymENT!PpeBn BCnUKN pa60tn no ypeDa n3dbpnaTe uenca!
- XbaHeTe KOpnyca Ha Kacetata, OTBnIte KaNaka B Nocoka Ha cTpeNkata "OTBAPrHE" I rO CBAneTe, N3BaJeTe npa3HaTa Kacete C Hnukata H.
2.Прokапte Края Ha HnшkaTa OT HOBaTa Kacete Nape3 yXOTO 3a HnшkaTa 1).

Ipe3 TOBa BpeMe HnUkKaTa He Tp6Ba Da ce OcBO6OxKdaBa OTΦnKcnpaunr OTBOp Ha Kacetata 3a HnUkKaTa (2).
3.И36yTaIe Kacetata 3a HnWkata qpe3 MeTaNHna 6byTOH K13bPnaIte KpaHa HnWkata,doKATO HnWkata ceOCBO6OOn OT fHKcnpaunr OTBOP Ha Kacetata 3a HnWkata.

ObpheTe BnMaHne Ha NoCTaBHeTo Ha KaceTaKaKTo e NOKa3aHo Ha cnrypata
- NocTaBeTe Kanaka. EdHaT a OT DBeTe O76eJ3aHn CTpeIKN Tp8Ba Da COuN KbM yXoTo 3a HmKaTa L (1).HaTncHeTe Kanaka I rO 3aBnTe HaJrCHO DoKaTO ce Uye N3UpaKBaHe. L (2).

Pn BkIIOUBAHeTO HmKata Ce OTP3Ba Ha pa6oTHaTa DbJxHnHa. BkIIOuBaIte ypeDa camo B pa6oTHO noloxeHne.
OtctpaHЯBaHe Ha nobpei
| Пов徕пriчни OTстравио | |
| • Рразна каса | • Сменихе kасета 3a Ншkaраз RQ-FA (7117 081) |
| • 3amьрсени 3бби можду черveгеля 6bytownи касета 3a Ншkaраз. | • Почистетe 3amьрсенич actи с четка. |
| • ржescату Ншka e сксана и се e пибрал a в касета. | • Демонтейкит e kасета 3a Ншkaраз,[eBERT. Ленихе Ншkaраз и поставete касета. |
| • ржescату Ншka e склорал a в касета. | |
| • ржescату Ншka ce e 3abapILA 3a kaseta. | • Изва对接е 3abapenaТа част OT Ншkaраз, [eBERT. Ленихе Ншkaраз и поставete kaseta. |
Pn cBmHeHne BnHaH ce 6pbuaTe KbM cepBn3 Ha WOLF.

BHHMaHHe, n3KJIIOUyBaIe TpIMepa IpeDn BcRA KPOBepKa, NOuNCTBaHe NII pa6OTn no KaCetata n 3BaJdaIte UcenCeJa.
TapaHcnoHHn ycNoBna
BbB BcKa CtpaHa Ca BaJIiDn N3daJeHIne OT Haata KOMPAnHn IIN OT CbOTBeTHn BHOCTeI rapaHcNoHHu cIOBn. BpaMKTe Ha rapaHcNoHHn CpOK OTcTpaHraBaMe NOBpeNi No BaWn ypeI 6e3nPaTHo, DOKOJKOTO Te Ce DblKaT Ha deΦeKT B
MaTePnJaIuI npI npOn3BOoCTBOTO. B Cnya, Ye TpA6Ba Da I3NoJ3BaTe npaBaTa cn Ha rapaHauNHO 6cnyKbaHe, ce o6bPHeTe KbM npOdaJIraBn UpeDa IUN KbM Han-6JIIN3KNKJIOH Ha HauataΦnpMa.
P03dpaBnaem Bac c nokynkO u3deJnA qnpmbi WOLF

BHHMaTeIbHO O3HaKOMbTecb CnHCTpyKcneiNo 3KcPnlyaTaUIMN 3aONMHNTe Ha3NaueHHe 3JeMeHTOB ynpabNeHn I npabnla 3KcPnlyaTaUIN yCTpOInCTBa. BHHMaHne! Pn INCNOJIb30BaHN 3JIeKTPoINHCTpyMeHTOB dJa npEoTbpaSeHn NOyueHn Ydapa 3JIeKTPuYeCKM TOKOM, TpaBM N BO3ROPaHn HEO6XODmIO CO6NJDoAtpnIBeDEHHbIE HNKe npABnIa 6e3OnaChOCTn. POnb3OBaTeNb yCTpOInCTBa HecET OTBeTCTBeHHOCt b 3a HecCaCTHbIe CJTuAn, KOTOpbIe MOrTy pON30In T C DpyHMN JIOdbMn, N Usepe6, KOTOpbIMoKet 6bITb HaHeCeh INx IMyUeCTBy.

HnkOrda He donyckaTe K pa6oTe C yCTpOuCTBOM DeTeN NnU,He3HaKOMbIX C nHcTpykUeI NO erO kCnPyatau. NlUaM,He DOCTnUIM 16 let,NoJIb30BaTbcra yCTpOuCTBOM 3anpeueHO.MecThbIMn HOpMaTnBaMn MOKeT 6bITb YcTAHOBJeH MInHMaJIbHbI B03paCT JNu, 3KcPnyATnpUox DaHHoe YcTPOuCTBO.
CopepkanHe
3HaueHHe CNMBOIOB. 86
IpaBnlaTexHKn6e3onacHocTn 87
3Kcnnyataua 89
Texo6cnyxuBaHne 90
YcTpaHHe HEnoJaOK 90
TapaHua 90
3HaueHne cIMBOJIOB

BHMaHne! NpeD BBODOM B 3KcPnyaTaUIO npOuTnte HNCTpyKUIO NO npIMHeHIO! He dOnyckaTb NOCTOPOHNX B ONaCHyO 30Hy!

HCTpymENT DBNKeTcNo HnepuN!
Hocnte 3aunTHbIe ouKn!

OuHCTnTe ra3OH OT NOCTOPOHnX npeMeTOB, TaKnx KaK BeTbN, KaMHN, IpOBoJOKa N T.I. Bo Bpemr pa60TbI TaKke o6paauNe TBnMaHne Ha NoCTOpOHnE npeMeTbI.
CMOHTnPOBaHHbI CHapyKn Ha arperaTe coeHNHtBbHbI yDInHtBbHbI Ka6eNb CNe dyET peYJrPHo NpOBeprTaHa NOBpeXdEHNr I np3HaKN CTapeHnra (NOMKocTb).PpIMeHrTb TOnbKO B HcnpaBHOM COCTOHN!
He npimehaTe arperat c nobpexdHbIMN 3aunTHbIMn npncnoc6neHnaMn nn OrpaXdHnMa.
- No coo6paqehnma 6e30nacnoctn cneNyet npimHeTb TOnbKO opuHnHaJIbHbIe 3aNpactn nn DeTaII, pa3peWeyHHbIe n3rOToBHTeJem. Ppi 3ame He co6HuaTe yka3aHn no c6opke!
-Перед Вьюненем Perуларовки Ип
ЧИСТКI arperaTa Ип Перд поверков
перекуноваю Ип ИЗHOСА
СоEdиНTeЛьно npOBODКI, СпEDуET arperat
OTKЛЮчNTь ИЗВLEЧ CBeTOВ ΜTEKEP.
-NepeB BBODOM MaUNHb IB 3KcNpyatauHIO n NocJIe KaKOro-NI6O CTOLKNHOBeHn CneJyET npOBepNTb COeINHTeJIbHyU npOBODKy Ha HAIChne Iprn3HaKOB U3HOca INI IOBpeKdEHHa N BblONHHTb Heo6xOdMbI pEMOHr.
Ka6eIb
-Применяпу yДинHTeЛьны Кбел bckIIOHHTeJIbHO C MmHMaJIbHbIM ceyHnem 3 x1,5 MM² n MaKc.ДИHOn 25 M:
-ecn3TO npoBOKa B pe3HOBOn Tpy6Ke,To HeIerue,emTIN HO7 RN-F
- ecnn trpy6kn n3 PBX, to He Ierue, yem TnH O5 VV-F (npoBoJka 3Toro Tnna HenpnuroJHa dIy NOCTOaHHORO npIMeHEnn eoD OTKpbITbIM He6om - KaK, HAnp.: NOD3emHna pOKJaKa dIy NODKnIOUeHncaADOBoP03eTKN, npyDOBOrHOacoca IIN XpaHENn IOd OTKpbITbIM He6om)
-ONHdoJXhbl IMeTb 6pbI3ro3aunuEHHoe NCPOJHHeHne.
-ИспользунTe aВТOMaT 3aиNTbI OT TOka yTeuKN (RCD) c TOKOM yTeuKN He 6oNshe 30 mA.
CoeHHTbHbKabeIb npKpeNTb K yctpoCTBy dIa ChTnHaTJKeHn. He DONYCKaTb TpeHnHa KpOMkax, KOJIIOuNX n OCTpbix IpeMetax. He 3aUeMJIaTb Ka6eNb
DBepeMn NIn OKHamn. IpeekIouaOuane yCTpoiCTBa HeNb3y UdaTb NIn nepeMbikatb (HaNP.. npNBra3bBaTb BKIOUaIOUyU pyKv Ha HAnpaBIAIOUe MnpuyHe)
Ppna pa6oTe
-Depxnte noaIbwe ot pexyuzero HnCTpyMeHtpa KyuN HOrn,OCo6eHHO KOrda BKJIouaTe DBrIraTeJb.
-13-3a onachocn noluyehn TpaBmbl 6ydbTe octopoxhbl c IIObIM npncno6neHem, Cnykaunm dna OTpe3aHnKoPda. Nocne BbITrNBaHnHOBOrO KOpda BCerDa Chauana yCTaHOBNTe MaunHy B OsbUHoe pa6ooye NOJoxHne, npexde Yem BKJIouHTe e.
Bo n36exaHne TpaBM TpMMep DepeKaTb npn BkJIoueHn npaJIeJbHO ra3OHy.
BoBpempa6oTbTaKkecoxpaHrTB 6e30nacHoe pacCTOJHne Do BpaUaIOUeROcK KOpda.He npkacaTbcK BpaUaIOUeMycKa KOpdy.
BcerIa HOCHTe COOTBeTCTByIOUpo pa6Ouyo OJekdy; He HaJeBaTb IInpOKyIO OJekdy n T.I., KOTOPaR MoKet 6blT 3axBaueHa peKyuIM INCTpyMeHToM. HocTb npOHyIO o6yBb! 3aunuaTe TaKke Baun Horn (Hanp., HocITe DnnHHbIe 6pOKn).
Hocnte 3aunTHbIe OUK!
-Пипегенoc Ha HOBoe pa6Ooee MeTo CNeJyET OTKIIuOaTb DBnIaTeIb.
-ПюяВЯйTe oc6oe BHMaHne npn DBNXKeHn Ha3ad. Bbl MoXeTe cNOTKHyTbCra!
CoeHnTeIbHbI npoBOD depXHTe Ha paCCTOHNOT pexyux INCHTpMeHTOB.
EcnI coeHnTeBna npoBOdka NOBpeHnacb npn npmHeHn, eCneDyET HeMeJeHNO OTKnIOHTb OT cTn. He npKacaTbcra K npoBOdKe, noka OHa He OTKJIQUHeHa OT cTn.
-ПиперьвaxВ pa6ote He ocTaNJIteТрIMМер 6e3 npncMoTpa. Прocьа xpaHNTberoB HADEXKHom MeCTe.
HaxoJusneCHa arperaTe nepeKIOUaHOuJe yCTpoIcTBA HeJIb3a YdaJIaTb IIN NpeMbIkaTb (HAnp., npB83bIBaTb nepeKIOUaTeJIb K pykoTKe).
KaTyuKy c KOpDM He ydapTb O rpyHT n He 3aDeBaTb eO p6pa cTeH. EcIn KaTuka c KOpDM NODBeprnacb CnIbHOMy ydApY, CJIeDyET Ha6JIIOdaTb 3a NOBJIeHHeM
ycnJIeHHoB Bn6paunHa pyKoTKe. EcNI Bn6paunI Meetc, cJeDyET npOBepntb arperat B cepBnCHOn MaCTepcKoN.
Pocne pa60TbI
-После пименеля ИЗБЕКИТe ceTeBOI uTEkep И npOBepbTe MaUNHy ha NOBpeKdEHne.
-Пиocтановke:ВнманHe,Опасноctb! Pexkyши ИнстугентдвижетсnoИнерци!
Bcerda cneIyETdoxdaTbCSOCTAHOBKN peKyuIero INHCTpyMeHTa.
Pa6oTbHa arperateNo TexobcnykBaHnIO n YnCTKe, a TaKke DeMOHTaX 3aUHTbIX npncnocO6JIeHn Hn 3aMeHa KaTyuKn C KOpDM DOJXHbI pOn3BOIDtbcr TOJbKO npN OCTaHOBJIeHHOM DBIrataTeNe I OTKJIooHeHHOM pExyUeM INCTpyMeHTe N TOJbKO npn 3BJIeEHHom CeTEBOM WTeKepe. PpIMeHrTaTOJbKO OpUNHaJIbHbIe KaTyuKn C KOpDM fIpMbI WOLF, co6JIoDaTb yKa3aHnA no c6OpKe!
He npombIBaTb KOpDObBm TpMMeR B IpOTouHO BOe,OCo6eHNO IOd BVICOKM DaBnEHm.
Pemont arperata DOJXeH pOun3BOuNTbcra TOJIbKO Ha cepBnCHbIX CTaHcIax qnpMbI WOLF nIN B yNoJHOMOeHHbIX MaCTepcknx.
CneIb 3a Tem, yTo6bl BeHTnlaUHOHbIE OTBepCTnHe 3aqr3HrNcB.
XpaHNTe MaunHy B HeIOCTyINHom JIJIaTeJ MeCTe.
YHHUToXeHne OTXoIOB
He cneyuET BbIbpaCbIBaTb
cNoMaHHoe 3NeKTpOo6OpyDoBaHne
BMeCTe C 6blTOBbIMN OTXoAMN.
YtInn3aunr 3NeKTpOo6OpyDoBaHnra,
akceccyapOB n ynaKOBOUHORo
MaTePnAna DOnJxHa npOn3BOuTbcra
6e3 yuepe6a dnn OkpykaUoJe
cpebl.
3Kcnpnyatazaia
Bpem3Kcnpnyatau
-Прocьба co6людь MeCTье npedпсаня.
-06paTntecb B MeCTHbIe aMmHnCTpaTHBhIE opraHbI dJIa BbIaCHEHn BpeMeHn 3KcPnyatauH.
PerynpoBaHne cpeHne pyKoTkn A
IocpeDCTBOM BpaaHouSeiCy pUKN MOxHO peryInpoBaTb CpeHIO pyKoRTKy COOTBeTCTBeHHo BaWeMy poCTy
PpoknaDbBaanHe Ka6eJyUcTpoNCTBO CHaTJeHnB
YCTPOINCTBO CHTNA HATXKENB HANpABJIOUeI pyKOITKE INPENrTCTByET CNYaHOMy OTCOEINHEHNO yDInHHTeNbHO KA6eJI.
Подключени К розтke (230 B, 50 Г)
-ПОДКЛЮЧаТь yCTpoIcTBO HeO6XODIMTOJbKO Kpo3eTKaM C INHepCUNOHbIM npedoxpaHnteIem 10-16 A (nII MaIOMOUIHOMy BbIKJIQUaTeIIO TnIaB).

Примechаиме: 3auntньий abTOMATNueCKN BBIKIOUaTeJIb
3TN 3aunTHbIe ycTpoiCTBa 3aunuauoT B cnuyae KacAHnIOBpeKdEHHbIX npOBODOB, NOBpeKdEHHoN u3OJnA, a B ONpeJeHHbIX CUYaX - TaKke OT nOlyueHn TjXeNbIX TpaBM npKacAHn NOBpeKdEHHbIX npOBODOB, HaxOJaUxxCnOHaNpJxKeHnEM.
- PeKOMeHdyem NOJKNIOUaTb yCTpoiCtBO TOIbKO K PO3eTKe, 3aUNuEHHoN aBToMaTuHcckIM BbIKNIOuTaTeMe (RCD) C TOKOM yTeuKN He 6OJIe 30 mA.
-Дя yctapeBuxxCCTeM po3etok MOxHO NcNoIb3OBaTb KOMnIeKtbl ДЯdoobopydObaHЯ.ObpaTnTeCb K cneunaNCTy-3NeKTpNKy
Pa6ooye noIoxKeHne C
Arperat BeCTn, DePkAcb 3a BepxHIO uIN npomexkyToHyIO pyKoTky. ONTmAlbHbI pa6OuY yroJ dJa CTrpIXKn KpOMOK N CBO6OHOc TpIXKn CoCTabJIeT OK. 30^ . Ppi CBO6OHOc CTpIXKe (6e3 KOHTaKTA c rpyHTOM) cJeDyET pa3MaxNBaTB nepei co6oB arperatOM DBNKeHNMaM B fOpMe nOlykpyra.
BepTnKaJIbHa nCTpIxxKa KpOMOKra3OHa D E
ArperaT MoXHO HAcTpOntb Ha BepTnKaJIbHyU CTpnKky. IpOuHo yIePxNBAt b arperaT. BbITaHyTb Tpy6y nIOBepHyTb Ha 180° Do qNKcnpOBaHn..
D
BkIIOueHne / BbIKIOUeHne F
Повстpoиka kopda G
IopctpoKa KOpda ocuueCTBnAeTcna IocpeDCTBOM TOUKOBOAABTOMaTNK.
Pa6oTaiouHn np6op KpaTkoBpeMeHHO npIaBntb K TBepdomy OCHOBAHIO, HAp., K PInTe DOpOKN (DaBHeHne npIXkMa OK. 3 Kr).
Pn 3TOM aBtOMaTnueckn BbInyckaetcra OK.2,5cm pejxuero kOpda.
i CoBeTbI dIy o6pa6oTK TpHMMepom
BbICOKyIO TpaBy NOIDCTpNtRaTb MeIeHHO CTyneHHaTO.
Arperat cpekyuM KOpDm NOBODNTb K DepeBbMy KcTapHky He CnIuKOM 6N3KO, YTObI He NOBPeDNTb Kopy.
- INHTEHCNBHbIK KOHTaKT CO CTeHAMN ININ INIITAMN DOPOXKe PnBODNT K CNJbHOMy N3HOCY KOpda.
BbI yBeHnHTe cpoK cnYk6bl BaWero TpIMMepa,ecnn npeed erO NcNoJIb3OBaHNEm nnN NOcNe 3TOrO OuNCTHe BO3dYxO3a6OpHNKn HNXHIOU qactb arperaTa OT OCTaTKOB TpaBbl.
Texo6cnyxmbaHne
3aMeHa KaTyuKn c KOpDoom

PexyuHnHCTpymeHT dBHXeTcno HnepuH! PpeD BcEMn pa6oTaMn Ha arperate oTOcoEHNrHb cTeBOH wTeKeP!
- YdepxnBaTb Kopnyc KaTyuKn, KpbIuKy
noBepHyb no cTpeIke “AUF" n ChrTb,
n3Bneyb nyctyku KaTykU dny KOpda H
- Koheu Koprda HOBoi KaTyuKn npoTeb uepe3
nettno dlya kopda 1).

BoBpem3toonepaunnKopdHeJIb3r
ocbo6oxkaTb n3 qnknpyuoero
pa3pe3a KaTuShKn dIy KOpDa (2).
- KaTyuKc KOpdOm HaJeTb Ha
MeTALINeCKyIO KHOHKy.kOTaHyTb 3a KOHeuKOpda,yTObI KOpDOCBO6OuINcN3 OIKCNpyUoIero pa3pe3a KaTyuKn.

Ipocneintb3aTeM,HTo6blKaTyuKa C
KOpDOM 6bIa yCTaHOBNeHa, KaK NOKa3aHO Ha pncyHke
- NaTeB KpbIuKy. Pnp 3TOM OHa n3 OTMeTOK B
BnDE CTpeIKN DOJXHa yKa3bBaTb Ha nETJIHO
TOnyKOBa aBtOMaTuKa He pa6oTaET
Katyusha nycTa
3arp3HnOcB 3y6aToe 3aueJIeHne Mekdy MeTaNHeCKo KNOpKo N KaTyuKO C KOpDM.
- Pexkyuoi KOpD o6OpBaH n BTrHyT B KOpnyc.
- Pexyuyn KOpD 3anyTanCnHa KaTyuKe.
- Pekyün Koprnpuynn KaTyuKe.
KaTyuKa ckopdom RQ-FA (7117 081) 3aMeHHTb.
OuHCTnITb DeTaNOT rpa3N uEeTKoJ.
-ИЗБЕЧКATUШКСΚОДМ,пгн Heo6xOДиMоCTN,ΚΟΡД pa3MOTaTb,CЛeRKa NOTЯнHyВ ERO И ВLOЖИТь KATUШК.
- Ydaanntb npninnu yuactb kopda, npn Heo6xOaMocTn, Kopd pa3MOTaTb, Cnerka NotaHyB ero n BLOXHTb kaTyUkY.
B clyuae comHeHnB Bcerda o6paataBcBepBnchyIO MaCtepckyio WOLF.

BHHMaHHe, nepeK kaxdo npOBepko, uCTKO uJn npoBeHne m pa60T ha kaTuSke,
TpMMep CJeDyeT OTKJIHouaTb I N3BJeKaTb CeTeBOJ WTeKeP.
TapaHcH
B kaKdoi n3 cTpaH DeIcTByIOT rapaHTnHbIe ycIOBn, yCTaHOBJIeHHbIe qnpMoN- n3rTOBHTeJEM IIN IMMOpTePOM n3dJIY.
Ecn npuHnHO HeNCpabBnOCTn 3dJIIN
nocnyxnn DepekTbMaTeepnaa nn c6opKn,
To TaKHe HEnCnPaBHOCTu yCTpaHAIOTCA
6e3B03Me3dNo. No BONpocam rapaHTnHoro
peMOHTa CneIyETo6paTaTbCnB
yIIOHMOUeHHbI cepBnCHbI cHTp.

AiaaTe Tpv aTOn tv evapn Tc odnyic xpnoS!
KpatnoTe Tpitouc
paKpi aTTO TV
ETIKIVUVN TEPIOXn!
ToKoTTIKoEpyaaleio
AeIToupyeiYiaLiyo
XPOVIKO DIAOTnua
kai apou
ATVEpyOTTOINoETe
tn unxavn!
Na opate yuaia
TPOOtaiac!

Na unv ektiOeTai To unxavna Otn Bpoxn!
EkTwv uotepwv puthetaion vnuatoG
H ek twuotepowpuoioiou vnuatoC yivetai e Tnv autopatn puoioion diaoTnmaTc (Tipp).Piote Tn ouakeun evw aeitoupyei o staepo edafoC, T. X. Pala kzodpoiou ouvtoua (duvaun tiocn C Tep.3 kg).Eto 0a tropoobotnoeia autupa Kaivoupio vna koTnc unkouc Tep.2,5 cm.
i u o u s y i a t n v t e p i t o i n o n
To yntoTepo ypaoi va koTie apya kai
H oukeun e To vna KOTnC va epxetai mvo too a Kovta o devopa n kai thauvouc, wte va mnu Tpaumati etai o EeWTEPIKOC pIooc touc.
- IoIu EvToVn EITaPn ME ToiXouc n TIAkeCs OTO ypaOidi ETTIpePeI UNTepBoAikn OOpa VnIaTOc.
AuaevTe Tn diapkeia Zomega Tou Tpiuep aac evaT aTTO KAe TEPiIOINK aThetaTE Tc oxioec aeipou kai Tnv KATW PEAUPa Tou mXavnaTOC aTOn UToaImuata ypaoiou.
Suvtnpnon
AvtikataoTaon kaoetac vnuatoC

To KOTIKO Epyaaleio Aetoupyei yia liyo xpoviok diotma kai apou aTevpyoioeTe Tn mXavn! Piv anr to thiepeyia Tns kaee epyaiaac va Tpaate To oic ato Tn picia Tou nEKTPIKOU DIKTUO!
MTD Products AG, Industriestraße 23, D-66129 Saarbrücken, T. Bukovec (Manager Products Standards Compliance)
| BG-Тример; CZ-Strunový vyžínač; DK-Graestrimmer; D-Rasentrimmer; GR-трипшеру указов; GB-Trimmer; FIN-Trimmeri; F-Débrousailleuses; HR-Trimeri trave; H-Gyepszegely nyíró; I-Trimmer per tappeti erbosì; NL-Trimmer; N-Plentrimmer; PL-Trymer do trawy; RO-Trimmer pentru gazon;RUS-Тример для газона; SK-Strunová kosáčka; SLO-Trimer za travo; S-Grästrimmer; TR-çim budama makinesi | |
| BGM-PaBOTNa NaHnIHa; CZ-Pracovní záber; DK-Arbejdsbredde; D-Arbeitsbreite; GR-Плátос εργασίας; GB-Working width; FIN-Työleveys; F-Lar-geur opérationnelle; HR-Radna širina; H-Munkaszélesség; I-Larghezza di lavoro; NL-Werkbredte; N-Arbejdsbredde; PL-Szerokóć pracy; RO-Latime de lucru; RUS-ШирINA образовки; SK-Pracovný záber; SLO-Delovnaširina; S-Arbetsbredd; TR-Çalıma genişligi | |
| BGM-Дебелина на НИшкATA / ДьлЖина на НИшкATA; CZ-Sila struny / Délka struny; DK-Snørens tykkelse / Tråd Længe; D-Fadenstärke / Faden-länge; GR-Плáхος výματος / Мíнкος výματος; GB-cord dia/ cord length; FIN-Siima halk. / Siima Pituus; F-Fil section / Fil Longueur; HR-Debljina niti/Duljina niti; H-Szálvastagság / Szálhosszúság; I-Filo Diameter/Filo Lungo; NL-Draad Doorsnde / Draad Lengte; N-Tråd Tykkelse / Tråd langde;PL-srednica / dlugość; RO-Diametrul firului / Lunginea firului; RUS-Tolüncia körda / Длиа körda; SK-Hrubka struny / Dlžka struny; SLO-Debelina nitke / Dolžina nitke; S-Tråd Grovlek / Längd; TR-Misina kalýnlýóf / Misina uzunluó | |
| BGM-TerINO; CZ-Hmotnost; DK-Vægt; D-Gewicht; GR-Bápoc; GB-Weight; FIN-Paino; F-Poids; HR-Težina; H-Súly; I-Peso; NL-Gewicht; N-Vekt; PL-Ciežar; RO-Greutate; RUS-Macca; SK-Hmotnost'; SLO-Teža; S-Vikt; TR-Agīrlík | |
| BGM-Mошност/обороти слетемотор; CZ-Výkon / otáčky elektromotoru; DK-Elmotorens ydelse / omdrejningstal; D-Leistung / Drehzahl Elektro-motor; GR-Ióχύς / Aριθύς OTPOΦW ηλεκτροκινηtríρα; GB-Power / speed of electric motor; FIN-Teho / kierrosluk sähkömoottori; F-Puissance /Vitesse du moteur électrique; HR-Snaga / Broj okretaja elektromotora; H-Teljesitmény / Elektromotor fordulatszáma; I-Potenza / numero di giri motore elettrico; NL-Vermogen/toerental elektromotor; N-Ytelse / turball elektromotor; PL-Moc / liczbaa obrotów silnilka elektrycznégo; RO-Putere /turătie electromotor; RUS-Mошносты /Число obportов们的 вагателя; SK-Výkon / otáčky elektromotora; SLO-Moc / Stevilo vrtljajev elektromotorjá;S-Effekt / varvital elmotor; TR-Güç / Devir sayisi, elektronik motor | |
| BGM-Hanpexenne; CZ-Napěti; DK-Spaending; D-Spannung; GR-Táčn; GB-Voltage; FIN-Jännite; F-Tension; HR-Napon; H-Feszültseg; I-Tensione; NL-Spanning; N-Spenning; PL-Napięcie; RO-Tensiune; RUS-Hanpexenne; SK-Napàtie; SLO-Napetost; S-Spanning; TR-Gerilim | |
| BGM-Предацентел; CZ-Pojistka; DK-Sikring; D-Sicherung; GR-Aşφāλίση; GB-Fuse; FIN-Sulake; F-Fusible; HR-Osigurać; H-Biztositék; I-Fusible; NL-Zekering; N-Sikring; PL-Bezpiecznik; RO-Siguratá; RUS-Пробханенияхъюе усточtle; SK-Pointka; SLO-Varovalka; S-Sakring; TR-Sigorta | |
| BGM-Трени – рамо/рьka; CZ-Vibrate prěnášené na ruce; DK-Händ-arm-swingninger; D-Hand- Arm-Schwungungen; GR-Kpáðááŋo i xépióu-βραχiová; GB-Hand/arm vibrations; FIN-Käsiin ja käsivarsin kohdistuva tärinà; F-Vibrations DKns les mains et les bras; HR-Vibracije šake i ruke; H-Kezet és kart érö rezgés; I-Vibrazioni su mano-braccio; NL-Hand-en armtrillingen; N-Händ arm swingninger; PL-Drgania przenoszone na dlönie i rça; RO-Oscilaţii-mână-brat; RUS-Upoßenvь ложально вибраши; SK-Vibrácie prěnášané na rucky; SLO-Tresljaji dlani in roke; S-Hand-arm-svangninger; TR-EI, kol sallamalar |
| BG-Измерета/ rapантурана звукова мошист (LWA/LWAg); CZ-Změřený / zaručený akustický vykon (LWA/LWAg); DK-Malt / garanteret lydeffekt-niveau (LWA/LWAg); D-gemessene / garantierte Schalleistung (LWA/LWAg); GR-Mětrpólýév Žévúŋóv ŽátníkÍ icos'Ux'Uc (LWA/LWAg); GB-Measured/ guaranteed sound power (LWA/LWAg); FIN-Mitattu / taattu aänitehotaso (LWA/LWAg); F-Puisance sonore mesurée / garantie (LWA/LWAg); HR-Izmjerena / zajemčena jakost zvuka (LWA/LWAg); H-Mér / garantált hangteljesitmény (LWA/LWAg); I-Potenza acustica misurata / garantita (LWA/LWAg); NL-Gemeten/gegarandeerd geluidsniveau (LWA/LWAg); N-Malte / garanterte lydefeffekt (LWA/LWAg); PL-Zmierzony / gwarantowany poziomhałasu (LWA/LWAg); RO-Putere sonora mǎsurata / garantata (LWA/LWAg); RUS-Измеренны / Гарандровань уровени звуковов мошист (LWA/LWAg); SK-Namerány / zaručený akustický vykon (LWA/LWAg); SLO-Izmerjena / zagotovljena akustična moč (LWA/LWAg); S-Uppmätt / garan-terad bullereffekt (LWA/LWAg); TR-Olçūlmüş / Garantie edilen ses cucù (LWA/LWAg) | |
| BG-Звуково налгаге (LpA); CZ-Akustický tlak (LpA); DK-Lydtryk (LpA); D-Schalldruck (LpA); GR-Akouotíký πíεση (LpA); GB-Sound pressure (LpA);FIN-Äänenpainetaso (LpA); F-Pression acoustique (LpA); HR-Zvučni tlak (LpA); H-Hangnyomás (LpA); I-Pressione acustica (LpA); NL-Geluidsdruk (LpA); N-Lydtrykk (LpA); PL-Cijsnienie akustyczne (LpA); RO-Presiunea sunetului (LpA); RUS-Upoběнь звукового давлиения (LpA); SK-Akustický tlak (LpA); SLO-Akustičnipritisk (LpA); S-Ljudtryck (LpA); TR-Ses basínci (LpA) | |
| BG-Texhneyесka dokomentаця рп; CZ-Technické Dokumenty; DK-teknisk dokumation for; D-Technische Unterlagen bei; GR-Tεχvićnǐteкmpižov; GB-Technical documentation at; FIN-Teknisitet asiakirjat; F-Dossier technique chez; HR-Tehnicke dokumentacije na; H-Technikai dokumentáció...nál; I-Documentazione tecnia presso; NL-Technische gegevens bij; N-Tekniske dokumenter på; PL-Dokumentacja techniczna jest archiwowsa i dostępna (w firmie); RO-Documente tehnice; RUS-Texhneyесka dokomentаця в ...; SK-Technické podklady u; SLO-Tehnicna Dokumenti; S-Tekniska dokument; TR-‘deki teknik belgeler |
WOLF Garten