
Slider SL20 TS20110 - Iron SIEMENS - Free user manual and instructions
Find the device manual for free Slider SL20 TS20110 SIEMENS in PDF.
| Product type | Steam generator (iron with boiler) |
| Brand | Siemens |
| Model | Slider SL20 TS20110 |
| Power supply | 220-240 V ~ 50/60 Hz |
| Power | 2200 W (estimated) |
| Water tank capacity | 1.2 L (estimated) |
| Soleplate type | Stainless steel |
| Continuous steam function | Yes, variable setting |
| Vertical steam function | Yes |
| Pulse steam function (intense steam) | Yes, triple jet |
| Intelligent steam function | Yes, automatic additional steam |
| Auto-off | Yes, after 8 minutes of inactivity |
| Energy saving mode | Yes, dedicated button |
| Anti-scale system | Calc'n clean (boiler cleaning) |
| Safety | Hot surface indicator, auto-off, overheat protection |
| Removable iron rest | Yes |
| Textile protection soleplate | Optional (ref. 571510) |
| Weight (approx.) | 4.5 kg |
| Dimensions (W x D x H) | 30 x 20 x 25 cm (estimated) |
| Power cord length | 2 m (estimated) |
| Steam hose length | 1.5 m (estimated) |
Frequently Asked Questions - Slider SL20 TS20110 SIEMENS
User questions about Slider SL20 TS20110 SIEMENS
0 question about this device. Answer the ones you know or ask your own.
Ask a new question about this device
Download the instructions for your Iron in PDF format for free! Find your manual Slider SL20 TS20110 - SIEMENS and take your electronic device back in hand. On this page are published all the documents necessary for the use of your device. Slider SL20 TS20110 by SIEMENS.
USER MANUAL Slider SL20 TS20110 SIEMENS
uk HctpyK4i3 BVKOpNCtAHH
ru Hnctpykunn no 3Kcnjnyataunn
ro Instructiuni de folosire
ar
A

B
C


D

protect
Calc'n clean
E
1
1
一
一
Index
| DEUTSCH 6 | |
| ENGLISH 14 | |
| FRANÇAISE 21 | |
| ITALIANO 29 | |
| NEDERLANDS 37 | |
| DANSK 45 | |
| NORSK 52 | |
| SVENSKA 59 | |
| SUOMI 66 | |
| ESPÁÑOL | 73 |
| PORTUGUES | 81 |
| ΕΛΑΗΝΙΚΑ | 89 |
| TÜRK | 97 |
| POLSKI | 104 |
| MAGYAR | 112 |
| ΥΚΑΡΑΙΗCbΚΑ | 119 |
| ΡΥСΚΙΝΙ | 127 |
| ROMÁN 135 | |
| العربية | 149 |
| SUOMI | NORSKSVENISKA DANSK FREIMALSIRIDSL ANO ENGLISH TÜRKI EVAHNIKA PORTUGUES | YKPAIHCHBKA MAGYAR POLSKI |
| ROMÁN |
Thank you for buying the slider SL20 steam station, the new steam-ironing system from Siemens.
Carefully read through the operating instructions for the appliance and safeguard them for future reference.
Introduction
These instructions for use contain valuable information about the unique features of this system and some hints to make ironing easier for you. We hope that you enjoy ironing with this steam station.
Important
Open out the first page of the booklet, this will help you to understand how the appliance works. This appliance complies with international safety standards.
This appliance has been designed exclusively for domestic use and must not be used for industrial purposes.
This appliance must be used only for the purposes for which it was designed, i.e. as an iron. Any other use will be considered improper and consequently dangerous. The manufacturer will not be held responsible for any damage arising from misuse or improper use.
General safety instructions
-
The iron must not be left unattended while it is connected to the supply mains.
-
Remove the plug from the socket before filling the appliance with water or before pouring out the remaining water after use.
-
The appliance must be used and placed on a stable surface.
-
When placed on its stand, make sure that the surface on which the stand is placed is stable.
-
The iron should not be used if it has been dropped, if there are visible signs of damage or if it is leaking water. It must be checked by an authorized Technical Service Centre before it can be used again.
-
With the aim of avoiding dangerous situations, any work or repair that the appliance may need, e.g. replacing a faulty mains cable, must only be carried out by qualified personnel from an Authorised Technical Service Centre.
-
This appliance can be used by children aged from 8 years and above and persons with reduced physical, sensory or mental capabilities or lack of experience and knowledge if they have been given supervision or instruction concerning use of the appliance in a safe way and understand the hazards involved. Children shall not play with the appliance. Cleaning and user maintenance shall not be made by children without supervision.
-
Keep the iron and its cord out of reach of children less than 8 years of age when it is energized or cooling down.
A
Surface is liable to get hot during use.
- This appliance is to be connected and used in accordance with the information stated on its characteristics plate.
- This appliance must be connected to an earthed socket. If it is absolutely necessary to use an extension cable, make sure that it is suitable for 16A and has a socket with an earth connection.
- If the safety fuse fitted in the appliance blows, the appliance will be rendered inoperative. To restore normal operation the appliance will have to be taken to an authorised Technical Service Centre.
- In order to avoid that, under unfavourable mains conditions, phenomena like transient voltage drops or lighting fluctuations can happen, it is recommended that the iron is connected to a power supply system with a maximum impedance of 0.27 . If necessary, the user can ask the public power supply company for the system impedance at the interface point.
- The appliance must never be placed directly under the tap to fill the water tank.
- Unplug the appliance from the mains supply after each use, or if a fault is suspected.
- The electrical plug must not be removed from the socket by pulling the cable.
- Never immerse the iron in water or any other fluid.
- Do not leave the appliance exposed to weather conditions (rain, sun, frost, etc.)
Important:
This appliance reaches high temperatures and produces steam during use, this could cause scalds or burns if not used properly.
The steam hose, base station, metal plate at the bottom of the removable iron pad (2) and in particular the iron can get hot when used. This is normal.
- Never aim the steam at people or animals.
- Do not allow the power cable to come into contact with the soleplate when it is hot.
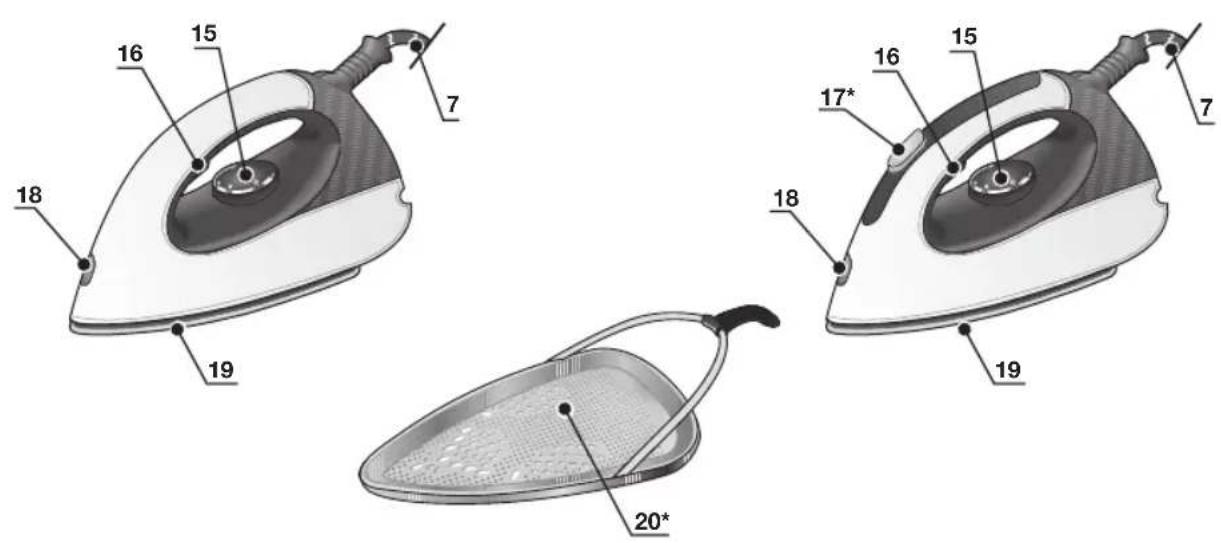
Description
- Water tank
- Removable iron pad
- Steam hose storage fixing
- Carrying handles
- Mains cable storage compartment
- Mains cable
- Steam hose
- "Energy Saving" button *
- "Steam ready" / "Auto shut-off" * pilot light
- "on / off" pilot light *
- Variable steam control *
- "Refill water tank" / "Clean warning" * pilot light
- Illuminated main power button (0/I)
- Housing with internal generator
- Temperature control knob
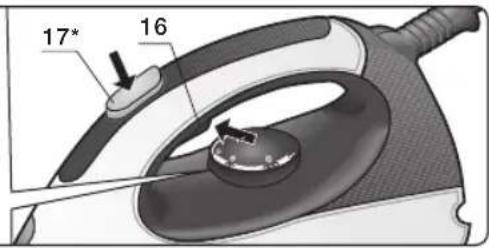
- Steam release button
- Steam release button "XTRM" *
- Iron pilot light
- Soleplate
-
Fabric-protection soleplate cover*
-
Model dependent
A
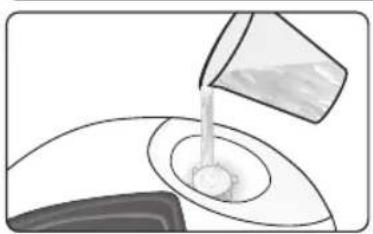
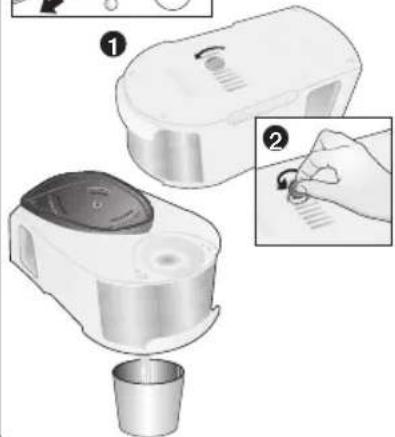
Preparations
- Remove any label or protective covering from the soleplate.
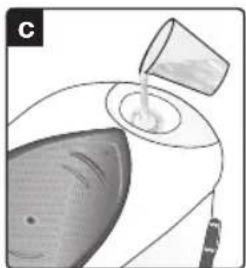
- Place the appliance horizontally on a solid, stable surface. You may remove the iron pad from the appliance and place the iron on it on another solid, stable, horizontal surface.
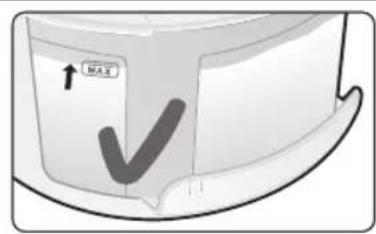
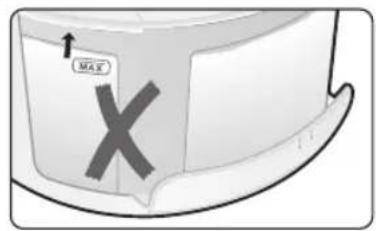
- Fill the water tank, making sure not to pass the level mark.
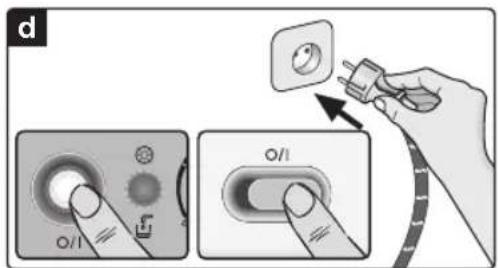
- Unwind the mains cable (6) fully and plug it into an earthed socket.
- Set the main power button (13) to the "I" position.
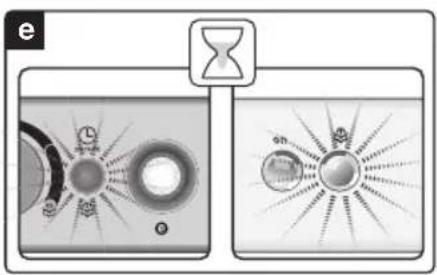
- The "Steam ready" indicator lamp (9) will light up after several minutes, indicating that the appliance is ready to use.
The steam generator will take more time to reach "Steam ready" state only upon the initial heating up, or after performing the de-scaling operation (Calc'n clean).
When water is already present in the steam generator during regular use, heat up time to reach the operating temperature will be faster.
7. This appliance has a built-in water level sensor. The "refill water tank" indicator (12^*) will light when the water tank is empty.
or (model dependent):
If the "steam ready" lamp (9) lights and steam is not released when pressing the steam release button (16 - 17^*) , refill the water tank.
Important:
- Normal tap water can be used.
To prolong the optimum steam function, mix tap water with distilled water 1:1. If the tap water in your district is very hard, mix tap water with distilled water 1:2.
You can inquire about the water hardness with your local water supplier. - The water tank can be filled at any time while using the appliance.
- To avoid damage and/or contamination of the water tank and the boiler, do not put perfume, vinegar, starch, descaling agents, additives or any other type of chemical product into the water tank.
Any damage caused by the use of the aforementioned products, will make the guarantee void.
- Do not use condensation water from tumble dryers, air conditioning systems or similar. This appliance has been designed to use normal tap water.
- The iron is not designed to rest on its heal. Pleas always position it horizontally on the iron pad (2).
- The iron pad can be placed into the specially designed recess on the appliance or somewhere suitable alongside the ironing area.
Never rest the iron on the appliance without the iron pad!.
- During it first use the iron may produce certain vapours and odours, along with white particles on the soleplate, this is normal and it will stop after a few minutes
- While the steam release button is pressed, the water tank may produce a pumping sound, this is normal, indicating that water is being pumped to the steam tank.
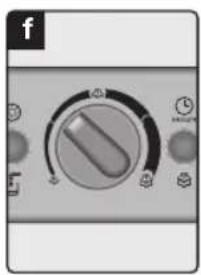
Setting the temperature

- Check the ironing instruction label on the garment to determine the correct ironing temperature.
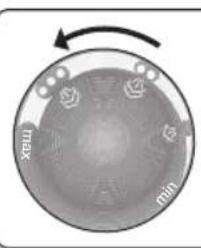
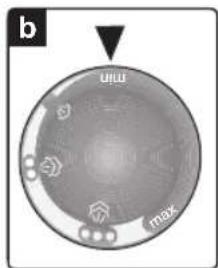
- Turn the temperature selector (15) to the required setting:
Synthetics
Silk-Wool
Cotton-Linen
- The indicator lamp (18) will remain lit while the iron is heating and go out as soon as the iron has reached the selected temperature.
Tips:
- Sort your garments out based on their cleaning symbol labels, always starting with clothes that have to be ironed at the lowest temperatures.
- If you are not sure what the garment is made of then begin ironing at a low temperature and decide on the correct temperature by ironing a small section not usually seen when worn
B
Ironing with steam

- Turn the temperature selector (15) to the required setting.
- Set the amount of steam to suit your needs, using the variable steam control (11^*) (depending on the model).
For normal use, please choose one of the following recommended settings:
- Press the steam release button to release steam.
Attention:
When ironing on a lower temperature setting "·".
If the appliance has variable steam control (11^*) , set the variable steam control to its lowest position
- If the appliance does not have variable steam control, press the steam release button only for a few seconds at a time when ironing at lower temperatures.
In both cases, if you find that water is dripping out of the soleplate, set the temperature selector (15) to a higher position (take care that the garment can be ironed on this heat temperature setting).
Tip: for better ironing results, iron the last strokes without steam to dry the garment.
"Pulse steam" function

(Model dependent)
This appliance has a special function for tackling difficult creases.
When the steam release button is activated, the steam generator will give three powerful shots of steam so that the steam reaches even deeper into the fabrics.
- Set the temperature selector (15) on “ ”
- Press the steam release button (16) on the bottom of the handle two times shortly (double-click) or (model dependent)
Shortly press the steam release button (17^*) on the top of the handle.
Remark :
- It is possible to stop the shots of steam by pressing the steam button shortly again.
- Some water drops may appear when you use the "Pulse steam" or the function for the first time. The water drops will disappear after you have used the function for some time.
"Intelligent steam" function
(Model dependent)
This system has intelligent steam control, which, after releasing the steam release button (16), provides a small amount of additional steam. The additional steam can always be stopped by briefly pressing the steam release button once again
Ironing without steam

Begin ironing but without pressing the steam release button.

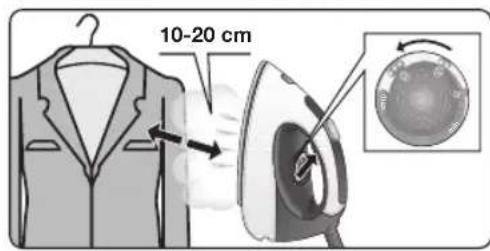
Vertical steam


Never direct the steam jet at garments that are being worn.
Never aim the steam at people or animals.
- Set the temperature control to the "…” or "max" position.
- You can steam iron curtains and hanging garments (jackets, suits, coats...) by placing the iron in a vertical position and pressing the steam release button.
Energy saving "eco" button

(Model dependent)
If the "Energy saving" button (8^*) is switched on, the energy consumption of the appliance will be reduced, by means of automatic reduction of electricity and water consumption. A good ironing result can be obtained for most of the garments. Use the normal energy setting only for thick and highly wrinkled fabrics.
Note: If you work with the "Energy saving" function, the variable steam regulation and temperature regulation can still be used as recommended.
Auto shut-off

(Model dependent)
If during ironing, the steam release button (16 - 17^*) on the iron handle is not pressed for a certain length of time (8 minutes), the steam station will automatically switch off. The "auto shut-off" pilot lamp (9) will flash when auto shut-off has been activated.
To switch the steam station back on, press the steam release button again.

Fabric protection soleplate cover

protect
(Model dependent)
The fabric-protection soleplate cover is used for steam-ironing delicate garments at maximum temperature without damaging them. Use of the soleplate cover also does away with the need for a cloth to prevent shine on dark materials.
It is advisable to first iron a small section on the inside of the garment to see if it is suitable.
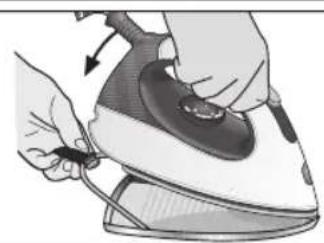
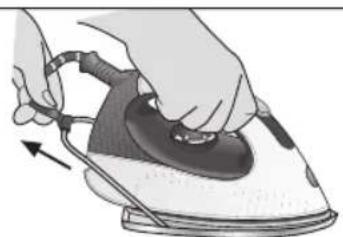
To attach the soleplate cover to the iron, place the tip of the iron into the end of the soleplate cover and pull the elastic strap over the lower rear of the iron until it fits tightly. To release the soleplate cover, pull the elastic strap and remove the iron.
The fabric-protection soleplate cover may be purchased from the customer service or specialist shops:
Accessory code (After-sales)
Name of accessory (Specialist outlets)
571510 TZ20450
E
"Calc'n clean"

AntiCalc
Cleaning the Boiler
To extend the life of your steam generator and to avoid any build up of scale, it is essential that you rinse out the boiler after several hours of use (approximately after 50 hours). If the water is hard, increase the frequency.
Do not use descending agents for rinsing out the boiler, as they could damage it.
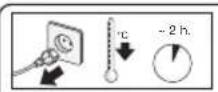
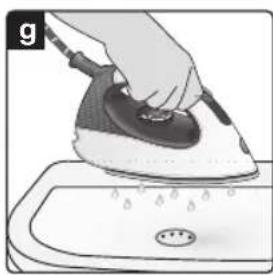
- Check that the appliance is cold and unplugged for more than 2 hours, and that the water tank (1) is empty.
- Place your appliance on the edge of your kitchen sink.
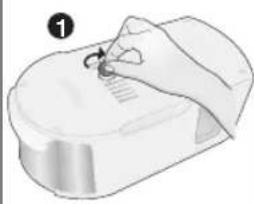
- Remove the plastic cover located on the bottom of the appliance by turning it to the position.
- Unscrew the boiler drainage plug using a coin.
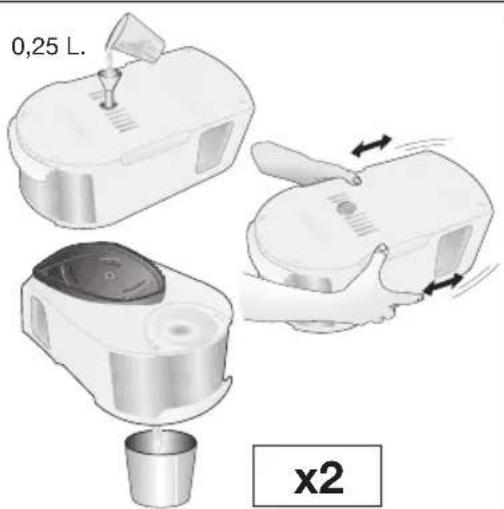
- Holding your steam generator in upside down position, and using a jug, fill the boiler (in the base unit) with 1/4 litre of water
- Shake the base unit for a few moments and then empty it completely over a sink or bucket. To obtain the best result, we recommend that this operation is done twice.
Important: before re-closing, make sure no water remains in the boiler.
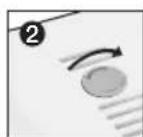
- Replace and tighten up the boiler drainage plug with a coin.
- Insert and close the plastic cover by turning it to the position.
Automatic clean warning
(dependently on model)
Pilot light (12^*) will flash indicating that boiler must be rinsed. To do this, follow the procedure described in the section above.
To reset "Calc'n clean" pilot light and counter, switch the station off twice, keeping it off during at least 30 seconds each time.
(on 30s off on 30s off on)
F
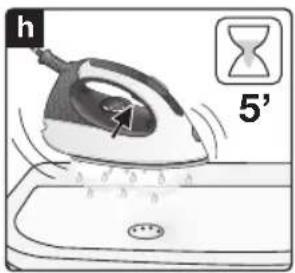
Rinsing the iron steam chamber
Caution! Risk of burns!
This procedure helps to remove scale particles out of the steam chamber.
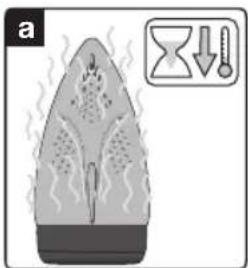
This cleaning procedure may be performed occasionally (approximately once a year), when after a long period of use with very hard water, scale particles start to come out of the soleplate.
a) Ensure that the iron is cooled down.
b) Set the temperature selector (15) of the iron to the "min" position.
c) Fill the tank with tap water.
d) Plug in the mains cable and set the main power switch (13) to the "I" position.
e) Wait until the "steam ready" indicator lamp (9) lights up.
f) If the steam station has steam regulator (11^*) set it to the maximum position
g) Hold the iron over the sink or a container to collect the water.
h) Press the steam release button (16) and gently shake the iron. Boiling water and steam will come out, carrying scale and or deposits that might be there. This could take approximately 5 minutes.
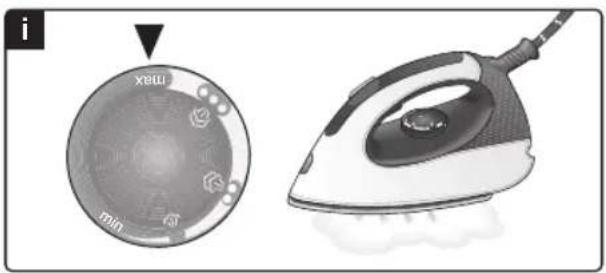
i) Set the temperature selector (15) of the iron to the "max" position, without pressing the steam release button (16). The water in the steam chamber will start evaporating. Wait until all the water inside the chamber has been evaporated.
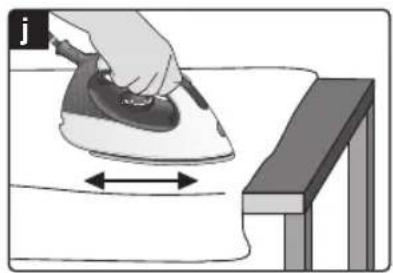
j) To clean the soleplate, immediately rub off any residue by running the hot iron over dry cotton cloth.
Cleaning & Maintenance

Always unplug the appliance from the mains supply before carrying out any cleaning or maintenance operation on it.
- After ironing, pull out the plug and allow the appliance to cool down before cleaning.
- Wipe the housing, handle and iron body with a damp cloth.
- If the soleplate is soiled with dirt or scale, clean it with a damp cloth.
- Never use abrasive products or solvents.
G
Storing the appliance

- Always allow the appliance to cool down before storing it.
- Set the main power to the "0" position and disconnect the mains cable.
- Empty the water tank.
- Place the iron on the iron pad, standing on the soleplate.
- Store the mains cable in the storage compartment (5) and the steam hose in the storage xing (3). Do not wrap the cords too tight.
- Use the carrying handles (4) on the sides when moving the appliance.
Tips to help you save energy

Steam production consumes the most energy. To help minimise the energy used, follow the advice below:
-
Start by ironing the fabrics that require the lowest ironing temperature.
Check the recommended ironing temperature in the label on the garment.
Regulate the steam according to the selected ironing temperature, following the instructions in this manual.
Only use steam if necessary. If possible, use the spray function instead. -
Try to Iron the fabrics while they are still damp and reduce the steam setting. Steam will be generated from the fabrics rather than the iron. If you tumble dry your fabrics before ironing them, set the tumble drier on the 'iron dry' programme.
- If the fabrics are damp enough, turn off the steam regulator completely.
- Stand the iron upright during pauses. Resting it horizontally with the steam regulator on generates wasted steam.
Disposal
Our goods come in optimised packaging. This basically consists in using non-contaminating materials which should be handed over to the local waste disposal service as secondary raw materials. Your local town council can give you information about how to dispose of obsolete appliances.
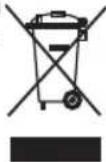
This appliance is labelled in accordance with European Directive 2012/19/EU -concerning used electrical and electronic appliances (waste electrical and electronic equipment WEEE).
The guideline determines the framework for the return and recycling of used appliances as applicable throughout the EU.
Trouble shooting
Problem Possible
causes Solution
The steam generator does not come on.
- There is a connection problem.
- The main power button is not switched on.
The iron does not heat up.
- The main power button is not switched on.
- The temperature control knob is set to the "min" position.
The iron begins to smoke when switched on.
- During first use: Certain components on the appliance have been lightly greased at the factory and may produce a little smoke when initially heated.
-
During later use: the soleplate may be soiled.
-
Check the mains cable, the plug and the socket.
-
Set the main power button (13) to the "I" position.
-
Set the main power button (13) to the "I" position.
-
Set the temperature control knob (15) to the desired position.
-
This is completely normal and will stop after a short while.
- Clean the soleplate according to the cleaning instructions in this manual.
| Problem Possible causes Solution | ||
| Water flows through the holes on the sole plate. | ·The steam function is being used before it has reached temperature. ·The water is condensing inside the pipes because steam is being used for the first time or has not been used for a long time. ·The steam generator contains too much scale. | ·Reduce the steam flow when ironing at low temperatures (Variable steam control (11*)). ·Point the iron away from the ironing area and press the steam release button until steam is produced. ·Clean the boiler as described in section "Calc'n clean" (E). |
| Dirt comes out through the sole plate. | ·There is a build-up of scale or minerals in the steam tank. ·Chemical products or additives have been used. | ·Use tap water mixed 50% with dis tilled or demineralised water. If the tap water in your district is very hard, mix tap water with distilled water 1:2. ·Clean the sole plate with a damp cloth. ·Never add products to the boiler water. |
| The iron does not produce any steam. | ·The boiler is not switched on or the water tank is empty. ·The steam regulator is set to the minimum position. | ·Set the main power button (13) to the "I" position and/or fill the water tank. ·Increase the steam flow by turning the steam control (11*). |
| The ironed gar ment turns dark and/or sticks to the soleplate. | ·The selected temperature is too high and has damaged the garment. | ·Select a suitable temperature for the material being and clean the sole plate with a damp cloth. |
| The soleplate turns brown. | ·This is a regular consequence of usage. | ·Clean the soleplate regularly with a damp cloth. |
| The appliance makes a pumping sound. | ·Water is being pumped into the steam tank. ·The sound will not stop. | ·This is normal. ·If the sound will not stop, do not use the steam generator and contact an authorised technical service centre. |
| Loss of pressure during ironing. | ·Steam release button activated during a long period of time. | ·Use the steam release button with intervals. This improves the ironing result as the textiles will be dried and stay smooth better. |
| Waterspots appear on the garment during ironing. | ·May be caused by steam condensed on the ironing board. | ·Wipe the textile cover of the ironing board, and iron the spots without steam to dry them. |
| Water spots appear on the garment during use of the "Pulse steam" function | ·Water spots are caused by steam condensation in the hose when cooling down after use. | ·Water drops stop coming out of the soleplate after using the "Pulse steam" function for some time. |
| The hose gets hot during use. | ·This is normal. It is caused by the steam passing through the hose during steam ironing. | ·Place the hose on the opposite side so that you can not touch the hose during ironing |
| Water leakage from the boiler. | ·Drainage plug located at the bottom of the appliance is loose. | ·Tighten up boiler drainage plug with a coin |
| The iron does not stop steaming after placing it on the pad. | ·"Pulse steam" function activated by double click. | ·Just press the trigger once again and the iron will stop steaming at once. |
If the above does not solve the problem, get in touch with authorized technical service.
You can download this manual from the local homepages of Siemens.
Loddrett dampstryking


Knapp for energisparing "eco"

Función "Pulse steam"

(Según el Modelo)
Función "Intelligent steam"
(Según el Modelo)
Função "Intelligent steam"
"Intelligent steam" Özelligi
(Modele gore deigiklik gosterir)
Akilli buhar sistemi buhar cikma dugmesine (16)
bastiktan sonra ekstra buhar cikisi saglar.
HarpiBaHHnIaIIOscRHeHHnPo6ooyTeMnepaTpynCKopoOyETbcra.
7.Дани npicpiMiCTNb B6yOBaHn ceHCop pIBH BOi. KOnI pe3epByap IJRA BOi CNopoXHie, 3acBITnbCra IHdNkaTOp HeCTaHi BOi B pe3epByapi (12^*)
a6o (B 3aIeXHocTi BiD MoDeni):
KUIO IHUNKaTOp roTOBHOCTI napn (9) CBITNbCRA, aJe nIa cac HATNCHEHNA KHOKN BUNyCKy napn (16 - 17^*) npa He BNXOAnTB, HANOBHITb pe3epByap dIra BOIN.
BaxJInBo!
BnMOKeTe BnKOpNCToBbATn 3BnuaHy BOy 3 BOIOPOBOy.
TTOIIO NOOBKNTN ONTMaJIbHy DIIO cyHKui BiJnapIOBaHHra,po36abJrTe BOONPOBIDHY BDOy INCTINbOBAHOY cnIBBiHDowEHHI 1:1.B TOMy BNpaDKy,RAIO zoKOpCTKICTb BOIN y BaWOMy perioHi 3aHaADTKo BnCOKA,pekOMeHdyEMo PO36abJrTH BOONPOBIDHY BOIN DnCTINbOBAHOY cnIBBiHDowEHHI 1:2.
IhOpMaioIIOOcTynHIOXopCTKoCTiBOIN BmMOKeTeOTpMaTuHaPiNpEmCTBi BOONOCaAHBaWOrO MicTa.
-ПдчасвИКОРИСТАнгпрИстpoIи Можete
НановHTи pe3eRByap BOДОу y 6удь-якIM
MOMeHT.
- yHnkaIte noKoJKeHb Ta/a6o 3a6pydHeHHpe3epByapy dЯ BODn Ta 6aky naporehepaTopa, He BnKOpNCToBvTe apomAtu3aTopu, Ocet, DomiKu, 3acO6n npOTn Hakiny Ta iHsi ximiuHi 3acO6n.
Буд-якnowkoДжehн,ВиКлнkaH BnKOpNCTaHHM BnIe3a3HaueHx DomiwoK, He po3noBcIOxkyOTbcr Ha yMOBn rapaHTiHorO 06cnyroByBaHH.
He BnKOpncTOByTe BOJHn KOHdEHCat i3 cyuINbHorO 6apa6aHa, CnCTeM KOHduciHOBaHH NOBITpR ToIO. PnpCTpii PO3paXOBaHN Ha BnKOpncTaHH 3BnuaHOOI BOU3 KpaHa.
-Данapacka He NOBHHa CToTn BepTnKaJIbHO. 3aBXd nCTaBte II rOpN3OHTanbHo Ha NiIknAdky dЯ npackn (2).
- PIIdknajky dny npackno MOKHa po3miuBaTu y cneuiabHomy 3aarrn6nHHi Ha Kopnyci npncTropo a6o y 6yNb-ramomy 3pyHOMy Micu npoy 3 30HOIO npacyBaHH.
Hikon He cTaBte npacky Ha Kopnyc npncptpo6e3 ndknaKn dny npackn!
-Пдчаспршо ВИКОРиСТАнгпpackи 3 HeI MOKуTb ITH CNEUФiHi 3aAnaxn Ta napa, a 3 ПДОшВМоKуTb CINaTиC6Ii NopoшИнк. Le E HopMaJIbHIM Ta npuHInHtbcr 3a KINbKa XBNJINH.
KoJH HATNCHeHO KhoNky BnNyScy napi, BmMOKeTe NOuyTN 3Byk NOMn y cepeHi
npntpoIO. Lc HOpMaJIbHO Ta 03NaUaC, 1O BOda nepekaayetbcra do 6aky naporeHepaTopa.
PeryIIOBaHHa Tempepatyp

- POnBItbcra IHcTpyKuIi SuOIO npacyBaHHa 6iIn3Hn Ha II EtNKeTci, SuO Bn3HaunTp npabnBHy TemnepaTy pnpacyBaHHa.
- NobepHITb peryIaTOp TemnepaTypu (15) Ha noTpi6Hy n03HaKy:
CnHTeTuHi MaTepiAn
-
- 10Bk-BOBHa
BaBOBHa-JbOH
- 10Bk-BOBHa
-
lHdkaTop (18) cBITNTMeTbcra nID yac HarpiBaHH npackTa BUMKHeTbcra, KOIN npackpa03irpiEtcdo 3aHaHOI TemnepaTypn.
Iopadn:
- Po36epiB 6iIN3Hy B 3aJIeXHocTi BiD CmMBOJIB Ha eTKeTkax Ta noUHaIte npacyBaHHra 3aBXdN 3peu, IIO nOtpebYIOb HauHHKQoi TEMnepaTypn npacyBaHH.
- RaKoBn He BneBHei, 3 KaOHn 3po6IeHO 6iIN3Hy, NoHITb npacyBaHHa 3 HauHnxKoi TemnepaTytn Ta o6epiTb nOtpi6Hn Bam pibEn harpiaHHa nonpacyBaBUn HeBeJIKy DiJIaHKy, kYr He BuDHO iD Yac BnKOpNCtAHHg 6iIN3HN.
B
HacaKaIJaDeJIkaTHnxI PpacyBaHHa 3 napoIO
- Повернitsь ретуларов Temпера typ (15) на notpi6Hy no3HaKy.
- 3a donomoroTopepyIaTopa noDaHnna napu (11^*) (y DeaKnx MoJeIax) BiDpeYnHOte KJIbKicTB napu BiNoBIDno Do Baunx notpe6.
ДяЗИЧАнОВИКОПИСТAHЯ,6yД-наСКА, OБЕРITБОДHe 3 HAcTуПнHX peKOMeHДОВaHnx HanaшТУВaHB:
| Tempepatya | О��多个国家 рекиму падчи пapyи |
| • | • |
| •• | •• |
| ••• | ••• |
3.ДЯВихоу napиHaTиСhiTb Ha KHOПКУ BUNyСKY napi.
Ybara!
PpacyBaHHa 3 Hn3bKoTeMnepeAtyHm peXUMOM
JaKuo Bawa npacka Mae peryIaTOp nOdaHHn napu (11^*) yCTaHObitb peryIaTOp napu yMiHimaJIbHe noJoxeHH
JaKIO peryIaTopa noDAHnnapnHa npacui Hemae, nID yac npacyBaHHy Y HIN3bKOtempeNapyHomy peKmHi HaTnCKaTe KHOKNy BUNyCKy napn IINue npOTAROM KINbKOx CEkyHd.
B o60 BnnaKax, kIIO Bn no6aHTe, 30 nIOoBn npackn coHTbcra B0da, yCTaHOBITb peryIaTOp TeMnepaTyPi (15) Ha BnUy No3HaKy (AIO 6IIN3Hy, kY Bn npacyTe, MoXHa npacyBaTu 3 TakoIO TeMnpaTypo).
Iopada: nIpy OTPMMAHH ONTUMAbHnX pe3yIbTaIb HAnpkiHci npacyBaHH BmKHiB npay Ta KInbKa pa3iB npoBeDiB npackoNo TKaHHi 6e3 3BOJIOKeHH, 0o6 Do6pe npocuHTn II.
Функциа Pulse steam

(YeKix Moenx)
DanHn npncptpi Mae cneuiabHy fhyKuio dna npacyBaHHcTINKnx 3MOpWok.
IicnaHaTnCKaHHKHOKNBUNyCKnynap npaporehepaTop noJaec Tpi nOtJxHi napOBux ydApn, 0o6 npapa npocounacra rN6oko BCEpeuHy TKaHInH.
- YctaHOBiBb peryIaTOp TemnepaTypn (15) Ha NO3HaUKy “…”.
2.ДикopoТКо HATИСHTь KHONKу BUNyСу napn (16),po3TaUOBAHy y HNKHi YaCTnHi pyuKn. a6o(B 3aJExKHOcTi BiД moDiJI)
Kopotko HATNCHTb Ha KNONky BUNyCKy napi (17^*) ,po3taWObaHy y BEpxHi qactnHi pyKn.
Ppimitka:
-Подання napOBnx ydapib MOЖHa npинHTN KOPOTKIM NOBTOPHM HaTNUCKaHHa M KHONK BUNyCKy napn.
-Пи nepшому BnKOpncTaHHi Фнкii "Pulse steam" a60 moKyTB 3'ЯВпUCяДeКINьka kpanenb BonOr. KpanenbKn BOJOrN 3HnKHyTb nicЯ BnKOpncTaHHaФнкiД npOTyROM He3HaUHorO yacy.
«Po3ymHa» cnCTeMa yTBopeHH nap «Intelligent steam»
(ydekix moedjx)
Cnctema ochaetapepyIaTOpom napn,io nicna Hatackahn KhoNKn BInycky napn (16) 3abe3neuecdoaTKOBn HebeuNKn yo6'em. Buynck doaTkoBn napn moke 6ytn 3ynHeHny 6ydb-kyac ue ODNHM doaTkoBM HAtnCKaHHm KhoNKn BInycky napn.
PpacyBaHHa 6e3 napn

PpacyTe, He HaTnCKaOuHa KhoNky BnNyScy nap.
C
BepTnkaJIbHa napa


HikonHe 60p6nTe Ctpymom napn 6iinn3Hy, OJrHEny Ha IIOJe.
Hikon He cnprMOByTe napy Ha IIOeYn TBapHH.
- YctaHObitb peryIaTOp TemnepaTypHa Hn03HaKy "..." a6o "max".
- 3abicn Ta oJrHa nIiKax (niJxakn, KocTOMn, naJbTa Ta IH.) MoXHa npacyBaTN 3 napOyTpMnyOuH npacky BeptNkaJIbHO Ta HATNCKAIOUHa KHONky BUNyCKy napn.
Ehepro36epiraouka KHONKa "eco"

(DeKix Moedex)
KHOKNKy 《36epekeHH ehepi》 (8^*) BBIMKHeHO, CNOXBAHH eepri npnAOM 3MeHwyeTbcra 3ABJKN ABTomuHOMy 3MeHweHHIO pIBHB CNOXBAHH eepri Ta BOi. FapHi pe3yIbTaTN npacyBaHH B cboMy pexmIO MoXHa OTpumATn DJI 6JIbwoCTI TNIIB TKAHH.
BnKOpNCToByTe 3BnuaHHi HanaWtYBaHHcNoXnBaHHeHepri DnTobCTnx Ta rpy6nx TkaHH.
PnmuTka:KaIO Bn BnKOpncTOByeTe cyHKciIO 《36epexehna ehepi》,peyIaTopn npy Ta TeMnepaTyPi BCE OJHO MOXHa BnKOpncTOByBaTu 3riIdHO IHCTpykui.
ABTOMATnUHe BUMKHeHHr

(DeKix MoDJIaX)
Kuio nicac npacyBaHHK Honky Bnnycky napi (16 afo 17*Ha pyuipnpackn He HATNCKATn npotrom neBHO yacy (8 XBUNH),napoBa CTAHZI ABTOMATUHO BUMKAeTbcra.
IicnaABTomTuHOrOBMMKHeHHnapoBOr CTaHcIiHNkAtOp《ABTomTuUHe BMMKHeHHR》 (9)nouHae6nmatn.
Uo6 3HOBy yBIMKHyTN napOBy cTaHcIIO, cIiD ue pa3 HaTnCHyTN KHOkKy BnNycky napN.
D
TKaHHH

protect
(YdeKix MoedJx)
HaHacaKa BnKOpNCTOByEbCg DnA 6e3neuHOro
IpcayBaHHa DeiKaTHx TkaHH Ha MaKcMaJIbHi
TempeaTypi 3 BnKOpNCTaHHm nap.
BnKOpncTaHnHa cAaKn dIeJIkaTHnx TkaHH TaKoX 3Himae Notpe6y KopncTyBaTncraHupkoIO dIyHKHeHH6IuCKy Ha TemHNx TkaHHax.
PekomeHdyetcbpo3noaTn npacyBaHHHa HeBeNkOMy UMaTKy BHyTpIuHbOIO NobepxHi OJrty Ta nepeBipu Tp e3yNbTaT.
Uo6 OJrTn HacaKy Ha npacky, yctaHObitb Hic npackn B KHeuB HacaKn Dny DeIikaTHNX TKaHH Ta npotraHtB eJactNHy CTpiKy Nohd 3aDhbO HxhHbOIO YactInHO packn, Uo6 HacaKa 3akpinnaCra. Uo6 3Hrtn HacaKy dny DeIikaTHNX TkaHH, NotarHtB 3a eJactNHy CTpiKy Ta cTgHtB HacaKy 3 npackn.
HacaKy dny deIikaTHnx TkaHN MoKHa npi6bTu y haWomy cepBic-zeHTpi a6o y cneuiiaI3ObaHnx Maa3nHax.
KoDdoataKOBOrO
06naHaHHN
571510 TZ20450
Ha3Ba 06naHaHHa
E
Функция
"Calc'n clean"

AntiCalc
OuHsENH6aKa naporeHepaTopa
Ioo nobOBkntn TepmH cnjxkb BaWoro naporehepatopa Ta yHNKHytn HaKoNueHHaKIny, nicna neBHO Yacy (opiEHTOBHO nicra 50 roDnH) BVKOpNCtAHnBaK naporehepatopa Heo6XiHo onONoCHyTN. KaIO y BaWoMy perioHi JocpCTKa BOda, onONoCKyIte BaK naporehepatopa YactiHe. He BVKOpNCtOByIte dnn OOnOscKyBaHHnaporehepatopa 3ac6b nJRA BuaJeHHaKIny. BOHI moKyt nozkOJTNI Ioro.
- Ipepeipte, 6o6 npicpi 6yB xOJOnHM Ta BUMKHeHIM npHaMHHi npOTarom 2 roHN Ta 6o6 pe3epByap dIg BOi (1) 6yB npOxHIM.
- NocTaBTe npncTpiH Na KpaN KyxOHHO paKOBuHn.
- 3HIMiTb PnlaCTNKOBy KPNuKy 3 npncTpOHO, NOBepHyBUNI B NpNOKeHHN 3 No3HaQKOIO
- BiɪkpyTntb 3aTnUky 6aKy naporeHepaTopa 3a DONOMOROHO MOHeTn.
- Utpmyu nporehepatop Doropn Horamn, 3a DOONOMOHO KxynBNIte y 6ak nporehepatopa (B OCHOBI Kopnyca) 1/4 IHTpa BOHN.
6.Дeклбка cekyнnotpycitsb naporehepaTOp, a notIM NOBHiCTIO cnopoxHHTb Ioro y paKOBHy
yBipno.P3yIbTat6yeKpaunM,KaIO NOBTOPIN TIO ONEPAUIO Dbi.
BaxJnBO! Npeed TmM, Jk 3HOBy 3aKpNTn naporehepatop, nepecbiuTbcra, y noRo 6aui 3OBcIM He liuunnoCBAOn.
- YctaHOBIb Ha Micue 3aTnKy 6aka naporehepatopa Ta 3akpyTiB II 3a DonomoroMOHETN.
8.BCTABTe nIaCTIKOBy KpUkky, NOBepHyBm II B NOJIOXeHHr 3 N03HaYKOIO
ABTOMaTHHn cnHn npo noTppe6y OuHcHHe
(YdexkixMoedjx)
Kuio iDnkaTop (12^*) 6JMaae,6aK naporehepatopa yac onoNochTy.ДЯ zuBOrO BIKOHaiTe di,Onncahi B nonepeHbomy po3dini.
Ioo nepe3anyctn iHdkaTop Calc'n clean Ta liuNbHK uacy, Dbiy BmKHTb napOBy cTahciio, 0pa3y npHaMHi Ha 30 ceKyHd.
(yBIMKH.→30ceK.BNMKH.→yBIIMKH.→ 30ceK.BNMKH.→yBIIMKH).
F
OnonickyBaHHnapoBoi kamepn npackn
Ybara! Ichyeche6e3neka onikib!
Dana onepaizio do3BONe BuaNTu Yactkn Hakiny 3napoBoi Kamepn.
Dany npocepy ouhueHHa moxHa npoBOHTn Yac Biu cacy (npu6n3Ho pa3 Ha pik), koni nicra TpnbAono BnKOpNCtAHH 3 KOpCTKOIO BOHO 3 NiOUsBn npack NouHaOTb CnNaTnc YaactOuyKn HAKNY.
a) NpepeipTe, YI npacka xoJOnHa.
b) YcTaHOBIb peryJrTop TemnepaTypr (15) npackn Ha no3HaKy min.
c) HanobHtB pe3epByap IJIa BOIN BOIOIO 3 KpaHy.
d)Пдклочь кабьхиьнгьdo eJekTpomepexi Ta yctaHOBiT roJOBHn BUMKau (13)Ha no3HaCyI.
e) 3auekaute,doKn 3acBtntbcra iHdkaTOp roTOBHOCTi nap (9).
f)Якwo napoba ctaHizmae napoperyIyITop (11*),ycTaHOBIb NOrO B MaKcImaJIbHe NOJIOXKeHHA
g)Пдимimitsяпackунад Кхоню paKOBиHO a6oMiCTKOIO NOcydINHOДЯ 36Opy BOnI.
h) Hatncihitb KhoNky Bnnycky napu (16) Ta obepexkno notpyciTb npacky. Hakun Ta noro 3aInuKIN BnDyTb 3 rapqOIO BOIO Ta npoIO. Lc moKe 3aHrtn 6iJra 5 XBnIH.
i) UctaHOBITb peryIaTOp TemnepaTyPi (15) npackHa no3HaCy max, He HATnCKaOuHa KhoNkByBnPyCky napi (16). Boda y napoBi kamepi noHe BnnapoByBaTncr. 3aueKaIte,
IOKHHe BnnapntbCBA BOda,IO NnnaacB KaMepi.
j) Uo6 ouhctntn iioowBy npacku, heraHOBuJaIITb Bc3aJIMKn 6pydy npobIBm npapcoIO no cyxii 6abOBHHi cepBetci.
OuHcHnTa DOrJaD

Ipeed 6ydb-3axoDAMN 3OuHHeHH Ta DOrJMy 3a npNCtpoeM 3aBXdN BmHKaTe Horo 3 po3eTKn.
1.Пия npacyBaHHЯ BIMKHiTb npicTpii 3 po3eTKI Ta daIte IOMy OXOJOhTy npeEd OUYIeHHaM.
2. NpOtpitb Kopnyc napoBoi cTaHcii, pyKy Ta Kopnyc npackN BONOrIO raHicPkoIO.
3.Якшо пioowBy 3a6pydneHo a6o Ha Hiн e HAKIN, OuNCTITb II BONORO rAnHypkoH.
4. Hikon He BnKOpncToBnyTe a6pa3nBHi 3ac06 Ta po3HHNK.
G
36epiranHn npnctroo

1.Перед ТИМ,Як Сховати пapову CTaHцIO,BOHa NOВИнHA OXОЛОHYTN.
2.ПepeBediTb nepemKauB noIoxKeHHa "0" Ta BiKJIuOHTb Ka6eJIb KINBNeHHa BiD po3eTKn.
3. NopoxH≥Tb pe3epByap IIN BOHN.
4. Noknaitb npacky niOoWBOHO roPn30HTaJIbHO Ha niknaiky dny npackn.
5.36epiraTe Ka6eJIb KINBHeHH B BiDcIky dIa 36epirAHn (5), a shyp Ira napn B fikcyte 3a IOnomoroO fikcaTopy (3). He 3roptaTe uHpyn HaITo Tyro.
6.Будь-лackа,КориCTуNTecd aHIMpyKamn(4), KOnBn NepeCTaJIeTe npuJa3MiCiHa MiCue.
CoBeTbI NO 3KOHOMN 3JIeKTpo3Heprn

Bolbwe Bcero 3Hepn pacxOyetyra Ha
BbipabokTy npa. TTo6bl cokpaTntb notpe6JIeHne
3Hepn, pnpdePknBaIteCb CneDyUoXs
peKOMeHdau:
- HaunhaTe TnaJaeHne c 6eJIb, KOtOpoe Tpe6yeT MInHMaJIbHOro TemNepaTypHoro peKIMa TnaJaeHn.
PekomeHdyemyu TemnepaTy pIaKeHHaMOxHO NOCMOTpeb Ha npIbke N3deJIyra. - PerynipyTe BixoJ napa B 3aBncMocTn OT BbIpaHHoro TeMnepaTyphoro peXIma rnaKeHnA, CNeDy INcTpyKUqm DaHHORO pyKOBOdCTBa.
- POnb3yInTeCb napOM ToIbKO TOrJa, KOrJa 3TO Heo6xOAnMo. No Bo3MOXHOCTn, IcNoB3yInTe BMeCTo npa yHKUIO paCnblJeHnRA BoDbl.
CTapaTecbIaNTbCJIeKbBnaXHbIe H3deJnIa, NOCTaBnB NapoperyIaTOp Ha MehbluyIO OTMeTKy. PIn 3OM nap 6yET ObaOBBiBaTcB CaMO TKAHN, a He B yTIORE. Ecn BB cyuINTE 6eJIbe B cyuINbHOm MaunHe, IcnoJIb3yIte nporpamMy "Cyka nOd yTOR". - Ecπn 6eJIbe DoCTaTOUHO BnaJXHoe, OTKJIIOHTe napoperyIyIATOP COBCem.
Bo Bpemnay3B npocece rnaxeHn cTaBbTe yTOrBepTKaIbHo.Ecn nocTaBnTb yTOr C BKIOUeHHbIM napoperyJrTopom rOpN3OHTaJIbHO,3pr pacxOdyETcnap.
yTnIIN3aunOToXoDOB
YnakOBKa Haunx TOBapOB ONTmAmNbHO
npOyMaHa. OHa B OCHOBHom COCTOnT n3
MaTePnaIOB, NOJnx Kaunx NOBTOpHO
Ipepa6OTke, KOToPbIE MOxHO CdaTb B MeCTHyIO
cLyK6y c6opa OTxoIOB. INHOpMaUIO O TOM,
KAK NoCTynITb C OTpa6OTabuIM
3NeKtpoPn6OpOM, Bbl MoKeTe NOLyUHTb B
MeCTHbIX OpraHax aDMNHnCTpaCIN.
DaHbI np6op nOmeuH B COOTBeTCTBUN C EBponeNcKo InpeKTHBOI 2012/19/EU, perynpyuOeYtniHaun OLektpnueckoro N3NeKTPoHHoro o6OpydoBaHna.
Daanha DnpeKTHBa onpeJeIe OCHOBhIe Tpe6oBaHnK yTnn3aunn n nepepa60Ke OTxoIOB OT 3NeKtpnuecknx n 3NeKtpoHHbIX npnbopOB, DeiCTByIoune Ha Bce N TeppHTOpn Ebponeckoro Co1o3a.
Po3B'jaHHaHeVeJIHKx npo6JeM
| ПюбLEMа Moхлесьі причини Pішени | |
| Парorehepatop He BIMKAeTbCS. | · ПюбLEMи 3i 3'EDнанняМ. · Поревір'te кабелЖИВлень,штенье� Ta розету. · Порев\'дів\"пор'veмікач (13)В поожень "I". |
| Прасka He HargiBaeTbCS. | · He yBIMKHeNo KHONkY rOLOBnOTo BIMNKaUc. · Порев\'дів\"пор'vemікач (13)В поожень "I". ·Установів\"per'velітOPtempepaTpyr Na BCTAHOBeNoHa ПОЗнayКу "min". |
| Коли прасky yBvIMKHeNo, 3 Hei iDeДIM. | · Піd quac nepworo BIMKoprustanHЯ:Дeяki DeTeaJI npriSTPOU DeIeO 3MaIeHNo Ha 3aBoDi,Tomy pIad quc nepworo HargiBaHnY 3 NIX Moke IITN TPOXn DmUy. · Піd quac noIaIIbWorO BIMKoprustanHЯ:MOxNiBO, nIDoShBa 3a6pudHeNa. |
| СkrpiЗ otвори упidошВi Teue BODa. | ·Функця napri BIVkorpiStaHa nepeod TIm,Як naporehepatop posizirpivcяdo notri6hoi Temnepatypu. · BODa konDteHcyeTbcS y Trpy6kax, Tomy zu nap BIVkorpiCTOBuEYbCBy Bnepiye abo doBroNe BIVkorpiCTOBuVabcry. ·У пао'rehepatopi uTbOpinocz 3a6barato hakiny. |
| 3 пidошВи сипeТбСьБрud. | ·У bauzi naporehepatopa uTbOpinocZhakn aboMiHepalbHi BIDknadeHn. ·ВIVkorpiCTOBuYte BODU 3 KpaHa,ЗмiiAnHy 3ДиctiNbobAOHIO abO demiHepaIizOBaHO BOdoU BnponpOii 1:1.В TOMy BnIaNky,ЯкwoжорstciBbBoNу BAIOMy periohi 3aHaIbTO BVCOKa,pekomeHdyEmo po36abJYrN BoDOnpoBIDny BodyДиctiNbobAOHIO y cniBvIqHoueHnI 1:2. ·Оч\'tів\"пidошВу 3a DoonomOrOTo BOLORoi ranchipkn. ·Hikoli Ne DoDaBaIte DomiKu Do BODu y bauzi naporehepatopa. |
| 3 праски He iide napa. | ·Парorehepatop He yBIMKHeNo abo pe3eRByap dIra BODn npokhni. ·PergnyTupar Napri BCTaHOBeNoHa mInImaIbHy nO3Hauchy. |
| БiINi3Ha TemHie Ta/ a6o prnkLeIoEbCSdo NiOswBn. | ·Овразно habTo BvICOKy TempepaTpy, ta ce nOshKOdIINO TKAHNHу. ·Оь\'tів\"bIINOVIDHy do TnPy TkaHNH TempepaTpy Ta OCHCTiB NiOswBv BOLOROTo rAChipko. |
(B 3aBnCmOCTN OT MoJeJI)
DaHHa CnCTema IMeet «yMHbI» MexaHn3M KOHTpOJI npa, KOToBb I Nocne OTnyCKAHN KHOKN BblNyCk npa n3 noDoWbI (16), noDaET He6oJIbWoE DoIOJIHnTeJIbHOe KOJInueCTBO npa.
IOnOHnHtBHyIO npa npa MOxHO B JIO6oMOMeHT OCTaHOBnTb KOpOTKmHaxaTNem Ha KHONKyBbInycka npa n3 NOOWBbl.
Tlaxhene 6e3 npa

HaunhaTe rnaNTb, He haxmam KhoNky Bblnycka napa .
C BepTnKaJIbHbI nap


HnkOrda He nCnoJb3yIte cTpyu npa dJa
obpa60TKn OeKdbI, HadeToH Ha IIOdei.
HnkOrda He HapabJIaIe Nap Ha IIOdei nn
XNBOTbIX.
- YctaHOBHTpepyTApToTtempeTApTyB V NOJIOXeHne «…» NIN «max»
- MoXHo IInaInb BnCraIue 3aHaBeckn n OeKdy Ha IIeUHKax (JkaKeTbI, KocTOMbl, NaNbTO n Dp.), NOHReB yTOr BEpTNKaJIbHO n HaxBaK HONKy BblNycka napa.
3Heproc6eperaoucaa KHONka «eco»

(B 3aBnCmOCTn OT MoJeN)
Hakatne «3heproc6eperaouei» KhoNk (8*) N03BOJnE T KOHOOMNTb 3HeprnIO npn NOJIb3OBAHN np6opom 3a ChET aBtOMaTNUeCKORO CHNXeHn paCXoJa 3JeKTPnueCTBa N BObl, COxpaHn npn 3TOM OTINuHbIe pe3yNbTaTbI rnaXeHn NOUTN BCEX BNDOB 6JIb.
IcnoB3yTe o6bHybI peXm pacxOa 3HeprToTOJbKO dJa INaXeHnra TOJCToN cINbHO MToT KAnH.
PnmeaHne: npn pa6ote c cyHKnnei 《3Heproc6epeXeHne》perynipOBka npa N TEMnepaTpyb MoKet HcNoJIb3OBAtbcB COOTBeTCTBnC peKomeHaJMaMn.
ABTOMaTnueckoe OTKJIIOUChHe

(B 3aBnCmOCTn OT MoJeN)
EcnB npocece rnaKeHn KOnKa BbInycka npa n3 noDowBbl (16 nI 17*Ha pyUke yTOra He HaximaetcB TeueHne OnpedeneHHoro BpeMeHn (8 MNHyT),napOBaB CTaHnA aBTOMaTHeCKN OTKJIIOuHaETcra.
Iocne aBTOMaTnueCKOTo OTKJIIOUeHnCBETOBo INNkKaTOP «ABTomaTnueCKoe OTKJIIOUeHnE» (9) 3AmrAeT.
YTo6bI CHOBa BKNHOnuTb napOByIO CTaHcNIO,CHOBa HAnMMTe KHOJIky BbInycka napa I3 NDoUWBbl.

3aunTHaTeKCTnIbHaNoDOWBa protect
(B HekoToPbIX MoJeIax)
3Ta nOoWbA uCnONb3yeTcA DnA rnaKeHbCnapOM
DeNkathbIX Beuei npMakCmAlbHO
Tempeatype, He nobpeKdAix. NcNoB3OBaHne
3aunTHOH TEKCTINbHO NDOWBbl TAKKE
NCKIIOuAET HeoXODIMOCtB NCNOJB3OBaTB TpRINKy
DnI npedOTbpaSeHHN 6Necka Ha TEMHBIXTKAHx.
MbI peKomeHdyem Bam nepeid hauJom
rnaKeHb I nonpo6oBaTb INaINTb Ha He6oJIbWOM
yAcTke Hb ByTpEHNHe CTOpOHe BEuIN, IN
NoHa6NJIOdaTb pe3yNbTaTbI.
4To6bl yCTaHOBt 3aunTHyIO NOoWBy,
NOMECTNE OCTpbIK KOHNI KYTOHA B KOHEU
3aunTHOH NDOWBbl NOTAHNTe 3a 3NaCTNUHyIO
JeHTy BDoJIb HNXHHe 3aNDHe YACTNu TYTO Tex
nop, Noka OHa He 6ydeT ODeTa. 4To6bl CHrTb
3aunTHyIO NOoWBy, NOTAHTE 3a 3NaCTNUHyIO
JeHTy, YTO6bl OTDeJIbT b NOoWBy OT YTOra.
3aunTHyIO TEKCTINbHYIO NOoWBy MOxHO
npno6pcTeN B CnyXBe NoCTnpOJaX INN B
CneuaHn3nPOBaHHbx Mara3nHax.
KoДakceccyapaHa3BaHneakceccyapa 571510 TZ20450

«Calc'n clean»

AntiCalc
YncTka 6aka naporehepatopa
YTo6bI npOdnITb cPOK 3KcNlNyatauIN naporehepatopa n136exKaTb HAKONJIeHnB HeM HAKIN, Nocne OnpedeJeHHoro BpeMeHN (opneHTnpoBOvHO nocne 50 yacOB) nCNoJIb3OBAHn Naporehepato Heo6xoJMo npOMbITb BOoI. EcIn B BaWEM perNoHE JecTKaR BAo, IpOMbIBaTb naporehepatop HxKHO aUe. He IcNoJb3yIte dIpy npOMbIBaHn naporehepatopa CpeDCTBa dIy UdaJIeHn HaKIN, NOTOMy YTO OH MOrYT erO nobPeDHTb.
- Ythor obra3aTeJIbHO DoJxKeH 6bITb OTKIIOueH B TeueHne 6oJee 2 yacOB, OH DoJxKeH 6bITb XOJODHBIM, a erO EMKocTb dJa BObl (1) nyctOn.
- NocTaBbTe npu6op Ha kpaH paKOBnbl.
-
OtkpoIte nIacTmaccOByIO KpbIuKy, pacnoJIOKeHHyIO B HnKHeN YactN npnbopa, NOBepHyB eE B NoJIOKeHne
4.C NOMOUsIO MOHeTbI BbIEbpHnTe Ipo6Ky BO TBepCTUN CTOKa. -
IpepeBepHnTe naporehepaTOp n c nomoIbIO cTaKaHa 3aJeIe T B 6ak, HaxOJaUncra B Kopnyce npoBOi CtaHUn, 1/4 n BoDiJI.
- B TeueHne HeckoJIbKx MNHyT BCtprXHnTe Kopnyc napOBoi CTaHcunu N NOHOCbU O BblneIe CoedePKmOe 6aka B paKOBHy IINB Bdpo. IЯ nOlyeHnHaHJyUHXpe3yJbTaTOB Mbl peKOMeHdyem npOBODHT bTy ONEpaCIO DBAJKbl.
BaxHo: npexJe yem ChOBA 3aKpbIb 6aK naporeHepaTopa, y6eINTeCb B TOM, YTO B HEm He octanocb BObl.
- NomeCTnTe DpeHaxHyNo np6ky Ha MeTo n 3akpyTnTe ee, INcNoJIb3y MoHeTy.
- YcTaHOBIne n 3aKpOIne pIaCTMaCCOByIO KpbIuKy, NOBepHyB eE B NoJOnKeHne
ABTOMaTHueckn CnHaJI O Heo6XoUMOCTN OHCTKN
(B 3aBnCmOCTn OT MoJeN)
Ecni CBeTOBoi INHnKaTOp (12^*) Miraet, naporehepatop cneDyET onoIOChyTb.ДЯ 3TORO BbINOHNHe DeiCTBn, ONIcaHHbIe B npedbyuem pa3dene.
YTo6bI nepe3anyCTnTB CBETOBH INHdkatOp Calc'n clean n CyeTcNk BpeMeHN, DBaXkbI OTKIOUHTe napOByo CTaHcNIO NO KpaHHeMepe Ha 30 cekyHd.
(BKI, 30CEK,BbIKI, BKI, 30CEK,BbIKI, )

ОполackиВане Камеры napoo6pa30Ваня утюга
Octopoxho! CyueCTByeT onachOCTb oxorOB!
DaanHaa npoceDpya nomoraet ydaJIntb Yactncbi HAKINN IN3 KamepbI napoo6pa3OBAHNA.
JaHHa npoceDypa OuNCTK MoKet BbINONHrTbcB BpemOT BpemEni (Pnpi6n3nteNbHO pa3 B rO), KOrda NocLe dNITeBHorIO nCNOJb3OBaHnC OueHb JECTKoBDOI IN3 NODOWBby yTHora HauHnAOT CbInaTbCS qACTNu bHaKnHn.
a) y6eHntecb, yTO yTIOr octbI.
b) YcTaHOBnTe peYrJrTOp TeMnePaTypbI (15) yTOra B NOJIOKeHne min.
c) HanoJIHnTe eMKoCTb IJRA BOIBy BOIOJ N3 KpaHa.
d) BkHouTe yTHor B po3eTkU y cTaHOBUnte rnaBHyb BBkIIOuataJeB (13) B noJoxKeHne "I".
e) NdoKdTe, noka 3aRopntcra CBetOBoHnDnKaTOp roTOBHOCTn npa (9).
f) Ecni napoBra cTaHcNra cHa6KeHa napoperyJrTopom (11*), yCTaHOBnTe erO B noIOXKeHne MaKcMmaJIbHoN IOnaUn napa.
g) NODHIMITE yTHOR HaD paKOBINHOI HnHaEMKOCTbIO, NOxOJaUeI dJIa c6opBaIBNBAHOUeICRA BObl.
h) HaxMMte Ha KONky BbInycka npa n3 nooBbl (16) n octopoxHO notpocrte yTOr. 13 nooBbl noJIbETcKnIaTOK nHaHET BbIXOHTb nap, ydaJra IMeIOUneCry aactuKN HAKINN n OTNOKeHN. 3TO MOKeT 3aHrTb OKOnO 5 MNHyT.
i) YctaHOBnTe peryIaTOp TemnepaTypbI (15) yTHoRa B noIOxKeHHe max, He HaxIMa KHOkky BblNyCka npa n3 noOuBbl (16).BoDa B KaMepe napoo6pa3oBaHnHauchET nCnaprTbcra. IIOxDnTe, noka He nCnapITc BcR BoDa, HaxOJaAraCBy KaMepe.
j) YTo6bI OuHCTnTb NDoOWBy, cpa3y Je npoTpnte BCE OCTaTKN 3aqrpa3HeHm O cyxyHO XIONHaTO6bymaxHyIO caOpETKy, He DOxKnDaarcb OctbIBaHHaYrOra.
UncTkau yxOa

Ipepe npoBeHem JIO6bIX DeiCTBn no YnCTke uXOy 3a 3NeKtpponpOpom, CneJyET o6raTeJIbHO OTKIOuHTb erO OT 3NeKtpocetn.
- Nocne rnaKeHyxOa BbIKIOUHTe np6Op n3 cTeN IOXdIteCb OCTbIBAHn NOIOWBbl yTOra, npexJe Yem YnCTNTb np6Op.
2.ПopotриkeKopnyc,pykyI nobepxhoctb ythora BnaXHO TkaHbIO. - Ecni noooba yTjora nCnauKaHa nn Ha Hei NOBUNc b TBePbIe OTJIOXeHn, OUnCTHTe ee BNaXHO TKAHbIo.
- HnKOrIa He nOJIb3yITeCb a6pa3NHBbIMn CpeIcTBaMn IINpactBOpNTeJAMN.
G
Xpahenie npnbopa

1.Перед y6bopKо np6bopa Ha xpaHHeNdoKdntecb erO octbBaHn.
2.YcTaHOBnTe TJIaBbIi BbIKIOUaTeJIb NITaHnB INoIOKeHHe «0» IN BbIKIOUHTe np6Op n3 cETn.
3.ЛeTe Bovy n3 pe3epByapa dIЯ BObl.
4. NomeCTnTe yTnR Ha erO nOcTaNBy, nOcTaBnB erO Ha nOdoWBy.
5.Cnoxnte shypr nntaHnB OtJeHne (5)IpxaHHeHn I 3aФNKcnpuTe npoBOJ uHaHr B npedyCMOTpeHHOM KpeHneHn (3).He CMatbAaiTe UHypbI CnUHKOM Tyro.
6.Испόньутepyкдяпенихockи(4),pacnoложенны ha 6okobbix cstopohax npnbopa npn ero nepeHOcke.
CoBeTbI NO 3KOHOMN 3JIeKTpo3Heprn

Bolbue Bcero 3heprn pacxoodyetca Ha Bbpa60tk npapa. TTo6bI cokpatntb notpe6lenHe 3heprn, npndepknaTecb cneDyOuNX peKOMeHdaun:
- HaunhaTe rnaKeHne c 6eJIb, KOtOpoe Tpe6yeT MInHMaJIbHOrO TemNepaTypHOrOpexIMa rnaKeHn.
PekomeHdyemyu TemnepaTy pIaxKeHH MoXHO NOCMOTpeb Ha npJIke N3deJInr. - PerynipyTe BixoJ napa B 3aBncMocTn OT BbIbpaHHoro TempepatypHO peKIMa rnaKeHn, CneDy INcTppyKUm DaHHORO pyKOBOdCTBa.
- POnb3yItecb napom ToJbKO TOrJa, KOrJa 3To Heo6xOIMo. IIO BO3MOXHOCTn, INcNoJIb3yIte BMeCTo npapa yHKUIO paCnblJeHnra BoDbl.
CTapaTecbIpaNTb CnErKa BnaXHbIe H3JeIy, NOCTaBnB NapoperyJrTop Ha MehBsyO OTMeKy. Pn 3Tom nap 6ydet O6pa3OBbIBaTbCBAcMoTkAHn, a He B yTIORe. EcNn Bbl cyuInTe 6enBe B cyuINbHOm MaunHe, nCIOJIb3yIte nporpamMy «Cyka IOD yTIOR - EcII 6eJIbe DoCTaTOUHO BnaxHoe, OTKJIIOHTe napoperyIyITop COBCem.
Bo Bpemnay3B npocece rnaKeHncaTabbTe yTOrBepTKaIbHo.EcnnnoCTaBnTb yTOr C BKIOUeHHbIM napoperyJrTopom rOpN3OHTaJIbHO,3pr pacxOdyETcnap.
yTnIIN3aunOToXoDOB
Ynakobka Haunx TObapOB ONTImaIbHO npOyMaHa. OHa B OCHOBHom COCTOnT N3 MaTePnaIOB, NOJExkaUnx NOBTOPHN Nepepa6OTke, KOToPbIE MOXHO CdaTb B MeCTHyIO CnyK6y C6Opa OTXoIOB. INHOpmauio O TOM, KAK IOCTynITb C OTPa60tAbuMm 3JIeKTPoPnp6OpOM, Bbl MoKeTe NOJyHTb B MeCThIx OPraHax aDMNHcTpaCIn.
DaHHbI np6Op nomeH B COOTBETCTBnC EbponeckOu DnpeKtBOo2012/19/EU, perynpyuoue ytnn3aunO 3NeKtpueckoro n 3JeKtpoHoro 6opuyoBaHra.
DAnHnA DnpeKtNbO npedeJeT OCHOBhIe Tpe6oBaHnK yTuJN3aun
I nepepa60Ke OTXoOB OT 3NeKtpnuecknx I 3NeKtpOnHHbIX np6OpOB, DeNCTByUOuNE Ha BcEi TeppHToPm Ebponeckoro CoHO3a.
BbIaBJIeHne n ycTpaHeHne HeNoJaIOK
a a a a a a a a a a a a a a a a a a a a a a a a a a a
Siemens asr aal
ailllll 1
S OBC = S COD + S_ BOC
Paeio Jace gaiyaiy jyj yj 113
.
ailll jgj 10
j0j1 jaoalil aiall ciaajll 1
aaiiaaii
aal gall a glll b 1gss o g jnss
sE - EU/2012/19
Aaannnnn nn nnnn nn nnnnnnnnnnnnnnnnnnnnnnnnnnnnnnnnnnnnnnnnnnnnnnnnnnnnnnnnnnnnnnnnnnnnnnnnnnnnnnnnnnnnnnnnnnnnnnn
0jg21 eljus plal jbi 1
g a Jgao g a Las la gai g ai
1
jglj
G
iiaai 15aie jji jzai jia jia jia iic jia jia jia jia jia jia jia jia jia jia jia jia jia jia jia jia jia jia jia jia jia jia jia jia
a 0
Jaxi juxjuxjuxjuxjuxjuxjuxjuxjuxjuxjuxjuxjuxjuxjuxjuxjuxjuxjuxjuxjuxjuxjuxjuxjuxjuxjuxjuxjuxjuxjuxjuxjuxjuxjuxjuxjuxjuxjuxjuxjuxjuxjuxjuxjuxjuxjuxjux
gll
F
1.0g
J 1 J 1 J 1 J 1 J 1 J 1 J 1 J 1 J 1 J 1 J 1 J 1 J 1 J 1 J 1
gdo gdo) 2g no oao aolac e j k
no gall gall lloic allg (lljaiill
alll nea ojol gall plisilw 2y glsall xla
a
(15) 2
"min"
all
cysll ciaa bai a ciyssll ool sall d
"1, 20 (13)
(9) "jaj jbj jij jjj jjj (e
(^*11)
a
eall gale 9g j 10gai gai gai (g
J 1 J 1 J 1 J 1 J 1 J 1 J 1 J 1 J 1 J 1 J 1 J 1 J 1 J 1 J 1 J 1 J 1 J 1 J 1 J 1 J 1 J 1 J 1 J 1 J 1 J 1 J 1 J 1 J 1 J 1 J 1 J 1 J 1 J 1 J

aalglg
a1oc g 2g waii jia yjyss iaywai jg231 gai
1 1
J 2
.3
S_ OBC = 12 · BO · CD = 12 × 2t × 5
aal alol all 105all aal lll
gill jll j1y, pksy cii yol sall gill 1sall jc alwal lbaal by
a aalaaan aa aalaaan aalaaan aalaaan aalaaan aalaaan
Jasall Jassall
571510TZ20450

AntiCalc
Calc'n clean"
E
#
J 1
clal 15] (yjae 50) yie cie
a
y 1
y la yie aley 1e algaoaogdyalgal .1
(1)claljzjgjiclu
Jiaaiilie jie jie 2
i 3
.
4
aalwllg Laiat gai cblal sall .5
aall 1sii ci iie jiaell .
.
jia jia clll iay po jia 5i,lae! all gall jia:pa
J = A^ ED = 90^
abolglae! 5ai aal
Aa
8
Suiogjg 1
()
a111 111 111 111 111 111 111 111 111 111
"Calc'n clean" 30 45
S ACD = S COD + S_ DCE
→30→→30()
#
gagc
C
1
1 1
(.)a 2
e
"eco"
()
iXgaiu i8) 1slll jj jaiii aI
auiySll xiy Sjio jiaaii jz aiall oSall
eilipao gai yia jiaaii ie Jssal .clall
. yxlall
aaii
#
Slaogg1 1a
()
gall (^*17 - 16) jlll b! j bcill p c a l g
gud gll (gla8) i ojai gl
Lgglg jlll g
(9)“jala jll" 111 111 111 111 111 111 111 111 111 111 111 111 111 111 111 111 111 1

protect
aall aalaaal aalaaal aalag y jlaal 128
clalglbljg jy gao jia jz j zaii dic
gay aaiy jda jz jz jz jz jz qo
"00" 15) 1
jIe (a jao jai) joo a aia 2
1g(j2gall
aillll lalall eolal alal
:
| ### | ### |
.3
A( 1,2) .C( -34,54)
"
Jy jia 1
(10*)
有 SE( 0 < S < T)
1
a a
aieeia 1
Jaxi 1111 1111 1111 1111 1111 1111 1111 1111
E = 1,
iiaia. clll s iinaa yaiia iiaia 1jaiai 12 jiy .7
jLaoi (^*12) "clally jzai Sui" aui jiuaiy
1.5
()
jLl (9) 《jla jll》
P
aiai elao Jaiui jay
1:1 clal gl auii clc jol, jll o ju yai lcljol, siaibio gale clall juc iis 1
1.1:2 个零全自
clll iiaie clll jae jao jaiaiy aiay
4.12011
jll Jaiil elal al g eall jla lo kay
oLa oJ. 1 Jil all j! al go. J, Jboc oal Jj
a
a
LdUwOgJzall Cldu
Lai Kaiabil juydall liao jia Lsi oLo priu
jolll oI p1iJ 2 aannn oI sall oig. Aii I oI sall
S do
(2)solsoill sallolilge Iaillgai,laids
*Jyill Jiljll jilil bio 11
*“gill jin"/'aXeJe oJooie! aaijui 12
gJsJall Jia1y1 1/0 13
jz jz jz jz jz jz jz jz jz jz jz jz jz jz jz jz jz jz jz jz jz jz jz jz jz jz jz jz jz jz jz jz jz jz jz
aJalal jll Jlalj 15
jzjj.16
*XTRM steam" jzj 17
aioolall ayaiyaiyai.18
olswi 19
*yai jia jai jai iai 20
Jg
A
.1
0jks jll jlsy. 0j, yla sxcj jzgl .2
a 1 a
sina 10e jglpiie 10jolall jjsal .3
yS11 bJbJcL aJbJ 4
J10 1/0" 5
"jol jilill" (9) jlll aal gai 6g jilld sdc 6. Jlaaill lga jial jlls
J 1 J 1 J 1 J 1 J 1 J 1 J 1 J 1 J 1 J 1 J 1 J 1 J 1 J 1 J 1 J 1 J 1 J 1 J 1 J 1 J 1 J 1 J 1 J 1 J 1 J 1 J 1 J 1 J 1 J 1 J 1 J 1 J 1 J 1 J
Caiol Gao li
J 160
j 150
P A = 1
g 1 1 1 1 1 1 1 1 1 1 1 1 1 1 1
jia dia zai
aill lall ol gall sall gail gall gall cll bllg 2
= · ( 12 + 13 - 13)
= 12a1 + 32a2 + 32a_3
p
. jlll 1200
j 1
gai i
jglal
jglal
jglal
jglal
jglal
jglal
jglal
jglal
jglal
jglal
jglal
jglal
jglal
jglal
jglal
jglal
jglal
jglal
jglal
jglal
jglal
jglal
jglal
jglal
jglal
jglall
slider SL20 Jybl y Ss. Siemens 1y.
10
aalee
. 11111111111111111111111111111111111111111
J 8 J 8 J 8 J 8 J 8 J 8 J 8 J 8 J 8 J 8 J 8 J 8 J 8 J 8 J 8 J 8 J 8 J 8 J 8 J 8 J 8 J 8 J 8 J 8 J 8 J 8 J 8 J 8 J 8 J 8 J 8 J 8 J 8 J 8 J
8 8 8 8 8 8 8 8 8 8 8 8 8 8 8 8 8 8 8 8 8 8 8 8 8 8 8 8 8 8 8 8 8 8 8 8 8 8 8 8 8 8 8 8 8
F
G

1
1
一
一