
slider SL45 TS45XTRMW - Iron SIEMENS - Free user manual and instructions
Find the device manual for free slider SL45 TS45XTRMW SIEMENS in PDF.
| Product type | Steam generator |
| Brand | Siemens |
| Model | slider SL45 TS45XTRMW |
| Power supply | 220-240 V ~ 50/60 Hz |
| i-Temp function | Automatic temperature and steam adjustment for all ironable fabrics |
| AntiShine function | Reduces shiny marks on black and delicate fabrics |
| pulseSteam function | Three powerful steam jets for thick fabrics |
| Intelligent Steam function | Additional steam supply after releasing the button |
| Energy saving mode (ECO) | Up to 25% energy savings and 40% water savings |
| Automatic shutdown (secure) | After 8 minutes of inactivity |
| Anti-scale system | Calc'nClean Plus: descaling of filter and boiler |
| Textile protection soleplate | Accessory available (code 571510) |
| Audible signal | Can be activated and deactivated |
| Child safety | Iron and cord out of reach of children under 8 years |
| Use | Household use only |
| Estimated weight | Approximately 5 kg |
| Estimated dimensions (WxDxH) | Approximately 45 x 30 x 30 cm |
Frequently Asked Questions - slider SL45 TS45XTRMW SIEMENS
User questions about slider SL45 TS45XTRMW SIEMENS
0 question about this device. Answer the ones you know or ask your own.
Ask a new question about this device
Download the instructions for your Iron in PDF format for free! Find your manual slider SL45 TS45XTRMW - SIEMENS and take your electronic device back in hand. On this page are published all the documents necessary for the use of your device. slider SL45 TS45XTRMW by SIEMENS.
USER MANUAL slider SL45 TS45XTRMW SIEMENS
Register your product online
G

H


Index
| DEUTSCH 6 | |
| ENGLISH 15 | |
| FRANÇAISE 24 | |
| ITALIANO 33 | |
| NEDERLANDS 42 | |
| DANSK 51 | |
| NORSK 59 | |
| SVENSKA 67 | |
| SUOMI 75 | |
| ESPÁÑOL | 83 |
| PORTUGUES | 92 |
| ЕАнniKA | 101 |
| TÜRKUAGE | 110 |
| POLSKI | 118 |
| MAGYAR | 127 |
| УКраïHсьКА | 135 |
| РУССКИ | 144 |
| ROMÁN 153 | |
| العربية | 169 |
Thank you for buying the slider SL45 steam station, the new steam-ironing system from Siemens.
Carefully read through the operating instructions for the appliance and safeguard them for future reference.
We hope that you enjoy ironing with this steam station.
Important
This appliance complies with international safety standards.
This appliance has been designed exclusively for domestic use and must not be used for industrial purposes.
This appliance must only be used only for the purposes for which it was designed, i.e. as an iron. Any other use will be considered improper and consequently dangerous. The manufacturer will not be held responsible for any damage arising from misuse or improper use.
General safety instructions
-
During the use, the decalcifying or rinsing aperture of the boiler is under pressure and must not be opened.
-
The iron must not be left unattended while it is connected to the supply mains.
-
Remove the plug from the socket before filling the appliance with water or before pouring out the remaining water after use.
-
The appliance must be used and placed on a stable surface.
-
When placed on its stand, make sure that the surface on which the stand is placed is stable.
-
The iron should not be used if it has been dropped, if there are visible signs of damage or if it is leaking water. It must be checked by an authorized Technical Service Centre before it can be used again.
-
With the aim of avoiding dangerous situations, any work or repair that the appliance may need, e.g. replacing a faulty mains cable, must only be carried out by qualified personnel from an Authorised Technical Service Centre.
-
This appliance can be used by children aged from 8 years and above and persons with reduced physical, sensory or mental capabilities or lack of experience and knowledge if they have been given supervision or instruction concerning use of the appliance in a safe way and understand the hazards involved. Children shall not play with the appliance. Cleaning and user maintenance shall not be made by children without supervision.
-
Keep the iron and its cord out of reach of children less than 8 years of age when it is energized or cooling down.

CAUTION. Hot surface.
Surface is liable to get hot during use.
- This appliance is to be connected and used in accordance with the information stated on its characteristics plate.
- This appliance must be connected to an earthed socket. If it is absolutely necessary to use an extension cable, make sure that it is suitable for 16A and has a socket with an earth connection.
- If the safety fuse fitted in the appliance blows, the appliance will be rendered inoperative. To restore normal operation the appliance will have to be taken to an authorised Technical Service Centre.
- In order to avoid that, under unfavourable mains conditions, phenomena like transient voltage drops or lighting fluctuations can happen, it is recommended that the iron is connected to a power supply system with a maximum impedance of 0.47 . If necessary, the user can ask the public power supply company for the system impedance at the interface point.
- The appliance must never be placed directly under the tap to fill the water tank.
- Unplug the appliance from the mains supply after each use, or if a fault is suspected.
- The electrical plug must not be removed from the socket by pulling the cable.
- Never immerse the iron in water or any other fluid.
- Do not leave the appliance exposed to weather conditions (rain, sun, frost, etc.)
Important:
This appliance reaches high temperatures and produces steam during use, this could cause scalds or burns if not used properly.
The steam hose, base station, metal plate at the bottom of the removable iron pad (2) and in particular the iron can get hot when used. This is normal.
- Never aim the steam at people or animals.
- Do not allow the power cable to come into contact with the soleplate when it is hot.
- Be aware that the system can keep on steaming for a short additional time after releasing the steam trigger. This is a normal function.
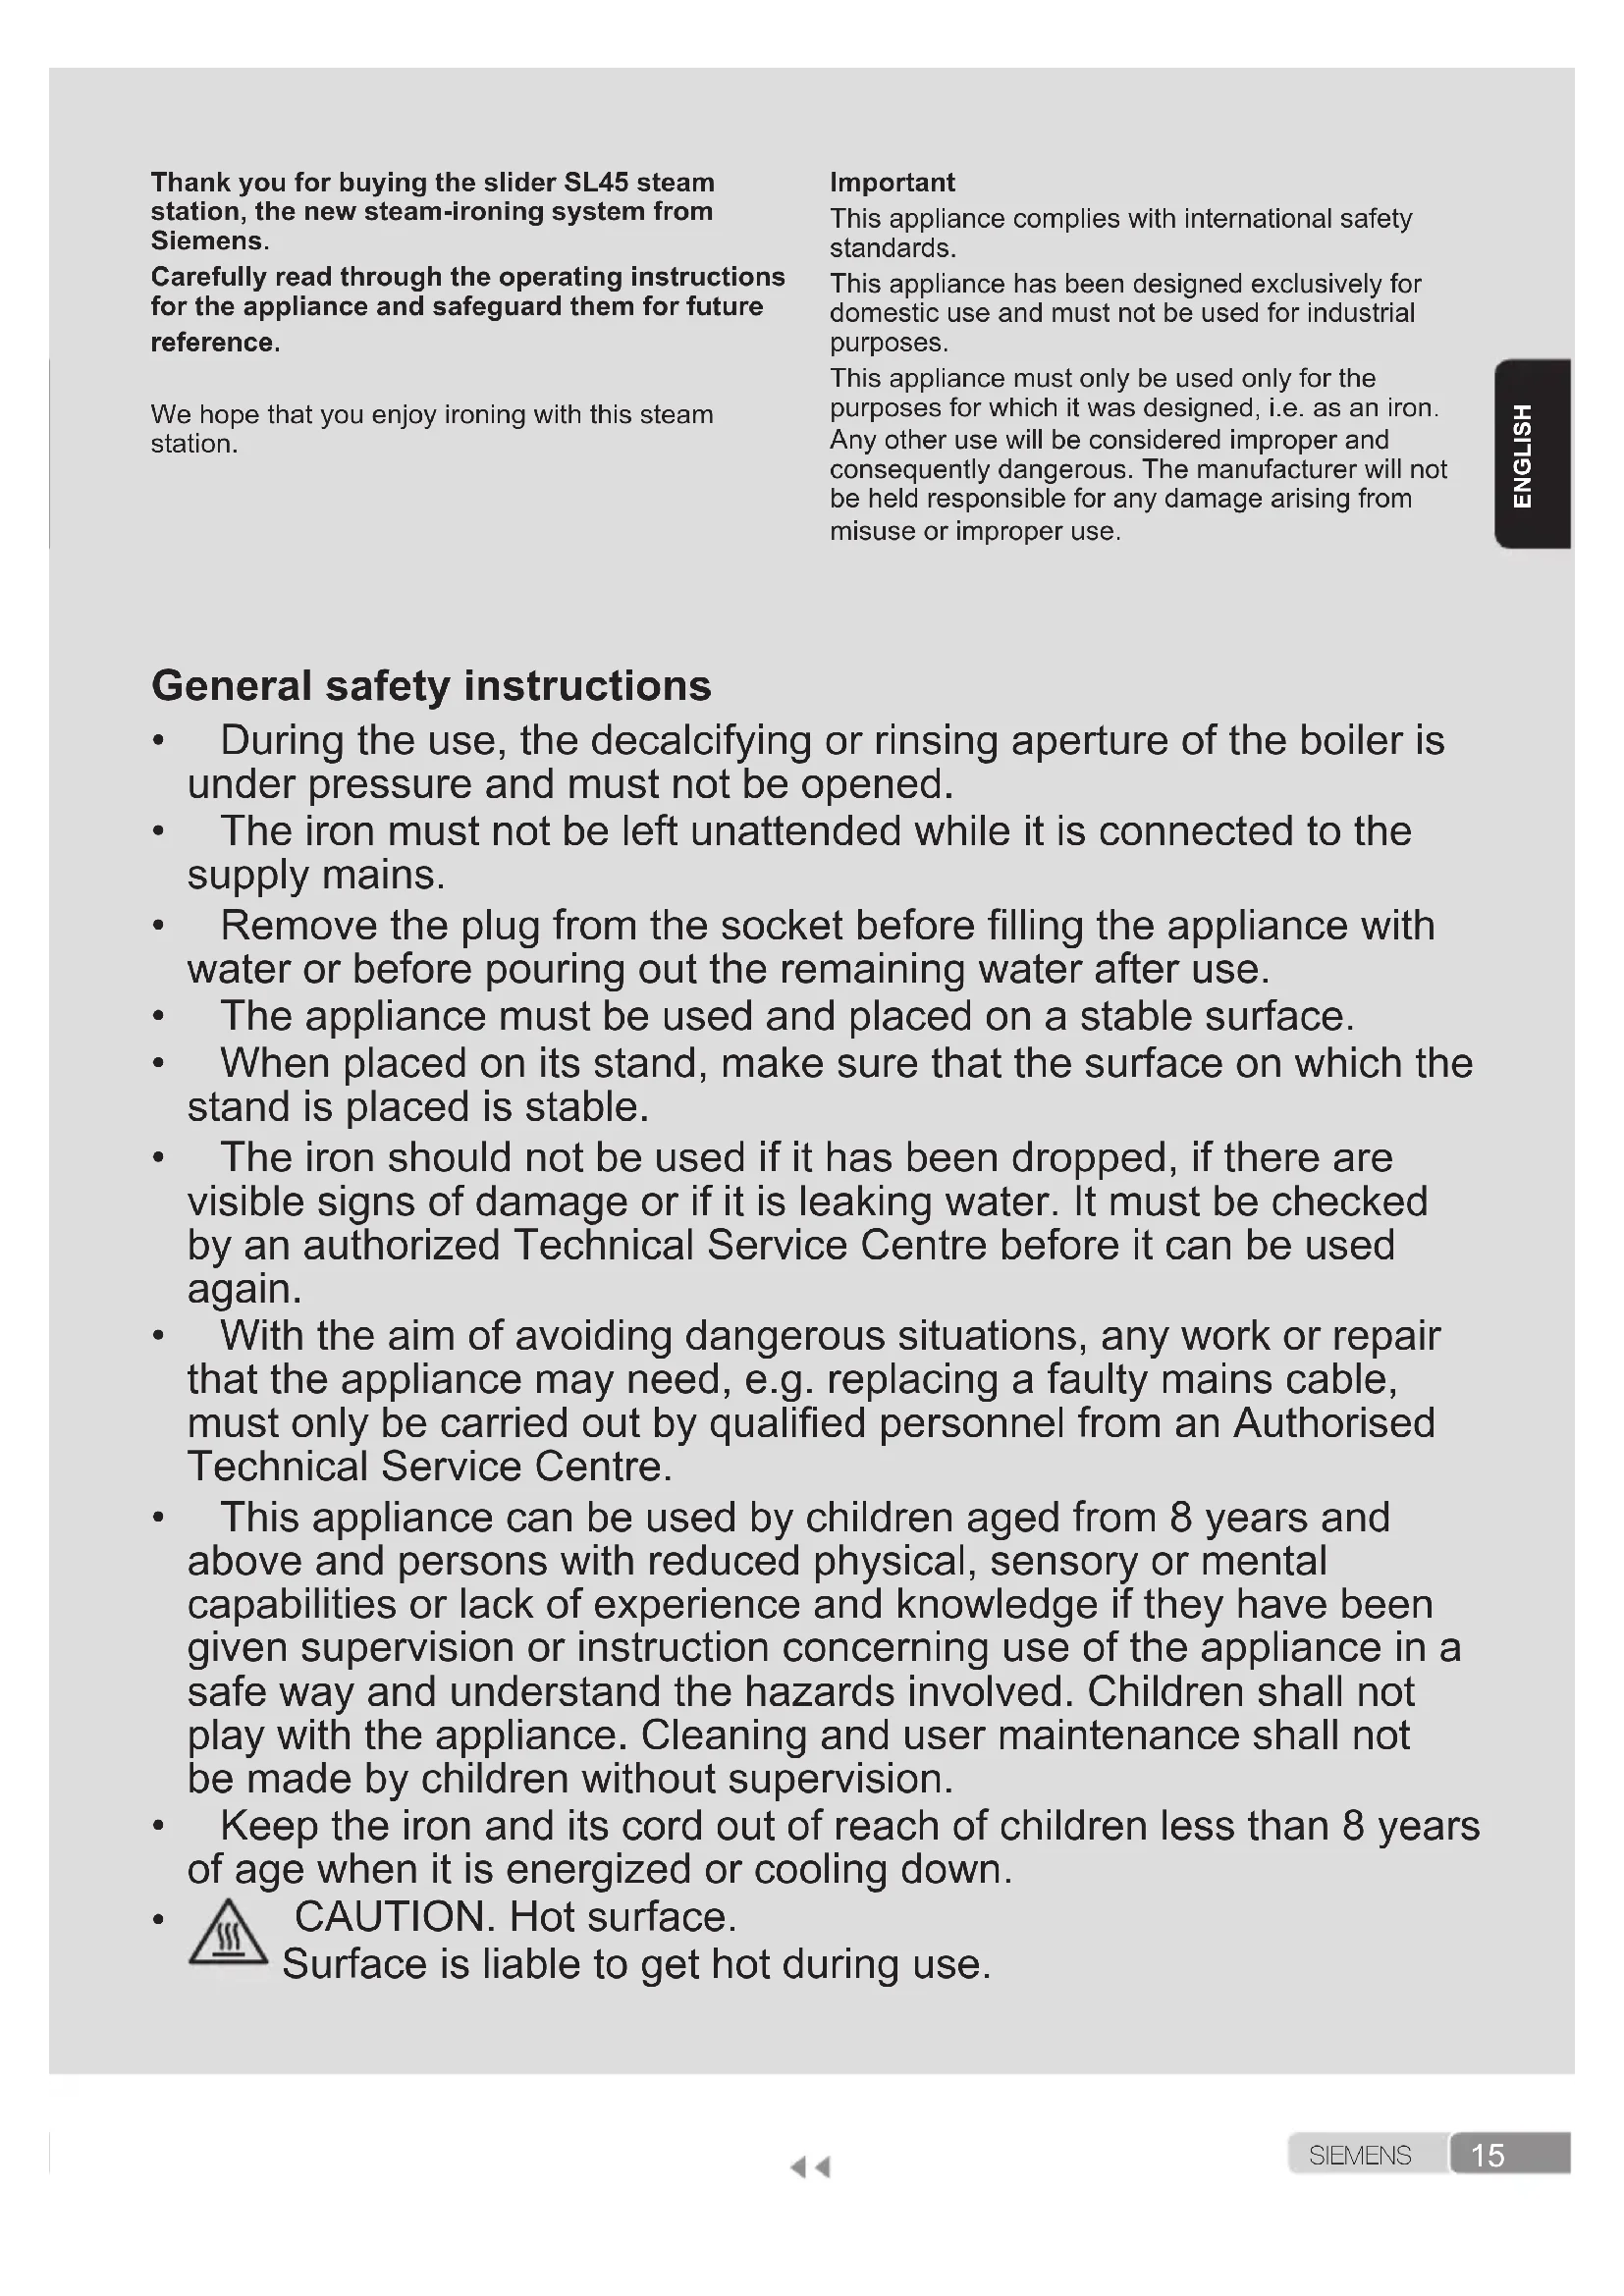
Description
- Removable water tank
- Removable iron pad
- Carrying handles
- Steam hose and mains cable storage compartment
- Mains cable
- Steam hose
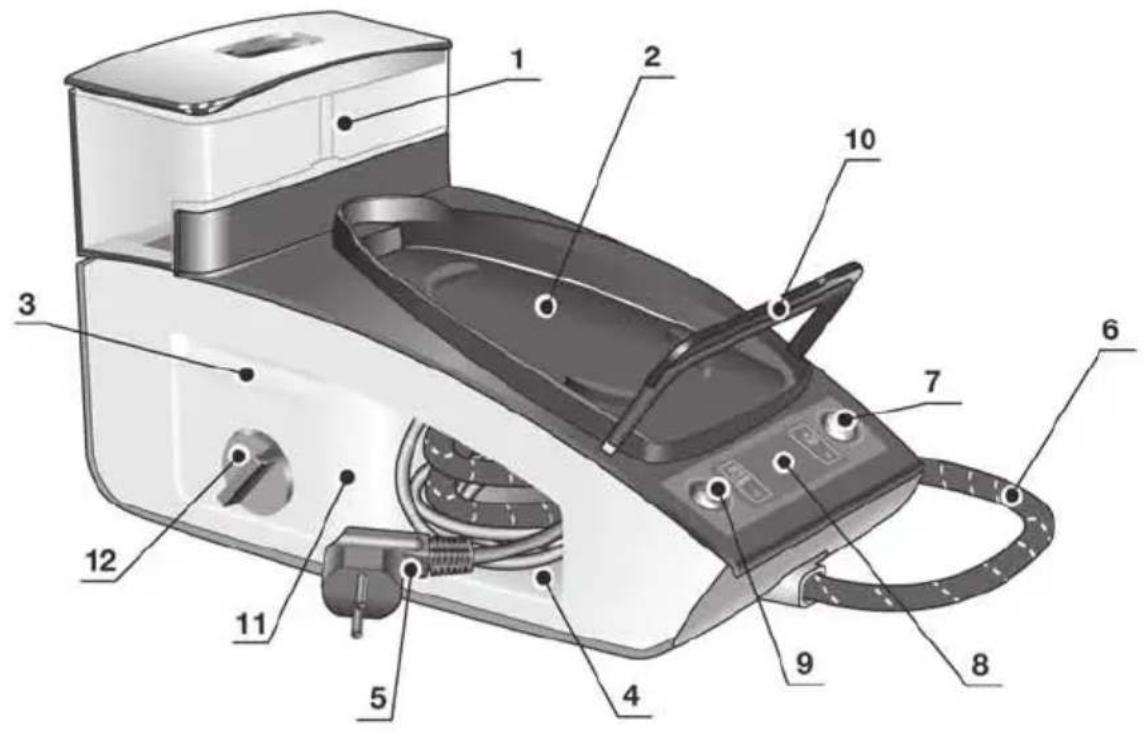
- "Energy Saving" button (green)
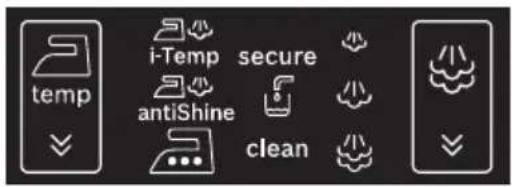
- Display
- Illuminated main power button (red)
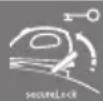
- Iron fixation system "secureLock"
- Housing with internal steam generator
- Descaling filter
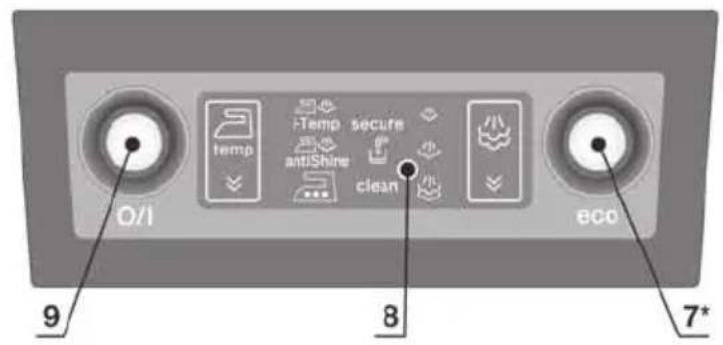
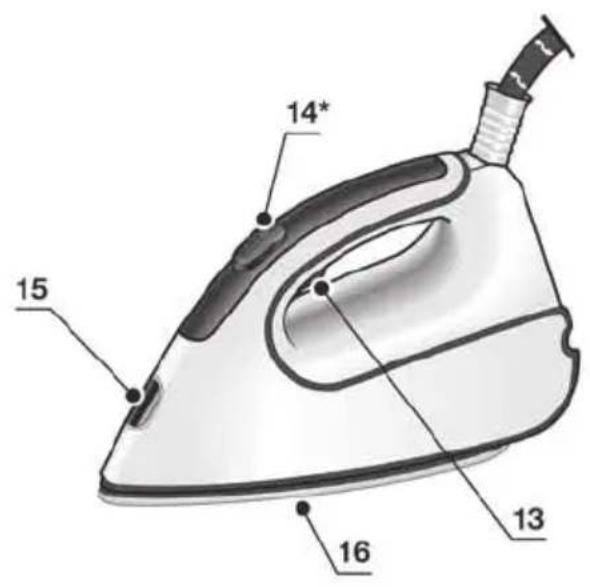
- Steam release button
- Steam release button "XTRM"*
- Iron pilot light
- Soleplate
-
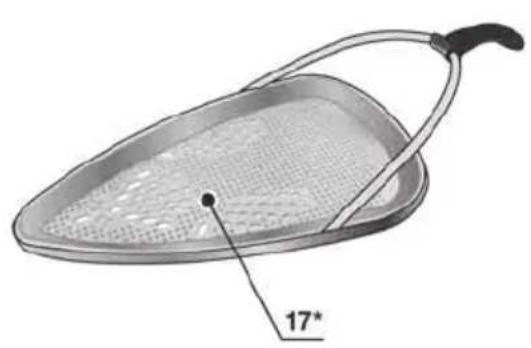
Fabric-protection soleplate cover*
-
Model dependent
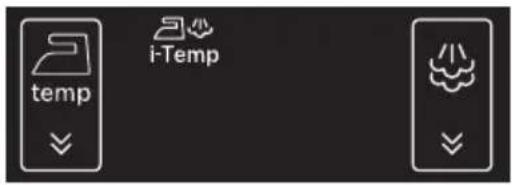
“i-Temp” function

This steam station has a unique "i-Temp" function. When switching on the appliance it automatically sets an appropriate combination of temperature and steam, which is suitable for all fabrics that can be ironed.
The "i-Temp" function prevents clothes from being damaged due to an unsuitable temperature being selected.
The "i-Temp" function does not apply to fabrics that cannot be ironed. Please check the garment care label for details or try ironing on a part of the cloth not visible normally.
"antiShine" function

This steam station has a unique "antiShine" function. If this function is selected and the steam release button (13 - 14^*) is regularly pressed, the risk of shiny marks on the garment due to the ironing is reduced.
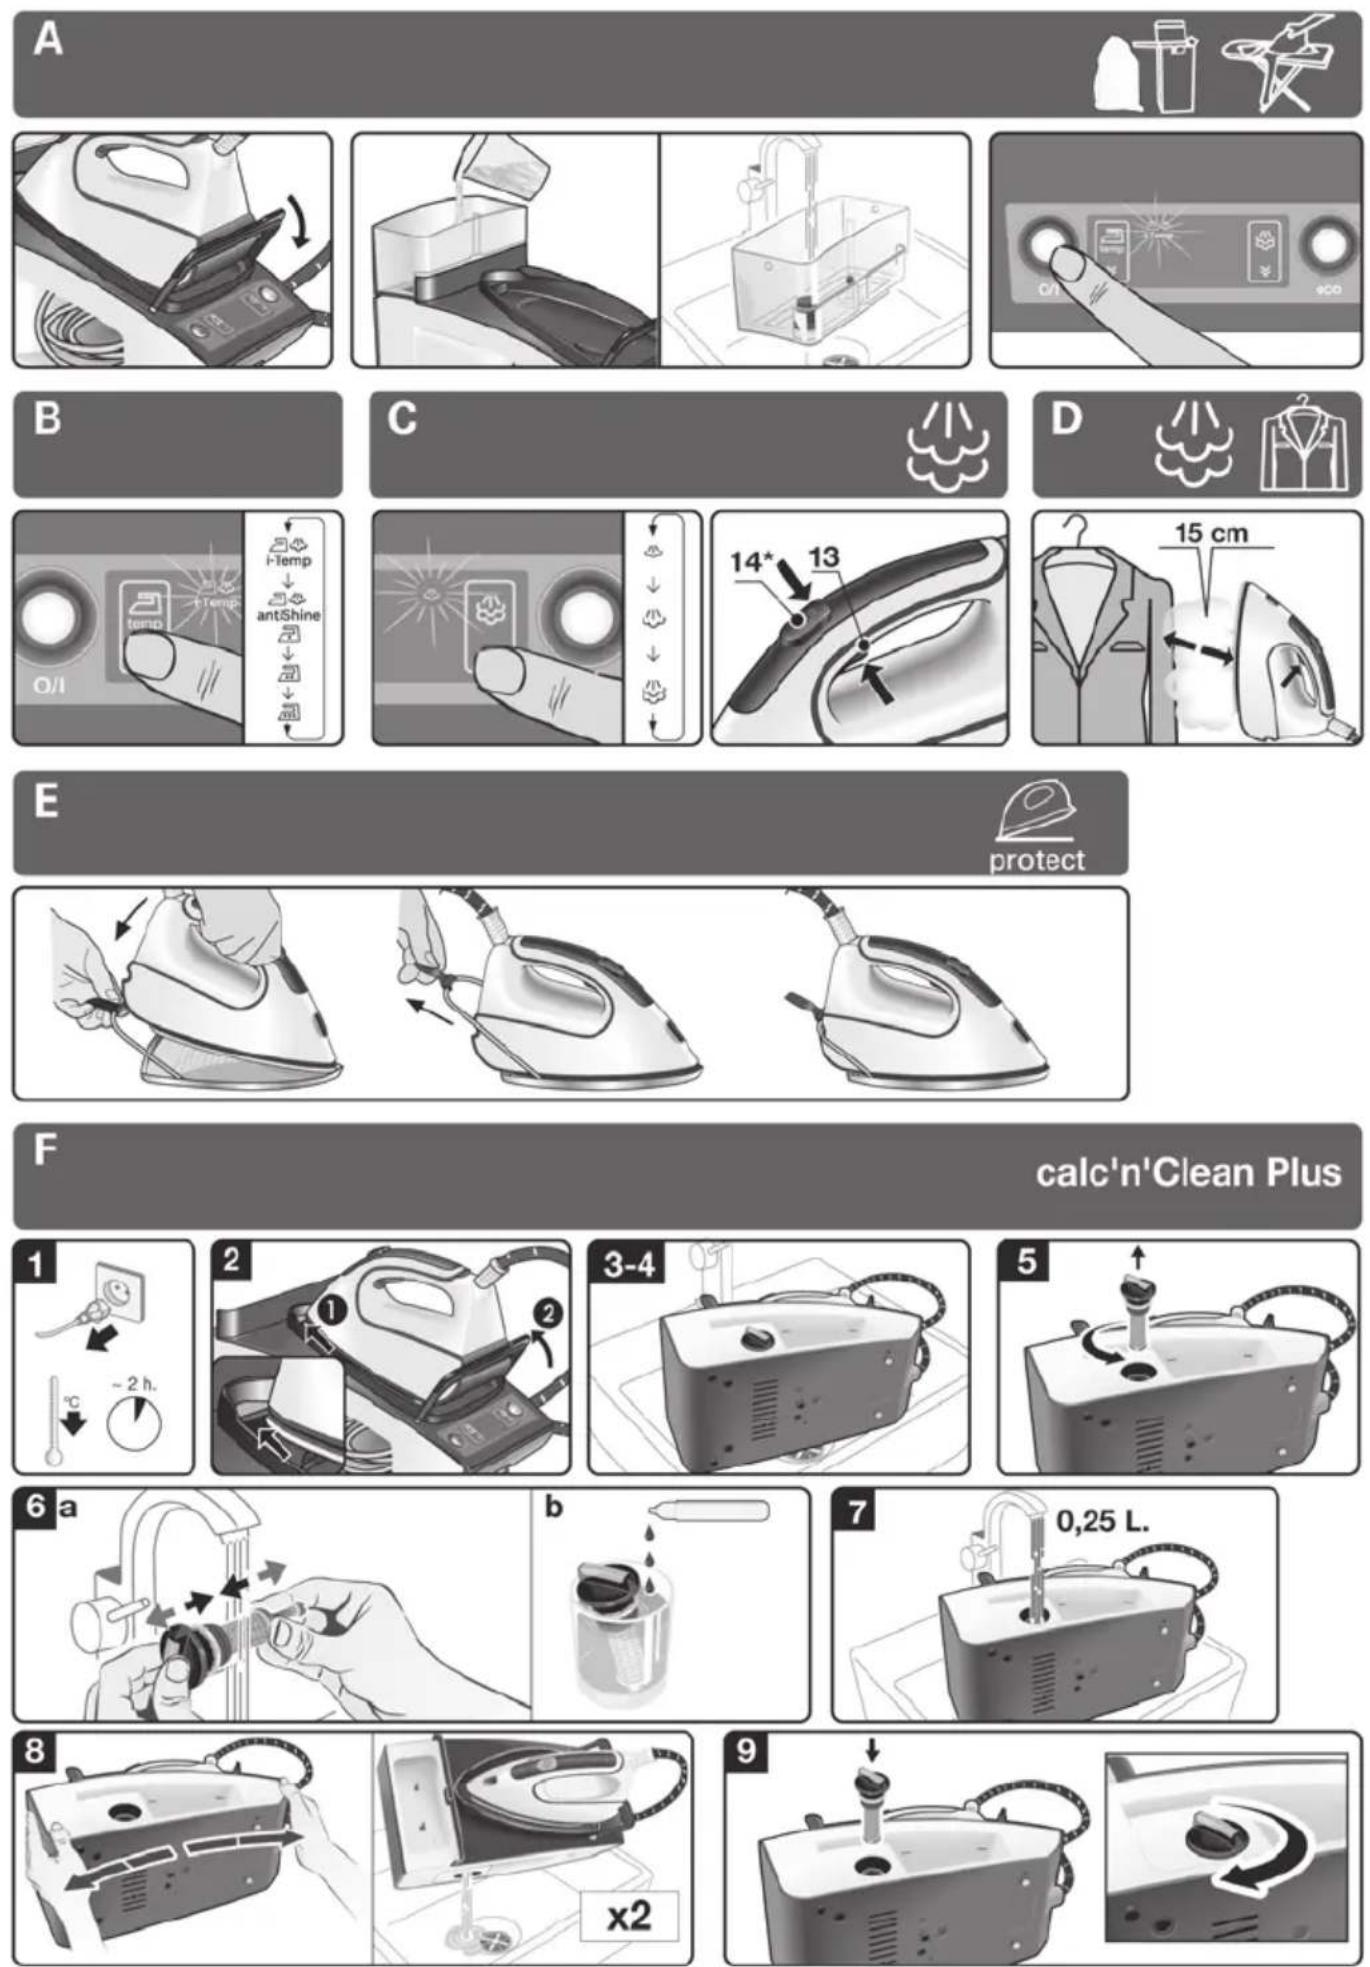
How to use the steam station

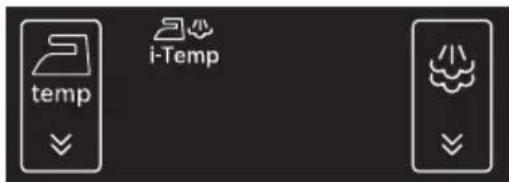
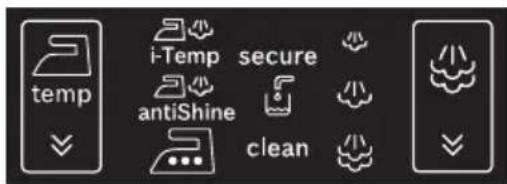
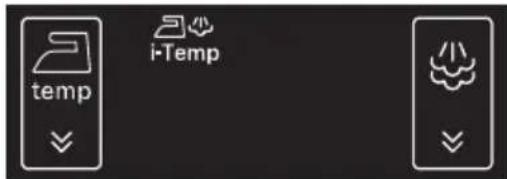
- When the steam station is plugged in and main power button set to the "on" position (button illuminated), the display (8) lights up and shows all icons for 2 seconds.
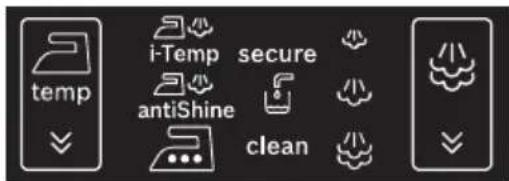
- After that time, the appliance shifts automatically to the "i-Temp" setting. The icon will flash until the temperature and steam settings are reached.
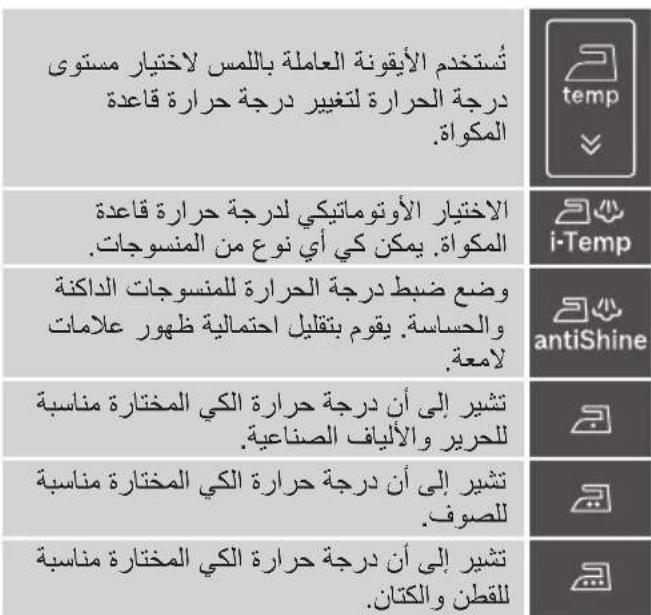
3. Temperature settings:
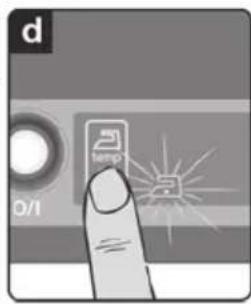
| temp | Temperature level selection tactile icon is used to change the temperature of the iron soleplate. |
| i-Temp | Automatic temperature selection of the iron soleplate. It is suitable for any type of fabric which can be ironed. |
| antiShine | Temperature setting for dark and delicate fabrics. Reduces the risk of shiny marks. |
| Indicates that the selected ironing temperature is suitable for silk and synthetic fabrics. | |
| Indicates that the selected ironing temperature is suitable for wool. | |
| Indicates that the selected ironing temperature is suitable for cotton and linen. |
To change the temperature of the soleplate, touch
the icon on the display (8) repeatedly. The iron runs through the following cycle:

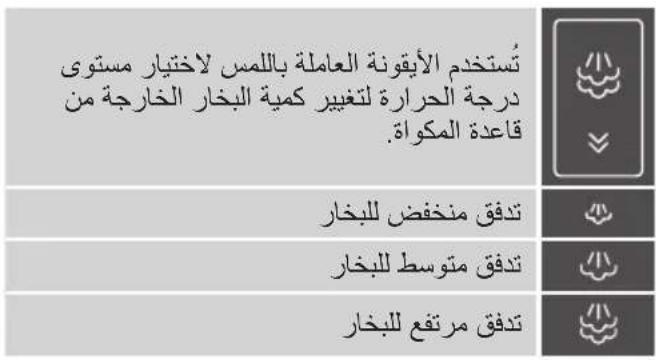
4. Steam settings:
| Steam level selection tactile icon is used to change the amount of steam coming out of the soleplate. | |
| Low steam flow | |
| Medium steam flow | |
| High steam flow |
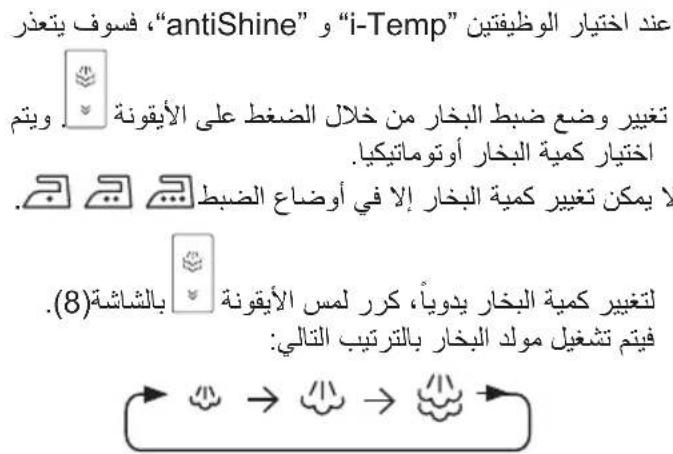
When "i-Temp" and "antiShine" functions are selected, it is not possible to change the steam
setting by pressing the icon. The steam amount is automatically selected.
Only on settings it is possible to change the steam amount.
To change the amount of steam manually, touch the
icon on the display (8) repeatedly. The steam generator runs through the following cycle:

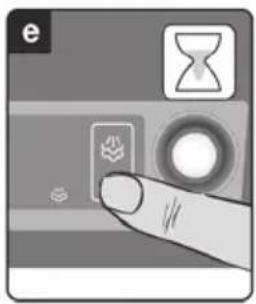
The selected icon flashes until the pressure corresponding to each steam level is reached.
Steam is now ready to be released by pressing the steam release buttons (13 or 14^* ).
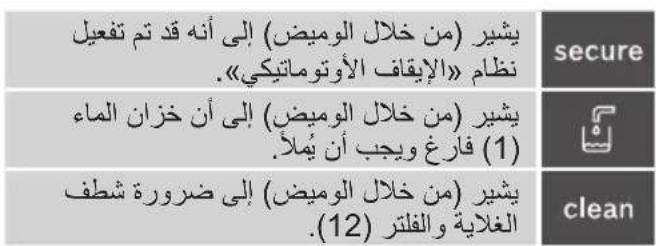
5. Other indications:
| secure | Indicates (flashing) that the auto shut-off system has been activated. |
| Indicates (flashing) that the water tank (1) is empty and must be filled. | |
| clean | Indicates (flashing) that the boiler and the filter (12) must be rinsed. |
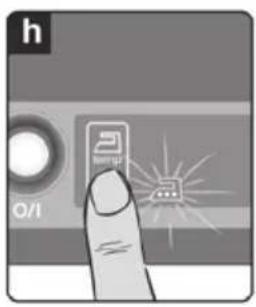
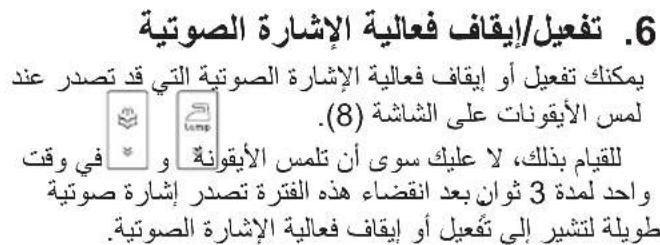
6. Beep activation/deactivation
You can activate or deactivate a beep which may be heard when touching the icons on the display (8).
To do this, simply touch the and icons at the same time for 3 seconds. After this time, a long beep will be emitted indicating that the beep has been activated or deactivated.
A
Preparations before ironing
For the details of the following actions, please see the related chapters of this user manual.
- Release the iron from its fixation system (10) by pulling the lever located at the heel of the iron backwards.
- Remove any label or protective covering from the soleplate (16).
- Place the appliance horizontally on a solid, stable surface. You may remove the iron pad (2) from the appliance and place the iron on it on another solid, stable, horizontal surface.
- Fill the removable water tank (1). If the tank is removed, three beeps may be heard.
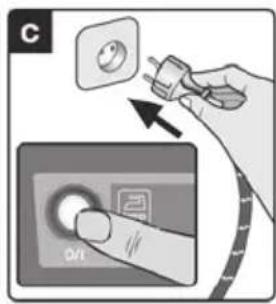
- Unwind the mains cable (5) fully, and plug it into an earthed socket.
- Set the main power button (9) to the on position (illuminated in red).
- The temperature and steam level automatic selection function will be selected by default.
This allows you to start ironing without selecting the steam or temperature levels.
If needed, select your preferred setting manually by touching the tactile icons on the display (8).
The selected temperature and steam icons will stop flashing after a time, indicating that the appliance is ready to use.
Remark:
The steam generator will take more time to generate steam only on initial heating up, or after performing the de-scaling operation (calc'n'Clean).
When water is already present in the steam generator during regular use, heat up time to reach the operating temperature will be faster.
- This appliance has a built-in water level sensor which shows when the water tank (1) must be filled.

The icon will flash when the water tank is empty (three beeps may be heard).
Important:
- Normal tap water can be used.
To prolong the optimum steam function, mix tap water with distilled water 1:1. If the tap water in your district is very hard, mix tap water with distilled water 1:2.
You can inquire about the water hardness with your local water supplier.
- The water tank (1) can be filled at any time while using the appliance.
- To avoid damage and/or contamination of the water tank and the boiler, do not put perfume, vinegar, starch, descaling agents, additives or any other type of chemical product into the water tank.
Any damage caused by the use of the aforementioned products, will make the guarantee void.
- Do not use condensation water from tumble dryers, air conditioning systems or similar. This appliance has been designed to use normal tap water.
- The iron is not designed to rest on its heel. Please always position it horizontally on the iron pad (2).
- The iron pad can be placed into the specially designed recess on the appliance or somewhere suitable alongside the ironing area.
Never rest the iron on the appliance without the iron pad!
- During its first use the iron may produce certain vapours and odours, along with white particles on the soleplate, this is normal and will stop after a few minutes.
- While the steam release button is pressed, the water tank may produce a pumping sound, this is normal, indicating that water is being pumped to the steam tank.
B
Setting the temperature

By default, the steam station automatically chooses the "i-Temp" temperature setting. If necessary, the temperature setting may be modified and adapted to your needs.
- Check the ironing instruction label on the garment to determine the correct ironing temperature.
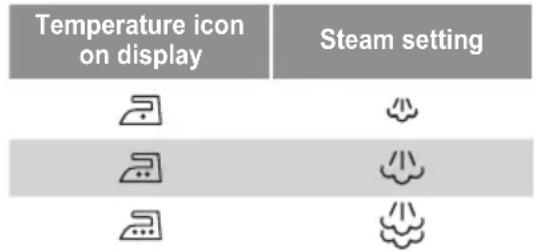
- Select the required ironing temperature setting:
Temperature icon on display
Suitable for:

any type of fabric which can be ironed.

dark and delicate fabrics. Reduces the risk of shiny marks.

synthetics.

silk - wool.

cotton - linen.
- The selected temperature icon will flash while the soleplate (16) is heating and will stop flashing as soon as the soleplate has reached the selected temperature.
Tips:
- Sort your garments out based on their cleaning symbol labels, always starting with clothes that have to be ironed at the lowest temperatures.
- If you are not sure what the garment is made of then begin ironing at a low temperature and decide on the correct temperature by ironing a small section not usually seen when worn.
C
Ironing with steam

The steam control is used to adjust the amount of steam produced when ironing.
By default, the steam station automatically chooses the "i-Temp" steam setting.
The steam setting can be changed by the user by changing the temperature. The steam station will propose the suitable steam level automatically.
If necessary, the steam level can be adapted to your
needs by touching the icon on the display (8).
The selected icon flashes until the pressure corresponding to each steam level is reached. Steam is now ready to be released by pressing the steam release buttons (13 or 14^* ).
Attention:
- When ironing on a lower temperature setting, only press the steam release button (13) for a few seconds at a time.
If you find that water is dripping out of the soleplate, set the temperature to a higher position (take care that the garment can be ironed on this heat temperature setting). - At the beginning of each use, it is possible that drops of water will be dispensed alongside steam. Therefore, it is advisable to try the iron on the ironing board or a piece of cloth to start with.
Tip: for better ironing results, iron the last strokes without steam to dry the garment.
“pulseSteam” function

This appliance has a special function for tackling difficult creases. The "pulseSteam" function helps soften stubborn garments like jeans or a linen tablecloth faster.
When the steam release button is activated, the steam generator will release three powerful shots of steam so that the steam reaches even deeper into the fabrics.
- Set the temperature to the setting.
- Press the steam release button (14^*) on the top of the handle.
or (model dependent)
Quickly press the steam release button (13) on the bottom of the handle twice (double-click)
Remarks:
- It is possible to stop the shots of steam by quickly pressing the steam button again.
- Some water drops may appear when you use the "pulseSteam" function for the first time. The water drops will disappear after you have used the function for some time.
Ironing without steam

This enables the iron to be used for dry ironing.
Begin ironing but without pressing the steam release buttons (13 - 14^*)
D
Vertical steam


This can be used to remove creases from hanging clothes, curtains etc. It cannot be used on a synthetic setting for delicate items.
Warning!
- Never direct the steam jet at garments that are being worn.
-
Never aim the steam at people or animals.
-
Set the temperature to the setting.
- Hold the iron in an upright position setting 15cm away from the garment being steamed.
- You can steam iron curtains and hanging garments (jackets, suits, coats...) by placing the iron in a vertical position and pressing the steam release button (13 or 14^* ).
"Intelligent steam" function
(Model dependent)
This system has intelligent steam control, which, after releasing the steam release button, provides a small amount of additional steam.
The additional steam can always be stopped by briefly pressing the steam release button once again.
Energy saving
"eco" button


(Model dependent)
If the "Energy saving" button (7) is switched on, you can save up to 25% of the energy and 40% of the water consumption (^*) , and still achieve good results when ironing most of your garments.
It is advisable to use the normal energy setting only for thick and very wrinkled fabrics.
(^*) In comparison to the maximum setting.
Note:
If you work with the "Energy saving" function, the variable steam regulation and temperature regulation can still be used as recommended.
"secure" auto shut-off

(Model dependent)
If during ironing, the steam release button (13-14*) on the iron handle is not pressed for a certain length of time (8 minutes), the steam station will automatically switch off.
The "secure" icon will flash when auto shut-off has been activated (three beeps may be heard).
To switch the steam station back on, press the steam release button again.
E
Fabric protection soleplate cover
protect
(Model dependent)
The fabric-protection soleplate cover is used for steam ironing delicate garments at maximum temperature without damaging them. Use of the soleplate cover also does away with the need for a cloth to prevent shine on dark materials.
It is advisable to first iron a small section on the inside of the garment to see if it is suitable.
To attach the soleplate cover to the iron, place the tip of the iron into the end of the soleplate cover and pull the elastic strap over the lower rear of the iron until it fits tightly. To release the soleplate cover, pull the elastic strap and remove the iron.
The fabric-protection soleplate cover may be purchased from the customer service or specialist shops :
Accessory code (After-sales)
Name of accessory (Specialist outlets)
571510 TZ20450
F
Dscaling the filter and the boiler

calYClean
(calc'nClean Plus)
To extend the life of your steam generator and to avoid any build up of scale, it is essential that you rinse out the filter (12) and the boiler after several hours of use (approximately after 50 hours). If the water is hard, increase the frequency.
Do not use descending agents for rinsing out the boiler, as they could damage it.
If the "clean" icon flashes, this indicates that the boiler must be rinsed (three beeps may be heard). Please proceed as follows:
- Check carefully that the appliance is cold and unplugged for more than 2 hours, and that the water tank (1) is empty.
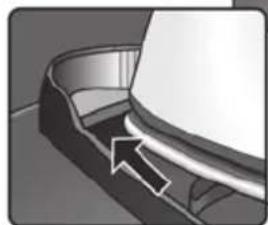
- Fix the iron to the stand by inserting the tip of the iron into the front slot and moving the fixation lever (10) against the heel of the iron.
- Place your appliance over a sink or bucket.
- Lean the appliance on the opposite side of the filter opening.
- Unscrew the filter (12) and take it out.
- To wash the filter, you may:
a. Place the filter under the water tap and wash it up until calc residues are removed. Squeeze the filter as indicated in the picture F.
b. Immerse the filter in tap water (250ml) mixed with a measure (25ml) of descending fluid.
The descending fluid can be obtained from our Aftersales Service or Specialist outlets:
Accessory code (After-sales)
Name of accessory (Specialist outlets)
311144 TZ11001
- Holding your steam generator in the lateral position and using a jug, fill the boiler with 1/4 litre of water and replace the filter.
- Shake the base unit for a few moments, unscrew the filter again and empty the boiler completely over a sink or bucket.
For best results, we recommend that this operation is performed twice.
Important: before re-closing, make sure no water remains in the boiler.
- Replace and tighten up the filter.
To reset the "Clean" counter, switch the station off twice, keeping it off for at least 30 seconds each time.
(on 30s off on 30s off on)
G
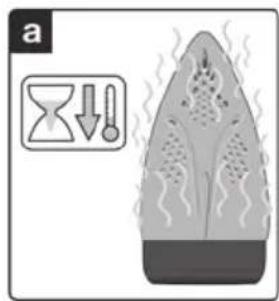
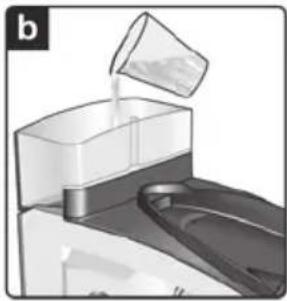
Rinsing the iron steam chamber
Caution! Risk of burns!
This procedure helps to remove scale particles from the steam chamber.
This cleaning procedure may be performed occasionally (approximately once a year), when after a long period of use with very hard water, scale particles start to come out of the soleplate.
a) Ensure that the iron has cooled down.
b) Fill the tank with tap water.
c) Plug in the mains cable and set the main power button (9) to the "l" position, (illuminated in red).
d) Set the temperature to the setting.
e) Set the steam setting to and wait until the icon stops flashing.
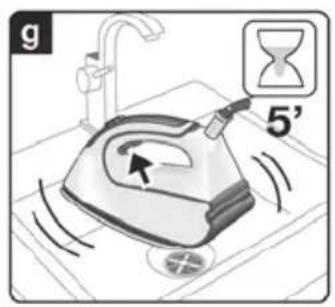
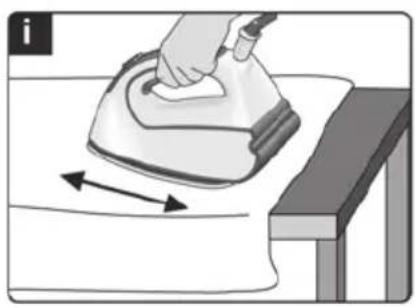
f) Hold the iron over the sink or a container to collect the water.
g) Press the steam release button (13) and gently shake the iron. Boiling water and steam will be released, carrying scale and or deposits that might be inside. This could take approximately 5 minutes.
h) Set the temperature to the setting, without pressing the steam release buttons (13 - 14^*) The water in the steam chamber will start evaporating. Wait until all the water inside the chamber has been evaporated.
i) To clean the soleplate, immediately rub off any residue by running the hot iron over dry cotton cloth.
Cleaning & Maintenance

Caution! Risk of burns!
Always unplug the appliance from the mains supply before carrying out any cleaning or maintenance operation on it.
- After ironing, disconnect the plug and allow the appliance to cool down before cleaning.
- Wipe the housing, handle and iron body with a damp cotton cloth.
- If the soleplate is soiled with dirt or scale, clean it with a damp cotton cloth.
- Never use abrasive products or solvents.
H
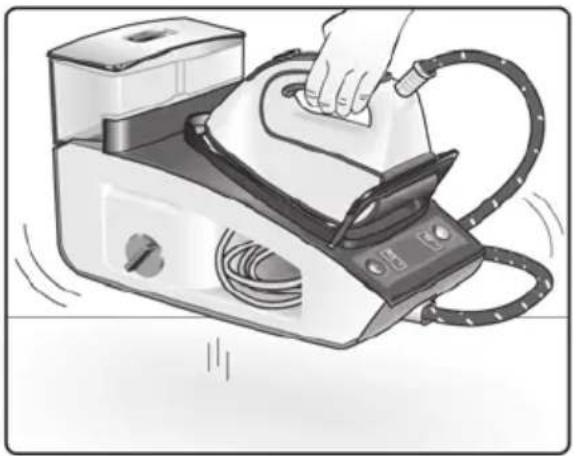
Storing the appliance
- Always allow the appliance to cool down before storing it.
- Set the main power button to the "0" position (the red light will go off) and disconnect the mains cable.
- Empty the water tank.
- Place the iron on the iron pad (2), standing on the soleplate, and fix it by inserting the tip of the iron into the front slot and moving the fixation system lever (10) against the heel of the iron.
- Store the mains cable (5) and steam hose (6) in the storage compartment (4). Do not wrap the cords too tight.
- Hold the iron's handle when moving the appliance, as shown in figure H, or use the carrying handles (3) on the sides.
Disposal
Our goods come in optimised packaging. This basically consists in using non-contaminating materials which should be handed over to the local waste disposal service as secondary raw materials. Your local town council can give you information about how to dispose of obsolete appliances.
This appliance is labelled in accordance with European Directive 2012/19/EU -concerning used electrical and electronic appliances (waste electrical and electronic equipment WEEE).
The guideline determines the framework for the return and recycling of used appliances as applicable throughout the EU.
Trouble shooting
Problem Possible causes Solution
The display does not react when touched.
-
Dirt on the display.
Fingers too cold. -
Clean the display with a damp cotton fabric (not too wet).
Warm your fingers a little bit and try again.
"secure" icon flashes
The steam release button (13) on the iron handle has not been pressed during the last 8 minutes, and the auto shut-off system has been activated.
- Press the steam release button again to switch the steam station back on.

icon flashes. Water tank is empty and must be filled.
- Fill the water tank.
"clear icon flashes.
- Boiler and filter must be rinsed. - Rinse the filter and the boiler according to the cleaning instructions in this manual (see section F).
When touching the display, the beep cannot be heard.
- The beep has been deactivated. - Activate it according to instructions in this manual.
The steam generator does not come on.
-
There is a connection problem.
-
Check the mains cable (5), the plug and the socket.
The iron does not heat up.
-
The main power button is not switched on.
-
Set the main power button (9) to the "I" position (illuminated in red).
The iron begins to smoke when switched on.
-
The main power button is not switched on.
-
Set the main power button (9) to the "l" position (illuminated in red).
The temperature is set to a low position.
- Set the temperature to the desired position.
Water flows through the holes on the soleplate.
-
During first use: certain components on the appliance have been lightly greased at the factory and may produce a little smoke when initially heated.
-
This is completely normal and will stop after a short while.
-
During subsequent use: the soleplate may be soiled.
-
Clean the soleplate according to the cleaning instructions in this manual.
Dirt comes out through the soleplate.
-
The steam function is being used before it has reached the correct temperature.
-
Reduce the steam flow when ironing at low temperatures.
-
The water is condensing inside the pipes because steam is being used for the first time or has not been used for a long time.
-
Point the iron away from the ironing area and press the steam release button until steam is produced.
The steam generator contains too much scale.
-
Clean the boiler as described in section "calc'nClean Plus" (F).
-
There is a build up of scale or minerals in the steam tank.
-
Use tap water mixed 50% with distilled or demineralised water. To prolong the optimum steam function, mix tap water with distilled water 1:1. If the tap water in your district is very hard, mix tap water with distilled water 1:2.
Chemical products or additives have been used.
- Clean the soleplate with a damp cloth.
The iron does not produce any steam.
-
The boiler is not switched on or the water tank is empty.
-
Set the main power button (9) to the "l" position (illuminated in red), and/or fill the water tank.
The steam regulation is set to the minimum position.
- Increase the steam flow (see section C).
| Problem Possible causes Solution | ||
| The ironed garment turns dark and/or sticks to the soleplate. | ·The selected temperature is too high and has damaged the garment. | ·Select a suitable temperature for the material being ironed and clean the soleplate with a damp cloth. |
| The soleplate turns brown. | ·This is a regular consequence of usage. | ·Clean the soleplate with a damp cloth. |
| The appliance makes a pumping sound. | ·Water is being pumped into the steam tank. ·Water tank (1) is not correctly inserted in the housing. ·The sound will not stop. | ·This is normal. ·Adjust the water tank correctly. ·If the sound will not stop, do not use the steam generator and contact an authorised technical service centre. |
| Loss of pressure during ironing. | ·Steam release button activated during a long period of time. | ·Use the steam release button at intervals. This improves the ironing result as the textiles will be dry and stay smooth better. |
| Water spots appear on the garment during ironing. | ·May be caused by steam condensed on the ironing board. | ·Wipe the textile cover of the ironing board, and iron the spots without steam to dry them. |
| Water spots appear on the garment during use of the “pulseSteam” function. | ·Water spots are caused by steam condensation in the hose when cooling down after use. | ·Water drops stop coming out of the soleplate after using the “pulseSteam” function for some time. |
| The hose gets hot during use. | ·This is normal. It is caused by the steam passing through the hose during steam ironing. | ·Place the hose on the opposite side so that you cannot touch the hose during ironing. |
| Water leakage from the boiler. | ·Filter (12) located at the side of the appliance is loose. | ·Tighten up the filter. |
| The iron does not stop steaming after placing it on the pad (2). | ·“pulseSteam” function activated by double click. | ·Just press the trigger once again and the iron will stop steaming at once. |
If the above does not solve the problem, get in touch with the authorised technical service.
You can download this manual from the local homepages of Siemens.
5. Andre angivelser:
Función "Intelligent steam"
(Según el Modelo)
PpOeToiuaoic Tpiv To OIdepwma
Tia TepiooTepeC TAnpoopieC TAvw OTIG TapaKaTu evpyeic, avatpeTe OTA OXETIKA KEPAAia Tou TapovTOc EYxEipoiou.
"pulseSteam" Özelligi

Dahn npncptpi CTbopeHO BKNHouHO dJnnobyTOBOro BNKOpNCtaHH Ta He MoXHaBNKOpNCTOBaTn DnBnPo6HNuNX ciine.
DAnHn npncptpi CJIg BnKOpncTOByBaTNI TIIbKn 3a npn3HaueHHm,TO6To,ДЯ npacyBaHH.
BukopncTaHHa 36ydb-kaIOIO IHWOIO MeTOO BBaxaetbcra HeDopeuHm I TOMy He6e3neuHm.
Bnpo6HnK He Hece BiINoBIaIbHocTi 3a 6yDb-aki NOxKOdXeHHra, CnpuHHeHi HnPaBnIbHM u HedeOpEHMM BkOpNCtAHm.
3araJIbHI npaBnla texhikn 6e3neKn
-Пд уас викорисання пистою OTbip, со пиз nauseй дяпомьання бака naporehepatopa тдя видалени 3 Нбого накни, 3нaxODNTbcя пд ТИСКOM, TOMу ИОТ He можна ВIDКрВаTN.
He 3aIIwaIte yBIMKHeHy y po3etky npacky6e3 harJy.
Bidknioitb npncpti BID eNektpomepekepeTtM, k HanoBHHTn Ioro BOIOO abOBnIHTN 3aIIuK N BoDn nicJy BNkOpNCtAHHnPaackn.
- Даний писстри сдд Викоростовыbatи ТарозMiшуbatи на CTiКiн NOBepxhi.
- YKsqo Bn cTabnte Noro Ha NiDcTaBky, nepeBipTe, 06 nobepxHna Kki CTOITb NiDcTabka, bynactiKOIO.
He KopncTyIeTcI npackoIO, kso BOHaJaIaIa, kso Ha Hi e BnDnMI O3NaKInOoKoJKeHb Ta kso 3 Hei Teue BoDa.Ipeed NOBTOpHm BnKOpNCTaHHaM npackycJIid nepeBipITn B aBTOpN3OBaHOMy cepBic-zeHTpi.
Kabel KINBHeHnI cboI O npIcTpoH HeMOKe 6yTN 3amHeHn KopncTyBaUeM. KaOka6eIb NowKOJKeHO a6o CnID 3aMHNTu,3aHa NOBHHa npOBODHTsc TIlbKn BaBTOpN3OBAHOMy cepBic-TeHTpi.
-Дани писстри може викорисоватия діт biomn BiD 8 рokiv ta OCobamN 3обмженин MФi3nHmN, ceHCOPHmNч MeHTaJIbHmN 3di6noCTaMn abo OCobamN, lo He MaIOt bdoCTaTHbOro DoCBiDy Ch 3HaHb, 3a yMOBn nonepedhboI OTPMaHn IHCTpyKtaxy 3 Be3neuHOI ekCnPyatauПпрstpoTo Ta po3ymInHЯ NOB'raHOI 3 noRo BvNKopnsTahnHЯн He6e3neKn a60 3a yMOBn HarJy 3 Boky BiIDNoBidaIbHOI OC6n. He do3BOJnTe dITram rpatncr 3 eIektponpncTpoem. He donyckaetbcr npOBeDeHHЯ npOceDyp 3 OUnIeHHa Ta DOgJMy 3a npcTpoEm dITbMn Be3 HaJIpy dopoclnx.
CniikkyiTe, 06 npacka Ta 3hnp 3naHOpNnncy HneOcKHomy dIeM MoJOnSe 8 pokB Micci, KOnn npncTpii PiKnUoyenn do eNeKtpomepexi abo oxolodKyetbcra.
YBAGA. Rapya noBepxHn. IiD yac BnKOpncTaHHn noBepxHn MoKe po3irpiTnca.
-Перед ТИМ,Як пдкночип рисрийdoелктомереши,пераовп,шпогуразчму BiДnobада нани,за3нayehiHa Tablunu3xХapakTepeNTKamn.
-Дани npicpii cnii nkiuohatn do 3aemnehoi po3eKn.у pa3i BnKOpncTaHnnoDobKyBaHa, nepeBipTe,poB HbOMy e DBOONpHa po3eTKa Ha 16A 33a3emHeHHm.
- Kaio 3anobixnK npncTropo0p03nnaBnEbC8, noaIbwe BnKOpNCtAHHnPnpCTpoHo HEmoXJIVe. Uo6 npncTpi3HOBy mIr HopMaJbHO npaOBoTu, IorocniD BiHeCTN Do aBTOpu3OBaHOrO cepBic- ceHTpy.
Uo63an06irtn TmuaocOmy naiHHH HAnpyu a6o 6IImaHHIO OCBiTIOBaIbHx npncTpoIB y pa3i BHNKHeHH HeCnpnRTINBHX yMOB B eJeKTpomepexi, npEHynte npacky do eJeKTpomepexi 3 MaKcImaJIbHM onopom0.47 O.y pa3i noTpbeN KopnctyBauch Moxe 3BepHyTncaJdo eHepronocTaaybHOI KOMnaHII 3a IHOpMaicio npo onip Mepexi y Micci 3'EdHaHH
Hikon He TpmaTe npncpti nKpaHom,io6 Hbpatn B Hboro BoNi.
JaKuo Bam 3daeTbcra, 10 npncTpii noWkoJxHn, HerauHO BiKKnIOUHTb Ioro BID eJeKeTpOpepexi. TaK camo BiKKnIOUaHte Ioro BiD MepeXi opa3y nicna BUKOPNCtAHHa.
He MoXHa BnTaryBaTu n TTeNceJIb 3 pO3eTKNCMkaIOuH 3a Hyp.
Hikon He 3aHpyoIte npacky uaporehepaTop y Body a6o B iHsi piDHH.
He 3aIiwaTe npicpii niD iieIOHecpnpTINBnx noroHNx yMOB (nID DOUeM,Ha COHci,Ha Mopo3i ta iH.).
Baxjlnbo!
Дани npicpii niid yac BnKOpncTahnpo3irpibaetcdo BnCOKoi Tempepatyn TareHepye napy, ue MoKe npnsBecTu Do onikib BiKOHTaKy 3 rapaUMN NOBepxHmN Yu napoU yBnnaDky He HeDouilbHorO BnKOpncTahnH.
Y npoueci BnKOpncTaHHa IHaHr dIpaN,napoBa CTaniz,MeTaNBeBnactnHaB OCHOBi 3HIMHO iNCTabKn dIy npack (2) iOCO6nBO cama npacka MoKytb Harpibatnc. Lc HopmaJIbHo.
HikonHe cnpaMOByTe npy Ha IIOeN TbapnH.
CniikyuTe, uo6 uHyp He Topkabcra rapyoi niOuBN npackn.
MaTe Ha yBa3i, 0o nCJra BiDnyckaHHK HONKn BnNyCKy napcncTeMa MoKe npOIOBkyBaTn noDaHHn napn npotrrom ige KInbKOx ceKyHd. Lc e HopMaJIbHIM.
Onnic npnctpo
1.3HIMn pe3epByap nBOn
2.3HIMHa NiDCTABKa DnI npackN
3. Pучкдпя посуваньnapoBoi cTaHcii
4. BiDineHHn 36epirAHn WnAHy nna np Ta Ka6eIO XnBHeHH
5.Ka6eIbKuBneHHra
6.Шланг дя napи
7.Khonka《Ehepro36epeXeHHa》(3eHa)
8.Диспел.
9. TOnOBHn Bumkauch i3 niDCbiyBaHHm (YeboHH)
10. Cnctema φikcaui npacku "secureLock"
11. Kopnyc i3 naporehepatopom
12. ΦínbTp dπλ BνdαJIeHŋ ḤaKɪny
13. Khonka Bnynycky napu
14. Khonka Bùnúcái napi 3 bóyHKüeJIO XTRM
15. CbITIOBn IINKATop npacn
16.Пидашва
17. TkaHHnH
- Y DejKnX MoJenJx
Функця i-Temp

IinCnnei (8) i Ha Hbomy BnpoDobx 2 cekyH, BnHO BcI CmBOJN.
2.Писяцboro intepBany npncTpni ABTOMaTHUHO nepemKHeTbca y pexm i-Temp.CnMBoJ 6NIMATME Do DOcRHeHHB Bu3HaueHoI DaHOO fYHKJIeIO TEMpepaTyPi Ta NiIdroTOBKn napn.
3. TemnepatypnH pexm:
6. YbIMKHeHH Ta BmKHeHH 3ByKOBOOr cnrHany
Bn moxete ybIMkHytn a6o BmKHyTn 3ByKOBn CnHaJ, 10 NyHae nD ac TopKaHHcMBOJIb Ha dncnnei (8).
IytpnmaTe ix npoobk 3 ckynd. Picra oBor npolyHaEOBRI 3ByKOBNI CnHaj, 00 Bkaye Ha yBIMKHeHHa H BIMKHeHHa 3ByKOBOrO CnHajy.
A
ПиДroTOВka ДО npacyBaHHa
Дя OТРИМАНЯ ДдАТКОВI iHФормaцii ILOD O BIKOHAHH HIXKHeHaBeDEHnx DiI DnB. BiNOBiHn P03dIn DaHOI IHCTpyKUJI 3 ekCnJyatauii.
- BiD'edhaIe npacky BiD cncTeMn fikcaii (10), NOTaRHyBwN DOHN3y BaXiNb, 1O yTpIMYe HxHIO qactInHy npackn.
- 3HIMITb 3 niOuBn (16) Bci eTnKeTKn Ta 3axnchy ynaKOBky.
- YctaHOBIb npicptpi ropn3oHTaIbHo HaMiCy Ta CTiKy NOBepxHIO.Bu MoKTe 3HrTn NiCTaBky Dna Ipackn (2) 3 npictpoH, NOKNaCTn II Ha IHsy MiCy, CTiKy, rOpN3oHTaIbHy NOBepxHIO Ta PO3MICTtHu HHi npacky.
- HanobHITb 3HIMn pe3epByap dna BoDn (1).JKUO pe3epByap BiDCyTHi, 3MOKeTe NOuyTu Tpu 3BykOBi CnHaII.
- NOBHicTIO po3ropHiB Ka6eJIb JxNBHeHHa (5) Ta NiDKNIOUHTb NOrO Do 3a3EmneHOi PO3eTKn.
- YctaHOBIb rOJIOBHN BUMKaU (9) Ha no3HaCy YyBIMKHeHOY (YBIMKHeTbCnIDCBiuyBaHH).
- 3a 3amOByBaHHm 6ynde AKTnBObHa ΦyHKiABTOMaTHHOro perynIOBaHHr TempepaTyPi ne pexmy noaui napu.
Lcdo3BOJNTb Bam po3noaTu npacybaHH6e3 o6paHH TeMnepaTyPhoro pexmMy Ta peXmMy noaui napu.
Y pa3i Heo6xHocTi 3aadaTe noTpi6He HanaWtBuHHa camOCTiHo, TOpKHyBUncRA Do BiNObiDHNxC CehCOPHX KHOK — CmMBOJIB Ha DnCnJIeI (8).
KoJIuYepe3 NeBnYac CmBOJIn, 0o BiIIOBiaIoTb 3aJaHr TempepaTyI Ta peXIMy IOnaHi napi, nepeCTaHyTB 6JIImMaTI, PpIJaD rOToBn Do BIKOpNCtAHHa.
PnimiTka:
Iaporehepatopy noTpi6Ho 6inbwe acy dny rehepyBaHHn npn niD vac nepworo harpiBaHHn a6o nicra BVKOHaHHn npoceDypu BndaJIeHHn HAKIny (calc'n Clean).
KoB npocci perynpHoro BnKOpncTaHHB naporehepatopi npucTyB Oda, Yac HarpBaHHd IdoCraHHeHH po6oOi Tempepatyn ckopooyetcbc.
8.Дани npicpiMae B6ydoBaHn daTynk pIBHbOHN,ЯKN CnHaJI3y ep Heo6xIdHicTB HANOBHeHHpe3epByapydNBoHN(1).
CnmboI 6JnMaE, KOJIpe3epByap IIN BODN oPOxHNI (MOXHa NOuyTu TPN 3BYKOBi CnHaJI).
Baxjlnbo!
- MoxHa BnKOpNCToBbATn 3BnUaHHy BOy 3 KpaHy.
Дя 6e3dOraHHOi pObTn Ta npoDobXeHHr TepmiHy cnYk6n naporehepatopy 6axaHo 3MiUyBaTN BOy 3 KpaHy 3 NCTuNbOBAHOIO BOYO y CnIBBiHOHeHHI 1:1. Jkso y BaWOMy perioHi BOa 3 KpaHa dYke jOpCTKa, 3MiUyTe BOy 3 KpaHa 3 NCTuNbOBAHOIO BOYO y cNIBBiHOWeHHI 1:2.
Ipo piBHeJ XOpCTKoCTI BOi MoXHa i3HaTnca y MicueBi BOOIOCTaJaIbHi KOMNaHII.
Hikon He cTaBte npacky Ha Kopnyc npncTpoo 6e3 nicTabKn dI npackn!
Piudnapepworo BnKOpncTaHHnpackn 3 Hei MOkytb BuxoHTn CneunphiHni 3anaxn Ta npapa,a 3 NiOuBn MOxyTB CnATNC6 bili nopoWuHKn. Lje e HopMaJIbHM RAUNEM, JKe npINHNtbcra 3a DekiIbKa XBJINH.
-ПдчacHaTnCKaHHK HONKN BUNyCy napN BIMoKeTe NOuyTN 3Byk NOMN ycepeDnHi npnstpoI.Le e HopMaIbHmMЯBnIeM Ta O3Naue, lo BoDa nepeKaUyETbcra do baky naporeHepaTopa.
B
PeyIIOBaHHaTeMnepaTpyn

3a 3amOByBaHHm npoBa cTahci ABTomTuHOBnBnbpac Temnepatypn pexim i-Temp.Y pa3i Heo6xidnocti BN MoKeTe 3miHTn Temnepatypn peXIM i HanaWtByaTN Noro 3a BnachHMn Notpe6amN.
- O3haHOMTeC3 HabeDeHIMn Ha etKeTci OJypeKoMeHdaIcIMy IooDo npacyBaHH, 06Bn3HaHTn Heo6XiHn TeMnepaTyHn peXHM.
2.Obepitbnotpi6Hy TemnepaTy npacyBaHHa:
Ipacynte, He HATnCKaOuH Na KHOPIK BUNyCky napi (13 Ta 14^*
D
BepTnkaJIbHa npa


DanyfuyHKciIO MoXHa BnKOpNCToBvBaTu DnBnBnDaJIeHHa 3MOpWOK Ha nIbIweHOMy OJra3i, Wtopax Too.
LIO cyHKUHO He MOXHa BnKOpNCTOByBaTu 3 peXNMOM npacyBaHHcNHTeTNKi Ni d Yac npacyBaHHa DeJIkaTHx TKAHN.
ybaral
HikonHe o6po6nTe ctpymom napn OJr, HndaryHTn Ha JIOJe.
HikonHe cnpMaOByTe napy Ha IIOeYn TBapuH.
- YctaHOBIb TeMnepaTyprHn peKIM
- TpmaTe npacky y BepTkaJIbHOMy noIoxeHHi Ha BiIcTaHi 15 cm BiI oJMy, kIy, o6pO6JIeTbcra napoI.
- 3aBicn Ta OJr Ha niiKax (niJxKaN, KocTOMn, NaIbTa Too) MoXHa npacyBaTN 3 napOIO, YtpMMyOuN npacky y BepTKaJIbHOMy NOJoxEHHi Ta HATNCKAOnu HA KNOpKy BInNyCky napu (13 afo 14^*
«Po3ymHa» cnCTema yTbOpeHnI napN
«Intelligent steam»
(удякnxMoTeJnx)
CnCTema ochaueha peryIaTOpom napu, 10 nicra HATNCKAHH KHOKN BInycky napu 3a6e3neyuEOdaTkoBn HeBeJNKn Jra O6'EM.
BunyckdoaTkoB0rnapmOme6ytN3ynHeHn y 6yDb-akn YacIe OndHM DoaTKOBnM HaTnCKaHHaM KhoNKn BUnycky napn.
KhoNka
«EHepro36epexeHnra


(eco)
(у дякх модях)
HaTnckaHnKHOJKn «Ehepro36epexeHHa》(7)
D03BOJRA CKOPOTNTN CNOXNBAHH EHEPII MAJKe Ha 25% Ta CNOXNBAHH BOIN MAJKe Ha 40%, (*) OTPMByOu npn cIbOMy kICHN pe3yNbTaT niD yac npacyBaHH 6iNbWocTi BnID OBaRy.
PekomeHdyTbcBnKOpncTOByBaTupeKIM npacyBaHH 6e3 eHepro36pepeKeHH TaibKn dI npacyBaHH TOBCTNX Ta dyKe 3im'ATnx TKaHH.
(^*) Y npiBHHH 3 HaiNtUxKHiIMpeXHMOM.
Pnmuitka:
Incnne He pearye Ha DOTNI.
-Диспел забрунен.
-Пальци занадтохолдNi
Блима сиmbол "secure".
- PpOraROM ocTaHHix 8 XbUNH Bn He HaTnCKaJn Ha KHOJIky BnNyCKy napi (13), po3aWoBaHy Ha pyuCi npackn, TOMy 6yJa aKTHOBaHa CnCTema ABTomaTuHOro BmNKaHHa.
OuNCTITb DnCnneBONrOHO (aNe He 3aHaTOMOKPOHO)6aBOBHHO CEPBeTKoHO.
- Tpoxn 3irpiinetaJIbciTa cnpo6yInTe 3HOvY.
- Pa3 HATNCiTb HA KHOKNy BUNyCKy nap, 06 3HOBy yBIMKHyTN npOBy cTAHciO.
Блимас сиMbON .Pe3epByap Дя ВОД nopoЖи, noro cnid HANOBHTN.
- HanobHitb pe3epByap dЯ BODI.
Bnmae CmBON clean
CniD onoNochTy6ak naporehepatopa Ta pinbtp.
- Ononochitb φinbtp Ta 6ak naporehepatopa,Як ce onncahOB daHIN IHcTpykui (po3dIN F).
Iiud doTkydo DnCnner He LyHae 3ByKOBn CnHaJ.
3ByKOBn CnHAn BmKHeHn. YbIMKHITb Noro, DToPmMyOuHcB Bka3iBOk daHOI IHCTpyKuii.
Naporehepatop He BMKAcTbcr.
-Прблеми3i3' endaHHaM.
-ПepeBipTe ka6eNBxuBnEHn8(5),wTeNCenb Ta po3eTKy.
Ipacka He HarpiBaTbcra.
-
He yBIMKHeHO KHONky roJIOBHorO BUMKaay.
-
YctaHOBITb rOJOBHn BmNKaU (9) Ha no3HaKy «I».
He yBIMKHeHO KHOIky roIOBHO BUMNKaHa.
-
YctahOBiTB roIOBHN BmNKaU (9) Ha no3HaKy «I».
-
O6paHOn Hn3bKm TeMnepaTpHn peXIM.
-
3aainTe nontip6Hn TemnepaTpyn pekm.
KoI npacky yBIMKHeHO,3 Hei iDe dM.
Piac nepworo BnKOpncTAHHJeAeKi Detani npnstpoHa 3aBoDi3MaUyOb, TOMiicnepworoHarpiBaHHra npack MoKe BnDInrTaNCHeBeJnKa KINBkICTb DmMy.
Lc a6conIOHO HOpMaIbHO Ta CKOPO npnnHHTbcra.
- Pn noJaIbIomega BnKOpIaTHHi: MOKnIBO, NiIOwBa 3a6pydHeHa.
OuictiB niDOWBy TaK, kCe OINCAHO B daHInHCTpykui.
Kpi3b OToBOp y niOuBi Teue BOda.
-Функя napи ВИКОРИСТОВЕТБСЕпег ТUM,ян naporehepatop po3irpiBcЯdo notpibHoi TeMnepaTyPn.
3MeHwItb noaCy npn niD hac npacyBaHHa 3 Hn3bKOIO TEMpepaTPOIO.
Boga kondehcyetbcrytp6kax, TOMy np BnKOpNCTOByeTbCByepwe a6o doBro He BnKOpNCTOByBaBC.
Cnpmynte npacky no3a 30Hy npacybaHHra Ta kibka pa3iB HATNCiTb Ha KHOKNy BUNyCKy napn, DOKN He NOUHe BNXODNTn napa.
- Y naporehepatopi yTBopnnoce 3a6araTo HAKINy.
OuHCTb 6ak naporehepaTopa TAK, k oncaHO b po3dini «calc'nClean Plus» (F).
3 OTBopIB nIOoBn BxOAnTb 6pyd.
- Y 6aky naporehepaTopa yTBopnBcra Haknn a6o MinepaIbHi BiKnaedHn.
BnKOpNCToByTe BDOy 3 KpaHa, 3MiuaHy Ha 50% 3 NCTNtBOaHO a6o DeminepaIi3OBAHO BOIO. IJa ONTImaJIbHOi PO6OTn I NOOBKeHr TepMHy cnyX6n napBoOI cyHKii 6axKaHO 3MiUyBaTu BOy 3 KpaHy 3 NCTNtBOaHO BOIO y cnIBiDNoWeHHi 1:1. JaKIO y BaWOMy perioHi BOa 3 KpaHa dYke XopCTKa, 3MiuyTe BOy 3 KpHa 3 NCTNtBOaHO BOIO Y cnIBiDNoWeHHi 1:2.
-Буно Викорпостанохimiihi3acobn a6o domiikn.
OuHCTITb nIOuBBy 3a DonomoroBOJoroi raHupKn.
Hikon He DoaBaTe y Body cTOpOHhi peOBNH.
Obune nHctpyKu nn no 6e3oNaChocn
Bo BpeMnIcNoJIb3OBAHnI OTBepCTne IJyUdaJIeHnI HaKINn IJIIn CInBa BoDbI naporehepaTopa HaxoINTcI NOd DaBJIeHNem I OTKpbIBaTb erO HeNb3J.
He octabnTe yTOr 6e3 npncMOtpa, noka OH BKJIouyeH B CeTb.
- Ipeed Tem, kak HanoHHTb np6op BOoI NII BblNTb OCTaTKN BObl nocJe erO hCNoJIb3OBaHn, BblTaUInTe wTeNCeIbHyIO BNkY n3 p03eTKN.
- Пибор Должен Истова Тбаяnomeша Тбая на устонь
ПОВЕРХHOCTN.
- Пи пошени пибopa на erо постаьу убдпесь, чтоберхноctь, на кOTOPОн haxODNTС рODSTaBka, уSTOnuBa.
He noIb3yItecb yTHOrom, ecn OH ypaI, ecn Ha HcBnHbI ABHbIe CneIbIOBpeJdeHnI INe cIIN OH npOnyckaet BODy. Ipeed BO306HOBJIeHNEM nCpONb3OBAHnI npnbopa erO heo6xoJIMO 6yJeT npOBepNTB BAHTOpN3OBAHHOM zEHTpe TexHnueCKoro obcIyKINBaHnI.
- Φнур питаня отого побopa не должень 3amehЯтбя полььзоватем.Еснишнур питаня повpeждан ил hyждаетсь в 3amеон,эTOdoлжноДела tbся толькВ abTopn3OBaHHOM ueHTpe texhnueCKOrO obcnyxuBaHnY.
Данньи рибор может Исплььогаься Deьм n Stapwe 8 leT n JIuцamn C Oрразиehьим ФизческIMN, ceHCOPHBIMn I yMCTBENHbIMn CnOCOBHcTЯm JIbO JIuZaMn, He IMeIoUzIMN COOTBETCTByIOUSeI ONBtA n 3HaHn, pri YCNoBn NOnyueHnЯ IMN npedBapITeJIbHO rHcTpPyKtaxka O 6e3OpacHoi 3KcPnyatauIn npi6opa I NOHIMaHn CBr3aHHoN C eRO INCNoJb3OBaHNem ONaCHOCTN IIN POnD npICMOrPOM OTBeTCTBeHHbIX JIu. He pa3peWaIte DeTAMIrpaTb C 3JIeKTPoIPn6Opom. He dOnyckaetc npOBeDeHne OuncTk n Onpaun I NO yXODy 3a pRn6Opom DeTbMn 6e3 npICMOrPa B3pocIbIX.
- YIIOH N IHNHP DOLJXHbI HAXOINTbcra B MeCTaX, HeIOCTyINhbIX dJIaTei MnaIaIe 8 let, KOrda npnbop BKJIouyeH B po3eTKy IIN OCTbIBaET nocJe NCNOJIb3OBaHnI.
OCTOPOXHO. TOpua nOBepxHocTb. B npoecce nCnoIb30BaHn r NobepxHocTb MoKeT HarpeBaTbcra.
-Пелед ВКЛЮЧЕнем пибopaВ сétы yбeДИТECb,чTo HAnPЯЖЕпBE B cETN COOTBETCTByET 3HaueHNo,уKa3aHHOMy Ha Ta6JIuYKe C TeXHnueCKIMxapaKTePncTnKaMn пибopa.
3TOT np6op DoJxeh BkIIOuATbcB 3a3eMneHHy10 po3eTKy. Pn nCNOb3OBAHn yDInHNTeJIy6eINTEcB, yTO OH cHa6xeh 6nIOJIpHOH po3eTKo16 A c 3a3emNeHmE.
- Ecni nIpaBkn npedeoxpAHntb, KOtOpbIM cIa6xhen npi6op, neperopit, npi6op 6ydet OTKnIOueH.ДЯ BOCCTaHOBHeHn HOpMaJIbHOJ paObTI npi6op HxKHO 6yDet DOCTaBHTB a BTOP3OBaHHbI CEHTp TexHnueCKOrO 6cIpyKuBaHnI.
Bo n36eXaHHe BpeMeHHoro NaDeHnHaHapJxHn Hm MepuaHn OCBeTntbHbIX np6opOB npn He6naorponrTHbIX ycNoBnx pa60tb CeTN, peKOMeHNdyETcnoKlnOuATb yTtK K 3JeKTpocEtnc MaKcMaJIbHbIM CoPOTNBHeHnem 0.47 Ω. Pn HEO6XoDMOCtN NOJIb3OBAteJIb MoKeT NOnyHTb INΦOpMaUIO O CoPOTNBHeHn B ToUke COeINHeHn, ObpaTnBUnCb B 3HepRoCHa6KaIooYIO KOMNaHIO.
- Pnp6op HnKOrda He DoJKeH NomeaTbCra NOBdoOpBOHDhI KpaH dIra erO HanoJIHeHRA BOoI.
- Пи подозрени на Heисправноctь CPA3y OTKПИЧЕ пибор OT сети. Тадж BCERda OTKПИЧАЕ ог OT сети посе КжДORO ИСПОЛБЗOBAHЯ.
Bunka np6opa He donxHa BbIepnBaTbcra n3 po3eTK pblkOM hHpya NHTAHIA.
Hikorda He norpykaTe yTOr nnn npoBoPe3epByap B BOdy nnn IIO6yIO INHyIO KINKOCtB.
He octabnIe np6op noD Bo3deNCTBnEM nOroHbIX ycNoBn (DOxJ, COJIHeuHbIX Iyuei, MOp03a n T. d.).
BaxHo
3TOT npnbop BO Bpempa60bHaHarpBaetcdo BBICOKO TEmnepaTypbI NrHehnpyET nap,TO MOKET Bbl3BaTb OKOrn pN HnPaBnBHOJ 3Kcnjlyaataun np60pa.
B npoecce nCnoB3OBAHnnaPapOBn 7nHaR, napOBa CTAHn, MetaJIInuecka PnactnBa B OCHOBAHn CbEMHO NOpCTABKn DnYyTOra (2) n B Oco6eHHOCHTcam yTOr MOrTH HArpeBaTbcra. 3To HOpMaJIbHo.
HnkOrda He HnpaBJIaTe nap Ha IIOeI nnXINBOTbIX.
Cneinte,HTobI uHyp He cOpnKacanc C noDOWBOE eue ropeyero yTora.
IIMETe B BVdy, YTO nocJe OTnysKaHna KHOKNBbInycka npapa CnCTema MoKeT pOdoJXKaTbNoauy npapa B TeueHne HeckoJIbKnx CekyHd. 3To HOpMaJIbHo.
Описиме
1.CbemHa eMKoCTb IaI BoDbl
2. Cbemna noctabka Jy yTora
3. Pукн дя перehockи napobоь CTaHци
4. Napoboi shaH ng otJeHne Iy xpaHnna Hypa nTaHn
5. LhnpntaHn
6. NapoBoi WlaHr
7. 《3Heproc6epeeraoua》KHOIIka (3eJIeHa)
8.Диспел
9.Главны ВькноуаTeЛь пNTанЯ C NOДCBETКО (kpachhbl)
10. CnCTemaФнкcaиуТюгa "secureLock"
11. Kopnyc c BHyTpEHHM naporeHepaTopoM
12.Фильтдяудаленин hakini
13. Khonka Bbinycka napa niooBbI
14. Khonka Bbinycka napa n3 nooWbI c yHKnei XTRM
15. CBeTOBoi INHdNKaTOP yTHoRa
16. IopoosBa yIora
17. 3aunTHaTekCTnBHaNoDOWBa
*B HekotopbIX MoDenjX
Функция i-Temp

KaKdbpa3BaHauane nCNoB3OBaHn yTOra BMeCTe C napOM MoryT BbIXOuNTb KaJIN BObl.
TOMy peKomeHdyeTc CHaana npoBeCTn yTHORm NO rnaIbHOJ DOCKe IIN Kcy HeHyxHO TKAHN.
COBeT:ДЯ NOJUyeHnO ONTIMaJIbHOro pe3yIbTaTa nepeD OKOHuaHnEM TJIaXeHnO TKJIIOHTe napи HeCKoJIbKO pa3 npOBeDiTe no TKAHN yTOrOM 6e3 yBnaXHeHn, YTO6bl XopoIo BbICyUHTb ee.
Функця pulseSteam

DaHbI np6op cHa6xhen CneuaJIbHOJ FyHKUeI dJa pa3rJaXnBaHnra 3aMraTbIX CKnaDOK. FyHKuIpa pulseSteam nomoraet 6bICptee cmrHuTaB nIOxoNoDAIOUyOcra3rJaXnBaHNIO TkaHb (HaNPmEp, JxNHCOBYIO IIN NbHryO).
Pn Haxatn Ha KhoNkY BbInycka napa n3 noDoWBn naporehepaTop nOaet Tpr MoHbIX napOBbIX yapa, YTo6bl oEscneuNb 60Jee rny6okoe npOHKnHOBeHne npaB TkaHb.
-
YcTaHOBInTe TEMnepaTpyHbI pexKIM
-
KopoTko HaxMITE Ha KhoNky BbInycka napa n3 noDoWBbl (14*), pacnoIooKeHHyU b BepxHeu qactn pyuKn.
(B HeKoToPbIX MoDeJIaX)
Данная систema Имeel «уMHьИ» Мexанзм KOHTponя па,КOTobI NOcIe OTnyckaHЯ KNOKN BbInycka napa n3 NOdoWBbl, NOdaet He6oJbwoe ДОПНHTeMbHoe KOLINueCTBO napa.
IOnonHnteBHyIOpaNy npa MoXHO B IIO6oI MOMeHT OCTaHOBnTb KOpOTKIM HaxKaTNEM Ha KHONKY BblNycka npa N3 NOOWBbl.
«Знecproсберегаюшя»


KHONKa «ECO»


(B HeKoToPbIX MoDeJIaX)
HaxaTne 3HePrc6eperaouei KhoNKn (7) no3BOJare TkoHOMnTb do 25% 3Heprn N do 40% BObl (^*) nOlya oTJIuHbIe pe3yJbTaTb InaKeHn 6OnbUnHCTBa TeKCTUhBbIX n3DeIin.
PekomeHdyetcNcNoJIb3OBAbTo6bIHybIpeKIMpacXoJa 3HeprnTOnbKO dJaIpaJKeHnToJCTOnuCINbHO N3MToT KAHN.
(^*) IocpaBHeHIOc yCTaHOBJeHHbIM MaKcImaJIbHbIM 3HaueHEm.
PpimMeaHne:
np npa6oTe C cyHKuee 3Heproc6epeKeHH perynnpOBka npapa N TeMnpaTpybIMoryt npon3BOuNTbcra B COOTBeTCTBnC O6uMM peKOMeHdaunm.
ABTOMATNueckoe
OTKJIIOUeHHe «secure»

(B HeKoToPbIX MoDeJIaX)
EcnB npoecce rnaKeHnK Honka BbInycka napa n3 noOnuBbl (13nn 14*Ha pyue yTora He haxmaetcB TteHHe onpeDeneHHoro BpemeHn (8MHyt), napOBa CTAHNq ABOTMaTHueCKN OTKNHOaETcR.
Pn cpa6aTbIBaHN n ABTomATNueCKORO OTKJIOneHn MInraet CmBOJ SECURE (6yDyT CJIbIiHbI TpN 3ByKObbix CNrHa).
YTo6bI CHOBa BKNIOHTb napOByo CTAHIO,CHOBa HAnMnTe KHOKNy BbInycka npa N3 NOoWBl.

3auntHaTeKCTnIbHa
NODOWBa

protect
(B HeKoToPbIX MoDeJIaX)
3Ta nOoWbNcNoB3yeTcIgIraJxHbCnapOM DeNKaTHbIX BeUeI npMakcImaJIbHOJ Tempeatype, He nobpeXdAHX.NcNoJIb3OBAHne 3aUHTHOJ TEKCTINbHOJ NODOWBbI TaIOKe NCKNIOVAe THeo6XoIMOCtB NcNOJIb3OBA Tb TpANKy dIpy IpeDToBpaueHn6BeckHaTeMHbIXTKaHx.
Mbpekomehnyem Bam neped Haayanom rnaxeHbanynonpo6oBaTb rnaDHTb Ha He6oBwom yactke HabyTreHHe ctopone Beu, INoHa6JIOdaTb pe3yJbTaTbl.
YTo6bI yCTaHOBnTb 3aunTHyU NOoWBy, NOMeCTnte OCTpbIK KOHnK yTHOra B KOHeu 3aunTHoN NOoWBbl I NOTAHTE 3a 3naCTnHyU JeHTy BDoNb HxKHe 3aDHei Yactn yTOrA Do Tex nop, noka OHa He 6yDet oDeTa.
YTo6bI CHrTb 3aunTHyIO NOOuBBy,NOTHnTe 3a 3naCTnHyIOJeHTy, YTO6bI OTdJIITb NOoUByOT yTOra. 3aunTHyIO TEKCTnblHyIO NOOuBY MoXHO npno6pctn B CnykBe NoCTnpoJAK NIN B CneuaJIn3NpOBaHHbIX MaRa3nHax.
KoI akceccyapa Ha3BaHne akceccyapa
571510 TZ20450

YdaJIeHHe NaKnIu N3
ФИЛБТРА N
naporehepaTopa

ckinCian
(calc'nClean Plus Plus)
YTo6bI npoDnITb cpoK 3cKnIyatauHn naporeHepaTopa H36eKaTb HaKoJIeHnB HEm HaKnHn, pInbTp (12) n naporeHepaTOp Heo6xOIMO nepNoDiueckn, no NCTeueHn ONpeJeHnHO BpemeHn NCOnb3OBaHn (npu6n3ntelbHo 50 Yacob), npomlbAtb BoDo. Ecnn B BaWeM peNoHe JecTkA Boda, npomlbAtb naporeHepaTOp HyXHo Yaue.
He nCnoIb3yIte IJI npOMbIbAHnI naporeHepaTopa cpeIcTBa IJIyUdAJIeHnI HaKIN, IOTOMy UTO OHI MOrY erO noBpeIITb.
Ecnn CmBON clean Muraet, 3HaunT naporehepatop HxKHO ONIOCHyTB (6yDyT CNbIWHb TPN 3ByKObIX cnHana). BblonHnTE cneDyUOune DeiCTBn:
- Pn6op 063aTeJIbHO DoJIxKeH 6bITb OTKnIOUeH B TeueHne 6OJee 2 YacOB, OH DoJIxKeH 6bITb XoIoDHBIM, a erO eMKoCTb DnA BoDi (1) nycToi.
- 3aФИКСИРУTe yTHOrI, NOMeCTINH HOC yTHOra B nepeДин пa3 И npIXKaB pbIar cNCTeMbI ФИКcaUN (10) K HIXKHeI qAChI yTHOrA.
- PacnoJIOXnTe np6op naPaKOBnHoi nJIi BeDpOM.
- HaknoHnte np6op B CTOPHY, npOTNBONOJXHyo OTBepCTNIO qnlbTpa.
- BbikpyTnTe qnIbTp (12) n 3BKeKte ero.
- YTo6bO uHCTnTb qHJIbTp:
a. NomeCTnTe nIbTp noi cTpyIO npOTOH BObl n IpomOIte erO, noka oCTaTKn HAKINH He 6yDyt NOJHOCTbU ydaJIeHbI. BbIXMITE nIbTp, kak noka3aHO Ha pncyHke F.
b. TOrpy3nte fHbTp B BoNy n3 KpaHa (250 M), CMeUaHHyO C Heo6XoDnMbIM KOINueCTBOM (25M) cneuaJIbHOJ XNkOCTn dny ydaJeHnA HAKINI.
Kndkoctb dnyydaJeHn HAKINN MOxHO npno6pctn B OTdene noclenpoaXHoro 06cnykBaHn NnB CneuaHn3npoBaHHbIX Mara3NuHax.
ApTkyI npHaadNexHocTN (BOTdJeNoCnpeNoaXHo 06cnyKbAHna)
HaMeHOBaHne npHaJnEeXHoCTN (B CnEuaIaI3uPoBaHHbIX MaRa3NuHax)
311144 TZ11001
- HakloHnB naporehepataop Ha 6ok, BocnoJb3yItecb nOxOJaE mKoCTbIO n HaneIte B naporehepatop 1/4 Jntpa BoDbl.
- B TeueHHe HeckoIbKINx MNHyT NotpIcNte Kopnyc napOBOn cTAHUn, a 3aTeM BbIeNeIe BCE copeKIMoe naporeHepaTopa B paKOBInH yIN BeDpo.
ДяdoctиженHaHnyuwope3yNbTaTapeKOMeHnyetc npoJeNaTb DaHHyO OnpaCIOOBaXDbI.
Baxho: npexkeyem 3aKpbBaTb naporeHepaTOp, y6eHTecb, YTO B HEM HeT OCTaTKOB BObl.
- YctaHOBNTe qnIbTp n IIOtHO 3AkpyTne erO.
YTo6bl nepe3anyctntb cyeTnK BpemeHn Do cJeIyoUe OuncTKn Clean, Dba pa3a npOprB BbIKIOHTe napOByIO CtaHcNIO NO MeHbWeMpe Ha 30 cekyHd
(BKn. → 30 ceK. Bblk. → BKn. → 30 ceK. Bblkn. → BKN.)
OuInctka n yXoD

BHHMaHHe! CyueCTByeT onaChocTB OxorOB!
Ipeep npoBeHemJIIO6bIX pa60T NO OYNCKe IIN texHnueckomy 06cnyxHBaHNIO BcerDa BbIHMaTe wTenceJbHyIO BNky np6opAp3 pO3eTKN.
- По okончаннглжeh,在пожду чьnpoBOДNTb OUHCTKу,OTCOeHNHTe WTeNCEbHyIO BnKy I daTepn6bopy ocTbITb.
- Постпente Корпс Napоь CTaHци, руку И КорпсуТюгвлaxнОТkaHbI.
- Ecni Ha noDoWe yTOra ocTalacb rpa3b nHnHaKInb, ouNCTIe ee BnaXHoJ xNoPauTo6yMaXHOtTKaHbIO.
- Hikorda He nCnoJb3yIte a6pa3nBhIe cpeIcTba nn pactBOpnten.
H
Xpahenne npn6opa
G
Functia "pulseSteam"

aill (i) 0" gai j bai.2
C. y ≤ 1 即 y ≤ 1 或 y ≥ 1
aI aI jai jai 3
jSjji (2) 8 all 8 8 all 4
alSallao JldJdlo
(10) 1
.0|Sall 0j030
(6)(5).5
.(4)
g Coo 80 80 Les jieal ojai dic olkall 6
.H
a
aaiial 12! 5al jnnnnaiaial jlll nn aill
algal g a y bti o sall o jy
- EU/2012/19
aIaIIaII aIg jck1g aIg k
j 1
a y j gaa g a Las la y gai dlc!g iiaannnll
(1)
jll jlll jll l 22 22 gall clll jll
.0 1
jbi jbi jbi jbi jbi jbi jbi jbi jbi jbi jbi jbi jbi jbi jbi jbi jbi jbi jbi jbi jbi jbi jbi jbi jbi jbi jbi jbi jbi jbi jbi jbi jbi jbi jbi jbi jbi jbi jbi jbi jbi jbi jbi jbi jbi jbi jbi jbi jbi jbi jbi
aiaaa aiee
aJzjzjz

ailllgl

!
y 1
.
j 1
4.1.2.3
aiaaiiyolall aygaiial 2
a 3
Aaiaaa aaaa aaaa aaaa
Cuiyio 1i i Cuiyio 1j j
JbcjI 1
Jalil alics all ywi
a b a b b b b b b b b b b b b b b b b b b b b b
(a)
.5j 100
Jg 1
小小 22
aill 1e 1sll 2g . ic y
.
(13)
a a a a a a a a a a a a a a a
aannn aen annnnn nn nnnn
Jasall Jassal
571510 TZ20450...
571510 1220450

ckcnn
e 1
A
F
(calc'nClean Plus)
aJn jnn nn nnnnnnnnnnnnnnnnnnnnnnnnnnnnnnnnnnnnnnnnnnnnnnnnnnnnnnnnnnnnnnnnnnnnnnnnnnnnnnnnnnnnnnnnnnnnnnnnn
(12) jilali abai yj 50 day) jiei ci lwl jaiy
aill 100
y
S OBC = S COD + S BOC - S BOC
aiee eae eee eae eae eae eae eae eae eae eae eae eae eae eae eae eae eae eae eae eae eae eae eae eae eae eae eae eae eae eae eae eae eae eae eae eae eae eae eae eae eae eae
ylll lglal g. (a yss sll
jla jia ely jie 11 jgao jy jglal laai .1
E(1)cllljzjgic
aill gololl aolao Jld Jdo Jdally oall 2
Soll o jao aij (10) ciiill e ji jj jaiol
.3

#
(*13-14)

#

gaiiie 100000000000000000000000000000000000000000000000000000000000
1
1 1
1
15 a 2000
a
()dclalglafalallgalealllgai
aaslll aal lal alal alal alal
Laaeill
.5
:aa
Salygagggg 15
A
a
图
图
小
品
aaiy
(8)
JSL wlll baiill l gaoi gia jiaai ai jao i Jda jiaai jai jaiai jaiai jaiai
(^*14,13)
:
bina 10
b#i#s oal #o joo joo ool
120 1
A
e o eo 1jba bllu j jSaal jn piaiui Js aydiie
1
sll 1 1 sll alglg 16 sll alglg aay slil g
aaii i 1

“pulseSteam”
aalll aall alal aal 1 jall l 1 1 1 1 1 1 1 1 1 1 1 1 1 1 1 1 1 1 1 1 1 1 1 1 1 1 1 1 1 1
C 1
1
gall (^*14) 111 2
()
jlb j 1 (a) (j) (j)
.1sall joo 10gall (13)
=
aJb211 Jx Jy Jz 100000000000000000000000000000
aiai iaii laie clll jbi jbi d o jai clal lji bi jbi jbi pulseSteam"
aill 1olil 1joo
jss j 1slll lgsi g slll yall j 1s 1s ll lal lal 1s 1s 1s 1s 1s 1s 1s 1s 1s 1s 1s 1s 1s 1s 1s 1s 1s 1s 1s 1s 1s 1s 1s 1s 1s 1s 1s 1s 1s 1s 1s 1s 1s 1s

#
C
aaii jaii aai iai jaiil gaii ciia
Jiill lll bia g jilil 11lal pia aaiwai aaiy i-Temp" siojgolglg 1
a Jn Jn Jn Jn Jn Jn Jn Jn Jn Jn Jn Jn Jn Jn Jn Jn Jn Jn Jn Jn Jn Jn Jn Jn Jn Jn Jn Jn Jn Jn Jn Jn Jn Jn Jn Jn Jn Jn Jn Jn Jn Jn Jn Jn Jn Jn Jn Jn Jn Jn Jnn
.(16) 2
3 1
sall jll all cdo jaiy
11 11 11 11 11 11 11 11 11 11 11 11 11 11 11 11 11 11 11 11 11 11 11 11 11 11 1
e 1
aiiiaaiil g i ylll ciao no laicio el poiiu 2
el piaiu 1aauo oI sall oie Aulilo g I gell
.
Lai 11.
aaii aill jglal 1sall sll w g uay
:Jb#Eg.4
JSL wlll baiill Jgall jilai all aag
Jldn jdbljal jalil g. jll lgi (^*14日 13)
5


aaii 8) aii i (0i jll) (jill)
.1
.2
g g 15 k j j j j j j j j j j j j j j j j j j j j j j j j j j j j j j j j j j j j j j j j j j j j j j j j j j j j j j j j j j j j j j j j jj
3
aaii 1


C
all all all jz 1
all all oall
3.
4
令 1,2,3 ≤ 1, 2 ≤ 3 ( 1,2)
6j = ( x1,y1)
( y + z) ( z - x) y = 0.
8
(j) selilj 2j jll g jll jll j.9
"secureLock" 10
11
aikill 12
13
*XTRM" 14
olSoll ayu yuay.15
olololololol .16
*gaiy jaij 17

“i-Temp”
Jieiie iie 5y jll "i-Temp" aagglg yjoo Jil11 g Jil11 11 11 11 11 11 11 11 11 11 11 11 11 11 11
i-Temp"g
i-Temp" 1
s y s i j 1j 1 j 1 j 1 j 1 j 1 j 1 j 1 j 1 j 1 j 1 j 1 j 1 j 1 j 1 j 1 j 1 j 1 j 1 j 1 j 1 j 1 j 1 j 1 j 1 j 1 j 1 j 1 j 1 j 1 j 1 j 1 j 1 j 1 j 1 j

“antiShine”
"antiShine" aLgol g 1a 1000000000000000000000000000000000000000000000000000000000000000000000
eIyJzll 10000000000000000000000000000000000000000000000
J 1
1 1
P 为
1 1
A
(2) 1111111111111111111111111111
a2 = 12 - a1 = 45,b2 = 12 - b1 = 56,c2 = 12 - c1 = 67
aol aol oI goll
a2 = a1 + 2,b2 = b1 + 2
AisLw
aolal
a 120
p
p 1
j 1
. j 1
. 1
. j 1
. j 1
. j 1
. j 1
. j 1
. j 1
. j 1
. j 1
. j 1
slider SL45 jI. Siemens 1gai
1 1
aalee
i 1
4
y
a aallll llll jlljlll 1
.4ol daii jao geiy
.
e 1
a 1 a
8 8 jj j j j j j j j j j j j j j j j j j j j j j j j j j j j j j j j
J 1 J 1 J 1 J 1 J 1 J 1 J 1 J 1 J 1 J 1 J 1 J 1 J 1 J 1 J 1 J 1 J 1 J 1 J 1 J 1 J 1 J 1 J 1 J 1 J 1 J 1 J 1 J 1 J 1 J 1 J 1 J 1 J 1 J 1 J
a
8 jnnn nn nnnn nnnn nnnn nnnn nnnn nnnn nnnn nnnn nnnn nnnn nnnn nnnn nnnn nnnn nnnn nnnn nnnn nnnn nnnn nnnn nnnn nnnn nnnn nnnn nnnn nnnn nnnn nnnn nnnn nnnn nnnn nnnn nnnn nnnn nn
1
J 100000000000000000000000000000000000000000
.1w 4
BSH Hausgeräte GmbH
Carl-Wery-Straβe 34
81739 Munchen, GERMANY
www.siemens-home.com