
VD07S - Tumble dryer Ardo - Free user manual and instructions
Find the device manual for free VD07S Ardo in PDF.
| Product type | Front-loading tumble dryer |
| Brand | Ardo |
| Model | VD07S |
| Dimensions (W x H x D) | 59.5 cm x 85.0 cm x 57.0 cm |
| Net weight | Approximately 45 kg |
| Supply voltage | 230 V ~ 50 Hz |
| Rated power | 2000 W (estimated) |
| Drying capacity | Up to 6 kg (estimated) |
| Loading type | Front with porthole |
| Drying programs | Cotton/Linen, Synthetics, Delicate synthetics; vigorous or gentle drying; timer and electronic control |
| Main functions | On/Off button, gentle/vigorous drying, adjustable timer, cooling cycle |
| Leveling | Adjustable feet |
| Air exhaust | Exhaust hose supplied, to be connected at the back |
| Power supply | Socket with mandatory grounding |
| Maintenance | Clean filter after each cycle; periodic cleaning with soapy water |
| Safety | Door lock during cycle, overheat protection, unplug before cleaning |
| Spare parts | Original, available from after-sales service |
| Repairability | Repairs exclusively by authorized personnel |
| Supplied accessories | Exhaust hose, support, connector |
| Intended use | Household use only |
| Environmental standards | Recycling according to WEEE directive 2002/96/EC |
Frequently Asked Questions - VD07S Ardo
User questions about VD07S Ardo
0 question about this device. Answer the ones you know or ask your own.
Ask a new question about this device
Download the instructions for your Tumble dryer in PDF format for free! Find your manual VD07S - Ardo and take your electronic device back in hand. On this page are published all the documents necessary for the use of your device. VD07S by Ardo.
USER MANUAL VD07S Ardo
Thank you for having chosen our product. Please read these instructions carefully before connecting and using the appliance.
A knowledge of the operating principles will help guarantee correct and safe use of the appliance.
If the appliance is sold or handed over for use by others, remember to give the new user the instruction booklet.
CONTENTS

NOTES AND ADVICE FOR THE USER 11-12
Technical information 11

DESCRIPTION OF THE APPLIANCE 113

INSTALLING THE APPLIANCE 13-15
Installation 13-14
- Levelling the appliance 14
- Connecting the air exhaust tube 14
- Connecting to the mains supply 15

USING THE APPLIANCE 15-17
Description of the functions 15-16
Door 16
- Drying the washing correctly 16
Precautions for fabrics types 17
- Program table 17
- Weights of washing 17

MAINTENANCE
- Cleaning the filter 18
- Fault finding 18
- Resolving problems 18
- Optional accessories 18
NOTES AND ADVICE FOR THE USER

TECHNICAL INFORMATION
| Dimensions: | Width cm.: | 59.5 |
| Height cm.: | 85.0 | |
| Depth cm.: | 57.0 | |
| Max. capacity | see characteristics plate | |
| Power rating | see characteristics plate | |
| Voltage | see characteristics plate | |
MODEL:
SERIAL NUMBER:
DATE OF PURCHASE :
This appliance has been designed for use as a domestic drier. Any other use is considered as improper and therefore dangerous.
- Keep this instruction book near to the appliance always, in order that it can be easily consulted when necessary.
Any modifications or attempts to interfere with the appliance can be dangerous for the user and may damage the product.
On delivery of the appliance, check that it has not been damaged during transport. If any damage is discovered, report the matter to the retailer immediately.
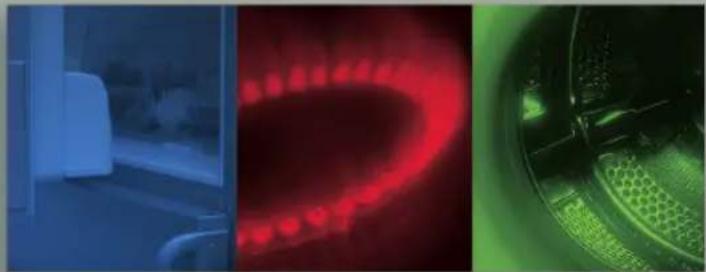
During the drying cycle, the air in the room is ducted through the back of the appliance. Do not cover the drier with washing or any other items.
▼ When positioning the appliance, ensure that the power supply cable is not kinked or squashed and is accessible.
Remember that the door glass and exhaust tube will heat up during a drying cycle and can reach temperatures of up to 60^ . Do not touch these parts before the cooling cycle has been completed.
The appliance must not be used by children unless supervised.
Never dry washing that has been in contact with chemical agents such as dry-cleaning fluids
These products are volatile by nature and could cause an explosion.
Do not dry items with parts containing foam rubber or rubber in general, in that the material could melt and damage other items or even the appliance itself.
If the appliance is sold or given away, remember to hand over this instruction book with it. This will help the new owner use the drier both correctly and safely.
Do not attempt to repair any appliance faults alone, in that repairs carried out by a nonprofessional may cause serious damage and will nullify any rights to repairs under guarantee.
Repairs to the appliance can only be carried out by personnel authorised by the customer service centres. All repairs must make use of original spare parts only.
Spin dry or wring the washing well before loading it into the drier. Spun dry washing will dry quicker.
Clean the filter thoroughly each time the drier is used in order to guarantee perfect air circulation.
Never insert or remove the plug from the mains socket with wet hands.
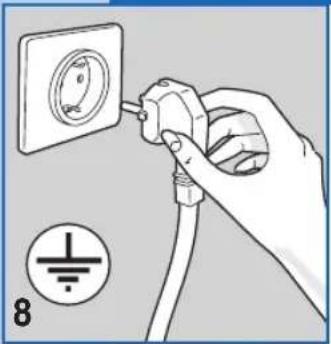
The machine must be connected to a mains socket fitted with an efficient earth complying with current safety standards.
Do not use extension leads or multiple plug adapters to connect the appliance to the mains supply.
Do not expose the appliance to atmospheric agents.
▼ When servicing or cleaning the appliance, remember to disconnect it from the mains supply.
Do not pull the power supply cable to unplug the appliance from the mains supply. Pull the plug only.
This appliance is marked according to the European directive 2002/96/EC on Waste Electrical and Electronic Equipment (WEEE). By ensuring this product is disposed of correctly, you will help prevent potential negative consequences for the environment and human health, which could otherwise be caused by inappropriate waste handling of this product. The symbol on the product, or on the documents accompanying the product, indicates that this appliance may not be treated as household waste. Instead it shall be handed over to the applicable collection point for the recycling of electrical and electronic equipment. Disposal must be carried out in accordance with local environmental regulations for waste disposal. For more detailed information about treatment, recovery and recycling of this product, please contact your local city office, your household waste disposal service or the shop where you purchased the product.
THE MANUFACTURER WILL NOT BE HELD RESPONSIBLE FOR ANY INCIDENTS RESULTING FROM NON-COMPLIANCE WITH SAFETY STANDARDS OR THE REQUIREMENTS OF THIS INSTRUCTION BOOK.
The drier is a domestic appliance capable of drying any type of fabric at any time.
The machine has been constructed in steel panels which have been treated and painted to guarantees that its aesthetic qualities remain unaltered over time.
The motor and all moving parts have been designed and manufactured to guarantee the minimum possible noise levels
The control panel has been designed to enable the user to run the desired drying program without difficulty.
The wide door makes loading and unloading the washing much easier.
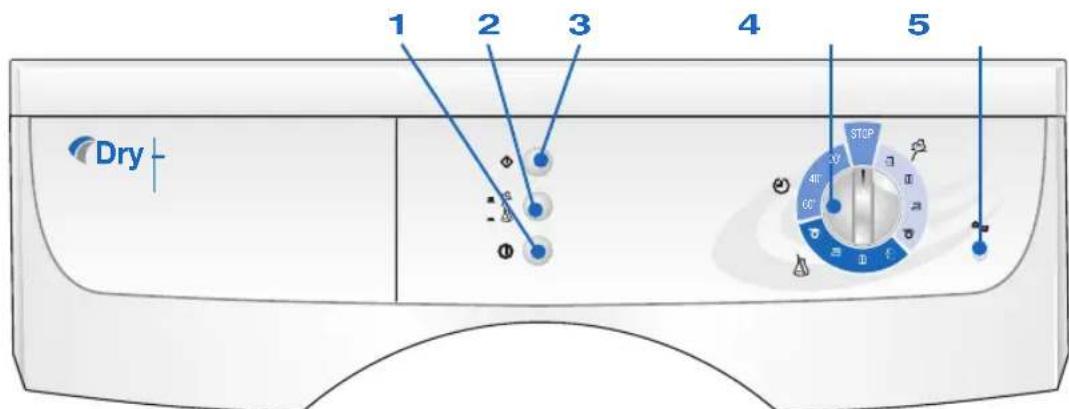
1-ON/OFF button
2 - Delicate or energetic drying button
3-Start button
4 - Drying time control knob
5 - Spin function active indicator light
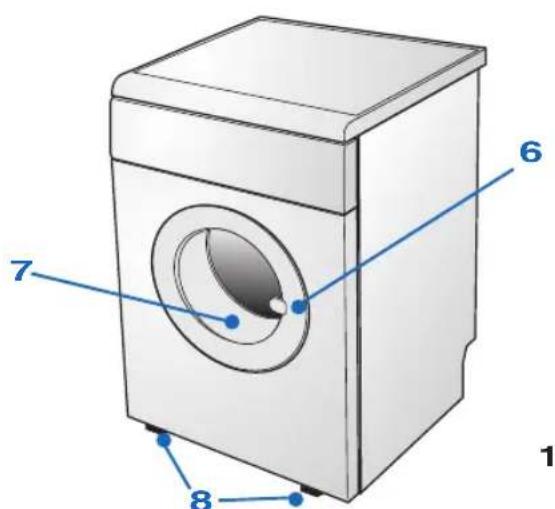
6-Door
7-Filter
8-Adjustable feet
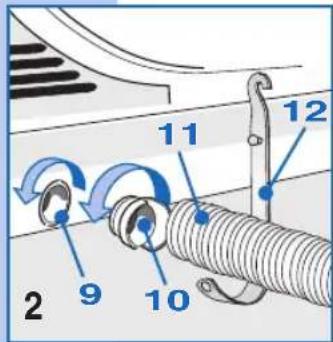
9 - Exhaust outlet
10- Outlet coupling
11- Exhaust tube
12-Tube support
INSTALLING THE APPLIANCE

INSTALLATION

Installation must be carried out by qualified personnel in line with the instructions supplied by the manufacturer. Incorrect installation may result in damage and injury.
Install the drier near to a window to facilitate the evacuation of the damp air from the drier.
The exhaust tube must be used to prevent condensation, and must be inserted in hole A at the bottom of the back panel of the appliance (fig. 3).
INSTALLATION
Never cover the air intake at the back of the appliance.
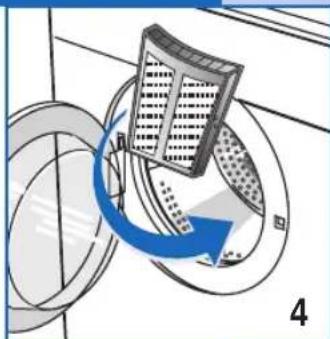
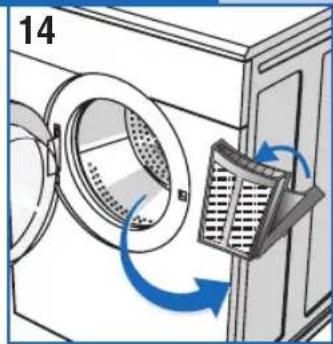
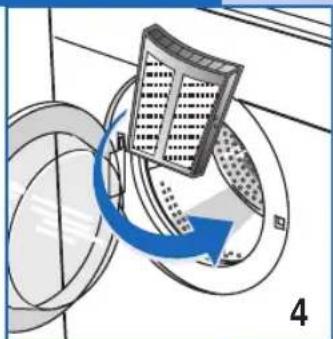
Place the filter in its normal position as shown (fig. 4).
Clean the inside of the drying drum using a damp cloth to remove any dust deposits.
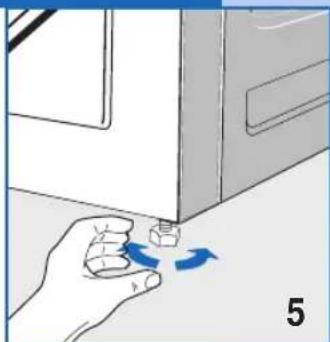
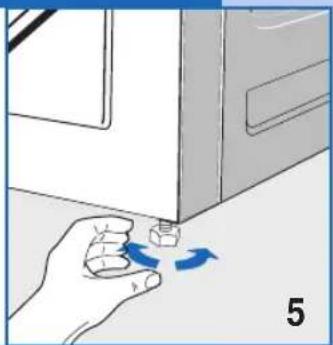
LEVELLING THE DRIER
Adjustable feet. Place the drier upright so that it rests firmly on all four feet. Level the drier by adjusting the feet as follows:
Lift the drier slightly.
Adjust the feet to the correct height (fig. 5).
(Do not unscrew the feet to much and do not use a screwdriver).
Lower the drier.
A badly levelled machine may cause damage to the bearings and lead to their premature wear. This drier does not need to be anchored to the floor.
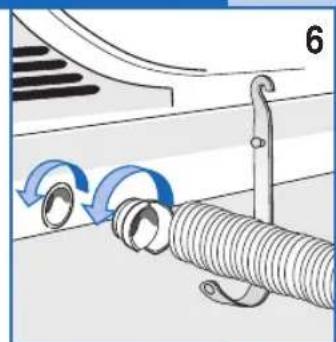
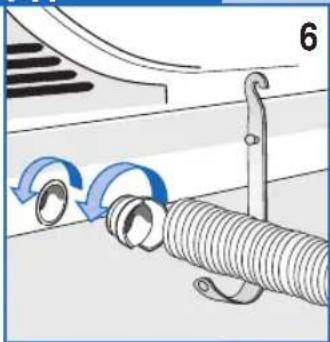
CONNECTING THE AIR EXHAUST TUBE
Connect the exhaust tube to the outlet on the back of the drier (fig.6), as follows:
Connect one end of the tube to the connector piece supplied.
Rotate the connecting piece (together with the tube) anticlock-wise in the drier outlet hole.
Carry the tube away from the back of the drier to the left or right by means of the recess at the bottom of the drier body.
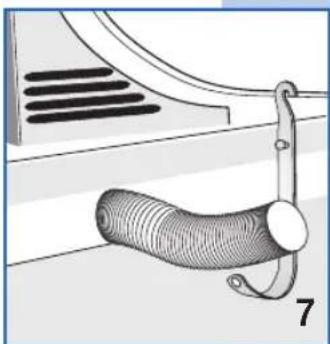
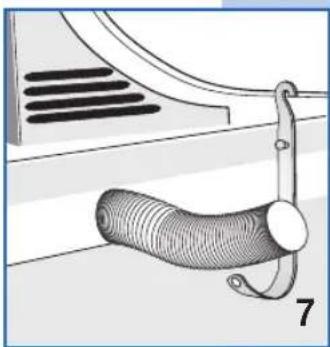
Position the other end of the tube near to a window or a ventilation outlet on an external wall. If this is not possible, ensure that the room is well ventilated when the drier is being used. Use the support supplied to anchor the tube (fig. 7).
Important: The air exhaust tube must be connected even if the air is not discharged outdoors, otherwise the drier will re-absorb the discharged damp air and thus prolong the drying time.
Damp air can also damage the drier. Although the air discharged from the exhaust tube is only warm and damp and does not constitute a danger, it must never be directed towards people, animals or plants.
Important: The exhausted air must not be conveyed to a chimney discharging fumes generated by gas or other fuel burning appliances.
ELECTRICAL CONNECTION
Make sure that the voltage indicated on the identification plate attached to the back of the appliance corresponds to that of the mains supply.
On completion of the installation, the appliance must be connected to the mains supply through a two-pole switch.
All cutouts, electric wiring and mains sockets must have a rating such that enables them to support the maximum load indicated on the identification plate.
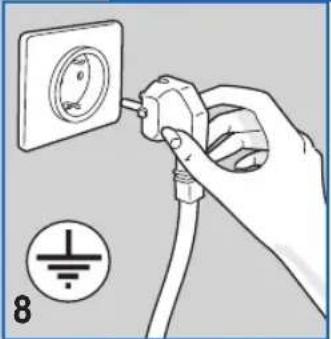
The mains supply to which the appliance is connected must be fitted with an earthing system. If this is not the case, the manufacturer will not be held liable for any incidents that may occur (fig. 8).
If the power supply cable is damaged in any way, contact the appropriate specialised customer technical service centre.
The drier must not be connected to the mains supply using indirect methods such as extension leads or multiple adapters.
Position the appliance so that the power supply cable is easily accessible for disconnection when the need arises.
Important: On completion of the drying cycle, disconnect the appliance from the mains supply to prevent young children from operating the drier.
USING THE APPLIANCE

DESCRIPTION OF THE FUNCTIONS
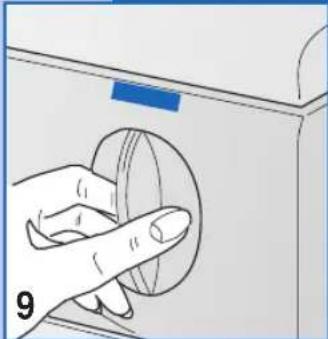
Drying time control knob: Rotate the knob to select the required drying times (fig._9).
(Refer to the program table to select the program according to the type of fabric)
At the end of each drying cycle, the appliance effects a 10 - 15 minute cooling cycle, during which time the appliance is still switched on.

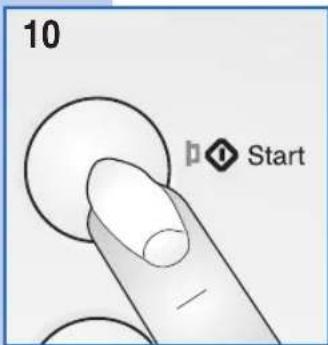
Start button: Press this button to start the drying cycle (the indicator will light up).

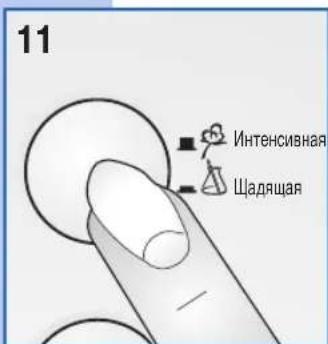
Delicate or energetic drying button: This button is used to select the type of drying cycle to run: Energetic or delicate (fig.11).
DESCRIPTION OF THE FUNCTIONS
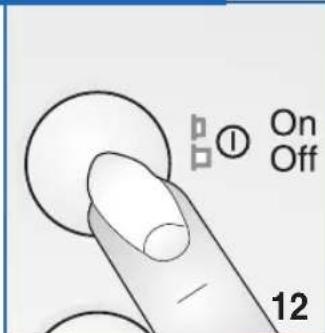
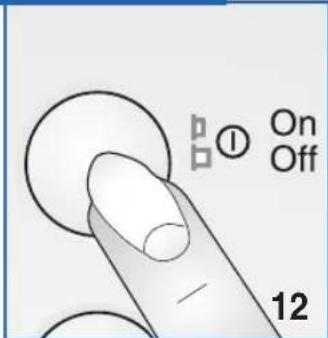
ON/Off button: Press the button to switch on the appliance.

DOOR
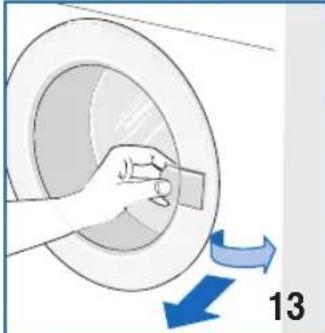
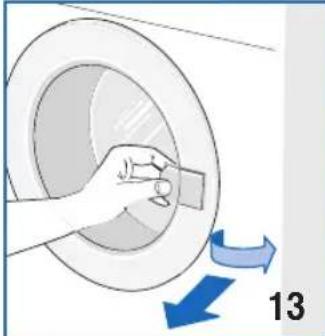
The drier is the front-loading type. Pull the handle outwards, without forcing it, and gently open the door. The appliance will stop if the door is opened during a drying cycle. The drum will continue to rotate for a while, slowing down gradually to a stop.
Important:
Obviously, during a drying cycle the washing in the drum will be hot. The washing is cooled during the cooling cycle.
To avoid being scalded by steam or burned by the hot washing, do not open the door during the drying phase.
DRYING THE WASHING CORRECTLY
Proceed as follows:
A
Spin the washing.
B
Separate the items into types or fabrics.
Close any zips and fasten buttons and remember to empty the pockets of any clothing.
Turn jumpers inside out.
C
Open the door
Load the washing in the drum and remember to load sheets from a corner first.
It is advisable to load small and large items together.
D
Close the door
Dry your hands (never touch electric appliances with wet hands).
Insert the plug in the mains socket.
E
Press the ON/OFF button to switch on the appliance.
Wait for the audible signal and the indicator light to switch off.
Select the drying cycle recommended for the load (see program table) or set the timer on
the required during time.
To start the drying cycle, wait for the indicator light to light up and press the "Start" button.
F
To stop the machine during a drying cycle, simply open the door (the drum will slow down then stop).
To continue the drying cycle, close the door and press the start button.
In order to ensure that large items dry perfectly, stop the machine and remove the washing a number of times during the drying cycle.
G
After having removed the dry washing, clean the filter as follows:
- Lift the filter
- Open it and clean it using a soft brush
- Close it and replace it in its seating
- The filter must be washed periodically using soapy water in order to remove very small particles.
Unplug the appliance from the mains supply.
PRECAUTIONS FOR FABRIC TYPES
In the case of doubt as to the type of fabric, read the label on the item itself. Almost all items that can be machine dried have this information specified on the label. To avoid static electricity being generated in the items, add a conditioner to the rinse cycle of the washing machine.
Remove synthetic materials from the drum immediately to prevent them from creasing.
PROGRAMTABLE
| Fabric | Weight of dry washing | Type of drying to utilise | Times in minutes | |
| Wardrobe dry Iron dry | ||||
| TIMER CONTROLLED PROGRAM | ||||
| Cotton/Linen | Half Load | 20-40 min.40-60 | ||
| TIMER CONTROLLED PROGRAM | ||||
| Synthetics | Half Load | 20-40 min.40-60 | ||
| Delicate synthetics | 1,5 kg | 20-40 min.40-60 | ||
| Fabric | Weight of dry washing | Type of drying to utilise | ||
| ELECTRONICALLY CONTROLLED PROGRAM | ||||
| Cotton/Linen | Maximum Load | Extra dry | # | |
| Cotton/Linen Wardrobe drym Load | # | |||
| Cotton/Linen Iron dampimum Load | # | |||
| Cotton/Linen Very dampimum Load | # | |||
| ELECTRONICALLY CONTROLLED PROGRAM | ||||
| Delicate synthetics | Half Load | Extra dry | # | |
| Delicate synthetics | Half Load | Wardrobe dry | # | |
| Delicate synthetics | Half Load | Iron damp | # | |
| Delicate synthetics | Half Load | Very damp | # | |
ENERGETIC DRYING DELICATE DRYING
Important: The drying time is dependent on a number of factors: weight, size of the items, type of fabric, degree of dampness. Well wrung/spun items dry quicker. To prevent items from creasing, do not overload the drier.
The indicated weights are approximate and may vary according to their manufacture, quality and finish.
WASHING WEIGHTS
| Bedding | Large tablecloth | 1000 g |
| Quilt 700 g | Napkin | 80 g |
| Bottom sheet 550 g | ||
| Top sheet 600 g | ||
| Pillowcase 180 g | Men's clothing | |
| Household linen | Wash 'n wear shirt | 250 g |
| Vest (sleeveless) 120 g | ||
| Tea towel (dishes) 90 g | Briefs | 80 g |
| Tea towel (glasses) 70 g | Long johns | 250 g |
| Flannel 20 g | Pyjamas | 480 g |
| Hand towel 200 g | Nightshirt | 400 g |
| Handkerchief | 25 g | |
| Other linen items | ||
| Bath robe 1200 g | Ladies' clothing | |
| Bath towel 800 g | Blouse | 100 g |
| Lady's blouse 300 g | Jumper | 100 g |
| Man's shirt 600 g | Briefs | 80 g |
| Blouse/shirt in synthetic material300 g | Slip | 150 g |
| Nightdress | 180 g | |
| Table linen | Pyjamas | 450 g |
| Tablecloth 250 g | Handkerchief | 15 g |
CLEANING THE FILTER
In order to guarantee optimum drying results under all circumstances, remember that the filter must be cleaned regularly. Remember to check and clean the filter after each drying cycle.
Important:
The filter must only be cleaned when the appliance is cold! Clean the filter following the procedure described below:
Open the door.
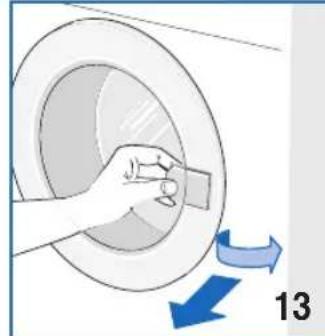
Grasp the filter in both hands and push it upwards to remove it.
Carefully widen the top edge and open the filter.
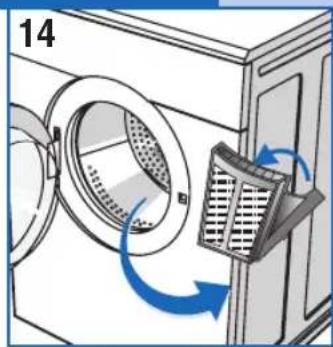
Remove the woollen particles.
Close the filter, making sure that the catch closes at the correct position.
Clean the filter slide guides on the appliance, using a vacuum cleaner if necessary.
Reposition the filter in the slide guides (fig. 14).
FAULT FINDING
All electric appliance may breakdown at some time. Remember to call a qualified electrician in these cases. However, many problems can be resolved without the need for external intervention.
Important: If a fault occurs, disconnect the appliance from the mains supply immediately. Before calling the customer service centre, check the points listed below.
RESOLVING PROBLEMS
If the drier doesn't start
- Check that:
1) The appliance is plugged into the mains supply.
2) The mains socket is working correctly:
2a) The fuse has not blown. (Check by plugging in another appliance such as a table lamp).
2b) All the instructions in the manual have been followed.
If the drier doesn't start
- Check that:
1) The door is closed properly.
2) The "START" button has been pressed.
The washing does not dry
- Check that:
1) The air exhaust tube is not twisted or kinked.
2) The filter is not blocked. (Remember that when the door is opened, the internal parts of the drier and the washing may be very hot).
If, after all these checks have been carried out, the appliance still does not work, inform the nearest customer service centre.
When contacting the service centre, inform them of the appliance model, serial number and type of fault.
This information will help the service centre operator in procuring the necessary spare parts, thus guaranteeing a speedy and efficient repair.
OPTIONAL ACCESSORIES
The retailer can provide an accessory to enable the drier to be mounted on top of a front-loading washing machine, thus saving space. The installer will inform you of the appliance model for which this option is possible.
Werter Kunde,
RATT SATT ATT TORKA TVVATTGODSET
POKNY K PESI O TKANINY
V3Byh yTuKa u3MpexKHe yTuHnue.
MEPE INPEDOCTPOXKHOCTN 3A TKAHINHE
Y cnyajy hncryphoctn y norney Bpcte TkaHnHe, npOBepntn etnkety Ha cAmoJ oDeh n py6by. Ckopo ha CBAKOj OdeHn y p6bBy Koju ce Mory cyuHTn, noc6Ho je Ha3NaueHO da cy norOHN 3a cyuHe b y MaunHn. Da 6n Ce cnpeHHno 06pa3OBaBe CTaTHKOR eJeKTPnUTeTa Ha ODeHn n py6by 3a BpeMe ZIKLyca NcnpaHa y MaunHn 3a npaBe py6Ba, ynotpeBnTcpeCTBO 3a OMeKwabaHe. N3Byh Omax CInHTeTuKy ODeH y py6Be n3 6y6BaDa 6n Ce cnpeHHNo HxOBO ryXbaHe.
TABEJIAPOTPAMA
TEKINHE PYBJIbA
EHEPIMHO CYUHEHE HEXHO CYUHE
Baxho:Bpeme cyheba 3aBnch od pa3nHex pakTopa:TexnHe,IMMeH3nje py6b,a, BpcTe TKaHHe, BlaxHoCTn. DObpo nCueJeho py6be ce HajnPpe ocyn. Da 6n ce cnpeuHno ryXBaBe py6ba, He Tpe6a npenyHnT MaunHy 3a cywebe py6ba.
HabeJe He TeKHe cy np6nXHe mOry da oDcTynajy 3aBnCHO od nocTynKa oBaJaTeTa Iopae.
NocteJbHa
Плат.的新шкр за кун.700g
Kehcka Kowyba 550g
Myska kowyba 600 g
Kehcke/Myuke Koojye oD cHTeTnKe TkaHHe 180g
Tahe
Tahnue 90g
Пижama 70g
HoHa Kowyba 20g
Mapamue 200g
JopraH
KpeBETcN YapwaB 1200g
PpeKpBaU 800g
IepjaHn jactyK 300g
Kyhno py6b6 600g
CToHo py6be
XeHcKo py6JIbe 300g
Kpne 3a TaHnpe
Kpne 3a qahe 250g
Ipy6n neuKnp 1000g IpaTHHeHneuKnp 80g
CTOJIbA
Belenki cToJIbak 250g
CanBeTe 120g
KoWyBa 80g
Majura 250g
Tahnue 480g
KoM6HHe3OH 400g
CnabaHua 25g
Nuxama
Mapamue 100g
Muyko py6be 100g
Octano py6be 80g
Kooyba "onepi n Hocn" 150g
Majua (6e3 pykaba) 180g
KynahmHTn 450g
CnabaHua 15g
CHWHEHbEΦNTPA
Ia 6n ce o6e36eDnH nontmamnpe3yntatn cyweha y cBAkoj npnnu, 3anamTnte da qnIap Tpe6a yBek da 6yde uCt. He 3abopabnte da npOBepnte n OCHNTte qnIap nopCne CBaKor UNKlyca cyweHa.
Baxho:
OuHCTNTn fHITap cAmo KaJa je MaunHa XnaHa! 3a YnHHe bE fHITpa CneDInTe CneDeHn noCTynak:
OTbOpTN Bpata.
Dpxkata npnapobema pykama nnotncnyra npema rope da 6nra n3Bykn.
PpoHpiTuMaIOnroHpy6pHtpaNOTBOpHTra.
V3ByhI nnauHne n3 hera.
3aTbOpTuФnTap npoBepaBajyH npu Tome da ce 3aTbapau BpaTu y npabunah noJokaj.
OuCTnT B0Hnue cHnTp a Ha Maunn H yKoNko je nTope6Ho ycncBaHem npaunHe.
NocTabuTn qunTap y Hberoe BoHnue (cInka 13).
OTKPNBAHe KBAPOBA
CbneEektpnHn anapatn cy noDnoXHN KBaOBbMa. ObpaTn Tn paxHy ha To da y TaKBM cnyajeBMa Tpe6a no3BaTN KBAIINKOBaHOr eektpnHa. Mehytm, moKeTe n camn da peWnte MHore npObneme KoJy CTBPheHn.
Baxho: Y cnyajy HenncnpaBHor paJa, o6paTn Tn pKbY Ha To Da Tpe6a Odmax NCKonTuMaunHy n3 eNeKtpnHe MpeKe 3a HanajaBe.
Ipe Hero wTo no3OBete haw OBnaWHeH cepBnC, npOBepuTe da nn je y3pOK HabeDen OJe.
PEWABAHE NPOBJIEMA
Ako MaunHa He cTapTyje
- yBepuTn ce y To:
1)PpOBepuTn da nn je npKbUyBaHaBe Ha eneKtpnHy MpeKy.
2)Поберпддл leутчнua icnpabha:
2a)Далne je nperopeo ocnrypaq? (KoHTpOJa je naKa,doBOJbHo je npNKbUyHTn HeKn dpyr ypehajy Kao 1to je cToHa lamna).
2b)Даису NOWTOBaHcBeMHCTpyKUJne n3 YnyTCTBa 3a ynotpe6y?
AkoMaunHaHe cTapTyje
- yBepuTuCe y To:
06aJb1HJa Jn cy BpaTa npabNHO 3aTbOpeHa.
BCTAHOBJIEHHRA MAUHHN 109-111
BcTaHOBJIeHHo6JaIHaHHa109-110
BupiBHOBaHH cyuHbHoMaunn 110
Пд' endanhaнншангдя вкndу nobitrpa 110
Пл'd' endahnn do eJeKtpnHoi mepexi 111

KOPNUCTYBAHHO BJIADHAHHAM 111-113
-OnncdyHKui 111-112
Bikohue 112
- RaPabNJIbHO cyuHTn 6JIn3Hy 112
3actepexeHHn TkaHn 113
·Tabniur nporpaam 113
·Bara 6iin3n 113

DOrna
- Ynctka pfjltpa 114
BnABJIeHHHeCnpaBHOCTe 114
·PiueHH npo6nem 114
-DoataKobi cyHKui 114
ПРИМITКИТА ПОРади ДлЯ KОРNUCTYBAU
TEXHIUHIDAHI
BCTAHOBJIeHHRA MauuHn

BCTAHOBJIENHHJ

BCTaHOBHeHHo6nHaHHnoBuHHO 3iINCHOBaTcK BaJIicpiKOBaHM nepcoHaOM, 3rIHO IHcTyKci BnpO6Nka. HenpaBnIbHe BCTaHOBHeHH MaunH MoKe CTaTN npuHNO HaHeCHeHH NOkOJKeHb IIOdM Ta peqam, 30 3NaOHApTbcNp6n3y.
BCTaHOBIb cyuINbHy MaunHy nopA3 BIKHOM, 06 noerwnBnBiD BOJororo nobITpr.
KopncTyIeTcA IJnAHrom IJRA BnBOy NOBITPA, 06 yHnKHyTN NOBN KOHDeHCaTy; 3akpiitb Ioro y OTBopi A, po3TaWOBAHOMy Ha 3aHni CTIni O6laDHaHHra, BHN3y MaunHn (pnc.3).
BCTAHOBJIENH
Hikon He hakpnaBae BENTnlauiHi pewiTK, po3miueHi Ha 3aHni CTiHci BaWoRo 0bnHaHH.
NocTaBTe pInbTp y po6Oe noJIOKeHHa (pnc. 4).
VHCTITb BHyTpIiHIO qACTnHy KOUkA dIa cyuIHHa 3a DonOMOrOIO BONOROI raHhipKn, uOb yCyHyTu MOKlnBn PII, HKn MoKe y Hbomy 3bnpaTnCn.
MOHTAX CUYINJIbHOI MAUNHH
Hixk, 0 peryIIOIbC. Iomicti cyuINbHy MaunHy y BeptnKaJIbHe nOLOKeHHraTak uo BOHa MiHO OINpAnac Ha BcI YoITnp HIXKn. BupIBHrTe MaunHy, peryIOUCh BiIDNOBIDHI HIXKn, k ONcaHO HIXKYe.
Пдимить злгкmaшину.
BidperyIIOHe HIXKN Ha noTpi6Hn Bucoti (pnc.5).
OnyctiB MaunHy.
He dockohano BnipBnHa MaunHa MoKe noWkoNTn NiDunHnKn i 3Hocntncpa hiwe yacy. Lc cyuNbHa MaunHa He NOBnHa KpinNTncr Do niJnOrn.
ПД'ЕДHAHHЯ WJAHry ДЯ BVBODY NOBITPRA
Пи'd'едн'teшлгдпьвody nobiTPЯdo BvBIDHOrO OTbOpy,po3taWOBaHOro Ha 3aHnI CTInci cyuINbHOI MaunHn (pnc.6).
PiEHaTe OINKHeuB WnAhry Do MyfTn, 0o DoaTaBCa.
NobepHtMyfTy (pa30 3i wHaROM) npOTn roHHNKOBoi cTpiKN y BnBiHOMy OTbopi cyuINbHOI MaunHn.
V IpotaHcHbIaHa3OBHi 3 aHbOi CTIHKn MaunHn MaunHn BnIBo a60 BnpaboYepe3 Hiuy,po3TaWObaHy Bn3y KapKacaMaunHn.
VomictiB iHnKineCb shaHaRa npa3 3 BIKHom a60 BeHTnIaHm IIOKOM, 1O BHXoNTb Ha3OBHi. RaKuo ce HEMOXKnBO, NepeKoHaTecs, 1O KOJI Bn KOpNCTyTEcR MaunHO, npMiuueHHr Do6pe npOdyBaCTbc. KopNCTyTEcR raKOM, 1O HaDaTeBCdra 3akpinHeHHaNaHry (pnc.7).
YBara: LAnr dIy BvOdy nobITpnoBHe 6yt NiEChn TaKoT Toi, KOn nobITp He BvBODntbCn Ha3OBHi, Tomy y npOTnHexHomy BnnaDky cywnbHa MaunHa norlnHATmE Bonore nobITp i cKn cyuHnBa dye DOBWM. Bonore nobITp moKe NowKOdHTcWnblHy MaunHy. 3i WnAhry dIy BvBOdy nobITp BxODNTb TiIbKn rapAye I Bonore nobITp, Ake He c Hebe3neHMM, aJe BOHO, ODAK, He NOBHHO HappaBnTnCn Ha IIODei, TBapH i pocnnH.
YBara: nobitpr, 0BBOHTbC, He NOBHHO BKNDaTnC y Tpy6oPobi, kN BnKOpNCTOByCTbC dIy BnBOy BiHOBHeHOrO dmy 3 06naHaHH, 0c cnaHc ra3 a60 inhe naIbHe.
ENEKTPNUEHIIEDHAHH
3aneBHTbca, 0e enektpnHa Hanpyra, Bka3aHa y texhiHnx daHnx Ha TabniuCi, HAKneChi 3aDhboro 60ky o6naDaHHB, BiDnOBiAde Hanpy3i enekTpomepeki.
3anobixnK,eneKtpuHni uHypni po3eTka eneKtpomepeXi NOBHHi MaTH XapaKTepNCtIKI Rki DO3BOJAIOTb BNTpMaTH MaKcIMaJIbHe HabaHTaKeHHBKA3aHe Y TabNIUJI.
Nicn BCTaHOBHeHH O6JaHaHH, DoCTyn Do eJKeTpOmepeXi NOBHeH 3abe3neyBaTnCBAeNoJIIOCHIM BMKAayem.
▼EnektpnHa po3eTka,do AkoiPiKJIIOUaCTbCa MaunHa,NOBHHa 6yTu 3a3emJeHa.Y npOTnJExHOMy BUNaIKy,BNPO6NHk BiXINHe 6yDb-ky BiNObIaJIbHiCt b 3a MOxJIbI Heuachi BUNaIKn (pnc.8).
YKIO eNKeTpUHmIHyP kIMcB YHOM NOIKoJxHeH, 3BepHiTbC y CneJIaIi3ObaHn UeHTp TexHHO O6ClyROByBaHH.
3abopohetbcn iEeHyBaHTCuunbHy MaunHy Do eEnKtpomepexi 3a DonomorHO HENPAMX enemehTIB, TaNX JIK npoOBKyBaY ta 6araTOKOHTaKTHi 3'EDhyaY.
V Nomictb 06naDHaHHa TaK, 06 eNeKtpnHm shyP 6by Nerko DocTyHn i 06 y BnnaDky Heo6XiHocTi Noro MoXHa 6yNo BiD'edHATN.
YBara: Y KInci uKny cyuHnB BiD'cHaIte cyuHbHy MaunHy BiD eNeKtpomepexi, 0o6 dITn He MOrn II yBimKHyTu.
KOPNUCTYBAHHRA MAMUNHOIO

ONNCyHKUIN

Pyka peryIIOBAHHaCy cyiHn: nobepHiB pyky IJI BCTaHOJIeHH 6axKaHOrO aCy cyiHn (pnc.9). (INB. TaBnIIO nporpaM IJI Bn6Opy nporpaMHa OCHOBI BNDy TKAHHN)
HapnkiHcI KOxHOrO uKny nepe6aueHt TaKoK uKl OXoJIoXeHH, iIOuHn npotrrom 10-15 XBUNH, nId Yac AkoRo MaunHa 3aIIuHaetbCBy BKIOUHeHO.
Khonka Ctap:HaTnCHiHb Ha zu KhoNky, yo6 yBIMKHyTu zKJI cyuHHA (3aropntbcraCITIOioD)
Khonka Ierkoro abo ehepriHoro cyuHHa: HATNCHYBUNIIO KHONKY,MOxHa Bn6patu BnD cyuHHa, Akn Bn 6axacte 3diChHTn: eheprHe abo JerKe (pnc.11).
ONNCyHKLIM
Khonka BKNI/BNKJI:HaTnciHb Ha zio KhoNky, zo6 BKnIOHTMaunHy.
BIKOHLE
Lc cywnbHa maHnO cHae H pOHTaBnM OTBOPm d3aBaHTaxeHH 6iIN3HN. IOTHRHITb pyKy Ha ce6e, He npNKlaDaOuC nIn, nicr yoro deIikaTHo BiIDkpNte BIKOHue. KOn Ni dac uKny cyunHn BIKOHue BiIDkpNBCTbC, MaUNHa npinnHnTb CBOIO POBOTy.
ybara:
VII. YAC UKJy cyuHn 6iIN3Ha 6yde rapHoo. BIn3Ha OxOJxkyetbcn iD Yac UKJy OxONoJxHH.
Hikon He BiKpnBaTe BIKOne NiD Yac UKNy CyuHHN, Oo6 yHNKHyTN oniKIB BiI rapaHOI napn a60 BiD cAmOI 6IN3H.
AK PABINbHO CYWNTBIIIN3HY
Dotpmyteca HactynHnx nyHKtB:
A
BiiJxMItb 6iIn3Hy.
B
Pozinitb 6iun3Hy 3a BnDOM a60 BOLOKHOM TKAHHN.
3akpiTe 3amKn Ta 3aunitb ryn, He 3abuOnn npu cboMy cnopoxHNTK nuenei Baoro odry.
BUNBepHiTb CBeTpN.
C
BikpnTe BikoHcE.
BKNHbTe 6iIN3Hy y KOuHK, He 3a6yBaIOU3aBAHTaxNTn npocTnpaJa 3 OdHorO 60ky.
PekomeHnyeMo 3aBaHTaKyBaTN pa3OM BENKIM Ta MAnO OJr.
D
3aKpnIte BikoHc.
BntpiB pyKn (hikoNn He TopKaTecn eNeKtpuHoi anapaTynp MOKpMn pykAmn).
Bknioitb wtencenby enektpnHy po3eKy.
E
HaTnCHITb KhONKy ON/OFF, 06 BKNIOHTMaunHy.
3auekaTe Ha 3ByKOBn CnHraI Ha Te,io6 BKNIOUBCB CBITIOIO.
Bn6epitb BiINObiHm cIKL cyuHHa (INB. TabIIO nporpa) aO bCTaHOBIT pyKy TaMepa Ha HeoXiHn Yac CyuHHA.
3auekaTe, NOKn He BKIOuHTbCBA CBITNOIOiHaTNCHTb KONKy "CTAP", 0o6 PO3noHaTu cIKN cyuiHH.
F
3ynHkn MaunHni iJ ac uKnCyuiHHIOCTb BiKpntu BIKOHue (KoWNepectaHe KpyTNTCA).
I npoobkennu cky cyiHn 3akniTe BIKOHce iHaTNCiB KHONKY CTapT.
I npabnBHorO cyuHHo6EMHOrO OaIpyeKOMeHdyEmo 3yunHATn pObTy MaunHn i KInbKa pa3IB BnMaTn 6iIN3Hy niD yac LkNcyuHHra.
G
▼ПияTORO,ЯВиВинHAN cyx6iIN3Hy, noYnCTiB pInbTp,ДЯ YORO:
-BNTARHHTb pijnbTp;
-BiKpIe IIOuNCTITb NOro 3a DOnOMorOIO M'RAKOI UToCH;
-3akpnTe pInbTp i NOBepHiTb NOro Ha Micce;
- pIbTp nOtpi6Ho nepioDnHOM MNTMnBHMPO3uHOM,0o6 yCyHyTN MOxJIINBi dp6Hi HeNCTOTn.
BnHATn UTencenb 3 po3eTKN.
3ACTEPEXEHHДТKAHINH
Rkpo y Bac noBnncy CmHInu 0do Bnu TkaHn, nepeBipTe etKekTy Ha OJ3i. MaJx He Bcix TkaHnax YOJ3i, Aki MoKyTB cyuTnCnB CyuNbHi MaunHi, cneuaIbHa Bka3IBKa Ha Te, 1o IX MOxHa cyuHTn y IbOMy ObaadHnHi. Uo6 yHnKHytn eNeKtpn3aui OJ4ry, nD cac uKny NonoCKaHH y npaBHi MaunHi KopnCTyTEcH NOM'rkSyBaem. BiPa3y BmIMtB 3 KOnKa OJ4 3 CNHTeTuHnx TkaHH, iHaKe Bih 3imHeTcR.
TABJIINU INPOIPTPAM
| Тканина | Bara cyuоi 6iInizhi | Рекоменда Ниьчын | Час уxbлларх | |
| Сушина дд сklаданьdoшфи | Сушина дд прасувань | |||
| Поррама 3 Таймером | ||||
| Бавовиа/Льон | ПОЛOBИHA 3ABAHTAXEHHA | 20-40 min.40-60 | ||
| Поррама 3 Таймером | ||||
| Си ntETичи TkaHINи | ПОЛOBИHA 3ABAHTAXEHHA | 20-40 min.40-60 | ||
| Делikathи си ntETичи TkaHINи | 1,5kg | 20-40 min.40-60 | ||
| Тканина | Bara cyuоi 6iInizhi | Рекоменда Ниьчын | Балу СУХа 6iInizha | |
| Поррама[elektrpoHHOro kOHTpOJIu | ||||
| Бавовиа/Льон | MAKSCIMAJIbHE 3ABAHTAXEHHA | Дуже суха 6iInizha | ||
| Бавовиа/Льон | MAKSCIMAJIbHE 3ABAHTAXEHHA | Дуя скудань doшфи | ||
| Бавовиа/Льон | MAKSCIMAJIbHE 3ABAHTAXEHHA | Волora 6iInizha дд прасувань | ||
| Бавовиа/Льон | MAKSCIMAJIbHE 3ABAHTAXEHHA | Дуже волora 6iInizha | ||
| Поррама[elektrpoHHOro kOHTpOJIu | ||||
| Делikathи си ntETичи TkaHINи | ПОЛOBИHA 3ABAHTAXEHHA | Дуже суха 6iInizha | ||
| Делikathи си ntETичи TkaHINи | ПОЛOBИHA 3ABAHTAXEHHA | Дуя скудань doшфи | ||
| Делikathи си ntETичи TkaHINи | ПОЛOBИHA 3ABAHTAXEHHA | ВолORA 6iInizha дд прасувань | ||
| Делikathи си ntETичи TkaHINи | ПОЛOBИHA 3ABAHTAXEHHA | Дуже волORA 6iInizha | ||
EHEPIHCECUHHDEJIKATHE CYUHH
Ybara: Yac cyuHHa 3aJIeKHTb BiD pi3Hnx fakTopiB: Barn, po3MpiB OJary, BNDy TKAHH, BONorocTi. DObpe BiJXaTm ODar coxHe WBNdIe. He nepeBaHTaxyIte cyuHbHy MaunHy i Bawa 6iIN3He He 6yde 3im'ra.
BAGA BIIIN3HN
Bka3aHa Bara 6iin3Hn np6n3Ha i moKe 3aIeKATn BiD npOecy II BnPo6HtBa, KaocTi Ta 6p06Kn.
Noctinbha 6iim3Ha
KoBpa 700 r.
Ppoctpaanda 550r.
Bepxhi npoctpaanda 600 r.
Habolouka 180 r.
JbHnhi Bnpo6n dnn doMy
PuyhNk dIa Tapinok 90 r.
PuyHnK DnIaTakAHIB 70r.
PuyHHK 3BnuaHm20r.
PyuHnO6aHHm200r.
Inha 6inn3Ha
BaHHnxata1200r.
PyuHnUOK6aHHm800r.
Copouka xiHoua 300r.
Copouka yonobiu 600r.
Xanat XInOHm/0JIOBcHm 3 CnHTeTNUHOI TKAHNH 300r.
JbHHiCKaTeptHH
CkaTeptHa 250r.
BéniKa ckaTeptiHa 1000 r.
CepBETK 80r.
YonobiyuO
Copouka BnnpaHa roToBa do HocinHn 250r.
Maika (6e3 pykabib) 120 r.
Tpycn 80r.
Dobri chonobici Tpycn 250 r.
Піжама 480r.
HiHa copouka 400r.
Xyctoukn 25r.
XiHouyOdA
Copouka 100r.
Maika 100r.
Tpycn 80r.
KombiHa 150r.
HiHa copoKa 180r.
Пixama 450r.
XycToUKn 15r.
CHCTKAΦIJIbTPA
ДязабeзпeeHHЯ 6e3dorahHHnx pe3yIbTaTib cywIHHЯ 3a 6byb-aknx yMOB nam'raTe, loФiNbTp nobuHEn 3abKdN bTyN chCTn. He 3a6yBaIte nepeBiprTu Ta YnCTHTnФiNbTp NiCJRA KOKHOrO UNKny cywIHHa.
yBara:
HcTb pfIbTp TiIbKn ToDi, KOn MaunHa XoNODHa! DnA YnCTkn φInbTp a DiTe HAcTyINHM YNHOM:
BViDkpMTe BikoHue.
3axonitbphiBtpdbOMa pykamn i niuTOBXHtB BROPy, 06 BuHATN.
3nerka po3cyHbTe BepxHi Kpa fIbTp a BidknIe pfInbTp.
BnMItbnyoK.
3aKpInTe pIbTp, 3aneBnBunc, 10 Bin Dobpe 3aKpBcra.
NoucTiB Hapabnoyi pIbTpmaHn; KIO Heo6xIDHO, KopntyTeCn
BCTaHOBiTbΦiJIbTp y Ioro HAnpaBnHoui (pnc. 13).

BnABJIeHHa NOWKOJXEHb
Byd-Ke eEke TpuHne 6nHaHH MoKe BnTu 3 JaNy. PAm'AtaTe, 0u y uNx BnauKax Heo6XiHO 3BepHyTcA do KBanidikobahoro eEektpka. Y KOKHOMy Bnaukky, Bu cami moKeTe BpiUnTo 6araTo npOBeM, 3 kIMN Bu CTNKHTecA.
YBara: Y BnnaKny noraoHoi po6oTu 06naHaHH He 3a6yDbTe HeraiHo BiD'cHaTH MaunHy BiEneKtpomepexi.
Iepu, HIX 3BepHyTncs 3a Donomoro y LcHTp TexHicHoro 06cNyroBvBaHH, nepeBiPe T Bka3aHi HxKHe nyHKn.
PIUeHHI NPOEJIEM
Kaio MaunHa He BKJIOaCTbca
3aneBHTbca, 0
1) MaunHa 6yna NiD'cHaHa Do eNektpomepeki.
2)po3eTka cnpabHa:
2a) He BnBnNo nnaBkn 3anO6ixHnk (ue HeCKNaADHO: Docntb NiD'EDHaTn IHwY anapaTy, TaKy k, HApnPKnaI, HactInbHa lamna).
2b) 6ynn 3diinchehi yci dii, Bka3aHi B iHCTpykui
Kaio Maunha He NouHae npaIOBaTu
3aneBHTbCA,IO:
1)Bikonue 6yno do6pe 3akpuTe.
2) Khonka "CTapT" HATNUCHyTa.
Biln3Ha He COXHe
3aneBHTbcra, 00:
1) WnAnr BnBOny nobiTp Hc 3irHyTuH He nepeKpyeHm.
2) pInbTp He 3a6ntn (Pam'rTaIte, zo KOnn BiKoHcE BiKpNBaEtbcN, BHyTpiHi DeTaJI CyuINbHOi MaunHn Ta 6iIN3Ha MoKyTb 6yTu dyXe rapui).
Kkso nicn BVKOHH ONcaHx yHKui O6naHaHH npoOBKyc 3aHnWATnc HecnpabHm, NOiOMTe npo HecnpabHicb B ha6bnXyN yNOBHOaKeHn ceHTp TexHOrO o6cnyroByBaHH. IIO6'3Ho npocmo NOiOMNT npu cboMy moelb, f6pnHn Homep Ta BnD HecnpabHocti. Lg IHopmaia Do3BOJNT b npaizBHKOBi ceHTpy TexHOrO o6cnyroByBaHH 3haTn Heo6xidhi 3anachi YactHH i, OTxe, rapaHTyBaTMe WBnke Ta efeKTNBHe BVKOHH PemONTy.
IDDATKOBIФYHKLII
IpoaBeMoxe Bam 3anponohyBatn KOMPJIeKTyOci IJra IHwO RO BuNy MOHTaxy, AKN IIN EKOHOMII npocTopy Donomoxe Bam 3akpinTu cyuunbHy MaunHy NaI ppaBHO MauuHO 3 ppoHTaBHM 3aBaHTaxKeHHaM. Moelb MaunHn, RaKa Do3BOInTb Bam 3diinCHTu ceN MOHTax, Bam nopeKomeHdye Bam mohtep.
Ybaxaembi Nokynatelb!
Blaoradapm Bac 3a Bb6op Haewero n3deJn. Ipeep noKJIoueHem m noJb3ObaHem MaunHO npoHTne, noKaIyicTa, BHMaTeNbHO daHHbIe IHCTpyKUnn NO kcnnyataun.
IOnHMaHHe npHcHnOB pa6Otbl MaunHbI rapaHTnpyET npaBnIbHoe nHaJeKHoe ee IcNoJIb3OBAHHe.
B cnyuae npo#aJn nn nepedaun cyuINbHOJ MaUNHb HOBOMy nOlb3OBaTeIIO Heo6xOIMTO kXe nepeDaTb emy 3TN INCTpyKmN NO 3KcPnyatau.
OΓJIABJIΕΗΝΕ


3AMEUHnI COBETbI JJIa NOJb3OBATEJI 116-116
TexHueckne daHHbIe 115

ONICAHNE CYUINJIbHOI MAUNHbI 117

YCTAHOBKA CYUINJIbHOJ MAUNHbI 117-119
YCTaHOBka 117-118
- BbictabJIeHne cyuINbHO MaunHbI no ropn3oHTaII 118
- PoiocoeiHHeHne Tpy6bI JnO tBOda Bo3dyxa 118
-ПодклioченkeКЗлкгпческoc cetn 119

IIOJIb3OBAHNE CyUINJIbHOJ MAUINHOJ 119-121
- OnpcaHne cyHKcui 119-120
CMOTPOBOE OKHO 120 - KaK npabnIbHo cyuHTb 6eJIbe 120
-Мерblпеборожностидяразлчьх Видов ТkaHn 121
·Tablina nporpaMM 121
Bec pa3nHbIX n3deJin 121

TEXHnueCKOE OBCJyXKBAHNE
·YnctkaΦnIbTpα 122
-ObnapyxeHne HncnpaBnocTei 122
- YcTpaHHeHHeNCnPaBHOCTeI 122
- IoponHnteIbHbIe npHaIeXHOCTn 122
3AMEUAHN I COBETbI JIJIIOJIb3OBATE
TEXHnueCKNE DAHHbIE
KhoNka 7aAaeu Hn HHTeHcNBHO cyKn: HaXIMar Ha 3Tu KhoNky, MOxHO BbIpaTb peXm cyKn: 7aAaun nn nHTEHCNBHy (Pnc.11).
ONICAHNEФYHKLIMN
Khonka BkI/BbIK: HaxMITE 3Ty KONky IINBkIOHcHnMaunHbl.
CMOTPOBOE OKHO
B 3TOI cyuINbHOn MaunHe npedcMoTpeHa fpoHTaJIbHnA 3arpy3ka. IOTHnTe, He npinraa n36bIToCHoro ycInn, pyKoRTky BnepeNIO octopoxHO OTkpoNTe CMOTPOBOE OKHO. Ecn 3TO OKHO 6yDet OTKpbIto BO Bpemr cIKNa cyuKn, TO MaunHa OCTAHOBNTca.
BHMaHHe:
BoBpemzukna cyuks beJebe octaetc ropyim.
OHO oxJaKaTaETcB Bo BpeMa LkJa OxJaKdHnA.
HnKOrJa He OTKpbBaIe CMOtpoBoe OKHO Ha 3Tane CyuKn, YTO6bI He 06KeYbC rOpAHM napOM nIN npN KacaHN CaMOro 6eJb.
KAK INPABINbHO CYUNTB BELBE
PnpdepxnBaItecb cIeDyUoInx npaBnI:
A
BbINONHHTeOTKIM6JIbIa.
B
PaccopTpnyTe 6eIbe no Tnny TkaHn.
3acterHnTe BCE MoHNu N yroBuCb; BbHbTe BCE COePXMoe N3 KapMaHOB.
VbIbeHnTe Hau3HaHKy nyIOBepbl.
C
OTkpOte DBepu CMToPoBOrO OKha.
3arpy3nte 6eJIbe B 6apa6aH; npocTbIHn CneIyET 3arpyKATb Cyra.
PeKOMeHnyetcB 60JIbUne n MeJKeN3IeJIa KNaCTb BmecTe.
D
3aKpoIe DBepuy.
▼BbITpnte Hacyxo pykn (Hn B KOem cnyuae He kacaTecb 3JeKtpo6OpydoBaHnBJaXhblmpykamn).
V BcTaBbTe BnIKy B po3eTKy.
E
Haxmte Khonky BKJ/BbIKI dna BKJIIOUeHHMaunHbl.
Doxntecb 3ByKOBORo CnHaJa n OTKIOUHeHn HINKaTopa.
V BbIbePte Han6OJee noXoJaun Cukn cyuKn (cm. Ta6nuy nporpaMM) nn yCTaHOBtne nepeKluoyateJIb BBIOpa
BpeMeHn Ha HyXHOe BpeM cyuKn.
JIOXdntecb BKHoueHn HnDnKaTopa n HaxMnte KhoNky Nycka dIa BkIoueHn IuKJa cyuKn.
F
VIOCTAHOBKN MaUNHBI BO BPEM ZUKNA CYWKN DOCTATOUHO OTKpbITb DBepuy CMOTPOBORO OKHa (Pn3TOM BpaueHne 6apabaha npekpaTNTc)
YTO6bI npOdoJXnTb cNkJI cyuKn, 3aKpOInTe DBepuy HaxMITE KHOKNy Nycka.
YTo6bI XopoOo BbCyuNTb KpyNhbIe N3dJIINr, peKOMeHdyETcH HeCKoJIbKO pa3B npOecce ZNKLa cyuKn OCTaHOBnTb MaunHy npeJIOxNtB 6JIbe BHyTpNI Hee.
G
Nocne toro kaK Bbl BbHyn 6enbe, noHCTnte qnlbTp:
-NOHMMTeΦnIbTp;
-OTKpoTe erO n npocntte MArKOIeTKoN;
-3aKpOHTeФnIbTpNIOCTaBbTeHa CBOE MecTO;
- nepnoDnueckn Cne dyet npombIbAtb
fNbTp MbIbHOBoOy ydaJeHHMENKx 3aPra3HeHn.
BbHbTe BnIKy n3 po3eTkn.
MEPbI INPEDOCTOPOXHOCTN DJIa PA3HbIX BVIDOB TKAHN
UTo6bI yToOHnTB TIN TKaHIn, NOCMOTpnte 3TNKeTky no yXoOy Ha n3dEHN. NOpTu Bce n3dEHN, dOnyckAIOUne cyuKy, HMeIOT COOTBETCTBYIOUIN CNMBON, Yka3bIAIOUIN HA BO3MOXHOCTb cyuKn B MaunHe. UTo6bI n36ExaTb o6pa30BaHnI CTaTIueCKORO 3JIeKTPueCtBA Ha n3dEINx, INcNoJIb3yIte npi Ctnpke Ha cTaINI IONOCKAHn YmArHTeNb. Cpa3y Xe BBHIMMaTe CnHTeTNUeCKNe n3dEINr n3 6apabHa, UTo6bI OHn He CMnNCb.
TABJIINLA IPOIPOPAMM
HHTEHCNBHA CUYKA UADJUAR CYKA
BHMaHne! BpemcN 3abncnT OT pa3nnHbIX paKTopOB: Beca, pa3Mepa n3denn, Tnna TkaHn, BnaXHoCTn. XopoOo OTXaTbe n3denn6ydyT BbcUyWeHHbIMN nepBBIMN. YTo6bl N3denn He MAnCb, He neperpykaTe cyuNKy.
BEC PA3JIINHbIX N3DEJIIN
OBHAPYXEHNE HENCPABHOCTEN
B IIIO6bIX 3JNEKTPo6bIOTOBbIX np6opax MOrY T MeTb MeCTO HEnCpabHOcTb. B TaKnx CnyaXH HyxHO BCERda Obaaatcbc K KBaINOpuPobAHOMy 3JNEKTPnky. ODAkO MHOrne c60n Bbl MoKeTe yctpaHHTb camocToTebHO.
BHMaHne! Ecnn MaunHa nloxo pa6oTaET, Heo6xOIMo cpa3y Je OTCoeHNHTb ee ot 3JeKtpocetn.
Ipejde yem obaaatabca B cepBnchbui eHTp, npoBepbTe onncahhbie Hxke ycNOBna.
YCTPAHEHNE HENCINPABHOCTEI
EcnnMaunHaHe BKJIOyaeTc,
- npOBepbTe:
1) BbINOHeNo JINIOKNIouHne K3NeKTpOcETN; 2) NcnpaBHa JIN pO3eTKa:
2a) He neperopen nnpedoxpahntel? (nnpoBepKn noKnIouHnte K po3etke IIObO np6op, HapnmeP, HactOnbHyIO lamny);
2b) co6IIOJeHb IIN Bce INHCTpyKcnn DaHHOro pyKOBOcTBA.
EcnMaunHa He BkIIOyaeTcA,
- npOBepbTe:
1) npabnIbHO JIN 3aKpbTa DBepu;
2) haxata Jn KhoNka nycka (Start).
Ecnn6enbe He BbicywnBaetc,
- npOBepbTe:
1) He neperHyTa IIN He nepeKpyeHa IIN BbInyCKHa Tpy6a;
2) He 3acopeh JIN φnIbTp (He 3a6bIbaIe Tnp INOTKpbIbAHIN DBepcI CMOTPOBOrO OKHa O TOM, YTO BHyTpeHHne DeTaII CyuINbHOI MaUNHbI N CaMO BeJIbe MOrYt 6bIT bOChEh ROPAHM).
Ecni nocJIe BbINOJIHeHn 3Tnx npOBepOK HeNCnpaBHOCTb COxpaHHeTcH, O6paNTecb B 6bnXaIshn CepBnchbl ueHtp c OnncAHmep NpO6nembl. Pn3Tom Heo6xoJMo yKa3aTb MoJeIb, 3aBOdckOn Homep N TnN HeNCnpaBHOCTn. 3Ta INHΦopMaun No3BOJNT CneuaJIncTam CepBnCHOrO ueCneuHTb HxKhble 3anactn N, TaKIM O6pa3OM, 6bICTpo n 3ΦΦeKTNBHO BbINOJHHTb peMOHT.
DONOJIHNTEJIbHbIE PnHaIeJEXKHOCTN
Bbl MoxkTe npno6peTn KOMnKeT dIy yCTaHOBKn BaWe cyuINbHoi MaunHbI CBepxHa CTnpaJIbHyO MaunHy C ppoHTaIbHoi 3arpy3Ko, YTO oBeCneUIT 3KOHOMIO npocTpahCTBa. IpokOHcyIbTnpuyItec b Ya BaWero npodabua, KaKHe MOneN DoNyCKaOT BblONHeHne TaKOrO MOHTaxa.


- CONTENTS
- NOTES AND ADVICE FOR THE USER 11-12
- DESCRIPTION OF THE APPLIANCE 113
- INSTALLING THE APPLIANCE 13-15
- USING THE APPLIANCE 15-17
- MAINTENANCE
- NOTES AND ADVICE FOR THE USER
- These products are volatile by nature and could cause an explosion.
- THE MANUFACTURER WILL NOT BE HELD RESPONSIBLE FOR ANY INCIDENTS RESULTING FROM NON-COMPLIANCE WITH SAFETY STANDARDS OR THE REQUIREMENTS OF THIS INSTRUCTION BOOK.
- INSTALLING THE APPLIANCE
- INSTALLATION
- LEVELLING THE DRIER
- CONNECTING THE AIR EXHAUST TUBE
- ELECTRICAL CONNECTION
- USING THE APPLIANCE
- DESCRIPTION OF THE FUNCTIONS
- DOOR
- Important:
- DRYING THE WASHING CORRECTLY
- Proceed as follows:
- PRECAUTIONS FOR FABRIC TYPES
- CLEANING THE FILTER
- FAULT FINDING
- RESOLVING PROBLEMS
- If the drier doesn't start
- The washing does not dry
- OPTIONAL ACCESSORIES
- Werter Kunde,
- RATT SATT ATT TORKA TVVATTGODSET
- POKNY K PESI O TKANINY
- MEPE INPEDOCTPOXKHOCTN 3A TKAHINHE
- NocteJbHa
- Tahe
- JopraH
- Kpne 3a TaHnpe
- CTOJIbA
- Nuxama
- CHWHEHbEΦNTPA
- Baxho:
- OTKPNBAHe KBAPOBA
- PEWABAHE NPOBJIEMA
- Ako MaunHa He cTapTyje
- AkoMaunHaHe cTapTyje
- BCTAHOBJIEHHRA MAUHHN 109-111
- KOPNUCTYBAHHO BJIADHAHHAM 111-113
- DOrna
- ПРИМITКИТА ПОРади ДлЯ KОРNUCTYBAU
- BCTAHOBJIeHHRA MauuHn
- BCTAHOBJIENHHJ
- BCTAHOBJIENH
- MOHTAX CUYINJIbHOI MAUNHH
- ПД'ЕДHAHHЯ WJAHry ДЯ BVBODY NOBITPRA
- ENEKTPNUEHIIEDHAHH
- KOPNUCTYBAHHRA MAMUNHOIO
- ONNCyHKUIN
- ONNCyHKLIM
- BIKOHLE
- ybara:
- AK PABINbHO CYWNTBIIIN3HY
- Dotpmyteca HactynHnx nyHKtB:
- 3ACTEPEXEHHДТKAHINH
- BAGA BIIIN3HN
- Noctinbha 6iim3Ha
- JbHnhi Bnpo6n dnn doMy
- Inha 6inn3Ha
- JbHHiCKaTeptHH
- YonobiyuO
- XiHouyOdA
- CHCTKAΦIJIbTPA
- BnABJIeHHa NOWKOJXEHb
- PIUeHHI NPOEJIEM
- Kaio MaunHa He BKJIOaCTbca
- Kaio Maunha He NouHae npaIOBaTu
- Biln3Ha He COXHe
- IDDATKOBIФYHKLII
- Ybaxaembi Nokynatelb!
- OΓJIABJIΕΗΝΕ
- 3AMEUHnI COBETbI JJIa NOJb3OBATEJI 116-116
- ONICAHNE CYUINJIbHOI MAUNHbI 117
- YCTAHOBKA CYUINJIbHOJ MAUNHbI 117-119
- IIOJIb3OBAHNE CyUINJIbHOJ MAUINHOJ 119-121
- TEXHnueCKOE OBCJyXKBAHNE
- 3AMEUAHN I COBETbI JIJIIOJIb3OBATE
- ONICAHNEФYHKLIMN
- CMOTPOBOE OKHO
- BHMaHHe:
- KAK INPABINbHO CYUNTB BELBE
- PnpdepxnBaItecb cIeDyUoInx npaBnI:
- MEPbI INPEDOCTOPOXHOCTN DJIa PA3HbIX BVIDOB TKAHN
- OBHAPYXEHNE HENCPABHOCTEN
- YCTPAHEHNE HENCINPABHOCTEI
- EcnnMaunHaHe BKJIOyaeTc,
- EcnMaunHa He BkIIOyaeTcA,
- Ecnn6enbe He BbicywnBaetc,
- DONOJIHNTEJIbHbIE PnHaIeJEXKHOCTN
Brand : Ardo
Model : VD07S
Category : Tumble dryer