
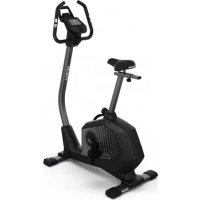
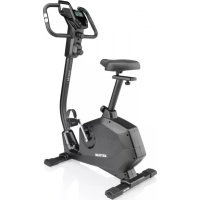
Vitto XL - Exercise bike KETTLER - Free user manual and instructions
Find the device manual for free Vitto XL KETTLER in PDF.

| Product Type | Exercise Bike |
| Brand | Kettler |
| Model | Vitto XL |
| Training Computer | ST2510-8 / ST2550-8, -9 / ST2551-8 |
| Power Supply | 2 LR6, AA, 1.5 V batteries |
| Heart Rate Sensors | Manual (grip sensors), ear clip, chest strap (accessory) |
| Display | Time, speed, distance, cadence, heart rate, kilojoules, ambient temperature |
| Training Programs | Free with specification of time, distance, energy, heart rate, heart rate zones (65% and 75%) |
| Recovery Function | Measures recovery heart rate and calculates fitness score (F1.0 to F6.0) |
| Speed Calculation | 60 rpm = 21.3 km/h |
| Kilojoule Calculation | Based on average effort level and cadence |
| Total Mileage | Stored in memory (lost when changing batteries) |
| Training Instructions | Warm-up, intensity (heart rate = 180 - age), progressive frequency and duration |
| Maintenance and Cleaning | Clean with a damp cloth, check battery status |
| Safety | Consult a doctor before training, do not exceed maximum heart rate |
| Spare Parts and Repairability | Chest strap, ear clip, LR6 batteries |
Frequently Asked Questions - Vitto XL KETTLER
User questions about Vitto XL KETTLER
0 question about this device. Answer the ones you know or ask your own.
Ask a new question about this device
Download the instructions for your Exercise bike in PDF format for free! Find your manual Vitto XL - KETTLER and take your electronic device back in hand. On this page are published all the documents necessary for the use of your device. Vitto XL by KETTLER.
USER MANUAL Vitto XL KETTLER
Bild 7 Bild 8
Bei Heimtrainer, Racer, Crossbike:
Functions and operation of the training computer
Instruction manual for the training computer with digital display
ST2510-8 / ST2550-8, -9 / ST2551-8
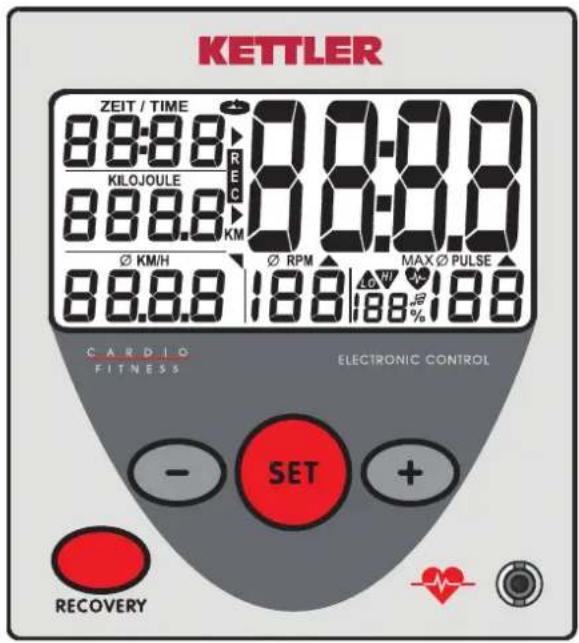
Symbols in the display
flowchart
graph TD
    A["ZEIT / TIME"] --> B["RE"]
    B --> C["KM"]
    C --> D["∅ KM/H"]
    D --> E["e"]
    D --> F["d"]
    D --> G["e"]
    H["KILOJOULE"] --> I["RE"]
    I --> J["KM"]
    J --> K["∅ RPM"]
    K --> L["Max ∅ PULSE"]
    L --> M["f"]
    L --> N["g"]
    L --> O["h"]
    L --> P["i"]
    L --> Q["j"]
    L --> R["k"]
    L --> S["e"]
Equipment:
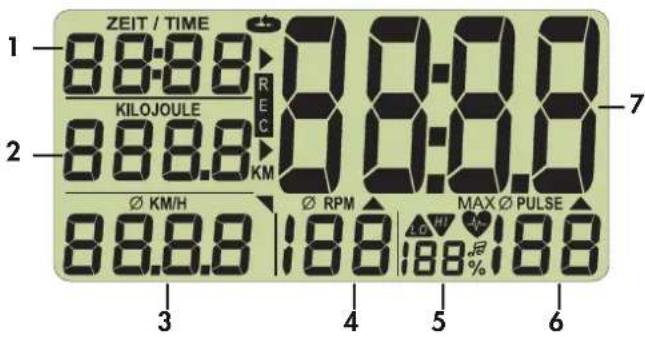
Values:
1 Time 0:00 - 99:59 [min:sec]
2 Energy consumption 0 - 9999
Full kilometers (Odometer) [0 - 9999 km]
3 Speed 0 - 99.9 [KM/H]
Distance 0 - 99,9 [KM]
4 Pedal frequency 20 - 199 [Revolutions/min] Pedal revolutions
5 Percent Relationship: Current pulse - maximum pulse
6 Pulse 50 - 199 [Beats/min]
7 Large display Room temperature [0 - 40 °]
Fitness grade [F1.0 - F6.0]
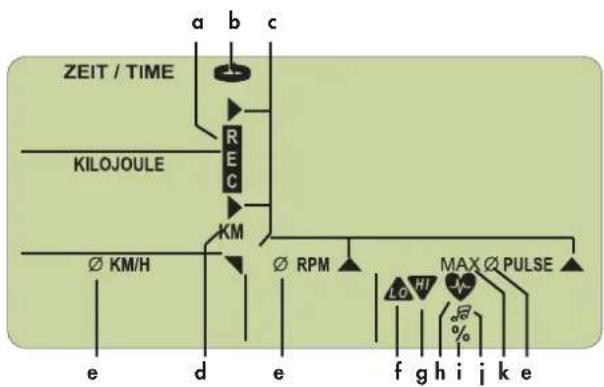
Symbols:
a REC Recovery pulse
b SCAN Automatic display change
c Arrow current area in the large display
d KM Full kilometers
e Average Beat frequency + pulse
f LO Lower than the lower pulse value
g HI Higher than the higher pulse value
h Heart blinks in tact with the pulse
i Percent % of maximum pulse specification
i Grade acoustic maximum pulse supervision
k MAX Exceeding the maximum pulse
Keys:
Minus key Lower value (display range back)
Set key Function key [Specification, Change, Reset of the display]
Plus key Increase values (display range up)
Recovery key Function key [Fitness grade determination]
Attachment (front)
Connector for the ear clip
Attachment (back)
Connector (4 pole) for the hand pulse sensors (not with Racer and Crossbike)
Connector (2 pole) for the speed recorded
Battery compartment 2 batteries: Mignon1.5 Volt, LR6, AA,
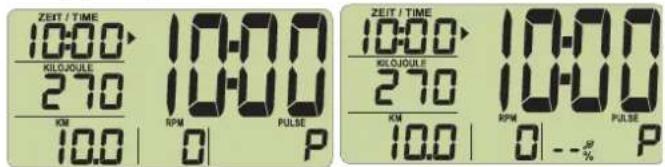
1.0 Display before exercising
- Room temperature Picture 1 [before and after exercising]
- Full display Picture 2 [after pedalling or pushing button, 1 sec]
-
Full kilometer Picture 3 [Length of display: 10 seconds or key]
-
Start display Picture 4
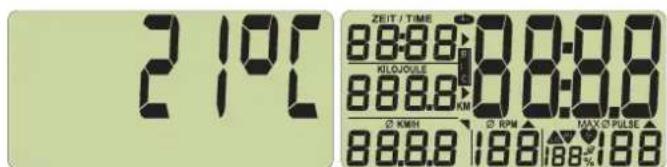
Picture 1 room temperature Picture 2 full display
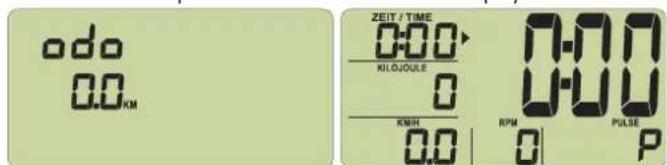
Picture 3 full kilometer Picture 4 start display
2.0 Recording of pulse
This display offers two or three ways of recording the pulse:
- with the hand pulse sensors (not with Racer and Crossbike)
- with the ear clip
- with a chest belt (as accessory available in shops)
Recording pulse with the hand pulse sensors
The hands cover the hand pulse sensors
Recording pulse with the ear clip
Plug the ear clip in the connection
Rub an earlobe to improve the circulation
Put the ear clip on the earlobe
Recording pulse with the chest belt
Put on the chest belt. Take notice of the corresponding instructions.
Pulse display
You have adjusted the start display (Picture 4).
The heart symbol (h) blinks in tact with your pulse.
After a few seconds, the pulse is shown as a value (6).
3.0 Exercising without specification of exercise data
Start exercising. All values are counted upward.
4.0 Exercising with specification of exercise data
Setting time (1), Kilojoule (2), Distance (3) and Pulse (6).
You have set the start display (Picture 4). Press the set key, enter the setting mode and set the desired values with the + or - keys.
If you press the +/- key longer, a quick advance or return of the setting values will follow.
If you press the +/- keys together, the value will go back to „OFF“.
With the set key, you will reach the next settings.
After the pulse setting, leave the setting mode with the set key and see the display with the possible settings (Picture 16/17).
Press the set key longer and the display will go to the full display (reset function) (Picture 2).
Note
If you do not enter a setting value within 4 minutes, the display will go to room temperature (Picture 1).
Picture 5 Picture 6
Picture 7 Picture 8
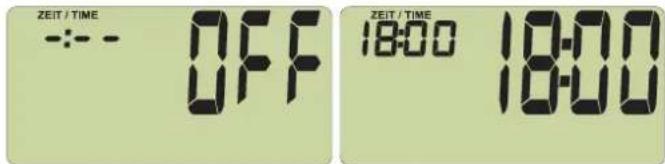
Picture 5: The time setting begins with "OFF"
Picture 6: Time setting: e.g. 18 minutes
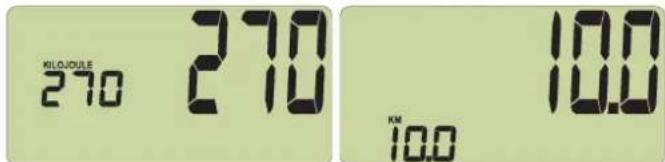
Picture 7: Energy consumption setting: e.g. 270 Kilojoule
Picture 8: Distance setting: e.g. 10 KM
The right exercising pulse
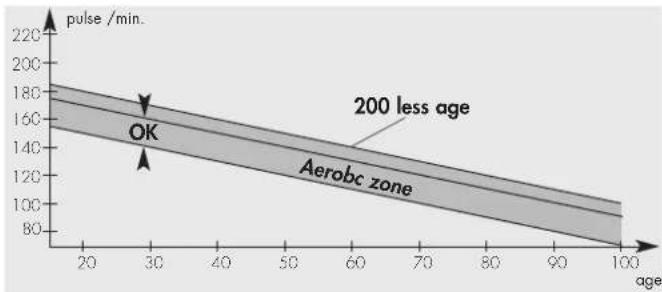
The exercising pulse depends on age and exercise goal. For each age and exercise goal there is the "right" so-called aerobe exercise area which is designated by an upper and lower pulse limit (+/- 10 beats). The exercise pulse should always be within the aerobe zone. The maximum pulse frequency (220 minus age) may not be exceeded. Healthy people orient themselves on the following diagram (compare also 4.2).
line
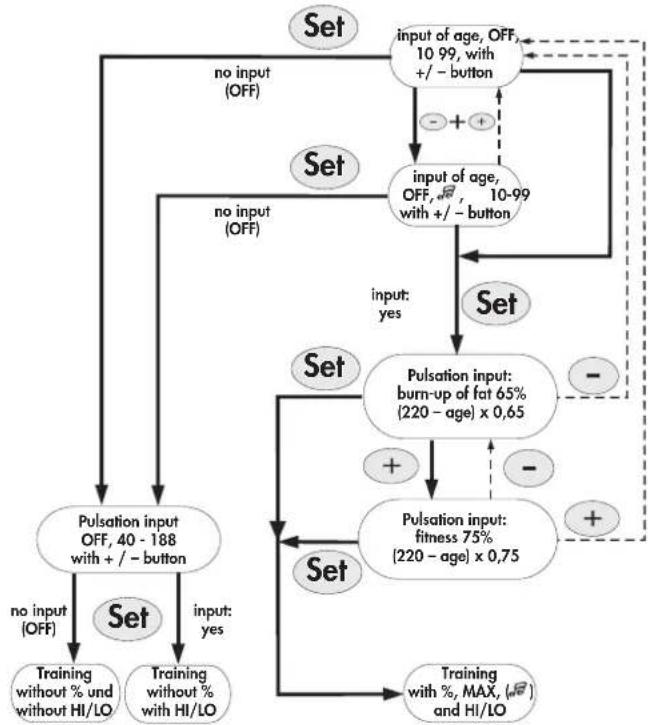
| age | pulse /min. | | --- | ----------- | | 20 | 180 | | 30 | 160 | | 40 | 140 | | 50 | 120 | | 60 | 100 | | 70 | 80 | | 80 | 60 | | 90 | 40 | | 100 | 20 |Pulse setting possibilities
The scheme shows the course of the pulse settings
flowchart
graph TD
    A["Set"] --> B["no input (OFF)"]
    B --> C["Pulsation input OFF, 40 - 188 with +/- button"]
    C --> D["Training without % and without HI/LO"]
    C --> E["Training without % with HI/LO"]
    D --> F["no input (OFF)"]
    E --> G["no input (OFF)"]
    F --> H["Input of age, OFF, 10-99 with +/- button"]
    G --> I["Input of age, OFF, 10-99 with +/- button"]
    H --> J["Input of age, OFF, 10-99 with +/- button"]
    I --> K["Input of age, OFF, 10-99 with +/- button"]
    J --> L["Set"]
    K --> M["Set"]
    L --> N["Pulsation input: burn-up of fat 65% (220 - age) x 0,65"]
    M --> O["Pulsation input: fitness 75% (220 - age) x 0,75"]
    N --> P["+"]
    O --> Q["-"]
    P --> R["Set"]
    Q --> S["Set"]
    R --> T["Training with %, MAX, (√), and HI/LO"]
    S --> U["Training with %, MAX, (√), and HI/LO"]
    T --> V["Output"]
    U --> W["Output"]
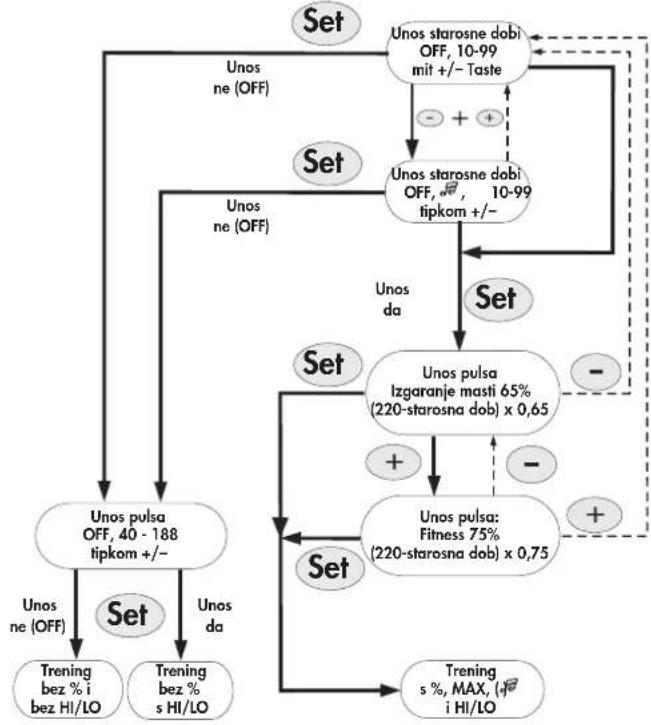
In detail:
Setting – exercise pulse
With the set key, you have access to successively 2 setting areas:
- Age (Picture 9/10)
- Pulse zones : burning of fat [Fa 65%] (Picture 12) Fitness [Fi 75%] (Picture 13)
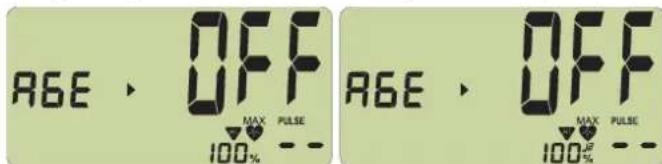
4.1 Age setting / alarm signal ON/OFF
The age setting serves for the calculation of your maximum pulse.
Picture 9
No setting "OFF". Shutting on of the alarm signal: press +/- keys together.
Picture 10
No setting "OFF" with "grade".
When you exceed the maximum pulse, an alarm signal will ring.
When you enter your age, in the PULSE display (6) there will be a maximum pulse which depends on the age (Formula: 220 - age) (Picture 11). With settings up to 21 years, only 199 can be displayed as maximum pulse but the right value will be calculated.
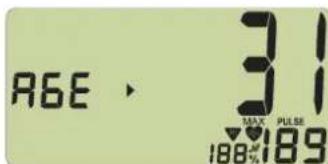
Picture 11
Age setting e.g. 31 with maximum pulse display 189
4.2 Pulse zones
with the +/- keys you select 2 zones. The age setting serves for the calculation of these pulse zones. This is visible with the % display (5).
1. Burning of fat [Fa 65%] (Picture 12)
Formula: (220 - age) x 0.65
2. Fitness Zone [Fi 75%] (Picture 13)
Formula: (220 - age) x 0.75
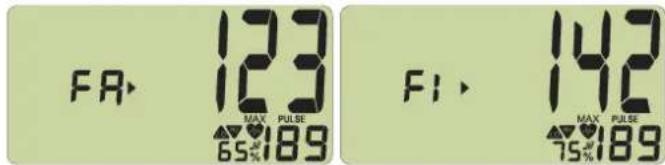
Picture 12 Picture 13
Pulse zone: burning of fat with 65% Pulse zone: Fitness with 75%
Function
Through the setting of the pulse zones and the assumed maximum pulse, a pulse zone supervision is activated. If the set exercise pulse falls short of 11 beats, the display shows "LO", if 11 beats are exceeded „HI". The "LO" supervision is active if first the given exercise pulse is reached while pedaling. If the rotation number falls below 20, the "LO" function becomes active again when the given exercise pulse has been reached. The "HI" supervision is always active.
If the maximum pulse is exceeded by 1 beat, "HI" will blink and "MAX" appears. If the acoustic alarm is active, you will be able to hear the alarm signal. The value which is displayed with the % symbol is the comparison between current pulse value and maximum pulse value.
4.3 Pulse supervision (depending on age)
This setting is possible in the area from 40 - 188 with the +/- keys.

Picture 14 Picture 15
No setting "OFF" Pulse value setting e.g. 150 with HI
LO symbol
Function
The "HI" and "LO" display functions as described in 4.2.
The proportional pulse display as well as the acoustic alarm function are not available.
4.4 Finishing the settings
After the last setting, if you press the set key, your setting values (except for pulse setting) will be displayed (Picture 16).
If you have activated a pulse zone, under (5) the comparison between the current pulse value and the maximum pulse value or “--” (Picture 17) with missing pulse signal will be shown.
Picture 16 Picture 17
Pulse zone setting (compare Picture 12/13)
Function
Start pedaling. All setting values count backwards, blink at zero for a couple of seconds and then count from the setting value upwards. In addition, short signal tones are emitted.
If your pulse beat exceeds the entered pulse limit or your maximum pulse exceeds it, first the HI and then the MAX symbol will be displayed.
5.0 Display while exercising
When you start exercising, in 5 second tact an automatic display change SCAN will begin (symbol b in the display). With the set key, you can shut it off. With the +/- keys you can then jump forward or back a display area.
6.0 Display before exercising, with breaks in the exercising, end
If you make less than 20 pedal rotations/min, the electronics recognize a break in the exercising. An automatic display changestops. The SCAN symbol disappears. Below KM/H (3), RPM (4) and pulse (5) the average symbol (e) and the average value is displayed.
If you do not continue exercising within 4 minutes, the display changes to room temperature (Picture 1). In doing so, the distance is added in full kilometers. All other values are not stored.
Note
Speed (3) and distance (3) change in 5 second tact.
With the +/- keys, you can jump forward or back one display area.
With the set key, you return to the setting mode. In doing so, all previous exercise data will be deleted. Settings remain.
7.0 Display when continuing exercising
Start exercising again. The values continue to count.
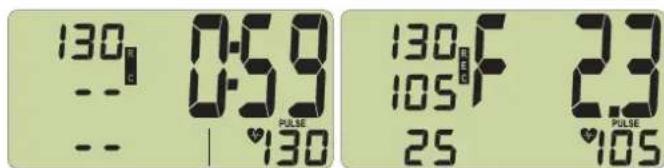
8.0 Measuring recovery pulse
The exercise computer is equipped with a recovery pulse function. This makes it possible to measure your recovery pulse when you finish exercising.
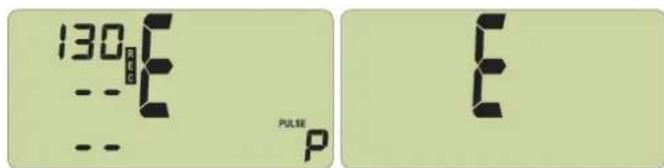
When you finish exercising, press the recovery key. The current pulse value is taken over under Time (1) (Picture 18). The computer measures your pulse during a 59 seconds countdown (Picture 18). Afterwards, the current pulse value is taken over under Kilojoule (2) and under KM/H (3) the difference of the pulse values within the return are given and a fitness grade is displayed with (F) (Picture 19). The calculation is explained under 9.0 General. If the measurement of the pulse is interrupted, instead of a value (P) is displayed. If you press the recovery key, the current exercise display will appear again.
The current pulse is always shown under Pulse (6).
Picture 18 Picture 19
Picture 20 Picture 21
Picture 18: Measurement of the recovery pulse with time return (0:59 - 0:00)
Picture 19: Fitness grade display
Picture 20: No recognition of pulse (E) with recovery pulse measurement
Picture 21: No recovery pulse function (E)
Note:
If no pulse value is displayed, the recovery pulse function is not activated.
9.0 General
Calculation of speed
With exercise machine, Racer, Crossbike:
60 pedal rotations result in a speed of 21.3 km/h.
With Cross Trainers:
60 pedal rotations result in a speed of 9.5 km/h.
Calculation of kilojoules
The calculation is based on the medium load level and only changes through variation of the pedal frequency.
From a sport medicine point, with bicycling there is the following energy consumption: 1 hour bicycling at 24 km/h uses 1680 kJ – 1 kilometer results in 70 kilojoules.
Cross Training the following energy consumption: 1 hour cross training at 9.5 km/h uses 3344 kJ – 1 kilometer results in 352 kilojoules.
Fitness grade calculation
The computer calculates and assesses the difference between load pulse and recovery pulse and your resulting "fitness grade" according to the following formula:
$$ \text { Mark } (\mathbf {F}) = 6 - \left(\frac {1 0 \times (P 1 - P 2)}{P 1}\right) ^ {2} $$
P1 = load pulse P2 = recovery pulse Grade 1 = very good Grade 6 = insufficient
The comparison of load and recovery pulse is a simple and quick possibility to check your body fitness. The fitness grade is an orientation value for your recovery ability after a physical load. Before you press the recovery pulse key and determine your fitness grade, you should exercise in your load area for a longer period of time, that is at least 10 minutes. With regular cardiovascular exercising, you will determine that your "fitness grade" will improve.
Average value calculation
For the calculation of the average value of speed, pedal rotations and pulse, all exercising intervals are taken into consideration until the "reset" function is activated or the "temperature" display appears.
Notes for measuring the pulse
The pulse calculation begins if the heart in the display blinks with the tact of your pulse.
With hand pulse (not with Racer and Crossbike)
After pressing the recovery key, quickly clasp again the hand pulse sensors or else the measuring of the pulse will be interrupted.
Avoid disturbing impulses.
A low voltage caused by the contraction of the heart will be registered through the hand sensors and evaluated by the electronics.
• Always clasp the contact surfaces with both hands.
- Avoid jerky clasping.
- Hold your hands quietly and avoid contractions and rubbing of the contact surfaces.
With ear clip
The pulse sensor works with infrared light and measures the changes of the transparency of your skin which are caused by your pulse. Before you put the pulse sensors on your earlobe, rub it strongly 10 times to increase the circulation.
Avoid disturbing impulses.
- Carefully attach the ear clip to your earlobe and look for a good point for the measurement (the heart symbol blinks without interruption).
- Do not exercise directly with strong lights (e.g. neon light, halogen light, spots, sunlight).
- Avoid in any case shaking or instability of the ear sensor including the cable. Using a clamp, always attach the cable to your clothing or even better to a headband.
With chest belt
Read the corresponding instructions.
Disturbances in the pulse display
Check the battery voltage of the electronics and the chest belt.
Disturbances with the exercise computer
Note the kilometer status. With unusual behavior with the exercise computer, take out the batteries, check the battery voltage and reinsert the batteries. The stored full kilometers are lost when the batteries are changed.
10. Exercise instructions
For your own safety
Before beginning exercising, check with your doctor to make sure that you are healthy enough to exercise with this device. The medical finding should be the basis for the design of your exercise program. The wrong or excessive exercising can damage your health.
This exercise machine was developed especially for the leisure athlete. It is excellent for cardiovascular exercises.
The exercising is to be designed methodically according to the principles of endurance exercises. In particular changes and adjustments in the cardiovascular system are generated. This includes sinking the relaxation pulse and the load pulse.
Thus for the heart there is more time for filling the heart chambers and the circulation of the heart muscle (through heart coronary arteries). Furthermore, the intensity of breathing and the amount of air which can be inhaled (vital capacity) increases. Further positive changes take place in the metabolic system. In order to reach these positive changes, you have to plan exercising according to certain guidelines.
On the intensity of exercise
The intensity with exercising with the exercise machine is regulated on one hand through the pedal frequency and on the other hand through the pedaling resistance. The pedaling resistance determines the end of exercising with the brake force adjustment on the steering column. You should always make sure that you don't overstrain yourself and avoid overloading yourself in view of the intensity. The wrong or excessive exercising can lead to health damages.
Therefore control while exercising based on your pulse frequency if you have determined your exercise intensity correctly. A basic rule for the suitable pulse frequency is:
180 minus age
This means that e.g. a 50 year old person should determine their endurance exercises with a pulse frequency of 130.
Exercise recommendations based on this calculation is considered to be reasonable by numerous accredited sport physicians. Therefore you should set the pedal frequency and the pedal resistance when exercising in such a way that you reach your optimal pulse frequency according to the above named rule.
These recommendations are not only valid for healthy persons and are not valid for people with cardiovascular diseases!
On the load amount
The beginner only gradually increases the load amount of his exercises. The first exercise units should be relatively short and in intervals.
On the part of sport medicine, the following load factors are observed as fitness positive:
Frequency Duration
daily 10 min
2-3 times weekly 20-30 min
1-2 times weekly 30-60 min
Beginners should not begin with an exercise unit of 30 - 60 minutes.
The beginner exercises can be conceived in the following manner in the first 4 weeks:
Training frequency Extent of training session
1st week
3 times a week 2 minutes of training
Break of 1 minute for physical exercises
2 minutes of training
Break of 1 minute for physical exercises
2 minutes of training
2nd week
3 times a week 3 minutes of training
Break of 1 minute for physical exercises
3 minutes of training
Break of 1 minute for physical exercises
2 minutes of training
3rd week
3 times a week 4 minutes of training
Break of 1 minute for physical exercises
4 minutes of training
Break of 1 minute for physical exercises
3 minutes of training
4th week
3 times a week 5 minutes of training
Break of 1 minute for physical exercises
4 minutes of training
Break of 1 minute for physical exercises
4 minutes of training
For personally documenting your exercises, you can enter the reached exercise values in the performance table.
Before and after each exercise unit, 5 minutes of gymnastics can serve for warming up or cooling down. Between two exercise units there should be an exercise free day if you prefer exercising 3 times a week for 20 – 30 minutes. Otherwise there is no reason to not exercise daily.
Motion sequence (Cross Training)
The motion sequence of Cross Training is already determined through the elliptical rotation of the pedal surfaces and the suspension of the grip bar. Still some points should be observed:
■ Always make sure the construction and state of the device is correct before exercising.
When getting on the device, one pedal surface must be in the lower, on in the upper position. Grab the grip bar with both hands and first step on the lower pedal surface. When getting off, first get off the upper pedal surface.
■ Adjust the pedal surfaces on the optimal distance to the grip bar for you; make sure in doing so that there is enough freedom of the legs to the grip bar.
■ Exercise with the corresponding sports shoe and pay attention to the safe condition of the pedal surfaces.
- Do not exercise without holding on. Hold the grips between the movable grip bars if you only want to exercise your lower body.
■ Make sure that you have an equal, round movement.
■ While exercising, vary between forward and backward movements of the pedal surfaces in order to stress the leg and bottom muscles in different ways.
With regular exercising, you can increase your endurance, your energy and thus your well being. The success of the exercises is optimized by a health-conscious lifestyle which is determined by a balanced, adequate diet.
date resistance level distance time P1 P2 fitness-
(km) (min) note
Illustration 7 Illustration 8
Sur Home-trainer, Racer, Crossbike :
Bij hometrainers, Racer, Crossbike:
2-3 x per week 20-30 min
1-2 x per week 30-60 min
Bewegingsafloop (crosstraining)
Nota Fitness [F1.0 - F6.0]
Símbolos:
Figura 7 Figura 8
Figura 7 Figura 8
Fitness [Fi 75%] (Fig. 13)
(Odometr) [0 - 9999 km]
llustr.7 llustr.8
Obrázek 7 Obrázek 8
Billede 7 billed 8
| 2017 | 2016 | 2015 | |
| Sales | 3,489 | 3,489 | 3,489 |
| Costs and expenses | (1,000) | (1,000) | (1,000) |
| Net income | 1,000 | 1,000 | 1,000 |
| 1 | 2 | 3 | 4 | 5 | 6 |
| 2017 | 2016 | |
| EBITDA | 3,458 | 3,458 |
| EBITDA margin | 1.9% | 1.9% |
Figura 7 Figura 8
Slika 7 Slika 8
Slika 5: Zadavanje vremena počinje s "OFF"
Slika 6: Zadavanje vremena: npr. 18 minuta
line
| dob | Puls / min. | | --- | --- | | 20 | 180 | | 30 | 170 | | 40 | 160 | | 50 | 150 | | 60 | 140 | | 70 | 130 | | 80 | 120 | | 90 | 110 | | 100 | 100 | | 110 | 90 | | 120 | 80 | The label "OK" is positioned near the center of the shaded region, which is bounded by the text "200 minus životna dob".Mogućnosti zadavanja pulsa
Shema pokazuje tijek pri zadavanju pulsa
flowchart
graph TD
    A["Unos starosne dobi OFF, 10-99 mit +/- Taste"] --> B["Unos starosne dobi OFF, 10-99 tipkom +/-"]
    B --> C["Unos pulsa Izgaranje masti 65% (220-starosna dob) x 0,65"]
    C --> D["Unos pulsa: Fitness 75% (220-starosna dob) x 0,75"]
    D --> E["Trening s %, MAX, i HI/LO"]
    F["Unos ne (OFF)"] --> G["Unos pulsa OFF, 40 - 188 tipkom +/-"]
    G --> H["Trening bez % i bez HI/LO"]
    I["Unos da"] --> J["Set"]
    K["Unos ne (OFF)"] --> L["Set"]
    M["Set"] --> N["Unos pulsa OFF, 40 - 188 tipkom +/-"]
    N --> O["Trening bez % s HI/LO"]
    P["Unos da"] --> Q["Set"]
    R["Unos na"] --> S["Set"]
    T["Unos da"] --> U["Set"]
    V["Unos na"] --> W["Set"]
    X["Unos na"] --> Y["Set"]
    Z["Unos na"] --> AA["Set"]
    AB["Unos na"] --> AC["Set"]
    AD["Unos na"] --> AE["Set"]
    AF["Unos na"] --> AG["Set"]
    AH["Unos na"] --> AI["Set"]
Pojedinačno:
Zadavanje: puls na treningu
(Odometer) [0 - 9999 km]
3 Hitrost 0 - 99.9 [KM/H]
Razdalja 0 - 99,9 [KM]
4 Frekvenca korakanja Obrati pedala
5 Odstotek Razmerje: trenutni utrip – maksimalni utrip
6 Srčni utrip 50 - 199 [udarci/min]
7 Veliki prikaz Temperatura prostora [0 - 40 °]
Fitnes ocena [F1.0 - F6.0]
Simboli
Slika 7 Slika 8
natural_image
Person using a rowing machine in a studio setting (no visible text or symbols)
natural_image
Black-and-white photo of a woman riding bicycles with two men in the background, snow-capped mountains in the background (no text or symbols visible)
natural_image
Person riding a multi-rotor vehicle on a snowy mountain slope under clear sky (no text or symbols visible)
natural_image
Black-and-white exterior view of a modern outdoor patio with wooden table and chairs, no visible text or signage
- Functions and operation of the training computer
- Equipment:
- Values:
- Symbols:
- Keys:
- Attachment (front)
- Attachment (back)
- Display before exercising
- Recording of pulse
- Exercising without specification of exercise data
- Exercising with specification of exercise data
- Note
- The right exercising pulse
- In detail:
- Age setting / alarm signal ON/OFF
- Pulse zones
- Burning of fat [Fa 65%] (Picture 12)
- Fitness Zone [Fi 75%] (Picture 13)
- Function
- Pulse supervision (depending on age)
- Finishing the settings
- Display while exercising
- Display before exercising, with breaks in the exercising, end
- Display when continuing exercising
- Measuring recovery pulse
- Note:
- General
- Calculation of speed
- With Cross Trainers:
- Calculation of kilojoules
- Fitness grade calculation
- Average value calculation
- Notes for measuring the pulse
- With hand pulse (not with Racer and Crossbike)
- Avoid disturbing impulses.
- With ear clip
- With chest belt
- Disturbances in the pulse display
- Disturbances with the exercise computer
- Exercise instructions
- For your own safety
- On the intensity of exercise
- minus age
- These recommendations are not only valid for healthy persons and are not valid for people with cardiovascular diseases!
- On the load amount
- Frequency Duration
- 1st week
- 2nd week
- 3rd week
- 4th week
- Motion sequence (Cross Training)
- Bewegingsafloop (crosstraining)
- Símbolos:
- Mogućnosti zadavanja pulsa
- Pojedinačno:
- Simboli
Brand : KETTLER
Model : Vitto XL
Category : Exercise bike