
MB-D14 - Camera Grip NIKON - Free user manual and instructions
Find the device manual for free MB-D14 NIKON in PDF.
| Product type | Power grip for digital SLR camera |
| Brand | Nikon |
| Model | MB-D14 |
| Compatibility | Compatible Nikon digital SLR cameras (see camera manual) |
| Dimensions (W × H × D) | 143 × 49.5 × 78 mm |
| Weight | Approx. 265 g (without batteries) ; 350 g with EN-EL15 ; 405 g with 6 AA batteries |
| Power source | EN-EL15 Li-ion battery, 6 AA batteries (alkaline, Ni-MH, lithium) or EH-5a/EH-5b AC adapter + EP-5B connector (optional) |
| Main functions | Shutter release, multi-selector, main and sub command dials, AE-L/AF-L button for vertical shooting |
| Command lock | Yes, prevents unintentional operation of controls |
| Battery order | Adjustable via camera's Custom Settings menu (group d) |
| Operating temperature | 0 – 40 °C |
| Supplied accessories | MS-D14EN holder (for EN-EL15), MS-D14 holder (for AA batteries), holder case, contact cap, user manual, warranty |
| Available options | EH-5a/EH-5b AC adapter and EP-5B power connector |
| Maintenance | Clean with a dry, soft cloth; avoid solvents |
| Safety | Use only recommended batteries; replace contact cap when not in use; observe polarity |
| Spare parts and repairability | Parts available from authorized Nikon service centers |
| Warranty | Included (see provided terms) |
Frequently Asked Questions - MB-D14 NIKON
User questions about MB-D14 NIKON
0 question about this device. Answer the ones you know or ask your own.
Ask a new question about this device
Download the instructions for your Camera Grip in PDF format for free! Find your manual MB-D14 - NIKON and take your electronic device back in hand. On this page are published all the documents necessary for the use of your device. MB-D14 by NIKON.
USER MANUAL MB-D14 NIKON
Multi-Power Battery Pack
MB-D14
使用說明書
User's Manual
| 危険 | This is the most serious accident in Japan. The man who was killed by a train explosion into the ground floor of a building, which caused 100 people's lives. The man was killed by a train explosion. This is the most serious accident in Japan. The man who was killed by a train explosion into the ground floor of a building, which caused 100 people's lives. This is the most serious accident in Japan. The man who was killed by a train explosion into the ground floor of a building, which caused 100 people's lives. This is the most serious accident in Japan. The man who was killed by a train explosion into the ground floor of a building, which caused 100 people's lives. This is the most serious accident in Japan. The man who was killed by a train explosion into the ground floor of building, which caused 100 people's lives. This is the most serious accident in Japan. The man who was killed by a train explosion into the ground floor of building, which caused 100 people's lives. This is the most serious accident in Japan. The man who was killed by a train explosion into the ground floor of building, which caused 100 people's lives. This is the most serious accident in Japan. The man who was killed during a train explosion into the ground floor of building, which caused 100 people's lives. This is the most serious accident in Japan. The man who was killed during a train explosion into the ground floor of building, which caused 100 people's lives. This is the most serious accident in Japan. The man who was killed during a train explosion into the ground floor of building, which caused 100 people's lives. This is the most serious accident In Japan. The man who was killed during a train explosion into the ground floor of building, which caused 100 people's lives. This is the most serious accident In Japan. The man who was killed during a train explosion into the ground floor of building, which caused 100 people's lives. This is the most serious accident In Japan. The man who was killed during a train explosion into the ground floor of building, which caused 100 people's lives. |
MB-D14 Multi-Power Battery Pack
User's Manual
Safety Precautions 2
Notice for Customers in Europe 2
Precautions for Use 2
Introduction 4
The MB-D14 and Accessories 4
The MB-D14 and Supplied Accessories. 4
Using the Optional EH-5a/EH-5b AC Adapter and EP-5B Power Connector. 4
Parts of the MB-D14 5
The MB-D14 Shutter-Release Button, Multi Selector, Command Dials, and AE-L/AF-L Button. 5
The MB-D14 Control Lock. 5
Using the Battery Pack 6
Attaching the Battery Pack.. 6
Removing the Battery Pack 6
Inserting Batteries 7
Removing Batteries 9
Specifications. 10
Safety Precautions
To ensure proper operation, read this manual thoroughly before using this product. After reading, be sure to keep it where it can be seen by all those who use the product.
Notice for Customers in Europe
CAUTION
RISK OF EXPLOSION IF BATTERY IS REPLACED BY AN INCORRECT TYPE. DISPOSE OF USED BATTERIES ACCORDING TO THE INSTRUCTIONS.
This symbol indicates that this product is to be collected separately.
The following apply only to users in European countries:

- This product is designated for separate collection at an appropriate collection point. Do not dispose of as household waste.
- For more information, contact the retailer or the local authorities in charge of waste management.
Precautions for Use
- The MB-D14 is for use with compatible cameras only.
- Do not use with batteries and battery holders not recommended in this manual.
- To prevent electrical shorts caused by metal objects touching the power terminals, replace the contact cap when the MB-D14 is not in use.
-
When a battery holder is removed from the MB-D14, remove the batteries or place the holder or cover in the holder case to prevent electrical shorts caused by contact with other metal objects.
-
The memory card access lamp may light up when the MB-D14 is attached or removed from the camera, but this is not malfunction.
- Should you notice smoke or an unusual smell or noise from the battery pack, discontinue use immediately. After removing the batteries, take the device to the retailer or a Nikon-authorized service representative for inspection.
- The MB-D14 is not equipped with a power switch. Use the camera power switch to turn the power on or off.
Notice for Customers in the U.S.A.
Federal Communications Commission (FCC) Radio Frequency Interference Statement
This equipment has been tested and found to comply with the limits for a Class B digital device, pursuant to Part 15 of the FCC rules. These limits are designed to provide reasonable protection against harmful interference in a residential installation. This equipment generates, uses, and can radiate radio frequency energy and, if not installed and used in accordance with the instructions, may cause harmful interference to radio communications. However, there is no guarantee that interference will not occur in a particular installation. If this equipment does cause harmful interference to radio or television reception, which can be determined by turning the equipment off and on, the user is encouraged to try to correct the interference by one or more of the following measures:
Reorient or relocate the receiving antenna.
- Increase the separation between the equipment and receiver.
Nikon

MB-D14
Tested To Comply With FCC Standards
FOR HOME OR OFFICE USE
- Connect the equipment into an outlet on a circuit different from that to which the receiver is connected.
- Consult the dealer or an experienced radio/television technician for help.
CAUTION
Modifications: The FCC requires the user to be notified that any changes or modifications made to this device that are not expressly approved by Nikon Corporation may void the user's authority to operate the equipment.
Nikon Inc.,
1300 Walt Whitman Road, Melville, New York 11747-3064, U.S.A.
Tel.: 631-547-4200
Notice for Customers in Canada
CAUTION
This Class B digital apparatus complies with Canadian ICES-003.
ATTENTION
Thank you for your purchase of an MB-D14 multi-power battery pack for use with all Nikon single-lens reflex digital cameras that list the MB-D14 as a compatible accessory in the camera manual. The MB-D14 takes one EN-EL15 rechargeable battery or six AA batteries (alkaline, Ni-MH, or lithium) and includes an alternate shutter-release button, AE-L/AF-L button, multi selector, and main and sub-command dials for taking pictures in "tall" (portrait) orientation. Camera menu options allow the user to choose whether the camera battery or the batteries in the MB-D14 are used first; see the camera manual for details.
The MB-D14 and Accessories
The MB-D14 and Supplied Accessories
Confirm that the following items are supplied with the MB-D14 (batteries are sold separately).

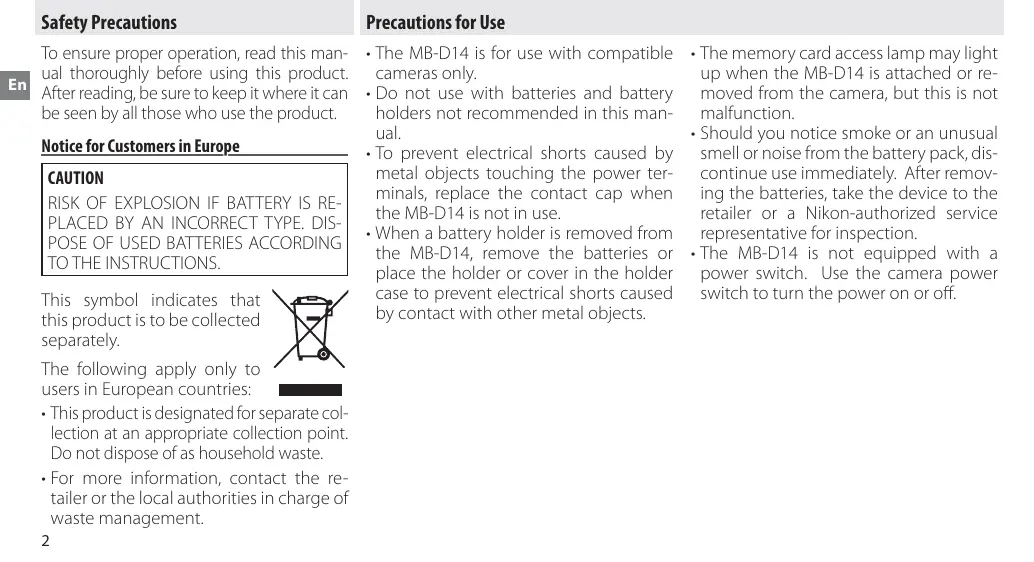
MB-D14
MS-D14EN holder for EN-EL15 batteries
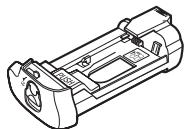
MS-D14 holder for AA batteries
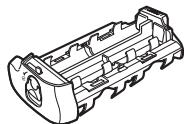
Holder case
The MS-D14EN is inserted in the MB-D14 at shipment. See "Inserting Batteries" for information on removing the battery holder.

Contact cap
- User's manual (this manual)
Warranty
Using the Optional EH-5a/EH-5b AC Adapter and EP-5B Power Connector
The optional EH-5a/EH-5b AC adapter and EP-5B power connector provide a reliable power source when the camera is used for extended periods. To use an AC adapter with the MB-D14, insert the EP-5B into the MS-D14EN battery holder as described on page 7 and then connect the EH-5a/EH-5b as described in the documentation provided with the EP-5B.
Parts of the MB-D14 (Figure A)
① Contact cap
②Holder for camera contact cover
③Power/signal contacts
④ AE-L/AF-L button
⑤Main command dial
⑥ Multi selector
⑦Attachment wheel
⑧Holder power connector cover
⑨ Battery-chamber cover
10 Battery chamber
⑪ Battery-chamber latch
⑫ Mounting screw
⑬Shutter-release button
14Control lock
15 Sub-command dial
16 Tripod socket
17MS-D14EN holder for EN-EL15 batteries
18Power terminals
19Power terminals (MS-D14EN battery holder)
20 MS-D14 holder for AA batteries
21 Power terminals (MS-D14 battery holder)
The MB-D14 Shutter-Release Button, Multi Selector, Command Dials, and AE-L/AF-L Button
The MB-D14 is equipped with a shutter-release button (Figure A-13), multi selector (Figure A-6), main command dial (Figure A-5), sub-command dial (Figure A-15), and AE-L/AF-L button (Figure A-4) for use when taking photographs in vertical ("tall," or portrait) orientation. These controls perform the same functions as the corresponding controls on the camera and are affected by changes to options in the Custom Settings menu (Group f) that affect these camera controls. See the camera manual for more information.
The MB-D14 Control Lock
The control lock (Figure A-14) locks the controls on the MB-D14 to prevent unintended use. Before using these controls to take photographs in vertical (portrait) orientation, release the lock as shown at right.
The control lock is not a power switch. Use the camera power switch to turn the camera on and off.
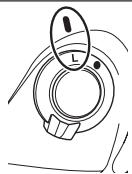
Locked

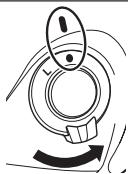
UnlockED
Using the Battery Pack
Attaching the Battery Pack
Before attaching the battery pack, be sure that the camera is off and that the MB-D14 control lock (Figure A-14) is in the L position (the illustrations show the D600).
1 Remove the contact cap (Figure A-①) from the battery pack.
2 The contacts for the MB-D14 are in the base of the camera, where they are protected by a contact cover. Remove the contact cover as shown in Figure B-1 and place it in the contact cover holder on the MB-D14 (Figure B-2).
3 Position the MB-D14, keeping the MB-D14 mounting screw (Figure C-2) aligned with the camera tripod socket (Figure C-1) and tighten the attachment wheel by rotating it in the direction shown by the LOCK arrow (Figure D). There is no need to remove the battery from the camera before connecting the MB-D14. At default settings, the battery inserted in the camera will be used only after the battery in the MB-D14 is exhausted. The Battery order option in the camera Custom Settings menu (Group d) can be used to change the order in which the batteries are used.
Be sure to place the camera contact cover in the contact cover holder and to keep the MB-D14 contact cap in a safe place to prevent loss.
A PB-6D and PK-13 auto-extension ring are required when using PB-6 bellows focusing attachment with the MB-D14.
Removing the Battery Pack
To remove the MB-D14, turn the camera off and set the control lock on the MB-D14 to L, then loosen the attachment wheel and remove the MB-D14. Be sure to replace the contact cover on the camera and the contact cap on the MB-D14 when the battery pack is not in use.
Inserting Batteries
The MB-D14 can be used with one EN-EL15 rechargeable Li-ion battery or with six AA batteries.
Before inserting batteries, be sure that the camera is off and that the MB-D14 control lock is in the L position.
1 Turn the MB-D14 battery-chamber latch to and remove the battery holder (Figure E).
2 Ready the batteries as described below.
EN-EL15: Matching the indentations on the battery to the projections on the MS-D14EN holder, insert the battery with the arrow (▲) on the battery toward the battery holder power terminals (Figure F-1). Press the battery lightly downward and slide it in the direction of the arrow until the power terminals click into place (Figure F-2).
AA batteries: Place six AA batteries in the MS-D14 battery holder as shown in Figure G, making sure that the batteries are in the correct orientation.
3 Insert the battery holder in the MB-D14 and latch the battery-chamber cover (Figure H). Make sure the holder is fully inserted before turning the latch.
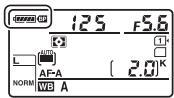
4 Turn the camera on and check the battery level in the control panel or viewfinder. If the camera does not turn on, check that the battery is correctly inserted.
The EP-5B Power Connector
When using the EP-5B power connector, insert it into the MS-D14EN holder with the arrow (▲) on the connector toward the battery power terminals. Press the connector lightly downward and slide it in the direction of the arrow until the power terminals click into place (Figure I-①). Open the holder power connector cover and pass the EP-5B power cable through the opening (Figure I-②).
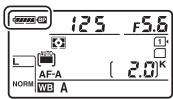
Battery Level
The camera displays battery level as follows:
EN-EL15
| Control panel | Viewfinder | Description |
| — | Battery fully charged. | |
| — | Battery partially discharged. | |
| Low battery. Ready fully-charged spare battery or charge battery. | ||
| (flashes) | (flashes) | Battery exhausted. Charge or ex-change battery. |
AA Batteries
| Control panel | Viewfinder | Description |
| — | — | Charge remaining. |
| — | — | Low batteries. Ready spare batteries. |
| —(flashes) | —(flashes) | Batteries exhaust- ed. Shutter release disabled. |
An option in Group dof the camera CustomSettings menu can beused to change theorder in which the
batteries are used. When the camera is drawing power from the MB-D14, a icon is displayed in the control panel. If the icon flashes, the battery-chamber cover is not locked. Close and latch the battery-chamber cover.
To ensure that the camera shows the correct battery level when AA batteries are used, choose the appropriate option for MB-D14 battery type in the camera
Custom Settings menu (Group d). If the correct option is not selected, the camera may fail to function as expected.
| Option | Battery type |
| QLR6 LR6 (AA alkaline) | AA alkaline (LR6) |
| QNi-MH HR6 (AA Ni-MH) | AA Ni-MH (HR6) |
| QFR6 FR6 (AA lithium) | AA Lithium (FR6) |
Remove the batteries when the MB-D14 is not in use.
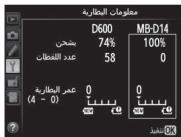
Battery Info
Battery information can be viewed from the camera setup menu (the camera battery is listed on the left, the MB-D14 on the right). Only th is shown when AA See the camera mar
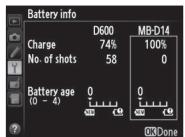
Note: The illustrations on this page are from the D600.
Removing Batteries
Be careful not to drop batteries or the holder.
1 Turn the MB-D14 battery-chamber latch to and remove the battery holder (Figure E).
2 Remove the battery or batteries from the holder.
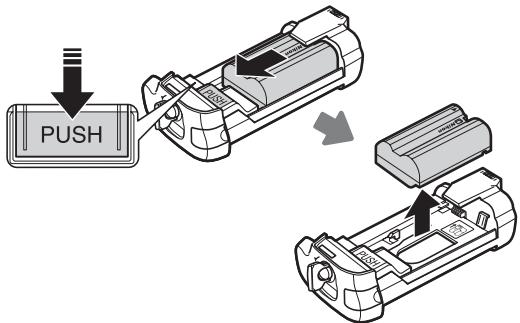
EN-EL15
While pressing the holder PUSH button, slide the battery toward the button. The battery can then be removed as shown.
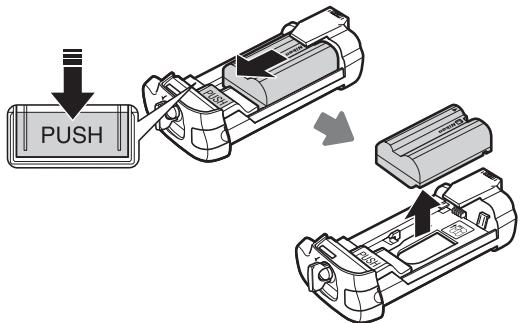
The procedure for removing the EP-5B power connector is the same as that for the EN-EL15.
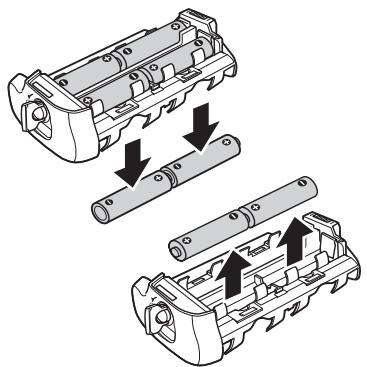
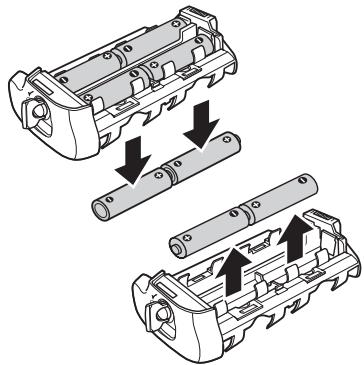
AA Batteries
Remove the batteries as shown. Be careful not to drop the batteries when removing them from the holder.
Specifications
| Power source | One EN-EL15 rechargeable Li-ion battery, six LR6 alkaline, HR6 Ni-MH, or FR6 lithium AA batteries, or EH-5b/EH-5a/EH-5 AC adapter (requires EP-5B power connector) |
| Operating temperature | 0–40°C (32–104°F) |
| Dimensions (W × H × D) | Approx. 143 × 49.5 × 78 mm (5.6 × 1.9 × 3.1 in.) |
| Weight | Approx. 350 g (12.3 oz) with MS-D14EN and optional EN-EL15 battery Approx. 405 g (14.3 oz) with MS-D14 and six AA batteries (available separately from third-party suppliers) Approx. 290 g (10.2 oz) with MS-D14EN and optional EP-5B power connector Approx. 265 g (9.3 oz) with MS-D14EN Approx. 265 g (9.3 oz) with MS-D14 |
Specifications and design are subject to change without notice.
EN-EL15 Batteries
The performance of EN-EL15 batteries drops at temperatures below about 10^ (50^) . Be sure the battery is fully charged and keep a warm spare battery on hand ready to exchange as necessary. Cold batteries will recover some of their charge when warmed.
AA Batteries
Due to their limited capacity, AA LR6 alkaline batteries should be used only when no other alternative is available. The capacity of AA batteries varies with make and storage conditions and may in some instances be extremely low; in some cases, AA batteries may cease to function before their expiry date. Note that the capacity of AA batteries may drop at temperatures below 20^ (68°F). Use is not recommended at low temperatures.
Poignée-alimentation MB-D14
Federal Communications Commission (FCC) Radio Frequency Interference Statement
1300 Walt Whitman Road, Melville, New York
11747-3064,U.S.A.
Tel.: 631-547-4200

This Class B digital apparatus complies with Canadian ICES-003.
Présentation
Tested To Comply With FCC Standards
FOR HOME OR OFFICE USE
- Consulte al proveedor o a un的技术o de radio/ television experimentado.
PRECAUCIONES
1300 Walt Whitman Road, Melville, New York
11747-3064,EE.UU.
Tel.: 631-547-4200
Tested To Comply With FCC Standards
FOR HOME OR OFFICE USE
1300 Walt Whitman Road, Melville, New York
11747-3064,U.S.A.
Tel.: 631-547-4200
muaaunauAC uEH-5a/EH-5b
MBA-107 MB-D14 (JWNSNA A)
①
②
③
④ 1NAE-L/AF-L
⑤
⑥
⑦
⑧ 甲
9
10 1
①
12
13
14
15 用
16
17 MS-D14EN EN-EL15
18
19 2000 (wumulunmmsD MS-D14EN)
20 WuJUHJUHJUHJUHJUHJUHJUHJUHJUHJUHJUHJUHJUHJUHJUHJUHJUHJUHJUHJUHJUHJUHJUHJUHJUHJUHJUHJUHJUHJUHJUHJUHJUHJUH
21 2019 (unlalalnd MS-D14)
riuee eae aee eae aeae aeae aeae aeae aeae aeae aeae aeae aeae aeae aeae aeae aeae aeae aeae aeae aeae aeae aeae aeae aeae aeae aeae aeae aeae aeae aeae aeae aeae aeae aeae aeae aeae aeae aeae aeae aeae aeae aeae aeae aeae aeae aeae aeae aeae aeae aeae aeae aeae aeae aaee
1 1 1 1 1 1 1 1 1 1 1 1 1 1 1 1 1 1 1 1 1 1 1 1 1 1 1 1 1 1 1 1 1 1
2
EN-EL15: "lauuunueaiee uanr (▲) wuuuuaa auiu uuaa uuaa uuaa uuaa uuaa uuaa uuaa uuaa uuaa uuaa uuaa uuaa uuaa uuaa uuaa uuaa uuaa uuaa uuaa uuaa uuaa uuaa uuaa uuaa uuaa uuaa uuaa uuaa uuaa uuaa uuaa uuaa uuaa uuaa uu
mnnnna aaannnnnnaaannnnnne aennnnnne nnnnnnne nnne annnnnne
Mayanh hié thi muc pin nhu sau:
EN-EL15
aaggl aagll aa aaa aaa aaa aaa aaa aaa aaa aaa aaa aaa aaa aaa aaa aaa aaa aaa aaa aaa aaa aaa aaa aaa aaa aaa aaa aaa aaa aaa aaa aaa aaa aaa aaa aaa aaa aaa aaa aaa aaa aaa aaa aaa aaa aaa aaa aaa aaa aaa aaa aaa aaaa
.(EJ) 1
Jol2100aUjLJIgAurJJI 2
AAwLzJyJU
Lolj oI gJl! sI iU UJI IblwI pO uS I. 000000000000000000000000000000
EN-EL15
AJIJ 1 JI JI JI JI JI JI JI JI JI JI JI JI JI JI JI JI JI JI JI JI JI JI JI JI JI JI JI JI JI JI JI JI JI JI JI JI JI JI JI JI JI JI JI JI
1000000000000000000000000000000000000000
.EN-EL15 JJI aJiJIuIgblJI IgaijE-5P-5B aLIJI Igog aJIjIgbs
4.10.11 Log10
LogLeo 00Loo S
1dlaa
10
aegaoo JwJgI 2
MB-D14 LJI
jococci.
ylll pniwiic hiaayi yll
JalalilolSjLjwJzJIAA
1J131 101
jod aocg
a a 101010101
15
LoaicuJbIJI pL
,MB-D14 aJbJI acgao joo aJI JyolSJI
BP jorj jorj oogg aeg
sLac gI. Jao aJbJIaJgS sLac 95 all
4.2.1.1.2.1.2.2.3
a a a a a a a a a a a a a a a a a a a a a a a a a a a a a a a a a a a a a
a a 1111111111111111111111111111111111
Jus 1
ggoLoS JooJol
| \( \ddot{A}\dot{a}\dot{b}\dot{c}\dot{d}\dot{e}\dot{f}\dot{g}\dot{h}\dot{i}\dot{k} \) | \( L\ddot{L}\ddot{L}\ddot{L} \) |
| AA \( \omega \omega \omega \omega \omega \omega \omega \omega \omega \omega \omega \omega \omega \omega \omega \omega \omega \omega \omega \omega \omega \omega \omega \omega \omega \omega \omega \omega \omega \omega \omega \omega \omega \omega \omega \omega \omega \omega \omega \omega \omega \omega \omega \omega \omega \omega \omega \omega \omega \omega \ddot{L}R6 \) | \( (AA\ddot{\omega}\ddot{\omega}\ddot{\omega}\ddot{\omega}\ddot{\omega}\ddot{\omega}\ddot{\omega}\ddot{\omega}\ddot{\omega}\ddot{\omega}\ddot{\omega}\ddot{\omega}\ddot{\omega}\ddot{\omega}\ddot{\omega}\ddot{\omega}\ddot{\omega}\ddot{\omega}\ddot{\omega}\ddot{\omega}\ddot{\omega} \)LR6QLR6 |
| (HR6) AA \( \mathrm{{Ni}} - \mathrm{{MH}}\ddot{\omega}\ddot{\omega}\ddot{\omega}\ddot{\omega}\ddot{\omega}\ddot{\omega}\ddot{\omega}\ddot{\omega}\ddot{\omega}\ddot{\omega}\ddot{\omega}\ddot{\omega}\ddot{\omega}\ddot{\omega}\ddot{\omega}\ddot{\omega}\ddot{\omega}\ddot{\omega}\ddot{\omega}\ddot{\ω}\ddot{\omega}\ddot{\omega}\ddot{\omega}\ddot{\omega}\ddot{\omega}\ddot{\omega}\ddot{\omega}\ddot{\omega}\ddot{\omega}\ddot{\omega}\ddot{\omega}\ddot{\omega}\ddot{\omega}\ddot{\omega}\ddot{\omega}\ddot{\omega}\ddot{\omega}\ddot{\omega}\ddot{\omega}\ddot{\ω} \) | (Ni-MH AA \( \ddot{\omega}\ddot{\omega}\ddot{\omega}\ddot{\omega}\ddot{\omega}\ddot{\omega}\ddot{\omega}\ddot{\omega}\ddot{\omega}\ddot{\omega}\ddot{\omega}\ddot{\omega}\ddot{\omega}\ddot{\omega}\ddot{\omega}\ddot{\omega}\ddot{\omega}\ddot{\omega}\ddot{\omega}\ddot{\omega }\)HR6QNHMH |
| (FR6) AA \( \rho \rho \rho \rho \rho \rho \rho \rho \rho \rho \rho \rho \rho \rho \rho \rho \rho \rho \rho \rho \rho \rho \rho \rho \rho \rho \rho \rho \rho \rho \rho \rho \rho \rho \rho \rho \rho \rho \rho \rho \rho \rho \rho \rho \rho \rho \rho \rho \rho \rho \rlap / \ddot{L} \ddot{L} \ddot{L} \ddot{L} \ddot{L} \ddot{L} \ddot{L} \ddot{L} \ddot{L} \ddot{L} \ddot{L} \ddot{L} \ddot{L} \ddot{L} \ddot{L} \ddot{L} \ddot{L} \ddot{\omega}\ddot{\omega}\ddot{\omega}\ddot{\omega}\ddot{\omega}\ddot{\omega}\ddot{\omega}\ddot{\omega}\ddot{\omega}\ddot{\omega}\ddot{\omega}\ddot{\omega}\ddot{\omega}\ddot{\omega}\ddot{\omega}\ddot{\omega}\ddot{\omega}\ddot{\omega}\ddot{\omega}\ddot{\ω\omega}\ddot{\omega}\ddot{\omega}\ddot{\omega}\ddot{\omega}\ddot{\omega}\ddot{\omega}\ddot{\omega}\ddot{\omega}\ddot{\omega}\ddot{\omega}\ddot{\omega}\ddot{\omega}\ddot{\omega}\ddot{\omega}\ddot{\omega}\ddot{\omega}\ddot{\omega}\ddot{\omega}\ddot{\omega}\ddot{L} \) | \( (AA\rho \rho \rho \rho \rho \rho \rho \rho \rho \rho \rho \rho \rho \rho \rho \rho \rho \rho \rho \rho \rho \rho \rho \rho \rho \rho \rho \rho \rho \rho \rho \rho \rho \rho \rho \rho \rho \rho \rho \rho \rho \rho \rho \rho \rho \rho \rho \rho \rho \rho \ρ \ρ \ρ \ρ \ρ \ρ \ρ \ρ \ρ \ρ \ρ \ρ \ρ \ρ \ρ \ρ \ρ \ρ \ρ \ρ \ρ \ρ \ρ \ρ \ρ \ρ \ρ \ρ \ρ \ρ \ρ \ρ \ρ \ρ \ρ \ρ \ρ \ρ \ρ \ρ \ρ \ρ \ρ \ρ \ρ \ρ \ρ \ρ \ρ \ρ \rho \rho \rho \rho \rho \rho \rho \rho \rho \rho \rho \rho \rho \rho \rho \rho \rho \rho \rho \rho \rho \rho \rho \rho \rho \rho \rho \rho \rho \rho \rho \rho \rho \rho \rho \rho \rho \rho \rho \rho \rho \rho \rho \rho \rho \rho \rho \rho \rho \theta \) |
aJbJI aIgaoo pIaIoo Ie JIJI
LMB-D14
a
ylllss 11111111111111111
EN-EL15
jll jll pluill lll gll gll gll gll gll gll gll gll gll gll gll gll gll gll gll gll gll gll gll gll gll gll gll gll gll gll gll gll gll gll gll gll gll gll gll gll gll gll gll gll gll gll gll gll gll gll gll gll gll gll
JolLJI JolJI I 1jI jai Jai Jai Jai Jai Jai Jai Jai Jai Jai Jai Jai Jai Jai Jai Jai Jai Jai Jai Jai Jai Jai Jai Jai Jai Jai Jai Jai Jai Jai Jai Jai Jai Jai Jai Jai Jai Jai Jai Jai Jai Jai Jai Jai Jai Jai Jai
2
2. plasmonics 10b1
3 40120
3. 1jgwwyIg MB-D14 JJI aeg
3....aJJI 1JgWwSg MB-D14 aJUJI aG
jIg jIgJ11 2211 JgJgJgJgJgJg
- EP-5B jIbLJI Jgog EH-5b/EH-5a
4... MB-D14 1JJI 1cgo-0eJ
jg.0s11 jy11,21 jj.111
- MB-D14 4jLbJl 4cg0AE-L/AF-L
4... MB-D14 aJbUJI acgaoo 53 Jaa
5
5 - 6
8
9
a
MB-D14
P
Nikon
No reproduction in any form of this manual, in whole or in part (except for brief quotation in critical articles or reviews), may be made without written authorization from NIKON CORPORATION.
C E
J
MOTEL:MB-D14
制式:Nikon Corporation
中国
上高云:()
K
KCC-REI-NKR-MB-D14
NIKON CORPORATION
Printed in Japan
SB2G02(E4)
© 2012 Nikon Corporation
6MFC04E4-02 ▲G12

- MB-D14
- MB-D14 Multi-Power Battery Pack
- User's Manual
- Safety Precautions
- Notice for Customers in Europe
- CAUTION
- Precautions for Use
- Notice for Customers in the U.S.A.
- Federal Communications Commission (FCC) Radio Frequency Interference Statement
- Nikon
- Notice for Customers in Canada
- ATTENTION
- The MB-D14 and Accessories
- The MB-D14 and Supplied Accessories
- Using the Optional EH-5a/EH-5b AC Adapter and EP-5B Power Connector
- Parts of the MB-D14 (Figure A)
- The MB-D14 Shutter-Release Button, Multi Selector, Command Dials, and AE-L/AF-L Button
- The MB-D14 Control Lock
- Using the Battery Pack
- Attaching the Battery Pack
- Removing the Battery Pack
- Inserting Batteries
- The EP-5B Power Connector
- Battery Level
- Battery Info
- Removing Batteries
- EN-EL15
- AA Batteries
- Specifications
- EN-EL15 Batteries
- Poignée-alimentation MB-D14
- Présentation
- PRECAUCIONES
- MBA-107 MB-D14 (JWNSNA A)
- AAwLzJyJU
- Log10
Brand : NIKON
Model : MB-D14
Category : Camera Grip