SS55003 - Hi-fi system HOMEDICS - Free user manual and instructions
Find the device manual for free SS55003 HOMEDICS in PDF.
| Product type | Dawn simulation alarm clock radio with wireless lamp |
| Brand | HoMedics |
| Model | SS55003 |
| Main power supply | 230 V DC mains adapter (included) |
| Backup power | 1 9V battery (not included) for memory backup |
| Display | Blue LED, dimmable (high/low) |
| Time display | 12/24 hour, adjustable ceiling projection (focus and rotation) |
| Radio | AM/FM, manual tuning, FM indicator |
| Natural sounds | 6 sounds: Rainforest, Ocean, Thunderstorm, Summer night, Rain, Waterfall |
| Alarm options | 7 modes: lamp, natural sound, beep, radio, or combinations lamp + sound/radio/beep |
| Dawn simulator (sunrise) | Light progression over 15 or 30 minutes, adjustable |
| Timer | 15, 30, 45 or 60 minutes, gradual dimming at end of cycle |
| Wireless controlled lamp | Wireless socket for dimmer (compatible with incandescent or dimmable compact fluorescent bulbs) |
| Snooze function | 9 minutes, repeatable until alarm turns off |
| Dimensions (approx.) | Approximately 25 x 15 x 10 cm (not certified) |
| Weight (approx.) | Approximately 1 kg (not certified) |
| Maintenance | Clean with a damp cloth, no abrasive or liquid cleaners |
| Safety | Do not use near water, do not cover while operating, unplug before cleaning |
| Repairability | Repair only by a HoMedics approved service |
| Warranty | See manual, any modification voids warranty |
Frequently Asked Questions - SS55003 HOMEDICS
User questions about SS55003 HOMEDICS
0 question about this device. Answer the ones you know or ask your own.
Ask a new question about this device
Download the instructions for your Hi-fi system in PDF format for free! Find your manual SS55003 - HOMEDICS and take your electronic device back in hand. On this page are published all the documents necessary for the use of your device. SS55003 by HOMEDICS.
USER MANUAL SS55003 HOMEDICS
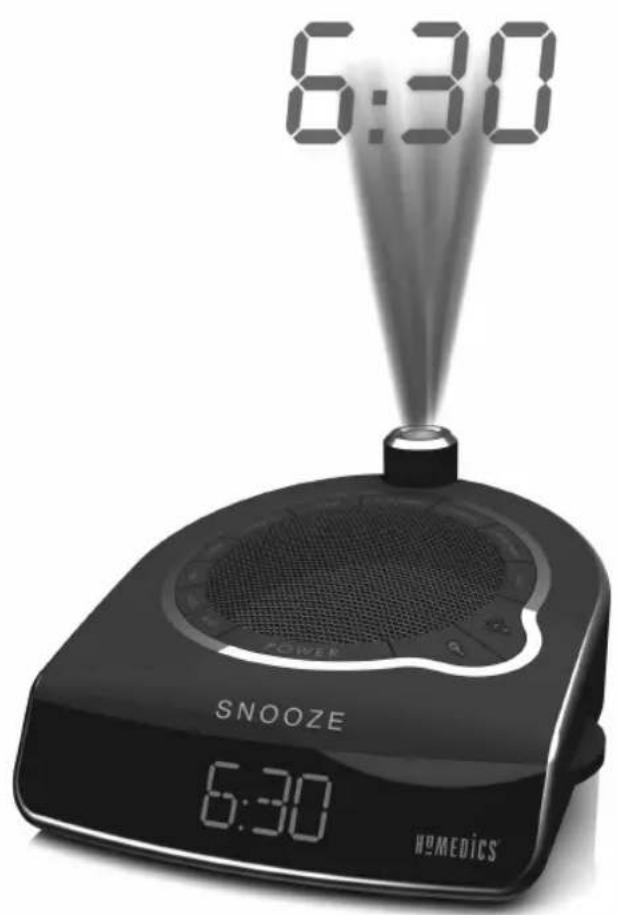
Wake Naturally with Gradual Light
Instruction Manual
SS-5500-2EU
SS-5500-3GB
2 year guarantee


Create your perfect sleep environment.
Thank you for purchasing SoundSpa Sunrise. This, like the entire HoMedics product line, is built with high-quality craftsmanship to provide you with years of dependable service.
SoundSpa Sunrise helps you to wake naturally, leaving you relaxed and ready for the day. Fall asleep to any of its six nature sounds, then wake to a virtual sunrise using your own lamp, plus nature sounds, radio or buzzer. SoundSpa Sunrise can also mask distractions to improve your concentration while you read, work or study.
READ ALL INSTRUCTIONS BEFORE USE.
SAVE THESE INSTRUCTIONS FOR FUTURE REFERENCE.
IMPORTANT SAFEGUARDS:
WHEN USING ELECTRICAL PRODUCTS, ESPECIALLY WHEN CHILDREN ARE PRESENT, BASIC SAFETY PRECAUTIONS SHOULD ALWAYS BE FOLLOWED, INCLUDING THE FOLLOWING:
Always unplug the appliance from the electrical outlet before cleaning.
- Do not reach for an appliance that has fallen into water. Unplug it immediately.
- Do not place or store appliance where it can fall or be pulled into a tub or sink.
- Do not place in or drop into water or any other liquid.
- Use this appliance only for its intended use as described in this manual.
Do not use attachments not recommended by HoMedics; specifically any attachments not provided with the unit.
SAFETY CAUTIONS:
PLEASE READ THIS SECTION CAREFULLY BEFORE USING THE APPLIANCE.
- Never operate this appliance if it has a damaged cord, plug, cable or housing. If it is not working properly, if it has been dropped or damaged, return it to HoMedics Service Center for examination and repair.
- Never drop or insert any object into any opening.
- Do not operate where aerosol (spray) products are being used or where oxygen is being administered.
- To disconnect, remove plug from outlet.
- This appliance is designed for indoor use only. Do not use outdoors.
- Only set on dry surfaces. Do not place on surface wet from water or cleaning solvents.
- Never cover the appliance when it is in operation.
- This unit should not be used by children without adult supervision.
- Always keep the cord away from high temperature and fire.
- Do not lift, carry, hang, or pull the product by the power cord.
- The unit should not be exposed to dripping or splashing water and no objects filled with liquids shall be placed on the appliance.
- Batteries should not be exposed to excessive heat, such as sunshine, fire or similar heat sources.
- The plugs on the power adaptor and wireless receiver are disconnect devices and will remain fully operable when the units are plugged in even though the unit is not operating.
-
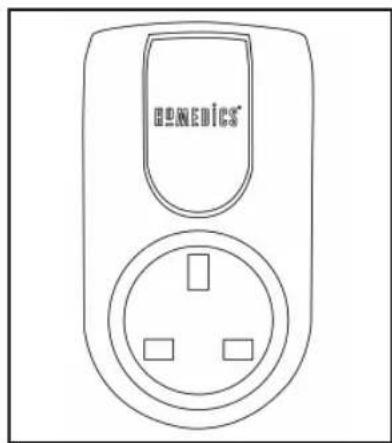
The wireless receiver is a Class I device and must be connected to a mains socket with a protective earthed connection.
-
If the adaptor sustains damage, you must stop using this product immediately and contact the HoMedics Service Center. (See the warranty section for the HoMedics address.)
Caution: All servicing of this product must be performed by authorized HoMedics Service Personnel only.
PRODUCT FEATURES:
- Dawn simulator using your own lamp
- 6 Nature Sounds: Rain Forest, Ocean, Thunder, Summer Night, Rain and Water Fall
AM/FM radio with alarm and snooze - Seven gentle-wake options - lamp only, lamp and nature sound, lamp and beep, lamp and radio, nature sound only, radio only, or beep only
- Easy-to-read clock with blue LED display
- Projection feature projects time on the ceiling in a soothing blue light
- Auto-timer lets you choose how long you listen - 15, 30, 45 or 60 minutes or continuously
Volume control adjusts the volume of the radio, beep or nature sounds - Wireless lamp brightness control
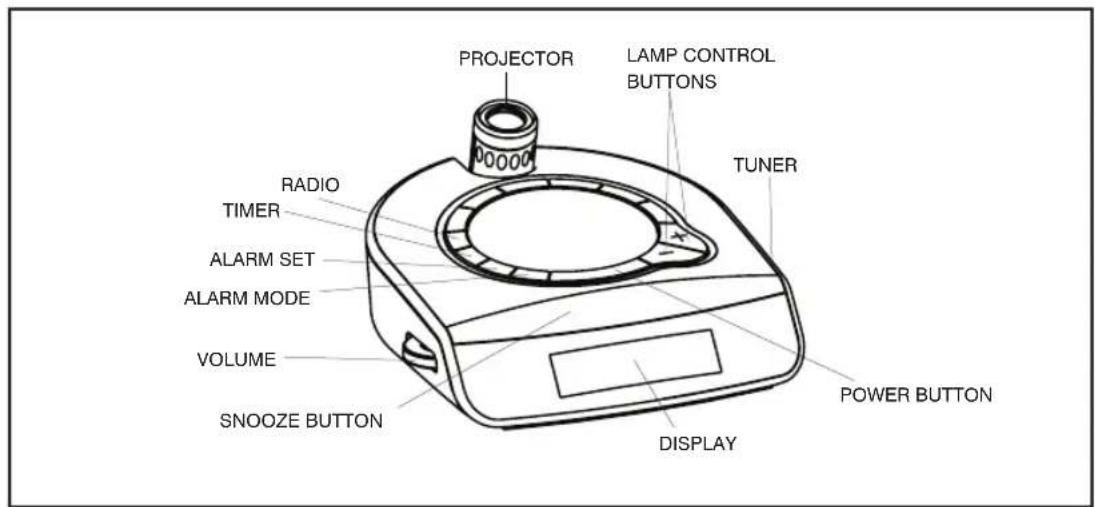
Figure 1
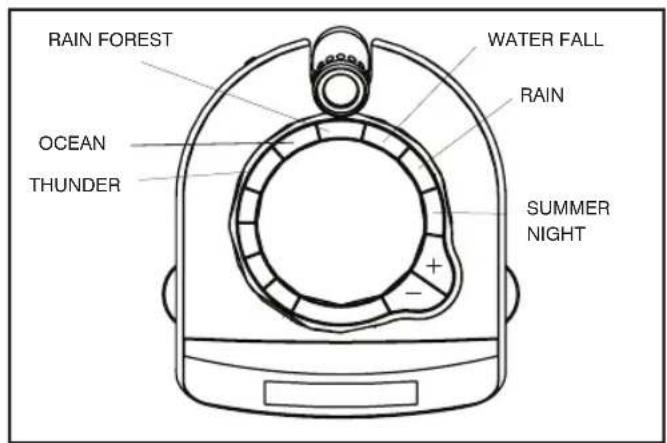
Figure 2
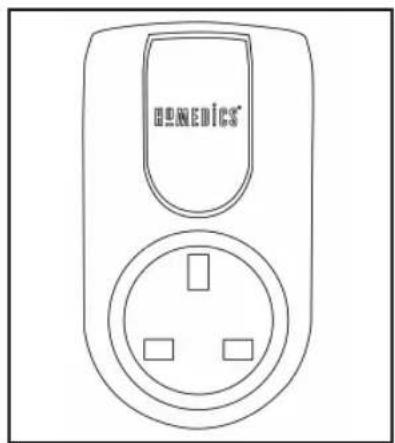
Figure 3
INSTRUCTIONS FOR USE:
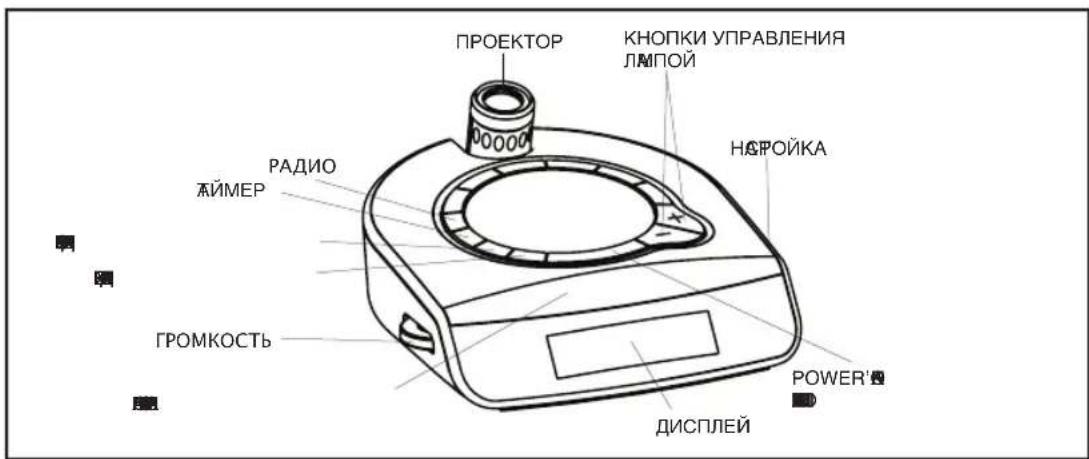
- Unpack the product and check to make sure everything is included (Fig. 1).
- This unit is powered by a DC adaptor, which is included.
- The battery power is designed only to provide MEMORY BACK-UP for the clock and alarm settings. One 9 Volt battery (not included) should be inserted into the battery compartment if memory back-up is desired (in the event of power outages or if the unit is unplugged).
However, the time will not be illuminated on the clock display. As soon as the power supply returns, the display will indicate the correct time.
NOTE: Battery must be installed in order for clock memory back-up to operate. In the event of a power failure or disconnection, if the battery is not installed, the clock and alarm will need to be re-set when power is restored.
- To install battery, remove compartment cover from the bottom of the unit. Insert one 9 Volt battery into the compartment following the diagram. Replace cover and snap into place.
- Attach the DC adaptor connector to the jack located on the back of the unit (Fig. 4) and insert the adaptor into a 230V household outlet.
- To use the dawn simulator and to control your lamp from your SoundSpa Sunrise, plug your lamp into the wireless receiver (Fig. 3). Then plug the wireless receiver into a 230V household outlet.
NOTE: Consult lamp instructions for light bulb specifications. The SoundSpa Sunrise works with most lamps that use incandescent or CFL dimming light bulbs. Before purchasing CFL bulbs verify they can be used in lamps with dimming switches.
Setting the Clock
- Your SoundSpa Sunrise clock is set to a 12 hour clock. If you would prefer a 24 hour clock, press the 12/24 button once (Fig. 4).
- Press and hold the HOUR button for 2 seconds (Fig. 4). The time will begin to flash
- While the time is flashing, press the HOUR button until you reach the correct hour. Then press the MINUTE button (Fig. 4) until you reach the correct minute.
NOTE: PM indicator will appear on the left side of the clock face for evening hours (Fig. 7). If the PM indicator is not illuminated, the hour is set to AM. Be sure to set the time for the correct 12-hour period – AM (morning) or PM (evening).
NOTE: After 5 seconds, the time will stop flashing and it will be set.
- Press the BACKLIGHT HI/LO button (Fig. 4) to choose between high and low clock LED display brightness.
Listening to Nature Sounds
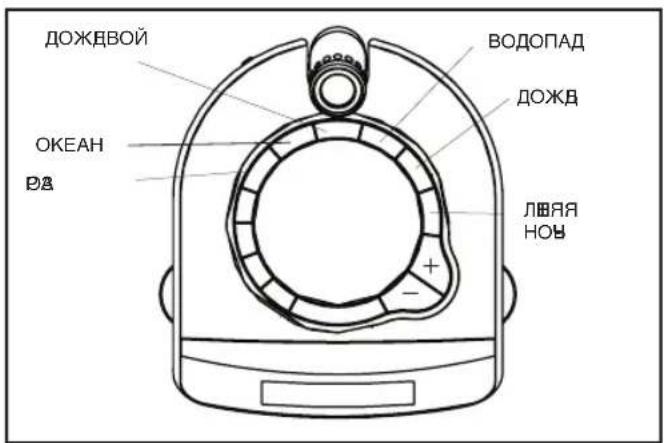
- Select the sound you wish to listen to and press the corresponding button (Fig. 2).
- To adjust the volume, turn the VOLUME knob (Fig. 1) to your desired level.
- When finished listening to the sounds, you may turn them off by pressing the POWER button, or switch to the radio by pressing RADIO (Fig. 1).
NOTE: When the unit is turned on, it will always default to the last mode used.
Listening to the Radio
- Press the RADIO button (Fig. 1).
- Rotate the TUNER (Fig. 1) to select a radio station.
- To adjust the volume, turn the VOLUME knob (Fig. 1) to your desired level.
- When finished listening to the radio, you may turn it off by pressing the POWER button, or switch to a nature sound by pressing the corresponding button (Fig. 1 and 2).
NOTE: To change between bands, there is an AM/FM switch located on the back of the unit (Fig. 4). When FM band is selected, a FM Indicator will appear on the left side of the clock face (Fig. 7). If the FM indicator is not illuminated, the band is set to AM.
Using the Lamp
- To turn the lamp on, press the lightbulb once (Fig. 1).
- To increase the brightness of the lamp, press and hold lightbulb until desired level is reached.
- To turn the lamp off, press the lightbulb once (Fig. 1).
- To dim the lamp, press and hold lightbulb until desired level is reached.
- You may also turn the lamp off by pressing the POWER button once. Pressing the POWER button again will turn the lamp on (Fig. 1).
NOTE: If radio is on it will mute during lamp adjustment resuming when adjustment is complete.
Using the Auto-Timer
When the power is ON and you are listening to a nature sound, the radio, or have your lamp illuminated through the SoundSpa Sunrise wireless receiver, you may set an auto off timer so the sound and/or light will automatically fade to off in the last 5 minutes of the chosen time.
- Toggle through the TIMER button (Fig. 1) to find the time of your choice 15, 30, 45 or 60 minutes shows on the clock face. The TIMER indicator will appear on the left side of the clock face to confirm that it is set (Fig. 7).
- The time remaining on the auto-timer can be terminated at any time by pressing the POWER button to turn off the nature sound, radio or lamp (Fig. 1)
Setting and Using the Alarm
For more information see Fig. 8.
- Press the AL SET button (Fig. 1) and the time will flash.
- While the time is flashing, press the HOUR button until you reach the correct hour. Then press the MINUTE button until you reach the correct minute (Fig. 4).
NOTE: When digits are flashing, press and hold the HOUR or MINUTE button continuously for a fast advance (Fig. 4).
NOTE: The PM function applies to the alarm. If the PM indicator is not displayed on the clock face, the alarm will be set to AM. (Fig. 7).
- Press AL SET button to set the time, or after 5 seconds the alarm will be set automatically (Fig. 1).
- To activate the alarm you may choose one of 7 settings. To confirm your setting, the appropriate alarm indicators will be illuminated on the clock face to the right of the time (Fig. 7).
a) LAMP-push the AL MODE button once. To set the Sunrise mode, adjust the 15/30/OFF switch (Fig. 4) to set lamp to brighten gradually in 15 or 30 minutes or in the OFF position to set lamp to turn on to full brightness at the set alarm time (Fig. 1).
b) NATURE SOUND-push the AL MODE button twice. The nature sound will be the last sound you listened to. To change the nature sound press the nature sound button you wish (Fig. 2) and then press POWER button (Fig. 1).
c) RADIO-push the AL MODE button 3 times (Fig. 1). Use the tuner to adjust the radio to your desired station (Fig. 1).
d) BEEP-press the AL MODE button 4 times (Fig. 1).
e) LAMP & NATURE SOUND-press the AL MODE button 5 times (Fig. 1).
f) LAMP & RADIO-press the AL MODE button 6 times (Fig. 1).
g) LAMP & BEEP-press the AL MODE button 7 times (Fig. 1).
- When the alarm sounds, the corresponding alarm indicator (Lamp, Sound, Radio, Beep or combination of these) blinks. You may take the following actions:
a) SNOOZE-press the SNOOZE button (Fig. 1). The SoundSpa Sunrise wake feature will be activated in 9 minutes. See Fig. 8 for options. You may use this feature until you turn the alarm off.
b) RESET-turn the alarm off by pressing ANY button but the SNOOZE button (Fig. 1).
The alarm clock will automatically reset for the next day in its current mode. The corresponding ALARM indicator (Lamp, Sound, Radio, Beep or combination of these) will indicate this. If you wish to change the wake mode, follow step 4 under Setting and Using the Alarm.
c) OFF-to completely turn off the alarm continue to press the AL MODE button until all the of the alarm indicators (lamp, sound, radio, beep) are off (Fig. 1).
Note: If alarm sounds for 30 minutes continuously it will automatically turn off and reset for the next day.
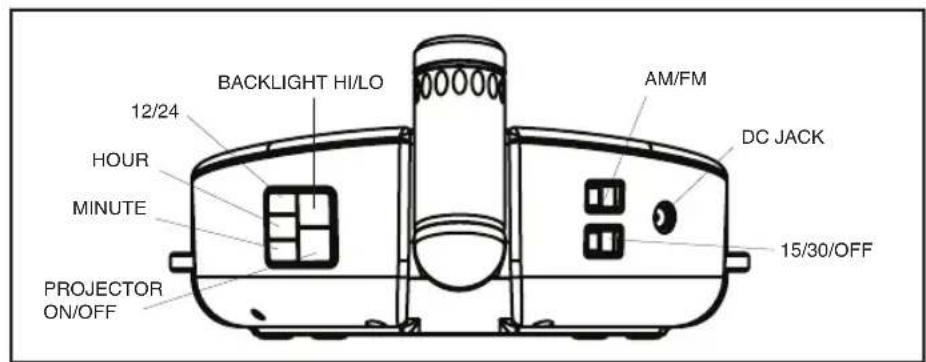
Figure 4

Figure 5
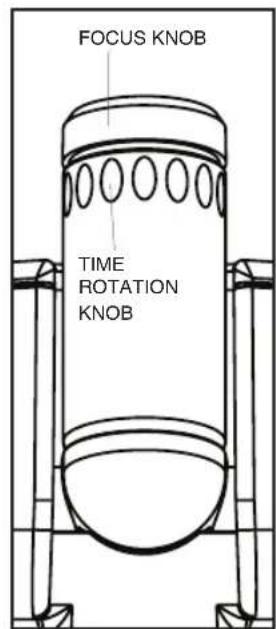
Figure 6
Figure 8
| Wake Mode | Sunrise Mode | What happens? |
| Lamp Only | No Sunrise | At alarm time: • Lamp turns on to full brightness |
| 15 or 30 minute Sunrise | 15 or 30 minutes before alarm time: • Lamp is dimly lit • Lamp brightens gradually for 15 or 30 minutes until full brightness | |
| Nature Sound | No Sunrise | At alarm time: • Selected Sound plays at the sound level you choose |
| 15 or 30 minute Sunrise | 5 minutes before alarm time: • Selected Sound plays quietly • Sound gradually increases to the sound level you choose | |
| Lamp & Nature Sound | No Sunrise | At alarm time: • Lamp turns on to full brightness and Sound plays at the sound level you choose |
| 15 or 30 minute Sunrise | 15 or 30 minutes before alarm time: • Lamp is dimly lit • Light brightens gradually for 15 or 30 minutes until full brightness at alarm time 5 minutes before alarm tim e: • Sound starts quietly • Sound gradually increases to the sound level you choose | |
| Lamp & Beep or Lamp & Radio | No Sunrise | At alarm time: • Lamp turns on to full brightness and Beep or Radio sound at maximum level you choose |
| 15 or 30 minute Sunrise | 15 or 30 minutes before alarm time: • Lamp is dimly lit • Light brightens gradually for 15 or 30 minutes until full brightness At alarm time: • Beep or Radio sound at the volume level you choose | |
| Radio or Beep | No Sunrise | At alarm time: • Radio or Beep sound at the volume level you choose |
| Alarm Settings | When you push SNOOZE: | |
| Alarm Indicator - LampSunrise Setting - OFF | ·Lamp turns off ·Lamp turns back on after 9 minutes at full brightness | |
| Alarm Indicator - LampSunrise Setting - 15 or 30 | ·Lamp returns to dimly lit ·Lamp brightens gradually for 9 minutes to full brightness | |
| Alarm Indicator - Sound | ·Sound turns off ·Sound turns back on after 9 minutes | |
| Alarm Indicator - SoundSunrise Setting - 15 or 30 | ·Sound turns off ·Sound plays quietly after 4 minutes ·Sound builds to maximum level you choose for 5 additional minutes | |
| Alarm Indicator - Lamp &SoundSunrise Setting - OFF | ·Lamp & Nature Sound turn off ·Lamp & Nature Sound turn back on after 9 minutes | |
| Alarm Indicator - Lamp &SoundSunrise Setting - 15 or 30 | ·Lamp returns to dimly lit ·Light brightens gradually for 9 minutes to full brightness ·Sound turns off ·Sound plays quietly after 4 minutes ·Sound builds to sound level you choose for 5 additional minutes | |
| Alarm Indicator - Lamp & Beepor Lamp &RadioSunrise Setting - OFF | ·Lamp & Beep or Radio turn off ·Lamp & Beep or Radio turn back on after 9 minutes | |
| Alarm Indicator - Lamp & Beepor Lamp &RadioSunrise Setting - 15 or 30 | ·Lamp returns to dimly lit ·Lamp brightens gradually for 9 minutes to full brightness ·Beep or Radio sound after 9 minutes | |
| Alarm Indicator - Radio or BeepSunrise Setting - OFF | ·Radio or Beep turn off ·Radio or Beep turn back on after 9 minutes |
Using the Projection Feature
- To turn the projection feature on or off, press the PROJECTOR ON/OFF button once (Fig. 4). The time is now projected on the ceiling. To turn projection off press PROJECTOR ON/OFF again. NOTE: If the projection feature is off you may press the SNOOZE button (Fig. 1) to trigger 5 seconds of projection.
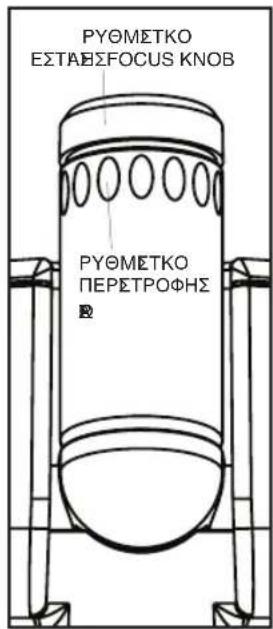
- To turn the angle of the time that appears on the ceiling, rotate the TIME ROTATION KNOB (Fig. 6) until you have reached your desired result. NOTE: The TIME ROTATION KNOB will rotate up to 350 degrees.
- To focus the time on the ceiling, rotate the FOCUS KNOB (Fig. 6) until you have reached your desired result.
- To adjust where time is projected, move projector forward or backward (Fig. 5).
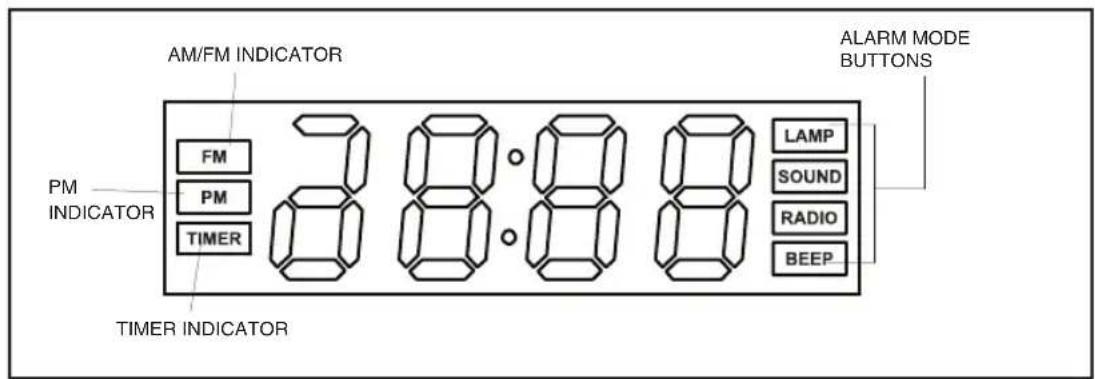
Figure 7
MAINTENANCE:
To Store
You may store the unit in its box in a cool, dry place.
To Clean
Wipe off dust with a damp cloth. NEVER use liquids or abrasive cleaner to clean. Modifications not authorised by the manufacturer may void users authority to operate this device.
Plug (MODEL SS-5500-3GB ONLY)
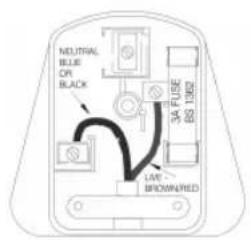
If the plug on this appliance is damaged, it can be replaced with a BS 1363 plug, fitted with a 3A BS 1362 fuse. Only use a 3amp fuse with this appliance. Care must be taken when changing the plug. If in doubt, contact a qualified electrician.
FONCTIONS DU PRODUIT:
VOORZORGSGMAATREGELEN:
DIT GEDEELTE AANDACHTIG LEZEN ALVORENS HET APPARAAT IN GEBRUK TE NEMEN.
- BACKLIGHT HI/LO (E4) LED
Φuokoi nXoi
- VOLUME (E1)
- POWER RADIO E1).
xρηομιοτοῦθηκε.
种
(LampSound Radio Beep
华
CAL MODE
Sound Radio Beep (E1).
30

Eikova 4
Eikova5

Eikova 6
Eikova8
m = 311 ;
- 带
IoMedics. (
HoMedics
图1
HoMedics.

·
·
AM/FM
m : x = 1 或 3x + 4y + 1 = 0
1
12x - 1 > 0 ②
1
3BYKOBOO CnHaJ.
·
m = 311
1
DNY6OM LBETE.
- 15,30,45,60
甲
m - 1 0 ;
3BYKOB pnpOdbI.
·
Pnc.1
Pnc.2
Pnc.3