SS45002 - Hi-fi system HOMEDICS - Free user manual and instructions
Find the device manual for free SS45002 HOMEDICS in PDF.
| Product type | Hi-fi system with radio alarm clock, nature sounds and projection |
| Brand | HOMEDICS |
| Model | SS45002 |
| Power supply | 230V mains adapter; 9V battery (not included) for memory backup |
| Main functions | AM/FM radio, 6 nature sounds, 3-mode alarm (radio/sounds/beep), snooze, timer (15/30/45/60 min), ceiling time projection, screen brightness adjustment |
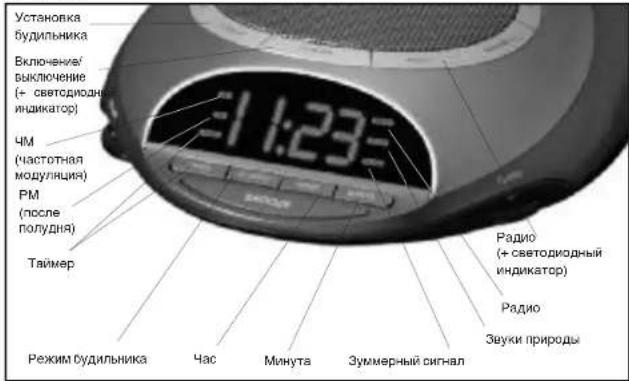
| Display | Digital with backlight, AM/PM indicators, alarm mode, FM, timer |
| Speaker | Built-in |
| Dimensions (approx.) | Approximately 20 x 15 x 10 cm |
| Weight (approx.) | Approximately 0.5 kg |
| Maintenance and cleaning | Clean with a damp cloth; do not use liquid or abrasive cleaner |
| Safety | Unplug after use; do not use near water; keep away from children; do not cover while operating |
| Spare parts | Mains adapter included; 9V battery not included |
| Repairability | Contact HoMedics Service Center |
Frequently Asked Questions - SS45002 HOMEDICS
User questions about SS45002 HOMEDICS
0 question about this device. Answer the ones you know or ask your own.
Ask a new question about this device
Download the instructions for your Hi-fi system in PDF format for free! Find your manual SS45002 - HOMEDICS and take your electronic device back in hand. On this page are published all the documents necessary for the use of your device. SS45002 by HOMEDICS.
USER MANUAL SS45002 HOMEDICS
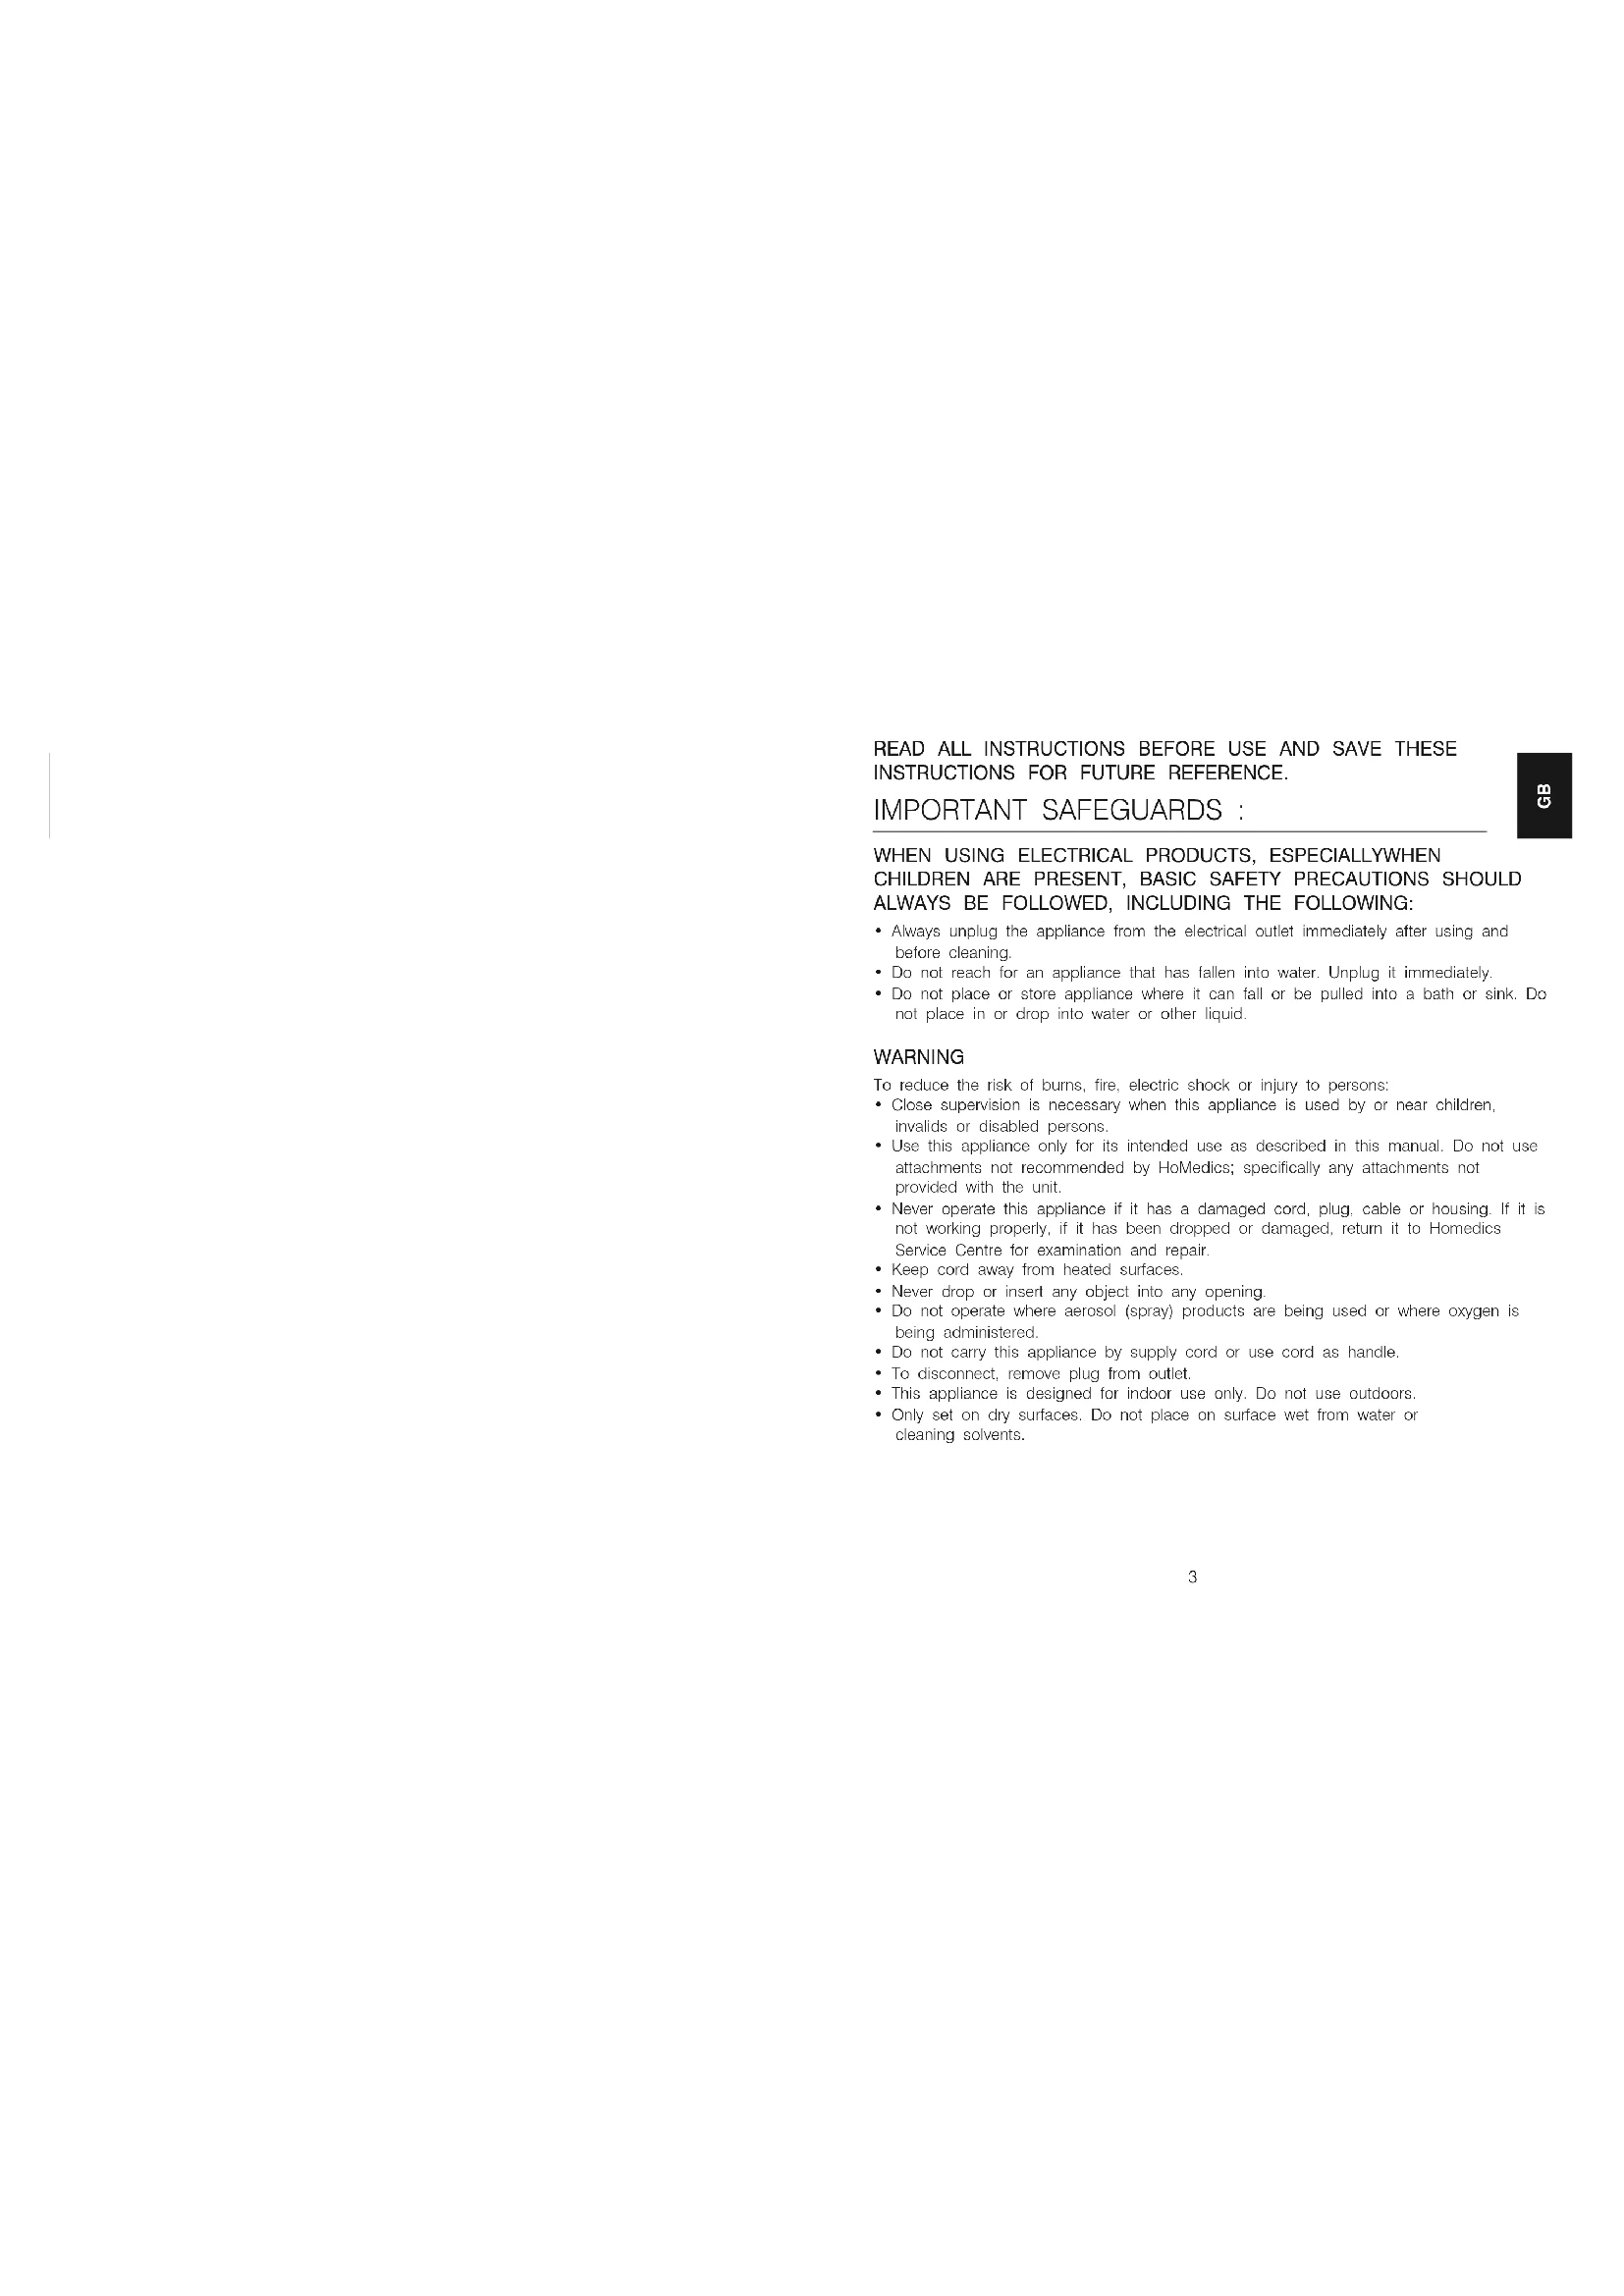
- Always unplug the appliance from the electrical outlet immediately after using and before cleaning.
- Do not reach for an appliance that has fallen into water. Unplug it immediately.
- Do not place or store appliance where it can fall or be pulled into a bath or sink. Do not place in or drop into water or other liquid.
WARNING
To reduce the risk of burns, fire, electric shock or injury to persons:
- Close supervision is necessary when this appliance is used by or near children, invalids or disabled persons.
- Use this appliance only for its intended use as described in this manual. Do not use attachments not recommended by HoMedics; specifically any attachments not provided with the unit.
- Never operate this appliance if it has a damaged cord, plug, cable or housing. If it is not working properly, if it has been dropped or damaged, return it to Homedics Service Centre for examination and repair.
- Keep cord away from heated surfaces.
- Never drop or insert any object into any opening.
- Do not operate where aerosol (spray) products are being used or where oxygen is being administered.
- Do not carry this appliance by supply cord or use cord as handle.
- To disconnect, remove plug from outlet.
This appliance is designed for indoor use only. Do not use outdoors.
- Only set on dry surfaces. Do not place on surface wet from water or cleaning solvents.
SAFETY CAUTIONS :
- Never cover the appliance when it is in operation.
This unit should not be used by children without adult supervision.
Always keep the cord away from high temperature and fire. - Do not lift, carry, hang, or pull the product by the power cord.
- If the adaptor sustains damage, you must stop using this product immediately and contact the HoMedics Service Centre.
INSTRUCTIONS FOR USE :
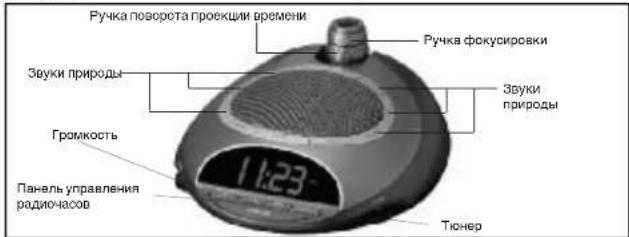
- Unpack the product and check to make sure everything is included (Fig 1).
- This unit is powered by a DC adaptor, which is included.
- The battery power is designed only to provide MEMORY BACK-UP for the clock and alarm settings. One 9V battery (not included) should be inserted into the battery compartment if memory back-up is desired (in the event of power outages or if the unit is unplugged). However, the time will not be illuminated on the clock display. As soon as the power supply returns, the display will indicate the correct time. Note: Battery must be installed in order for clock memory back-up to open In the event of a power failure or disconnection, if the battery is not inst the clock and alarm will need to be re-set when power is restored.
- To install battery, remove compartment cover. Insert one 9V battery into the compartment on the bottom of the unit following the diagram. Replace cover and snap into place.
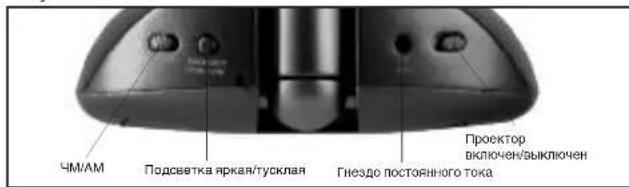
- Attach the DC adaptor to the jack located on the back of the unit (Fig 4) and insert the cord into a 230V power supply.
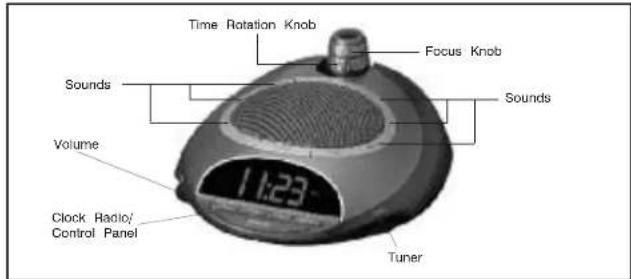
Figure 1
Setting the clock
- Press and hold the HOUR button for 5 seconds (Fig. 5). The time will begin to flash
- While the time is flashing, press the HOUR button until you reach the correct hour. Then press the MINUTE button (Fig. 5) until you reach the correct minute. Note: PM indicator will appear on the left side of the clock face for evening hours (Fig. 5). If the PM indicator is not illuminated, the hour is set to AM. Sure to set the time for the correct 12-hour period - AM (morning) or PM (evening). After 5 seconds, the time will stop flashing and it will be set.
- Press the BACKLIGHT HIGH/LOW button (Fig. 4) to choose between high and low clock brightness.
Listening to Nature Sounds
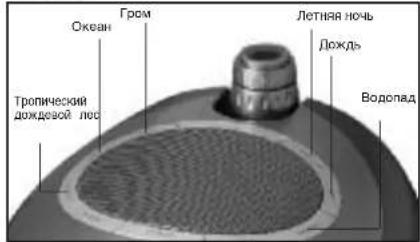
- Select the sound you wish to listen to and press the corresponding button (Fig 2).
- To adjust the volume, turn the VOLUME knob (Fig 1) to your desired level.
- When finished listening to the sounds you may turn them off by pressing the POWER button, or switch to the radio by pressing RADIO (Fig 5).
Note: When the unit is turned on it will always default to the last mode used.
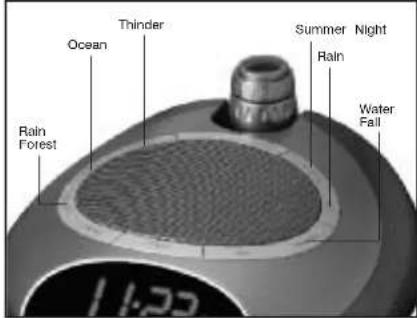
Figure 2
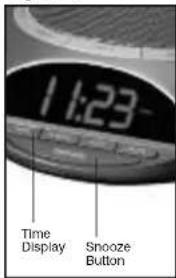
Figure 3
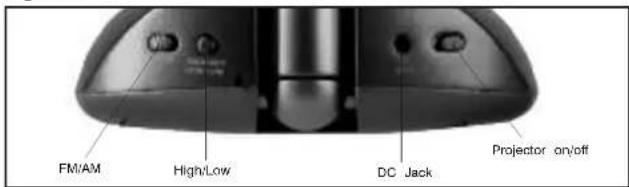
Figure 4
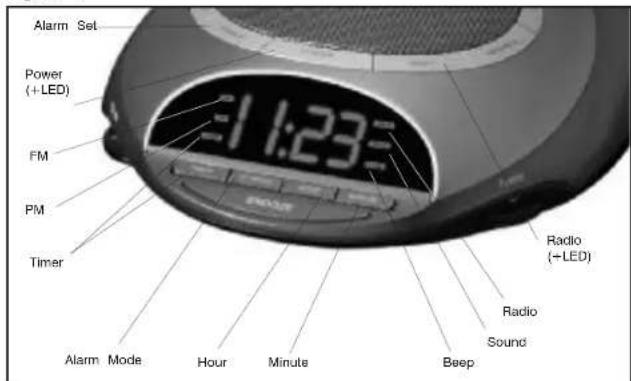
Figure 5
Listening to the radio
- Press the RADIO button (Fig 5).
- Rotate the TUNER (Fig 1) to select a radio station.
- To adjust the volume, turn the VOLUME knob (Fig 1) to your desired level.
- When finished listening to the radio you may turn it off by pressing the POWER button, or switch to a nature sound by pressing the corresponding button (Fig 2). Note: To change between bands there is an AM/FM switch located on the back of the unit (Fig 4). When FM band is selected, a FM Indicator will appear on the left side of the clock face (Fig. 5). If the FM indicator is not illuminated, the device is set to AM.
Using the Auto-Timer
- When the power is on and you are listening to a nature sound or the radio you may set a timer so the unit will automatically turn off.
- Toggle through the TIMER button (Fig 5) until the time of your choice, 15, 30, 45 or 60 minutes, shows on the clock face. The TIMER indicator will appear on the left side of the clock face to confirm that the timer is set.
Setting and using the alarm
- Press the ALARM SET button (Fig 5). The time will flash.
- While the time is flashing press the HOUR button (Fig 5) until you reach the correct hour. Then press the MINUTE button (Fig 5) until you reach the desired minute.
- After 5 seconds the alarm set time will stop flashing and it will be programmed, or you may press the ALARM SET button.
Note: The PM indicator also applies to the alarm. You can review the alarm setting any time by pressing the ALARM SET button.
- To activate the alarm you may choose one of 3 wake options:
a. To wake to RADIO (Fig. 5) press the AL MODE button (Fig. 5) once. You may leave it on the current station or adjust the TUNER.
b. To wake to a SOUND, press the AL MODE button a second time. It will set to the last sound you listened to. If you wish to change it, press the sound you wish to wake to and then press the POWER button (Fig 5).
c. To wake to BEEP, press the AL MODE button a third time.
Note: The ALARM MODE indicator (RADIO/SOUND/BEEP) will appear on the right side of the clock face (Fig. 5), and will indicate that the alarm is set.
- When the alarm sounds, the corresponding ALARM indicator (RADIO/SOUND/BEEP) blinks. You may either:
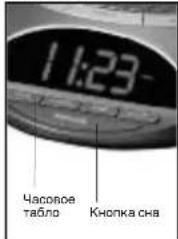
a. SNOOZE: Press the SNOOZE button (Fig 3). Your sleep time will be extended by 9 minutes. You may use this feature until you turn the alarm off.
b. RESET: Turn the alarm off by pressing ANY button on the unit, except for the SNOOZE button (Fig 1). The alarm clock will automatically reset for the next day in its current mode. The corresponding ALARM indicator (RADIO/SOUND/BEEP) will indicate this. If you wish to change the wake mode follow step 1 under Setting and Using the Alarm.
c. OFF: To completely turn off the alarm so it is not set for the next day, continue to press the AL MODE button until all the ALARM indicators (RADIO/SOUND/BEEP) are all off.
Note: If the alarm sounds for 30 minutes continuously it will automatically turn off and reset for the next day.
Using the projection feature
- To turn the projection feature on, slide the switch on the back of the unit (Fig 4) ON position. The time is now projected on the ceiling. Note: If the projection feature is off you may press the SNOOZE button (Fig 3) to trigger 5 seconds of projection.
- To turn the angle of the time that appears on the ceiling, rotate the TIME ROTATION KNOB (Fig.1) until you have reached your desired result.
Note: The TIME ROTATION KNOB will rotate up to 350 degrees. - To focus the time on the ceiling, rotate the FOCUS KNOB (Fig 1.) until you have reached your desired result.
- The angle of the projector can be adjusted by angling forward or backward.
MAINTENANCE :
Storage
You may leave the unit on display, or you can store it in its box or a cool, dry place.
Cleaning
Wipe off dust with a damp cloth. NEVER use liquids or abrasive cleaner to clean. Note: Modifications not authorized by the manufacturer may void users authority to operate this device.
LIRE ATTENTIVEMENT LES INSTRUCTIONS AVANT EMPLOI ET LES CONSERVER POUR Toute CONSULTATION ULTÉRIEURE. PRECAUTIONS IMPORTANTES :
LORS DE L'UTILISATION D'APPEARILS ÉLECTRIQUES, PARTICULIERÉMENT EN PRESENCE D'ENFANTS, IL EST CONSEILLÉ DE TOUJOURS PRENDRE DES PRECAUTIONS DE BASE, NOTAMMENT DE SUIVRE LA PROCEDURE SUIVANTE :
IpMnEHaHMe: DlKnKa 6bTbYcTaHOBHe BatapeKa IaI TORO, TcObI DeIeCTBoAOn CoxapHeMa nAmrTH aocB. B cNyaae pnekpaehner noaay 3NeKTPO3EHPRm mN oTCoCoDHeHHc, eCN SbATapeKa He yctAHOBHe, To cAsb MydMbHk Mydt HkydTaBC h NepeyCTAHOBe, Korda noDaay 3NeKTPO3EHPRm bYedt BOCCTAHOBHe.
4.ДиТо,уTObI yToHOBnIT bOaTepeHky,ChHMMte KpbIbKy batopeHoro OTeKa. BCTabTe ONY batopeHky B 9 B aOTcK dNAn batoapeK ha NtHMe UcTPOHCTBa CneDy DmApPAMMe. NoCTabTe KpbIbKy OTeKa Ha MeCtO hAaUeHNKhTeEe.
5. Bactbte pa3em aandentepa noctonHHoro TOKA b rhe3do HA ochoobanyu yctpoiye (Pinc.4) nnoocOeHNHTpe npOBK O cHtOHNHy 3nekTPONTAHNA B 230 B
PucyHok 1
PcyHOK2
PucyHok 3
YcTaHOBKa BpeMeHH
- HAXMITE u dEXPHTE KHONKY YACOB HOUR B TceHEnE 5 cokyHn (Pnc.5).Bpemr HANHT MFRfB.
- NOKA BPEMA MNAET, HAXKMAITE KHNKY YACOB HOUR DO TEX NOP, NOKA BBy HE Bb6epete npabnBbHc hAc 3aTeM HAXKMAITE Ha KNOKY MINHT MINE (Pnc. 5) do Tex nop, NOKA BBy He Bb6epete npabnHyIO MNHTy.
PnIMeHAnHe: YkAsTeBb PM (Noce nonynDn) NOBNTc Ha NEBOI CTOPOHE YACOBORo TAbNO Dn OOb3AHENH NoCenNOyDEHHbIX YACOB (Pnc. 5). EcnN YkAsTeBb PM He BcBcHbAETcN, 3To NOHHT, YoC hAcTPOeH Na BPEMa Do NOyDn. Y6edntecb, 7To BPEMa yCTaHOBHeN Ho npabnBbHb 12-ACoBOI nepnoi -AM (yTPo) nHI PM (Behep). Nocne 5 cekyHd BPEMa nepeCTaHet MURtBm Bydert ycta HOBHeN. - Haxnme Ha konkyo nocbctekn BACKLIGHT HIGH/LOW (noCbeTka npkran/Tyccklan) (Prc.4) dny toro, yto6bl Bbopatm Mexdy BboKoN HmK0n RpKoctBo.
PucyHok 4
Cnywahne 3ByKOB npnpoDbI
- BbEpnre 38yKn npDob, KOptBle Bb XoTne ciuyaTb n HxKMTE COOTBcTByOuSy KhoNky (Pnc.2).
2.ДИТORO,TTO6IbIOTOPYNIOBpAIBRPMOKCTB.NOBOPAINBAIe pyHkyrpmKoCTN VOLUME(Pnc.1)doJXeMAEOMOYPOBNH3BYYAHNHI. - Nocne OKOHaHn CnyuHn 3bYkoB npDob Bbl MoKeTe BbIKIOHTb nx, HAKAB Ha KhoNKy BKNIOHUYBbIKIOHNY POWER INI nepeKIOHbUncb Ha padHO HaxaTneM KhoNKn paADRO RADIO (Puc.5). PmmeHaHne: Korda yCTPOJcTBO BKIOUaETC, OHO NO yMOVAHnBO BCERda
PcCyHOK5
HacTpoeHO Ha Te 3ByKn npHpOdbI, KOtOpbln pocnyuBAAHcB nocJeHHMM.
Cnyuahne padno
- HaxmTe Ha KhoKy paNo RADIO (Pnc. 5).
- NopopayBaHte TIOheP TUNER (Pnc. 1), yTObblb6paTb paIIOCTAHUHO.
3.ДЯTORO,YTO6bIOTOPYNPBOBtRPMKOCTB.NOBOPAHAaHTe pyuKy rpmKoCTN VOLUME(Phc.1)do jxemaMOrOyPOBHR3BAYHAAH. - Pocne OKOHAHIN CNYAHIN PAIDMO BBI MOXETe BIKIOHHTB ERO.HAKAB HA KHONKY BKNIOEHN/BOKIOEHN POWER Wn nepeKNOHBMNCb Ha 3yKn npipOdb HAKATEM COOTBTCTBYOEN KONKN (PNC.2).
PpMueHHe: DnTORO,TOToBMeHrBmna3OHYACTOT,MMeETcR
peekohateb AMYM (AMFM), paoJooKeHHn Ha 3aHHe cToPoHe
paHocB (Pc. 4). KOrDa BbIpaH dHaIaHsO cAcoTfM (FM), Ha IeBON
ctopoe Taacoborto Taocno HOBaHTy ykaataten FM (PMc.5).Echm ykaataten FM He BbceBwAaTc, dmaanao Tact OCT YtaohoJIe HA AM.
IcnoJb3OBaHne aBTotaMepa
- Koga KaNIOHcE 3eKtponTahnHe IM BbI cyuAetae 3Bkyr npDioJI mnn PAIO, Bbl MoXeTe OYCTAOHBtB TaHmep, YTObI pAOaOHcAs BOATMAtNUeCKn BuIKNoNINCb.
- NpcknHnAHTb KhONk TYaMepa TIMER (Pnc. 5) do Tox nop, noka HA YAcOBOM Ta6no HE nonBnTc BbpaHnoe BAm BPmN:15,30,45 Wn 60 MMyt. YkaatateNs TaHmepa TIMER noBNTc H na neoB CTOpOHe YacOBOrO Ta6no, TOTbO NoTBePHTb, TTO
TainMep yctaHOBneH.
YcTaHOBka HnCnONb3OBaHHe 6yDnJIbHnKa
- HAKMITE Ha KHONKY yCTAHOBK 6yDINHNIKA ALARM SET (Pc.5).BpMa HauHOT MHTA
- Noka BpMa MmAeT, HaxMMAIe KHONKY HAcOB HOUR DO TEX NOP. NOKa BBy HE BbOpTe npAbNbHMy lac. 3Atem HaxMMAIe Ha KHONKY MNHT MINUTE (Pnc. 5) do tex nop. NOKa BBy He bblpeTe KenaEMyO MNHTY.
- Iocne 5 cekyHb Bpema yCTAHOBKn 6yDnBnHAKe NpecTaHET MmRa b 6yDet 3anporpaMMPOBAHO, HNN Bb MoKTe HAXaTb KONKy yCTAHOBKn 6yDnBnKA ALARM SET.
PnmeaHHe: yk3aTeIb PM (noCne noyDHa) TaKKe npmehetcra Pd 6dyuNbHKa. Bbl MokeTe npoBeptb ycTaHOBky DInuBnHKa B IIO6oe BPMe, HAKBa HA KhoNky cyaTOHbIKy DInuBnHKa ALARM SET.
4.ДЯTORO,YTO6BPNPBECTBNDECTBNECnHAN6yDINbNtKa,BHMOKTe Bb6paTbOHN3TPEXBAPANTOBpOByXkDEHn:
a.ДЯTORO,TTO6bI npocHytbcNOD 38yKu pAno RADI (Pnc.5),HaxMnTe OmHpa3Ha KHOkny peKIMMa bydInbHnKa AL MODE (Pnc.5).BbMOxKeTe OCTaBntbpaNOACbHa ToJke pAOcTahUIN,KOTpyo BbClyAaIN,INOPeyrUmpoBaT hAcTPOyK C NOMoubToKHePA TUNER.
b. pIIN TOrO,IToBb npOCHyTb cnd 3EyKn npPpOdb SOUND, HAKMnTe Ha KHONKY pEXHMa 6dyInhHkA AL MODE bTOpoi pa3. PaDmoacbl 6dyT HACTPOeHbHa Te 3EyKn npPpOdb, KOtOpbe Bc CnyUanu noCneJHMm. EcnB BxOTHe hMmHbHnCTpOky, HAKMnTe Ha KHONKY 3EyKOB npPpOdb, NOd KOTOpbe Bc XeJaTe npOChyTb cR, a 3aTe m HAKMnTe Ha KHONKY BKNOHm/BrKIOHOHPOWER (Pnc.5).
JINI TORA, YO6B1 npOHTcN DaYMMEPHcRHN BEEP, HAKMTE Ha KHONKY pEXKMAEyDTHNKA AL MODE TpeTn pa
PpmeaHne: yka3aTeB peKmua 6yduNbHnKa ALARM MODE
(RADIO/SOUND/BEEP - paDNo/3ByKn npHpoDbI/3ymMepHbI cnHaI)
NORBNTCA Ha npabOi cTOpOHe yacoboro Ta6No (Pnc. 5) n noKaXeT, YTO
6ydnbHK yctaHOBneH.
- KOra 3yHHT CnHAn 6yDnBnHnKa, To COOTeCTbYIOuM yKAsateB bUdHnHnKa (RADI/ SOUND/BEEP - padO/3ByKn npnpOdu/3yMMepHn CmHAn) mHaet. Bbl MoKete BbOpTa Hnn:
a. Coh (SNOOZE): Haxmte Ha KHONKY CHA SNOOZE (Puc. 3). BpembaBauero6 Byet npdojkeho H 9 MHTy. Bbl MoXeTe Mcnolbocatb 3To CBOCTBO, no Bbl He bblKnIOHcT Bydlnhik.
b. IpeyeCTAHOBKY (RESET): BkIIOHIOITE CnRHN 6yIaIIhNka HAKATMEM IOIOB KHONK HA paHOHocax, KpOme KhoNk CHA SNOOZE (Pnc. 1). ByIbNtIK bEyET ABOMATNI HECKN IpeyeCTAOHOBH NcIeDyUHIN DEB E BOr TEKUYEPEKIMHE A TOYKAJET COOTBETZyOUM YKASATEB NcIeDyHINKA (RADIO/SOUND/BEEP -paHO/3ByKN npINODb/syMMepHn CnHAn). Ecnbl XoHTNE mHmHTb pKIMN npOboyKnCneDyTne NYKTHY 1 paDENa "YTOCAHBON M nCnOIL3OBAHNE
6yDnInbHnka
B. CklnIOHHe (OFF):ДгTORO,TObSbI NonIOCTbO BbIKIOHTb,BydINbIKHK,TaK, TcBOH He bHJ yctAHOBnEH Na cneIyUoiu DeHb, npOIOxJaTe HaxKMAtb KhoNky pexkima 6yDInbHnka AL MODE do Tnp, noka BCE yka3aTeJIy BydInbHnka (RADIO/SOUND/BEEP - paIHO/3EyKn pnpOdb/3yMMepbH cnHAn) He BkNIOUaTcR.
PnIMeUHHe: Ecnn CnHn 6yDnIbHnKa 6yDet nOCToHHo 3ByuTaB B TeHHe 30 MmHTy.
OH aBTOMaTHueckn BbIKJIOHTcN 6byTe nepeycTaHOBneH Ha cNeyIOuM NeHb.
NcnoB3OBAHMe CBOICTBa npoeKm
1.ДЯTORO,YTOBBIKIOVHTCBIOCTBOPOEKUMNEPEDBHNTepeKNOUATEbHa 3aJHeCtOPOEpaNOCOB(Pnc.4)BnonOKHeMeTenepbApomBydET PPOEUPOBATbCAHNotOLK.
Ппмсчанно:ЕстсCBоюстwo Вькгдьвь Вьл мokөгдн Мэхгдн Chkнок са SNOOZ (Pvc. 3), Түбөд mнүдүрорbatс 5 сүйд nрөдүмсн
2.ДагноТугбblnoBepHyb yronpoekmBpeMeHH.KOTOPOE NOBHTCnHa NOTOLKe,NoobpaUbaIeTpyKU nobopoTa npoekmBpeMeHH TIME ROTATION KNOB(Pnc.1)doTexnop,nokaBHe nojnytteXjaenAebmpezYbIbTat.
1PmmeaHnme:Yka nobopota npoeukin BpeMeHH TYI ROTATION KNOB 6ydtNOBOPaHbTaCbdo 350 rpaDycob.
3.ДагоТ罗,Тубб bсфоксимьаь apemа на толочke,�овачайда рукчу pokссимьн FOCUS KNOB (Prc.) 10 du tex nop, noka Бын несячite
4. Yron npoektopa MoKet 6bItb OtperynnpoBaHakNoHom Bnepeid nn Hasad
TEXHUNECKOE OBCJYKINBAHNE:
XpaHeHne
Bbl mojete octabnt paDIOHcSto Hx Hx MceTe Hn Hb Mojete xpaHHTb Hx Hx ynakokBeN b npOxAJADHom, cYoxM CeTe.
OuInCTka
BbIynpaIte bIbIc pBaIaHcOa BnAJOH TKaHbU. HNkOrJa IHCNOJ3yTe IIN OCHKTK JXKnOKeCTn IIN ABpA3BbHcOc OcHTTBeTb.
PnMmHMe:MoHnKauCaHH,He ATOPTuO3BaHbHHe npOMBtDENTen,MOYr AHnHNpOBaTbNNoHMOncHnNotpOeENTenN NoBtOBaTCb 3TNM YCTPOCTCBOM.
PRZED UZYCIEM URZADZENIA NALEZY PRZECZYTAĆ I ZACHOWÁNAPRZYSZLOŚC NINIEJSZE INSTRUKCJE DOTYCZACE BEZPIECZENSTWA.
WAZNE ZALECENIA DOTYCZACE BEZPIECZENSTWA :