SS30002 - Hi-fi system HOMEDICS - Free user manual and instructions
Find the device manual for free SS30002 HOMEDICS in PDF.
| Product type | Sound and light projector (SoundSpa Lullaby) |
| Brand | Homedics |
| Model | SS30002 |
| Power supply | 230V DC power adapter (included) |
| Number of natural soundscapes | 3 (Rain, Ocean, Heartbeat) |
| Number of lullabies | 3 (Twinkle Twinkle Little Star, Rock-A-Bye-Baby, Cradle Song) |
| Image projector | Yes, with rotation and tilt |
| Image discs included | 3 (Night Sky, Rainforest, Ocean) |
| Timer function | 15, 30, 45, 60 minutes or continuous |
| Volume control | Rotary knob |
| Brightness control | HI/LO knob (high/low) |
| Disc storage | Built-in storage compartments |
| Use | Indoor use only, dry surface |
| Cleaning | Damp cloth, no abrasive or liquid cleaners |
| Safety | Unplug after use, do not immerse, do not use near water |
| Warranty | Contact HoMedics service center (any modification voids warranty) |
| Dimensions (approx.) | 20 x 15 x 15 cm (approx.) |
| Weight (approx.) | 0.5 kg (approx.) |
| Manual languages | FR, DE, EL, EN, ES, IT, NL, PL, RU and others |
Frequently Asked Questions - SS30002 HOMEDICS
User questions about SS30002 HOMEDICS
0 question about this device. Answer the ones you know or ask your own.
Ask a new question about this device
Download the instructions for your Hi-fi system in PDF format for free! Find your manual SS30002 - HOMEDICS and take your electronic device back in hand. On this page are published all the documents necessary for the use of your device. SS30002 by HOMEDICS.
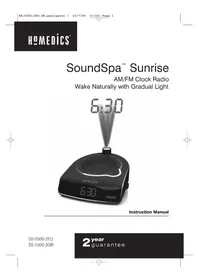
USER MANUAL SS30002 HOMEDICS
with Picture Projection
INSTRUCTION MANUAL
SS-3000-2EU
SS-3000-3GB
2year guarantee
5
READ ALL INSTRUCTIONS BEFORE USE AND SAVE THESE INSTRUCTIONS FOR FUTURE REFERENCE.
IMPORTANT SAFEGUARDS :
WHEN USING ELECTRICAL PRODUCTS, ESPECIALLY WHEN CHILDREN ARE PRESENT, BASIC SAFETY PRECAUTIONS SHOULD ALWAYS BE FOLLOWED, INCLUDING THE FOLLOWING:
- Always unplug the appliance from the electrical outlet immediately after using and before cleaning.
- Do not reach for an appliance that has fallen into water. Unplug it immediately.
- Do not place or store appliance where it can fall or be pulled into a bath or sink. Do not place in or drop into water or other liquid.
WARNING
To reduce the risk of burns, fire, electric shock or injury to persons:
- Close supervision is necessary when this appliance is used by or near children, invalids or disabled persons.
- Use this appliance only for its intended use as described in this manual. Do not use attachments not recommended by HoMedics; specifically any attachments not provided with the unit.
- Never operate this appliance if it has a damaged cord, plug, cable or housing. If it is not working properly, if it has been dropped or damaged, return it to Homedics Service Centre for examination and repair.
- Keep cord away from heated surfaces.
- Never drop or insert any object into any opening.
- Do not operate where aerosol (spray) products are being used or where oxygen is being administered.
- Do not carry this appliance by supply cord or use cord as handle.
- To disconnect, remove plug from outlet.
- This appliance is designed for indoor use only. Do not use outdoors.
- Only set on dry surfaces. Do not place on surface wet from water or cleaning solvents.
SAFETY CAUTIONS :
- Never cover the appliance when it is in operation.
- This unit should not be used by children without adult supervision.
- Always keep the cord away from high temperature and fire.
- Do not lift, carry, hang, or pull the product by the power cord.
- If the adaptor sustains damage, you must stop using this product immediately and contact the HoMedics Service Centre.
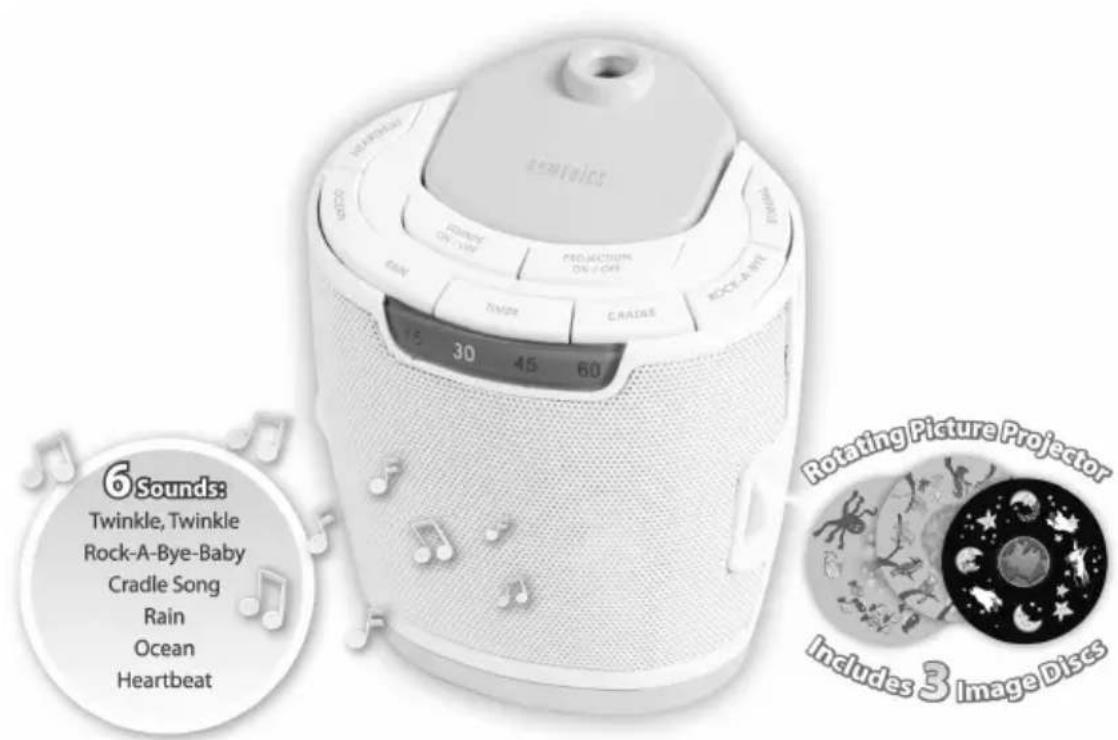
SOUND SPA LULLABY FEATURES:
3 Natural sounds: Rain, Ocean and Heartbeat.
- 3 Lullabies: Twinkle, Twinkle; Rock-A-Bye-Baby and Cradle Song.
Rotating picture projection.
3 Image Discs: Night Sky, Rainforest and Ocean.
- Auto-timer lets you choose how long your baby listens - 15, 30, 45 60 minutes or continuously.
- Convenient disc storage for spare image discs.
- Volume control adjusts the volume of the lullabies or natural sounds.
- Dimmer control adjusts the brightness of the picture projection.
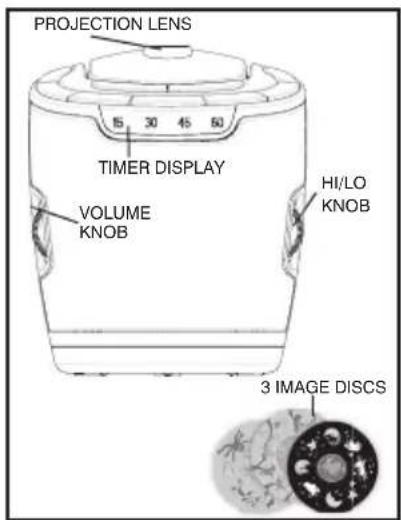
FIGURE 1

FIGURE 2
5
INSTRUCTIONS FOR USE :
- Unpack the product and check to make sure everything is included (Fig 1).
- This unit is powered by a DC adaptor, which is included.
- Attach the DC adaptor jack to the base of the unit and insert the cord into a 230V power supply.
Listening to Lullabies and Natural Sounds
- Turn on the sound machine on by pressing the SOUNDS ON/OFF button. Next select the sound or lullaby you wish to listen to and press the corresponding button (Fig 3).
- To adjust the volume, turn the VOLUME knob (Fig 4) to your desired level.
- When finished listening to the lullabies or sounds you may turn them off by pressing the SOUNDSON/OFF button.
Note: When the unit is turned on it will always default to the last sound used.
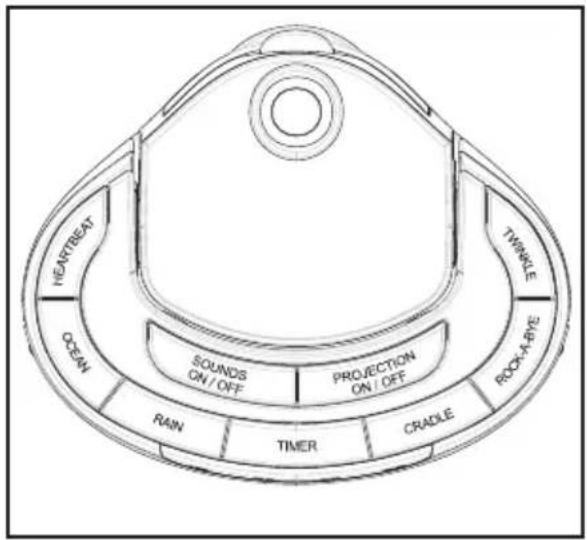
FIGURE 3

FIGURE 4
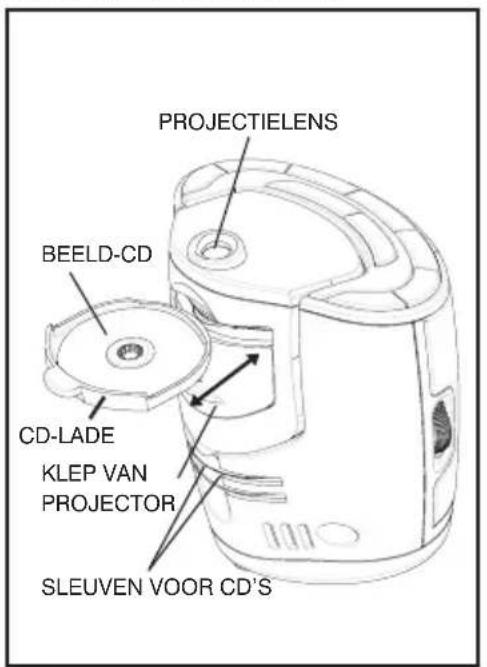
Using the Picture Projection
NOTE: The projector door must be completely closed, pushed all the way up, in order for the picture projector to function (Fig 6).
- Turn on the picture projection on by pressing the PROJECTION ON/OFF button (Fig 3).
- To adjust the brightness of the projection, turn the HI/LO knob (Fig 5) to your desired level.
- The angle of the projector can be adjusted by angling forward up to 90^
- When finished using the picture projection you may turn it off by pressing the PROJECTION ON/OFF button.
NOTE: SOUNDS and PROJECTION are independent functions. You can use one at a time or both combined.

FIGURE 5

FIGURE 6
5
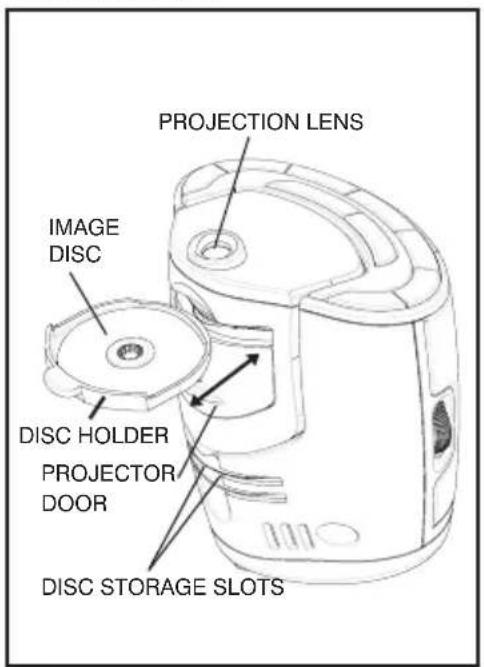
FIGURE 7 FIGURE 8
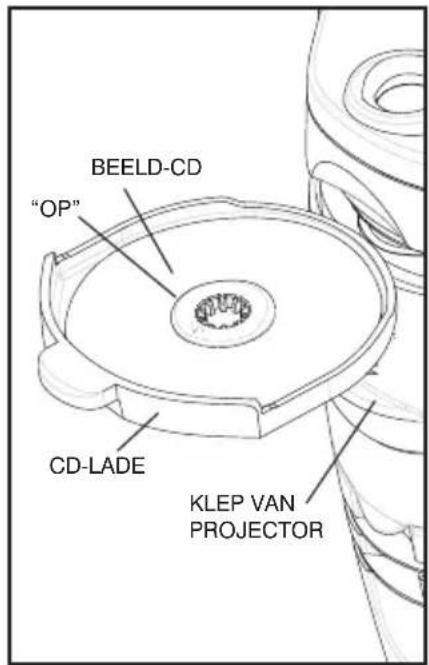
Changing the Image Disc
- Make sure projection is off, then slide down the projector door and pull out the disc holder (Fig 7).
- Gently remove the current disc and set aside (Fig 7).
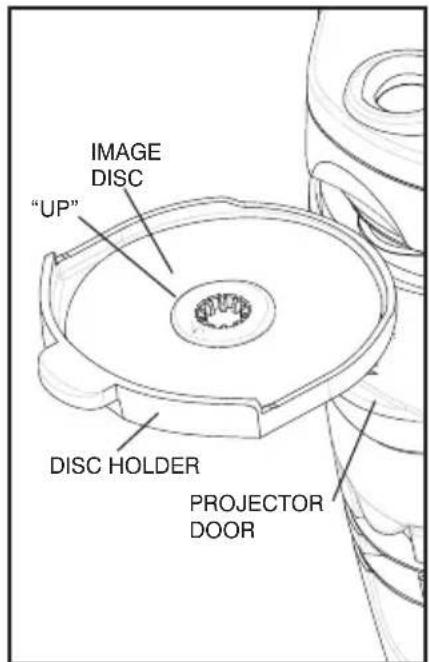
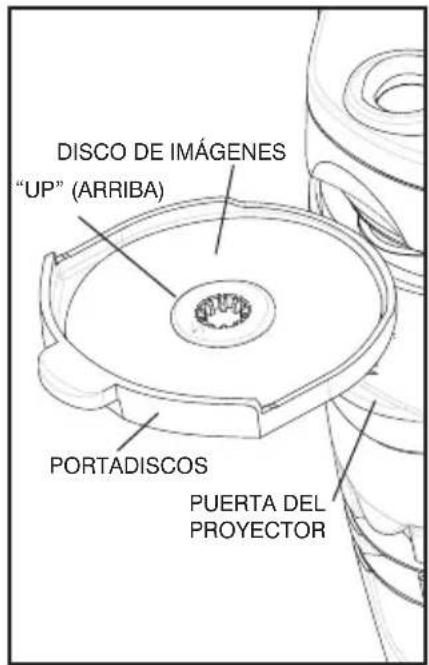
- Select a new disc from the disc storage slots (Fig 6) and place into the disc holder so that you can see the word "UP" printed on the disc (Fig 8).
- Slide the disc holder back into the unit and push projector door up to close (Fig 6). NOTE: The projector door must be completely closed, pushed all the way up, in order for the picture projector to function (Fig 6).
- Put original image disc into empty disc storage slot (Fig 6).
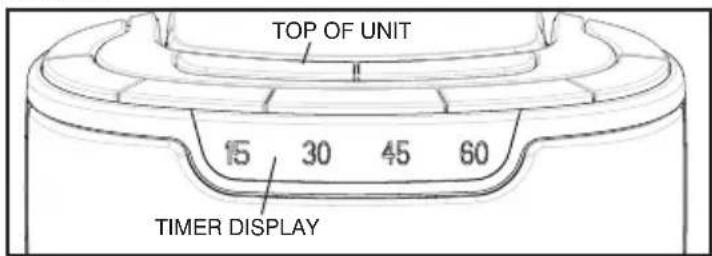
FIGURE 9
Using the Auto-Timer
- When the power is on and you are listening to a nature sound you may set a timer so the unit will automatically turn off.
- Toggle through the TIMER button (Fig 3) until the corresponding LED illuminates next to the time of your choice, 15, 30 or 60 minutes. The unit will automatically shut off after the selected time and the POWER LED (Fig 3) will remain lit showing you it is still in timer mode. If you choose to listen to another timed sound press the timer button to select a desired time. Or if you choose to listen to the sounds continuously, turn the unit off and then back on.
Note: Do not select the TIMER button if you wish to listen to the sounds continuously.
MAINTENANCE :
Storage
You may leave the unit on display, or you can store it in its box or a cool, dry place.
Cleaning
Wipe off dust with a damp cloth. NEVER use liquids or abrasive cleaner to clean.
Note: Modifications not authorised by the manufacturer may void users authority to operate this device.
LIRE ATTENTIVEMENT LES INSTRUCTIONS AVANT EMPLOI ET LES CONSERVER POUR Toute CONSULTATION ULTÉRIÉURE.
PRECAUTIONS IMPORTANTES :
LORS DE L'UTILISATION D'APPAREILS ÉLECTRIQUES, PARTICULIERÉMENT EN PRESENCE D'ENFANTS, IL EST CONSEILLÉ DE TOUJOURS PRENDRE DES PRECAUTIONS DE BASE, NOTAMMENT DE SUIVRE LA PROCEDURE SUIVANTE :
SOUNDSPA LULLABY - PRODUKTMERKMALE:
NOTE: SOUNDS and PROJECTION are independent functions. You can use one at a time or both combined.
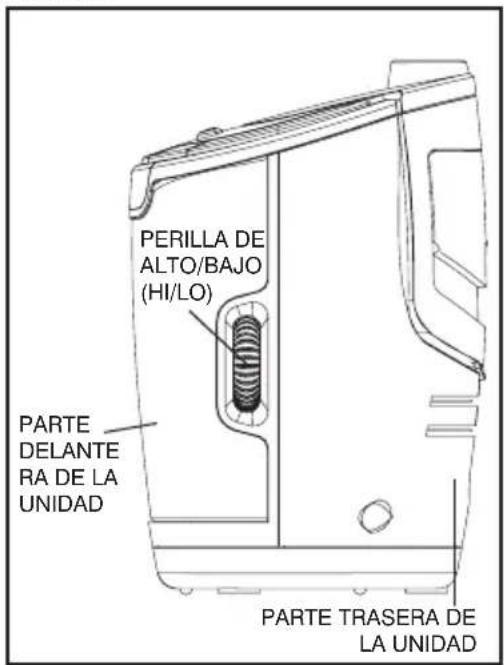
FIGURA 5
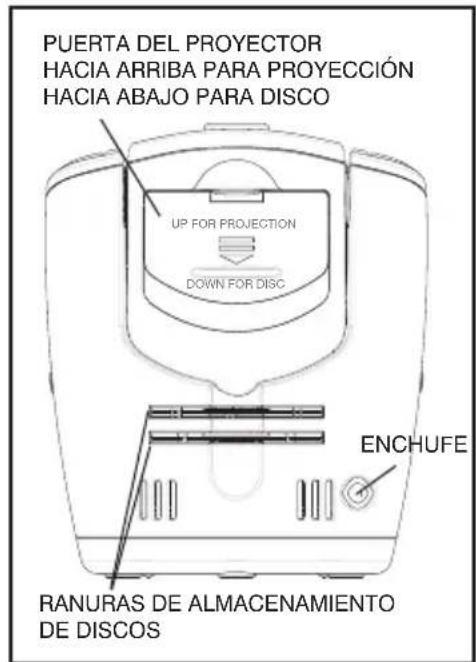
FIGURA 6
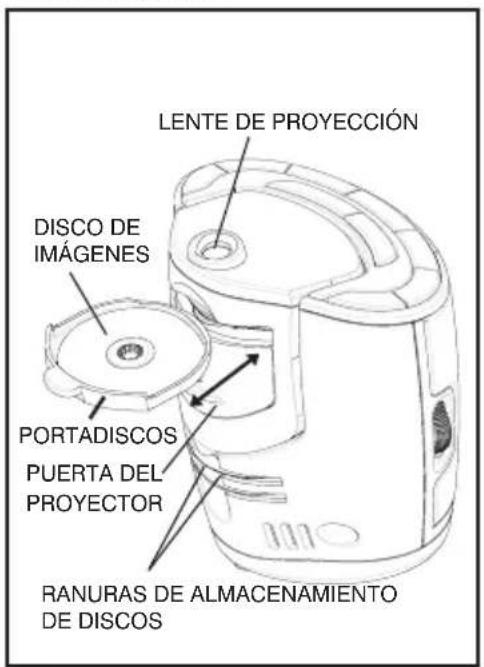
FIGURA 7 FIGURA 8
ParaATTERELDISCODEIMAGENES

AFBEELDING1 AFBEELDING2
GEBRUKSAANWIJZING:
AFBEELDING 7 AFBEELDING 8
m = 311
·
m : x = 1 或 3x + 4y + 1 = 0
华
PPOEIΔOIOIH∑H
华
tpauatiouow:
·
HoMedics,
OUKKEU.
·
περιβλημα.
·
Service toMedics
EUN
·
avoyua.
·
(2)
·
·
·