
KM 3633 - Food Processor CLATRONIC - Free user manual and instructions
Find the device manual for free KM 3633 CLATRONIC in PDF.

| Brand | Clatronic |
| Model | KM 3633 |
| Category | Food processor |
| Product type | Stand mixer with tilting head |
| Net weight | 5.65 kg |
| Power supply | 220-240 V ~, 50 Hz |
| Rated / max power | 1000 W / 1200 W |
| Maximum bowl capacity | 2.5 kg (dough) or 2.0 L (liquids) |
| Number of speeds | 4 speeds (1-4) |
| Included accessories | Dough hook, mixing hook, whisk, splash guard, protective disc |
| Main functions | Kneading, mixing, whisking, beating |
| Max continuous operation | 10 min (heavy dough), 45 min (light dough) |
| Automatic stop | Yes, when the arm is raised |
| Cleaning the housing | Damp cloth, do not immerse |
| Cleaning accessories | Bowl and guard: dishwasher safe; tools: hand wash |
| Child safety | Safety switch on the arm |
| Color | White (model KM 3633 W) |
| Country of manufacture | Not specified |
| Warranty | Covered by manufacturer warranty (see manual) |
Frequently Asked Questions - KM 3633 CLATRONIC
User questions about KM 3633 CLATRONIC
0 question about this device. Answer the ones you know or ask your own.
Ask a new question about this device
Download the instructions for your Food Processor in PDF format for free! Find your manual KM 3633 - CLATRONIC and take your electronic device back in hand. On this page are published all the documents necessary for the use of your device. KM 3633 by CLATRONIC.
USER MANUAL KM 3633 CLATRONIC
TexhiHixapaKTepeNCTnKn
MoeJIb: KM 3633 W
HomiHaJIbHa HAnpyra/
Yactota: 220-240B\~/50T
CnOxuBaHHKuBHeHH
HOMHaJIbHe 3NaueHHra: 1000 Bt
MaKcImaJIbHe 3HaueHHr: 1200BT
Klac 3axncty:
KopoTkoTepeMHOba po6oTa: 10xbnHH
Bara HeTTo: 5,65 Kr
Mn 36epiraem0 3a cobio npabo Ha BheceHHa 3mH y d3aH Ta TexHiHi 3miH y npocci po3pO6Kn npOdykTy.
Ley npicpii ceptnikobao HbnoiHdo dio hOpM PC, HapnKnaJ Hopm eNeKTpOMarHITHOI cyMICHOCTi Hn3bKOi HAppyu, i cKOHcTpyNoBAHO BiNOBiHO Do OCTaHHix xapaKTePncTIK i3 TexHk6e3neKn.
General Safety Guidelines
Before using this device, carefully read this user manual and keep it together with the Warranty Certificate, cashier receipt and if possible, the original package inclusive its interior packing. If you hand on the device to any third person, include the user manual as well.
- Use the device for private and its intended purpose only. The device is not intended for commercial use.
Do not use the device outdoors. Protect it from heat, direct sunlight, humidity (do not immerse into liquids under any circumstances) and sharp edges. Do not use the device with wet hands. If the device gets wet, unplug it immediately. - Always switch off and unplug the device (pull the plug, not the cable) when you do not use the device, or when you attach accessories, during cleaning or malfunctioning.
- Do not leave the device unattended during operation. Always switch off the device when leaving the room. Unplug the device.
- Regularly check the device and cable for signs of damage. Do not continue to operate the device in case of damage.
- Do not repair the device by yourself. Please contact authorized personnel. In order to avoid hazards, a damaged mains cable must be replaced with an equivalent cable by the manufacturer, our customer service or any other qualified specialist.
- Do only use original parts.
- Please observe the following "Special safety instructions".
Children and disabled persons
- For the safety of your children, keep any packing parts (plastic bags, cartilage, Styrofoam etc.) out of their reach.

Warning!
Don't let small children play with foils for danger of suffocation!
- This device is not intended for use by persons (including children) with reduced physical, sensory or mental capabilities, or lack of experience and/or knowledge unless they have been given supervision or instructions concerning the use of the device by a person responsible for their safety.
Supervise children to ensure they do not play with the device.
Symbols in this user manual
Important notes for your safety are marked distinctively. Pay absolute attention to them to avoid accidents and damage to the device:

Warning:
Warns of dangers for your health and indicates potential risks of injury.

Caution:
Indicates potential dangers for the device or other objects.

Note:
Highlights tips and information for you.
Special Safety Precautions for this Device
- Place the device on a flat, level and sturdy surface.
- Do not connect the device to mains power supply before attaching all necessary accessories.
- Do not touch moving parts and wait until the appliances come to a standstill.
- Do not insert utensils such as spoons or spatulas or even take hold with your hands of the rotating whisk or kneading hook during operation! Danger of injury!
- Turn the appliance off and disconnect from mains power supply before changing accessories!
- Only process foodstuffs with this device.
- Do not operate the appliance for more than 10 minutes. Let it cool down for approx. 10 minutes before using it again.
- Do not move the appliance during operation; always turn it off first and disconnect from mains power supply. Always carry the appliance with both hands!
Electric Connection
Ensure that your mains power corresponds with the specifications on the type label.
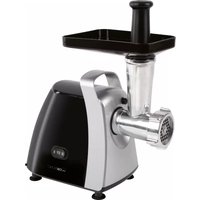
Location of Controls
1 Control panel
2 Swivel arm
3 Rotary knob to lift arm
4 Casing
5 Mixing bowl
6 Splashguard mixing bowl
7 Protective disc
8a Kneading hook
8b Mixing hook
8c Whisk
Install Accessories
- Turn the rotary knob (3) in direction of arrow to lift the arm of the machine.
- For using the whisk (8c) first attach splashguard (6): Hold splashguard with collar upward.
Note: At the bottom of the arm you can see two grooves left and right () .
Slide splashguard with its tab into these grooves and lock by turning clockwise.
Note: The splashguard is not necessary when preparing dough with the kneading or mixing hook. This allows you to add ingredients during dough preparation.
- Attach the protective disc (7) when using the kneading hook (8a). It stops the rising dough from touching the driveshaft. Hold the disc like you would hold a bowl. Slide the kneading hook from below through the opening in the disc and tighten by turning it approx. 90^ .
- At the upper end of the tool you can find a groove for driveshaft and cotter pin. Mount the desired tool by inserting its upper end into the driveshaft. Simultaneously press and turn the tool anti-clockwise to lock the pin to the driveshaft.
- Place the bowl in its seat and turn clockwise all the way to the stop.
- Now fill in your ingredients.
Caution: Do not overfill the appliance, the max. amount of ingredients is 2.5kg or 2.0 litres respectively for liquids.
- Press the arm down until it locks in place.
- Connect the mains plug to a properly installed 230V / 50Hz wall outlet. The red indicator light signals standby mode.
- Press one of the speed buttons (buttons 1 / 2 / 3 / 4 ) on the control panel (1) to turn the appliance on. A green LED displays the selected speed.
Select tool and speed according to the following table:
| Product/ preparation | Max. amount | Tool | Speed setting | Max. operating time |
| Heavy dough (e.g. yeast dough, short pastry) | 2.5 kg | Kneading hook | 1 - 24 min | |
| Medium dough (e.g. waffles dough or cake mixture) | 2.5 kg | Mixing hook | 2 - 35 min | |
| Light dough (e.g. sponge mixture, crèpe, whipped egg whites, cream, custard) | 2.5 kg or 2.0 litres | Whisk 3 - 4 | 5 min |
When selecting the speed also observe the references in the recipes.
i Note:
For better mixing of heavy dough the appliance starts with speed 1 at a low speed. After approx. 1.5 min operation it automatically changes to speed 2. The green LED displays this process. Return to speed 1 if this is not desired.
The electronic speed control avoids motor overload. With a too high load the rpm is automatically reduced within a speed setting. The LED display of the selected speed setting is kept.
Short-term operation: Do not operate the appliance to operate with heavy dough for more than 10 minutes and allow it to cool down for 10 minutes afterwards.
Use the splashguard for liquid dough.
- Press the OFF button to turn the appliance off as soon as the dough or dough ball has formed. Disconnect from mains power supply.
- Turn the rotary knob (3) in direction of the arrow to lift the arm of the machine.
Note:
The arm is equipped with a safety switch. The motor turns off if the arm is tilted up during operation. After lowering the arm operation only resumes after pressing the speed button again.
- Remove the mixing bowl by turning it anticlockwise.
- Loosen the dough with a spatula and remove from mixing bowl.
- To release the tool from the driveshaft press it upward and turn clockwise. Now it is easy to remove.
- Clean the used parts as described under "Cleaning".
Recommended Recipes
Sponge Mixture (Basic Recipe) Speed setting 2 - 3
Ingredients:
250g soft butter or margarine, 250g sugar, 1 sachet vanilla sugar or 1 sachet Citro-Back, 1 pinch of salt, 4 eggs, 500g wheat flour, 1 sachet baking powder, approx. 1/8-litre milk.
Preparation:
Place wheat flour with the other ingredients in mixing bowl, mix with mixing hook for 30 seconds at speed 2, then approx. 3 minutes at speed 3. Grease baking tin or lay out with baking paper, fill in dough and bake. Before the cake is removed from the oven, test to see if it is done. With a sharp wooden stick pierce the centre of the cake. If no mixture sticks to it, the cake is cooked. Turn the cake on to a cake grid and allow to cool.
Conventional Oven:
Slide: 2
Heat: Electric oven: top and bottom heat 175 - 200^ gas oven: setting 2-3
Baking time: 50-60 minutes
You can modify this recipe according to your taste, e.g. with 100g raisins or 100g nuts or 100g grated chocolate. Nothing limits your imagination.
Linseed Rolls Speed setting 1 - 2
Ingredients:
500-550g wheat flour, 50g linseed, 3/8-litre water, 1 cube yeast (40g), 100g low-fat curd, well drained, 1 teaspoon salt. For brushing: 2 tablespoons water
Preparation:
Soak linseed in 1/8-litre lukewarm water. Place the remaining lukewarm water (1/4-litre) in mixing bowl, crumble the yeast into it, add curd and mix well with kneading hook on speed setting 1. The yeast must be completely dissolved. Place flour with the soaked linseed and salt in mixing bowl. Knead on speed 1, then change to speed 2 and knead another 3-5 minutes. Cover dough and prove in a warm place for 45-60 minutes. Knead again, take out of mixing bowl and shape 16 bread rolls from it. Cover baking tray with wet baking paper. Place rolls on it, prove for 15 minutes, brush with lukewarm water and bake.
Conventional Oven:
Slide: 2
Heat: Electric oven: top and bottom heat 200 - 220^
(preheat for 5 minutes),
Gas oven: setting 2-3
Baking time: 30-40 minutes
Cleaning
Warning:
Disconnect from mains power supply before cleaning.
Do not submerge the appliance into water. This may lead to electric shock or fire.
Caution:
Do not use a wire brush or other abrasive utensils for cleaning.
Do not use aggressive or abrasive cleaning agents.
- Use a damp cloth to clean the casing.
- Clean all detachable accessories in dishwater.
Caution:
The attachments are not suitable for dishwasher. Heat and aggressive cleaning agents may warp or discolour the attachments.
Technical Specifications
Model: KM 3633 W
Rated voltage/frequency: ....220 - 240 V~ / 50 Hz
Power consumption
nominal: 1000 W
maximum: 1200 W
Protection class:
Short-term operation: 10 minutes
Net weight: 5.65 kg
We reserve the right to make technical and design changes in the course of our ongoing product development.
This device complies with all current CE directives, such as electromagnetic compatibility and low voltage directive and is manufactured according to the latest safety regulations.
Meaning of the
"Wheelie Bin" Symbol
Take care of our environment, do not dispose of electrical applications via the household waste.
Dispose of obsolete or defective electrical appliances via municipal collection points.
Please help to avoid potential environmental and health impacts through improper waste disposal.
You contribute to recycling and other forms of utilization of old electric and electronic appliances.
Your municipality provides you with information about collecting points.
TeNJIIOuC OrhoHueHHbIMBO3MOXHOCTaM
-ИЗ coobpaxeHн DeTCKO 6e3oNaCHOCTn XpaHInTe BCE 3IeMeHTbI ynaKOBKn (Пл actNKOBble NaKeTbI, KapToHHbI e N I3OJIaUHOHHbI MaTePnaJIbI N.T.I.) B HeIOCTyINbIX DnIeTeI MeCTax.
IpeynpekdeHne!
He n03BOJnTe MaHbKIM DeTAM INrpaTb C npeHKo. Onachoctb ydysb!
-Данhoe yctpoCTBO He DoJNHO NCNoJIb3OBAtbcra JIuamn (BKNIOUaYaTee) C Ocna6JIeHHbIMn 0H3NUeCKIMn, CeHCOPHbIMn IIN YMCTBEHHbIMn CNOco6HOCTaMI, INH HeIOCTaTKOM ONbTa H/INn 3HaHn, 3a NCKIOUeHNEM CNyuaEB, KOrda 3a HMM Na6JIIOJaET OTBeTCTBeHHbI 3a INX 6e3oNaCHOCTb nepCOHaJ INI OH NOnyUHIn INHCTpyKUnn NO NcNoJIb3OBAHnU yCTPOCTBa.
CneIte 3a DeTbMn, UTObI y6eINTbcra, UTO OHn He IcNoJIb3yIOT npIbOp B KaueCTBe INrpyuKn.
CIMBOJI B DaHHOM pyKOBOIDCTBE NOJIb3OBaTeJIa
BaxkhbIe yka3aHnI, kacaIOuIeScBaSei 6e3oNaChocTn, OTMeueHbI OcO6o.Bo n36eXaHne HeCuaCTbIX cJIyuaEB n NOBpeKdEHH yCTpOJCTBa oBpaUaITe Ha HnX ocO6oe BHNMaHHe.
IpeynpexkdeHne:
PpeynpexKeHne 6 onachocTn IJra 3DopOBbya, yKa3bIbAeT Ha BO3MOXHOCTb NOBpeXDeHn.
BHHMaHHe:
IonteuaJIbHaonacHocTbIpyyctpoiCTBa IIN DpynX npedMeTOB.
IПгмецань:
CobetbI INHOpMaunIЯBac.
Ocobie Mepbl 6e3onacHocTn IJnaDaHHoro yctpoiCTBa
- YctaHOBnTe yCTPOINCTBO Ha POBHOI TOpN3OHTaJIbHOI INPOUHOI NOBepXHOCTN.
He NOKIIouaTe yCTpoNcTBO K 3JIeKTPoPNTaHIO OT CETn DO TORO, KAK Bbl YCTaHOBtE BCE Heo6xOdUmblie 3JemeHTbl.
He npikacaiTecb K NOBUNKbIM 3JIeMeHTaM IN NOOJNTe, NOKA pnp6Opbl He OCTaHOBATc.
He BCTaBnIe KxOHHbIe npHaIeJNHOCTn, TaKne KaK IoKKn, H He XBaTaIeTecb pyKaMn 3a BpaAioUHmCBeHUn KInn KpOuOK dJa 3aMeCa BO BpeMa paBoToIyCTpoiCTBa!
Onachoctb TpaBM!
- BbIKIIOUHTe yCTPOINCTBO I OTKIIIOUHTe eeroOT 3JIeKTPoINITaHnI O T CETN INpeD 3AmEHON KOMIIeKTyOuix!
C NOMOu yCTPOINCTBa rOTOBTe TOnbKO npOdyKTBI NTaHn.
He nCnoB3yUte yctpoiCTBO Ha npotjXeHn 60nee 10 MNHT. NdoxJnte, noka OHO octbIeT Ha npotjXeHn npimepHo 10 MNHT nepeTeM, kAc nCnoB3ObaT b erO cHOBA.
He DnraTe yctpoCTBO BO Bpem eropabo; BCerda ChauJa BBKIOUaTe erO n3cetn. Bcerda nepeHocnte yctpoCTBO DBympykam!
3NeKtpnuecka CeTb
PpOBepbTe, yTo6bI 3JKeKtpoNtahHe O T CeTn COOTBeTCTBOBaNo CneuNΦuKaUm NaCIOptHOI Ta6NvKn.
PacnoJoxeHne 3JeMeHTOB
1 NaheJIynpaBneHnI
2 NObOpOThbI pyKaB
3 NobopoTHa KhONKa JIy NOJbema pyKaBa
4 Kopnyc
5Джа
6 KpbiikKa dekn
7 3aunTHbIn DNCK
8a KpIouK IJIa 3aMeca
8b KpOyok dIa CMeUINBaHn
8c BeHnK
YcTaHOBka KOMnNeKTyUoHx
- Повернite NOBOPOTHyO KhoNky (3)В
НаразвileHи CTpeIKNДЯ NOДьema pyKaBa
MaSHINHbI.
2.ДЯнсплььзовая ВEHУнka (8c) ChачANA npincoeDHHte KpbIshky DeKn (6):ДерЖNTe KpbIshKy DeKn KOJIbCtOM BBePx.
I Primeyahnna:
Bn3y pykaba Bbl yBnDnte Dba na3a -npabBn n neBbIn (V).
PpOraHnTe KpbIuKy DeJx uXkamn Upe3 na3bI n 3aUeJIKNHTe ee, NOBepHyB No YacOBoN CTpeJIke.
I Primeyachnaya:
Kpbuoka DeKn He HyxHa npn
npuroTOBHeHn Tecta C NOMOUsbIO
KpUcKa DnA 3aMeca Nn KpUcKa DnA
CMeuBaHn. 3To DaCT Bam BO3MOxHOCTb
Do6abTb HrpeJeHTb BO BpEm
npuroTOBHeHn Tecta.
3.ПпсоeДинHTe 3aUHTbIй nIcK (7) npn IcNoJIb3OBAHIn KpOuKa dIЯ 3aMeca (8a).
Oh npedotbpatNT, YTO6bl NODHnMaIOUeecr TECTO He COpNIKOCHyNOCb C BeDyIcIM BaJOM.
ДерхиTe ДИСТаK,ΚΑΚ 6БΙ ВΙДЕХАЛДEXу.ПOTЯнITE КЮЧОК ДЯЗAMeCa CHN3Uчep3 OТВЕРСТУВ ДИССЕ И 3aKpeNTe,ПоверHyВ erO ПпIMePHo Ha 90^
- B BepxHne YacTu HNCTpyMeHTa Bbl MoKeTe yBnDeTb Na3 DnA BeDyUeBOBaNA uINHNTa.
YcTaHOBNTe HxHbI INHCTpyMeHT, BCTaBBEro BEpxHNI KOHeC B BeDyNBI BaI.
OndHOBpeMeHHo HaxMHTe N NOBepHNTe INCTpyMeHT npOTNB YacOBON CTpeJKN DJIa 3aKpePHeHnIuNNNTa B BeDyUeM BaJy. - NomeCTNe DeKy Ha MeTo I NOBepHnTe No YacobOu CTpeJIke Do ynpa.
- Tenepb noJoxnTe nHrpeJeHTbl.
BHHMaHHe:
He nomeuaiTe cniukom MHOI HrpeDnEHTOB, INX MaKcMmaJIbHoe KOJNUeCTBO COCTaBnIeT 2,5 Kr IJN 2,0 JITPa dIJa XNDKOCTe COOTBETCTBEHHO.
- Haxmte Ha pykab Bn3 do Tex nop, noka OH He 3aueKHeTcra.
8.Подкнчite shyp nHTaHnK npabuNbHo yctaHOBJIeHHoH NaCTeHHoH po3eTke 230 B\~ / 50 Tc. 3aropeBmKpachbI INdNkaTop roBOpNT opeXIMe OxndaHnA. - Haxmte OndHy n3 KhoNOK ckopoctn (KhoNk 1/2/3/4) Ha naHei ynpabNeHn (1) Iy BkIIOUeHn yCTpOcTbA. 3eJeHbI CBeToIDNoDhBn INHdNKaTOP NOKa3bIBaET Bbl6paHHyO CKOpocTb.
BbIbepuTe HnctpyMeH n cKOpocTb B COOTBeTCTBn Co CneDyUoSe Ta6Jnue:


- TexhiHixapaKTepeNCTnKn
- General Safety Guidelines
- Children and disabled persons
- Warning!
- Symbols in this user manual
- Warning:
- Caution:
- Note:
- Special Safety Precautions for this Device
- Electric Connection
- Location of Controls
- Install Accessories
- i Note:
- Recommended Recipes
- Sponge Mixture (Basic Recipe) Speed setting 2 - 3
- Ingredients:
- Preparation:
- Conventional Oven:
- Linseed Rolls Speed setting 1 - 2
- Cleaning
- Technical Specifications
- Meaning of the
- "Wheelie Bin" Symbol
- TeNJIIOuC OrhoHueHHbIMBO3MOXHOCTaM
- IpeynpekdeHne!
- CIMBOJI B DaHHOM pyKOBOIDCTBE NOJIb3OBaTeJIa
- IpeynpexkdeHne:
- BHHMaHHe:
- IПгмецань:
- Ocobie Mepbl 6e3onacHocTn IJnaDaHHoro yctpoiCTBa
- Onachoctb TpaBM!
- 3NeKtpnuecka CeTb
- PacnoJoxeHne 3JeMeHTOB
- YcTaHOBka KOMnNeKTyUoHx
- I Primeyahnna:
- I Primeyachnaya:
Brand : CLATRONIC
Model : KM 3633
Category : Food Processor