RK 2925 - Rice cooker CLATRONIC - Free user manual and instructions
Find the device manual for free RK 2925 CLATRONIC in PDF.

| Product type | Rice cooker |
| Brand | Clatronic |
| Model | RK 2925 |
| Power supply | 230 V ~ 50 Hz |
| Cooking capacity | 3 to 10 cups (measuring cup included) |
| Functions | Rice cooking, keep warm (WARM), steam cooking |
| Indicator lights | COOK (cooking) and WARM (keep warm) |
| Automatic shut-off | Yes, switches to WARM mode after water evaporation |
| Included accessories | Measuring cup, spoon, spoon holder, steam accessory, condensation collector |
| Main safety | Hot surfaces - risk of burns; hot steam at outlet |
| Cleaning | Removable parts (inner pot, steam lid, collector) washable with soapy water; do not immerse the appliance |
| Maintenance | Wipe interior and exterior with a damp cloth; do not use abrasive detergent |
| Condensation collector | Empty and clean after each use |
| Warranty | 24 months from date of purchase |
| Recommended use | For domestic use only, on a flat surface resistant to heat and moisture |
| Precautions | Do not open the lid during cooking - risk of steam burns; let cool before cleaning |
Frequently Asked Questions - RK 2925 CLATRONIC
User questions about RK 2925 CLATRONIC
0 question about this device. Answer the ones you know or ask your own.
Ask a new question about this device
Download the instructions for your Rice cooker in PDF format for free! Find your manual RK 2925 - CLATRONIC and take your electronic device back in hand. On this page are published all the documents necessary for the use of your device. RK 2925 by CLATRONIC.
USER MANUAL RK 2925 CLATRONIC
General Safety Instructions
- Read the operating instructions carefully before putting the appliance into operation and keep the instructions including the warranty, the receipt and, if possible, the box with the internal packing.
- The appliance is designed exclusively for private use and for the envisaged purpose. This appliance is not fit for commercial use. Do not use it outdoors (except if it is designed to be used outdoors). Keep it away from sources of heat, direct sunlight, humidity (never dip it into any liquid) and sharp edges. Do not use the appliance with wet hands. If the appliance is humid or wet, unplug it immediately. Do not put it in water.
- When cleaning or putting it away, switch off the appliance and always pull out the plug from the socket (pull on the plug, not the cable) if the appliance is not being used and remove the attached accessories.
- Do not operate the machine without supervision. If you should leave the workplace, always switch the machine off or remove the plug from the socket (pull the plug itself, not the lead).
- To protect children from the dangers posed by electrical appliances, make sure that the cable is hanging low and that children do not have access to the appliance.
- Check the appliance and the cable for damage on a regular basis. Do not use the appliance if it is damaged.
- Do not try to repair the appliance on your own. Always contact an authorized technician. To avoid the exposure to danger, always have a faulty cable be replaced only by the manufacturer, by our customer service or by a qualified person and with a cable of the same type.
- Use only original spare parts.
- Pay careful attention to the following "Special Safety Instructions".
Special safety instructions
- Place the appliance on an even, moisture and heat-resistant surface. Use a heat-resistant plate when placing on sensitive surfaces.
- Attention! Fill water into the rice pot only, never into the housing.
- Caution! Hot steam escapes from the lid during operation!
- Be sure to hold the lid only by the intended handles after cooking. Risk of steam burns!
- Keep the unit at a safe distance from easily infl ammable objects such as furniture, curtains, etc. (30cm).
- In order to ensure your children's safety, please keep all packaging (plastic bags, boxes, polystyrene etc.) out of their reach.
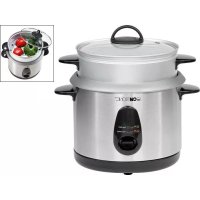
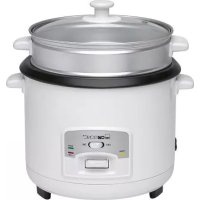
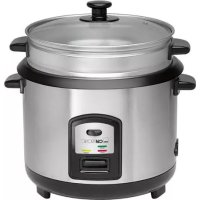
Overview of the Components
GB
1 Lid 10 Rice pot
2 Attachment pin 11 Steaming lid
3 Steam escape
4 Water level indicator
5 Line cord a Spoon
6 Switching contact b Measuring CUP
7 Hotplate c Spoon rest
8 Switch/control lights d Steam insert
9 Housing e Condensation tray
Accessories:
Safety Symbols on the Device and in the Instructions

Caution! Hot surface! Danger of scalding!
How to use
Opening the lid
To open the lid, press the button to the top of the lid.
Measuring cup
The measuring cup (CUP) in combination with the water level indicator in the rice pot helps determine the amount of water and rice. For example, if you wish to cook 6 CUPs of rice, add 6 measuring cups of rice to the pot and fill with water to the respective (CUP) mark, e.g. 6.
Switch
- The appliance is in WARM mode as soon as it is plugged in.
- Use the switch to change into COOK mode. This is only possible if the rice pot has been correctly inserted, making the switching contact (6).
Cooking time
Once the water has fully evaporated in the rice pot, the appliance switches automatically to WARM, ending the cooking process.
Condensation tray
Condensation forming on the lid as a result of the rising steam is collected in a tray on the hinge. Please empty and clean this tray after every use. See also illustration e.
Attention! The appliance is not suitable for the preparation of rice pudding. Milk could boil over or burn.
GB
Before Initial Use
- Remove the packaging.
We recommend cleaning the appliance as described under „Cleaning".
Initial Operation
- Place the appliance on a moisture and heat-resistant surface.
- Be sure that the switch is set to WARM and insert the plug of the connecting line in the appliance fi rst.
- Connect the device to a properly installed 230V , 50Hz power socket.
Note: The appliance is in operation as soon as the plug has been connected. To terminate operation, first set the switch to WARM and then disconnect the plug.
Using the unit
Cooking rice
Prior to cooking rice, observe the manufacturer's notes on how to prepare the rice, such as washing the rice prior to cooking, or soaking certain varieties of rice.
- Insert the rice pot into the rice cooker.
- Set the desired rice volume of between 3 to 10 CUPs with the measuring cup and fi II this volume into the rice pot.
- Fill the rice pot with water to the respective mark on the CUP.
- Close the lid.
- Make the electric connection as described in "How to Use". The WARM control light is on.
- Press the switch down. The WARM control light goes out and the COOK light goes on.
- Once the water has completely evaporated in the rice pot, the appliance will switch automatically to WARM, thus ending the cooking process. The COOK control light goes out and WARM goes on.
TIP: Leave the rice for a further 5 minutes prior to draining it from the pot.
- End operation by disconnecting the plug from the socket.
- Open the appliance by pressing the button on the lid.

Attention! Risk of steam burns. Hot steam may escape.
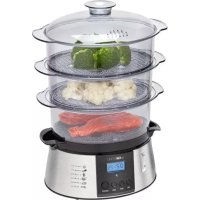
Steaming
Steaming is a gentle way to cook food using hot water steam. This maintains more valuable nutrients in the food compared with other methods of cooking. To steam food, use the steam insert.
- Insert the rice pot into the rice cooker.
-
Pour 1 measuring cup (CUP) of water into the rice pot.
-
Place the steam insert into the rice pot.
- Place your food into the steam insert.
- Close the lid.
- Make the electrical connection as described under "How to Use". The WARM control light goes on.
- Press the switch down. The WARM control light goes out and the COOK light goes on.
- Depending on the steam time it may be necessary to top up water to compensate for evaporation. Add water as needed during steaming.

Attention! Risk of steam burns. Hot steam may escape.
- Once the end of steaming has been reached, terminate operation by pressing the switch up and removing the plug from the socket.
- Open the appliance by pressing the button on the lid.

Attention! Risk of steam burns. Hot steam may escape.
Steam table
| Food State Quantity | Cooking time (min.) | ||
| Artichokes fresh | 4 pieces, average size | 40 – 45 | |
| Cauliflower over fresh, small pieces 500g 20 – 25 | |||
| Broccoli fresh, small pieces 500g 15 – 20 | |||
| Champignon mushrooms, fresh, whole or cut 500g 15 – 25 | |||
| Green beans fresh, whole or cut 500g 25 – 35 | |||
| Carrots fresh, sliced 500g 20 – 25 | |||
| Potatoes cut 500g 20 – 25 | |||
| Potatoes jacket potatoes 500g 30 – 40 | |||
| Cabbage, fresh, cut | 500g 25 – 30 | ||
| Kohlrabi fresh, sliced 500g 20 – 25 | |||
| Brussels sprouts, fresh | 500g 20 – 25 | ||
| Asparagus, fresh | 500g 30 – 40 | ||
| Zucchini, fresh, sliced 500g 15 – 20 | |||
| Apples, pears, fresh, pieces | 500g 10 – 15 | ||
| Trout, fresh | 2 pcs., 150g each | 18 – 25 | |
| Ruff fi let fresh | 2 pcs., 200g each | 15 – 18 | |
| Salmon, fresh | 2 pcs., 140g each | 15 – 18 | |
| Shrimps frozen | 450g 15 – 20 | ||
| Mussels in the shell | 1000g 18 – 25 |
GB
| Food State Quantity | Cooking time (min.) | ||
| Turkey escalope, Chicken legs | fresh 2 pcs., 150g each 25 | -30 | |
| Escalope, cutlets | fresh 2 pcs., 150g each 30 | -35 | |
| Short fat smooth pork & beef sausage | fresh, from the jar or can 2 | -8 pcs. | 8 - 13 (pierced) |
| Eggs, soft-boiled | in the shell | 2 - 10, medium size | 10 - 13 |
| Eggs, hard boiled | in the shell | 2 - 10, medium size | 15 - 20 |
The cooking times listed in the table are approximate. Please adjust accordingly to your needs.
Cleaning and Maintenance
- Always pull out the plug from the mains socket before cleaning and wait until the unit has cooled down.
- Never immerse the housing, the line cord and the mains plug into water.
- Drain the contents of the rice pot and the condensation tray.
- Clean the rice pot, the steaming lid and the condensation tray with hot soap water. Rinse the parts thoroughly with clear water and allow them to dry.
- Wipe the lid and the housing from the inside and outside with a damp cloth. Then allow the parts to dry.
- Do not use any acidic or abrasive detergents.
This device has been tested according to all relevant current CE guidelines, such as electromagnetic compatibility and low voltage directives, and has been constructed in accordance with the latest safety regulations.
Subject to technical changes without prior notice!
Guarantee
GB
The device supplied by our Company is covered by a 24 month guarantee starting on the date of purchase (receipt).
During the life of the guarantee any fault of the device or its accessories *) ascribable to material or manufacturing defects will be eliminated free of charge by repairing or, at our discretion, by replacing it. The guarantee services do not entail an extension of the life of the guarantee nor do they give rise to any right to a new guarantee!
Proof of the guarantee is provided by the proof of purchase. Without proof of purchase no free replacement or repair will be carried out.
If you wish to make a claim under the guarantee please return the entire machine in the original packaging to your dealer together with the receipt.
*) Damage to accessories does not mean automatic free replacement of the whole machine. In such cases please contact our hotline. Broken glass or breakage of plastic parts are always subject to a charge.
Defects to consumables or parts subject to wearing (e.g. motor pistons, kneading blades, drive shafts, spare remote control, spare toothbrushes, saw blades, etc.) as well as cleaning, maintenance or the replacement of said parts are not covered by the guarantee and hence are to be paid!
The guarantee lapses in case of unauthorized tampering.
After the expiry of the guarantee
After the expiry of the guarantee repairs can be carried by the competent dealer or repair service against the payment of the ensuing costs.