USER MANUAL PLL 2 BOSCH
OBJ DOKU-36397-003.fm Page 1 Thursday, January 23, 2014 10:24 AM

Robert Bosch GmbH
Power Tools Division
70745 Leinfelden-Echterdingen
Germany
www.bosch-pt.com
1618C0093G(2014.02)O/168WEU

1618C0093G
WEUWEU

PLL2

BOSCH
de Originalbetriebsanleitung
en Original instructions
fr Notice originale
es Manual original
pt Manual original
It Istruzioni originali
nl Oorspronkelijke
gebruiksaanwijzing
da Original brugsanvisning
sv Bruksanvisning i original
no Original driftsinstruks
fl Akuperäiset ohejeet
elPwototuno oBnyov xPnOnc
tr Original isletmet talimat
ar aaljll


2
Deutsch. . . . . . . . . . . . . . . . . . . . . . . . . . . . . . . . . . . . . . . . . . . . . . . . . . . . . . . . . . . . . . .
English. Page 20
Francais Page 32
Espanol. 44
Portugues. Pagina 57
Italiano . 68
Nederlands.. 80
Dansk Side 91
Svenska. Sida 102
Norsk. Side 112
Suomi Sivu 122
EAAynvika . 2eAia 132
Türkce Sayfa 144
G


3
Bosch Power Tools 1618 C00 93G| (23.1.14)


OBJ_BUCH-2030-003.book Page 6 Thursday, January 23, 2014 10:38 AM


6


1618 C00 93G| (23.1.14) Bosch Power Tools


8 | Deutsch
Deutsch
Sicherheitshinweise

All instructions must be read and observed in order to work safely with the measuring tool. Never make warning signs on the measuring tool unrecognisable. SAVE THESE INSTRUCTIONS FOR FUTURE REFERENCE AND INCLUDE THEM WITH THE MEASURING TOOL WHEN GIVING IT TO A THIRD PARTY.
- Caution - The use of other operating or adjusting equipment or the application of other processing methods than those mentioned here can lead to dangerous radiation exposure.
The measuring tool is provided with a warning label (marked with number 9 in the representation of the measuring tool on the graphics page).

If the text of the warning label is not in your national language, stick the provided warning label in your national language over it before operating for the first time.
Do not direct the laser beam at persons or animals and do not stare into the direct or reflected laser beam yourself, not even from a distance. You could blind somebody, cause accidents or damage your eyes.
If laser radiation strikes your eye, you must deliberately close your eyes and immediately turn your head away from the beam.
Do not make any modifications to the laser equipment.
- Do not use the laser viewing glasses as safety goggles. The laser viewing glasses are used for improved visualisation of the laser beam, but they do not protect against laser radiation.

English | 21
- Do not use the laser viewing glasses as sun glasses or in traffic. The laser viewing glasses do not afford complete UV protection and reduce colour perception.
Have the measuring tool repaired only through qualified specialists using original spare parts. This ensures that the safety of the measuring tool is maintained.
Do not allow children to use the laser measuring tool without supervision. They could unintentionally blind other persons or themselves.
Do not operate the measuring tool in explosive environments, such as in the presence of flammable liquids, gases or dusts. Sparks can be created in the measuring tool which may ignite the dust or fumes.


Keep the measuring tool away from cardiac pacemakers. The magnet inside the measuring tool generates a field that can impair the function of cardiac pacemakers.
- Keep the measuring tool away from magnetic data media and magnetically-sensitive equipment. The effect of the magnet can lead to irreversible data loss.
Product Description and Specifications
Intended Use
The measuring tool is intended to determine and check horizontal and vertical lines as well as lines at a defined angle. Moreover, the measuring tool is intended to determine the angles of objects.
The measuring tool is suitable exclusively for operation in enclosed working sites.
The measuring tool is not intended for commercial use.

OBJ_BUCH-2030-003.book Page 22 Thursday, January 23, 2014 10:38 AM


22 | English
Product Features
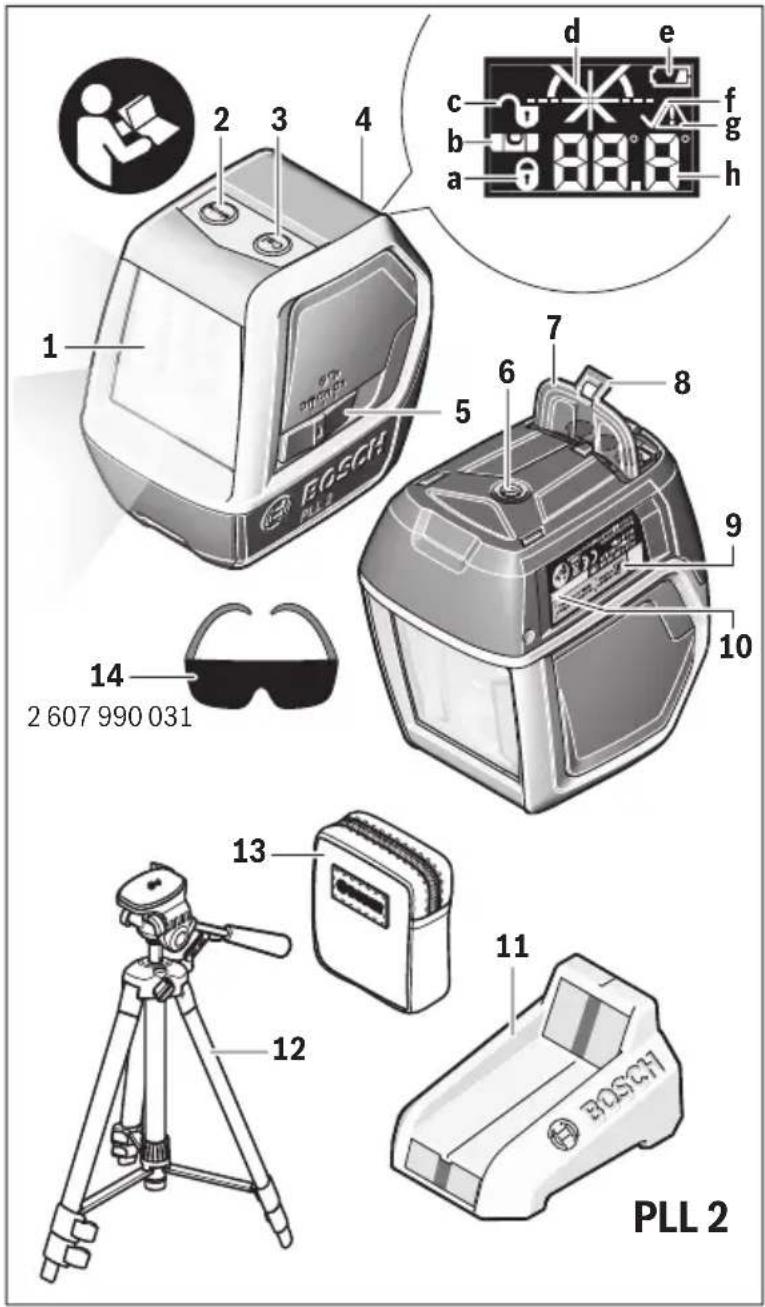
The numbering of the product features shown refers to the illustration of the measuring tool on the graphic page.
1 Laser line
2 Mode button
3 C a l calibration button
4 Display
5 On/Off switch

On Automatic levelling on

On Tilt function with angle indicator on
Off Measuring tool off
6 Tripod mount 1/4"
7 Battery lid
8 Latch of battery lid
9 Laser warning label
0 Serial number
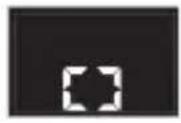
1.1 Laser target plate
2 Tripod
3 Protective pouch
4 Laser viewing glasses
* The accessories illustrated or described are not included as standard delivery.
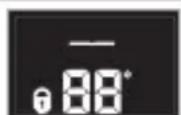
Display Elements
a Tilt measurement on (automatic levelling off)
b Digital spirit level on
c Automatic levelling on
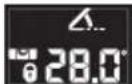
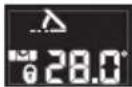
d Tilt angle symbol
e Battery low indicator
f Calibration completed
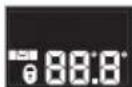
g Measuring range warning
h Tilt angle

1618C0093G|(23.1.14) Bosch Power Tools


English | 23
Technical Data
| Cross-line Laser PLL 2 |
| Article number | 3603 F53 4.. |
| Working range to approx. | 10 m |
| Measuring range | 0-90° |
| Levelling Accuracy | ±0.5mm/m |
| Measuring Accuracy | |
| -digital (spirit level) | ±0.2A) B) |
| -with las er lines | ±1.2° |
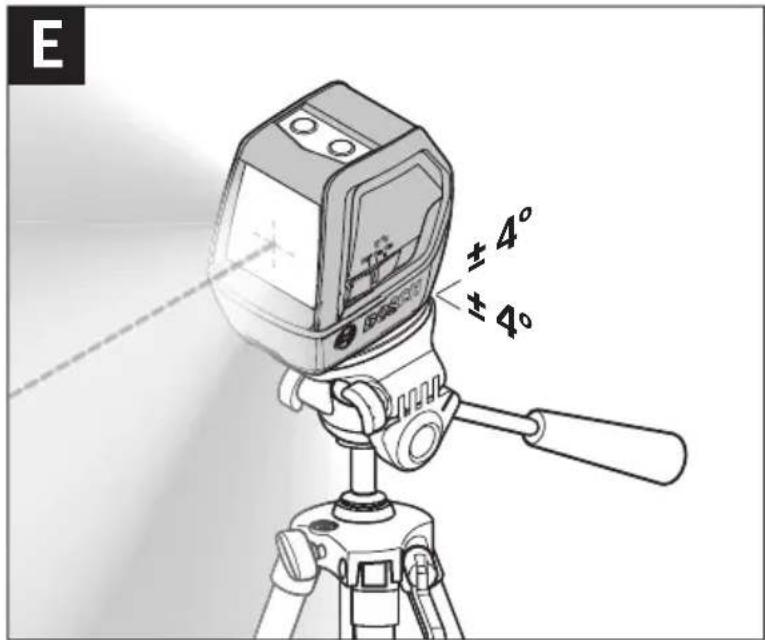
| Self-levelling range, typically | ±4° |
| Levelling duration, typically | <5 s |
| Automatic Levelling | ● |
| Horizontal mode/vertical mode | ● |
| Cross-line mode | ● |
| Tilt function with angle indicator | ● |
| Digital vial | ● |
| Operating temperature | +10 °C...+40 °C |
| Storage temperature | -20 °C...+70 °C |
| Relative air humidity, max. | 90% |
| Laser class | 2 |
| Laser type | 640 nm,<1 mW |
| C6(laser line) 1 | |
| Tripod mount | 1/4" |
| Batteries | 3 x 1.5 V LRO3 (AAA) |
| Operating life time, approx. | 5 h |
| Weight according to EPTA-Procedure | |
| 01/2003 | 0.4 kg |
| Dimensions (length x width x height) | 123 x 67 x 110 mm |
| A) After calibration at 0° and 90° at an additional pitch error of max. ±0.02°/degree up to 90°. |
| B) over 25 °C gradual deterioration |
| The measuring tool can be clearly identified with the serial number 10 on the type plate. |
Bosch Power Tools 1618 C00 93G| (23.1.14)
24 | English
Assembly
Inserting/Replacing the Batteries
Alkali-manganese batteries are recommended for the measuring tool.
To open the battery lid 7, press on the latch 8 and fold the battery lid up. Insert the batteries. When inserting, pay attention to the correct polarity according to the representation on the inside of the battery lid.
Always replace all batteries at the same time. Only use batteries from one brand and with the identical capacity.
Remove the batteries from the measuring tool when not using it for extended periods. When storing for extended periods, the batteries can corrode and self-discharge.
Operation
Initial Operation
Protect the measuring tool against moisture and direct sun light.
Do not subject the measuring tool to extreme temperatures or variations in temperature. As an example, do not leave it in vehicles for longer periods. In case of large variations in temperature, allow the measuring tool to adjust to the ambient temperature before putting it into operation.
Avoid heavy impact to or falling down of the measuring tool. Damage to the measuring tool can impair its accuracy. After heavy impact or shock, compare the laser lines with a known horizontal or vertical reference line.
Switch the measuring tool off during transport. When switching off, the levelling unit, which can be damaged in case of intense movement, is locked.
Switching On and Off
To switch on the measuring tool, slide the On/Off switch 5 to one of the "On" positions (off on on
Do not point the laser beam at persons or animals and do not look into the laser beam yourself, not even from a large distance.
To switch off the measuring tool, slide the On/Off switch 5 to the "Off" position. When switching off, the levelling unit is locked.
1618 C00 93G| (23.1.14) Bosch Power Tools

English | 25
Do not leave the switched on measuring tool unattended and switch the measuring tool off after use. Other persons could be blinded by the laser beam.
To save energy, only switch the measuring tool on when you are using it.
Once the measuring tool has been switched on, it is in the automatic levelling operation mode or in the tilt function with angle indicator operation mode
To change the mode, repeatedly press the "Mode" button 2 until the desired mode appears on the display.
The following operation modes are available:
Automatic levelling operation mode:
Indication Mode

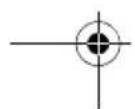
Cross-line mode (see figure A): The measuring tool generates a horizontal and a vertical laser line, the levelling of which is monitored.
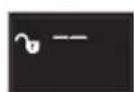
Horizontal mode (see figure B): The measuring tool generates a horizontal laser line, the levelling of which is monitored.

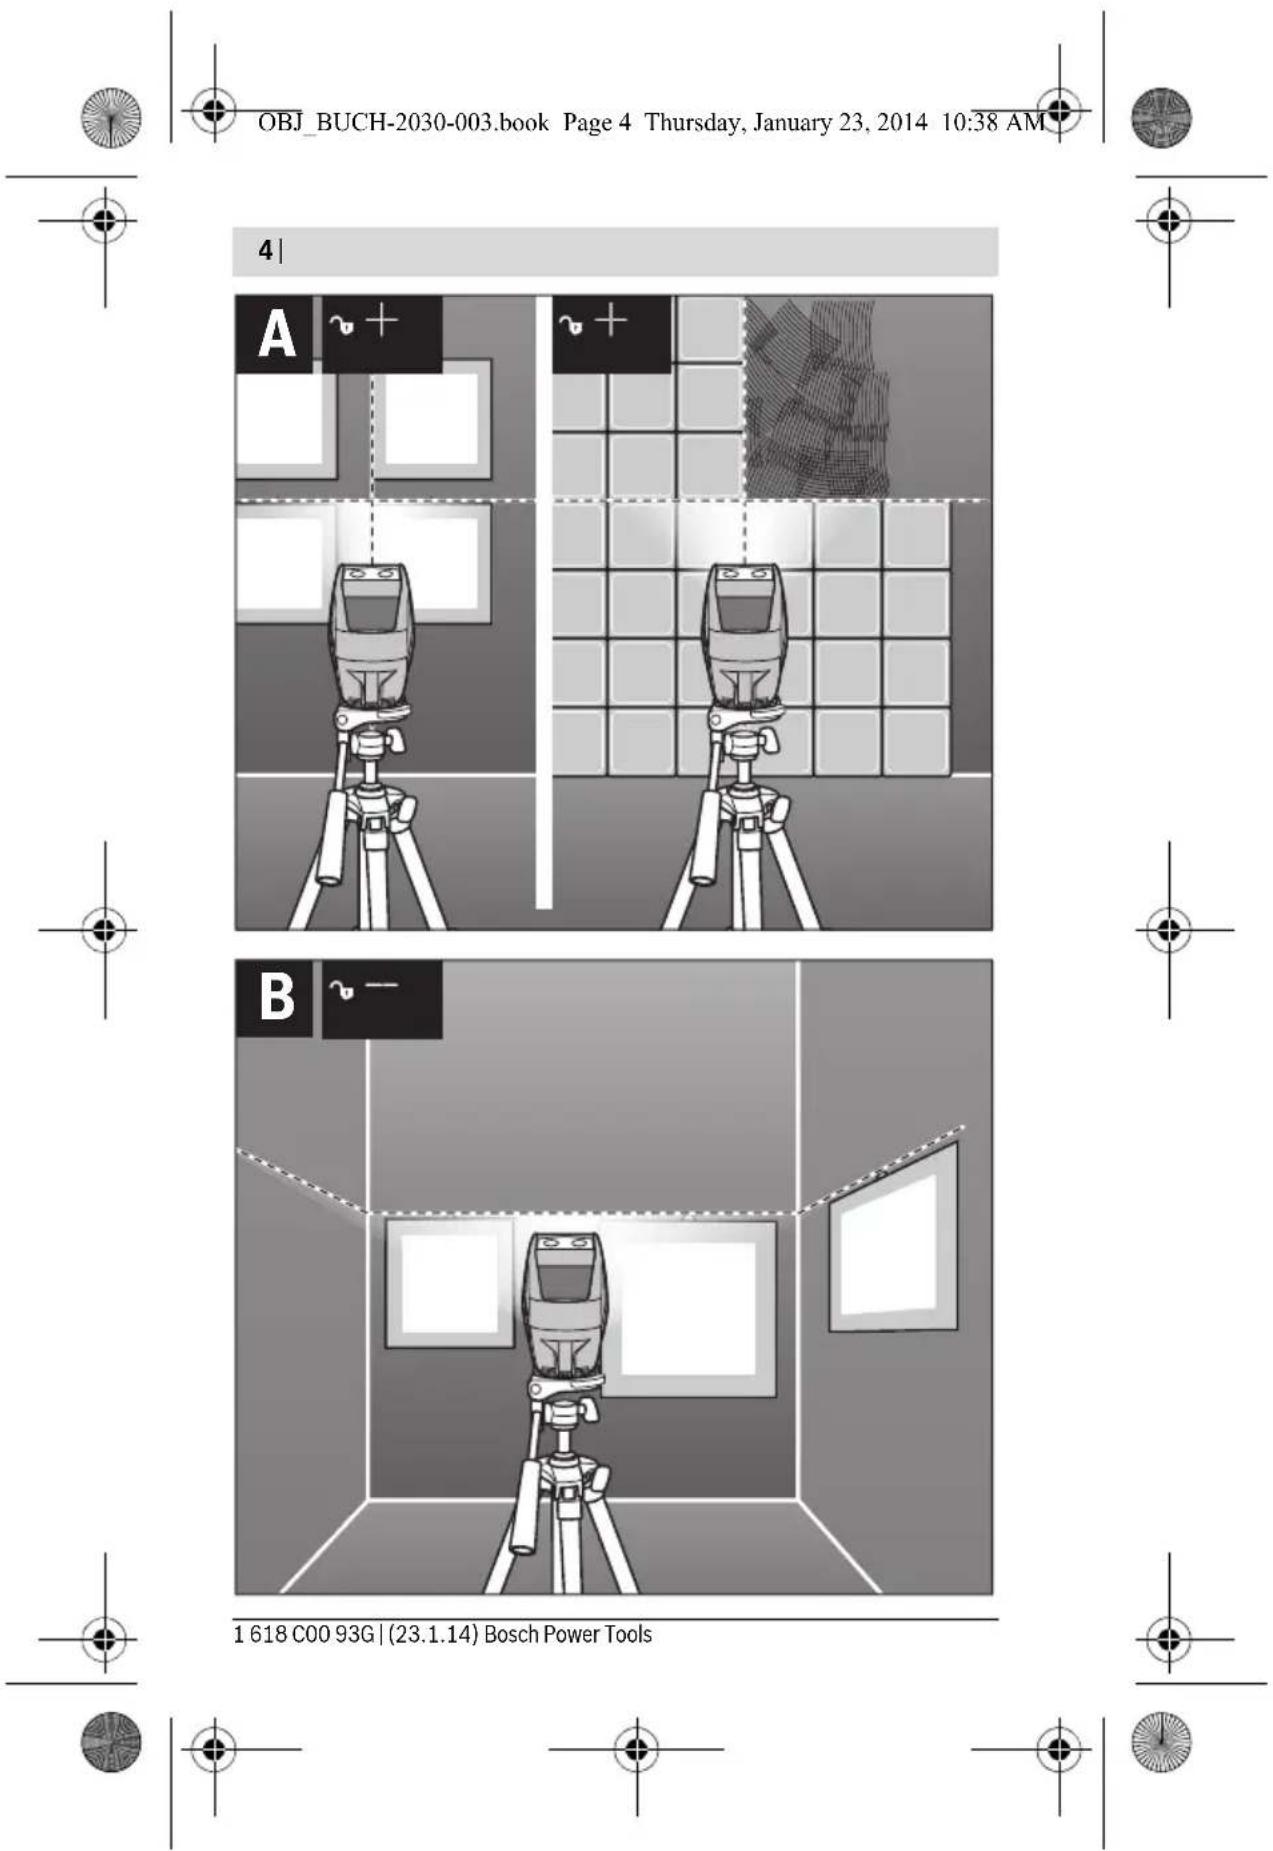
Vertical mode (see figure C): The measuring tool generates a vertical laser line, the levelling of which is monitored.

The self-levelling range of ± 4^ is exceeded, self-levelling is not possible (display flashes). The laser line goes out.
Tilt function with angle indicator operation mode:
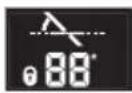
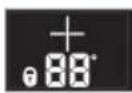
Indication Mode
Horizontal mode.
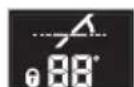
Horizontal mode. The measuring tool is tilted to the left.*
- Tilt angle h and laser lines are only indicated from an incline of > ± 2^ .
Bosch Power Tools 1618 C00 93G| (23.1.14)


26 | English
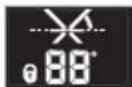
Indication Mode
Horizontal mode. The measuring tool is tilted to the right.*
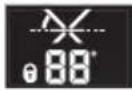
Cross-line mode (see figure D): The measuring tool generates two crossed laser lines that can be aligned as requested, and must not run vertical to each other.
Cross-line mode. The measuring tool is tilted to the left.*
Cross-line mode. The measuring tool is tilted to the right.*
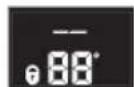
Digital spirit level. The measuring tool checks horizontal or vertical like a spirit level. Laser lines are not projected.
Digital spirit level. The measuring tool is tilted to the left. The smallest indicated angle is 0.1^ .
Digital spirit level. The measuring tool is tilted to the right.
The smallest indicated angle is 0.1^ .

The tilt angle of ± 10^ forwards (in the direction of the laser) or backwards (in the direction of the display) is exceeded (display flashes). The laser line goes out.


The calibration is active (display flashes).


The calibration is completed.
- Tilt angle h and laser lines are only indicated from an incline of > ± 2^ .

1618 C00 93G| (23.1.14) Bosch Power Tools


Additional displays:
Indication Description

The measuring tool starts.
When no button on the measuring tool is pressed for approx. 30 minutes, the measuring tool automatically switches off to save the batteries.
Position the measuring tool on a level and firm support or mount it to the tripod 12.
Select one of the operating modes with automatic levelling.
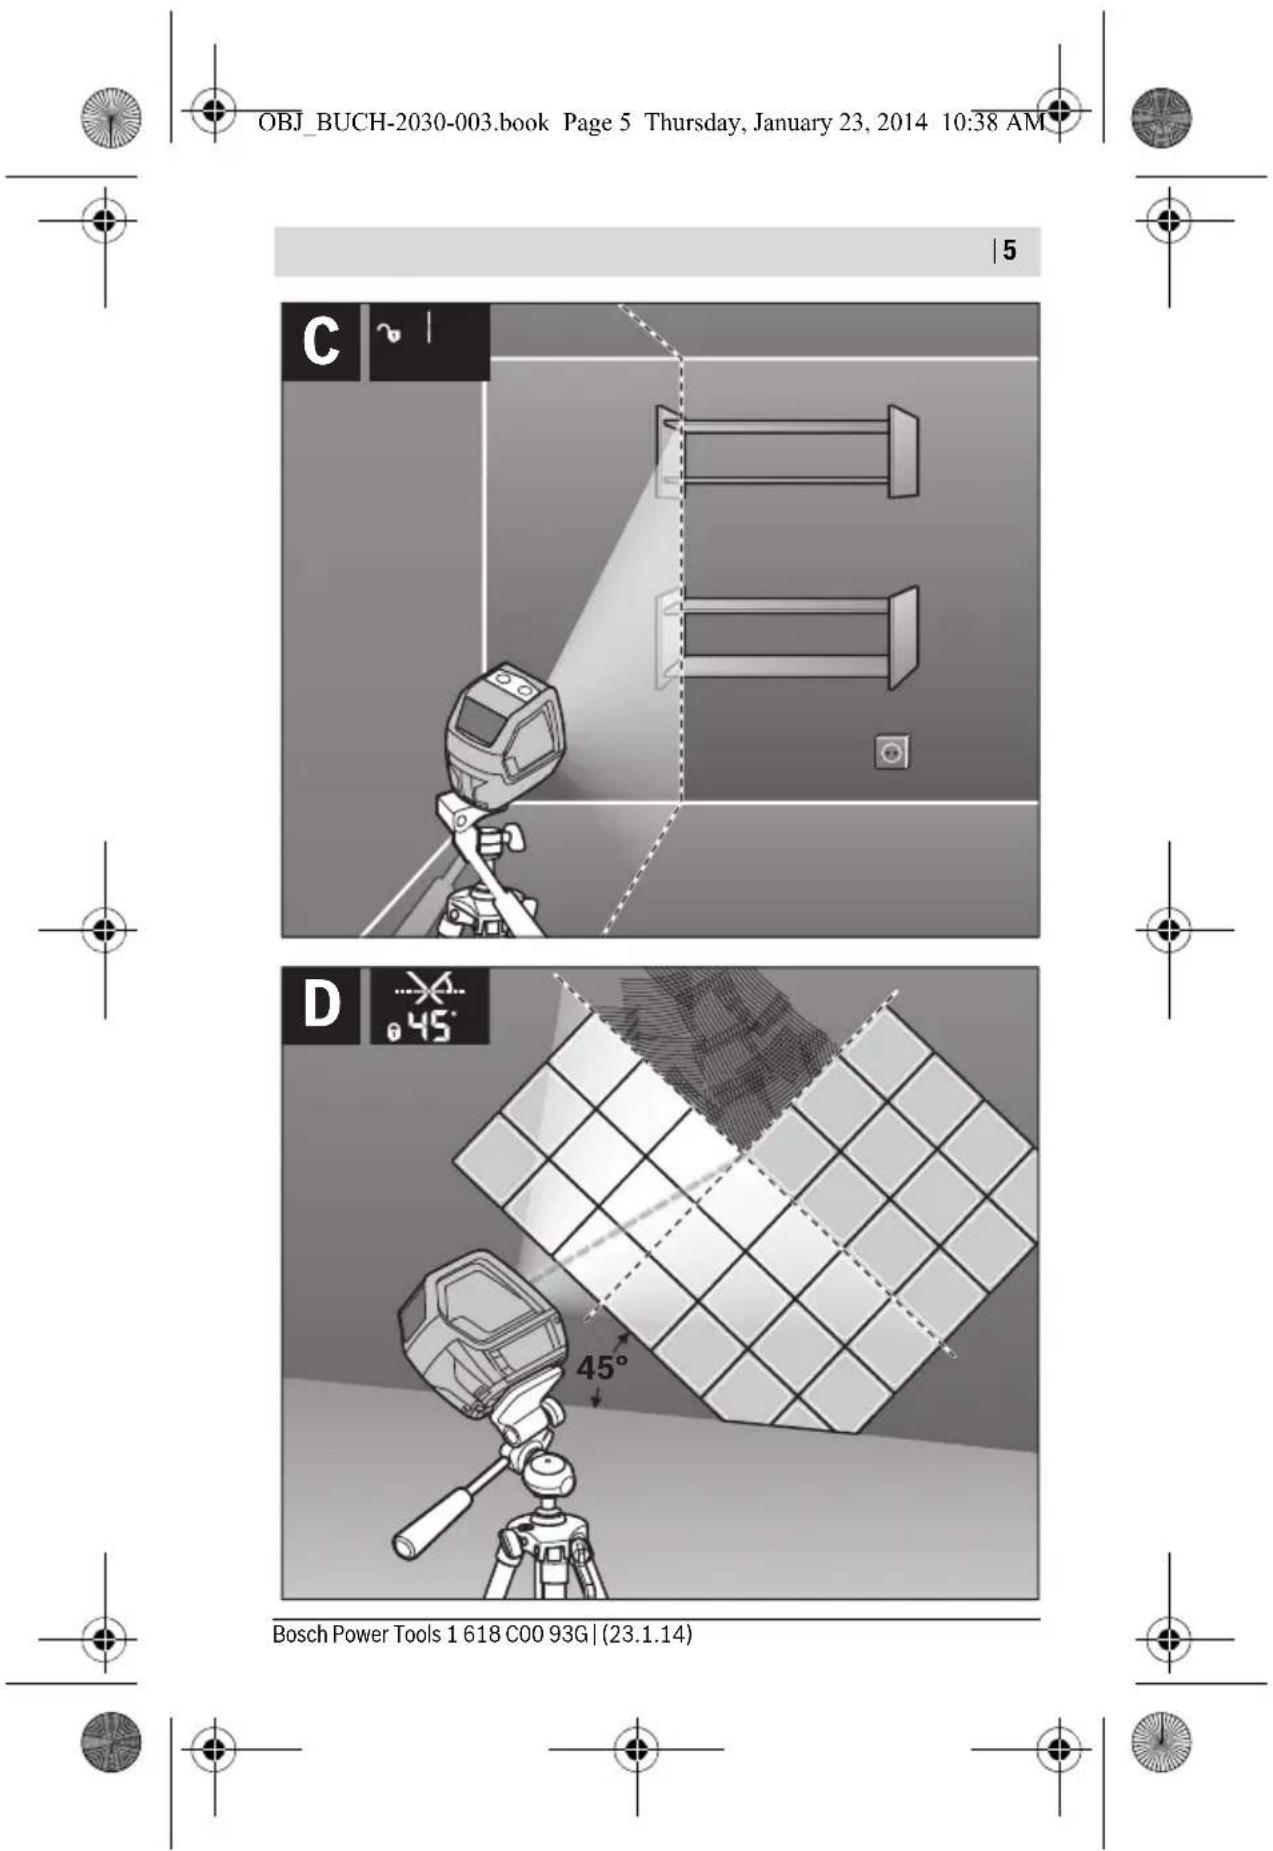
After switching on, the automatic levelling function automatically compensates irregularities within the self-levelling range of ± 4^ . The levelling is finished as soon as the laser lines do not move anymore. The operating mode appears in the display.
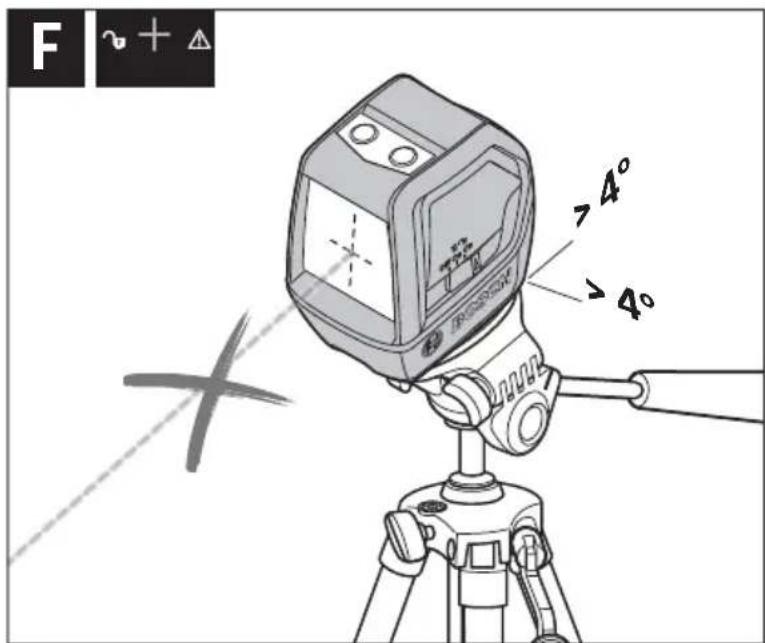
If the automatic levelling function is not possible, e. g. because the surface on which the measuring tool stands deviates by more than 4^ from the horizontal plane, the display 4 flashes and the laser is switched off automatically (see figure F). If this is the case, set up the measuring tool in a level position and wait for the self-levelling to take place. As soon as the measuring tool is once again within the self-levelling range of ± 4^ , the operating mode appears in the display 4 and the laser is switched on.
When not within the self-levelling range of ± 4^ , working with automatic levelling is not possible, because it cannot be assured that the laser lines run at a right angle to each other.
In case of ground vibrations or position changes during operation, the measuring tool is automatically levelled again. Upon re-levelling, check the position of the laser lines with regard to the reference points to avoid errors.
Tilt function with angle indicator
In this operation mode, the measuring tool generates a horizontal or two crossed laser lines, which can be freely aligned. The tilt angle is shown in the display.

28 | English
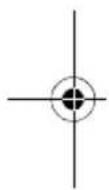
The measuring tool must be calibrated with the target plate in order to ensure conformity of the tilt angle shown in the display with the projected laser line on the wall. Place the target plate on the wall. Select the cross-line mode or the vertical mode of the automatic levelling operation mode. Ensure that the laser line passes through the upper and lower red mark on the target plate. Select a mode of the tilt function with angle indicator operation mode and project the laser line in the desired angle on the wall. When doing so, do not tilt the measuring tool more than 10^ forwards (in the direction of the laser) or backwards (in the direction of the display). Otherwise the measuring accuracy may deteriorate.
Digital spirit level
The measuring tool checks horizontal or vertical like a spirit level. Laser lines are not projected.
The side of the laser aperture serves as a reference edge. For angle measurement, align this reference edge with the horizontal or vertical plane that is to be measured. When doing so, do not tilt the measuring tool more than 5^ forwards (in the direction of the laser) or backwards (in the direction of the display). Otherwise the measuring accuracy may deteriorate.
Working Advice
Calibration of the inclinometer without laser lines (e.g. before the initial operation, after transportation or severe temperature fluctuations):
Place the measuring tool on a flat table with a tilt of less than 5^ . Select the digital spirit level mode. Press and hold the "Cal" calibration button 3 until the hook f appears in the display and CA1 is permanently shown. Rotate the measuring tool 180^ within 15 seconds and press the "Cal" button 3 again until CA2 flashes in the display. The calibration is completed once the hook f appears in the display and CA2 is permanently shown.
Regularly check the accuracy of the grade measurement. This is done by carrying out a reversal measurement. For this, place the measuring tool on a table and measure the grade. Turn the measuring tool by 180^ and measure the grade again. The difference of the indicated reading may not exceed by more than 0.3^ (max.).
1618C0093G|(23.1.14) Bosch Power Tools


English | 29
A tripod 12 offers a stable, height-adjustable measuring support. Place the measuring tool via the tripod mount 6 onto the 1/4'' male thread of the tripod and screw the locking screw of the tripod tight.
Laser Viewing Glasses (Accessory)
The laser viewing glasses filter out the ambient light. This makes the red light of the laser appear brighter for the eyes.
Do not use the laser viewing glasses as safety goggles. The laser viewing glasses are used for improved visualisation of the laser beam, but they do not protect against laser radiation.
- Do not use the laser viewing glasses as sun glasses or in traffic. The laser viewing glasses do not afford complete UV protection and reduce colour perception.
Maintenance and Service
Maintenance and Cleaning
Store and transport the measuring tool only in the supplied protective pouch.
Keep the measuring tool clean at all times.
Do not immerse the measuring tool in water or other fluids.
Wipe off debris using a moist and soft cloth. Do not use any cleaning agents or solvents.
Regularly clean the surfaces at the exit opening of the laser in particular, and pay attention to any fluff of fibres.
In case of repairs, send in the measuring tool packed in its protective pouch 13.
After-sales Service and Application Service
Our after-sales service responds to your questions concerning maintenance and repair of your product as well as spare parts. Exploded views and information on spare parts can also be found under:
Bosch's application service team will gladly answer questions concerning our products and their accessories.
Bosch Power Tools 1618C0093G| (23.1.14)


OBJ_BUCH-2030-003.book Page 30 Thursday, January 23, 2014 10:38 AM


30 | English
In all correspondence and spare parts orders, please always include the 10-digit article number given on the type plate of the measuring tool.
Great Britain
Robert Bosch Ltd. (B.S.C.)
P.O.Box 98
Broadwater Park
North Orbital Road
Denham
Uxbridge
UB 95HJ
At www.bosch-pt.co.uk you can order spare parts or arrange the collection of a product in need of servicing or repair.
Tel. Service: (0844) 7360109
E-Mail: boschservicecentre@bosch.com
Ireland
Origo Ltd.
Unit 23 Magna Drive
Magna Business Park
City West
Dublin 24
Tel. Service: (01) 4666700
Fax: (01) 4666888

Australia, New Zealand and Pacific Islands
Robert Bosch Australia Pty. Ltd.
Power Tools
Locked Bag 66
Clayton South VIC 3169
Customer Contact Center
Inside Australia:
Phone: (01300) 307044
Fax: (01300) 307045
Inside New Zealand:
Phone: (0800) 543353
Fax: (0800) 428570
Outside AU and NZ:
Phone: +61 3 95415555
www.bosch.com.au
1618C0093G|(23.1.14) Bosch Power Tools


English | 31
Republic of South Africa
Customer service
Hotline: (011) 6519600
Gauteng - BSC Service Centre
35 Roper Street, New Centre
Johannesburg
Tel.: (011) 4939375
Fax: (011) 4930126
E-Mail: bsctools@icon.co.za
KZN - BSC Service Centre
Unit E, Almar Centre
143 Crompton Street
Pinetown
Tel.: (031) 7012120
Fax: (031) 7012446
E-Mail: bsc.dur@za.bosch.com
Western Cape - BSC Service Centre
Democracy Way, Prosperity Park
Milnerton
Tel.: (021) 5512577
Fax: (021) 5513223
E-Mail: bsc@zsd.co.za
Bosch Headquart
Midrand, Gauteng
Tel.: (011) 6519600
Fax: (011) 6519880
E-Mail: rbsa-hq.pts@za.bosch.com
Disposal
Measuring tools, accessories and packaging should be sorted for environmental-friendly recycling.
Do not dispose of measuring tools and batteries/rechargeable batteries into household waste!

Bosch Power Tools 1618 C00 93G| (23.1.14)


32 | Français
Only for EC countries:
According to the European Guideline 2012/19/EU, measuring tools that are no longer usable, and according to the European Guideline 2006/66/EC, defective or used battery packs/batteries, must be collected separately and disposed of in an environmentally correct manner.
Batteries no longer suitable for use can be directly returned at:
Great Britain
Robert Bosch Ltd. (B.S.C.)
P.O.Box 98
Broadwater Park
North Orbital Road
Denham
Uxbridge
UB95HJ
At www.bosch-pt.co.uk you can order spare parts or arrange the collection of a product in need of servicing or repair.
Tel. Service: (0844) 7360109
E-Mail: boschservicecentre@bosch.com
Subject to change without notice.

Français
OBJ_BUCH-2030-003.book Page 56 Thursday, January 23, 2014 10:38 AM


56 | Espanol
Perú
Robert Bosch S.A.C.
Bosch Service Center
Telegrafvej 3
2750 Ballerup
Pá www.bosch-pt.dk kan der online bestilles reservedele eller oprettes en reparations ordre.
TIf. Service Center: 44898855
Fax: 44898755
E-Mail: vaerktoej@dk.bosch.com

Bortskaffelse
OBJ BUCH-2030-003.book Page 104 Thursday, January 23, 2014
10:38 AM


104 | Svenska
6 Stativfaste 1/4"
7 Batterifackets lock
8 Sparr på batterifackets lock
9 Laservarningsskylt
10 Serienummer
11 Lasermålitavla
12 Stativ
13 Skyddsfodral
14 Lasersiktglasogon
Bosch Service Center
Telegrafvej 3
2750 Ballerup
Danmark
Tel.: (08) 7501820 (inom Sverige)
Fax: (011) 187691
Avfallshantering
OBJ BUCH-2030-003.book Page 114 Thursday, January 23, 2014
10:38 AM

114 | Norsk
6 Stativfeste 1/4"
7 Deksel til batterirom
8 Låsing av batteridekselet
9 Laser-adversellskilt
10 Serienummer
11 Laser-malplate
12 Stativ
13 Beskyttselsesveske
14 Laserbriller
OBJ BUCH-2030-003.book Page 124 Thursday, January 23, 2014
10:38 AM


124 | Suomi
5 Kaynnistyskytkin

Off'Opyavo merponons Off
6YIOOxH TpuoBou 1/4"
1618C0093G|(23.1.14) Bosch Power Tools


OBJ BUCH-2030-003.book Page 135 Thursday, January 23, 2014
10:38 AM

Eληνικα | 135
7 Kanaki θηκης πιατρίας
8 Aopaleia Tou kanakiou oKnnc matapia
9Poeofoounikn mavakda letcep
10 Apoioc oepa
11 IVaKaOToXeUOncIeCep
12 Tpino8o*
13 ToaTnpoToia
14 Fuai npaonnc leizep
* EApntjmuata nou anekoviciovtai n nepiypapovtai dev nepiexovtal orn otavrap ouokcuoaia.
Touexia evdeix
a MToPOnKaiOnc On (AutOpauTxwOoTaθμon Off)
b Ψηφιακή φυσαλίδα On
CAtOpatnXwpooTaθμonOn
d Uβoλ yωviac kλionc
e Ptoeioonan mataipac
f Oλokhρωan βaθμovμonnc
gPiocdiOniOn npioxncmuTOnn
h Fwvia klaionc
Texvka xaapaknpotiká
Tpnonac Aetroupyiac Autopatn xwpooraunon:

EvseIeTpOnc

TpnoC aeitoupyiac diaotaupoupevwoa kTivwo
Bosch San. ve Tic. A.S.
Ahi Evran Cad. No:1 Kat:22
Polaris Plaza
80670 Maslak/Istanbul
Bosch Uzman Ekibi +90 (0212) 367 18 88
Isiklar LTD.STI.
Kizilay Cad. No: 16/C Seyhan
Adana
Tel.: 0322 3599710
Tel.: 0322 3591379
OBJ_BUCH-2030-003.book Page 155 Thursday, January 23, 2014
10:38 AM


Türkce|155
Orsel Bobinaj
- San. Sit. 161. Sok. No: 21
Denizli
Tel.: 02582620666
Bulut Elektrik
OBJ_BUCH-2030-003.book Page 156 Thursday, January 23, 2014
10:38 AM

156 | Türçç e
Sezmen Bobinaj
Ege Is Merkezi 1201/4 Sok. No: 4/B Yenisehir
Izmir
Tel.: 02324571465
Ankarali Elektrik
Eski Sanayi Bolgesi 3. Cad. No:43
Kayseri
Tel.: 0352 3364216
Asal Bobinaj
Eski Sanayi Sitesi Barbaros Cad. No: 24
Samsun
Tel.: 0362 2289090
Ustundag Elektrikli Aletler
Nusretiye Mah. Boyacilar Araligi No: 9
Tekirdag
Tel.: 02826512884
Tasfiye
.aaagaiyagaiyaoaayaoaogjia yaiyaoa aaiyaoi
Jgll Jn Lg 1011 g wla ooc ubsj X
JgUosuW 2. aBg aBb aab abwI g Iwgl wol .alall glall g
aIwll aIg pblio Jkwh jUu 2gja dia jic gblwll ala cblj .uJ s
13 aIgll aoo 1000000000000000000
p|aaWxI oJgog nJljjdo
iill iil g j sdd sllw lgl jll a do j k j y 1000000000000000000000000000000000000000000000000000000000000000
www.bosch-pt.com
Ug g aSjw pI dssXl oJgwaag jgws gds no ngk. Lgig liiao n c alwJggsbysdclw
(Ggj) aaggl glaaalb bgs yawll g f glg j qbnan l aaggl .g ywll agl g wlaell oce ybe yabnll aagll g f ayllalgbgbl aaybplg llg 1yagll 1yjll 1yjll 1yjll 1yjll 1yjll 1yjll 1yjll 1yjll 1yjll 1yjll 1yjll 1yjll 1yjll 1yjll 1yjll 1yjll 1yjll 1yjll 1yjll 1yjll 1y
JlJ1J 1 JI JI JI JI JI JI JI JI JI JI JI JI JI JI JI JI JI JI JI JI JI JI JI JI JI JI JI JI JI JI JI JI JI JI JI JI JI JI JI JI JI JI JI JI JI JI JI JI JI JI J1J1J1J1J1J1J1J1J1J1J1J1J1J1J1J1J1J1J1J1J1J1J1J1J1J1J1J1J1J1J1J1J1J1J1J1J1J1J1J1J1J1J1J1J1J1J1J1J1J1J1
J
Jl lI (L) jll bgs n g lgjj 100
: () Jg f g I g I g Jg Jg Jg Jg Jg Jg Jg Jg Jg Jg Jg Jg Jg Jg Jg Jg Jg Jg Jg Jg Jg Jg Jg Jg Jg Jg Jg Jg Jg Jg Jg Jg Jg Jg Jg Jg Jg Jg Jg Jg Jg Jg Jg Jg Jg Jg Jg Jg Jg Jg Jy I.5° n c yj yj yj yj yj yj yj yj yj yj yj yj yj yj yj yj yj yj yj yj yj yj yj yj yj yj yj yj yj yj yj yj yj yj yj yj yj yj yj yj yj yj yj yj yj yj yj yj yj Y3"Cal"JJJIyJyJyJyJyJyJyJyJyJyJyJyJyJyJyJyJyJyJyJyJyJyJyJyJyJyJyJyJyJyJyJyJyJyJyJyJyJyJyJyJyJyJyJyJyJyJyJyJyJyJy
wIaI I o 49 J
a lac u no s p. ptiio ksh bll lll w q d s f 0 15 c w qll o sc n jn i y bi y qall .qil g w q 180° Jdssw qll o s c jg d .lll ssjg .ds 0,3° aagglaqg jg jg
:dduUgSul
j
.
30 15 uai l auiu
(F-E oJgJgJj) aGwJl dJl
uioJI Uc Ig aigwog auiu oJU c uaiI sJl
12 gJU
eLwBnJdUaI JpI lacI pI .LLaewI sWlaJI
jU
.1qolsswI sicXJ wuLgll osc JgBj ggl
(D-AJgU|j) J
gI gwll aJg j wJl o s c ngkJ J
0 agljI nn go Jall abg j
2"Mode" aJbIJJ Jc bJd Js dJy
.aaI 1c aGjal IaJbJI
:duI JgJgJnJL
:agwul dJl 1swhuEgj
jw gJlq
g:(A gJgJgJj)aJlaJIbgbJIaaJB
jg jj b 0000000000000000
ggiwlaolpo wg

wIaJ I oSc pgoj:(B oJgJJI J) aQgJI aJbJI
dglgwl aolpo g jj

wJll oJg:(Cjglj) aJl Jd
.1gwiiaolpo g,wwjjlu

Joc 4 1gWg jg J
julll b(uog)g

:gljI Jn o go IJll abg Js
jw gao
.aa9laaJbll
.1u|U|UuUoIooaUlo|p..aaqJdabj

.>±2°JUoJooIjJJbBg hJUaJIgjj
UJl|U|w|/
. 8 8 8 8 8 8 8 8 8 8 8 8 8 8 8 8 8 8 8 8 8 8 8 8 8 8 8 8 8 8 8 8 8 8 8 8 8 8 8 8 8 8 8 8 8 8 8 8 8 8 1
aJlAs
gaaagabjolajssiculjullusw .algb
山
山
4.0jUJU
JxAul
wlaal o dc jil .Loo yIaIwll g aIgob oJl kJU 2.1590 all
IaIe Ie Jn lqdoosuun Jlq JyJdss
.ooS aJj
A. = 1 = 2 .
Lg jn J. Lg D y Lg w g y y Lg all o d a l 1 n!
y b 20 jjll bgs 1 y Lg gaw g o dy s w ao
. Lgolw no d kll g gac g
JwI oag Jlaai pui. lalai gai loic wuall osc abl .dwl UkJll Jda no cdu sag labx sic
labg
5 1/1s wu e o uwuuw u (Off On On) "On" E
4wJg
. 5 . 5ab1g 1111 aoo g y ool ooc .lab! jao . "Off" jSall
| PLL 2 | ddj jj |
| ωj jj |
| ωj jj |
| ωj jj |
| ±0,2° A) B) ±1,2° | - ωj jj (ωj jj) - jj jj |
| ±4° |
| 5> |
| ● |
| ● |
| ● |
| ● |
| ● |
| ● |
| +10°C... +40°C | -20°C... +70°C |
| 90% |
| 2 |
| 1 > ωj jj |
| 1 | (AAA) LR03 |
| 5 |
| EPTA-Procedure 01/2003 hj jj |
| 110 x 67 x 123 | ≤ 0,4 |
labg uusuul alao 5
On

alssaaaggljI joo oJollaaog
On
aagio wulal Off
1/4 10gll 6
Uull 7
UJbJI 8
jU-μddgX 9
Juuu10
jUU uuag 11
*gll 12
aLg aua 13
*j山Ua gJ UJb1 14
Jglll lgl f g oogolw jg aagogall glll
L
dululic
(aagg gguill aI) Jssu uol uug a
Joo JI JjJI b
alssuogwuilldulc
JdgljjoJ d
aJbU JdU I e
oJlaal | laui|f
wlaI gI bJ dJg
山uaiagljh
auiUul
PLL2
aIlaIbglbljj
J3603F534..
10
10 90°g0°glj sic oJlal A
.90° Lgddj/±0,02°
25°C (B
.1J 10 JUULI IJI JI JI JI JI JI JI JI JI
J 100000000000000000000000000000000000000000000000
UuOJooI Uc aagolll
Jgoo u c JsW jjJ 1oLcI lgog
-1J 11111111111111111
.0jI gI oJcI O JU Wg, wIaI I dC JJuWl a
aaii iiai iin no waii 8
oJdSgagall uublaol j.aaal
aI I aI I aI I aI I aI I aI I aI I aI I aI I aI I aI I aI I aI I aI I aI I aI I aI I aI I aI I aI I aI I aI I aI I aI I aI I aI I aI I aI I aI I aI I aI I aI I aI I aI I a
.aaiaJdulJI

A
A. aqol u9g
A
<logall
15g. uubla Jy aWuJl ojg auaabla
aLg aBpBbI logal I d 1 ublzol
.0JwU
|Jg aiaI aog
Jaaai Jlaaai
aagggl aawll bgbll adjog uwwu wll o
wll oeg l c glc .dall aggll 1bgbalg
LwIgjUwJd
baoaolal jolai jloj g uuul wlaal o
iagai pIaaWU WuaIooa
jgaal | jax
Jc ooggall wlll o gw j J oogall 1j
aabbaIgWJl a
jj山1 b 1
Mode 2
Cal 3
awwU4
#
Jl

e 1000000000000000000000000000000000000000000000000000000000000000
A
LJ
J 1 J 1 1 1 1 1 1 1 1
(9 pJb aabbsll gwll aa cIc wlaal o jg

dulc
JgI oJAL pI sWIL JG 1JbAaJbAaJbAaJb
Xg Uglalgl gJl Jjllg 8g
. uaii gl jwlaal jllg 1j pj d
E9g gJgUaWJlg! gJd y
. nn
JjIg
A
A. jiu jiαi
A pui j g
UJlJIg UJIbIK JJIJIg UJIbI pSsW X 100X Ig jllg JJJIg JJIKso! JJJIg
gall aall jll lj jn jg 11