
BSR 919 CB - Vacuum Cleaner BOMANN - Free user manual and instructions
Find the device manual for free BSR 919 CB BOMANN in PDF.
| Brand | BOMANN |
| Model | BSR 919 CB |
| Product type | Robot vacuum cleaner |
| Net weight | 2.95 kg |
| Power supply | Power adapter 230-240 V~, 50 Hz, output DC 18 V-, 400 mAh |
| Battery type | Ni-MH rechargeable, 14.4 V-, 2000 mAh |
| Runtime | Up to 70 minutes |
| Charging time | 6 to 8 hours (first charge: 12 hours) |
| Cleaning area per program | S: 10-15 m², M: 15-25 m², L: more than 25 m² |
| Main functions | Automatic cleaning, automatic return to charging station, virtual wall |
| Included accessories | Charging station, power adapter, battery pack, virtual wall emitter, replacement lint filter bag |
| Maintenance and cleaning | Empty the dust compartment, clean the filter and brushes (main and side brushes) |
| Safety instructions | Do not vacuum liquids, hot ashes, or sharp objects; use only the supplied adapter; do not immerse the appliance |
| Repairability | Do not repair yourself; contact a qualified technician or after-sales service |
| General information | Manual available in several languages (FR, DE, EN, ES, etc.) |
Frequently Asked Questions - BSR 919 CB BOMANN
User questions about BSR 919 CB BOMANN
0 question about this device. Answer the ones you know or ask your own.
Ask a new question about this device
Download the instructions for your Vacuum Cleaner in PDF format for free! Find your manual BSR 919 CB - BOMANN and take your electronic device back in hand. On this page are published all the documents necessary for the use of your device. BSR 919 CB by BOMANN.
USER MANUAL BSR 919 CB BOMANN
Robotsauger BSR 919 CB
Robotstofzuiger · Aspirateur robot · Aspiradora robotica · Aspirador rob
Robot aspirapolvere · Robot vacuum · Robot czyszczancy
Robotporszivó·Pobot-ninococ·Pobot-nbineco
Figures A to F 3
Figures G to N. 4
Instruction Manual 30
Cleaning 32
Maintenance 32
Technical Data Page 33
Disposal 33
JEZYK POLSKI
Spis tresci
Retirar as pilhas / Eliminar as pilhas
Thank you for choosing our product. We hope you enjoy using the appliance.
General Safety Instructions
Read the operating instructions carefully before putting the appliance into operation and keep the instructions including the warranty, the receipt and, if possible, the box with the internal packing. If you give this device to other people, please also pass on the operating instructions.
- The appliance is designed exclusively for private use and for the envisaged purpose. This appliance is not fit for commercial use.
- The power adaptor is only intended for use in dry environments.
- Ensure that output power, voltage, and polarity of the power adapter match the specifications on the type label!
- Do not touch the connected power adaptor with wet hands!
- Disconnect from mains power supply before cleaning.
- Ensure that the mains cable is not bent or kinked; do not walk or drive over the cable; do not subject the cable to heat sources.
- The device and the mains lead have to be checked regularly for signs of damage. If damage is found the device must not be used.
- Do not try to repair the appliance on your own. Always contact an authorized technician. To avoid the exposure to danger, always have a faulty cable be replaced only by the manufacturer, by our customer service or by a qualified person and with a cable of the same type.
- Use only original spare parts.
- Pay careful attention to the following "Special Safety Instructions".
Symbols in these Instructions for Use
Important information for your safety is specially marked. It is essential to comply with these instructions in order to avoid accidents and prevent damage to the machine:

WARNING:
This warns you of dangers to your health and indicates possible injury risks.

CAUTION:
This refers to possible hazards to the machine or other objects.

OTE:
This highlights tips and information.
Children and Frail Individuals
- In order to ensure your children's safety, please keep all packaging (plastic bags, boxes, polystyrene etc.) out of their reach.

WARNING!
Caution! Do not allow small children to play with the foil as there is a danger of suffocation!
- This device is not intended to be used by individuals (including children) who have restricted physical, sensory or mental abilities and/or insufficient knowledge and/or experience, unless they are supervised by an individual who is responsible for their safety or have received instructions on how to use the device.
Children should be supervised at all times in order to ensure that they do not play with the device.
Special Safety Instructions

CAUTION:
- Only use the supplied power adaptor.
- Do not suck up liquids!
- Do not suck up hot ashes or pointed or sharp objects!
- Do not use the device in damp rooms!
- Never use without the filter. Check that the filter is inserted correctly!
- The robot vacuum may collide with objects which are standing on the floor. Put fragile objects such as vases in a safe place!
- Do not leave the robot vacuum unattended. It may become jammed and damage the floor covering!
Intended use
This appliance is designed to clean the surface of short pile carpets or smooth floors in domestic households.
The appliance is only to be used as described in the user manual. Do not use the appliance for any commercial purposes.
Any other use is not intended and can result in damages or personal injuries.
The manufacturer assumes no liability for damages caused by improper use.
Supplied parts (see fig. A)
1 X Power supply
1 X Charger station
1X Robot vacuum
1 X Plug-in battery pack
1X "Virtual Wall" transmitter unit
1 X Spare fleece filter bag (not shown)
Unpacking the appliance
- Remove the appliance from its packaging.
- Remove all packaging materials such as films, filler material, cable clips and carton.
- Check the contents for completeness.
NOTE:
Production residue or dust may have collected on the appliance. We recommend cleaning the appliance according to chapter "Cleaning".
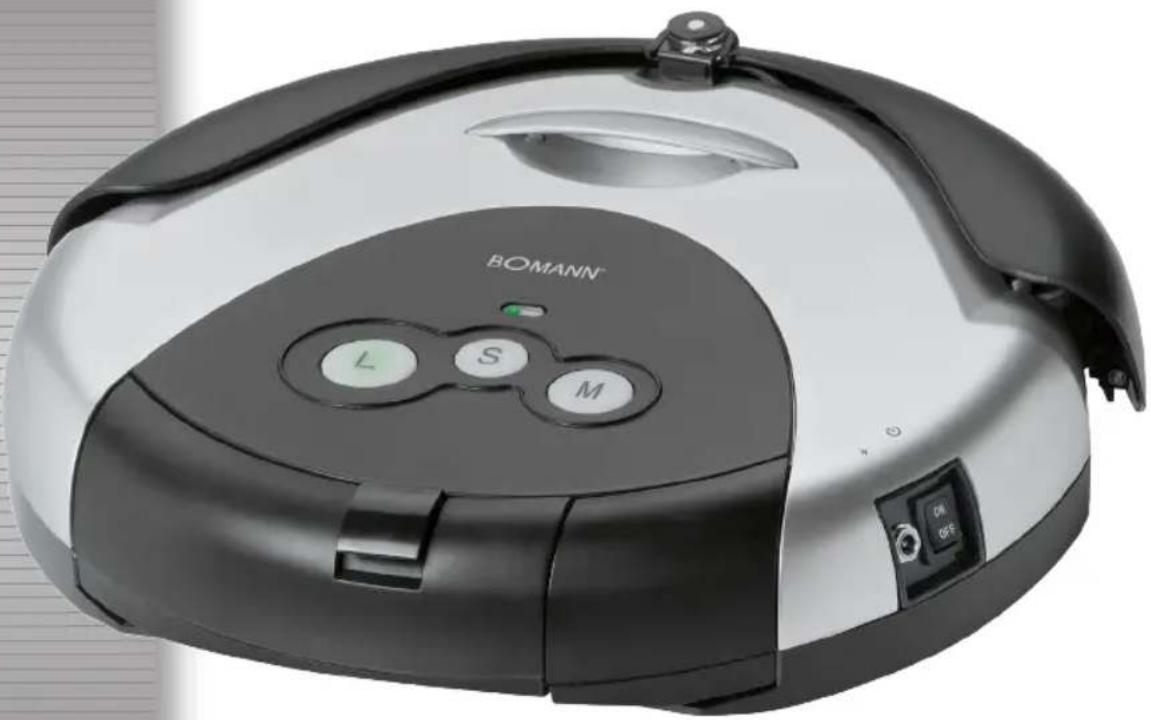
Description of controls (see fig. B)
1 Status indicator
2 Start buttons S-M-L
3 Dust compartment
4 Handle
5 Collision sensor
6 Infrared receiver
7 Infrared sensor
8 Main brush
9 Filter
10 Vacuum compartment cover
11 Charger socket
12 On/off switch (ON/OFF)
13 Side brushes
14 Infrared sensor
15 Battery pack
"Virtual Wall" transmitter unit (see fig. E)
16 Power indicator
17 "Virtual Wall" transmitter unit
18 Coverage selector S-M-L
19 On/off button (press for 3 seconds)
20 Infrared sensor
Setting up the appliance
NOTE:
- You must insert the battery pack on the bottom of the robot vacuum.
- The battery pack is included. You can find it in the packaging.
- The robot vacuum cannot be operated solely from the mains.
Insert the battery pack
- Turn the robot vacuum onto its back. The collision sensor should be facing you.
- Attach the battery pack to the left side.
- Guide the terminals on the battery pack onto the terminals on the robot vacuum.
- Press gently onto this area. The battery pack latches into the housing.
Charging the battery (see fig. C, D)
-
Switch off the robot vacuum at the switch (12).
-
Connect the power supply to the
2.1. Charger socket (11) on the appliance or
2.2. to the charger socket on the charger station. Put the robot vacuum onto the charger station.
- Connect the power supply to a properly installed 230 V~50 Hz earthed socket.
CAUTION:
Place the mains cable in such way that it does not become a trip hazard.
iNOTE:
- The status indicator is lit red during the charging process.
-
The charging time is around 12 hours for the initial charge and around 6 to 8 hours for all subsequent charges.
-
Disconnect the charger plug from the charger socket.
- Disconnect the power supply from the outlet to save energy.
Setting up the charger station (see fig. D)
- Place the charger station close to a plug socket.
- The robot vacuum must have free access.
- Plug the power supply charger into the charger socket on the charger station.
- Connect the power supply to properly installed 230V 50Hz earthed socket.
- The green light lights up on the charger station.
- Place the robot vacuum onto the charger station. The sensors should be facing you. The status indicator on the robot vacuum must light up red.
Setting up the "Virtual Wall" (see fig. E, F)
Do you want the robot vacuum to cover a limited area? You can set up a "Virtual Wall" to enable this. Infrared beams are transmitted and received and a barrier is thus erected.
- Rotate the "Virtual Wall" transmitter unit.
- Open the battery compartment. To do so you will need a small Philips head screwdriver.
- Insert 2 batteries size · D · MONO · R20 ·
NOTE:
- Make sure the polarity is correct. Use the appliance to guide you.
-
Batteries are not included.
-
Close the battery compartment.
- Press the button on the transmitter unit. The indicator light turns green.
-
Select coverage on the selector: S = short, M = medium, L = long.
-
Position the transmitter unit at the transition to the other area.
- Align the transmitter diode along the barrier (see fig. F).

WARNING:
Do not look directly into the transmitter diode!
Operating the robot vacuum
The initial charging of the robot vacuums is complete after around 12 hours.
- Switch the robot vacuum on at the on/off switch. The start buttons light up.
- Estimate the size of the area and select the start button S for around 10 to 15m^2
M for around 15 to 25m^2
L for around more than 25m^2
- The robot vacuum now begins its work automatically. It will move around the room for around 70 minutes according to the specific program (see fig. G).
- If the battery is almost exhausted, the robot vacuum will look for the charger station on its own.

NOTE:
- This function is active in a radius of around 1.5 metres around the charger station.
- The search function is deactivated when the battery is charged.
- Depending on its position, the robot vacuum may need several attempts to dock with the charger station.
-
The robot vacuum has now cleaned the floor. For best results, service the vacuum.
-
Switch off robot vacuum at the on/off switch.
- Disconnect the power supply from the outlet to save energy.
- Switch off the "Virtual Wall" transmitter unit.
Cleaning

WARNING:
- Always disconnect the device from the power adaptor before cleaning!
- Do not submerge the device in water.

CAUTION:
- Do not use a wire brush or other abrasives for cleaning.
- Do not use aggressive or abrasive cleaning agents.
Housing
Wipe the housing clean with a dry cloth.
Dust compartment (see fig. H, I)
- Press the button on the dust compartment and pull it out.
- Empty the dust compartment into a dustbin.
- Open and clean the filter compartment on the dust compartment (see fig. 1).
- Empty the filter compartment and clean the fleece filter bag.
- If the fleece filter bag is too heavily soiled or damaged, use the spare fleece filter bag.
Air intake (see fig. J)
The air intake is masked by a cover.
- Remove the cover, as shown in fig J.
- Remove any residue which may have collected under the cover.
- Clean the intake filter. Use a brush if necessary.
Maintenance
If long fibres or hairs are caught in the brushes it may be necessary to detach the brushes.

WARNING:
- Before maintenance, always disconnect the appliance from the mains!
- Switch off the robot vacuum at the on/off switch!

CAUTION:
- The following work requires some technical know-how. If necessary seek advice from a specialist.

OTE:
- You will need a small Philips head screwdriver for this work.
Main brush (fig. K, L, M)
- Turn the robot vacuum onto its back. The collision sensor should face away from you.
- Loosen the screw on the right hand side of the brush.
- Unhook the brushes on the right hand side. You can now remove the brushes completely.
- Threads and hairs which may have been caught in the brushes can be cut off.
- Attach the brushes on the left hand side. Pay attention to the square axle.
- Guide the rollers back into the housing.
- Replace the screws.
Side brushes (fig. N)
- Loosen the two screws on the housing.
- Detach the cover.
- Remove the threads and hairs.
- Replace the cover.

OTE:
Conduct a test run to check the function.
Troubleshooting
| Problem Possible cause Solution | ||
| The appliance does not work. | The appliance is not connected to mains power. | Check the wall outlet with a different appliance. |
| Insert the plug properly in the wall outlet. | ||
| Check the fuse. | ||
| The appliance is not switched on. | Check the on/off switch. | |
| The battery pack is not correctly inserted. | Detach the battery pack again and put it back in. | |
| The appliance is not charged. | Check the charger connection. | |
| The appliance is defective. | Contact our service centre or a specialist. | |
| Weak vacuum power. | The filter system is clogged. | Clean the filter as described under “Cleaning” and “Maintenance”. |
| There is a loud noise during operation. | The brushes are dirty or blocked. | Clean the brushes as described under “Maintenance”. |
Noise development
The sound pressure level in the ear of an operator (LpA) was measured according to DIN EN ISO 3744.
Sound pressure level detected: 68 dB(A) (no limit)
Technical Data
Model: BSR 919 CB
Net weight: 2.95 kg
Power Adaptor
Protection class:
Input: 230-240 V~, 50 Hz
Output: DC 18 V-, 400 mAh
Polarity:
Batteries: 14.4 V-2000 mAh
Operating time: max. 70 minutes
Charging time: 6-8 hours
Subject to technical changes without prior notice!
This device has been tested according to all relevant current CE guidelines, such as electromagnetic compatibility and low voltage directives, and has been constructed in accordance with the latest safety regulations.
Disposal
Meaning of the "Dustbin" Symbol
Protect our environment: do not dispose of electrical equipment in the domestic waste.
Please return any electrical equipment that you will no longer use to the collection points provided for their disposal.
This helps avoid the potential effects of incorrect disposal on the environment and human health.
This will contribute to the recycling and other forms of reutilization of electrical and electronic equipment.
Information concerning where the equipment can be disposed of can be obtained from your local authority.
Detaching the battery pack / disposal of batteries
The appliance contains rechargeable nickel-metal hybrid batteries.
Remove these batteries before disposing of the appliance. As the consumer you are legally obliged to return spent batteries/battery packs.
WARNING:
- Disconnect the appliance from the mains before detaching the battery pack!
- Only remove spent battery packs.
The battery pack is latched into the bottom of the appliance.
- Turn the robot vacuum onto its back. The collision sensor should be facing you.
- Detach the battery pack on both sides and pull it up.
- Take the battery pack out of the housing.
You can take the battery pack to a collection point for old batteries or special waste. Contact your local authority for information.
Instrukcja obstugi
KOMnJIeKT noCTaayHnA (INB.MaI.A)
1XJKepeNoKuBHeHHN
1XCTaHcJ3aepdKaHH
1XPo6OT-IMIOOCO
1X3mHnHaakymyIaTOpHa6batape
1XIpepeabau "bipTaunha CTHa
1X3aIacnBBOBHHMIiJok3cipbTpom(Hepoka3aHm)
PoznakobvBaHH npucToPO
- BnIMtB npuIa3 ynaKOBKn.
- BmmitybecbnakybaIbnMateipian, Hanpknad foIbny, HanoBHOBaU, fikcatopn Ka6enib i KaptoH.
- NpeBipTe, Hn HaBbH Bc YacTHINH.
I PIMITKA.
Ha npinlaDi moKytb 6ytn 3aJINsKn Bnpo6HnTBA a6o nI. Mn peKOMeHNyEMO NOYNCTNTn npinad, k3a3NaueHO B po3dini "UnuHHeH".
Onnc enementb ynpablinHHa (nB. Man. B)
1 INdikaTop cTahy
2 KhoIynycky S-M-L
3Bidinokdny6pydy
4 PyuKa
5 DaTtHK 3iTKHeHHH
6 InffpauepeboHn peCnBep
7IhpaayepBOHm daTHNK
8 OchOBHa LiJtKa
9ΦinbTp
10 KpnuKa BaKyyMHoro BjDinika
11 P03'EmДЯЗэрдногорпсстрно
12Перека WMK./BMM.(ON/OFF)
13 BoKoBI uJiTKn
14 IIndpauepeBOHn DaTuHK
15 AkymyTTopHa 6batape
IpeepaBau "BipTaJbHa cTiHa" (MnB. Man. E)
16 Izhikatop KINBHeHnHa
17 Peredabay "BjpyaIbHa cTHa
18 Peremnikaun DijanHKn npni6panHs S-M-L
19 KhoNka BMK./BMMK. (yTpyMnYBaTN HaTNCHyTOH 3 cekyHdN)
20 IIndpaayepBOHn DaTtHK
HanaaHTyBaHHn npHaay
I PIMITKA.
- Notp6Hb BCTaBHTn akMyyIaTOpHy 6aTaapeHO B HxKHO yactHy po6Ota-nIIOOCca.
- AkymyIaTOpHa 6aTapeB XoDnTb y KOMPnEeT nOCTaHnH.BoHa 3haxoDnTbcr y Kopo6ci.
He MoXHa Iopabatn XMBIeHHa Ha pOBoT-NINOCoc TINbKm BID MepeKi.
IooB BCTaBHTn akyMnyTOpHy 6aTapeH
- NpeBepHitb po60t-NINOCOC HNIXHBOIO YactNIHOIO DOropn. N6aHTe DaTnK 3ITKHeHHa.
2.Пд' endа Te akmyntopny 6atapeNo do niboro 60ky. - BCTABTe akymyIaTOpHy 6aTaPeH y po6oT-ninococ BiNobiINO nolpHocTi.
- 06epeXHO npTmChiTb ii. AkymyIaTopHa 6aTaape 3 KnaaHnM BcTaHe Ha MicJe.
1063apnntakymnytophy6atapeo(mB.Man.C,D)
- BumkhHbpo6oT-ninococ3a donomoro npepemika (12).
2.Пд ecHаTe dkepeNo xNbneHndo:
2.1. P03'Emy dny 3apdHoro pncTroo (11) Ha npnadi a6o
2.2. lo po3'emy dlya 3apraHoro npicrpoHa ctaHci3apraXkaHHa. NocTaBe po60-tnIOOC Ha ctaHciO3apraXkaHHa.
3.Пi'deHaHTe DkepeNo KINBHeHnI Do 3a3emJeHOI po3ETKn 230B\~50Tc, BCTaHOBJeHOI HAIKeHHM YHOM.
VBAFA.
Po3aUyTe Ka6eB JxNBHeHH TaK, 06 BIn Hikomy He 3abaxkAB.
I P N I M I T K A.
PiJvac3apdkaHnIHnKaTOp cTHy CBITbCRAePBHOHM.
- Yac nepworo 3apdkaHnna CtaHOBnTB np6Jn3Ho 12 roHN Ta np6bn3Ho 6-8 rOINH dnyycix hAcTynnx 3apdkaHb.
Bid'edhaite 3ekep 3apnHoro npncpto Boi po3'emy dna 3apnHoro npncpto.
Bid'EDHyTe DKepeIOn XnBHeHnH BID po3eTKn, 106 3aoaadtn enEkeTpoeHepriio.
106 hanaatbybnt cTahciu 3apJkaHn (INB.MaI.D)
- P03tauJyIte cTaHJIIO 3apJpkAHN6bln3bKO do pO3eTkn
- P6oBt-IIIIOOC NOBHeH MaTn BiJbHm DoCTyI.
3.Пд'снaiteЗарднлпсгтiodpo3'emудязарdHoropnictpoHастцilzлзарdkaHHA.
4.Пд'бнaiteДжеретохиВьенгДоЗаemлсHoPozETK230B\~50TUBCTAHOBNHOHAIJIEXHMYHOM - Ha cTaHui 3apAkaHH Iuikatop 3acBITbc 3eHeHM.
- BCTaHObitb po6OT-niNOCoc Ha cTaHJIIO 3apJDKaHHa DaTtIKAMn Do ce6e. IHdNKATOp cTaHy Ha po6OT-niNOCocMaE 3acBITNTnCryepBOHM.
106 hanaatybatn "BipTyalbHy CTiHy (DINB.MaI.N.E.F)
JaIIO notpioHIO, 106 pOoT-nIOOC npIbpaB oMExeHy dIaIKy, IINZBOrO MOxHa HanaUytBAtn "BiTyAInbHy CTIny". IHpaupeBPOHi IpOMeHI BnPOMiHIOHTbCra Ta npIMMaIoTBcR, i TAKIM YINHOM CTBOpIOCTbCe nepeuKoDa.
- Ipepebephitb pepebaaB "BiptyaIbHa cTina".
- BiDkPnIe BiDinok dIg 6aTapeiok. Ioo6 ce 3po6ntn, 3HaIO6Nb8 HeBENka BnKpytKa BnO6HNTBa Philips.
- BCTaTe 2 6aTapeiKn po3MpOm·D·MONO·R20·
ITPIMITKA.
- YneBHItbcra, 10 noIopHicTb, kky HabeJeHO Ha npnIaDi, DToPMHaO.
-
BaTapeKn He BXOaTb B KOMnIeKT NoCTaHaHH.
-
3akpiTe Bvdinok dna 6atapeoK.
- Hatncihb KhoNky Ha nepeDaBaui. IHnkaTOp 3acBiITbcra 3eHnM.
- BctaHOBiB po3Mip iinHKn 3a donomoroo nepemkaaya: S = mana, M = cepenH, L = beniKa.
- Po3auyte nepebaaHa Mexi dInnHn npnbpaHna.
- HanpaTe iOJ nepeIaBaA yBa 3dOBx "BipTyalbHOi CTINH (nVB.MaI.F).
NONEPEDXEHHA. He nibitbc na iod nepebadaya!
Eknnnyatai pyooba-nilococa
Pepwe 3apJxKaHHpO6To-NNOCocCTaHOBnTb np6n3HO 12 roHn.
- YbIMKHTb poBt-NINOCOC 3a donomoroH nepeMkaay BMK./BMK. 3acBITbCk HONKn IyCKY.
- Bn3HaTe po3Mip dIiIaHKn Ta Bn6epiTb BiIIOBIDHy KHOIky nycky
S Dn npin6n3Ho 10-15 m²
MДЯпиблзно15-25m²
L DnI npu6n3Ho 6inbue 25m^2
- Tenep po6oT-ninococ abTomatnHNo nohe po6Oty. BIn pyxatImetbcra nKIMHati npi6n3Ho 70 xBnIH BIDIOIHO do BN6paHOI pOrpamn (INB. man. G).
- 阿卡图阿凯明阿凯明阿凯明阿凯明阿凯明阿凯明阿凯明阿凯明阿凯明阿凯明阿凯明阿凯明阿凯明阿凯明阿凯明阿凯明阿凯明阿凯明阿凯明阿凯明阿凯明阿凯明阿凯明阿凯明阿凯明阿凯明阿凯明阿凯明阿凯明阿凯明阿凯明阿凯明阿凯明阿凯明
ITPIMITKA.
LcpyhkuijnieBpaiyci npu6n.1,5MbiD ctaHuii 3apraJkaHHI.
Функля ПОЛУКУ ВIMИΚAЕТБСА, KОП 6атAPEH3apdIXKeHO.
B 3aIeXHoCTi BiD nIoXeHnR po6oTbi-nIOocOcBi MoKe 3HaIObMbCa KInbKa Cnp6, Uo6 NiEEdHaTncr Do CTaHJI 3apJxHnH.
- Po60t-ninococ npin6paB nDnory. Teneh naikpaae DOrJIaHyTu nINOCoc.
- BmMKHITb po60T-nnOoc 3a donomoro no nepemkaay BMK./BMK.
- Bi'ειδηαίτε οχερεύον κυνιβηκουν Biί ποεΤΚι, ομόδ 3aοῦπι έπελεκτροεθερriο.
- BvmkhHtIb nepeIabauh "biptyalha cTHa"
UH
TIONEPEDKEHHRA
- Perw Hix YNCTNTN, 3aBXn BiKNoaIte npncpii BiD aanTepa KnuBneHn!
- He 3aHypoiTe npicTpi y BDOy.
YBAGA.
He BnKOpNCTOByIe IpoTMy uItkY a6o abpa3nBHi 3ac06n dnnuHn
- He BnKOpncToBnyTe arpeCnBHi a6o abpa3nBHi 3ac06n DnA YnUeHn.
Kopnyc
BntpItb Kopnyc cyxho raHnupkno.
BidiinokdpaNy (nB.MaH.H,I)
- HataHcHb KhoNkHa bDinKy dny 6pyu Ta BHTaHrHtB Myo
2.CnopoXhItB BiDjInok Dny 6pyu B KOnTeHep Dny CmTTT.
3.BiKnPnTe Ta NoocntB Bldinok fIpIbtpa, 10 3haxoDnTbcry Bldininky Dn86pydy (mB. man. I).
4.CnopokHItb BiDinok pInbTpTa nOuHCTITb BOBHNMIJOK3pINbTPOM. - RaKIO BOBHnMIiOK 3 fIbTpOM 3aHaTTO 3acMITUBC8 a6o NIOJKOJKeHn, BIKOPNCOTByTe 3aNaCHN BOBHnMIiOK 3 fIbTpOM.
PoiBIpO3a6ipHnK (mB. mAn. J)
Tobirpo3a6ipnHK CXObaHNo iN KpnIky.
- 3HIMITb KpIuKy, Ra NOKa3aHo Ha Man. J.
2.ПибepiMbYci3aIIuKmI,UO3i6paIncrNkD KpuiIkoKo.
3.ПоистITьфлгпрповитрабipнika,заnotpeбИСКористаяпесьшткою.
Dorjia
KIO IOBNI HNTKN ABO BOLOCCNOTPANIN y UITKN,MOJINBO, notpi6HO BIDcHATN iX.
TONEPEDKEEHNA
- Péné à HIX YNCTNTN, 3aBXn BiID'EDHyIe npnaD BiD MepexKi XNBHeHH!
BIMnKaItepo6oT-nHIOOCNEpeMnKaeEMBMK./BMK!.
YBAGA.
-Дя ВИКОHAннЯ HabTynHIX DiBIMarAeTbCЯ NeBHe texHiYHe Hoy-xay.3a Notpe6n 3BepHITbCЯ npaIoIO do CneuianicTa.
I P N I M I T K A.
- Lio6 BnKoHaTn HactynH iii, 3naOobntcR HeBemika BnKpyTkBa Bnp6HnUrTa Philips.
OchOBHa uItka (MaJI.K.L.M)
- IpeBepHITb po6OT-NINOCOC HIXKhBOO YacTHNHO DOROPn, DaTtHKOM 3iTKHeHH BID Ce6e.
- BiDkpyTb TbnHTn 3 npaboro 6oky uitkn.
- Bi'edhaTe 3 npaboro 60ky. Teep MoKHa 3HrTn 5tKn NOBHCIO.
- HHTKn Ta BOJocca, 10 noTpannn y uitkn, MoxHa o6pi3aTn.
5.Пи endaHte uTkn do JIIBORO 60ky.3BepHITb yBary Ha KaandaPathy Bicb. - CnpmyIte pONIKn Ha3a y Kopnyc.
7.3akpytib rBnHTI.
Bokobi zitkn (MaN. N)
- BДКутITь ДВа РИNTа На Корпсyci.
2.3HIMITbKPNIUKy - BuaJIITb HHTKn Ta BOIOCCA.
- BctahOBitb KpUkky Ha Micue.
I PIMITKA.
Uo6 nepebepn npobTo, BvkoHaTe npobHn nyck.
YcyHeHH HeCpBaHocTe
PnIaM MICTb akymyIaTOpHri 6pndHi Hikei bIaapeii.
Ipeed ytniizaoieo npnay BnIMtB ci 6ataeii.
Jc CnoKmbu Bn opuDnH0 3o6ob'ra3aHi NOBepHyTN BnKOpNCtahi BaTapei.
IIOPEJXEHNA.
-ПершИК BИИНЯТи 6БатAPEI, BiD'EDHAite npINaB BiID MEPEKIXIBNENH!
BIMMaTe 6ataeTiiIbKoI BOH pO3pJKeHi.
AkymyIaTOpHa 6aTapeKpimntbCra IIO HxKHbOi CToPOH npnay.
- NpeBepHtB p60T-NINOCOC HIXHbHO qACTHIO DOROPn, DaTHKOM 3ITKHeHHr Do ce6e.
- Bi'dcHnate akymyIaTOpHy 6atapeo 3 o6ox 60kib i BNTNHiTb ii.
- Bnimitb 6aTapeo 3 Kopnycy.
Moxha BiHecTn akymyIaTOPHy 6bataeIO do nyHKTu npNOMy CTapnx 6batae a6o do cneuaJIbHOro KOHTeINHepa.3a BiOMOCTMa 3BepHITbcra do opraHb MiCEBOI BnaDN.
PykoBoCTBO no 3Kcnnyatau
Cnacn6o 3a BbI6op Hauero npOykTa. Haedeemc, Bam noHpaBntc3KcnJIyaTnpOBaTb yCTpoCTBO.
06uue yka3aHnno TExHnke 6e3onacHOCTn
Ipeed nauJOM 3KcNpyatauIN np6oRa BnHMaTeIbHO npOHNTaIe npunraeMyIO NHCTpyKUIO NO 3KcNpyatauIN COxpaHInTe ee B HndExHom MeCTe, BMeCTe C rapaHTnHBIM TaHOHOM, KaccOBbIM YekOM IN, NO BO3MOXHOCTM, KAPTOHHOJ KOp6KOc CynakOBouHbIM MaTePnaIOM. EcnI daTe KOMy-1n60 Inonl3ObaTbCS np6oBopOM, O83aTeJIbHO daITe Bnpdauy daHHyo IHCTpyKUIO NO 3KcNpyatauIN.
Пользутесь пибором только чатумобраим И по наз haЧeMu. Пибор HeпрдhaЗнчен Дя KOMМерчecKOИ NGПЛьЗВАИЯ.
CetbeoAaantep npedha3HaueH dIy IcnoIb3ObaHnra TOnbKO B cyxoi cpe.
- Y6eIntecb, YTO BixOHaH MoUHcTb, HAnpJxHeHne I NOnJIphHOCTb CTeBOrO aAaTIpea COOTBeTCTByIOXapaKTEpcnCTnKam Ha NaCIOptTHo Ta6nHke!
He npikacaiTeCb K BkIIOueHHOM CeTeBOMy aanTepy MOKpbIMn pykami!
-ПередческовOTCOEOHNITEOTICTOHnkaNTaHnA.
- Y6eIInTeCb, YTO cTeBoi Ka6eBb He 3aHyT N He 3aNytAH; He NaCTynaiTe INn He nepee3xKaaiTe Yepe3 Ka6eBb; DePknTe Ka6eBb NoJaIbWe OT NcToCHNKOB TENla.
-Пибори Кабелсетeвоги ппаня HeobxOIMPOperyIpyHNo obcneIOBaTb Ha HanuHne cIeIOBNOBpeKdENn.Пи OБнapUkeHn NOBpeKdENnONlb3OBaTbCЯпборom 3anpeSHTcR.
HnB KOem cIyae He pemOHnpyIte np6bop camoCTOReTbHO, a ObaaAITeCb B TAKOM clyae 3a NOMOuH K CneuaNCTy, IMeouMeMy COOTBeTCTByUOuN Donyck. H3 coobpaKHeH Nbe30NaChOCTN, ZameHa CeTeBOrO UHypa Ha paBHoo3HaHyb IOnyCKaETCra TOnbKO uepe3 3aBOJ-N3ROTOBHTeJIb, HauCy cepBnCHyMoCTepCKyIO INN COOTBeTCTByUOJeero KBaINOpuPoBaHOrO cneuaNtCTa.
IcnoJb3yIteToJIbKOOpnHaHaNbHbIe3aIuaCTN.
- IoxaanyIcTa, co6nOaIte HNOKeCneIyOuIe "CneuaIbHbIe yka3AHnI IO TexNIke 6e3oNaChOCTN".
CIMBOJI pImeHReMbIe B DaHHOM pyKOBoDCTBe NOJIb3OBATeTn
BaxhBiE peKOMeHdaaIIN IJIg OBeceueHnBaUeIe 630NaChOCTN 6o3HaueHbI IIO OcObeHOMy.Oba3aTeIbHO cIeDyIte 3TNM peKOMeHdaaIIM, YTObI PpeOTbPaTtB HeCuaCThBi CnyaI INI NOnOMKy U3dEIIIA:
IPEyIpyEKeJDEHNE:
PpeDynpexkdaetobnacchoTINJN3dOpOBbI BO3MOxHOM PnCKe IOnyHeHr TpaBMbl.
BHIMAHINE:
Yka3bIbaET Ha BO3MOXHyIO ONaCHOCTb IINI3JeINr IN DpyTnx OKpyKaHOUx INpeDMeTOB.
IIPIMEYAHNA:
Jaet COBETbI INHOpMaJIIO.
TeHn nIuHa HyKdaHouMeecB npncMOrpe
-13 coo6paekhen 6e30nacchoT nIraTeH He octabTnIe IeKaTb yNakOBky (PiactIKOBBIE MEUKN, KapTOH, neHONPAACT N.T.D.) 6e3 npncmOTpa.
IPEyIpyEeHHeI
He no3BOJnTe DeTmIrpaTb C nOIN3TNHeHOBOn nIeHko. Onachocb ydyuBa!
3TOT npi6op He npedHa3NaeH DnI NOJIb3OBAHnI INaMn (BkIOUaJeTe) C ORpAHueHHbIMn FmN3UeCKIMN, CEHCOPHbIMN IIN YMCtBeHHbIMN CNOco6HOCTAMN IIN IINaAMn, HE IMEHOzMMN ONbITa N/INN Heo6XODMbIX 3HaHn. NcJIIOuHeH CoCTABJrH CTyAan, KOrDa OHN HaxOJaTcR NOI npICMOTPOM IINa, OTBEtCTBeHHoro 3a INx 6e3ONaCHOctb, INI KOrDa OT 3TOI NOJIyHehY yKa3aHnI PO NOJIb3OBAHnIO npi6Opom.
Heo6xoJMo npICMaTpNBaTb 3aTeBmU,TO6bl y6eHnTBcB TOM,TOO HN He IprpaTc Pn6bOpom.
CneuaHbIe yka3aHnNo TeHXnKe 6e3oNaChOCTn
BHIMAHINE:
- IcnoIb3yIte ToJIbKO npunaraembl cTeBoB aIaANTep.
He noIb3yITeCb nbIeCOCOM dny ydaJIeHnB bIaXHOI nbIIN nn KUdkOCTe!
He nbinecocte ropeuO 30ny, ocptbIe nI npexyue npedMeTb!
He noJIb3yITeCb npIb6OpOM BO BnAaXbIx NOMEueHnax!
HnB Koem cnyae He pa6oTaIe 6e3 fNtpa. Iocne kajdoi Cmehb fNtpa o6ra3aTeNbHO npOBepbTe eropabINbHyIO nocaKy!
Pobot-ntbIIEcOC MOKET CTaKNBaTbCS npeDMTaMn, cToraUM Ha noJy. XpyNKe IpeDMtbl, HapnPmep Ba3bl, y6epTe B 6e0naCHOe MecTo!
He octabnIte po6oT-bIeNecoc 6e3 npncMToPa. OH MOKET 3aCTPbI NIOBpeDHTNoJIOBOE NOKpBITne!
Ha3haeHne
3TOT npin6op npedHa3HaueH IJI YIcTKn NOBepxHocTN KOBPOB C KOPOTKIM BOPCOM IIN POHBIX NIOOB B DOMaUHeM XO3YICTBe.
YCTPOICTBO MOKHO INCNoJIb3OBaTb TOJIbKO TaK, KAK ONICAO B DaHHOM pyKOBoDCTBe NOJIb3OBaTeJr. He INcNoJIb3yIte erO B KaKnx-ПИБО KOMMepuecknX ueJx.
JIIO6oeIpyrOe IcNOJb3OBaHHe CHTaTeTcR IcNoJb3OBaHHe IIO Ha3HaueHnIO, INMOKeT PpNBecTn K NOpYe IMyUeCTBa INI TpaBMam.
PpOu3BODHTeJIbHe Hecet HIKAKoI OTBETCTBEHHOCn 3a yUep6, PpHINHEHHbI HENpaBUNbHbIM NcNIOJb3OBAHNEM YCTPOINCTBa.
NoctabJREMbIe KOMNOHeHTbI (cm.pnc.A)
NCTOCHNKNTaHNA-1UJ.
3aepnna 1Wt.
PobT-tnbcneoc -1 wT.
CbeHbIaKkMyJrTOpHbI 6nK -1 wT.
IpeepaTnK "BnptyanbnaCTeHa" - 1 wT.
3aAHOBBOIOCAHOΦmNbTPOBAHbHbMMeJOK-1uT.
PacnaKOBka yCTpoNCTBa
- ɪərʌnɛknte yctpɔɪctBO nʒyɪnəkOBKN.
- YdaNITe BCE ynaKOBOHyIe MaTePnAJIbI, TaKne KaK NOIN3TIneHOBaI NJIeHka, MaTePnA1 HAnONHITeJIa, Ka6JIbHbIe CTaKKN I KOp6Kn.
- Y6eIITScb, YTO B KOpOke ecTb BCE KOMIOHeHTbl.
I PIMMEUHNA:
Ha yctpoiCTBe BCE eue MOyT OCTaBaTbC MeJIKe YactuBn IblIb, OCTaBUnecr NocLe npOn3BOJCTBeHHoro IpOceCa. PeKOMeHnyETcNIOHnCTNTb yCTpoiCTBO,KaK OINCAHO B pa3dJe "UInCTKa".
Onncahne 3JIeMeHToB ynpaBJIeHn (cm. pnc. B)
1 INHdNkaTOp COCTOHNIA
2 KhoNk nycka S-M-L
3Пьлесборнik
4 PyuKa
5 DaTnIK npeIaTCTBnR
6 INHpaPacbHbI npMeMHNK
7 INHpaKpaChbI daTnIK
8Tnabnaa uetka
9ΦnJbTp
10 KpbIuka oTecka pa3pJKeHHa
11 THe3do 3apdHoro yctpoNCTBa
12 PerekluohateIb BkluoheneH/BykluoheneH (ON/OFF)
13 BoKOBbIe 1eTkn
14 NhoopaKpaChbI DaTuHK
15 AkmyJrTOphBb6nok
IpeepaTuk "BupTyanbHaA cTeHa" (cm.pnc.E)
16 INHdkatop nTaHn
17 PepedaTnK "BnpyaIbnaIc TcHa"
18 PerekluataeIb dmaana3oHa S-M-L
19 KhoTnKa BkIIOUeHmraBbIKIOUeHmna (HaXIMaTb 3 cekyHdb)
20 NnDpapkpaChbI daTtIK
IoproToBkaKpa6oTe
I PIMMEUAHNIA:
- AkymyIaTOpHbI 6Iok Heo6xOIMMo BCTaBnTb CHN3y poBoTa-NbIeNcoCa.
AkyMnyTropHbI 6nok npnnaeTc. OH haxoNTcB yNtakOBke. - Pobot-NbIeoc He MoKet pa6oTaTb HEnOpeIcTBeHHO OT 3JIeKTPOCeTI.
Bctabka akkymyIaTOpHoro 6Joka
- NpeBepHnTe po6oT-nbIeNecoc. DaTuNK npenrTCTBnA DOJKeH 6bITb o6paueH K Bam.
2.BctabTe akkymyIaTOpHbI 6bnK c IeBoi CTopoHbI.
3.KIeMMbHa aKMyMJIaTOpHOM 6IOKe DOJIKNbI BOITN B KOHTAKTC KJIeMMaMn Ha pO6ote-NbIneCOce. - Мяков НадмITE на зачесь блoka. Актуларовский 6лok зафимсupyетсь в Корпуce.
3apkaakymyTopa (cm.pnc.C,D)
- BbiknIOUHTe po6OT-nbIeOC npeKIOUaTeNEM (12).
2.Поdkлioчite 6нokптаняк:
2.1. rhe3dy 3apdHoro yctpoictBa (11) Ha np6ope nn
2.2. rHe3y 3apJHOrO yCTPOIcTbHa Ha 3apJHOn cTaHcIM. YctaHOBtpepo6oT-NbIeocCHa 3apJHyIO CTaHcIO
3.BknHouNte 6IOK nHTaHnB I npaBnIbHO yCTaHOJIeHHyIO 3a3emJehHyIO pO3eTKy 230 B\~,50 T.
BHIMAHHE:
IpoJIOXnTe CeTeBOi Ka6eNb TaK, UTO6bHa 3aHHTbcra O Hero.
ITPIMEYAHNA:
-BoBpEm3apAdknHnDnKaTOpcoCToHnCBETHTCkPacCbIMCBETOM.
Bpem3apncoCTabIeTOKOIO12acobPnIpeBoi3apKkeNOKO6-8cacOBpnBCexnoCJeDyUoX3apKax.
- BbHbTe BnIky 3apJdHoro yCTpoiCTBa n3 rHe3da 3apJdHoro yCTpoiCTBa.
- OToeDInHTe 6Iok IITaHnA OT pO3eTKn IJIg 3KOHOMNn 3Heprnn.
UctaHObKa 3apAHOH cTaNCH (CM.pNC.D)
- Pa3MeCTnTe 3aprAnHyIO CTaHcIIO IO6JIINKe K ΘeKtPOPo3eTKe.
- P6oBt-tnbIeocOdoJxKeHIMeTb CBo6oDhBIO DOCTyn K Hei.
3.BKIOHHTe 3apAHOe yCTPOICTBO 6LOKa IITAHINB THe3DO 3apADHOrO yCTPOICTBa Ha 3apADHOI CTAHUIM.
4.BKIOHHTe 6IOK NITaHnB B npabINbHO yCTaHOBNEHHyO 3aEMHeHHy po3eTky 230 B\~,50 T. - Ha 3apdnoi CTaHcun 3acBETnTc8eHehI INDkaTOp.
- NomeCTNe po6OT-NbIIEcOC Ha 3apdHyto CTaHtIO. DaTHIKN DoJIKhbI 6bITb ObpaueHbIK Bam. INHnKaTOp COCTOHHa Ho p6oTe-NbIIEcOCe DoJIkeH CBETNbCRA KpaCHbIM CBETOM.
YctahOBka "BnptyanaBHO CTehbi" (CM. pnc. E, F)
BamHyxho,уTO6bIpo6OT-NbIeoc y6pAnOrpaHnueHHyO nIOUaJIb?ДЯЗTOROMOxHOINcONb3OBaTb"BNPTyAblHyHO CTeHy".NtOpaKpaCbHBeIpyuNcNpyCKaHTcNprHIMMaHTcN,N 3TMMco3daetcnpepada.
1.Повернiteблokпераатчika"Виртуальна стеса".
2. OTKpoIte 6aTapeiHbI OTcEK. IJI TTOI NOHaIOBITcR MaJIeHbKa JKpctOBaI OTBePtKa.
3. BCTaBtE 2 6aTapeKn TINTopa3Mepa·D·MONO·R20·
ITPIMMEAHNA:
CoBnJaTeNoIpaHocTb.Ha npi6ope ecTB o03HaueHn.
-Батуарейки He npilanaiaotca.
-
3akpoTe 6aTaapeHbI OTCek.
-
Haxmnte KhoNky Ha 6nOke nepedaTnuKa. INHdkaTOp HAHTCETNTbCA 3eJIHehIM CBTOM.
- BbIbepuTe dHaana3oH Ha ceJeKtope: S = KopoTkn, M = cpeDnH, L = nnHHbI.
- NocTaBbTe 6nok nepeDaTnHa Ha rpaHnue nNouaa.
- CopneHTnpyIte IIOJ npepaTnka BdoJIb nperepaBc (cm.pnc.F).
NPEyTNPEKDEHNE:
He cmToptne npraMo Ha dnoi nepeDaTuNka!
Ucnnoj3OBaHne po6oTa-ntbIeCoca
Первая заряда ko6obTOB-ньиecOCOB 3aHIMaET OkIo 12 yapOB.
- BkIIOHnTe pOoBt-PlIeNcOC npeKIIIOuTaHeM BkIIOUeHnA/ BbIKIOUeHnIITaHnA. KhONKn Nycka HauHyT CBETNbCra.
- OueHnTe pa3Mep pIoouaIи BbI6epnte KhoNky nycKa S dny y6opkn npImepno 10-15 M² M dny y6opkn npImepno 15-25 M² L dny y6opkn 6oJee 25 M²
- Nocne 3Toro po60t-NbIeoc HauHET pa60Ta b ABTomaHTueckn. OH 6yTe NTpeMeuaTbcra NO KOMHaTe npImepHO 70 MInHyT cOrnaCHO CneluaNbHO IporpaMMe (cm.pnc.G).
- Korda akKymyTOp 6yIeT Ha IcXOe, pOb0T-NbIneCoc HauHET NCKaTb 3apRdHyIO CTaHciHO.
IINPIMEYAHNA:
3TaФyHKnIa DeIcTBeyET BpaNcype npImepHO 1,5 metpaOT3apRdHOnCTAHnI.
-Функлгпюнckа DeaktnBnpyeTcR,KOrda aKkMyIITOP 3apJxkaETcR.
B3aBnCIMOCTNOTMeTOnIOJIOKeHnPO6Oty- nIIEcOCyMOKETIOHaIOBbTCHeCKOJIbKO IONbITOK, YTO6blPnIapKOBaTbCk K3apdHoiCTAHm.
TenepbpoBt-NbIeNcoC OHCTIN non. Dn HauNyUHXpe3yNbTaTOB BInONHInTe ObcnyKmbAHne NbIeNcoCa.
5.BbIKIOHHTe po60T-PIJIIEcOC npeKIOHATEJEM BKIOHHeHr/BBIKIOHHeHr PINTAHn.
6. BbIKIIOHTe 6IOK nITaHn I3 po3ETKn IJIЯ 3KOHOMN 3HEPNI.
7. Bbiklouhnte 6Iok nepedatnya "BnpyaIbHaia CTeHa"
UncTka
TPEyTPEJKDEHNE:
-Переднистков BCERДа OTCOEДИНЯTE ceTeBOI aDANTEP!
- He norgykaite yctpoCTBO B BOy.
BHIMAHINE:
He nnoIb3yIte npoBOIoHnyU 1eKy IIN a6pa3nBhIe cpeIcTBA dIra YIcTKn.
He nIIOJIb3yIte arpeccnBhIe IIN a6pa3nBhIE qIcTAAIe cpeCTBA.
Kopnyc
IpoptnTe Koprnc cyxoiTkAhbio.
TbInec6OpHnK (cM. pNc. H, I)
- HaxMMTE KONKHa NbIeNc6OpHnke N BbIbTe erO.
- BbIcIbIte COepeXIMoe PbIeSc6OpHnKa B MycopHbI KOHTeIHep.
- OTPoIte HIOHCTMTEOTCEK pINbTpa NbIeNc6OpHnKa (CM.PNC.I).
- ToHnCTInTe OTcE KΦnIbTpA IN BOIOcRAHO ΦnIbTpOBAJIbHbIMELUOK.
- KOrJa BONOCaHOH cINbTPOBaJIbHbI MEUOK CINbHO 3aRpa3HNTcra INIOBpeJITcRA, IcNIOJIb3yIte 3aNaCHOB OBOOCAHOH cINbTPOBaJIbHbI MEUOK.
OTBepTne nna 3a6opa Bo3dyxa (cm.pnc.J)
OTBepCTmeIgna3a60paBo3dyxa3akpbItoKpbIiKoI.
- CHHMMTE KpbIHKy, KaK nOKa3aHO Ha pnc. J.
- Y6epTe nbIb, KOtOpa MoKET CKONITbCn IOI KpbIuKoN.
3.ПOTИСТΙЕ BCACSBIAIOUДI ΦИЛБТР.IПИ HEO6XODIMOCTN ICSINOLB3YITE UETKY.
06cnyxmbHne
ECINI INHHBIE BOJOKHA HIN BONOCbI HAKONATCR B UETKAX,TO MOXET NOTpe6OBaTcR CHrTB UETKN.
TPEUYTPEJKDEHNE:
-Пердобсукванем Всерда оTKичайприбор оТэнektprocesn!
- BbIKHouHTe pO6OT-NbIeNcOC nepeKnHouTeIeM BKIIIOUeHIN/BBKIIIOUeHIN NITaHIN!
BHIMAHHE:
CneyuouaonepaunrTrepeytOnpeedeHnro TexHuueckoro Habbka.PnHHeo6xOIMocnt npokohcylbTnpyTecb y CneuaIncta.
I PIMMEUAHNIA:
-ДЯВынOLHeHЯОЕРALINOTpe6yEtCMAJIeHbKaJ KpeCTOBa OTBeptKa.


- JEZYK POLSKI
- Spis tresci
- Retirar as pilhas / Eliminar as pilhas
- General Safety Instructions
- Symbols in these Instructions for Use
- WARNING:
- CAUTION:
- OTE:
- Children and Frail Individuals
- WARNING!
- Special Safety Instructions
- Intended use
- Supplied parts (see fig. A)
- Unpacking the appliance
- NOTE:
- Description of controls (see fig. B)
- Setting up the appliance
- Insert the battery pack
- Charging the battery (see fig. C, D)
- iNOTE:
- Setting up the charger station (see fig. D)
- Setting up the "Virtual Wall" (see fig. E, F)
- Operating the robot vacuum
- Cleaning
- Housing
- Air intake (see fig. J)
- Maintenance
- Main brush (fig. K, L, M)
- Side brushes (fig. N)
- Noise development
- Technical Data
- Power Adaptor
- Disposal
- Meaning of the "Dustbin" Symbol
- Detaching the battery pack / disposal of batteries
- Instrukcja obstugi
- KOMnJIeKT noCTaayHnA (INB.MaI.A)
- PoznakobvBaHH npucToPO
- I PIMITKA.
- Onnc enementb ynpablinHHa (nB. Man. B)
- IpeepaBau "BipTaJbHa cTiHa" (MnB. Man. E)
- HanaaHTyBaHHn npHaay
- IooB BCTaBHTn akyMnyTOpHy 6aTapeH
- 1063apnntakymnytophy6atapeo(mB.Man.C,D)
- VBAFA.
- I P N I M I T K A.
- hanaatbybnt cTahciu 3apJkaHn (INB.MaI.D)
- hanaatybatn "BipTyalbHy CTiHy (DINB.MaI.N.E.F)
- ITPIMITKA.
- NONEPEDXEHHA. He nibitbc na iod nepebadaya!
- Eknnnyatai pyooba-nilococa
- UH
- TIONEPEDKEHHRA
- YBAGA.
- Kopnyc
- BidiinokdpaNy (nB.MaH.H,I)
- PoiBIpO3a6ipHnK (mB. mAn. J)
- Dorjia
- TONEPEDKEEHNA
- OchOBHa uItka (MaJI.K.L.M)
- Bokobi zitkn (MaN. N)
- IIOPEJXEHNA.
- PykoBoCTBO no 3Kcnnyatau
- 06uue yka3aHnno TExHnke 6e3onacHOCTn
- CIMBOJI pImeHReMbIe B DaHHOM pyKOBoDCTBe NOJIb3OBATeTn
- IPEyIpyEKeJDEHNE:
- BHIMAHINE:
- IIPIMEYAHNA:
- TeHn nIuHa HyKdaHouMeecB npncMOrpe
- IPEyIpyEeHHeI
- CneuaHbIe yka3aHnNo TeHXnKe 6e3oNaChOCTn
- Ha3haeHne
- NoctabJREMbIe KOMNOHeHTbI (cm.pnc.A)
- PacnaKOBka yCTpoNCTBa
- I PIMMEUHNA:
- Onncahne 3JIeMeHToB ynpaBJIeHn (cm. pnc. B)
- IpeepaTuk "BupTyanbHaA cTeHa" (cm.pnc.E)
- IoproToBkaKpa6oTe
- I PIMMEUAHNIA:
- Bctabka akkymyIaTOpHoro 6Joka
- 3apkaakymyTopa (cm.pnc.C,D)
- BHIMAHHE:
- ITPIMEYAHNA:
- UctaHObKa 3apAHOH cTaNCH (CM.pNC.D)
- YctahOBka "BnptyanaBHO CTehbi" (CM. pnc. E, F)
- ITPIMMEAHNA:
- NPEyTNPEKDEHNE:
- Ucnnoj3OBaHne po6oTa-ntbIeCoca
- IINPIMEYAHNA:
- UncTka
- TPEyTPEJKDEHNE:
- TbInec6OpHnK (cM. pNc. H, I)
- OTBepTne nna 3a6opa Bo3dyxa (cm.pnc.J)
- 06cnyxmbHne
- TPEUYTPEJKDEHNE:
Brand : BOMANN
Model : BSR 919 CB
Category : Vacuum Cleaner