
BS 9027 CB N - Vacuum Cleaner BOMANN - Free user manual and instructions
Find the device manual for free BS 9027 CB N BOMANN in PDF.
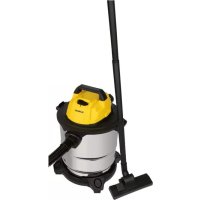
| Product type | Bagless canister vacuum |
| Brand | Bomann |
| Model | BS 9027 CB N |
| Power supply | 220-240 V~, 50/60 Hz |
| Rated power | 700 W |
| Net weight | 5,30 kg |
| Energy class (carpet) | A |
| Energy class (hard floor) | A |
| Annual consumption (carpet) | 28,0 kWh/year |
| Annual consumption (hard floor) | 20,4 kWh/year |
| Noise level | 85 dB(A) |
| Collection system | Transparent bagless dust container |
| Filtration | 4 filters: nylon, felt, central, pre-filter + exhaust filter |
| Included accessories | Floor nozzle with carpet/hard floor selector, parquet brush, 2-in-1 brush/crevice tool |
| Telescopic tube | Yes, adjustable length |
| Power control | Slider on the body |
| Air control | On the hose handle |
| Cable length | Automatic rewind with yellow/red marking |
| Parking | Parking hook at the back of the appliance |
| Child safety | Do not leave within reach of young children, risk of suffocation |
| Maintenance | Empty the container when it reaches MAX; wash filters with water, air dry |
| Repairability | Do not repair yourself; contact a qualified technician |
| Standards | LVD 2014/35/EU, EMC 2014/30/EU, RoHS 2011/65/EC, ErP 2009/125/EC |
Frequently Asked Questions - BS 9027 CB N BOMANN
User questions about BS 9027 CB N BOMANN
0 question about this device. Answer the ones you know or ask your own.
Ask a new question about this device
Download the instructions for your Vacuum Cleaner in PDF format for free! Find your manual BS 9027 CB N - BOMANN and take your electronic device back in hand. On this page are published all the documents necessary for the use of your device. BS 9027 CB N by BOMANN.
USER MANUAL BS 9027 CB N BOMANN
De stofcontainer is vol.
Maatregel:
Leeg de stofcontainer.
of
Mogelijkoorzaak:
Thank you for choosing our product. We hope you will enjoy using the appliance.
Symbols in these Instructions for Use
Important information for your safety is specially marked. It is essential to comply with these instructions in order to avoid accidents and prevent damage to the machine:

WARNING:
This warns you of dangers to your health and indicates possible injury risks.

CAUTION:
This refers to possible hazards to the machine or other objects.

NOTE: This highlights tips and information.
General Notes
Read the operating instructions carefully before putting the appliance into operation and keep the instructions including the warranty, the receipt and, if possible, the box with the internal packing. If you give this device to other people, please also pass on the operating instructions.
- The appliance is designed exclusively for private use and for the envisaged purpose. This appliance is not fit for commercial use.
- Do not use it outdoors. Keep it away from sources of heat, direct sunlight, humidity (never dip it into any liquid) and sharp edges. Do not use the appliance with wet hands. If the appliance is humid or wet, unplug it immediately.
- When cleaning or putting it away, switch off the appliance and always pull out the plug from the socket (pull the plug itself, not the lead) if the appliance is not being used and remove the attached accessories.
- Do not operate the machine without supervision. If you leave the room you should always turn the device off. Remove the plug from the socket.
- The device and the mains lead have to be checked regularly for signs of damage. If damage is found the device must not be used.
- Use only original spare parts.
- In order to ensure your children's safety, please keep all packaging (plastic bags, boxes, polystyrene etc.) out of their reach.

WARNING:
Do not allow small children to play with the foil. There is a danger of suffocation!
Special Safety Instructions for this Device
- Do not try to repair the appliance on your own. Always contact an authorized technician. If the supply cord is damaged, it must be replaced by the manufacturer, its service agent or similarly qualified persons in order to avoid a hazard.
- This appliance can be used by children aged from 8 years and above and persons with reduced physical, sensory or mental capabilities or lack of experience and knowledge if they have been given supervision or instruction concerning use of the appliance in a safe way and understand the hazards involved.
Children shall not play with the appliance. - Cleaning and user maintenance shall not be made by children without supervision.
- Do not suck up liquids!
- Do not suck up hot ashes or pointed or sharp objects!
-
Do not use the device in damp rooms!
-
Never use without the filter. Check that the filter is inserted correctly!
- Hair, clothing and body parts away from the vacuum nozzle during use!
- Keep the vacuum cleaner away from sources of heat like radiators, ovens, etc.!
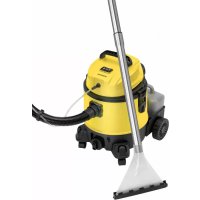
Overview of the Components
1 Air slide
2 Handle
3 Suction hose
4 Cover lock (dust container)
5 On / off switch
6 Carrying handle
7 Dust collector release button
8 Cable-winding button
9 Suction power control
10 Ventilation grill lock (outlet filter)
11 Positioning aid
12 Dust container
13 Dust collector base plate
14 Hose connection
15 Connection head of the vacuum hose
16 Carpet / hard floor selector
17 Floor nozzle (with hook (not shown))
18 Telescopic suction tube
19 Parquet brush
20 Combined brush / crevice nozzle
Start-up
- Insert the connecting head of the suction hose into the hose connection of the appliance. It must lock mechanically.
- To disconnect the hose again, press the button on the connecting head.
- Insert the vacuum tube into the handle if required.
- You can use the sliding switch on the telescopic suction tube to adjust the length individually. (Page 4, Fig. A)
- Then assemble the floor nozzle and / or the accessories.
Nozzle Attachment
Floor nozzle (17)
You can clean smooth surfaces and carpets with the floor nozzle.
Set the selector (16) according to condition of the floor:

For durable hard floors like laminate, tiles, PVC, etc.
For carpet floors, rugs, etc. with high or low pile
Parquet brush (19)
For gentle cleaning of sensitive hard floors like parquet, laminate, tiles, etc.
Combined brush / crevice nozzle (20)
For vacuuming upholstery, curtains and in corners and crevices etc.

NOTE: "2-in-1" nozzle:
When this is folded together it can be used as a groove nozzle. If you would like to use the brush nozzle, pull the brush section in the direction of the arrow until it locks in place.
To detach the nozzle attachments from the suction pipe, pull them off by turning them slightly.
Using the Appliance
- Unwind the length of cable you require.

CAUTION:
- Pull out the cable up to the maximum length indicated with the yellow mark.
- Never pull the cable out up to the red mark as the cable winding can be damaged.

NOTE:
If the red mark is visible, pull in the cable with the help of the cable winding button back to the yellow mark.
- Insert the mains plug into a correctly installed power socket.
- Turn the device on by the on / off switch by pressing down the button.
- Set the "carpet / hard floor" selector, depending on the floor covering.
- Set the suction power with the suction power controller.
- Vacuum at a steady speed. There is no need to exert pressure.

NOTE:
Pay attention to the range that can be covered with the cable length!
Air Slide (1)
Open the air slide on the hose handle in order to regulate the airflow or to clear any particles sticking to the nozzle.
Switching off and Winding up the Mains Lead
- Turn the vacuum cleaner off by the on / off switch and remove the plug from the socket.
- Hold the cable to avoid wrapping.
- Press the cable winding button and guide the cable.
Maintenance
Emptying the dust collector
Empty the dust collector once the collected dirt reaches the MAX marking.
- Disconnect the mains plug from the wall socket.
- Press the button (7) to release the dust collector. Remove the dust collector.
- Empty the dust collector over a dustbin. In order to do so, press the button on the dust collector to open the base plate. (Page 4, Fig. B)
- Then close the base plate again.
- Attach the dust collector to the appliance. First position it at the bottom of the appliance and then secure it with the hook on top.
- Check that the position of the dust collector is secure by briefly lifting the appliance at its carrying handle.
The Filter System
Your appliance features 4 filters. The common dust bag system has been replaced by a transparent dust collector. The higher flow speed of the collector allows for heavy dirt and smallest floating particles to be separated from the "sucked-in air".
It is thus not necessary to buy dust bags.
The filters must be cleaned periodically.
The filter unit (Page 4, Fig. C to H)
The filter unit is composed of:
- Nylon filter
Filter fleece
Central filter
Pre-filter - Fastening disk
CAUTION:
- Never wash the components in a washing machine or a dishwasher!
- Do not use a hairdryer for drying.
- Operate the appliance again only when all components are completely dry and have been installed correctly.
Proceed as follows to clean the filter unit:
- Empty the dust container as described above. (Steps 1-3)
2. Disassembly of the filter unit
2.1. Turn the filter unit in the direction. (Fig. C)
2.2.Pull the filter unit from the dust container. (Fig.D)
2.3. Turn the fastening disk and pull it off. (Fig. E)
2.4.Pull the pre-filter from the central filter. (Fig.F)
2.5. Open the cover of the filter unit. (Fig. G)
2.6. Remove the nylon filter and the filter fleece. (Fig. H)
- Clean all parts of the filter unit and the dust container under running water. You may use a soft brush.
- Allow all parts to dry completely in air.
5. Assembly of the filter unit
5.1. Insert the filter fleece and then the nylon filter into the cover.
5.2. Close the cover. It must lock mechanically.
5.3. Set the pre-filter to the central filter.
NOTE:
The pre-filter has recesses of different sizes, which match the tabs on the central filter.
5.4. Set the fastening disk onto the pre-filter and tighten it by turning.
5.5. Replace the filter unit in the dust container: Set the guide tab on the filter unit to the symbol. Tighten the filter unit by turning it in the direction.
Outlet filter
The appliance is also equipped with an outlet filter. It is located on the back of the appliance.
- Push the lock (10) down and remove the ventilation grill.
- Remove the filter insert and clean it as described above.
- Place the completely dry filter back into the ventilation grille.
- Put the ventilation grille back on the appliance. Observe the guide lugs. The ventilation grid must engage audibly.
Cleaning
WARNING:
- Before cleaning remove the mains lead from the socket.

WARNING:
- Under no circumstances should you immerse the device in water for cleaning purposes. Otherwise this might result in an electric shock or fire.

CAUTION:
- Do not use a wire brush or any abrasive items.
- Do not use any acidic or abrasive detergents.
Clean the housing with a soft, dry cloth without additives.
Storage
- Let the device cool down completely.
- Wind the cable completely.
- Please insert the hook of the floor nozzle into the parking assistant on the rear of the device.
Troubleshooting
The device does not work.
Remedy:
Check the connection to the mains.
Check the position of the switch.
- The device does not suck up anything.
Possible Cause:
The dust collector is full.
Remedy:
Empty the dust collector.
or
Possible Cause:
The filters are dirty.
Remedy:
Clean the components.
or
Possible Cause:
There is a foreign body in the suction tube or the nozzle.
Remedy:
Check the accessories for foreign bodies.
Technical Data
Model: BS 9027CB
Power supply: 220-240V\~, 50/60Hz
Protection class: II
Net weight: 5.30 kg
The right to make technical and design modifications in the course of continuous product development remains reserved.
Technical Data for vacuum cleaners
COMMISSION DELEGATED REGULATION (EU)
Nr. 665/2013
| Trade mark Bomann | ||
| Model BS 9027 CB |
Use as universal vacuum cleaner with floor nozzle
| Energy efficiency class1) | A | |
| Energy consumption | ||
| Annual energy consumption2) | kWh/year | 28.0 |
| Cleaning performance class | ||
| Carpet cleaning performance class | E | |
| Hard floor cleaning performance class | B | |
| Dust re-emission class G | ||
| Sound power level | dB(A)re1pW | 85 |
| Rated input power W 700 |
Use as hard floor vacuum cleaner with parquet brush
| Energy efficiency class1) | A | |
| Energy consumption | ||
| Annual energy consumption2) | kWh/year | 20.4 |
| Cleaning performance class | ||
| Hard floor cleaning performance class | D | |
| Dust re-emission class G | ||
| Sound power level | dB(A)re1pW | 85 |
| Rated input power W 700 |
1) A (highest efficiency) to G (lowest efficiency).
2) Indicative annual energy consumption (kWh per year), based on 50 cleaning tasks.
Actual annual energy consumption will depend on how the appliance is used.
The device meets the European standards and directives in the current version at delivery:
Low Voltage Directive (LVD) 2014/35/EU
- Electromagnetic Compatibility (EMC) Legislation Directive 2014/30/EU
RoHS-directive 2011/65/EU
- Ecodesign-directive (ErP) 2009/125/EC
- Ecodesign requirements for vacuum cleaners COMMISSION REGULATION (EU) No 666/2013
Disposal
Meaning of the "Dustbin" Symbol
Protect our environment: do not dispose of electrical equipment in the domestic waste.
Please return any electrical equipment that you will no longer use to the collection points provided for their disposal.
This helps avoid the potential effects of incorrect disposal on the environment and human health.
This will contribute to the recycling and other forms of re-utilisation of electrical and electronic equipment.
Information concerning where the equipment can be disposed of can be obtained from your local authority.
Instrukcja obslugi
Yka3bIbaeT Ha BO3MOxHyO ONaCHOCTb InI3dEINN aDpynx OKpyXaHOxN ppeDMetOB.

INPIMEUYAHNA:JaetcoBebti INHOpMaIyIO.
067a HhOpMaun
Ipeed Hauanom 3KcNpyataunn npnbopa BHImaTeJbHNO npouHTaTe npnaaraemyu INHCTpykUIO NO 3KcNpyataunn COxpaHNTe ee B HAdexHOM MeCTe, BMeCTe C rapaHTnHBIM TaHOm, KaccOBbIM YekOM N, NO BO3MOXHOCTN, KAPTOHHO Ko06KO C yNAKOBOUHBM MaTePnAON. Ecn daTe KOMy IIn6o nonNoB3OBAtBCr np6OpOM, O6BaTeNbHO daTBe B npndaHy dAnHyIO INHCTpykUIO NO 3KcNpyataunn.
Пльзупесь пиборм только чстным образим и по ha3haЧeMu. Пибор He пpeДиЗИЧаЧeн ДЯ КOMМерчe-CKORO ИСПОЛьЗOBAHИ.
He nonb3yIeTcB np6bOp mO tKpbItbIM He6om. PpeoXpAHnTe np6bOp OT kApbl, npMblx cOnHeuHbIX lyuei, BnaJXHOCTN (Hn B KOem Cnyae He nOpykaTe erO B BoY) u yapOB o6ocTpbiE yrbl. He npKacaiTeCb K np6bOp ByaJXHbIM pykam. Ecnl np6bOp yBaJXHnICn IIN HAOK, Tyt Je BbIHte BnIKy u03ETKn.
- Pocne 3KcIpyaTuM,MOHTaKe npHaIeKHOCTe, YNCTKe IINI POJOMKe Ipnbopa Bcerda BbHMaIte BUNKy n3 pOzETKn (TaNITe 3a BNkY,a He 3a KaBeJIb).
He octabJrTe BkHoueHHbIe 3JIeKtpOnpnp6Opbl 6e3 npncMoTpa. BbIXoJa n3 NOMEuEHNr BcERda BbIKIOuaTe np6Op. BbHbTe uTEkepe n3 po3eTKn.
- Pn6op n Ka6eBcTeBOro NHTAHNHeo6xOIMOppeyIrpHO o6cneIOBaTb Ha HAIuHne cIeOB NOBpeKdENH.Pn 6hApUKeHN IOBpeKdENH NoJIb3OBAtCBnp60pom 3aIpeuaTcR.
- VcnoJb3yIe ToIbKO opnHaHbHbe 3aIuaCTN.
- IV3 coo6paXeHn 6e3oNaChOCTn dIaIeTe HcOctaBnIyTe IeKaTb ynaKOBky (IIaTcIKOBbIe MeUKN, KApTOH, NeHOrJaTn T.D.) 6e3 npncMOTpa.

PENEYNPEXDEHNE:
He no3BOJnIe TeTm IrpTaB c nOINaTHNeHOBOI nJIeHKO. Onachocb ydyuBa!
CneuNbHbIe yka3aHnI NO 6e3OpaCHocTn IJIy 3TOrO np6opa
He nbitaTe OTpeMOHTnPOBaTb yCTpoiCTBO cAmOCToTeIbHo. O6a3aTeJIbHO CBJXITeCb C aBTOpN3OBaHHbIM MaCTepOM. Ppi NOBpeKDeHm CeTeBOrO shHpa, BO n36exKaHne ONaCHOCTn nopaxKeHn 3JIeKTPnueCKnM TOKOM, shHyp CJIeDyET 3aMeHNTb y n3ROTOBtEJIa, cepBnCHOrO pndCTaBnteJIa IIN dpyrNX KBaJIncuPPOBaHHbIX IInU.
- ΘТИМ пибором могут полььоваться DeTи CTapшe 8 leT Илца с OгранчehныIMN ФизчесКIMN, OСЯЗTeЛьнБIMN И PCINXИчESКIMN CПОСОБНOCТЯМN ИПИ He IMeJOUJIe OпБITA ИПИ 3HaHи,ЕСПИ OHI HaxODЯТСЯ ПОД HAДЗOPOM ИПИ пОИНСТPyKTIPOBaHbI B OTHOWEH N6e3ОпАСHOrO NOЛьЗOBaHЯ пиборOM И 3HaIOT O CBЯЗHHbIX C ΘТИМ ONACHOCTЯX.
He no3B0JTe DeTm nIgpaTb c np6opom.
-ЧИстkaи уход 3а пибором He должны пюворитбя DeТьми 6e3 надзopa.
He BcacbBaIte XndKoCTn!
He BcAsbIbAitTe ropeuHnepeHnOCTpOKoHeHbIe nHn OCTpbIe npedMeTb!
He nCnoJIb3yIte yCTpoIcTBO B cblpblx nomeueHnX!
- HNKoIda He nCNoIb3yIte yCTpoIcTBo 6e3 φnIbTpα. ПрOBepaIte, npaBnIbHo JI N BCTaBJIeH φnIbTp!
Bo BpemnncnoB3OBaHnJe depXnTe BOIOcbl, OeJny N qactn TeJaNoaJIbWe OT BCacbIBaIOUeRo conna!
He npnbjkaTe nbineCoc K nCTOuHnKaM TePna, TaKm KaK baTapeN OTOpIeHn, neu n T. d!.
O63op detanei np6opa
1 PeryniaTop noaun Bo3dyxa
2 Puyka
3 BcacbBaoum shaHr
4 3amok Kpbilikn (EMKOCbIg IyIbn)
5 PepeknioaTeB BkJ/BbIKN
6 Puyka dIa nepeHocKn
7 Khonka qnkcaTopa nbinec6opnka
8 KhoNka CMaTbIBaHnIuHypa
9 Pernylantop MoUHcTn BCaCbBaHn
10 3amok BeHTnIaIIOHHOpeWeTKn (BbInyckHOf nIbTp)
11 Kpenenne nnaHa
12 EMKoCTbIaIbIIN
13 OchoBaHnE PbIeSc6OpHnKa
14 PoiKnIOHeHne ⅢaHa
15 CoeinnHtIeBna rOIOBa BakyMnHO 7NaHa
16 PepeKIOUaTeIb peXIMMa "KOBep/ TBePdbI non"
17 HacdaKa dIra nona (c KpOkOM, KOtOpbH He noka3aH)
18 TeneckonuChekra BcacbIbaouza Tpy6a
19 15eTka dIy napKeTa
20 Kom6HHHOBaHHa Y3KcO dINHHoe cOnIO
Haayapabotb
BCTaBBTe COeHNHITbHyI rOJIOBky BCaCbIbAIOuei Tpy6bl B OTBepCTne NOKJIIOUeHnHa ycTpoiCTBe. OHa DOJIKHA 3aΦNkCIPoBaTbc MEXaHNUeCKn.
-ДяТОуTO6bIOTCOeHINHTbUJIaHr,HAKMnTeKHONkyHa COeHNHTeBHOJTOJOBKe.
BctabbTe BakyymHyIO Tpy6yBy pyky,ecnHc0xOdmo.
Moxho nCIOJIb3OBAbT cDnIXHNOI nepeKIOUaTeJIb Ha TeIEeCKONIueCKo BCacBIAIOuE Tpy6, YTO6bl HAcTpOnIb ee dNHy. (Ctp. 4, pnc. A)
3aTeM yCTaHOBNTe HacaIky IINI pIaNnIpyrne akceccyapbl.
Hacadkn
Hacadka dnon nona (17)
C NOMOUsbHacaKnIJIa NOJa MOxHO YnCTNb TnaKne NOBepXHOCTN KOBpbI.
UctaHOBtnepeKIOuateIb (16) corgnaCHO coCTOHHIO nOIA:

IpyoHbIX, TBepdbix NOIOB Tnna JAmHaTa, PNTKN, PBX nT.D.
Дя КOBрБьIX NOKрВИ, KOBрИКОВ И.T.I.C BbICOKIM ИЛN Hn3KIM BOPCOM
Uemka dny napkema (19)
IЯMgKoYbOpKn YyBCTBnTeNbHbX TBepDbIX NIOOB, HapnpMep,napKeTa,naMHaTa,nnTkn n np.
KombuHupoBaHHa Yemka/ y3Koe dnuHoe conno (20)
ДячскдрариpoBк,штб,ByrmaxИуглбнЯnxT.Д.

TPIMMEUHNA: HacdaKa "2-B-1"
Korda obe cheTn Hacadkn He coedinHebl, oecneueh pekm uCTKn B yIax. Korda nOTpe6yETc 8eTka, Hacadte cactb co 8eTKoB HanpaBHeHm CTpeKN Do qKcaun Ha MeTe.
Ipy6Ka Heo6xOIMO IX CnEKA NOeBbTaB.
IcnoJIb3OBAHnE np6opa
- Pa3BepHnTe shynp Ha Heo6xOdmyu dInHy.

BHIMAHHE:
- BbTackBaIte WHyp TOnbKO Do MaKcImaJIbHOJINHbI, Yka3aHHO XeJTOn MEtKo.
He BbIyraBaiTe Ka6eNb dAnbWe KpaChOn MeTKn, HnHaaye MoXHo NOBpeiNb yCTpoiCtBO CbOpaHbA-HnY shypa.

ПИМЕЧАЙ:
Ecnn BnHa KpaCha MetKa, BDbHbTe ShHyp BHyTpbc NOMOuKHOKN CBOpaHbAHN UHypa BNIOb DOJXeTToMETKn.
- BCTaBbTe BnIky 3neKtpoNTaHnB nPpaBnBHO yCTaHOB-NeHHyO 3neKtpuYeCKyIO po3eKy.
- BkIIOUHTe ycTPOINCTBO nepeKNIouaTeIeM BKN/BBIKN, HaxKaB erO KHOInKy.
- YctaHOBtnepeKIOHcATEJIb "KOBeP /NON" B 3aBcIMOCTNOT MecTa ONUCTKN.
- YCTAHOBITE MOUHOCTb BCaCbIBAHNc NOMOUsbOperyTJTOPa MOUHOCTn BCaCbIBAHN.
- ПобдпЕ чькс постоннй скоportь. He tpe6yETcprnlaratb 3haHTeHbHorO yCInnIa.

ПОНМЕЧАЙ:
O6paTne BnHMaHHe Ha pacCToHHe, KOtOpoe oecne- YBaETcA DnHOH shHpa!
PernyrTop noDAuH Bo3dyxa (1)
OtkpoTe 6eryHok Bo3dyxa Ha pyuKe uHaRa, YTO6bI peryInpOBaTb NOTOK Bo3dyxa nn ydaNtB npEdMeTbI, pnnnInneK HacaDke.
BbIKHoueHne nCBopaunBaHne uHypa 3JekTpOnnTaHn
- BbIKHNoHTe nbIeNOC nepeKHOuATEJIEM BKN / BBkN n3BnKeNTe BNky N3 3NEKTPnueckO p03ETKn.
2.ДеркитЕ кабель кpenkoВ pykax,чTo6bl npedotBpaTb erO xIeCTaHne. - Haxmte KhoNky cbOpaunBaHnI shHpy n HappaBnTe shHyp B nbInecoc.
06cnykmbaHne
OnyctoWeHne nbIe6OpHnka
BbIbpaCbIaBnTe MycOp n3 nbIeNec6OpHnKa, KaK TOnIbKO yPoBeHb DoIeT Do OTMeTKn MAX.
- BbIKIIOHIne BnIKy n3 CeTeBO pO3ETK.
2.ДЯOTCOeHHeHn PBIEc6OpHnKa HAXMnTe KHOIky (7). BbITaUHTe PBIEc6OpHnK. - BbIbPOcIne MycOp n3 nbJInc6bOpHnka B MycOpHoe BeApO. IINr 3TOrHO HaxmITE KHOIIky Ha nbJInc6bOpHnke, OTKpbIBaR OCHOBAHn. (CTP 4, pnc. B)
-
3aTeM 3aKoPoiTe OCHOBaHne.
-
3akpenite nbinec6opnB yctpoiCTBe.Chaana yctaHOBITE erO BHyTpB n 3aTeM 3akpenite C NOMObH BepxHero KpUcKa.
- Поверьтей Надекность пасноюженьпblпесборнika, с diferка пиюняв усточ STBO 3a pyчky.
Cnctema qnlbtpob
B yctpoiCTBe npedymoTpeHo 4 hnIbTa. O6bIyHnA cnCTema C MeuKOM dIa c6opa nbIIN 6blIa 3aMeHeHa na Ipo3paHbI nbIeSc6opHnk. BoJeE BicOka KcOpocTb c6opa nbIIN PO3BOJIaRr pa3dJIaRr TaKeJyIO nbIIN MaNeIWe qACTNlB B 3acacbIBaEMOM BO3dyxa.
TakIM o6pa3OM, OTCyTCTByET Heo6xOJIMOCtB nOKyNaTb MEUKN.
ФиьтбтптpebyтперндческочNTК.
Enok qunbmpo8 (cmp.4.puc.C-H)
BLOK qnIbTPOB BKnIOaET B CSeBcNeDyUoee:
HeJIIOHObBI qINbTp
ΦnIbTpyuOuBvBOP
- ΚeHTpaJIbHbI ΦmJIbTp
ΦnIbTp npeDbapnteHbHOuCTKN
Kpenexhnydick

BHIMAHHE:
3aPpeaetcMbTBKOMnoHENTbI npibopaB CTnpaBHOHnIOncydomoeyHO MaHHe!
3aIpeaaetcNcIOJb3OBaTb DnBbCyUINBaHnA qEH DnBBOLOC.
- NOBTOPHOE nCIOJIb3OBAHne npi6opa pa3peWaaETcra TOnIbKO, KOrJa BCE KOMIOHeHTbI pONHOCTbHO CyXNe I yCTaHOBnHeHbI npaBnJIbHO.
I P E D U N P E X K D E H N E:
- Перацякови3ВлжITEвлкуи3po3eTKN.
- Hn npi kaKx o6cToIeJIbCTBax He dOnyckaIte nOrpyKeHna YcTpoIcTBa B BOdy C cIbI OChIcTK. IHaue BO3MOJKeH yIap 3JIeKTPnueCKIM TOKOM IJI N BO3rOpaHne.
BHIMAHNE:
He npimehnTe npoBOJOnHyU 1eTky nnn a6pa3NBhIe MaTePnAbJI.
He nCnoIb3yIte KNCIOIbI IIN a6pa3nBbIe YnCTaIne cpeIcTBA.
OuHCTnTe KOpNc MmRkOy cyXoY TkaHbIO 6e3 YnCTraIux CpeDCTB.
XpaHeHne
- 06ecneythe nonHoe octbHaHne ycTpoiCTBa.
-ПОПИСТБИ CBEPHNTe UNHP. - PtoKaIyIcTa, BCTaBbTe KpIOK HacAaKN IINI NOJa Ha BbICTyn npxpaHEnHn Ha 3aDHeN CTOpOHe yCTpoIcTBA.
DnarHoctnka
- YCTPOINCTBO He pa6oTaE.
YcmpaHeHue:
PpOBeBpe TIOKNIHcHHe K CETn 3JIeKTponITaHn.
IpoBepbTe noIOxKeHHe nepeKnIOuChaTeJIa.
- YCTPOINCTBO HE BCACbIBaET.
Bo3MOxHn npUuHa:
ПьiocборнКпероннен.
YcmpaHeHue:
Onyctoumtne nbIeNc6OpHnK.
NIM
Bo3MOxHn npUuHa:
Tpa3HbIeΦnIbTpα.
YcmpaHeHue:
OuICTIe 3TN KOMIOHeHTbI.
NIM
Bo3MOxHn npUuHa:
IocToPOHHn IpeMmET HaxoDITcB BO BCaCbIBaHOUe TpyBe NIN B HacaKe.
YcmpaHeHue:
PpOBeBte 3TN npHaIeJxHocTn Ha nOCTOpOHHe npEaMeTbI.
TexHnueckne daHHbIe
Modelb: BS 9027 CB
3JIeKtpoNTaHHe: 220-240B\~,50/60T
Klacc 3auntbI: II
Bec HETTO: .5,30K
CoxpaHeNo npaBo Ha TexHnueckne I KOHCTpyKlmoHHbIe 13MeHeHnB paMkax npoDoJIkaHOUeCra pa3pa60TKn npOyKTA.
JenepoBaHHbI PernAmeHT Komnccnn (Ec) No 665/2013
| Toproboria Марka Bomann | ||
| Морель BS 9027 CB |
IcnoB3yTe kak yHnBepcaNbHbI nbJnecoc c HacaKoI dna nona
EU/65/2011 8jlll jlll lll (ErP) EC/125/2009 4iill 4iill 4iill 4iill 4iill 4iill 4iill 4iill 4iill 4iill 4iill 4iill 4iill 4iill 4iill 4iill 4iill 4iill 4iill 4iill 4iill 4iill 4iill 4iill 4iill 4iell 4iill 4iill 4iill 4iill 4iill 4iill 4iill 4iill 4iill 4iill 4iill 4iill 4iill 4iill 4iill 4iill 4iill 4iill 4iill 4iill 4iill 4iill 4iill 4iill 4ioll
J
:Laaiall
.
.
.
.
.
.
.
.
.
.
.
.
.
aai 1i
BS 9027 CB. j
60/50 240-220
II .
5,3.
j
j
665/2013 6
a a a a a a a a a a a a a a a
"clgll gaiiaaiill jaiil"jao
a aal al aal al al al al al al al
A
(H.11C.10.5571.4 2
:J 1
julil
jolal
s j sall jilil
jil
:
- | x - 2| = 1 , | y - 3| = 1
aill 1
C. all
J 1
jilali 8, uaiui yu la
(1) (2)
(3-1
jiei 2
(CJ) 1 jiljld.2.1
a.
:
J 1
1
4.2.1.1
S OBC = S AOB + S_ BOC
Jss
Cieaill 10
y j
:laiaall
jieao jieell
1
Jgall gao
:
a15s1g0g 1
abla 1 y a 1y 1y
aaii i 1
1.
JSLy JSLI
gall gill xlaa gdl 1y gll
jieell 12
3
1
10
"1 2" a.
Lg 10
jie 1
JSLJI JUJUJLLJULJUL1.1
A 1
i
a 2
J/1j 3
" 4
5
6
a 1
(1) 1gell buaai aai jia sll
J 1.1
J 2
J 3
aill
jiee
MAX 2000000000000000000000000000000000000000000
1
- jie 2020 all jie ai. jie 2020 yjai (7) jie 2020
g lalil, 11111111111111111111111111111111111111
aiee eae
(B 4
.4
5
Cllgssal 1e aale o jbi
1 1
Jus 3
(jaill ciej) cllaill Jss 4
Jusill 1 Jusill 5
Jouill 6
j 7
8
baai 9
(zall)aill 10
jaiiall baiill gie 2g jil
(AJ,4a)
aal 1 j aai jai aai
a#
(17) S OBC = S COD + S_ BOC
1 1
aai 11 (16) aai ai
aie aiee eae 1

10 1
j 1
(19) AD = BD = 12AB,AB = AC
a 11111111111111111111111111111
(20)
a
jgl jgl aalil aylll
3
1
1
一
一
1
1
一
一
GARANTIEKARTE
warranty card · garantiekaart · carte de garantie · schedadi garanzia · tarjeta de garantia · cartao de garantia · garantikort karta gwarancyjna · zaru.cnli list · karta jamstva · carte de garantie · IapaunnoHnKaPra · zaru.cnly list · garancijski list garanciajegy · rapaHTINHmΦOpMynp · RapaHTNnHBnTALONJ
BS 9027 CB
24 Monate Garantie gemäß Garantiererklarung - 24 months warranty according to warranty declaration - 24 maanden garantie volgens garantieverklarung - 24 mois de garantie selon la déclaration de garantie - 24 mesi di garanzia secondo la dichiarazione di garanzia - 24 meses de garantia de acuerdo con la déclaración de garantía - 24 meses de garantia, de accordo com a déclaration de garantia - 24 mandes garanti
1 henhold li garantibeteingense - 24 misiez guarancji na podstawie owsiadczenia
gwarancyjneo - zaruka 24 mEscu podle prohlasei o zaruke - 24 mesecno jamstvo
u skladu s jamstvenom deklaracionj - 24 luni garantie conform declariei de garantie - 24 mecaea rapanuza a cbtoaetCTBne c rapanuhoHHATA deknapaua - 24-mesaena
zaruka podla vhyhlasieno o zaruke - 24-meisecnagarcija, skladno z garancjskjo izavo - 24 honaparacia garanciafeletetelekben leitart szerint - rapaHTHn Ha 24 Miciu
binoa hao npo rapaHTHn 24 mecaua corncno tarnne HMM
rapanTtHM nppaVAM - jai jai jai jai 24
Kaufdatum, Handlstertempelt, Unterschied: - date of purchase, dealer stamp, signature - sankoepodium, dealerstempelt, handtenskering - date of achat, tampon du concessionaire, signature - data de acquisto, timbre del vendidto, firma - fecha de compora, sello del distribuidocir, fema - data de compora, carlimbo do distribuidocir, azinatura - karpadosdo, forhandierstemppelt, signatur - data zakupu, prezcei sprzemadnye, podiprs - datum zakusopent, radilie prodedge, podiprs - datum napoviro, zig trovica, potiprs - data ochitatne, pamlita funizornut, sennunca - Data na noxynama, flerar na npjopaasaia, ilognec - datum nukapu, pebaka obchodnka/ predajeu, podispis - datum nukapu, zig trovica, podips - variklas datum, kerske65 balyegje, alaliras - Data npjopaabau, nevchina npjopaabau, nognec - Data npjopoperenin, Lhram npjopaasaia, Iognacma- qyq1234567890123456789012345678901234567890123456789012345678901234567890123456789012345678901234567890123456789
BOMANN®
www.bomann.de
BOMANN®
C. Bomann GmbH
Internet: www.bomann.de
- Symbols in these Instructions for Use
- WARNING:
- CAUTION:
- General Notes
- Special Safety Instructions for this Device
- Overview of the Components
- Start-up
- Nozzle Attachment
- Parquet brush (19)
- Combined brush / crevice nozzle (20)
- Using the Appliance
- NOTE:
- Air Slide (1)
- Switching off and Winding up the Mains Lead
- Maintenance
- Emptying the dust collector
- The Filter System
- The filter unit (Page 4, Fig. C to H)
- Disassembly of the filter unit
- Assembly of the filter unit
- Outlet filter
- Cleaning
- Storage
- Troubleshooting
- Technical Data
- Disposal
- Instrukcja obslugi
- 067a HhOpMaun
- PENEYNPEXDEHNE:
- CneuNbHbIe yka3aHnI NO 6e3OpaCHocTn IJIy 3TOrO np6opa
- O63op detanei np6opa
- Haayapabotb
- Hacadkn
- Hacadka dnon nona (17)
- Uemka dny napkema (19)
- KombuHupoBaHHa Yemka/ y3Koe dnuHoe conno (20)
- TPIMMEUHNA: HacdaKa "2-B-1"
- IcnoJIb3OBAHnE np6opa
- BHIMAHHE:
- ПИМЕЧАЙ:
- ПОНМЕЧАЙ:
- PernyrTop noDAuH Bo3dyxa (1)
- BbIKHoueHne nCBopaunBaHne uHypa 3JekTpOnnTaHn
- 06cnykmbaHne
- OnyctoWeHne nbIe6OpHnka
- Cnctema qnlbtpob
- Enok qunbmpo8 (cmp.4.puc.C-H)
- I P E D U N P E X K D E H N E:
- BHIMAHNE:
- XpaHeHne
- DnarHoctnka
- - YCTPOINCTBO He pa6oTaE.
- - YCTPOINCTBO HE BCACbIBaET.
- TexHnueckne daHHbIe
- JenepoBaHHbI PernAmeHT Komnccnn (Ec) No 665/2013
- IcnoB3yTe kak yHnBepcaNbHbI nbJnecoc c HacaKoI dna nona
- aai 1i
- jie 1
- aill
- Cllgssal 1e aale o jbi
- jgl jgl aalil aylll
- GARANTIEKARTE
- BS 9027 CB
- BOMANN®
Brand : BOMANN
Model : BS 9027 CB N
Category : Vacuum Cleaner