
BS 6058 CB - Vacuum Cleaner BOMANN - Free user manual and instructions
Find the device manual for free BS 6058 CB BOMANN in PDF.
| Product Type | Wet and dry vacuum cleaner |
| Brand | Bomann |
| Model | BS 6058 CB |
| Power supply | 220-240 V~, 50-60 Hz |
| Power consumption | 1200 W |
| Protection class | II |
| Protection type | IPX4 (protected against water splashes) |
| Net weight | Approximately 4.9 kg |
| Main functions | Dry and wet vacuuming, blower function |
| Tank capacity | Approximately 20 L (reasonable estimate) |
| Filter type | Permanent filter for dry vacuuming, protective foam filter |
| Included accessories | Hose (3 pieces), floor nozzle, flat nozzle, brush nozzle, sealing ring for wet vacuuming |
| Cable length | Not specified, wound around the motor housing |
| Maintenance and cleaning | Rinse the tank with clean water, clean accessories with hot water and dish soap, do not immerse the motor unit |
| Safety | Temperature fuse in case of overheating, float valve for automatic shut-off in wet vacuuming |
| Repairability | Spare parts available from the manufacturer or dealer |
| Intended use | Domestic and similar use, wet and dry vacuuming, blower function |
| Storage | In a dry, well-ventilated place, out of reach of children |
Frequently Asked Questions - BS 6058 CB BOMANN
User questions about BS 6058 CB BOMANN
0 question about this device. Answer the ones you know or ask your own.
Ask a new question about this device
Download the instructions for your Vacuum Cleaner in PDF format for free! Find your manual BS 6058 CB - BOMANN and take your electronic device back in hand. On this page are published all the documents necessary for the use of your device. BS 6058 CB by BOMANN.
USER MANUAL BS 6058 CB BOMANN
Be sure to read the separately enclosed safety instructions first.
Instruction Manual
Thank you for choosing our product. We hope you will enjoy using the appliance.
Read the instruction manual and the separately enclosed safety instructions very carefully before using this appliance. Keep these documents, including the warranty certificate, receipt and, if possible, the box with the inner packaging in a safe place. If you pass the appliance on to a third party, always include all the relevant documents.
Symbols in this Instruction Manual
Important information for your safety is specially marked. It is essential to comply with these instructions in order to avoid accidents and prevent damage to the appliance:

WARNING:
This warns you of dangers to your health and indicates possible injury risks.

CAUTION:
This refers to possible hazards to the appliance or other objects.
Content
Overview of the Components 3
Intended Use 9
Unpacking the Appliance. 9
Overview of the Components / Scope of Delivery. 9
Warnings for the Use of the Appliance 10
Putting Into Operation 10
Mounting the Carrying Handle 10
Mounting the Rollers 10
Inserting the Filter 10
Putting on the Motor Housing 10
Connect and Disconnect the Hose 11
3-part Suction Tube. 11
Nozzle Attachments 11
Air Slider 11
Mains Cable 11
Switching On/Off 11
Using the Appliance 11
Preparation 11
Vacuuming Dry 11
Wet Vacuuming 11
Emptying the Permanent Filter and
Collection Container 11
End Operation. 12
Cleaning 12
Collection Container 12
Accessories 12
Housing 12
Storage 12
Troubleshooting 12
Technical Data. 13
Disposal 13
Meaning of the "Dustbin" Symbol 13
Intended Use
This appliance has the following functions:
Wet and dry vacuuming
Fan function
It is intended for household and similar use.
It may only be used in the manner described in this instruction manual. You must not use the appliance for commercial purposes.
Any other use is considered improper and may result in damage to property or even personal injury.
The manufacturer is not liable for damage caused by improper use.
Unpacking the Appliance
- Remove the appliance from its packaging.
- Remove all packaging material, such as foils, filling material, cable ties and cardboard packaging.
- Check the scope of delivery for completeness. Some parts from the scope of delivery can be found in the collection container.
- If the contents of the packaging are incomplete or if damage can be detected, do not operate the appliance. Return it to the dealer immediately.
Overview of the Components / Scope of Delivery
1 Suction pipe, 3-piece
2 Air slide
3 Suction hose
4 On/off switch (I/O)
5 Air outlet
6 Attachment device for the floor nozzle
7 Carrying handle
8 Motor housing
9 Attachment device for the nozzle attachments
10 Locking device
11 Suction opening
12 Hose connection
13 Collection container
14 Attachment device for the nozzle attachments
15 Rollers
16 Chassis frame
17 Lever for extending and retracting the brush
18 Floor nozzle
Accessories
19 Crevice nozzle
20 Brush nozzle
Without Illustration
Permanent filter (for dry vacuuming)
Sealing ring (for wet vacuuming)
Protective foam filter
Warnings for the Use of the Appliance

WARNING:
- Only use the appliance in damp rooms if a residual current circuit breaker has been connected upstream in the circuit for your protection. If in doubt, consult an authorised electrician.
If the appliance, which is filled with water, should accidentally tip over, always unplug it from the wall socket before standing it up again. - Never use it to suck up explosive liquids (such as heating oil, petrol, paint thinner, acetone) and dusts (such as magnesium and aluminium dusts), flammable gases as well as undiluted solvents and acids, there is a risk of explosion! Explosive vapours or mixtures could be created by swirling the suction air. These substances could attack the parts and materials used.

CAUTION:
- Pay attention to the limited range due to the cable length!
-
Switch off the appliance immediately in the following situations:
-
In case of foam formation.
- In case of liquid leakage.
- When the container is full.
-
If the appliance is tipped over.
-
Do not vacuum foam-forming cleaning agents with the appliance!
-
When vacuuming liquids, always remove the permanent filter. Insert the sealing ring instead.
- Check that the protective filter is correctly seated.
- Before you vacuum dry again the next time, all components must be dry again.

CAUTION:
- When vacuuming smooth floors dry with the floor nozzle, be sure to use it with the brushes extended to avoid damaging the floor.
Putting Into Operation
If not already done, remove the supplied parts from the collection container.
Mounting the Carrying Handle
Mount the carrying handle with the two enclosed screws. Hand-tighten the screws with a suitable screwdriver.
Mounting the Rollers
Before you use the appliance, fasten the rollers to the chassis frame of the collection container.
- Detach the motor housing from the collection container by pressing the latches inwards.
- Remove the motor housing from the collection container.
- Place the collection container upside down.
- Insert the rollers with the pins into the provided holes as far as they will go.
- Turn the collection container back round so that it stands on the rollers.
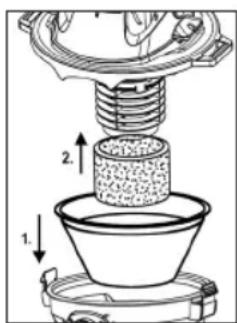
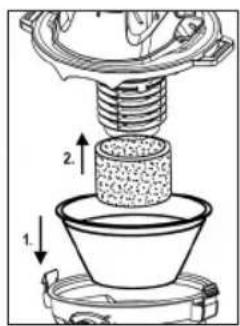
Inserting the Filter
1. Insert the Permanent Filter (only when Vacuuming Dry)
The appliance has a permanent filter. It is easy to insert and clean.
- Put the rubber rim of the permanent filter over the edge of the collection container. It serves as an airtight seal for the motor housing.

2. Protective Foam Filter
A protective foam filter is located underneath the motor. It is needed for both wet and dry vacuuming.
- If not already fitted, place the protective filter on the suction strainer.
- Regularly check that the filter is correctly fitted and in good condition.
Putting on the Motor Housing
- Align the motor housing so that the on / off switch sits above the intake opening.
- The latches on the appliance must be in the recesses of the motor housing. Press the motor housing onto the collection container until the latches engage.
Connect and Disconnect the Hose
Suction Function
Insert the hose connection into the suction opening on the collection container. Pay attention to the recesses. Turn the hose clockwise to tighten.
Fan Function
Insert the hose connection into the blow-out opening on the motor housing. Pay attention to the recesses. Turn the hose clockwise to tighten it.
Loosen the Hose
Loosen the hose by turning it anticlockwise and pulling it out.
3-part Suction Tube
- Insert the two suction pipes into each other without the holder.
- Insert the thinner end of the assembled suction tubes into the thicker end of the suction tube with holder.
- To detach the suction tubes, pull them off while turning them slightly.
Nozzle Attachments
- To detach the nozzle attachments, pull them off with a slight twist.
-
There are several ways to store the brush nozzle and crevice nozzle.
-
Use the holders above the rollers or the holders on the lid.
Floor Nozzle
You can clean smooth surfaces and carpets dry or wet with the floor nozzle. The floor nozzle is equipped with rollers for easier guidance.
- Use the lever to move the brushes outwards or inwards.
The optimal use depends on the condition of the floor. We recommend the following use:
-
Use without Brushes ( :
-
For vacuuming dry carpets (high pile).
-
For cleaning wet, smooth floors.
This setting is also best suited for picking up water from larger areas.
Note that the collection container can only hold a limited amount of liquid! The maximum filling quantity is reduced accordingly for foam-forming additives! -
Use with Brushes ( m)
-
For vacuuming dry, smooth floors and dry carpets (low pile).
- For cleaning (scrubbing) wet, smooth floors and wet carpets (low pile).
Crevice Nozzle
For vacuuming in corners and slits, etc.
Brush Nozzle
For cleaning upholstery or curtains.
Air Slider
Open the air slider on the hose handle to regulate the air or to loosen parts sticking to the nozzle.
Mains Cable
- For operation, unwind the mains cable completely.
After operation, let the motor housing cool down first. You can then wrap the mains cable around the motor housing.
Switching On/Off
Use the on/off switch to turn the appliance on (I) and off (O).
Using the Appliance
Preparation
- Select the desired accessory.
- Unwind the mains cable completely.
- Check that the mains voltage you want to use corresponds to the information on the rating plate.
Vacuuming Dry
- Place the permanent filter in the collection container.
- Place the motor housing with the recesses on the latches until they click into place.
- Fit the accessories.
- Insert the mains plug into a properly installed earthed socket.
- Switch on the appliance.
- Now vacuum at a steady speed. It is not necessary to press down.
Wet Vacuuming
- Pull the mains plug out of the socket.
- Remove the permanent filter.
- Place the motor housing with the recesses on the latches until they click into place.
- Fit the accessories.
- Insert the mains plug into a properly installed earthed socket.
- Switch on the appliance.
The collection container can only hold a limited amount of liquid! If foam forms in the collection container, the maximum collection volume is reduced accordingly! When the container is full, the float valve closes the suction opening and the motor runs at increased speed. Switch off and empty the appliance immediately.
Emptying the Permanent Filter and Collection Container
-
Switch off the appliance with the on / off switch. Pull the mains plug out of the socket.
-
Detach the motor housing from the collection container by pressing the locks inwards. Remove the motor housing.
- If necessary, remove the permanent filter. Shake it out.
- Remove the suction hose.
- Empty the collection container.
- If necessary, put the permanent filter back into the collection container.
- Reassemble the hose connection and the motor housing.
- Resume operation.
End Operation
- Switch off the appliance.
- Unplug the mains plug from the socket.
Cleaning
WARNING:
- Pull the mains plug out of the socket before cleaning or maintaining the appliance.
- Never immerse the motor housing in water for cleaning. It could cause an electric shock or fire.
CAUTION:
- Do not use a wire brush or other abrasive objects.
- Do not use harsh or abrasive cleaners.
Collection Container
- Rinse the collection container with clean water after use.
- You can remove impurities in the container with a sponge or a nylon brush.
Accessories
- You can clean all accessories in warm rinse water with a little hand dishwashing liquid. If they are not very dirty, you can just tap them out.
- Rinse with clean water and dry the parts. Do not put the appliance back into operation until all filters are completely dry.
Housing
The housing can be wiped clean with a slightly damp cloth.
Storage
- Clean the appliance as described and allow it to dry completely.
- You can wrap the mains cable around the motor housing.
- The attachment device (6) is intended exclusively for the floor nozzle without tube and hose.

- We recommend storing the appliance in its original packaging if you do not intend to use it for a long period of time.
Always store the appliance out of the reach of children in a well-ventilated and dry place.
Troubleshooting
| Problem Possible Cause | Remedy | |
| The appliance has no function. | The appliance has no power supply. Check the collection container is full. Empty the collection container. | the socket with another appliance. |
| Insert the mains plug correctly. | ||
| Check the house fuse. | ||
| The appliance does not suck. | There is a foreign object in the suction hose or nozzle. | Check the accessories for foreign objects. |
| The appliance has tipped over. 1. Switch off the appliance.2. Maintain the standstill of the motor.3. Resume operation. | ||
| Dust or liquid leaks from the telescopic tube, the suction hose or the suction connection. | The accessories are not mounted correctly. | Make sure that the accessories are firmly and correctly connected. |
| The appliance switches off during operation. | The appliance is equipped with a temper- ature fuse that automatically switches off the appliance if it overheats. | Let the appliance cool down for approx. 15 minutes before using it again. |
Technical Data
Model: BS 6058 CB
Power supply: 220 - 240 V~, 50 - 60 Hz
Power consumption: 1200 W
Protection class: II
Protection type: IPX4*
Net weight: approx. 4.9 kg
- The appliance complies with protection type IPX4. This means that the appliance is protected against splashing water from all sides.
The right to make technical and design modifications in the course of continuous product development remains reserved.
This appliance has been tested according to all applicable, current CE directives and built according to the latest safety regulations.
Disposal
Meaning of the "Dustbin" Symbol
Protect our environment: do not dispose of electrical equipment in the domestic waste.
Please return any electrical equipment that you will no longer use to the collection points provided for their disposal.
This helps avoid the potential effects of incorrect disposal on the environment and human health.
This will contribute to the recycling and other forms of re-utilisation of electrical and electronic equipment.
Information concerning where the equipment can be disposed of can be obtained from your local authority. Your dealer and contractual partner is also obliged to take back the old appliance free of charge.
BELANGRIJK:
Tipode protection: IPX4*
Peso neto: aprox. 4,9 kg
Yka3bIbaeT Ha BO3MOxHNO ONaCHOCTb IIN3dEInn INpynx OKpykaHOuNX PpeDMTOB.
CoapedkaHne
O63op Detanei np6opa. 3
IpeqnojaraeMoE nCNoJb3ObaHne 45
PacnaKOBka npnbopa. 45
063op detae np6opa / KomnjeKT nocTaBKn 46
PpeDynpexdHnno nCNoJb3oBaHnO np6opa....46
BbD B 3Kcnnyaatauio. 46
UcTaHOBka pyuKn IJIpeHocKn. 46
MOnTax poNikOB 46
yctahOBka qunbtpa. 47
UctaHOBka Kopnyca Dnuratena 47
Poioknoyehne n OTKIOUeyHne 7naHra 47
BcscbIbuaOuJra Tpy6ka n3 3aucte.. 47
Hacakn 47
3acnoHka BO3dyxa 47
Ceteboi Kaebib 47
BkHoueHme/BbIKHoueHne 47
IcnoJb3OBAHne np6opa 48
IooTobka 48
Cyxay y6opka nIeNecocom 48
BlaJxHa y6opka. 48
OnopoxKHeHne nocToaHHoro fHbTpa I KOHTeHepa dIra c6opa Mycopa 48
OkoHuaHne pa6oTbI 48
Ynctka 48
KonteHep dIa c6opa 48
Akeccyapbl 48
Kopnyc. 48
Xpanenie 48
YcTpaHHe HEnoJaOK. 49
TexHHueckne daHbIe 49
YTNIN3aun 49
3HaueHne CmBbOla «KOp3nHa» 49
Ppeonaraemoe nCNoB3OBaHne
3TOT npnbop nmeet cneIyIOue IyHKUIN:
Blaackna cyxayy6opka
-ФункцьВERTINITOPa
Oh npedHa3HaueH dJa 6bITOBORO n aHaJOrnHoro nCNoB-30BaHn.
Ero moXHO nCNoIb3OBA Tb TOnBko TaK, KaK OINcAHO B daHHO INCTpykUIM. 3aInpeuaetcra nCNoIb3OBA Tb np6Op B KOMMepuecknx UeJx.
JIIO6oe dpyroe nCNOJb3OBAHnE CHTaETcR HeHaIJIeKaUIM mMOKeT pINBeCTn K NOBpeKdEHHU IMUeCTBa IIN DaKe K TpaBMam.
PpOIN3BOIDNTeJI He HecET OTBETCTBEHHOCTH 3a yUep6, npuHHeHHbI B pe3yIbTaTe HnPaBnIbHO nCnONb3oBAHn.
PacnaKOBka np6opa
1.ИЗБЛЕКЛТЕ РПБОР ИЗУПАКOBК.
2. YdaJInte BCE ynaKOBOHyIe MaTePnAJIbI, TAKHe KaK foJIbra, HanoNHTeJIb, Ka6eJIbHbIe CTaXKn I KApToHHaY naKOBka.
3. Поберп Te KOMЛКТ NOCTaBKN Ha KOMЛKEKTHOCtB. HeKOTOpbIe DeTaN IN3 KOMЛKEKTA NOCTaBKN MOXHO HauTN B KOHTeHHepe dNIA c6Opa Mycopa.
4. Ecnn coepkmoe ynaKOBn HenoHoe nnn ecnn moxho 6hapyknb noBpeKdEHHa, He 3KnnyatnpuYte np6op. HemedneHo BepHnte erO dInepy.
O63op DeTalei npnbopa / KomnIeKT nocTaBKN
1 Bcacbibaoua Tpy6a,3-ckmuHna
2 Bo3nyHna 3acJIOHka
3 BcacbBaOuIwJHaH
4IpeeknHouateTeB BKIOueHn/ByIKIOueHn(I/O)
5 BbInyck Bo3dyxa
6 Habechoe yctpoNCTBO nIaHnObHoH HacAdK
7 Puyka dIy IpeHocKI
8 Kopnyc DvuraTeTn
9Писпocоьнe Дд Крпьнгну Hacdok
10 3anophoe yctpoiCTBO
11 BcacbIbAIOoee OTBepCTne
12 ⅢlaHroBoe coeDInHeHne
13 KOnTeHepIa c6opa Mycopa
14 YcTpoiCtBO DnIg KpEnIeHnHa cAdok
15 Polniku
16 Pama uaccn
17 PbyarДЯ BbIDBxKeHn I BtYBaHnIeTkn
18 Hacadka dnnnona
PpinaJeknOCTN
19 HacaKa dIa IeIeI
20 乙toynaHaNacdaKa
Beznnnno
YcTaHOBka pyKn IJIa nepeHocKn
YcTaHOBnTe pyKu IJIa IapeHoCKn C NOMOuBIO DByx PnpI
IaraeMbIX BnHTOB. 3aTHeNTE BnHTbI BpyHyO C NOMOuBIO
NoDxOJaUe OTBePtKn.
MOHTAX pOJIKOB
Ipeep nCnObl30BaHHeM yCTpoHCTBa pNkpeHnTe poJNKK Waccn KONTeHepa dJa c6opa Mycopa.
- OToeHNHTe KopNyc DnBraTeJIa OT KOHTeHepa IJIa c6opa Mycopa, HaxaBa Ha 3aUeJIKN BHyTpB.
2.ИЗBLEKeNTe KOpNc DBuRaTeJIa I3 KOHTeHepa dIa c6opa Mycopa.
3.Перевернite контейнepдя сбopa Mycopa Bbepx dHOM. - BCTaBbTe pOJIHKn CO UITNΦTAMN B IpeIyCMOTpeHHbIe OTBepCTnI DO ynpa.
- Choba nepeBepHnte KOHTeHep dIa c6opa Mycopa BBepx HOM, YTObI OH CToJn Ha pONkax.
YcTaHOBKaΦnJIbTpap
1. BctabBte NOCTOHHbI INbTp (TOJIbKO npn cyxOy6OpKe)
Pn6op Ochaen NoCToHHbIM
HnIbTpOM.EroJeKOBCTaBJIbTB
HnCHTb.
HaenebTe pe3nHObBIO6oD nocToHHoro fNtBtpa Ha Kpai KOHTeHepa dIa c6opa Mycopa.OH cnyKIT repMeTuHbIM ynnOTHeHmE MnKOpNyCa DBN
2.3aunTHbI NOPoHOHBbI pNbTp
3aunTHbI nopoHOHbI pIbTp paONIOxEN IOd BnraTeIeM. OH Heo6xoIIM kak dIy BlaxHo, TaK I dIcyxO y6OpKn.
- Ecnn OH eue He yctahOBnEn, yctahOBnTe 3aunTHbIn ΦnIbTp Ha cTtAdb ΦnIbTp BCacbHaHn.
- PeryIaHNO npOBepaTe npabINbHOCTb yCTaHOBKn I coCTOHNHe pNbTpa.
YctaHObKa Kopnyca DniratTeTn
BbipOBHnIe Kopnyc DnBraTeTn TaK, YTo6bI nepeKlIOyateJIb BkIIIOyeHn / BbIKIOyeHn HaxOuINCn HaBCaCbBaHOUM OTBepCTnEM.
3aueKnHa np6ope doJXhbl HaxoDttbCBy yrrny6eHnIX KopnyCa Motopa. PnKMMte Kopync Dbratela K KOHTeHepy dIra c6opa Mycopa, noka 3aueKn He 3aФNKcnpUOTcR.
IopKJIIOUeHne HOTKJIIOUeHne IuaHa
ΦYHKUUA 8CaCbIaHua
BCTABbTe WtUcEp 7aHaRa BO BCacbBaIOoee OTBepCTne Ha KOHTeHHepe dIra c6opa Mycopa. Obpatnte BHMMaHne Ha yrny6JIeHn. IOBepHte 7aHaR nO YacobO nCptelke, TTo6bl 3aTAYb erO.
Функuaь Бehmunямopa
Bctabte wtycep wnaHra B bbyBHOe OTbepCTne Ha kopnyce DBnraTeI. Obpatnte BnmaHne Ha yTJy6nHn. NobepHnTe Wnahr no YacOBoN CTpeJIke, YTObI 3aTaNtB erO.
Ocna6nue uanaea
OcnaBte IJnAHr,IOBepHyB erO npOTNB yacOBN CTpeJIKN IN BbITaHyB erO.
BcacbBaOuaTpy6ka n3 3aTei
BCTaBbTe DBe BCaCbBaIOuIe Tpy6Kn Dpyr B Dpyra 6e3 DePkaTeIa.
BCTaBbTe 60Jee TOHkM KOHeC cO6paHHbIX BCaCbIBaHOuNX Tpy6oK B 60Jee TOIcTbIM KOHeC BCaCbIBaIOUeTpy6Kn C DEpKaTeJIeM.
- UTo6bI OTcoeINHHT BCaCsbIbAHOJIe Tpy6Kn, NotAHNTe INX, CnErKa nobOpauHBAJ.
Hacaikn
-
UTo6bI OTOeINHHTb HacaIKN, NOTaHNTe INX, cnerKa NOBepHyB.
CyuieCTByeHT HeckoIbKO cnoocobXpaHEnHa HacaIKN-TeKN IeNeBoi HacAdKn. -
IcnoIb3yIte DepeKaTeJI NaI polIkaMn IIIN DepeKaTeJI Ha KpbIWe.
Hacaoka nona
C nOMOsbH hacakn dIa IIOJa moJHO npOn3BODntb cyxuO uIN BnaXHyU y6OpKy rIaNkIX IOBePxAocTei KOBPOB. HaCadaI NaI OchaueHa pONKAMN dIg 6oJe e yOboHoro nepemeueHn.
- IVcnoJIb3yIte pbIar IJIpeMeIeHnIeTeK HApJxU JINI BHyTpB.
ONTIMaJIbHOE IcIIOJIb3OBAHHe 3aBNCHT OT COCTOHHa IOnla.MbI peKOMeHNyEM CJIeDyUoJee IcIIOJIb3OBAHHe:
- McnoIb3OBaHne 6e3 ueTOK (
- Pπi6op COOTBETCTByet TINY 3aunTbI IPX4. ΘTO o3haaet, ΚTO πi6op 3aunuien OT 6pb3r BɔdbI co BCex CTOPOH.
CoxpaHeNo npaBo Na TexHnueckne N KOHCTpyKuONHbIe N3MeHeHn B paMKax npoDoJIkaIOUeIcra pa3pa6OToKn npOdykTa.
DaHHbI npH6op 6bI I pOteCTnOBAH B COOTBETCTBm CO BCEMN pPIMEHMBIM DeIcTBUOMM DnpeKTHAMC CE IN3ROTOBEN B COOTBETCTBm C NocNeHNMI npaBUNAMN 6e3oNaCHOCTn.
Yttnn3aun
3haueHne CNMBOJNA KOp3nHa
3aunita OKpykaIOuei Cpebl: He donyckaetcnytnn3aunnae 3neKtpnpnbopob BmecTe CbIbTOBbIMN OTXODAMN.
YtIIN3aUy yCTapeBwEe TeXHKn HEnCnPpABhIx 3JIeKtpoPnp6OpOB npOn3BODITcB TropOdCKNX pNiEMhBx NyHKtax.
He donyckaIte He npabnblHo yTnH3aun OTXoOB. 3TO HAnocHT Bpe OkpykaOuSe I cpe E Oka3bIbAeT HeraTNBHOE BO3dEmCTBne Ha 3DopOBBe NIOei.
Oka3bIaBte coaeCTBne nporpamme yTuIN3aunn n DpyrMM fopmam nepepa60TKn 3NeKtpoHHoN n 3NeKtpuueckoTexHKn.
HOpMaIIOpytynHkTxyTNn3aIIN6bITOBOITexNKn MoXHO POJyHTB MecTHbIX OprAHx BnactN. BaI dIneP nIapTHeP NO DOrOBopy TaKKe 6o3aH 6ecPiAtHO npInrTa bCTapbI np6op.
J 10
ol61 1000 jgljipjipipipipipipipipipipipipipipipipipipipipipipipipipipipipipipipipipipipipipipipipipipipipipipipipipipipipipipipipipipipipipipipipipipipipipipipipipipipipipipipipipipipipipipipip
gol gao 100
jgblglg 1 aagag g cglg jg
.
g,g,g,uu auiu g uu g uu u u u u u u u u u u u u u u u u u u u u u u u u u u
00 100000000000000000000000000000000000000000
aill aogj lgl 8ggb1 loggbl
aagaae aegae eae
aiko 3joo joljglgogolgolgol
.3
Jxu Jxu Cuao jao gao a 1y
jglj山
13.2.10.14
S APQ = S AOB + S_ QPH
b
aai jn gjgsslll 1
JUJI 2
aiko 3
.4
J5000 1
jLJU 63.6
131 Jilalll jdoogdoa a 1y 1 y
g g aagaaa aagaaa aagaaa aagaa
aixi dolglalpoJao Jauoaggljgloic!
aJg jIgU Jauu uui yu. yI de uu uuuu
S OBC = S BOC + S_ BOC
gogw
wJy/1jz0iitgtao 1
Jaljai jie biaq jyj gaoai ayglo jc jda 1.2
.1J061 C 1
. 42
bαillgβδεjil.4
gagglgej
a 13
.7
.8
J
j.1
J 2
1j 20000000000000000
. Jolalj gJy loga:
·
Joloo 0gj61 h
a
aagai llo
.
aai aagglol
yb = ya + b
.
a001
aog 1uuswblg jkbjauu uasll aubu
a. gill algswl 1yks 089joo a. jy 1aeg.
.
gaaagaaaegaae aae aee aee aee
aagaii aaiii iaiy g i g
J
LolgJUJUJIaJb.
J 1
1
Jz/
.(0)d
aJyAs1 aasbl pIuoiui
gaoaai aeglo jaoaa jbi bai Jj Jiaaiaaeoo jSb13
JoooJoooo
jIyJySb ySOL. jzBtJyJyMaI pUuLyU JauU Jaa
L 1
山
gaaal 1oog gdd jSll
baaai 11
gbsal alog 12
zao 13
aogai tiaolo 14
15
j5u111111 16
Laaaagoljgai j1s 17
a0j1a0g 18
#
- 11jbj jde aaii jbi jg axil iaglo jc jrabi ciaiaiaiaiaiaiaiaiaiaiaiaiaiaiaiaiaiaiaiaiaiaiaiaiaiaiaiaiaiaiaiaiaiaiaiaiaiaiaiaiaiaiaiaiaiaiaiaiaiaiaiaiaiaiaiaiaiaiaiaiaiaiaiaiaiaiaiaiaiaiaiaia
立 l_2 = 1 : 11
Ld20
- 1
3 1
4 1
- 15.2014 2015
ogjllgla
2016 11-2
1
(baa)alil aaiil piaowuie
dD 1Jgall jao. gdo 0jgo jzgl
.4a,b3g
gilo aIte ai. gaoai dgo aIto
.000000000000
gjgl 2
aJ 1
.
aaa aagaaa
a a 100
yabcno g
jaiy/1jiai jS cy 015
JSLJgbsdgdj
:yjUyUyUyUyUyUyUyUyUyUyUyUyUyUyUy
.8gjUgjSdUg
JUUL
. atllllo 4yglall jgsLoluc -
S_ OBC = 12 · CO · BC = 12 × CD × 5
L
cde bclol jalb Cgglj jglj j
goljgl g
dla8gpbjoloo
b_1 = 32,b_2 = - 12
aagglal aaii gaoai aglo 3 Jauai aodg 5gbyal ao log Jsi
abjafellwolfoaololjgobol
S_ OBC = S_ COD + S_ BOC
j5j. jyglall l daii. 0j61 cui i aei ggbjll alog Jz
aBjAcllllwlalololol
S_ OBC = S_ AOB + S_ BOC
a a a a a a a a a a a a a a a a a a a a a a a a a a a a
C( 1,0) .D( -32,32)
jglalpduwdyjdi
:
#
jlll jbjg bja 15! a, jll jll jll paa
1 100
jLalal alalal jalal jzj 156y glaljlaaljai 13!
S OBC = S BOC + S_ CDF
aill 1jio) 8 jaiil jilgail yaoy
gaaiai jia (j) jaiy g (juiy jaiy jaiy jaiy
jolalglgulldgJusuUdallg(g
Saaee
algl0i 1j j jS. gai bI algll yjj jy jj
J 150000000000000000000000000000000000
.
pUuUyU UUdUj gOJ
LlloLwIe Iblauuauo aolul ologal oiae oolse g
gllgogolgoegg glllglllgllgglgall
jglgjly
:
a>gsb1 a>ab
jblao 0g jyag ddo yblae aolly jo jorll iia joi
aLooJoo
log log abj jibj lulu yao gao
y. 100000000000000000000000000000000000000000


- Be sure to read the separately enclosed safety instructions first.
- Instruction Manual
- Symbols in this Instruction Manual
- WARNING:
- CAUTION:
- Content
- Intended Use
- Unpacking the Appliance
- Overview of the Components / Scope of Delivery
- Accessories
- Without Illustration
- Warnings for the Use of the Appliance
- Putting Into Operation
- Mounting the Carrying Handle
- Mounting the Rollers
- Inserting the Filter
- Insert the Permanent Filter (only when Vacuuming Dry)
- Protective Foam Filter
- Putting on the Motor Housing
- Connect and Disconnect the Hose
- Suction Function
- Fan Function
- Loosen the Hose
- 3-part Suction Tube
- Nozzle Attachments
- Floor Nozzle
- Crevice Nozzle
- Brush Nozzle
- Air Slider
- Mains Cable
- Switching On/Off
- Using the Appliance
- Preparation
- Vacuuming Dry
- Wet Vacuuming
- Emptying the Permanent Filter and Collection Container
- End Operation
- Cleaning
- Collection Container
- Housing
- Storage
- Technical Data
- Disposal
- Meaning of the "Dustbin" Symbol
- BELANGRIJK:
- CoapedkaHne
- Ppeonaraemoe nCNoB3OBaHne
- PacnaKOBka np6opa
- O63op DeTalei npnbopa / KomnIeKT nocTaBKN
- PpinaJeknOCTN
- Beznnnno
- YcTaHOBka pyKn IJIa nepeHocKn
- MOHTAX pOJIKOB
- YcTaHOBKaΦnJIbTpap
- BctabBte NOCTOHHbI INbTp (TOJIbKO npn cyxOy6OpKe)
- 2.3aunTHbI NOPoHOHBbI pNbTp
- YctaHObKa Kopnyca DniratTeTn
- IopKJIIOUeHne HOTKJIIOUeHne IuaHa
- ΦYHKUUA 8CaCbIaHua
- Функuaь Бehmunямopa
- Ocna6nue uanaea
- BcacbBaOuaTpy6ka n3 3aTei
- Hacaikn
- Hacaoka nona
- - McnoIb3OBaHne 6e3 ueTOK (
- Yttnn3aun
- 3haueHne CNMBOJNA KOp3nHa
- aJyAs1 aasbl pIuoiui
- JoooJoooo
- 山
- #
- 11-2
- 1
- yabcno g
- L
- dla8gpbjoloo
- b_1 = 32,b_2 = - 12
- S_ OBC = S_ COD + S_ BOC
- S_ OBC = S_ AOB + S_ BOC
- jglalpduwdyjdi
- :
Brand : BOMANN
Model : BS 6058 CB
Category : Vacuum Cleaner