
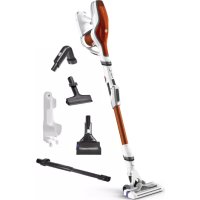
RH8569WH - Stick vacuum ROWENTA - Free user manual and instructions
Find the device manual for free RH8569WH ROWENTA in PDF.

| Product type | Stick vacuum |
| Brand | Rowenta |
| Model | RH8569WH |
| Power supply | Rechargeable NiMH battery (Nickel-Metal Hydride) |
| Battery voltage | 18 V or 24 V depending on version |
| Charger | 18 V (ref. RS-RH4901) or 24 V (ref. RS-RH4902) depending on version |
| Spare battery | 18 V (ref. RS-RH4899) or 24 V (ref. RS-RH4900) |
| Run time (18 V battery) | Up to 40 min in Floor mode, up to 30 min in Carpet/Booster mode |
| Run time (24 V battery) | Up to 50 min in Floor mode, up to 40 min in Carpet/Booster mode |
| Initial charge time | 16 hours |
| Suction modes | Floor (hard floors) and Carpet/Booster (carpets and rugs) |
| Suction head | Delta with integrated motorized brush |
| Dustbin | Removable with quick emptying via push-button trapdoor |
| Motor filter | Motor protection foam filter (washable, dry at least 12 h) |
| Cleaning of the motorized brush | Cut accumulated threads and hair using the provided notch |
| Indicator lights | Charge indicator and booster light (LED) |
| Thermal safety | Automatic shutdown in case of motorized brush overheating |
| Storage | Vertical parking position |
| Weight | Approximately 2.5 kg (estimate) |
Frequently Asked Questions - RH8569WH ROWENTA
User questions about RH8569WH ROWENTA
0 question about this device. Answer the ones you know or ask your own.
Ask a new question about this device
Download the instructions for your Stick vacuum in PDF format for free! Find your manual RH8569WH - ROWENTA and take your electronic device back in hand. On this page are published all the documents necessary for the use of your device. RH8569WH by ROWENTA.
USER MANUAL RH8569WH ROWENTA
natural_image
Black Rowenta Air Force vacuum cleaner with propeller and fan (no visible text or symbols on body)www.rowenta.com
natural_image
Line drawing of a hairdryer with an arrow indicating rotation and a magnified inset showing the brush tip (no text or symbols)fig. 1
natural_image
Line drawing of a hand holding a tool near a metal strip (no text or symbols)fig. 2
natural_image
Illustration of a hand adjusting a small mechanical component with an arrow indicating motion (no text or symbols present)fig. 3
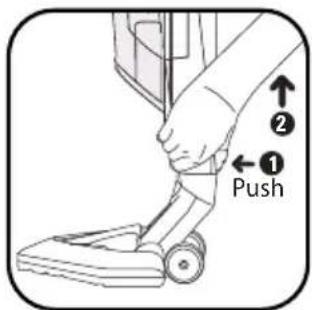
fig. 4
natural_image
Line drawing of a vacuum cleaner with attached cable and handle, shown in two views: top is close-up; bottom is detailed inset showing internal components (no text or symbols)fig. 5
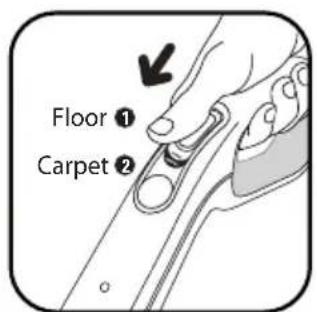
fig. 6
natural_image
Illustration of a hand using a tool to adjust or install a mechanical component (no text or symbols visible)fig. 7
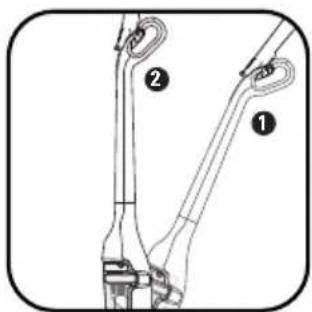
fig. 8
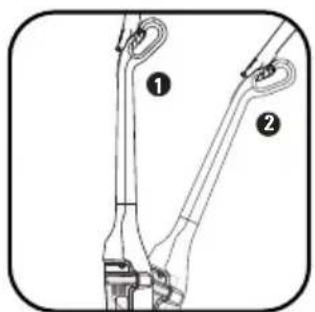
fig. 9
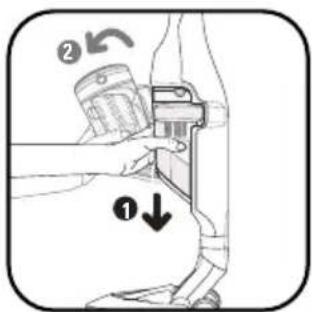
fig. 10
natural_image
Illustration of hands using a portable device to lift a surface, with no visible text or symbolsfig. 11

natural_image
Illustration of hands installing or adjusting a device component with a curved arrow indicating rotation (no text or symbols present)fig. 12
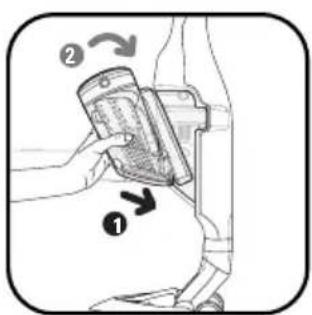
fig. 13
natural_image
Illustration of a hand using a water dispenser with an inset showing a sun and cleaning tools (no text or symbols)fig. 14
natural_image
Illustration of hands holding a mechanical component with an arrow indicating upward motion (no text or symbols)fig. 15
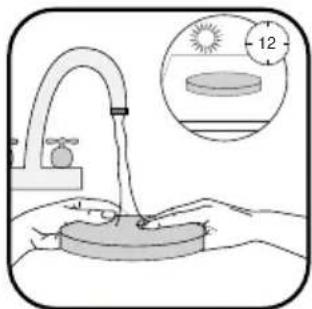
fig. 16
natural_image
Line drawing of a hand adjusting a car interior panel with circular components (no text or symbols)fig. 17
natural_image
Illustration of a hand holding a tool with arrows pointing to a mechanical component (no text or symbols)fig. 18
natural_image
Diagram of a mechanical device with an upward arrow indicating motion or force (no text or symbols present)fig. 19
CONSEILS DE SECURITE
Read the instructions for use carefully and keep them in a safe place.
- Your vacuum cleaner is an electrical device: it must be used under normal conditions of use.
Use and store the appliance out of reach of children.
Never leave the appliance operating without supervision. Do not hold the vacuum head or the end of the tube close to your eyes and ears.
- Do not use your vacuum cleaner on the wet surfaces, water or liquids of whatever kind, hot substances, extremely fine substances (plaster, cement, ash ...), large sharp objects (broken glass), products that are harmful (solvents, paint strippers ...), , corrosive (acids, cleaning fluids...), , flammable and explosive (petroleum or alcohol-based).
- Never immerse the appliance or charger in water or any other liquid, do not splash water on the appliance or charger.
- Do not store outside and keep away from damp.
- Never place the device close to a heat source (oven, heating appliances or hot radiators).
- Do not expose the batteries to a room temperature over 40^ .
- Do not disassemble the vacuum cleaner while it is running.
- Never operate the vacuum cleaner without the dust box and without the foam motor filter.
- Do not use the appliance:
- if it has fallen and has visible damage or appears to be working abnormally.
- if the charger or the charger cord are damaged.
In this case, do not open it, but send it to the nearest Rowenta Authorised Service Centre, as special tools are needed to carry out any repairs safely.
• Repairs are to be performed only by specialists with original spare parts.
- Repairing an appliance oneself may constitute a danger to the user.
- Use only guaranteed Rowenta accessories (filters, batteries ...).
This product has been designed for domestic use only. Any commercial use, inappropriate use or failure to comply with the instructions, the manufacturer accepts no responsibility and the guarantee will not apply.
This appliance is not designed to be used by people (including children) with a physical, sensory or mental impairment, or people without knowledge or experience, unless they are supervised or given prior instructions concerning the use of the appliance by someone responsible for their safety. Children must be supervised to ensure that they do not play with the appliance.
For your safety, this appliance complies with all enforceable standards and regulations (Low Voltage Directives, Electromagnetic Compatibility, Environment, etc.).
2 • Power supply
- Check that the power voltage indicated on the nameplate of your vacuum cleaner's charger corresponds to that of your mains installation.
- Never unplug the charger by pulling on the cable.
- If the charger cord is damaged or if the charger does not work: do not use any other charger than that provided by the manufacturer and contact the nearest Rowenta Consumer Service or Approved Service Centre.
3 • Repairs
Repairs are to be performed only by specialists with original spare parts. Repairing an appliance oneself may constitute a danger to the user and voids the guarantee.
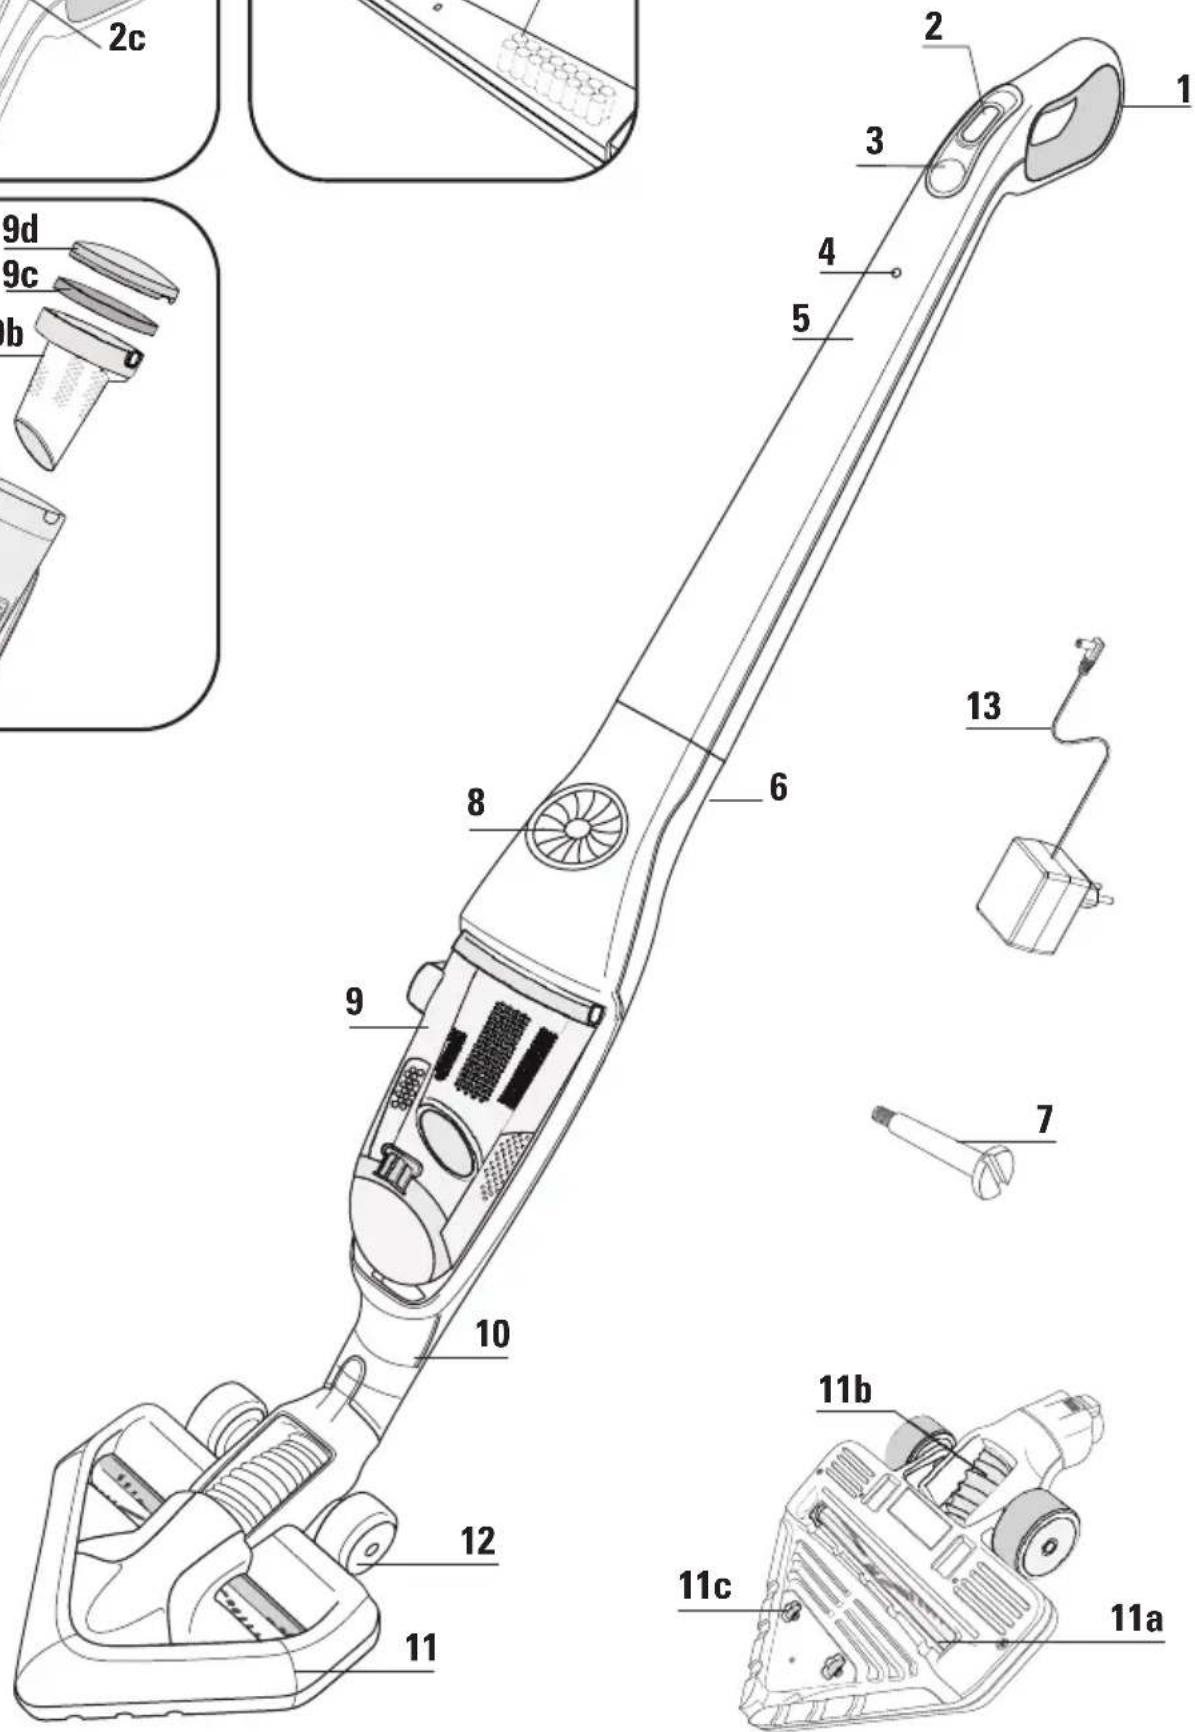
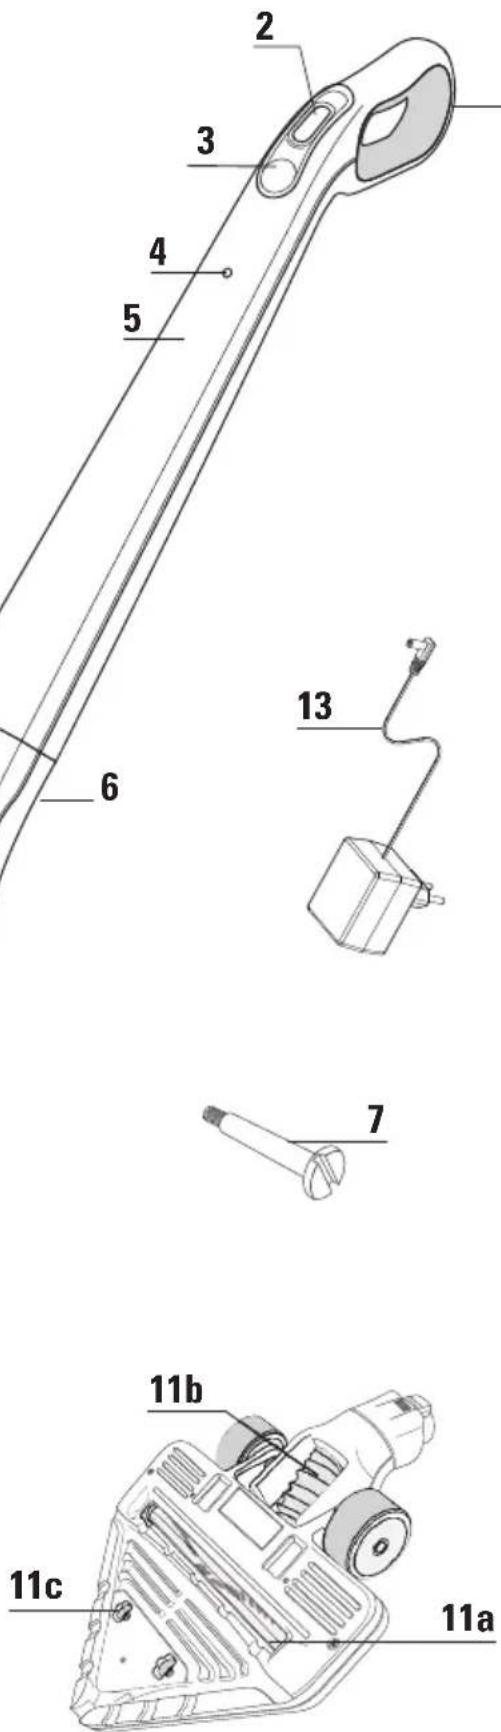
DESCRIPTION
- Ergonomic handle
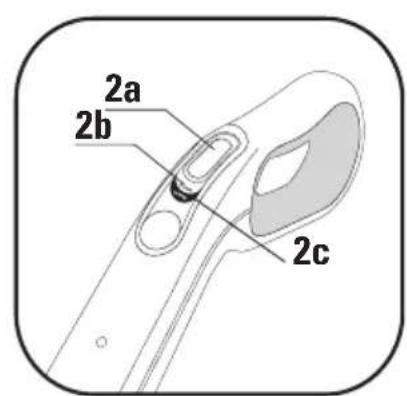
- On off button
2.a "Off" position
2.b "Floor" position
2.c "Carpet/Booster" position - Booster lighted button (LED)
- Light charging indicator
- Handle
- Main body
- Locking screw
- Air flow grid
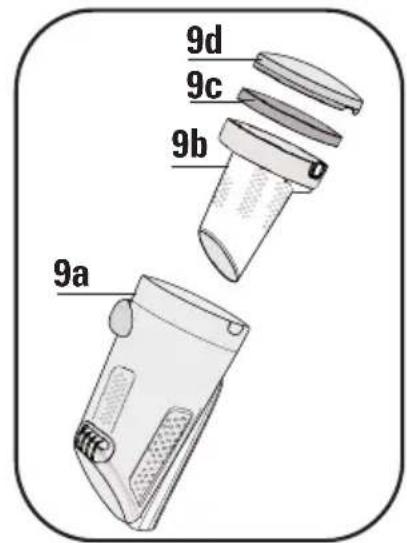
- Dust compartment
9.a Dust container
9.b Dust separator
9.c Filter foam
9.d Cover
EN
- Hose connector
- Delta suction head with integrated electrobrush
11.a Electrobrush
11.b Flexible
11.c Small wheels - Wheels
- Charger
- 18V: ref. RS-RH4901*
- 24V: ref. RS-RH4902*
- Batteries
- 18V: ref. RS-RH4899*
- 24V: ref. RS-RH4900*
BEFORE USING FOR THE FIRST TIME
1 • Mounting the appliance
Unpack your device and get rid of all the labels. Keep your warranty card and read the instructions for use carefully before using your appliance for the first time.
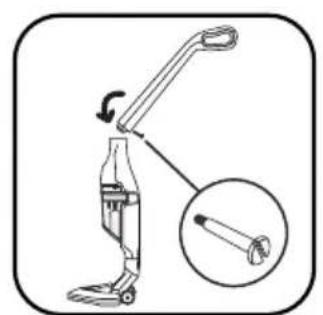
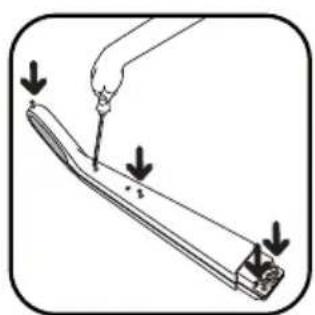
- Remove the screw from the handle and leave the nut in its housing.
- Attach the handle by carefully inserting it into the upper part of the main body (fig.1)
- Insert the blocking screw (7) into the handle and tighten it with a screwdriver (fig.2).
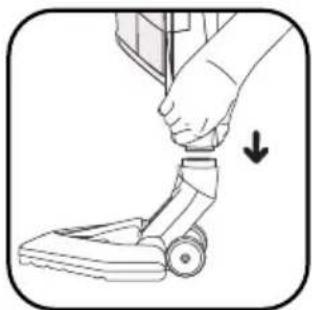
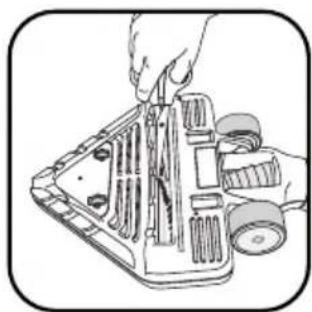
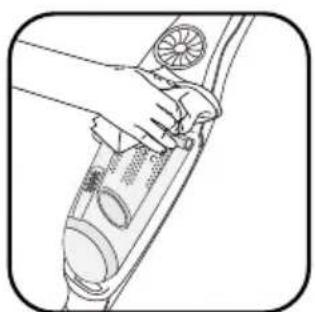
- Attach the Delta vacuum head (11) by clipping it on to the lower part of the main body (fig. 3).
Note: to remove the Delta vacuum head, press the eject button on the back (fig. 4) and remove the vacuum head from the main body.
2 • Charging the battery
IMPORTANT Use only the original charger supplied with the appliance. Never charge below 0°C and above 40°C.
Before using your vacuum cleaner for the first time, the battery must be charged for 16 hours.
When you are charging, the switch must be on Stop (2.a)
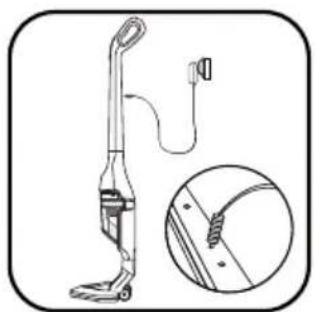
- Place the vacuum cleaner near a power outlet.
- Plug the charger into the mains and connect it behind the handle (fig.5).
- The charging light (4) on the front comes on. Leave the vacuum cleaner to charge. The light goes out at the end of the recharging cycle (about 16 hours).
The appliance can remain permanently on charge without any risk. The base might heat up slightly, which is a perfectly normal phenomenon.
The vacuum cleaner should always be put back on charge after use to ensure that it is always available with a fully charged battery. However, it is best to unplug it in the event of prolonged absence (holidays, etc), in which case, there may be a decrease in autonomy because of self-discharging.
3 • Turning the vacuum cleaner on
Remove the charger cable from the vacuum cleaner.
Hold the vacuum cleaner by the handle and slide the power switch down, to one of the two following positions (fig.6):
- "Floor": for smooth floors (2.b)
In the «Floor» position, the electrobrush (11.a) built into the Delta vacuum head, operates at normal speed.
Note: regularly check that the wheels at the back of the sucker attachment are clean.
- "Carpet / Booster": for a better dust pick up efficiency on all kinds of floors. (2.c)
In the «Carpet» position, the Booster light (3) below the power switch comes on to indicate that the electrobrush (11.a) is operating at high speed.
Autonomy of your vacuum cleaner * depending on the position of use:
| Position 1« Floor » | Position 2« Carpet/Booster » | |
| 18 Volts | up to 40 MIN up | to 30 MIN |
| 24 Volts | up to 50 MIN up | to 40 MIN |
USE OF THE ELECTROBRUSH
The Electrobrush is a motorised rotating brush that ensures very effective cleaning. It vacuums and cleans deep down. It has bristles all along, enabling it to remove threads and animal hair embedded in rugs and carpets.
Note: If the sucker attachment adheres to the surface too much, place the switch back to the «Floor» position.
ATTENTION Do not vacuum large debris that may block the brush and damage it. Do not use the electro-brush on deep pile carpets, animal fur and curtain fringes.
CLEANING THE ELECTROBRUSH
ATTENTION Always stop and unplug your vacuum cleaner before maintenance or cleaning.
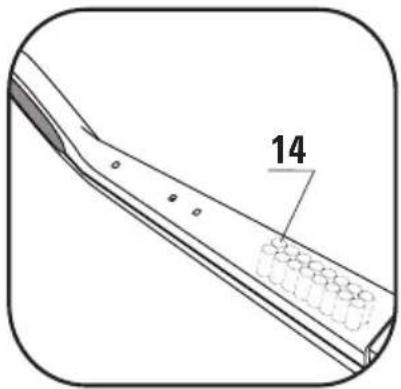
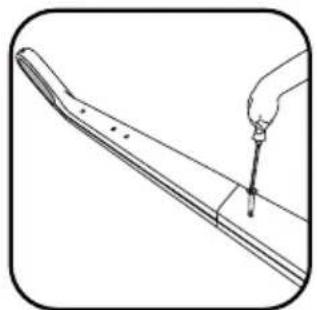
Delicately cut the threads, hairs, animal fur, etc. following the notch designed for this purpose on the electrobrush (fig.7).
FOR YOUR SECURITY
- Do not touch the rotating parts without having stopped and unplugged the vacuum cleaner.
- Do not use the vacuum cleaner on a wet surface.
- Never immerse your appliance in water.
TROUBLESHOOTING
The electrobrush is working less efficiently or is making an abnormal noise
- The rotating brush or the hose are clogged: stop the vacuum cleaner and clean them.
- The brush is worn: please contact an Authorised Service Centre to have the brush changed.
- The belt is worn: please contact an Authorised Service Centre to have the belt changed.
The electrobrush stops in the middle of vacuuming
- The heat safety device has come on: stop the vacuum cleaner by moving the switch to the OFF position (2.a) and unplug it. Make sure that nothing is impeding the rotation of the brush, if so remove the obstacle and clean the electrobrush (fig.7), then turn the vacuum cleaner back on.
The electrobrush is difficult to move
- The suction power is too high: reduce the suction power by moving the switch to the «Floor» position (2b).
If the problem persists, take your vacuum cleaner to the nearest Rowenta Approved Service Centre.
See the list of Rowenta Authorised Service Centres or contact the Rowenta Consumer Service.
4 • Storage
After use, switch off your vacuum cleaner by moving the switch to the OFF position (2a). Your vacuum cleaner may then be put away standing vertically wherever you want, in its parking position.
To place the vacuum cleaner in its parking position: stand it vertically so as to lock it (Fig. 8)
To use it again: hold the handle and tilt it backwards to release it from the parking position (Fig. 9)
IMPORTANT Always stop and unplug your vacuum cleaner before maintenance or cleaning.
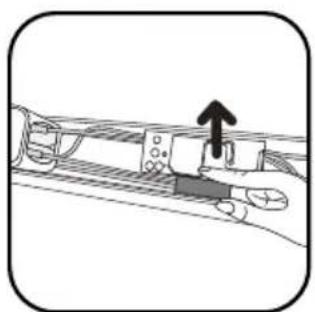
1 • Cleaning the dust compartment (9)
1.a Quick emptying
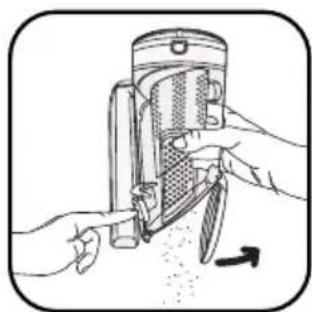
When the dust compartment is full, empty it as follows: remove the dust compartment by sliding down (fig.10), place it over a dustbin and press the «push» button to open the emptying hatch downwards and empty the contents of the dust compartment (fig.11). Close the hatch (fig.12), and replace the dust compartment (fig.13).
1.b Deep cleaning
The dust compartment should be cleaned out regularly.
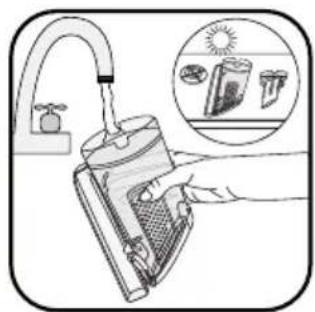
- Remove the dust compartment (fig.10), then separate each component (9).
- Remove the filter foam that protects the motor (9c).
- Run the dust compartment (9a) under warm water (fig.14), along with the dust separator (9b) and the cover (9d) and then let them dry or wipe with a dry cloth.
- Wash the filter foam that protects the motor (see paragraph 2).
- Once dry, replace the dust compartment components, along with the replacement filter foam (9c) that comes with your vacuum cleaner.
- Close the dust compartment and reposition it on the device.
2 • Cleaning the filter foam that protects the motor (9c)
WARNING Never operate the vacuum cleaner without the motor filter foam.
To preserve the efficiency of your device, do not vacuum extremely fine substances (plaster, cement, ash ...) and clean the engine protection filter at least once a month.
It is recommended that you clean the filter foam more frequently if you see a drop in the efficiency of your vacuum cleaner.
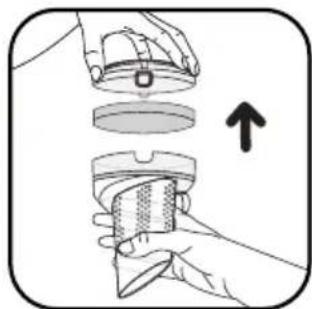
- Remove the dust compartment cover (9d) and then remove the filter foam protecting the motor (9c) (fig.15).
- Clean the filter foam that protects the motor (9c) with warm soapy water. Rinse it and leave it to dry for at least 12 hours before putting it back in the vacuum cleaner (fig. 16).
IMPORTANT For optimal protection of the motor, make sure the filter foam is dry before you put it back in. It is therefore necessary to leave it to dry for at least 12 hours. Your vacuum cleaner comes with an additional foam filter so you can use the device while the original foam filter is drying.
WARNING Never wash the dust compartment components or the engine filter foam in a dishwasher.
3 • Caring for your vacuum cleaner
Wipe the body of the vacuum cleaner with a soft wet cloth, then dry using a dry cloth (fig. 17)
IMPORTANT Do not use detergents or any corrosive or abrasive products. The transparency of the dust compartment and/or dust separator cover may change over time. This does not affect performance.
BATTERIES
1 • Replacing the batteries
This device contains Nickel Metal Hydride (NiMh) batteries that for safety reasons are only accessible by a professional service engineer.
When the battery is no longer able to maintain the charge, the NiMh battery pack must be removed.
To replace the batteries, please contact the nearest Authorised Service Centre.
2 • Scrapping the appliance
Do not dispose of your appliance without having first removed the batteries.
To remove the batteries, please contact an Approved Service Centre or proceed as follows: unplug the appliance from the mains, remove the handle from the main body by removing the central screw, then remove the 5 assembly screws at the back of the handle (fig.18). Lift the top cover of the handle carefully and disconnect the battery pack by pulling the plug (fig.19).
EN
Do not throw the battery pack out with household refuse, but drop it off at the nearest Rowenta Authorised Service Centre or at a disposal site specifically designed for that purpose.
Warning
Do not replace a block of rechargeable batteries with non-rechargeable batteries. To change the batteries, please contact an Approved Services Centre.
The batteries are designed for indoor use only. Never immerse them in water. The batteries must be handled with care. Do not put batteries in your mouth. Do not let batteries touch other metal objects (rings, nails, screws, etc). You must take care not to create short circuits in the batteries by inserting metal objects at their ends. If a short circuit occurs, the battery temperature may rise dangerously and can cause serious burns or even catch fire. If the batteries leak, do not rub your eyes or any mucous membranes. Wash your hands and rinse your eyes with clean water. If the discomfort persists, consult your doctor.
ENVIRONMENT
- All inoperable appliances must be deposited in an Authorised Service Centre which disposes of it in accordance with existing regulations.
• Environment: Directive 2002/95/EC
Environment protection first!
① Your appliance contains valuable materials which can be recovered or recycled.
Take it to a collection point or an approved service centre so that it can be recycled.
IMPORTANT As soon as your vacuum cleaner stops performing efficiently, and before making any checks, stop it by placing the On/Off switch in the Off position.
Repairs are to be performed only by specialists with original spare parts. Repairing an appliance oneself may constitute a danger to the user.
If your vacuum cleaner does not start
The appliance is not charged up. Put it back on charge.
If your vacuum cleaner does not suck
- The tube or the hose are blocked: unblock the tube or hose.
- The separator is clogged: remove the dust compartment and clean the dust separator.
If your vacuum cleaner is not sucking properly or is making a whistling noise
- The hose or tube are partially blocked: unblock them.
- The dust compartment is full: empty it and clean it.
- The dust compartment is poorly positioned: put it back properly.
- The Delta vacuum head is dirty: clean it.
- The filter foam that protects the motor is saturated: clean it.
WARRANTY
This product has been designed for domestic use only. Any commercial use, inappropriate use or failure to comply with the instructions, the manufacturer accepts no responsibility and the guarantee will not apply.
HELPLINE:
If you have any product problems or queries, please contact our Customer Relations Team first for expert help and advice:
0845 602 1454 - UK
(01) 677 4003 – Ireland
or consult our website www.rowenta.co.uk
If the separator is filled with dust
- Dust is accumulating in the separator. Make sure nothing is blocking the duct between the separator and dust compartment.
- The entrance to the dust compartment is obstructed: remove the dust compartment and empty it. Clean the opening to the dust compartment.
If the sucker attachment is difficult to move lower the suction power using the switch.
If the problem persists, take your vacuum cleaner to the nearest Rowenta Approved Service Centre. See the list of Rowenta Authorised Service Centres or contact the Rowenta Consumer Service.
Read the instructions for use carefully before using your appliance for the first time: in the event of any use that does not comply with the instructions, Rowenta shall accept no liability.
SICHERHEITSHINWEISE
DE
1- manufacturers INIT

- CONSEILS DE SECURITE
- • Power supply
- • Repairs
- DESCRIPTION
- EN
- BEFORE USING FOR THE FIRST TIME
- • Mounting the appliance
- • Charging the battery
- • Turning the vacuum cleaner on
- USE OF THE ELECTROBRUSH
- CLEANING THE ELECTROBRUSH
- FOR YOUR SECURITY
- TROUBLESHOOTING
- The electrobrush is working less efficiently or is making an abnormal noise
- The electrobrush stops in the middle of vacuuming
- The electrobrush is difficult to move
- • Storage
- • Cleaning the dust compartment (9)
- 1.a Quick emptying
- 1.b Deep cleaning
- • Cleaning the filter foam that protects the motor (9c)
- • Caring for your vacuum cleaner
- BATTERIES
- • Replacing the batteries
- • Scrapping the appliance
- Warning
- ENVIRONMENT
- Environment protection first!
- If your vacuum cleaner does not start
- If your vacuum cleaner does not suck
- If your vacuum cleaner is not sucking properly or is making a whistling noise
- WARRANTY
- HELPLINE:
- If the separator is filled with dust
- If the sucker attachment is difficult to move lower the suction power using the switch.
- SICHERHEITSHINWEISE
- DE
Brand : ROWENTA
Model : RH8569WH
Category : Stick vacuum