Trillo LX - Car seat Joie - Free user manual and instructions
Find the device manual for free Trillo LX Joie in PDF.
User questions about Trillo LX Joie
0 question about this device. Answer the ones you know or ask your own.
Ask a new question about this device
Download the instructions for your Car seat in PDF format for free! Find your manual Trillo LX - Joie and take your electronic device back in hand. On this page are published all the documents necessary for the use of your device. Trillo LX by Joie.
USER MANUAL Trillo LX Joie
natural_image
Line drawing of a car seat assembly (no text or symbols)GB Welcome to Joie
TM
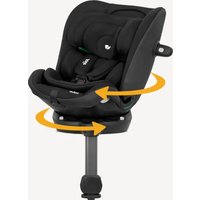
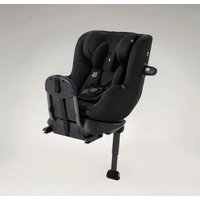
Congratulations on becoming part of the Joie family! We are so excited to be part of your journey with your little one. While traveling with Joie trillo™ LX high back booster you are using a high quality, fully certified safety Group 2/3 booster. This product is suitable for use with children weighing 15-36kg (approximately 3-12 years old). Please carefully read this manual and follow each step to ensure a comfortable ride and best protection for your child.
Please confirm
This booster can be installed using a 3 point retractable adult seat belt approved to ECE Regulation No. 16 or other equivalent standards.
Booster
! IMPORTANT: KEEP FOR FUTURE REFERENCE. PLEASE READ CAREFULLY.
Please keep the instruction manual in the storage compartment at the bottom of the booster as right figure.

natural_image
Abstract line drawing of a person sitting on a chair with an open book and pencil, no text or symbols present.Parts List
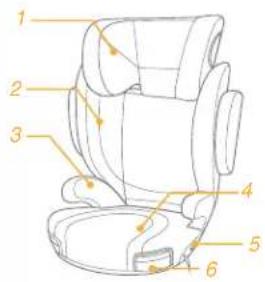
Make sure all parts are available before assembly. If any part is missing, please contact local retailer. No tools are required for assembly.
1 Head Support
2 Lower Back Support
3 Armrest
4 Base
5 Adjustment Button
6 Cupholders
7 Head Support Adjustment Lever
8 Shoulder Belt Guide
9 Side Impact Shield
10 Latch Connector
text_image
Technical diagram of a car seat assembly with numbered parts labeled 1 through 6
text_image
Technical diagram of a car seat assembly with numbered parts labeled 7, 8, 9, and 10Booster Assembly
natural_image
Line drawing of a medical device with a strap and clasp (no text or symbols)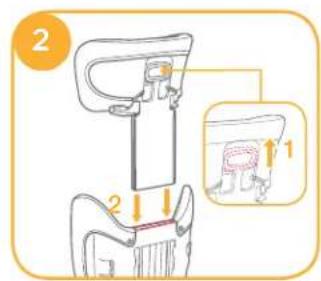
text_image
2 1 2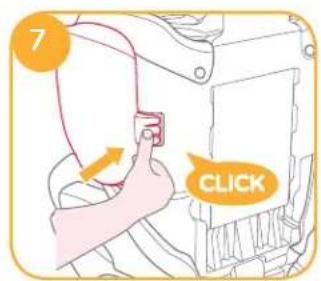
text_image
7 CLICK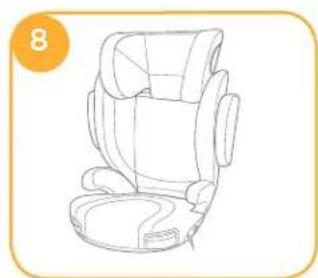
natural_image
Line drawing of a car backseat with seat and seat plate (no text or symbols)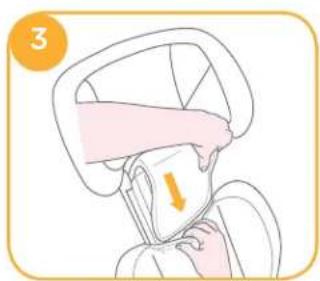
natural_image
Illustration of a person wearing a helmet and holding a device, with no visible text or symbols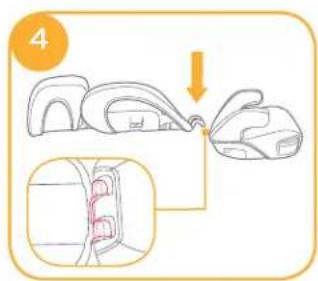
text_image
4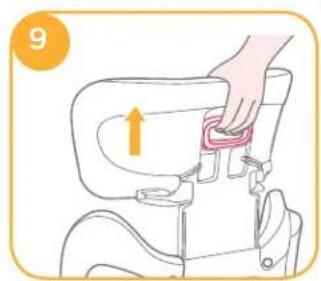
natural_image
Illustration of a hand placing a red object into a toilet seat (no text or symbols)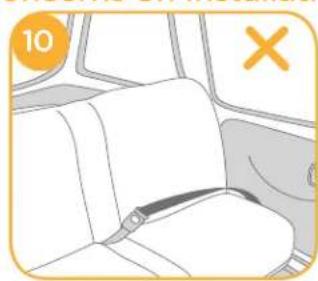
natural_image
Interior view of a car seatbelt with a visible buckle, no text or symbols present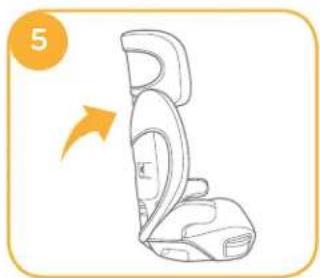
natural_image
Line drawing of a car seat with an arrow indicating motion (no text or symbols)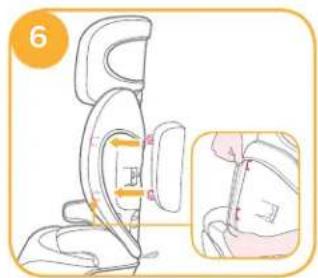
text_image
6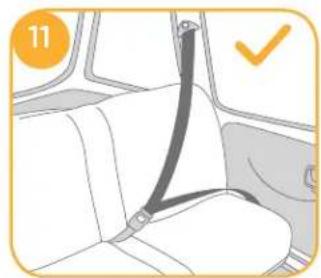
natural_image
Interior view of a car seatbelt with a black strap and checkmark indicator (no text or symbols)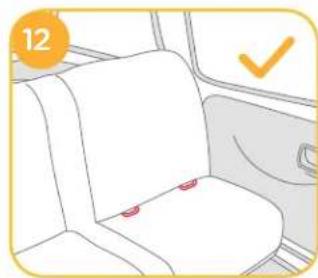
natural_image
Interior view of a car seat with red buttons and a checkmark (no text or symbols)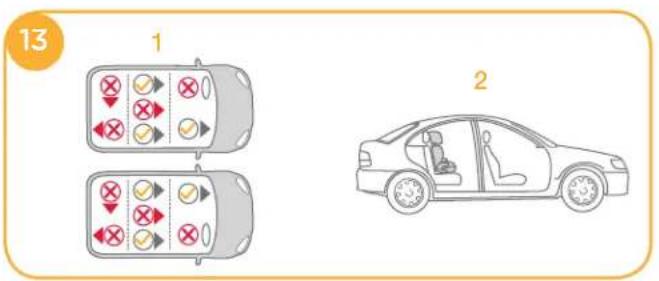
text_image
13 1 2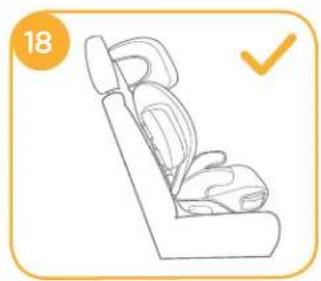
natural_image
Line drawing of a car seat with a checkmark indicating selection (no text or symbols)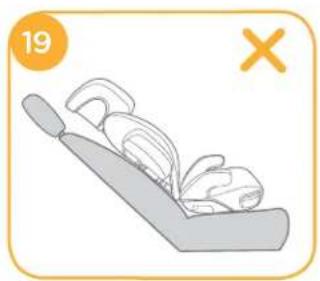
natural_image
Illustration of a car seat with seats and a cross symbol (no text or labels)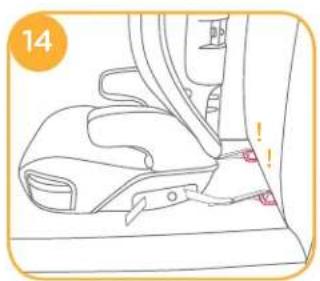
natural_image
Line drawing of a car seatbelt with red buttons and a numbered label (14), no text or symbols present.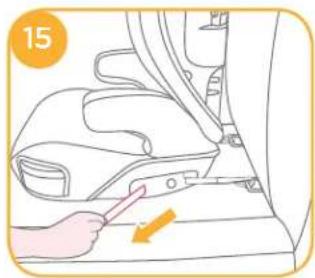
natural_image
Illustration of a hand pressing down on a car seatbelt component (no text or symbols)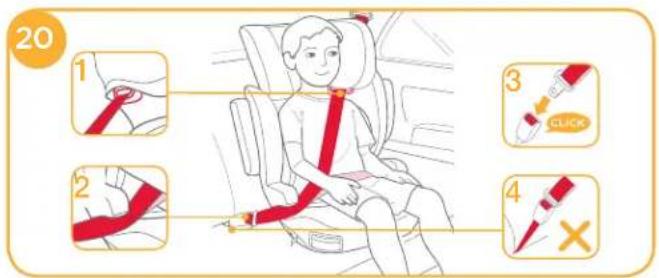
text_image
20 1 2 3 CLICK 4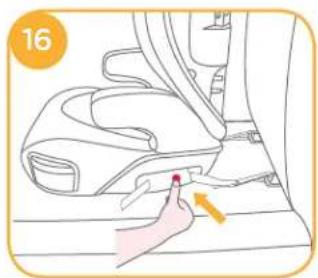
natural_image
Illustration of a hand pressing down on a car seatbelt component (no text or symbols)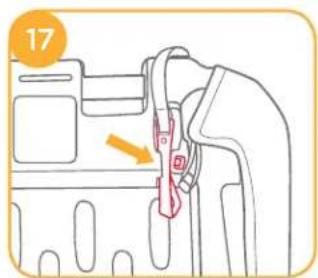
text_image
17
text_image
21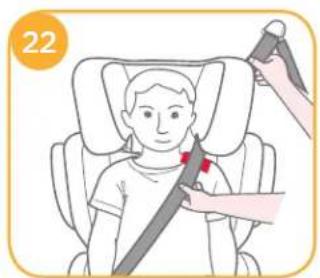
text_image
22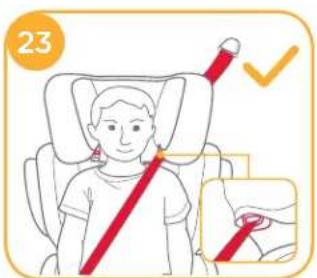
text_image
23Use Cupholders
text_image
24 ×Detach Soft Goods
natural_image
Line drawing of a car seat with orange arrows indicating motion or movement (no text or symbols)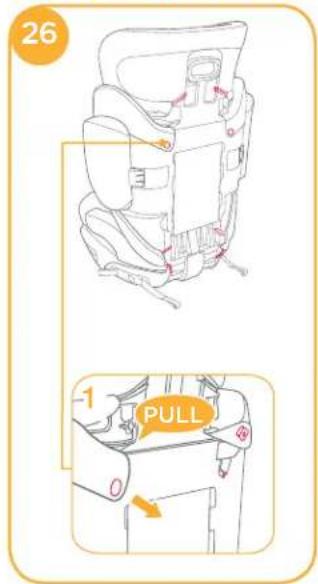
text_image
26 -1 PULL 0NOTE
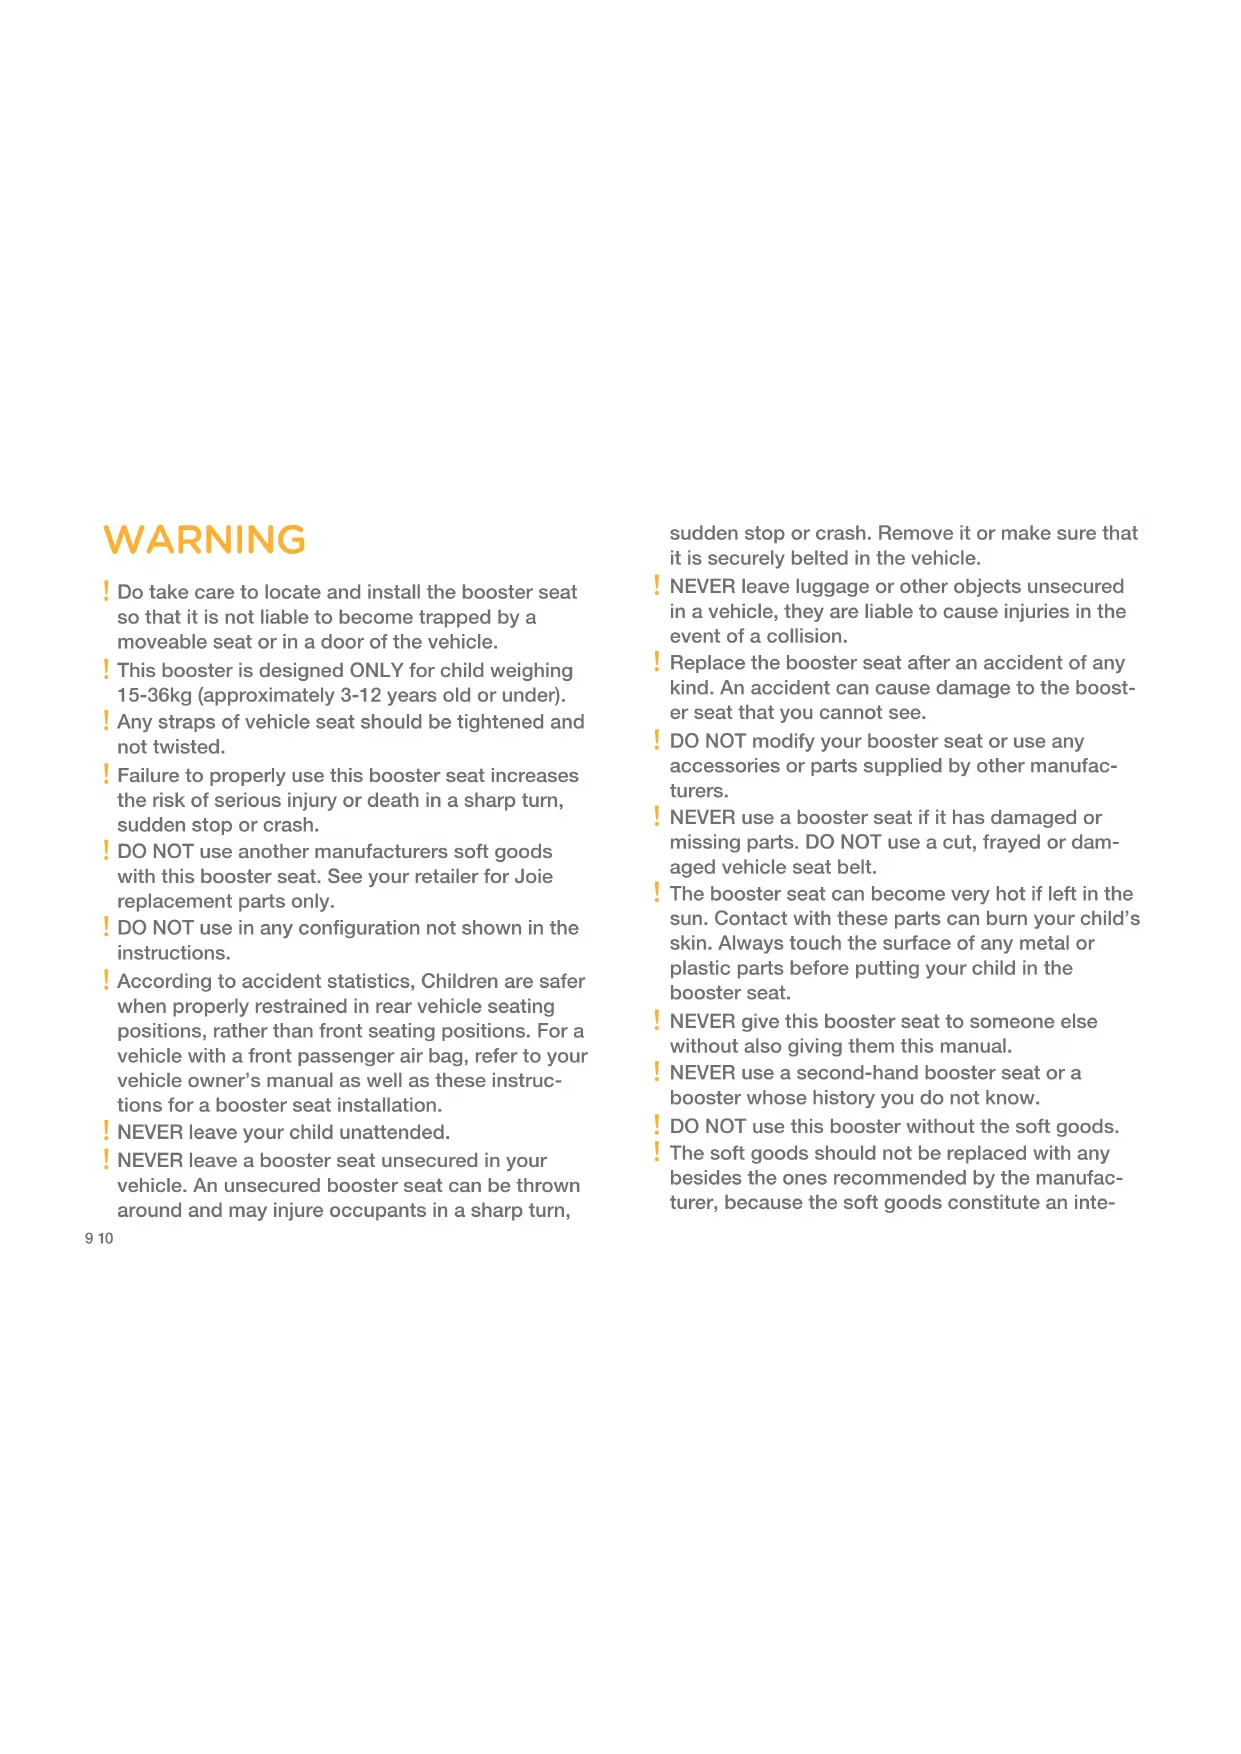
WARNING
! Do take care to locate and install the booster seat so that it is not liable to become trapped by a moveable seat or in a door of the vehicle.
This booster is designed ONLY for child weighing 15-36kg (approximately 3-12 years old or under).
! Any straps of vehicle seat should be tightened and not twisted.
! Failure to properly use this booster seat increases the risk of serious injury or death in a sharp turn, sudden stop or crash.
! DO NOT use another manufacturers soft goods with this booster seat. See your retailer for Joie replacement parts only.
! DO NOT use in any configuration not shown in the instructions.
According to accident statistics, Children are safer when properly restrained in rear vehicle seating positions, rather than front seating positions. For a vehicle with a front passenger air bag, refer to your vehicle owner's manual as well as these instructions for a booster seat installation.
! NEVER leave your child unattended.
! NEVER leave a booster seat unsecured in your vehicle. An unsecured booster seat can be thrown around and may injure occupants in a sharp turn,
sudden stop or crash. Remove it or make sure that it is securely belted in the vehicle.
! NEVER leave luggage or other objects unsecured in a vehicle, they are liable to cause injuries in the event of a collision.
! Replace the booster seat after an accident of any kind. An accident can cause damage to the booster seat that you cannot see.
! DO NOT modify your booster seat or use any accessories or parts supplied by other manufacturers.
! NEVER use a booster seat if it has damaged or missing parts. DO NOT use a cut, frayed or damaged vehicle seat belt.
! The booster seat can become very hot if left in the sun. Contact with these parts can burn your child's skin. Always touch the surface of any metal or plastic parts before putting your child in the booster seat.
! NEVER give this booster seat to someone else without also giving them this manual.
! NEVER use a second-hand booster seat or a booster whose history you do not know.
! DO NOT use this booster without the soft goods.
! The soft goods should not be replaced with any besides the ones recommended by the manufacturer, because the soft goods constitute an inte-
gral part of the booster performance.
! DO NOT use any load bearing contact points other than those described in the instructions and marked on the booster.
! DO NOT face your booster toward the rear of the vehicle.
! To avoid burns, never put hot liquids in your cupholders.
! DO NOT use this booster for more than 10 years after the date of purchase, as parts may degrade over time, or from exposure to sunlight, and may not perform adequately in a crash.
! After your child is placed in this booster, the safety belt must be used correctly, and ensure that any lap strap is worn low down, so that the pelvis is firmly engaged.
Emergency
In case of emergency or accidents, it is most important to have your child taken care of with first aid and medical treatment immediately.
Product Information
Read all the instructions in this manual before using this product. If in doubt, consult either the booster manufacturer or the retailer.
- This booster is a 'Universal' child restraint. It is approved
to UN ECE regulation 44, 04 series of amendments, for general use in vehicles and it will fit most, but not all, car seats.
- A correct fit is likely if the vehicle manufacturer has declared in the vehicle handbook that the vehicle is capable of accepting a ‘Universal’ child restraint for this age group.
- This booster has been classified as ‘Universal’ under more stringent conditions than those which applied to earlier designs which do not carry this notice.
For Installation with Latch System and 3-point-belt
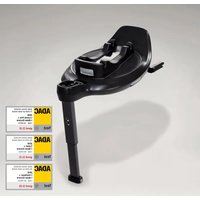
- This booster is a ‘Semi-Universal’ child restraint. It is approved to UN ECE regulation 44, 04 series of amendments for general use in vehicles fitted with ISOFIX anchorages systems.
- It will fit vehicles with positions approved as ISOFIX positions (as detailed in the vehicle handbook), depending on the category of the booster and of the fixture.
- If in doubt, consult either the booster manufacturer or vehicle manufacturer.
Product Booster
Suitable for Child weighing15-36kg
Mass Group Group 2/3
Materials Plastics, metal, fabrics
Patent No. Patents pending
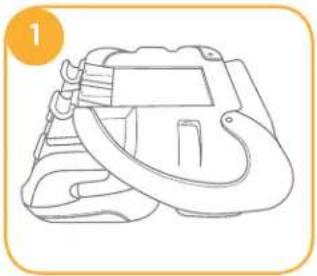
Booster Assembly
Assemble Head Support
see images 1 - 3
- Booster taken from the carton as 1
- Flip head support and lower back support over as shown. ②
! Squeeze adjustment lever 2-1 and slide two pieces together until they snap into place. 2-2
Assemble Lower Back Support
see images 4 - 5
When attaching backrest to base, please press backrest down strongly. "U"-shaped hooks on bottom of backrest will interlock with bars on base. 4
! Shake the backrest to make sure the recline mount is correctly fixed.
! Do not use this booster seat base separately.
Assemble Side Impact Shield
see images 6 - 8
Align the side impact shield with the slot of lower back support plastics mounts, and then insert to lock. 6 7
The completely assembled booster is shown as 8
Height Adjustment
for Head Support
see images 9
Concerns on Installation
see images 10 - 13
Installation with 3-point-belt
see images 14 - 24
If vehicle is equipped with ISOFIX, the vehicle lower anchor points may be visible at the vehicle seat crease. See your vehicle owner's manual for exact locations, anchor identification, and requirements for use.
- Place the booster in forward-facing position on a forward-facing vehicle seat with anchors, hook latch connectors to vehicle anchors. 14
! NEVER put two latch connectors on one vehicle ISOFIX anchor unless specifically allowed by the vehicle manufacturer.
! The latch connectors can be detached for use from the compartment on the bottom where it is stored.
-
Secure the booster firmly by pushing it downward with knee or hand while pulling the adjustment belt. ⑤
-
For ease of unhooking, extend the adjustment belt to its maximum length while pressing the adjustment button.
-
DO NOT use a booster seat beyond reclined position. 19 Pull the vehicle safety belt and pass through the belt path 20, and then buckle it up. 20-3
! Position shoulder belt through the shoulder belt guide shown in 20-1
! DO NOT position vehicle belt over top of the armrests. It must pass underneath the armrests. 20-2
! The booster can not be used if the vehicle safety belt buckle (female buckle end) is too long to anchor the booster securely. 20-4
! The lap belt must be low down on hips. The booster is shown as 20
! To ensure the correct head support height is obtained, the bottom of the headrest MUST be even with the top of child's shoulders as shown in 21 and the shoulder belt must be positioned in the red zone as shown in 22.
! Place a booster seat firmly against the back of a forward-facing vehicle seat equipped with a lap/shoulder belt.
! Have your child sit in a booster seat with their back flat against back of a booster seat.
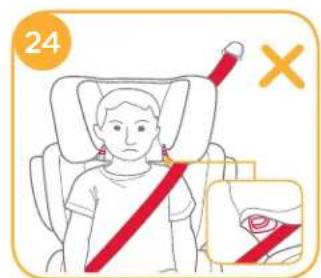
! NOT as shown in 24. Fasten buckle and pull up on the shoulder belt to tighten.
! If the belt lays across child neck, head or face, readjust head support height.
! Belt must not be twisted.
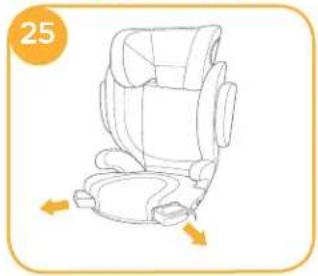
Use Cupholders
see images 25
Detach Soft Goods
see images 26
Open 2 pairs of buttons and 6 pairs of elastics on the back of soft goods to remove it. ^26
! Pull down to remove button as 26-1
To refit the seat pad simply reverse the steps above.
Care and Maintenance
! Please wash the soft goods and inner padding with cold water under 30^ C.
! Do not iron the soft goods.
! Do not bleach or dry clean the soft goods.
! Do not use undiluted neutral detergent, gasoline or other organic solvent to wash the booster. It may cause damage to the booster.
! Do not twist the soft goods and inner padding to dry with great force. It may leave the soft goods and inner padding with wrinkles.
! Please hang dry the soft goods and inner padding in the shade.
! Please remove the booster from the vehicle seat if not in use for a long period of time. Put the booster in a cool, dry place and somewhere your child cannot access it.
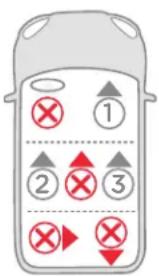
Vehicle Fitting Information
The Joie booster with latch is classified for “Semi-Universal” child restraint system use. It is suitable for fixing into the seat positions of most cars. The letters on the diagram below correspond with the vehicle fitting positions listed in the following pages.
Seat positions in other cars may also be suitable to accept the booster. The following Vehicle Fitting Information is only for vehicles sold in European markets. If in doubt, consult either the booster manufacturer or the distributor.
ALWAYS give priority to the rear seats of your vehicle.
If your booster can be fitted, it is marked with ●
If your booster can not be fitted, it is marked with ○
If your vehicle is not listed in this manual or it is not marked with either a ● or □ then please refer to your vehicle's
handbook or contact the manufacturer for further information.
text_image
Diagram showing a vehicle battery pack with numbered indicators and symbols for electrical or safety features.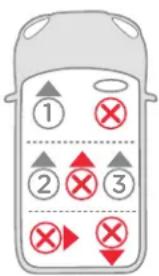
text_image
Diagram showing vehicle battery charging station layout with numbered stations and operation symbolsPTem-vindo a Joie
三
text_image
Technical diagram of a car seat with numbered parts labeled 1 through 6text_image
Diagram showing two car door seat arrangements with numbered positions and red/green checkmarks indicating selection or status.Note

envenido a Joie
TR
natural_image
Illustration of a person reading a book with a pen, set against an orange background (no text or symbols)Lista de piezas
text_image
Technical diagram of a car seat assembly with numbered parts for identificationtext_image
Technical diagram of a car seat assembly with numbered parts labeled 7, 8, 9, and 10ADVERTENCIAS
text_image
Diagram showing two car door seat arrangements with numbered positions and red/green checkmarks indicating selection or status.
envenue à Joie
10
natural_image
Illustration of a person sitting in a chair with an open book and a pointer, set against an orange background (no text or symbols)Liste des pièces
text_image
Technical diagram of a car seat with numbered parts labeled 1 through 6text_image
Technical diagram of a mechanical device with numbered parts labeled 7, 8, 9, and 10AVERTISSEMENTS
text_image
Diagram showing two car door seat arrangements with red and black icons indicating positions or directions, labeled with numbers 1, 2, 3.
Millkommen bei Joie
19
natural_image
Illustration of a person sitting in a chair with an open book and a pointer, against an orange background (no text or symbols)text_image
Technical diagram of a car seat with numbered labels pointing to different seat components
text_image
Technical diagram of a mechanical device with numbered parts labeled 7, 8, 9, and 10WARNHINWEISE
text_image
Diagram showing two vehicle compartments with directional arrows and checkmarks indicating actions or options
elkom bij Joie
24
natural_image
Illustration of a person sitting in a chair with an open book and a pointer, set against an orange background (no text or symbols)text_image
Technical diagram of a car seat with numbered labels pointing to different seat components
text_image
Technical diagram of a mechanical device with numbered parts labeled 7, 8, 9, and 10WAARSCHUWINGEN:
text_image
Diagram showing two vehicle compartments with directional arrows and checkmarks indicating actions or options, likely for vehicle safety or emergency response.
envenuto a Joie
记
natural_image
Illustration of a person sitting in a chair with an open book and a pointer, no text or symbols present.Elenco componenti
text_image
Technical diagram of a car seat with numbered parts labeled 1 through 6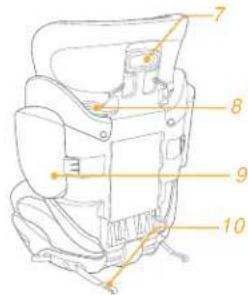
text_image
Technical diagram of a mechanical device with numbered parts labeled 7, 8, 9, and 10AVVERTENZE
natural_image
Illustration of a person sitting in a chair with an open book and a diagonal line, against a solid orange background (no text or symbols)Parça Listesi
text_image
Technical diagram of a car seat with numbered labels pointing to different seat components
text_image
Technical diagram of a vehicle seat assembly with numbered parts labeled 7, 8, 9, and 10UYARILAR
text_image
Diagram showing two car door seat arrangements with directional arrows and numbered positions for seating or positioning.natural_image
Abstract line drawing of a person reading a book with a pen, set against an orange background (no text or symbols)text_image
Technical diagram of a car seat assembly with numbered parts for identification
text_image
Technical diagram of a car seat assembly with numbered parts labeled 7, 8, 9, and 10WARNINGAR
Angående installation
se bilder 10 - 13
text_image
Diagram showing two identical car door seat arrangements with icons and numbers, possibly indicating seat counts or indicators.natural_image
Abstract line drawing of a person sitting with an open book and a pen, no text or symbols present부품 설명
text_image
Technical diagram of a car seat assembly with numbered parts for identification
text_image
Technical diagram of a car seat with numbered labels pointing to different seat positions주의
text_image
Diagram showing two vehicle compartments with numbered compartments and red X marks indicating failure or failure points.natural_image
Illustration of a person sitting in a chair with an open book and a pointer, set against an orange background (no text or symbols)Λίστα Τεμαχίων
text_image
Technical diagram of a mechanical device with numbered components for identificationtext_image
Labeled diagram of a mechanical device with numbered parts 7, 8, 9, and 10ΠΡΟΕΙΔΟΠΟΙΗΣΗ
text_image
Diagram showing two vehicle compartments with directional symbols and numbered indicators, likely illustrating vehicle movement or safety instructions.natural_image
Illustration of a person reading a book with a pen, set against an orange background (no text or symbols)قائمة الأجزاء
text_image
Technical diagram of a car seat with numbered parts labeled 1 through 6
text_image
Technical diagram of a vehicle seat assembly with numbered parts labeled 7, 8, 9, and 10
text_image
Diagram showing two car door compartments with numbered and cross symbols indicating status or selection.Installation with Latch System
| 1 | 2 | 3 | Bentley | |||||
| Alfa Romeo | Continental GT (2003 - 2011) | ● | ● | ● | ||||
| Continental Flying Spur (2005 - 2012) | ○ | ● | ● | |||||
| Guilietta (2010 >) | ○ | ● | ● | Continental GTC (2005 - 2012) | ● | ● | ● | |
| Mito (2009 >) | ○ | ● | ● | Mulsanne (2010 >) | ○ | ● | ● | |
| Audi | BMW | |||||||
| A1 (2011 >) | ○ | ● | ● | 1 Series Convertible (2008 >) | ● | ● | ● | |
| A1 Sportback (2012 >) | ○ | ● | ● | 1 Series Coupe (2008 >) | ● | ● | ● | |
| A3 Hatchback (2012 >) | ● | ● | ● | 1 Series F20 (2011 >) | ○ | ● | ● | |
| A3 (1996 - 2003) | ○ | ● | ● | 3 Series Coupe (2007 >) | ● | ● | ● | |
| A3 S3 (2012 >) | ● | ● | ● | 3 Series F30 (2012 >) | ○ | ● | ● | |
| A3 Saloon (2014 >) | ● | ● | ● | 5 Series Saloon (2003 - 2010) | ○ | ● | ● | |
| A4 Allroad (2009 >) | ● | ● | ● | 5 Series Touring (2003 - 2010) | ○ | ● | ● | |
| A4 Avant (2008 >) | ● | ● | ● | 5 Series Touring (2011 >) | ○ | ● | ● | |
| A4 Saloon (2008 >) | ● | ● | ● | 5 Series Saloon (2011 >) | ○ | ● | ● | |
| A4 S4 (2009 >) | ● | ● | ● | 5 Series (2011 >) | ○ | ● | ● | |
| A4 S4 Avant (2009 >) | ● | ● | ● | 6 Series Coupe (2011 >) | ○ | ● | ● | |
| A5 (2007 >) | ● | ● | ● | 6 Series Convertible (2011 >) | ○ | ● | ● | |
| A5 Sportback (2009 >) | ● | ● | ● | 6 Series Gran Coupe (2011 >) | ○ | ● | ● | |
| A5 S5 Sportback (2007 >) | ● | ● | ● | 7 Series (2010 >) | ○ | ● | ● | |
| A6 (2011 >) | ● | ● | ● | i3 (2014 >) | ○ | ● | ● | |
| A6 Allroad (2011 >) | ● | ● | ● | X1 (2010 >) | ○ | ● | ● | |
| A6 Avant (2011 >) | ● | ● | ● | X3 F25 (2011 >) | ○ | ● | ● | |
| A6 S6 (2011 >) | ● | ● | ● | X5 (2007 >) | ○ | ● | ● | |
| A7 Sportback (2011 >) | ● | ● | ● | X6 (2008 >) | ○ | ● | ● | |
| A8 (2011 >) | ○ | ● | ● | 3-GT (2013 >) | ○ | ● | ● | |
| A8 S8 (2011 >) | ○ | ● | ● | 5-GT (2010 >) | ○ | ● | ● | |
| Q3 (2013 >) | ● | ● | ● | |||||
| Q5 (2009 >) | ● | ● | ● | |||||
| Q7 (2006 >) | ● | ● | ● | |||||
| TT Coupe (2006 >) | ● | ○ | ○ | BLS Saloon (2006 - 2011) | ○ | ● | ● | |
| 1 | 2 | 3 | 1 | 2 | 3 | |||
| Chevrolet | Fiat | |||||||
| Aveo (2012 >) | ○ | ● | ● | 500 (2008 >) | ○ | ● | ||
| Captiva (2007 >) | ○ | ● | ● | 500 C (2009 >) | ○ | ● | ||
| Cruze (2009 >) | ○ | ● | ● | Abarth 500 (2009 >) | ○ | ● | ||
| Spark (2012 >) | ○ | ● | ● | Bravo (2007 >) | ○ | ● | ||
| Volt (2011 >) | ○ | ● | ● | 500L (2013 >) | ○ | ● | ||
| Orlando (2011 >) | ○ | ● | ● | Panda (2012 >) | ○ | ● | ||
| Traxx (2013 >) | ○ | ● | ● | Grande Punto (2006 >) | ○ | ● | ||
| Abarth Grande Punto (2008 - 2011) | ○ | ● | ||||||
| Chrysler | Ford | |||||||
| Grand Voyager (2008 >) | ○ | ● | ● | B Max (2012 >) | ○ | ● | ||
| 300 C (2012 >) | ○ | ● | ● | Fiesta (2008 >) | ○ | ● | ||
| Delta (2011 >) | ○ | ● | ● | Focus (2010 >) | ○ | ● | ||
| Ypsilon (2011 >) | ○ | ● | ● | Focus CMax (2003 - 2010) | ○ | ○ | ||
| Citroen | Honda | |||||||
| Berlingo Multispace (2007 >) | ○ | ● | ● | C Max (2010 -2012) | ○ | ● | ||
| C1 (2006 >) | ○ | ● | ● | CMax (2013 >) | ○ | ● | ||
| C3 5 Door (2009 >) | ○ | ● | ● | Galaxy (2006 >) | ○ | ● | ||
| C3 Picasso (2009 >) | ○ | ● | ● | KA (2009 >) | ○ | ● | ||
| C4 (2010 >) | ○ | ● | ● | Kuga (2013 >) | ○ | ● | ||
| C4 Picasso (2007 >) | ○ | ● | ● | Mondeo Estate (2007 >) | ○ | ● | ||
| C4 Picasso (2014 >) | ○ | ● | ● | Mondeo Hatchback (2007 >) | ○ | ● | ||
| C5 Saloon (2008 >) | ○ | ● | ● | Mondeo Saloon (2007 >) | ○ | ● | ||
| C5 Tourer (2008 >) | ○ | ● | ● | Mondeo (2014 >) | ○ | ● | ||
| DS3 (2011 >) | ○ | ● | ● | S Max (2006 >) | ○ | ● | ||
| DS4 (2011 >) | ○ | ● | ● | |||||
| DS5 (2013 >) | ○ | ● | ● | |||||
| Dacia | ||||||||
| Accord Saloon (2008 >) | ○ | ● | ||||||
| Accord Tourer (2008 >) | ○ | ● | ||||||
| Civic (2012 >) | ○ | ● | ||||||
| Civic (2006 - 2011) | ○ | ● | ||||||
| Civic Hybrid Saloon (2006 - 2010) | ○ | ● | ||||||
| Civic Type R (2007 - 2010) | ○ | ● | ||||||
| CRV (2007 - 2013) | ○ | ● | ||||||
| Hyundai | CRV (2012 >) | ○ | ● | ● | XK R (2006 >) | ○ | ● | |
| Elysion (2012 >) | ○ | ● | ● | |||||
| FRV (2006 - 2011) | ○ | ● | ● | |||||
| Insight (2009 >) | ○ | ● | ● | |||||
| Jazz (2008 >) | ○ | ● | ● | Grand Cherokee (2011 >) | ○ | |||
| Odyssey (2010 >) | ○ | ● | ● | Compass (2011 >) | ○ | |||
| Cherokee (2014 >) | ○ | |||||||
| i10 Hatchback (2008 >) | ○ | ● | ● | |||||
| i20 Hatchback (2009 >) | ○ | ● | ● | Carens (2013 >) | ○ | |||
| i30 (2012 >) | ○ | ● | ● | Ceed Hatchback (2012 >) | ○ | |||
| i40 (2011 >) | ○ | ● | ● | Optima (2011 >) | ○ | |||
| iX20 (2010 >) | ○ | ● | ● | Picanto (2008 >) | ○ | |||
| iX35 (2010 >) | ○ | ● | ● | Rio (2012 >) | ○ | |||
| SantaFe (2012 >) | ○ | ● | ● | Sorento (2012 >) | ○ | |||
| Tucson (2010 >) | ○ | ● | ● | Soul (2009 >) | ○ | |||
| Veloster (2012 >) | ○ | ● | ● | Sportage (2011 >) | ○ | |||
| Venga (2010 >) | ○ | |||||||
| Infiniti | EX (2009 >) | ○ | ● | ● | Land Rover | |||
| FX (2009 >) | ○ | ● | ● | |||||
| G Coupe (2009 >) | ○ | ○ | ○ | |||||
| G Saloon (2009 >) | ○ | ● | ● | |||||
| M (2010 >) | ○ | ● | ● | |||||
| Jaguar | X-Type (2001 - 2010) | ○ | ○ | ○ | Lancia | |||
| X-Type Estate (2004 - 2010) | ○ | ○ | ○ | |||||
| XF (2008 >) | ○ | ● | ● | |||||
| XF R (2009 >) | ○ | ● | ● | |||||
| XF Sportbrake (2013 >) | ○ | ● | ● | |||||
| XJ (2010 >) | ○ | ● | ● | |||||
| XK (2006 >) | ○ | ● | ● | |||||
| XK Convertible (2006 >) | ○ | ● | ● | |||||
| Lexus | GL Class (2006 - 2012) | ○ | ● | ● | ||||
| M/ML Class (2005 - 2012) | ○ | ● | ● | |||||
| CT (2011 >) | ○ | ● | ● | R Class (2006 - 2012) | ○ | ● | ||
| GS (2013 >) | ○ | ● | ● | S Class (2006 - 2013) | ○ | ● | ||
| IS Saloon (2005 - 2012) | ○ | ● | ● | SL Class (2012 >) | ○ | - | ||
| RX (2010 >) | ○ | ● | ● | SLK (2011 >) | ○ | - | ||
| Mazda | Mini | |||||||
| CX-5 (2011 >) | ○ | ● | ● | Mini (Cooper) Hatchback (2006 - 2013) | ○ | ● | ||
| CX-7 (2007 - 2011) | ○ | ● | ● | Mini (Cooper) Hatchback (2014 >) | ● | ● | ||
| 2 (2007 >) | ○ | ● | ● | Mini Coupe (2009 >) | ○ | - | ||
| 3 Hatchback (2009 >) | ○ | ● | ● | Mini Countryman (2010 >) | ○ | ● | ||
| 3 Saloon (2009 >) | ○ | ● | ● | Mini Paceman (2013 >) | ○ | ● | ||
| 3 Hatchback (2014 >) | ○ | ● | ● | |||||
| 5 (2005 - 2010) | ○ | ● | ● | Mitsubishi | ||||
| 6 Estate (2008 - 2012) | ○ | ● | ● | |||||
| 6 Hatchback (2007 - 2012) | ○ | ● | ● | ASX (2010 >) | ○ | ● | ||
| 6 Saloon (2007 - 2009) | ○ | ● | ● | Colt (2007 -2013) | ○ | ● | ||
| 6 Saloon (2013 >) | ○ | ● | ● | Lancer Sportback (2008 - 2011) | ○ | ● | ||
| 6 Estate (2012 >) | ○ | ● | ● | Lancer Ralliart (2009 - 2011) | ○ | ● | ||
| Mercedes-Benz | Outlander (2007 - 2013) | ○ | ● | ● | ||||
| Outlander (2013 >) | ○ | ● | ● | |||||
| Shogun (2007 >) | ○ | ● | ● | |||||
| A Class (2005 - 2012) | ○ | ● | ● | Nissan | ||||
| A Class (2013 >) | ○ | ● | ● | |||||
| B Class (2012 >) | ○ | ● | ● | |||||
| C Class (2008 >) | ○ | ● | ● | |||||
| C Class Estate (2008 >) | ○ | ● | ● | |||||
| C Class Coupe (2011 >) | ○ | ● | ● | |||||
| CLA (2013 >) | ○ | ● | ● | |||||
| CLS Shootingbrake (2012 >) | ○ | ● | ● | |||||
| CLS Coupe (2011 >) | ○ | ● | ● | |||||
| E Class Saloon (2009 - 2012) | ○ | ● | ● | |||||
| E Class Coupe (2009 >) | ○ | ● | ● | |||||
| E Class Estate (2013) | ○ | ● | ● | |||||
| E Class Saloon (2013 >) | ○ | ● | ● | |||||
| Opel | 5008 (2011 >) | ○ | ● | |||||
| RCZ (2011 >) | ○ | ○ | ||||||
| Peugeot | Adam (2013 >) | ○ | ● | ● | Porsche | |||
| Agila (2008 >) | ○ | ● | ● | |||||
| Ampera (2011 >) | ○ | ● | ● | |||||
| Antara (2007 >) | ○ | ● | ● | Cayenne (2011 >) | ○ | |||
| Astra 5dr (2010 >) | ○ | ● | ● | Panamera (2011 >) | ○ | |||
| Astra Estate (2010 >) | ○ | ● | ● | |||||
| Astra GTC (2011 >) | ○ | ● | ● | Renault | ||||
| Corsa 3dr Hatchback (2006 >) | ○ | ● | ● | Clio (2005 - 2012) | ○ | |||
| Corsa 5dr Hatchback (2006 >) | ○ | ● | ● | Clio Renault Sport (2006 - 2012) | ○ | |||
| Corsa VXR (2007 >) | ○ | ● | ● | Clio Sport Tourer (2007 - 2012) | ○ | |||
| Insignia Hatchback (2009 >) | ○ | ● | ● | Clio (2013 >) | ● | |||
| Insignia Saloon (2009 >) | ○ | ● | ● | Laguna (2008 - 2012) | ○ | |||
| Insignia Sports Tourer (2009 >) | ○ | ● | ● | Laguna Sport Tourer (2008 - 2012) | ○ | |||
| Meriva (2010 >) | ○ | ● | ● | Megane Hatchback (2008 >) | ○ | |||
| Mokka (2013 >) | ○ | ● | ● | Megane Sport Tourer (2009 >) | ○ | |||
| Zafira (2005 >) | ○ | ● | ● | Modus (2004 - 2012) | ○ | |||
| Zafira VXR (2005 >) | ○ | ● | ● | Grand Modus (2008 - 2012) | ○ | |||
| Scenic (2009 >) | ○ | ● | ||||||
| Twingo (2007 >) | ○ | ● | ||||||
| Twingo (2012 >) | ● | ● | ||||||
| 107 (2005 >) | ○ | ● | ● | Saab | ||||
| 207 3dr (2006 - 2012) | ○ | ● | ● | |||||
| 207 5dr (2006 - 2012) | ○ | ● | ● | |||||
| 207 SW (2007 - 2012) | ○ | ● | ● | |||||
| 2008 (2013 >) | ○ | ● | ● | 9-3 (2002 - 2012) | ○ | |||
| 208 3dr (2013 >) | ○ | ● | ● | 9-3 Sport Wagon (2005 - 2012) | ○ | |||
| 208 5dr (2013 >) | ○ | ● | ● | 9-3 X (2009 - 2012) | ○ | |||
| 307 (2001 - 2007) | ○ | ● | ● | 9-5 Estate (2005 - 2010) | ○ | |||
| 307 Estate (2002 - 2007) | ○ | ● | ● | 9-5 (2011 - 2012) | ○ | |||
| 308 Hatchback (2007 >) | ○ | ● | ● | |||||
| 308 SW (2008 >) | ○ | ● | ● | Seat | ||||
| 308 (2014 >) | ○ | ● | ● | |||||
| 3008 (2009 >) | ○ | ● | ● | Alhambra (2010 >) | ○ | |||
| 508 (2011 >) | ○ | ● | ● | Altea (2004 - 2011) | ○ | |||
| 508 SW (2011 >) | ○ | ● | ● | Altea XL (2007 - 2011) | ○ | |||
| 508 RXH (2013 >) | ○ | ● | ● | Altea Freetrack4 (2007 - 2009) | ○ | |||
| 1 | 2 | 3 | 1 | 2 | 3 | |||
| Exeo (2008 >) | ○ | ● | ● | Subaru | SX-4 (2006 >) | ○ | ● | ● |
| Exeo ST Estate (2008 >) | ○ | ● | ● | SX-4 Saloon (2009 >) | ○ | ● | ● | |
| Ibiza Cupra (2009 >) | ○ | ● | ● | |||||
| Ibiza FR (2009 >) | ○ | ● | ● | |||||
| Ibiza Hatchback (2008 - 2013) | ○ | ● | ● | |||||
| Leon Cupra (2007 - 2011) | ○ | ● | ● | BRZ (2012 >) | ○ | ● | ● | |
| Leon FR (2006 - 2012) | ○ | ● | ● | Forester (2013 >) | ○ | ● | ● | |
| Leon Hatchback (2005 - 2012) | ○ | ● | ● | Impreza 5 Door (2013 >) | ○ | ● | ● | |
| Leon (2013 >) | ○ | ● | ● | Legacy (2012 >) | ○ | ● | ● | |
| Mii (2011 >) | ○ | ● | ● | Outback (2012 >) | ○ | ● | ● | |
| Toledo (2013 >) | ○ | ● | ● | XV Hatchback (2011 >) | ○ | ● | ● | |
| Toyota | ||||||||
| Citigo (2012 >) | ○ | ● | ● | Auris (2007 - 2012) | ○ | ● | ● | |
| Fabia Estate Combi (2008 >) | ○ | ● | ● | Auris (2013 >) | ○ | ● | ● | |
| Fabia Hatchback (2007 >) | ○ | ● | ● | Avensis Hatchback (2003 - 2011) | ○ | ● | ● | |
| Octavia Estate Combi (2005 - 2013) | ○ | ● | ● | Avensis Tourer (2009 >) | ○ | ● | ● | |
| Octavia Hatchback (2004 - 2012) | ○ | ● | ● | Aygo (2005 >) | ○ | ● | ● | |
| Octavia Scout (2007 - 2013) | ○ | ● | ● | Aygo (2014 >) | ○ | ● | ● | |
| Octavia Hatchback (2013 >) | ○ | ○ | ○ | EZ MPV (2013 >) | ○ | ● | ● | |
| Rapid (2013 >) | ○ | ● | ● | GT86 (2012 >) | ○ | ● | ● | |
| Roomster (2006 >) | ○ | ● | ● | Highlander (2013 >) | ○ | ● | ● | |
| Superb Combi Estate (2008 >) | ○ | ● | ● | Land Cruiser (2003 - 2009) | ○ | ● | ● | |
| Superb (2008 >) | ○ | ● | ● | Land Cruiser (2009 >) | ○ | ● | ● | |
| Yeti (2009 >) | ○ | ● | ● | Prius (2004 - 2009) | ○ | ● | ● | |
| Prius (2010 >) | ○ | ● | ● | |||||
| Prius Plus + (2012 >) | ○ | ● | ● | |||||
| Rav 4 MK3 (2006 - 2011) | ○ | ● | ● | |||||
| RAV4 (2013 >) | ○ | ● | ● | |||||
| Verso (2009 - 2012) | ○ | ● | ● | |||||
| Verso (2013 >) | ○ | ● | ● | |||||
| Yaris Hatchback (2011 >) | ○ | ● | ● | |||||
| Vauxhall | ||||||||
| Agila (2008 >) | ○ | ● | ● | Volvo | Touareg (2012 >) | ○ | ● | ● |
| Ampera (2011) | ○ | ● | ● | Touran (2010 >) | ○ | ● | ● | |
| Antara (2007 >) | ○ | ● | ● | UP! (2012 >) | ○ | ● | ● | |
| Astra 5dr (2010 >) | ○ | ● | ● | |||||
| Astra Estate (2010 >) | ○ | ● | ● | |||||
| Astra GTC (2011 >) | ○ | ● | ● | |||||
| Corsa D (2007 >) | ○ | ● | ● | C30 (2007 - 2013) | ○ | ● | ● | |
| Corsa 3dr Hatchback (2006 >) | ○ | ● | ● | S60 (2010 >) | ○ | ● | ● | |
| Corsa 5dr Hatchback (2006 >) | ○ | ● | ● | S80 (2007 >) | ○ | ● | ● | |
| Corsa VXR (2007 >) | ○ | ● | ● | V40 (2013 >) | ○ | ● | ● | |
| Insignia Hatchback (2009 >) | ○ | ● | ● | V40 Cross Country (2012 >) | ○ | ● | ● | |
| Insignia Saloon (2009 >) | ○ | ● | ● | V60 (2011 >) | ○ | ● | ● | |
| Insignia Sports Tourer (2009 >) | ○ | ● | ● | V70 (2008 >) | ○ | ● | ● | |
| Meriva (2010 >) | ○ | ● | ● | XC60 (2008 >) | ○ | ● | ● | |
| Mokka (2013 >) | ○ | ● | ● | XC70 (2008 >) | ○ | ● | ● | |
| Zafira (2005 >) | ○ | ● | ● | XC90 (2003 - 2013) | ○ | ● | ● | |
| Zafira VXR (2005 - 2010) | ○ | ● | ● | |||||
| Volkswagen | ||||||||
| Beetle (2012 >) | ○ | ● | ● | |||||
| Multivan Caravelle (2008) | ○ | ● | ● | |||||
| Golf Cabriolet (2009 - 2012) | ○ | ● | ● | |||||
| Golf Hatchback (2009 - 2012) | ○ | ● | ● | |||||
| Golf Hatchback MK7 (2012 >) | ○ | ● | ● | |||||
| Golf Plus (2009 - 2011) | ○ | ● | ● | |||||
| Jetta (2011 >) | ○ | ● | ● | |||||
| Passat (2010 >) | ○ | ● | ● | |||||
| Passat (2005 - 2010) | ○ | ● | ● | |||||
| Passat Alltrack (2012 >) | ○ | ● | ● | |||||
| Passat CC (2008 >) | ○ | ● | ● | |||||
| Passat Estate (2005 -2011) | ○ | ● | ● | |||||
| Polo 3dr (2009 >) | ○ | ● | ● | |||||
| Polo 5dr (2009 >) | ○ | ● | ● | |||||
| Scirocco (2011) | ○ | ● | ● | |||||
| Sharan (2010 >) | ○ | ● | ● | |||||
| Tiguan (2008 >) | ○ | ● | ● | |||||

text_image
Joie™Joie Children's Products (UK) Ltd, Venture Point, Towers Business Park, Rugeley, Staffordshire, WS15 1UZ