USER MANUAL BAR928 OREGON SCIENTIFIC
Cable Free Weather Station
Model: BAR928
User Manual
Congratulations on purchasing the BAR928 Top Weather Station.
The BAR928 is an all-in-one clock and weather device. RF-controlled, it can automatically synchronize its current time and date when it is brought within an approximate 1500km radius of the radio signal generated from Frankfurt, Germany (DCF77).
The BAR928 does weather forecasts and tells temperatures, indoors and outdoors. It also shows the trend of changes plus the recorded maximum and minimum temperatures. A remote thermo sensor is included with the unit.
Apart from temperature, the BAR928 shows the indoor relative humidity and rates the comfort level. It also retains the maximum and minimum relative humidity readings.
The built-in barometer enables the BAR928 to display the atmospheric pressure with user-selectable altitude adjustment. A bar graph will show the pressure trend of the last 24 hours.
What is more, the BAR928 is equipped with a moon phase scanner, which lets you check the moon phase of any day between 1990 and 2089.
Other features include a HiGlo backlight, daily crescendo alarm with eight-minute snooze function, and extra-large display.
No wire installation is required between the main and remote units. As the BAR928 operates at 433MHz it can be used in the U.S. and most places in Continental Europe.
MAIN FEATURES: MAIN UNIT

RADIO RECEPTION SIGNAL
Indicates the condition of radio reception
SNOOZE/LIGHT BUTTON
Activates the snooze function when an alarm goes off or turn on the backlight for five seconds
MODE WINDOW
Displays the current time and date
ALARMONICON
Appears when the alarm is activated
⑥ ALARM ICON
Appears when the alarm time is displayed
F MAIN UNIT BATTERY LOW (BATT) INDICATOR
Lights up and blinks when the batteries of the main unit are running dry
REMOTE UNIT BATTERY LOW (BATT) INDICATOR
Lights up and blinks when the batteries of the remote unit are running dry
Displays the weather pattern
① TEMPERATURE WINDOW
Shows the current temperature or the maximum or minimum recorded temperature
IN/OUT-REMOTE INDICATOR
Indicates if the current temperature is displayed as indoors or outdoor-remote
TEMPERATURETRENDARROWS
Indicates the trend of temperature changes
C/°FSLIDE SWITCH
Selects between Centigrade (^) and Fahrenheit (^) display
RELATIVE HUMIDITY WINDOW
Displays the indoor relative humidity
COMFORT INDICATOR
Indicates the comfort level of the indoor relative humidity
ATMOSPHERIC PRESSURE CHART
Shows the atmospheric pressure trend chart of the last 24 hours
ATMOSPHERIC PRESSURE WINDOW
Displays the current atmospheric pressure
PRESSURE HISTORY INDICATOR
Indicates the pressure history of previous hours
PRESSURE UNIT SLIDE SWITCH
Selects between mb/hPa and inHg display
⑧ MOON PHASE SCANNER
Displays the current moon phase or that of the date checked
THERMO BUTTON
Sets the unit in indoor or outdoor-remote temperature mode
① MEMORY BUTTON
Displays the maximum or minimum temperature or indoor relative humidity or erases the memory
HISTORY BUTTON
Displays the pressure history of previous hours
UP(ANDDOWN()TTONS
Increases or decreases the value of a setting, scan the moonphase status
ALARM ON/OFF BUTTON
Displays the alarm time or sets the alarm status
MODE BUTTON
Changes the display mode of the clock or triggers the clock setting mode
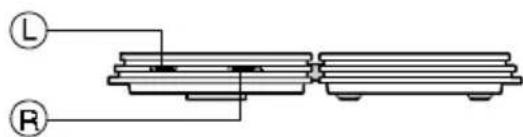
② RESET BUTTON
Resetsetheunitbyreturningall settingsto their defaultvalues
BATTERY COMPARTMENT
Accommodates four UM3 or AA-size batteries
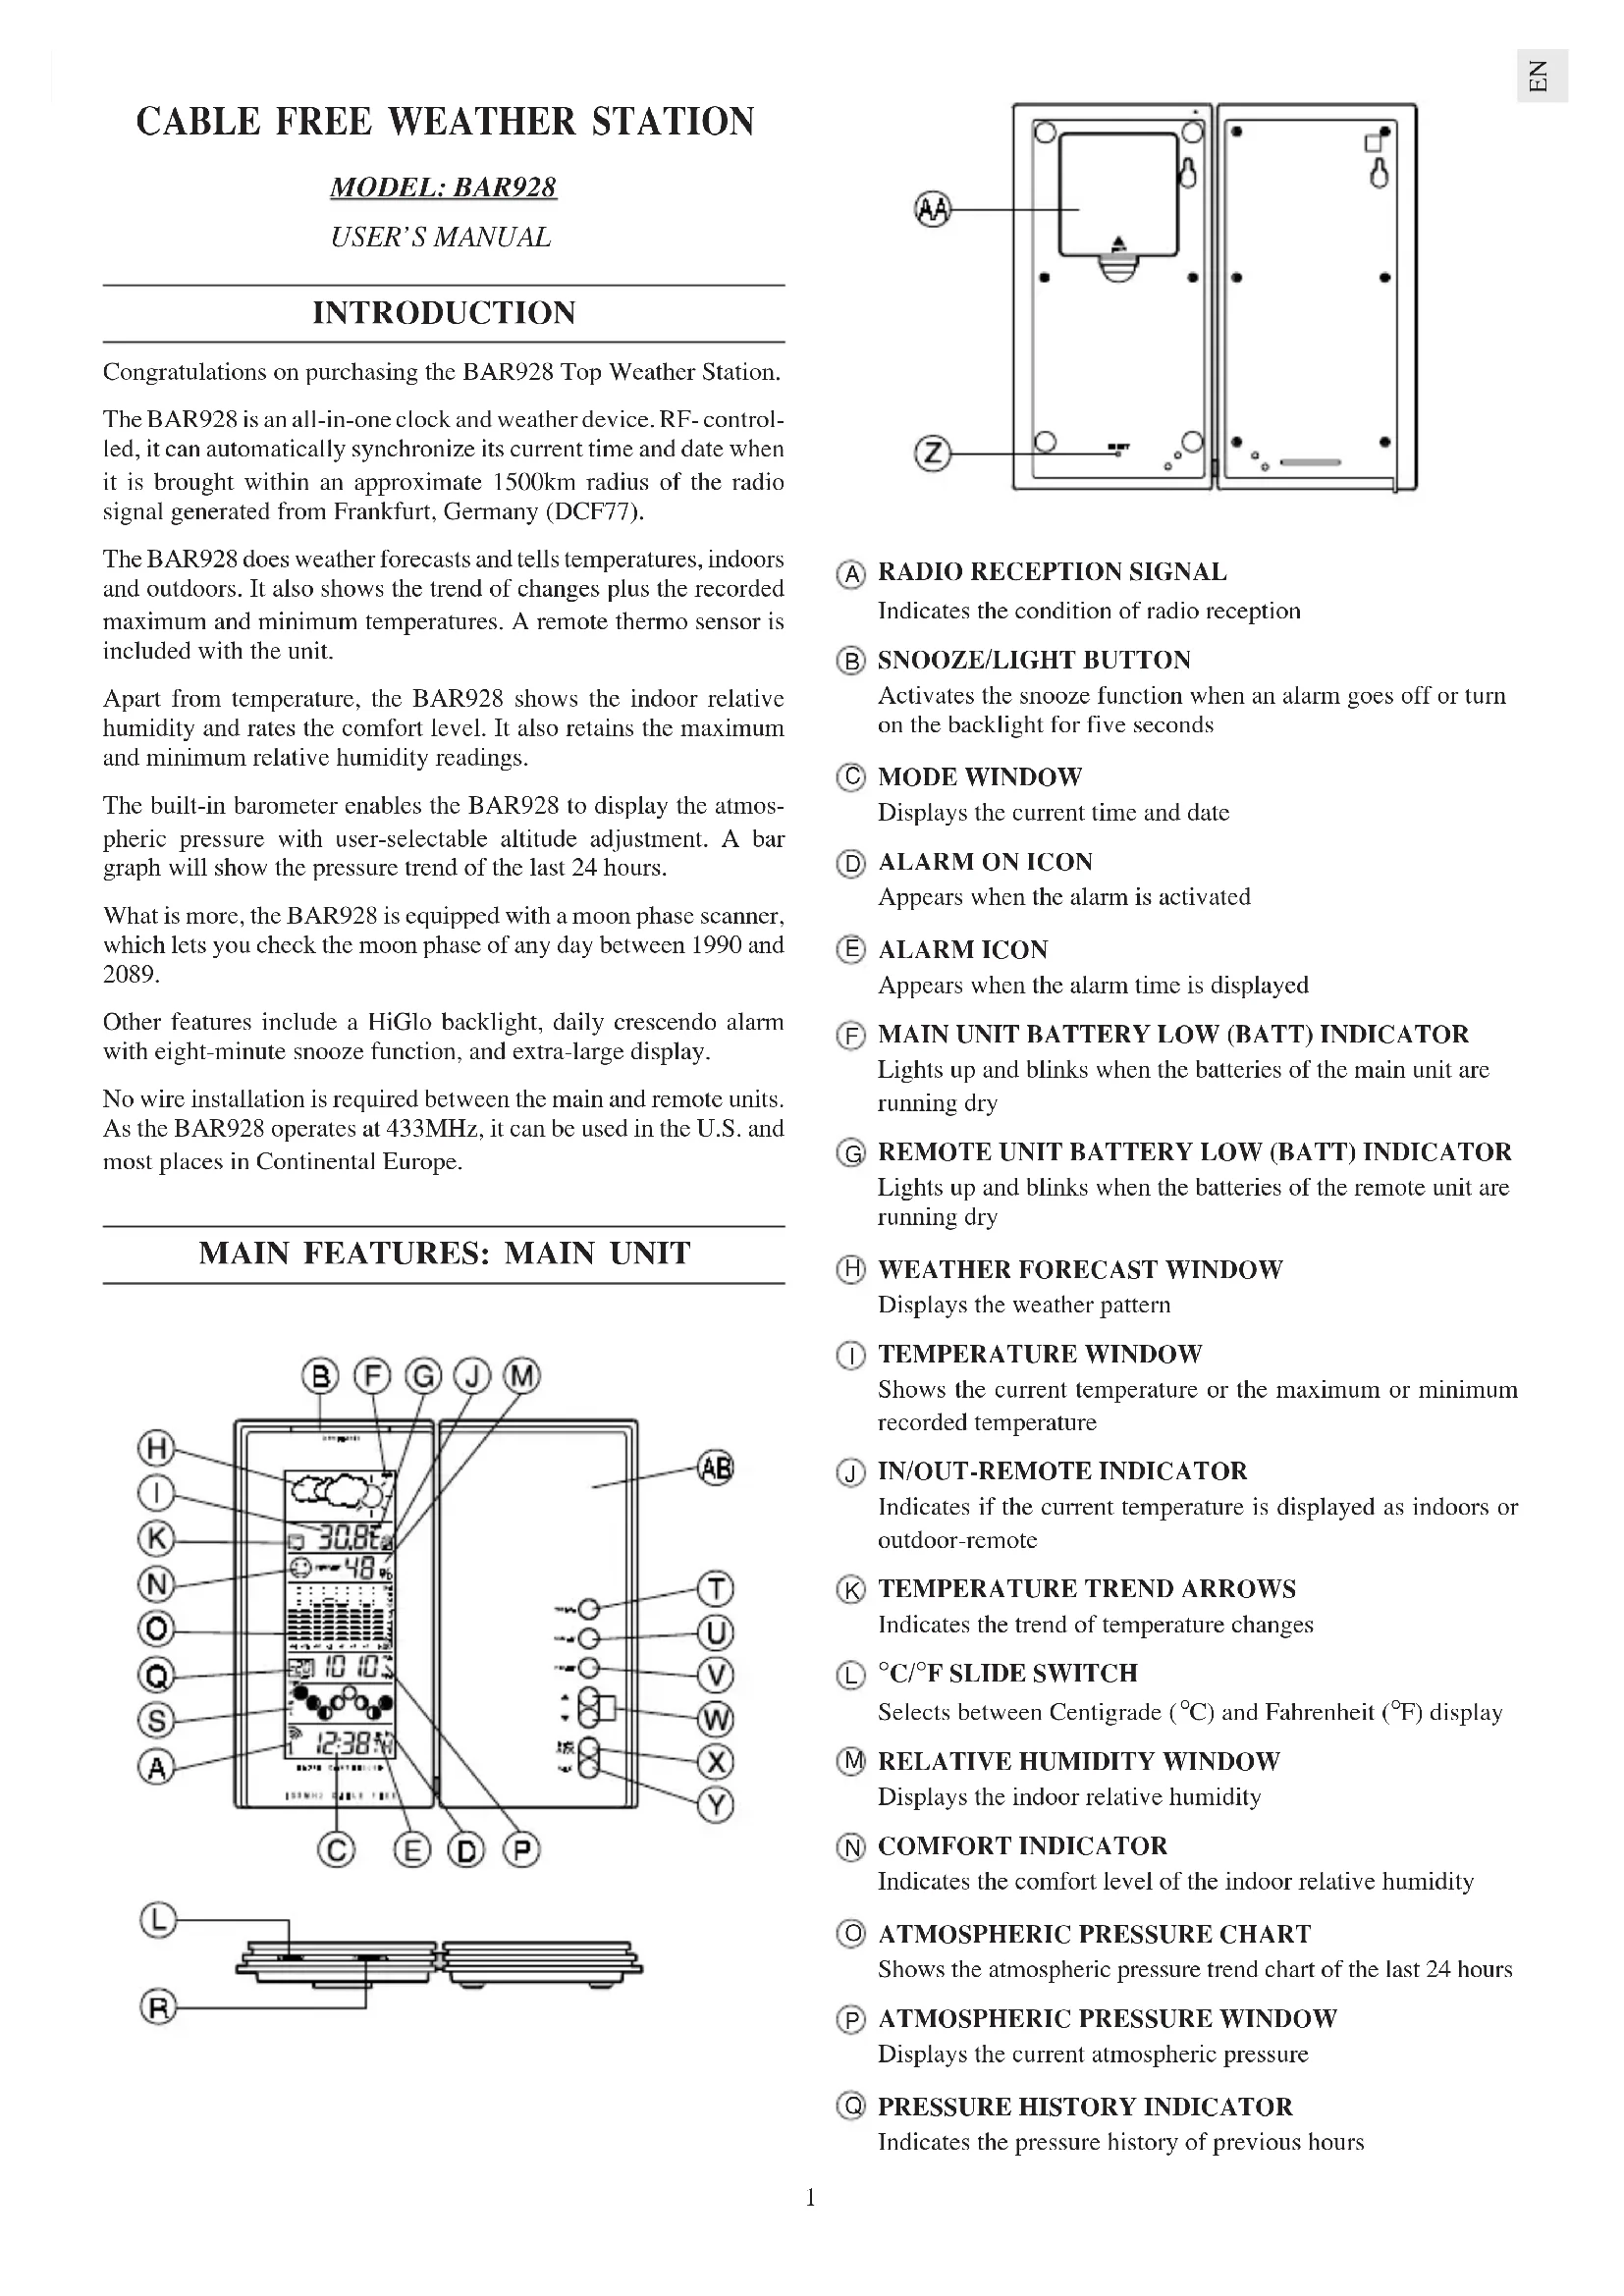
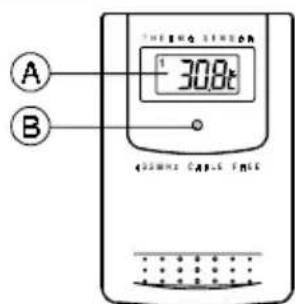
AB TABLE AND CONTROL STAND
Acts as control panel and supports the unit when lying flat.
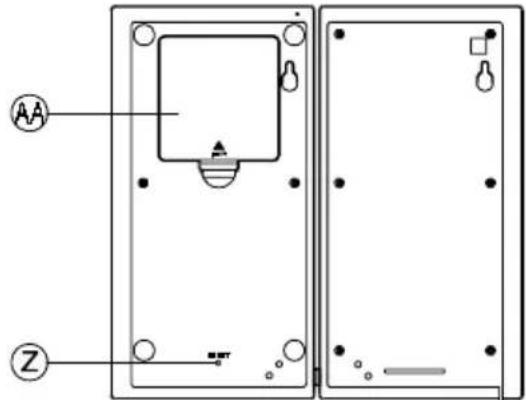
MAIN FEATURES: REMOTE UNIT


LCD
Displays the current temperature monitored by the remote unit
LEDINDICATOR
Flashes when the remote unit transmits a reading
C/FSLIDE SWITCH
Selects between Centigrade (^) and Fahrenheit (^)
RESET BUTTON
Returns all settings to default values
BATTERY COMPARTMENT
Accommodates two UM4 or AAA-size batteries
WALL-MOUNT HOLDER
Supports the remote unit in wall-mounting
REMOVABLE TABLE STAND
For standing the remote unit on a flat surface
BEFORE YOU BEGIN
For best operation,
-
Insert batteries for remote units before doing so for the main unit.
-
Position the remote unit and main unit within effective transmission range, which, in usual circumstances, is 30 meters.
Though the remote unit is weather proof, it should be placed away from direct sunlight, rain or snow.
BATTERY INSTALLATION: REMOTE UNIT
The remote unit uses two UM4 or AAA-size batteries. To install them,
- Remove the screws on the battery compartment.
- Insert the batteries strictly according to the polarities shown therein.
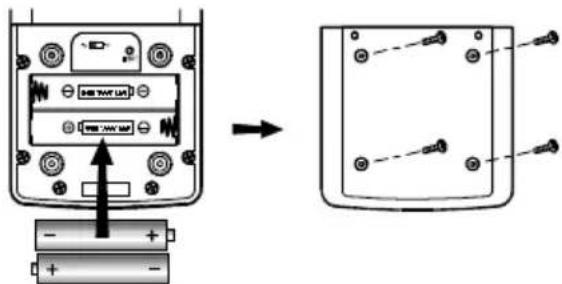
- Select the temperature display unit on the ^ C / F slide switch.
- Replace the battery compartment door and secure its screws.
Replace the batteries when the battery low (BATT) indicator of the outdoor temperature window lights up.
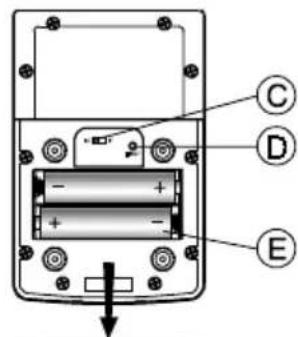
BATTERY INSTALLATION: MAIN UNIT
- Gently press and lift the tab on the battery compartment door.
- Insert four UM3 or AA-size batteries.

- Replace the battery compartment door.
Replace the batteries when the BATT indicator on the weather forecast window lights up.
HOW TO USE THE BACKLIGHT
Press the SNOOZE/LIGHT button once. The backlight will be turned on for five seconds.
TIME DISPLAY MODES
The current time and date can be displayed in three modes: hour-minute-second, hour-minute-day-of-the-week and day-month-year. Press the MODE button to change from one mode to the other.
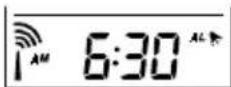
Pressing the ALARM button during any of these modes will display the alarm time instead. Another press will activate or deactivate the alarm. To go back to normal time and date display, press MODE.
ABOUT RADIO RECEPTION
The BAR928 is designed to automatically synchronize its calendar clock once it is brought within range of the Frankfurt DCF77 radio signal. It will scan and adjust every full hour.
When the BAR928 is within range, its radio-control mechanism will override all manual settings.
When the unit is receiving radio signal, the RADIO RECEPTION signal will start to blink. A complete reception generally takes about two to 10 minutes, depending on the strength of the radio signal.
When the reception is complete, the RADIO RECEPTION signal will stop blinking. The strength of the reception for the last full hour will be indicated.
For better reception, place the clock away from metal objects and electrical appliances to minimize interference.
Should you wish to deactivate the RF controlled function, press MODE and DOWN () button simultaneously.
To reactivate the RF control function, press MODE and UP() simultaneously.
| - Strong |
| - Weak |
| - No signal |
| - Receiving |
HOW TO SET THE CLOCK MANUALLY
When the current time is displayed, press MODE for three seconds. The 12-hr or 24-hr digits will flash. Use the UP or DOWN button to select either. If 12-hour clock format is selected, the time will be displayed with the AM or PM indicator.
Press MODE. The hour digits will flash. Use the UP or DOWN buttons to enter the hours. Holding down either button will increase or decrease the value rapidly. Press MODE to go to the minutes. Set the minutes like you set the hours. Press MODE again to confirm and exit.
If changes are made during this process, the seconds will start from zeros.
ABOUT ALTITUDE SETTING
For a correct reading of the local barometric pressure, select 0 for altitude compensation reading while setting the calendar. (See HOW TO SET THE CALENDAR for details.)
For users staying at a higher altitude, such as in the mountain area, sea level barometric pressure applies. In this case, select -100 to 2500 meters, whichever appropriate, when entering the altitude compensation reading.
HOW TO SET THE CALENDAR MANUALLY
- When the calendar is displayed, press MODE for three seconds. The altitude compensation reading on the atmospheric pressure window will flash. Use the UP or DOWN button to enter the desired value. (See ABOUT ALTITUDE SETTING for more information.)
- Press MODE. The year digits will flash. Enter the year using the UP or DOWN button.
- Press MODE. The D or M indicator will flash. Use the UP or DOWN button to select D for day-month display or M for month-day display.
- Press MODE and follow the same procedure to set the month and day-of-the-month.
- Press MODE. The E, I, D, F or S language indicator will flash. Use the UP or DOWN button to select E for English, I for Italian, D for German, F for French or S for Spanish.
- Press MODE. The day-of-the-week will flash. Use the UP or DOWN button to enter the day and press MODE again to confirm and exit.
MULTILINGUAL DAY-OF-THE-WEEK
The display language of the day-of-the-week is selected in the calendar setting procedure. The foreign languages and their meanings are as follows:
| Language | Monday | Tuesday | Wednesday | Thursday | Friday | Saturday | Sunday |
| English | E | M | T | U | W | E | T |
| German | H | M | M | M | M | B | F |
| French | F | L | M | A | N | E | E |
| Italian | I | L | M | A | N | G | V |
| Spanish | S | L | M | A | M | G | H |
HOW TO SET AND ACTIVATE THE ALARM
When the alarm time is displayed, press and hold ALARM for three seconds.
Enter the value for the hour digits. Press ALARM to confirm and go to the minute digits. Enter the value and press ALARM to confirm.
The alarm is automatically activated. To deactivate it, press ALARM once when the alarm time is displayed. Then use the UP or DOWN button to toggle its status.
ALARM AND SNOOZE FUNCTION
When the alarm is active, it will go off at the set time. The display will light up for five seconds with the ALARM ON icon flashing.
The crescendo function allows the alarm to start off gently and step up its intensity in three steps. Without interruption, the alarm will go off for 2 minute.
To stop the alarm, press any button. If the SNOOZE/LIGHT button is pressed, the SNOOZE function will be triggered. The alarm will stop and the bell icon blinks for about eight minutes before going off again.
HOW TO CHECK INDOOR AND OUTDOOR-REMOTE TEMPERATURES
To measure indoor temperatures, press the THERMO button until the IN indicator lights up.
To measure outdoor-remote temperatures, press the THERMO button until the OUT indicator is displayed.
The temperature can be shown in Centigrade (^) or Fahrenheit (^) . It is selected on the ^ C / ^ slide switch. Slide the switch to ^ C for Centigrade or ^ F for Fahrenheit.
The BAR928 is capable of measuring temperatures within the -50^ (-58^) and +70^(+158^) range. If the temperature goes above or below that, the display will show flashing "70" or "-50".
NOTE ON OUTDOOR-REMOTE TEMPERATURE
Once batteries are in place for the remote unit, it will start transmitting samplings at 30-second intervals.
If no signals are received when the outdoor-remote temperature is selected, blanks will be displayed. Press and hold the THERMO button to enforce a search. This is useful in synchronizing the transmission and reception of the remote and main units.
If that fails, check if the remote unit is still in place. Make sure the transmission is within range and path is clear of obstacles and interference.
Repeat this procedure whenever you find discrepancies between the reading shown on the main unit and the remote unit.
NOTE ON ^ AND ^
The outdoor temperature display on the main unit is dominated by the selection on the ^ C / ^ slide switch of the main unit. Whatever the display unit of the remote sensor is, it will only apply to the remote sensor itself and the temperature will be automatically converted to the chosen one of the main unit.
MAXIMUM AND MINIMUM TEMPERATURES
The maximum and minimum recorded temperatures will be automatically stored in memory. To display them, press MEMORY to rotate through the maximum, minimum and current temperatures. The respective MAX or MIN indicator will be displayed.
To clear the memory, hold down MEMORY for three seconds. The maximum and minimum temperatures will be erased. If you press MEMORY now, the maximum and minimum temperatures will have the same values as the current one until different readings are recorded.
TEMPERATURE TREND
The temperature trend indicator shows the trend of temperature changes for the last minutes. Three trends, rising, steady and falling, will be shown.
| Arrow indicator | TEMP | TEMP | TEMP |
| Temperature Trend | | Steady Falling | Rising |
WEATHER FORECAST
The unit is capable of detecting atmospheric pressure changes, and basing on the data collected, can predict the weather for the forthcoming 12 to 24 hours. The effective range covers an area of 30 to 50km
| Indicator displays on the unit | | | | |
| Forecast | Sunny Slightly Cloudy Cloudy Rainy | |
NOTE:
- The accuracy of a general pressure-based weather forecast is about 70 to 75% , and therefore, cannot be held responsible for any inconveniences so caused by an inaccurate forecast.
- The weather forecast is meant for the next 12 to 24 hours. It may not necessarily reflect the current situation.
- The "Sunny" icon, when applies to night time, implies clear weather.
INDOOR RELATIVE HUMIDITY
The indoor relative humidity is automatically detected. The reading is displayed in the relative humidity window.
Like temperature, the maximum and minimum relative humidity will be stored in memory. Use the MEMORY button to rotate through the maximum, minimum and current relative humidity. The respective MAX and MIN indicator will be displayed.
To clear the memory, hold down MEMORY for three seconds. The maximum and minimum temperatures will be erased. If you press MEMORY now, the maximum and minimum relative humidity will have the same values as the current one until different readings are recorded.
COMFORT LEVEL
The comfort level is based on the recorded relative humidity. An indicator will be displayed to show if the level is comfortable, wet or dry.

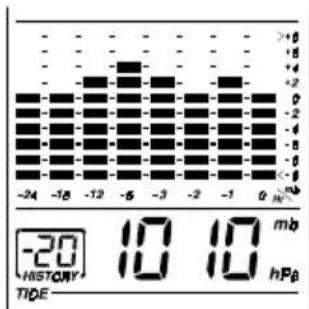
ATMOSPHERIC PRESSURE
The current atmospheric pressure is shown on the atmospheric pressure window. If you need to adjust the altitude compensation, follow the procedure set in HOW TO SET THE CALENDAR MANUALLY.
The atmospheric pressure can be displayed in mb/hPa or inHg. The unit is selected on the atmospheric pressure slide switch.
If you want to know the pressure history for a particular hour during the past 24 hours, press the HISTORY button. Each press on the button will go back by an hour. Holding down the button will increase the value rapidly.
The recorded atmospheric changes for the past 24 hours are displayed in a bar chart above the atmospheric pressure window.
HOW TO USE AND SCAN THE MOON PHASE
The BAR928 is equipped with a moon phase display and scanner with which eight moon phases are displayed on the screen from new moon to waning crescent. The one falls on the current day will flash on the screen.
If it is a full moon or new moon day, the icon will flash faster.
The eight phases are:
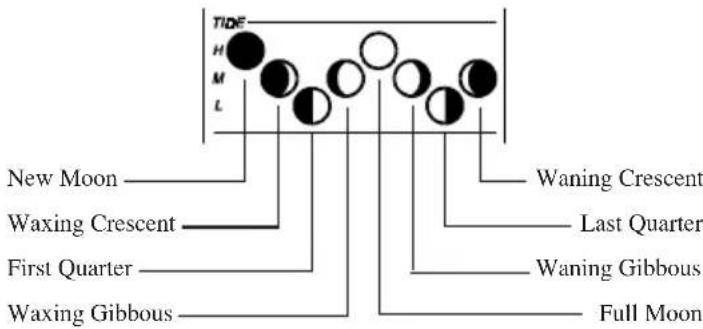
To check the moon phase for a particular day, press the UP or DOWN button once. The clock will enter moon phase scanning mode.
Use the UP or DOWN button to locate the date you want to check. The calendar will be day-driven in this mode.
You can go back in time or travel to the future, any day between the years 1990 to 2089. The corresponding moon phase will appear immediately on the screen.
The unit will return to the last display mode when the UP and DOWN buttons are left idle for 15 seconds.
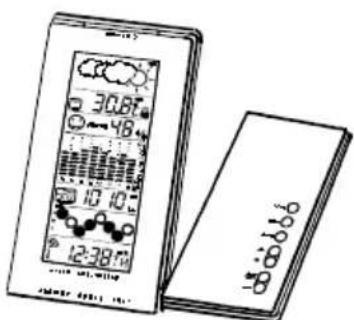
HOW TO WALL MOUNT OR USE THE TABLE STAND
The unit can be wall-mounted using its recessed screw holes or place on a flat surface using its table and control stand. To use the stand, lay the control panel on a flat surface. Then adjust the angle of the display panel for best display and support.
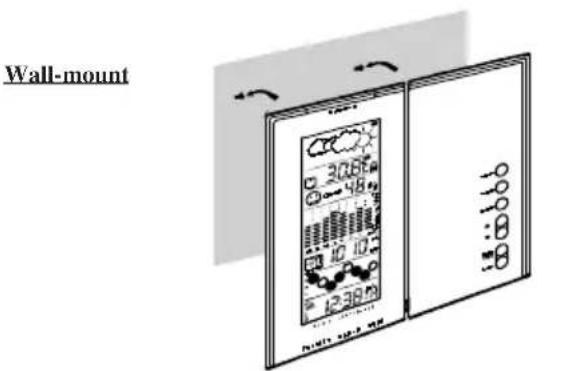
Table stand
HOW TO RESET THE UNIT
The RESET button allows you to return all settings to its factory values. The button is required only when the unit is not operating in a favorable way, such as in the rare case of a malfunction.
The RESET button is located inside the battery compartment door. To use the button,
- Lift open the battery compartment door.
- Press the button with a blunt stylus.
- Replace the battery compartment door.
PRECAUTIONS
This unit is engineered to give you years of satisfactory service if you handle it carefully. Here are a few precautions:
- Do not immerse the unit in water. If you spill liquid over it, dry it immediately with a soft, lint-free cloth.
- Do not clean the unit with abrasive or corrosive materials. They may scratch the plastic parts and corrode the electronic circuit.
- Do not subject the unit to excessive force, shock, dust, temperature or humidity, which may result in malfunction, shorter electronic life span, damaged battery and distorted parts.
- Do not tamper with the unit's internal components. Doing so will invalidate the warranty on the unit and may cause unnecessary damage. The unit contains no user-serviceable parts.
- Only use fresh batteries as specified in the user's instructions. Do not mix new and old batteries as the old ones may leak.
- Always read the user's instructions thoroughly before operating the unit.

TIME ZONE AND OFFSET TABLE
SPECIFICATIONS
- Temperature Measurement
Main unit
Indoor Temperature measurement
Displayed IN temperature range : -50.0°C to +70.0°C (-58.0°F to 158.0°F)
Proposed operating range : -5.0^ to +50.0^ (23.0°F to 122.0°F)
Temperature resolution : 0.1^ (0.2^)
Remote Temperature measurement
Displayed OUT temperature range: -50.0°C to +70.0°C (-58.0°F to 158.0°F)
Proposed operating range : -5.0^ to +50.0^ (23.0°F to 122.0°F)
Temperature resolution : 0.1^ (0.2^)
Remote unit
Displayed range : -50.0^ to +70.0^ (-58.0°F to 158.0°F)
Proposed operating range : -20.0^ to +60.0^ (-4.0°F to 140.0°F)
Temperature resolution : 0.1^ (0.2^)
RF Transmission Frequency: 433 MHz
No. of Remote unit : one
RF Transmission Range : Maximum 30 meters
Temperature sensing cycle : around 30 seconds
- Relative Humidity Measurement
Indoor relative humidity measurement ranging from 25% RH to 95% RH
- Barometric Pressure Measurement
Pressure measuring range: 795 to 1050mb / hPa (23.48 to 31.01 inHg)
Pressure sampling cycle : 15 minutes
- Moon Phase Functions
Moon Phase Scanner Range : From 1990 to 2089
- Radio Controlled Clock
- Maintime set and synchronized by Radio Signal DCF77 for Continental/ Central Europe
- user selectable 12 or 24h display with hh : mm ss
- Date Format: Day-Month-Year or Month-Day-Year
- Day of week selectable in 5 language (E, F, D, I, Sp)
- 2-minute crescendo alarm
Power
Main unit: use 4 pcs UM-3 or "AA" 1.5V alkaline batteries
Remote sensing unit: use 2 pcs UM-4 or "AAA" 1.5V alkaline batteries
Weight
Main unit: 306gm
Remote sensing unit: 100gm
- Dimension
Main unit: 182(L)× 133(W)× 28(T)
mm
Remote sensing unit: 92(L)× 60(W)× 21(T) mm
CAUTION
The content of this manual is subject to change without further notice.
Due to printing limitations, the displays shown in this manual may differ from the actual display.
The manufacturer and its suppliers hold no responsibility to you or any other person for any damage expenses, lost profits, or any other claim as a result of using this product.
The contents of this manual may not be reproduced without the permission of the manufacturer.
ABOUT OREGON SCIENTIFIC
Visit our website (www.oregonscientific.com) to learn more about Oregon Scientific products such as digital cameras; MP3 players; children's electronic learning products and games; projection clocks; health and fitness gear; weather stations; and digital and conference phones. The website also includes contact information for our customer care department in case you need to reach us, as well as frequently asked questions and customer downloads.
We hope you will find all the information you need on our website, however if you'd like to contact the Oregon Scientific Customer Care department directly, please visit: www2.oregonscientific.com/ service/support
OR
Call 949-608-2848 in the US.
For international enquiries, please visit www2.oregon scientific.com/ about/international/default.asp
This product contains the approved transmitter module that complies with the essential requirements of Article 3 of the R&TTE 1999/5/EC Directive, if used as intended and the following standards have been applied:
(Article 3.1.a of the R&TTE Directive)
Applied Standard EN 60950-1 : 2001
Electromagnetic compatibility
(Article 3.1.b of the R&TTE Directive)
Applied Standards
Efficient use of radio frequency spectrum
(Article 3.2 of the R&TTE Directive)
Applied Standards
ETSI EN 300 220-3 (Ver1.1.1) : 2000-09
Additional information:
The product herewith complies with the requirements of the Low Voltage Directive 73/23/EC, the EMC Directive 89/336/EC and carries the CE marking accordingly.

Carmelo Cubito
Agrate Brianza (MI) / Italy January 2004
Manufacturer's EUR&TTE Representative
COUNTRIES RTTE APPROVAL COMPLIED
All EC countries, Switzerland

and Norway

| Language | Monday | Tuesday | Wednesday | Thursday | Friday | Saturday | Sunday | |
| English | E | Mo | Tu | We | TH | Fr | SA | Su |
| German | I | No | M | M | Do | Fr | SR | So |
| French | F | Lu | Ma | ME | DE | VE | SA | M |
| Italian | I | Lu | Ma | ME | G | VE | SA | Bo |
| Spanish | S | Lu | Ma | M | Du | H | SA | Bo |
COME IMPOSTARE E ATTIVARE L'ALLARME
Agrate Brianza (MI) / Italia January 2004
Rayon de transmission RF: 30 metres maximum
Sonde a distance: 92 (L) x 60 (l) x 21 (H) mm
ATTENTION
Agrate Brianza (MI) / Italie January 2004
Representant du fabricant R&TTE

PAYSCONCERNES RTT&E
MAXIMAL- UND MINIMAL-TEMPERATUREN
Agrate Brianza (MI) / Italia January 2004
Para instalar as pilhas do controle remoto:


OBSERVACAO Nao use baterias recarregaveis.

Agrate Brianza (MI) / Itália January 2004
ALARM AAN/UIT TOETS
| Language | Monday | Tuesday | Wednesday | Thursday | Friday | Saturday | Sunday | |
| English | E | No | Tu | We | TH | Fr | SA | Su |
| German | I | No | M | M | Bo | Fr | SA | So |
| French | F | Lu | NA | NE | DE | WE | SA | M |
| Italian | I | Lu | NA | NE | GI | WE | SA | No |
| Spanish | S | Lu | NA | M | GU | M | SA | Bo |
HET INSTellenEN EN AKTIVEREN VAN HET ALARM
Agrate Brianza (MI) / Italie January 2004
RF mottagningssignal (
Vikt 542 gram (1,19 lbs)
utan batteri
Dimensioner for Fjarrkontrollen
LxBxH 108x17x39mm
(4,25× 0,67× 3,91cm)
Vikt 34 gram (0,08 lbs)
utan batteri
Dimensioner for Fjärrenheden
LxBxH70x24,5x116mm
(2,76× 0,96× 7.3tum)
Vikt 108 gram (0,24 lbs)
utan batteri
Temperatur
Enhet
^ C ellerrF
Mätområde Inomhus
-5°C till 50°C
(29°F till 122°F)
Mātomrāde Utomhus
-20°C till 60°C
(-4^ till 140^)
Upplosning
0.1^(0.2^)
Minne
Min / Max
Vaderprognos
Display
Oregon Scientific Inc. Tualatin, Oregon USA
欧西亚中国授权制造商
展科电子(深圳)有限公司
制造地:中国深圳宝安臣田工业区
C