
CMM620 - Coffee maker KENWOOD - Free user manual and instructions
Find the device manual for free CMM620 KENWOOD in PDF.

| Product type | Filter coffee maker |
| Brand | Kenwood |
| Model | CMM620 |
| Water tank capacity | 1,250 ml (max.) |
| Carafe | Thermal, airtight seal |
| Power supply | 230 V ~ 50 Hz |
| Power consumption | Not specified |
| Dimensions (approx.) | 30 x 20 x 35 cm |
| Weight (approx.) | 3 kg |
| Main functions | Delayed programming (up to 8 programs), aroma control (mild/medium/strong), 1-4 cup function, automatic shut-off, 24-hour clock, anti-drip valve |
| Keep warm | Automatic (40 min.); disabled in 1-4 cup mode |
| Filter | Permanent filter included, compatible with paper filters |
| Descaling | Every 90 cycles; "CLEAN" indication on screen |
| Maintenance and cleaning | Hand wash; do not immerse; wipe with a damp cloth |
| Safety | Automatic shut-off, safety lid, do not use without water, do not touch hot surfaces |
| Spare parts | Measuring spoon, permanent filter, anti-scale filter, thermal carafe |
| Repairability | Repair by KENWOOD or authorized repairer only |
| Compliance | CE (2004/108/EC, 1935/2004) |
| Origin | Designed in the United Kingdom, manufactured in China |
Frequently Asked Questions - CMM620 KENWOOD
User questions about CMM620 KENWOOD
0 question about this device. Answer the ones you know or ask your own.
Ask a new question about this device
Download the instructions for your Coffee maker in PDF format for free! Find your manual CMM620 - KENWOOD and take your electronic device back in hand. On this page are published all the documents necessary for the use of your device. CMM620 by KENWOOD.
USER MANUAL CMM620 KENWOOD
natural_image
Line drawing of a modern toaster with front panel and control buttons (no text or symbols)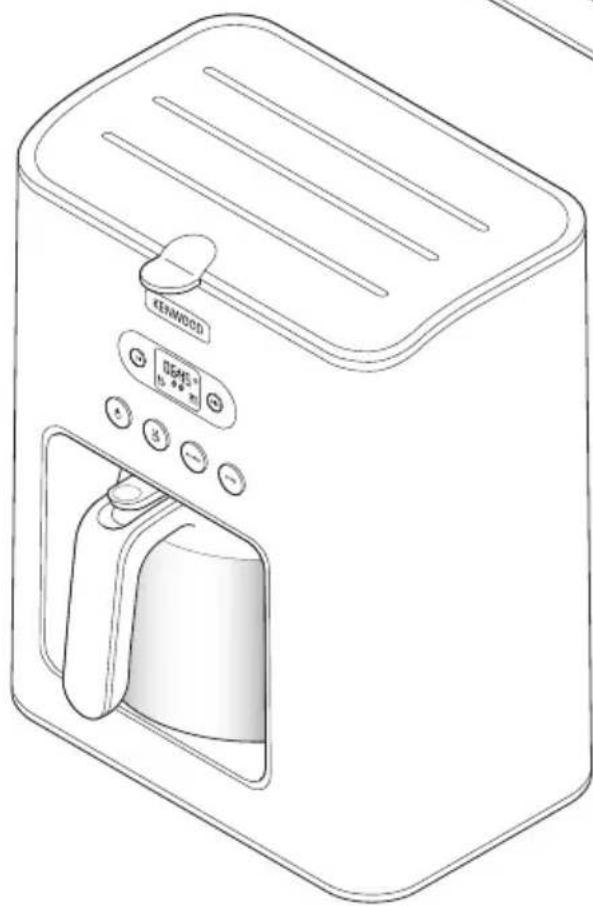
natural_image
Line drawing of a modern toaster with a digital display and control buttons (no text or symbols)CMM620
English 3 - 11
Nederlands 12 - 21
Français 22 - 31
Deutsch 32 - 41
Italiano 42 - 50
Português 51 - 59
Español 60 - 69
Dansk 70 - 78
Svenska 79 - 87
Norsk 88 - 96
Suomi 97 - 105
Türkçe 106 - 114
Česky115 - 123
Magyar124 - 132
Polski133 - 143
Ελληνικά144 - 154
Slovenčina 155 - 163
Українська 164-173
CMM610
CMM620
English
KenwoodCoffeeExperience
Here at Kenwood we share your appreciation for coffee and that's why we have ensured that this filter machine will enrich your experience for enjoying filtered coffee. Unfortunately not all coffee machines are able to brew coffee the ways it meant to be. In fact it's a fine art to deliver the perfect cup; a combination of the right ingredients and the right equipment.
Filter coffee is one of the many ways to enjoy coffee, below are some recommendations to perfect the ultimate filter coffee experience to serve you, family and friends.
TheWater\~ Your coffee is around 98-99% water so it's important to ensure you use fresh filtered water. We recommend using a water filter as it will reduce limescale and prolong the use of your coffee maker.
TheCoffee\~ This machine will optimise the flavour of medium ground coffee, to deliver full body, aroma and taste. Be sure before you buy that the coffee is suitable for a filter machine. Or if you grind your own beans set the grinder to medium coarseness. If the particles are too small, water will pass through the filter too slowly resulting in ‘over-extraction’; your coffee will taste bitter. If particles are too large, water will pass through too quickly resulting in ‘under-extraction’; your coffee will taste weak and watery.
TheMeasurements\~ To brew a perfectly balanced cup we recommend to use 7 grams or 1 tbsp of ground coffee per cup. Use the measuring spoon provided do this accurately. Coffee will taste better when fresh so we recommend drinking within 30 minutes of brewing, any longer and taste begins to deteriorate.
The Maintenance\~ Use paper filters or a permanent filter either type is suitable to produce great coffee. We recommend that you rinse your permanent filter with water after every use as any residual detergent could taint your coffee. Dispose the used grounds immediately after use to prevent drip through of unwanted flavours trapped in the used coffee grounds. Try to keep your coffee machine clean, especially the shower head as this will help to prolong your machine and maintain perfect brewing.
We hope you will enjoy coffee brewed from Kenwood.
safety
- Read these instructions carefully and retain for future reference.
- Remove all packaging and any labels.
- Watch out for steam, never lift the tank lid during the brewing cycle.
- Never touch the hotplate or surrounding area.
- Always lift the lid using the tab at the front ④.
- Do not touch hot parts.
- Never let the cord hang down where a child could grab it.
- Never use a damaged appliance. Get it checked or repaired: see ‘service and customer care’.
- Never put the appliance in water or let the cord or plug get wet - you could get an electric shock.
- Unplug:
- before filling with water
- before cleaning
- after use.
- Never leave the appliance on unattended unless using the programme feature.
- Always switch off and unplug after use unless using the programme feature.
- Do not let the cord touch hot parts.
- Always make sure there is water in the tank before switching on.
- This coffee maker is only suitable for use with the type of carafe supplied.
- The CMM610 glass carafe is not interchangeable with the CMM620 thermal carafe.
- CMM610 only - Do not leave the appliance switched on with an empty carafe on the hotplate.
- Never put the carafe in the microwave.
- Misuse of your appliance can result in injury.
- Children from 8 years and above can use, clean and perform user maintenance on this appliance in accordance with the User Instructions provided they are supervised by a person responsible for their safety and have been given instruction concerning the use of the appliance and are aware of the hazards.
- Persons with reduced physical, sensory or mental capabilities or lack of knowledge using this appliance must have been given supervision or instruction on its safe use and are aware of the hazards.
- Children must not play with the appliance and both appliance and cord must be out of reach of children less than 8 years.
- Only use the appliance for its intended domestic use. Kenwood will not accept any liability if the appliance is subject to improper use, or failure to comply with these instructions.
before plugging in
Make sure your electricity supply is the same as the one shown on the underside of your appliance.
●W ARNING: THIS APPLIANCE MUST BE EARTHED.
- This appliance conforms to EC directive 2004/108/EC on Electromagnetic Compatibility and EC regulation no. 1935/2004 of 27/10/2004 on materials intended for contact with food.
before using for the first time
1 Wash the parts: see 'care and cleaning'.
2 Run two full tanks of water (without coffee) through the coffee maker to clean it out. See 'to make coffee'.
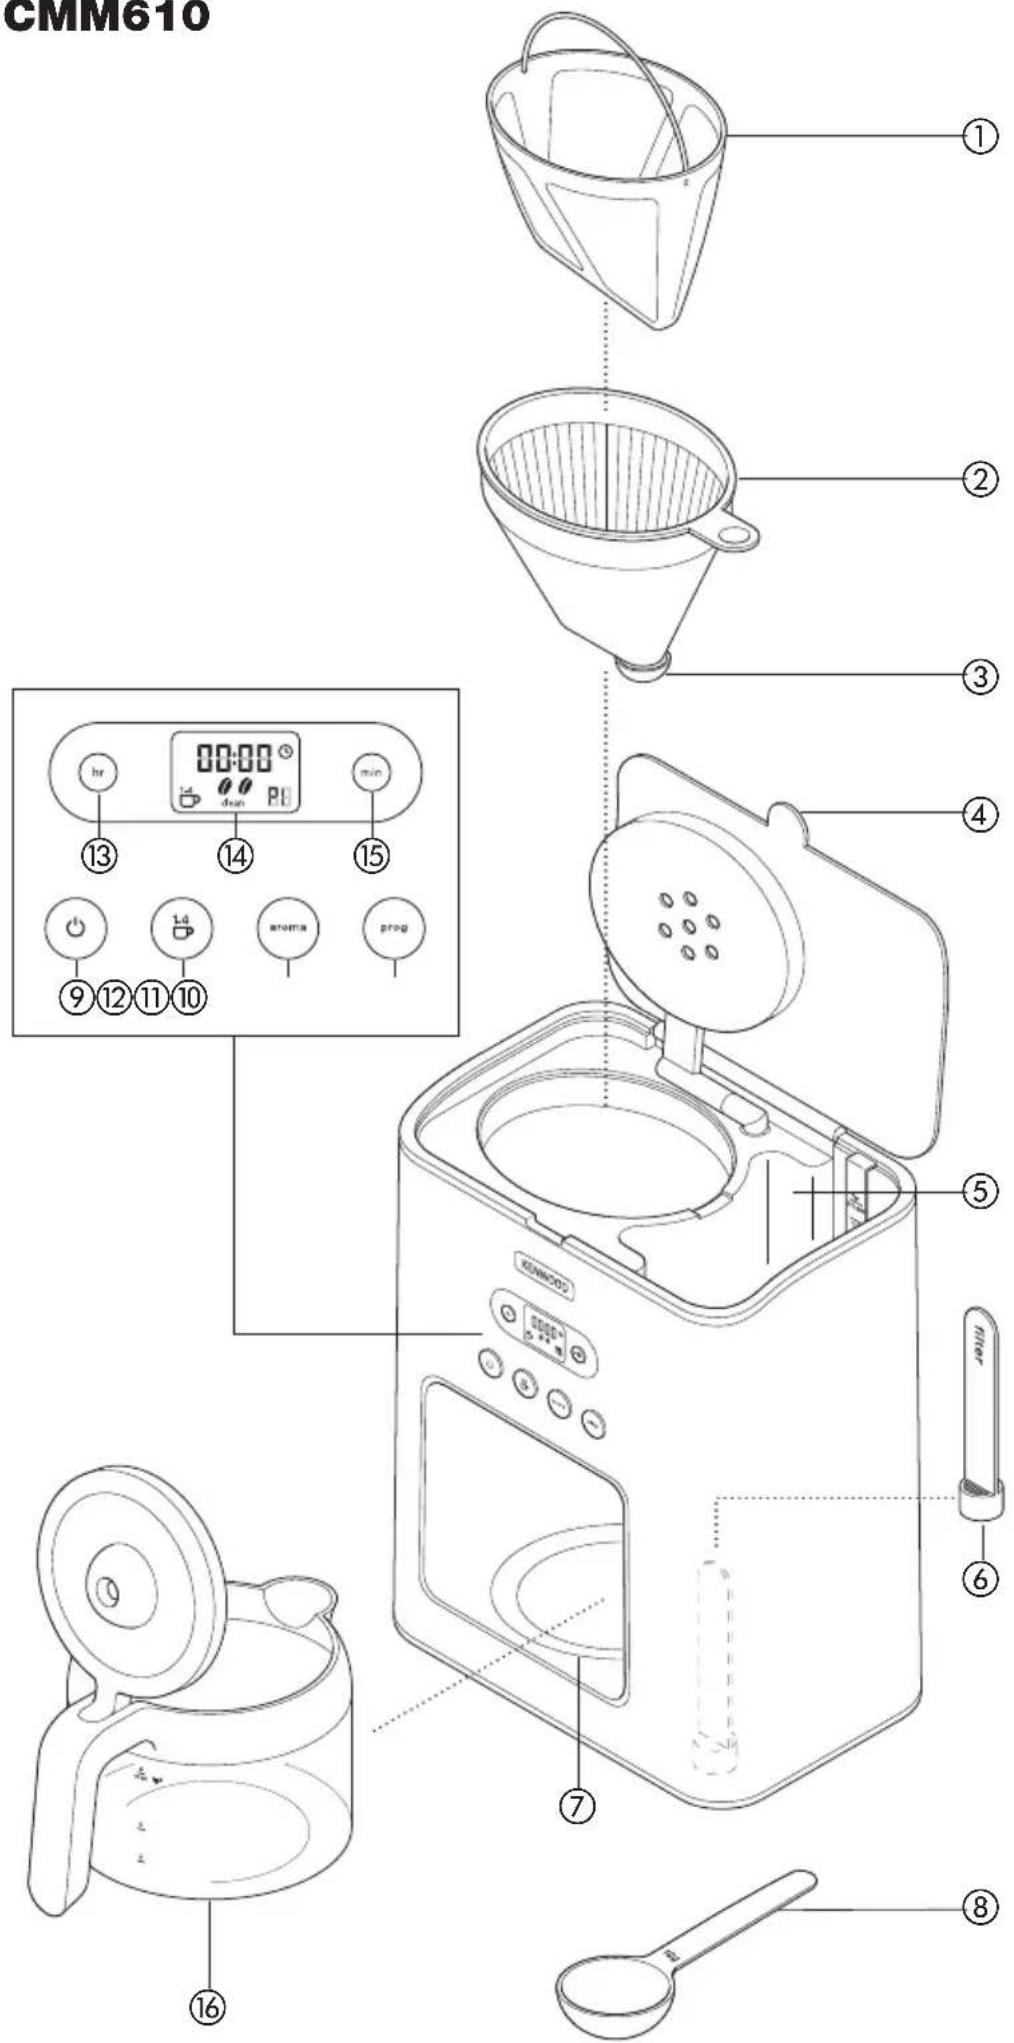
key - CMM610
①permanent filter
②filter holder
③anti-drip valve
④lid tab
⑤water tank (max 1500mls)
⑥scale filter
⑦hotplate
⑧measuring spoon
⑨ON/OFF button with indicator
⑩1 - 4 cup button
⑪ aroma control button
⑫programme button
⑬hour setting button
⑭display screen
⑮minute setting button
⑯glass carafe
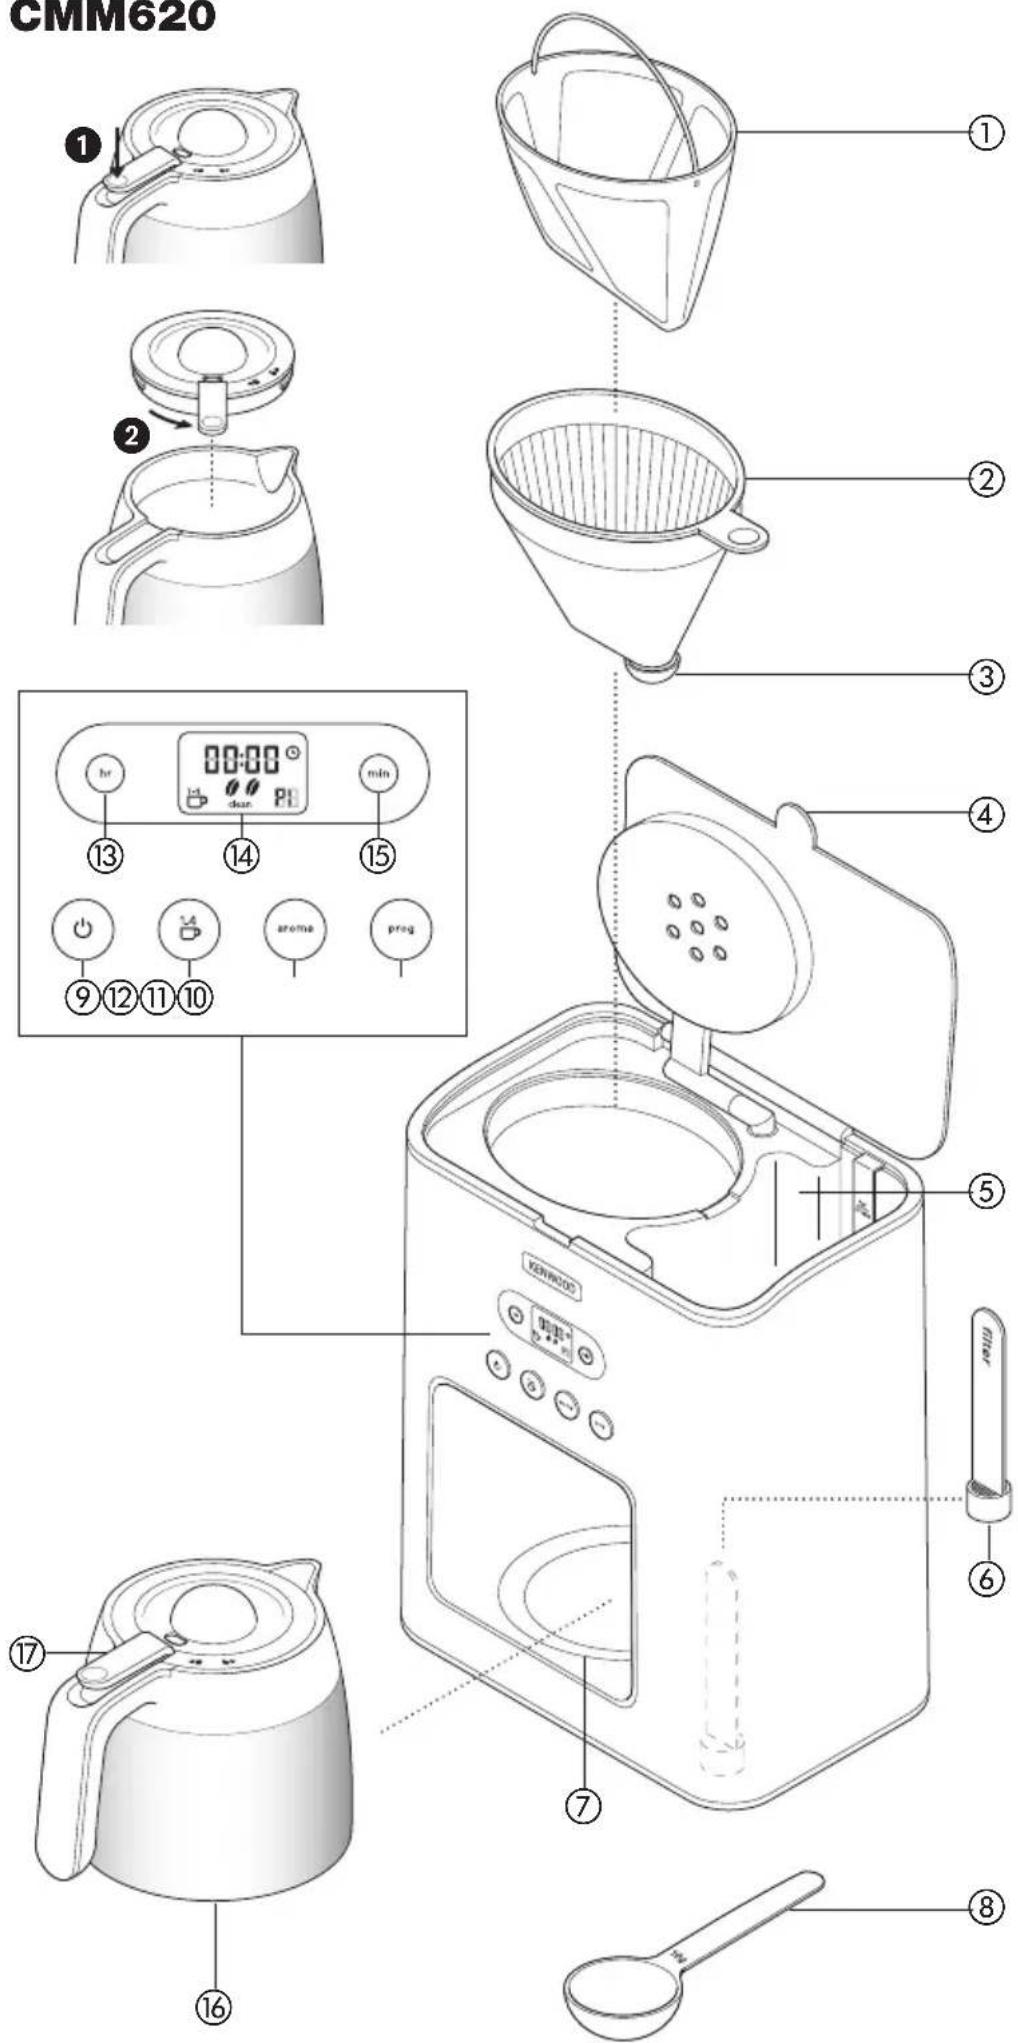
key - CMM620
①permanent filter
②filter holder
③ anti-drip valve
④lid tab
⑤water tank (max 1250mls)
⑥ scale filter
⑦location plate
⑧measuring spoon
⑨ON/OFF button with indicator
⑩1 - 4 cup button
⑪ aroma control button
⑫programme button
⑬hour setting button
⑭display screen
⑮minutes setting button
⑯thermal carafe
⑰lid release lever
Note: the glass carafe is only suitable for use with the CMM610 coffee maker model and the thermal carafe is only suitable for use with the CMM620 coffee maker model. The glass and thermal carafes are not interchangeable. etting the clock
1 Plug in, the display screen will show 00:00 and flash until the time is set on the 24 hour clock.
2 Set the time on the clock by pressing the Hour and Minute buttons until the required time is reached. Holding the buttons in when selecting the time will allow you to scroll more rapidly through.
Note: if the coffee maker is unplugged the time will not be saved and the display screen will default back to showing 00:00 and flash until the time is set again.
to make coffee
1 Lift the lid using the tab ④ at the front of the coffee maker.
2 Fill the tank with the desired amount of water – ensure the scale filter ⑥is fitted correctly in the bottom of the tank. The water level must be between 125mls and the MAX mark. Do not overfill above the MAX level.
| Models Min Max | |
| CMM610 125mls 1500mls | |
| CMM620 125mls 1250mls | |
- Use cold water. We recommend using filtered water as it reduces limescale and prolongs the life of your coffee maker. Never use warm or fizzy water.
3 Ensure the filter holder is positioned correctly.
4 Fit either the permanent filter supplied or a paper filter into the filter holder. Add the coffee using the spoon supplied (approximately 1 level spoon (7g) per cup to taste).
5 Close the lid and put the carafe on the hotplate/location plate ⑦.
Note: Ensure the lid is fully closed. If the lid is not closed down correctly the anti-drip valve will not operate causing the filter holder to overfill, resulting in water spillage from out of the holder area.
1-4 brewing small quantities
- If you want to brew small quantities (500 ml or less) press the (1-4 cup) button and the graphic will appear on the display screen.
- Press the (1-4 cup) button again to remove option from display screen.

Aroma control
- To adjust the strength of your coffee press the Aroma button and select from the following settings:-
| Standard – default setting |  |
| Medium – press button once |  0 0 |
| Strong – press button twice |  00 00 |
6 Press the ON/OFF button and the indicator light will flash to show the brewing cycle has started.
7 Don't remove the carafe until brewing has finished.
CMM620 Thermal carafe - to pour coffee from the carafe, push the lid release lever ⑰ down ①. To empty and clean the carafe, remove the lid by turning the lid release lever anti clockwise ② and lift off.
8 When the carafe is empty, press the ON/OFF button and the coffee maker will go into "Standby Mode" and the display will dim until any of the buttons are pressed again.
NOTE: if the coffee maker is not in the brewing cycle and none of the buttons are pressed the coffee maker will automatically go into "Standby Mode" to help reduce energy consumption.
CMM610 only
- Your coffee maker will keep the coffee warm and then switch off after approximately 40 minutes. The indicator light will go out when the keep warm stops. If you want to continue keeping the coffee warm ensure the water tank is empty before pressing the ON/OFF button back on, the coffee will then keep warm for another 40 minutes.
●The Keep Warm feature will not operate if the (1-4) cup feature is selected.
Programme feature
| The programme feature allows you to create and store up to 8 of your own personal settings. | |
| 1 Set the coffee maker up with the required water and coffee as per the “to make coffee” section. | |
| 2 To ensure the coffee maker will start at the correct time check that the 24 hour clock is set to the correct time before creating your programmes. Refer to “Setting the Clock” section.For example: set time to 2pm (14:00). |  |
| 3 Press the programme button once and the display screen will show ‘P1’ and the symbol will flash.If no selection is made within 15 seconds the screen will revert back to the normal clock function but ‘P1’ will still be shown on the display screen.Note: a program can only be set when a programme number is shown on the display and the symbol is flashing. | 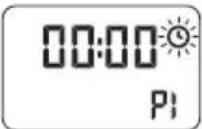 |
| 4 Press the programme button again and P1 will be displayed on the screen. | |
| Firstly set the time you want the coffee maker to automatically switch on. Note: The programme feature will not operate unless a time is set.For example if you want the coffee maker to start at 8:30am. Press the hour and minute buttons until 08:30 shows on the display screen.Then set the following if required: | 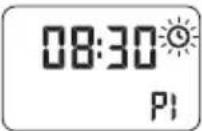  |
| Strength of the coffee. | |
| Coffee quantity either full carafe or small quantities. |  |
| 5 Once you have set the programme to your personal requirements, either select another programme by pressing the programme button again or press the ON/OFF button to start the programme. | |
| 6 When you want to start a programme, select the required programme by pressing the programme button until the number required is shown in the display. For example: Program 1 (P1) to start at 8:30am and medium aroma selected. | 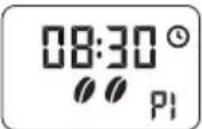 |
| 7 Then press the ON/OFF button to start the program. If the program is set to start straight away the ON/OFF indicator light will start flashing.Note: if you have set a delayed start time the symbol, programme number and the current time will be shown on the display but the ON/OFF button light will remain constant until the start time set is reached. | 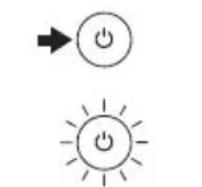 |
care & cleaning
● Always switch off, unplug and allow to cool before cleaning.
- Do not wash parts in the dishwasher.
- If you have not used the appliance for a while, run one full tank of water (without coffee) through to clean it out.
filter holder and permanent filter
- Wash, then dry.
CMM610 - Glass carafe
●Wash, then dry.
●Note: the lid is not removable.
CMM620 - Thermal carafe
- To empty and clean the carafe, remove the lid by turning the lid release lever ⑰ anti clockwise ② and lift off.
●Wash the carafe and lid, then dry. - Refit the lid and turn the lid release lever ⑰ clockwise to lock.
body
- Wipe with a damp cloth, then dry. Don't use abrasives - they'll scratch the plastic and metal surfaces.
to descale
It is recommended that you descale your coffee maker after approximately 90 brewing cycles when “CLEAN” appears on the display screen.
1 Buy a suitable descaler.
2 Descale the machine.
Note: leave the scale filter fitted in the tank whilst descaling.
3 After descaling, run at least two full tanks of water (without coffee) through the coffee maker to clean it out.
4 Wash the parts.
service and customer care
- If the cord is damaged it must, for safety reasons, be replaced by KENWOOD or an authorised KENWOOD repairer.
If you need help with:
• using your appliance
• servicing or repairs
- Contact the shop where you bought your appliance.
- Designed and engineered by Kenwood in the UK.
- Made in China.
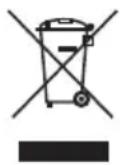
IMPORTANT INFORMATION FOR CORRECT DISPOSAL OF THE PRODUCT IN ACCORDANCE WITH EC DIRECTIVE 2002/96/EC.
At the end of its working life, the product must not be disposed of as urban waste.
It must be taken to a special local authority differentiated waste collection centre or to a dealer providing this service.
Disposing of a household appliance separately avoids possible negative consequences for the environment and health deriving from inappropriate disposal and enables the constituent materials to be recovered to obtain significant savings in energy and resources. As a reminder of the need to dispose of household appliances separately, the product is marked with a crossed-out wheeled dustbin.
troubleshooting guide
| Problem Cause Solution | ||
| Coffee maker not No operating Coffee maker not plugged plugged in. in. | aker is | |
| Programme feature not operating water. | No water in tank. Ensure tankStart time not set during The programming. not operate if Incorrect time set or set. wrong program selected.ON/OFF button not Check the pressed to start program. symbol. If no selection is made within 15 seconds the screen will revert back to the normal clock function but ‘P1’ will still be shown on the display screen.Note: a program can only be set when a programme number is shown on the display and the symbol is flashing. | is filled withprogramme feature will a time is notthat the timer symbol, program number and the current time are shown on the display screen.Refer to “Programme feature” section. |
| Coffee not filtering through to carafe | No water in tank. Fill the tankLid not closed down correctly. | with water.Ensure the lid is fully closed. If the lid is not closed down correctly the anti-drip valve will not operate causing the filter holder to overfill, resulting in water spillage from out of the holder area. |
| Limescale/mineral build up on shower head and scale filter in tank affecting operation.“CLEAN” shown on display after 90 brewing cycles. | Descale your coffee maker. Refer to “descaling” section under care and cleaning. | |
| Display screen dimmed | If the coffee maker is not in the brewing cycle and none of the buttons are pressed the coffee maker with automatically go into the “Standby mode” to help reduce energy consumption. | Press a button to switch the coffee maker back on. |
| Thermal Carafe – Carafe cold. | Pre-warm the carafe with hot water prior to brewing will keep the coffee hotter. | |
| Thermal Carafe – coffee not hot enough | Lid release 17 not pushed down. | To pour coffee from the carafe, push the lid release lever 17 down 1. |
| If none of the above solve the problem see “Service & Customer Care”. | ||
troubleshooting guide
| Problem Cause | Solution | |
| Keep Warm Keep W feature not automatically switch off is empty, then press the operating. after approximately 40 ON/OFF button back on to minutes. keep your coffee warm for a further 40 minutes.Keep Warm feature will Check that the (1-4) cup not operate if the (1-4) cup has not been selected. feature is selected. Press the (1-4) cup button to cancel selection. | ||
| If none of the above solve the problem see “Service & Customer Care”. | ||
Nederlands
●WAARSCHUWING: DIT APPARAAT MOET GEAARD ZIJN.
HEAD OFFICE: Kenwood Limited, 1-3 Kenwood Business Park, New Lane, Havant, Hampshire POS
kenwoodworld.com


- English
- KenwoodCoffeeExperience
- safety
- before plugging in
- ●W ARNING: THIS APPLIANCE MUST BE EARTHED.
- before using for the first time
- key - CMM610
- key - CMM620
- to make coffee
- 1-4 brewing small quantities
- Aroma control
- CMM610 only
- Programme feature
- care & cleaning
- filter holder and permanent filter
- CMM610 - Glass carafe
- CMM620 - Thermal carafe
- body
- to descale
- service and customer care
- IMPORTANT INFORMATION FOR CORRECT DISPOSAL OF THE PRODUCT IN ACCORDANCE WITH EC DIRECTIVE 2002/96/EC.
- Nederlands
- ●WAARSCHUWING: DIT APPARAAT MOET GEAARD ZIJN.
Brand : KENWOOD
Model : CMM620
Category : Coffee maker