
Viaggio1 DuoFix K - Car seat PEG PEREGO - Free user manual and instructions
Find the device manual for free Viaggio1 DuoFix K PEG PEREGO in PDF.

User questions about Viaggio1 DuoFix K PEG PEREGO
0 question about this device. Answer the ones you know or ask your own.
Ask a new question about this device
Download the instructions for your Car seat in PDF format for free! Find your manual Viaggio1 DuoFix K - PEG PEREGO and take your electronic device back in hand. On this page are published all the documents necessary for the use of your device. Viaggio1 DuoFix K by PEG PEREGO.
USER MANUAL Viaggio1 DuoFix K PEG PEREGO
EN Instructions for use
FR Notice d'emploi
natural_image
Silhouette of a car above a right-pointing arrow (no text or symbols)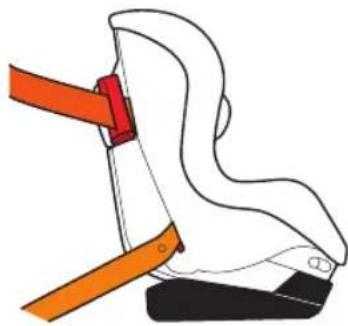
natural_image
Illustration of a hand gripping a curved object with orange and white bands (no text or symbols)EN· The "Viaggio1 Duo-Fix K" car safety seat is attached to the car using a three-point seat belt.
natural_image
Silhouette of a car above a right-pointing arrow (no text or symbols)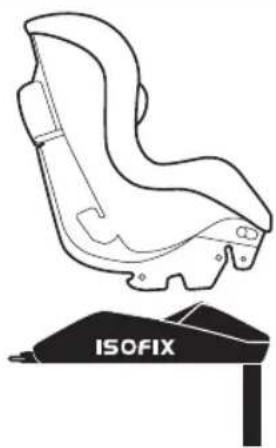
natural_image
Line drawing of a scooter seat with 'ISOFIX' label, no other text or symbols presentIT• Il seggiolino auto "Viaggio1 Duo-Fix K" si aggancia in auto con il sistema ISOFIX. Consultare il manuale istruzioni di "Isofix Base 0+1" per le istruzioni di fissaggio in auto.
EN• The "Viaggio1 Duo-Fix K" car seat is secured in vehicles with the ISOFIX system. See the "Isofix Base 0+1" instruction manual for the vehicle installation procedure.
FR• Le siège-auto «Viaggio1 Duo-Fix K» se fixe dans le véhicule grâce au système ISOFIX. Consulter le manuel d'instructions d'« Isofix Base 0+1 » pour prendre connaissance des instructions de fixation dans le véhicule.
DE• Autokindersitz „Viaggio1 Duo-Fix K“ wird mit dem ISOFIX-System auf dem Autositz befestigt. Die Anleitung zur Befestigung im Auto entnehmen Sie bitte dem Handbuch „Isofix Base 0+1“
ES• La silla de auto "Viaggio1 Duo-Fix K" se engancha en el automóvil con el sistema ISOFIX. Consultar el manual de instrucciones de "Isofix Base 0+1" para seguir las instrucciones de fijación en el automóvil.
BR-PT· A cadeira auto "Viaggio1 Duo-Fix K" acopla-se ao automóvel com o sistema ISOFIX. Consulte o manual de instruções de "Isofix Base 0+1" para as instruções de fixação ao automóvel.
NL• Het autozitje "Viaggio1 Duo-Fix K" wordt in de auto met het ISOFIX-systeem bevestigd. Raadpleeg de gebruiksaanwijzing van "Isofix Base 0+1" voor de aanwijzingen voor bevestiging in de auto.
SEMI-UNIVERSAL CATEGORY 9-18 Kg Y ISOFIX
DK• Autostolen "Viaggio1 Duo-Fix K" monteres i bilen ved hjælp af systemet ISOFIX. Se brugsanvisningen for "Isofix Base 0+1" for anvisninger på, hvordan den spændes fast i bilen.
FI• "Viaggio1 Duo-Fix K" turvaistuin kiinnitetään autoihin joissa ISOFIX järjestelmä. Katso "Isofix Base 0+1" ajoneuvoon asennuksen toimenpiteet käyttöohjekirjasta.
CZ- Autosedačka "Viaggio1 Duo-Fix K" se pripevnuje do auta k systému ISOFIX. Pokyny k pripevnění do auta najdete v návodu k použití pro podstavec "Isofix Base 0+1".
SK• Autosedačka "Viaggio1 Duo-Fix K" sa vo vozidle upína pomocou systému ISOFIX. Pokyny na upevnenie vo vozidle nájdete v návode na použitie pre "Isofix Base 0+1".
HU• A "Viaggio1 Duo-Fix K" autós ülés az ISOFIX rendszerrel rögzíthető az autóba. Az autóban történő rögzítésre vonatkozóan olvassa el az "Isofix Base 0+1" használati utasítását.
SL• Avtosedež "Viaggio1 Duo-Fix K" v avtomobil pripnemo s sistemom ISOFIX. Upoštevajte navodilo za uporabo »Isofix base 0+1«, v katerem so navodila za pritrditev v avtomobil.
RU• Детское автокресло "Viaggio1 Duo-Fix K" крепится к автомобило с помощью системы ISOFIX. Для правильного крепления системы к автомобило внимательно ознакомьтесь с инструкцией к "Isofix Base 0+1".
TR• Oto bebe koltuğu "Viaggio1 Duo-Fix K" otomobile ISOFIX sistemi ile takılır. Otomobile sabitleme talimatları için "Isofix Base 0+1" talimat kitapçığına bakınız.
HR/SRB/MNE/BiH• Auto sjedalica "Viaggio1 Duo-Fix K" se pričvršćuje u vozilu sustavom ISOFIX. Pročitajte priručnik za uporabu "Isofix Base 0+1" za upute o montaži.
PL• Fotelik Viaggio 1 Duo-Fix K jest montowany w samochodzie za pomocą trzypunktowych pasów bezpieczeństwa.
UA•Автокрісло "Viaggio1 Duo-Fix K" закріплено в автомобілях з системою ISOFIX. Див. Інструкцію з експлуатації транспортного засобу "Isofix Base 0 + 1".
EL·To κάθισμα autokivnțou "Viaggio1 Duo-Fix K" συνδέεται στο autokívητο με το σύστημα ISOFIX. Συμβουλευτείτε το εγχειρίδιο οδηγιών της "Isofix Base 0+1" για τις οδηγίες στερέωσης στο autokívητο.
natural_image
Diagram showing a car being adjusted to a seatbelt, with an arrow indicating leftward movement (no text or symbols present)
natural_image
Simple icon of a seatbelt with a diagonal band (no text or symbols)OK
natural_image
Line drawing of a car seat assembly (no text or symbols)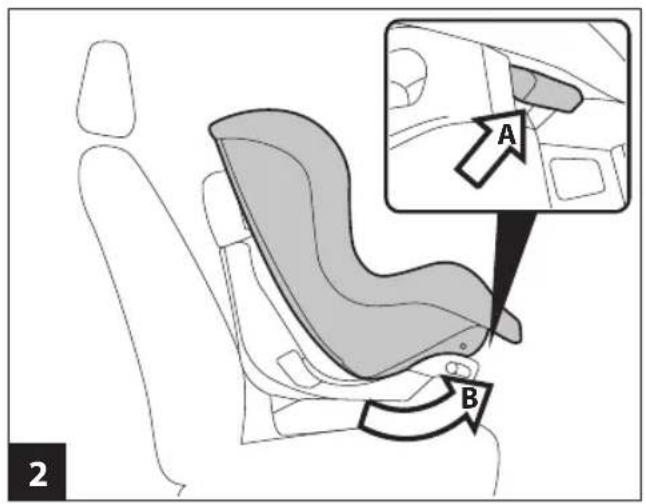
natural_image
Illustration of a car seat with orange and gray belt, showing seatbelt usage (no text or symbols)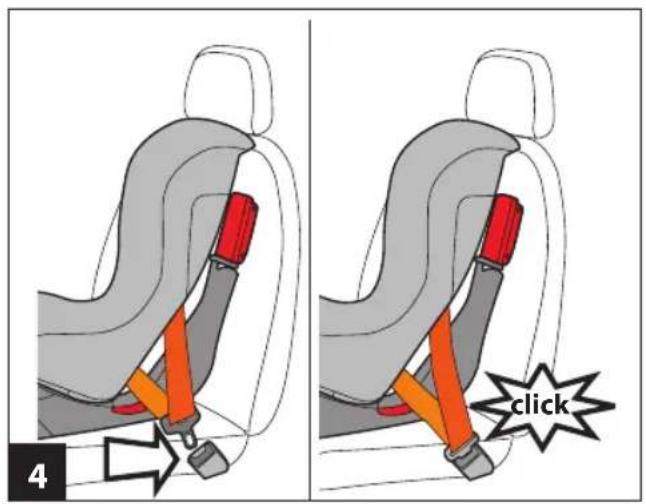
natural_image
Diagram of a car seat with orange belt and orange straps, no text or symbols present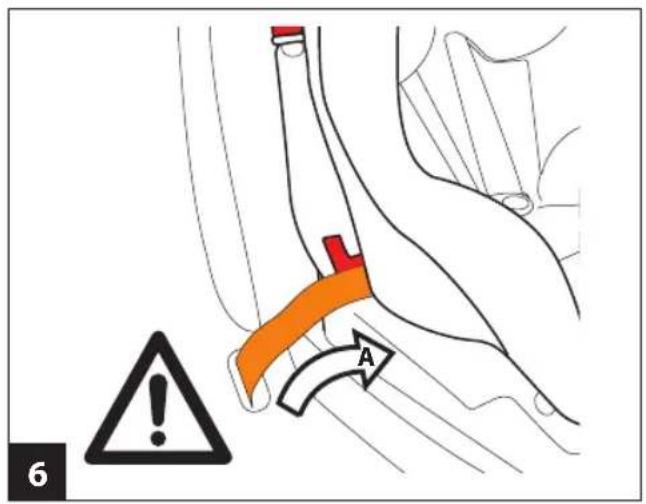
SEMI-UNIVERSAL CATEGORY 9-18 Kg Y ISOFIX

natural_image
Line drawing of a car seat with 'ISOFIX®' branding on the base (no other text or symbols)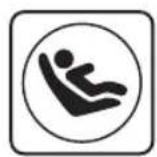
flowchart
graph TD
    A["Point A"] --> B["Point B"]
    B --> C["Point C"]
    C --> D["Point D"]
    style A fill:#f9f,stroke:#333
    style B fill:#f9f,stroke:#333
    style C fill:#f9f,stroke:#333
    style D fill:#f9f,stroke:#333
natural_image
Line drawing of a car seat assembly with a close-up inset showing the detail of the seat (no text or symbols present)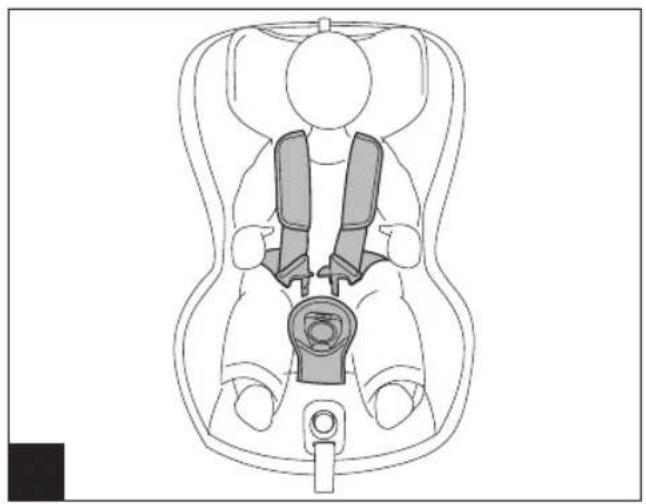
natural_image
Line drawing of a car seat assembly with two seats and a central seat (no text or symbols)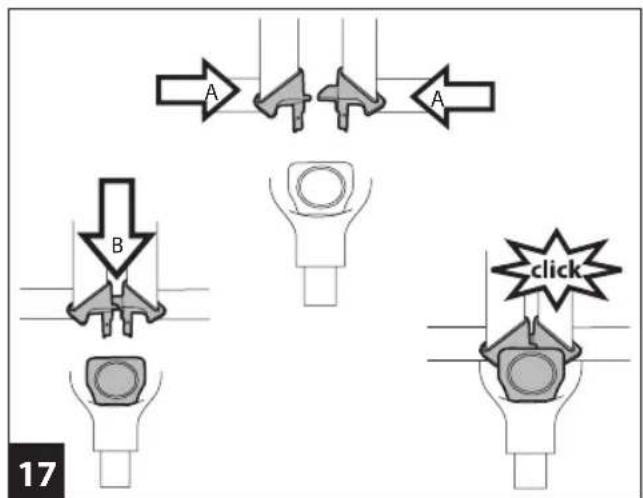
flowchart
graph TD
    A["Start"] --> B{Component 1}
    B --> C["Component 2"]
    C --> D{Component 3}
    D --> E["Component 4"]
    E --> F["Click"]
    style A fill:#f9f,stroke:#333
    style B fill:#ccf,stroke:#333
    style C fill:#cfc,stroke:#333
    style D fill:#fcc,stroke:#333
    style E fill:#cff,stroke:#333
    style F fill:#ffc,stroke:#333

natural_image
Line drawing of a car seat with a seatbelt and seat, no text or symbols present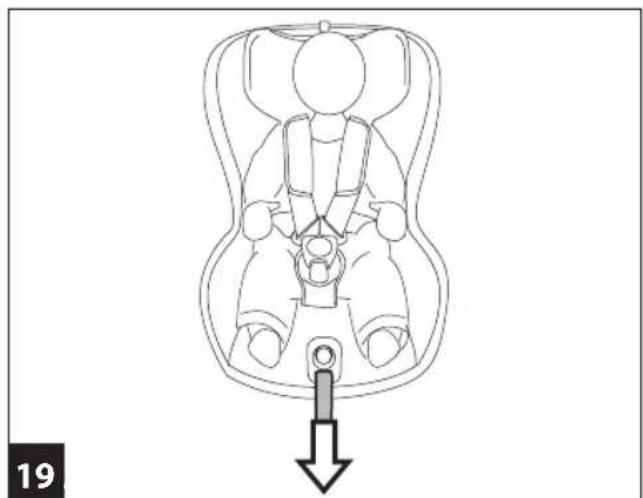
natural_image
Line drawing of a car seat assembly with a downward arrow indicating a component (no text or symbols)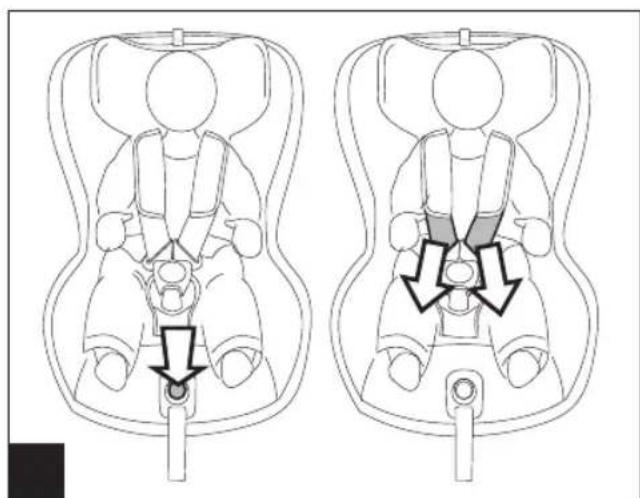
natural_image
Two identical line drawings of a car seatbelt device with arrows indicating movement or force (no text or symbols)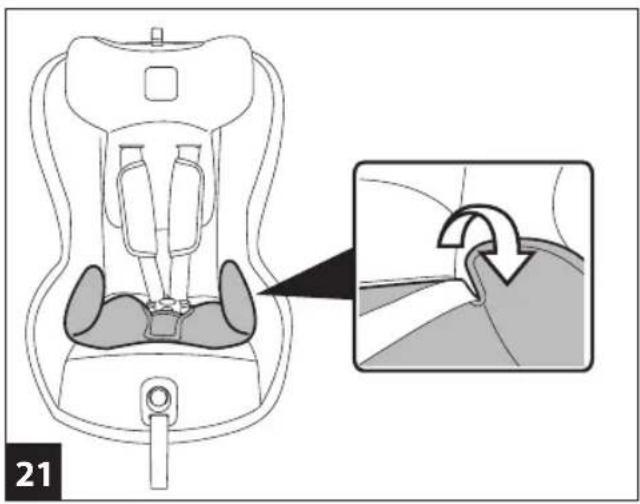
natural_image
Diagram of a car seat assembly with an inset showing the internal structure (no text or labels)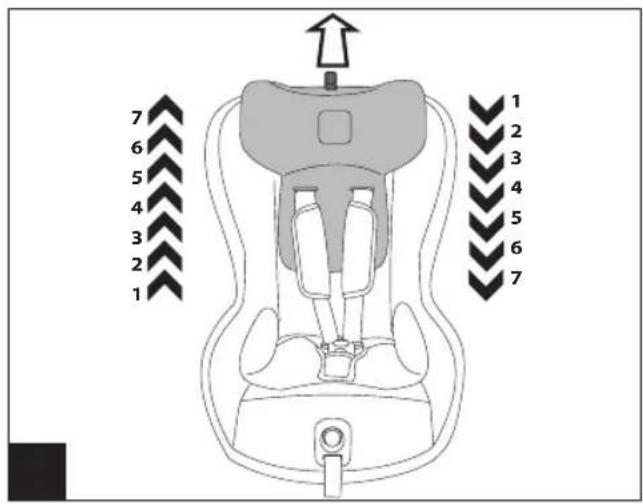
natural_image
Mechanical component diagram showing a piston-like structure with a curved arrow labeled 'A' indicating rotational motion (no text or symbols beyond label)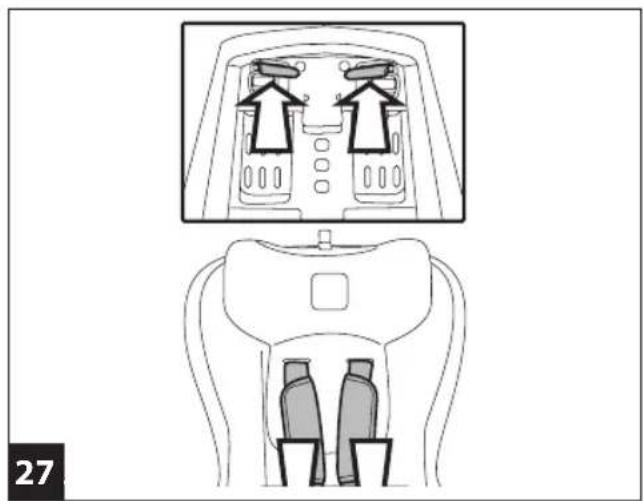
natural_image
Diagram of a car seat assembly showing front and side views with no text or symbols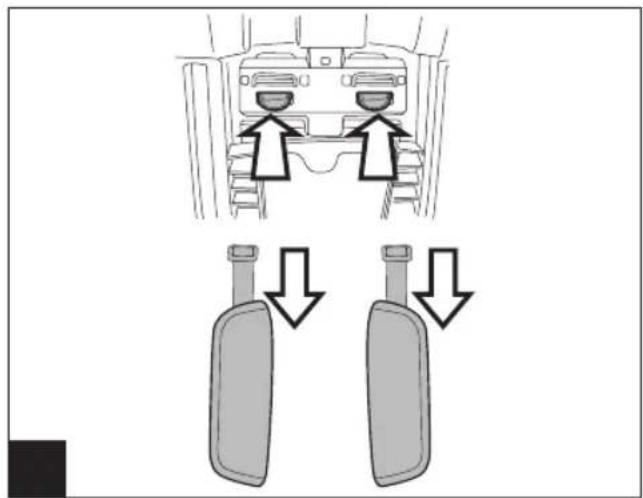
natural_image
Diagram showing two views of a car interior with arrows indicating movement or force (no text or symbols)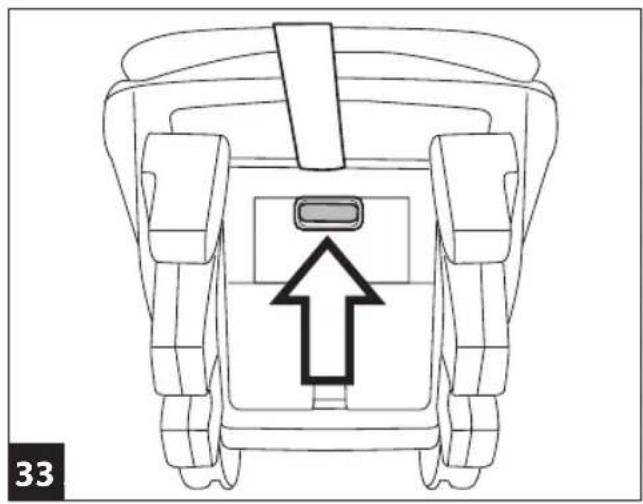
natural_image
Top-down line drawing of a robot's back view with an arrow pointing to the front wheel (no text or symbols)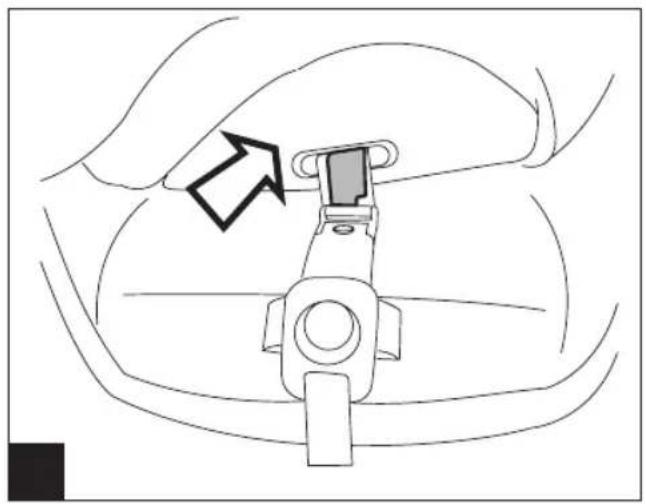
natural_image
Line drawing of a car seatbelt mechanism with a black arrow indicating the adjustment point (no text or symbols present)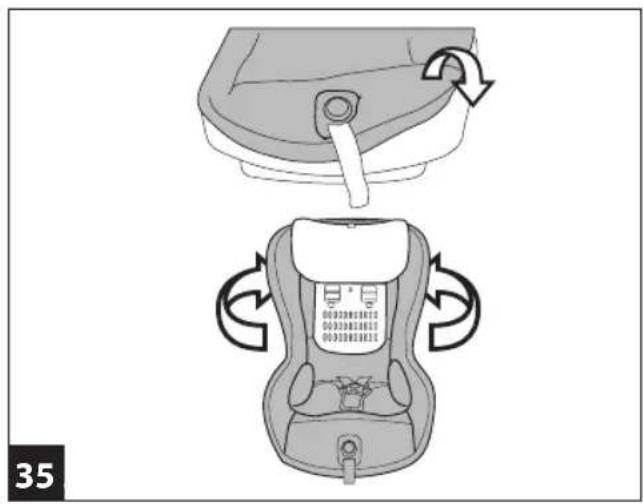
natural_image
Diagram showing two steps of a car seat replacement device with rotation arrows (no text or symbols)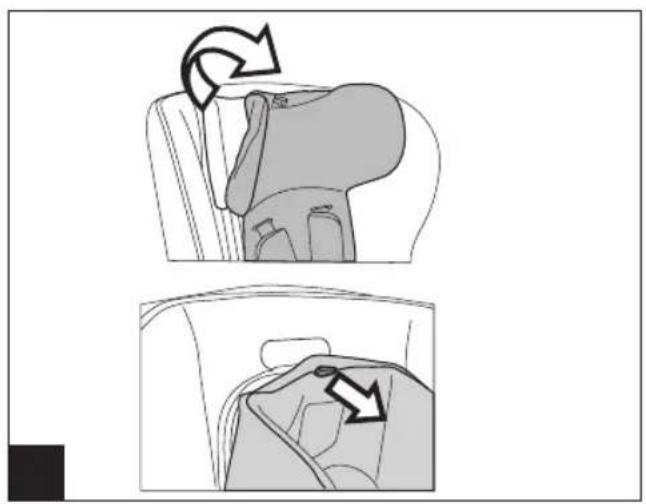
natural_image
Diagram showing two steps of a mechanical or anatomical process, with arrows indicating rotational movement (no text or symbols present)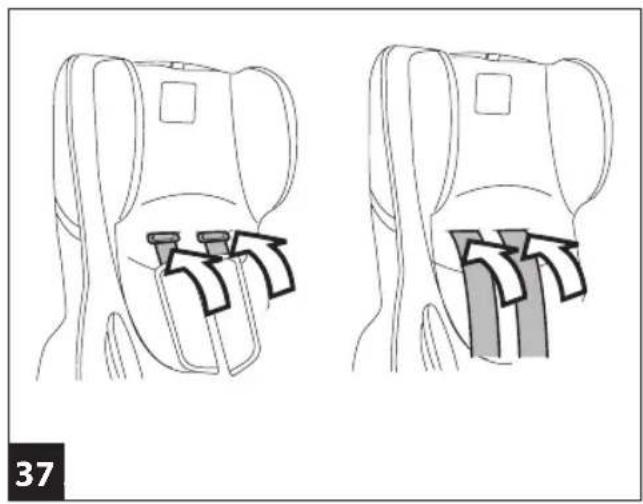
natural_image
Diagram showing two views of a car seat with arrows indicating movement or force direction (no text or symbols)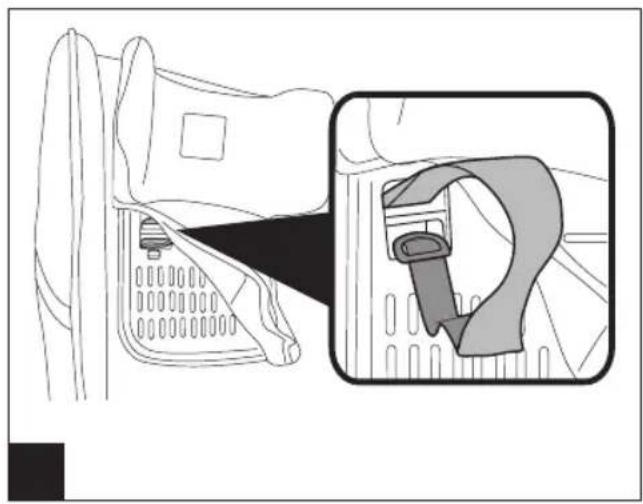
natural_image
Diagram showing a car seatbelt switch inside the seat, with an inset close-up of the component (no text or symbols)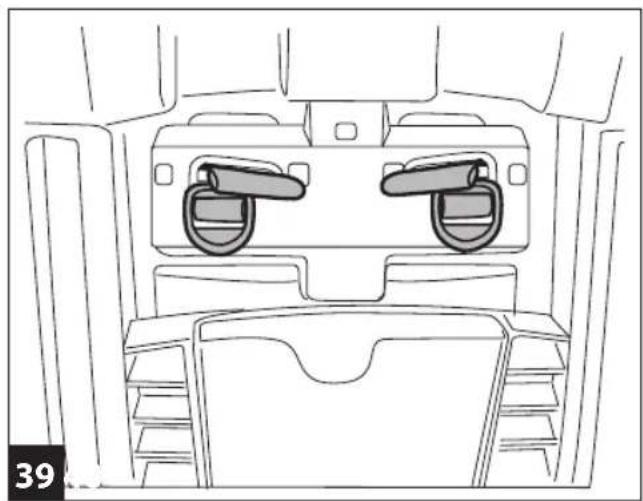
natural_image
Top-down line drawing of a car interior showing front seats and rear seats with two side-mounted lockers (no text or symbols)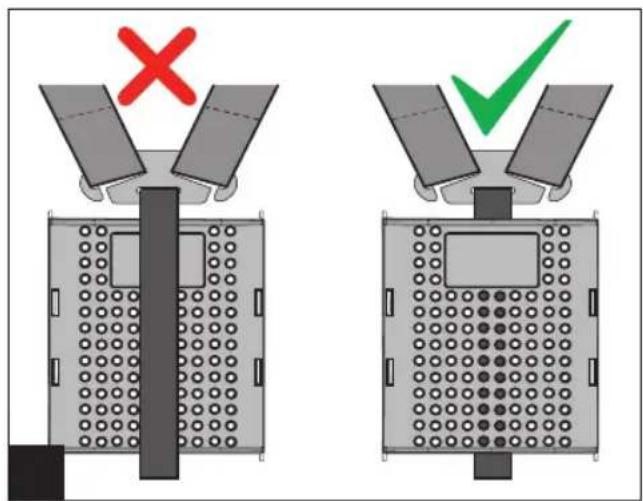
natural_image
Two grayscale illustrations of car seat compartments, labeled (a) and (b), with no text or symbols on the diagrams themselves.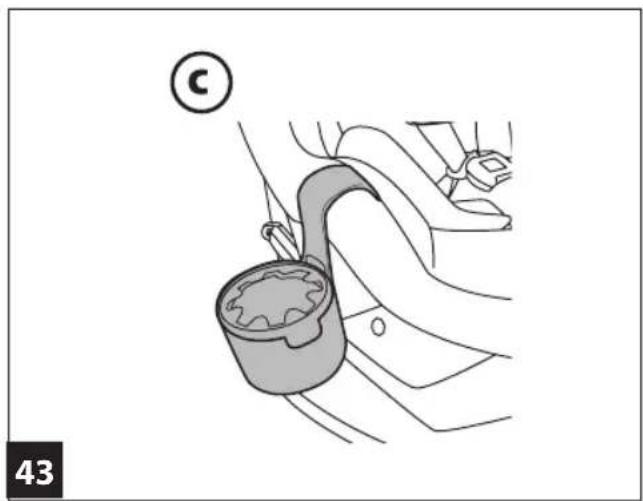
natural_image
Line drawing of a car seatbelt buckle with a circular mark and number 43, no text or symbols present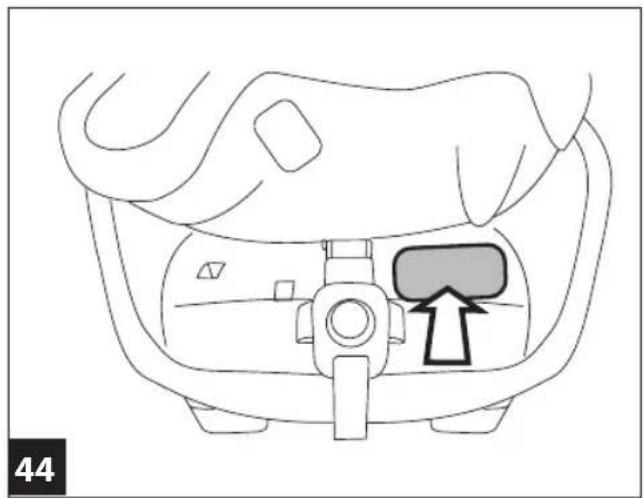
natural_image
Line drawing of a car interior with a highlighted seat area and directional arrow (no text or symbols)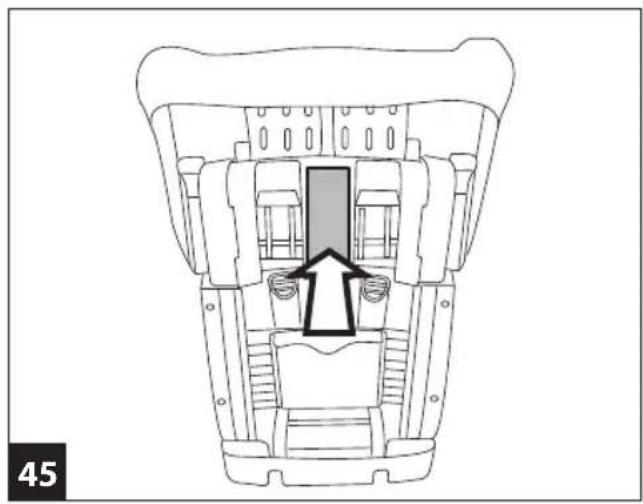
natural_image
Technical line drawing of a mechanical component with an arrow indicating direction (no text or symbols)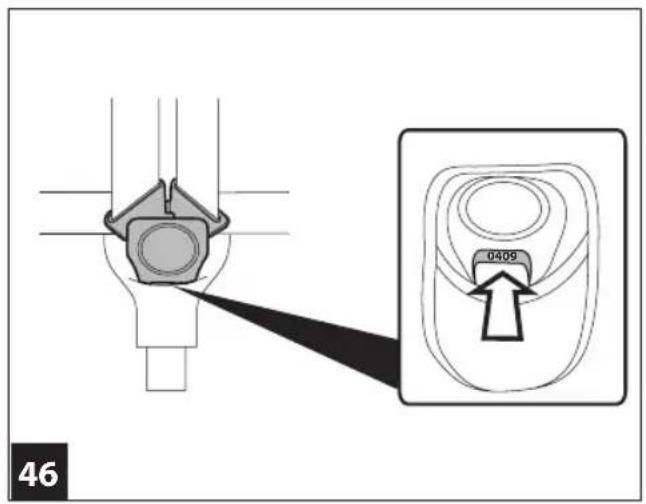
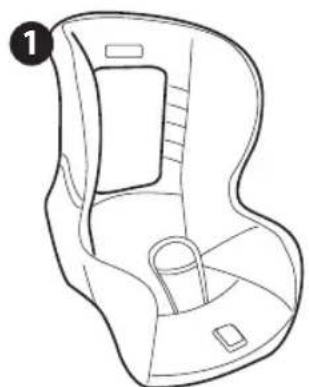
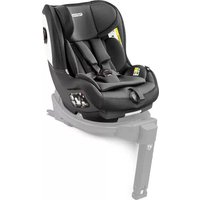
Viaggio1 Duo-Fix K
natural_image
Line drawing of a car seat with no text or symbols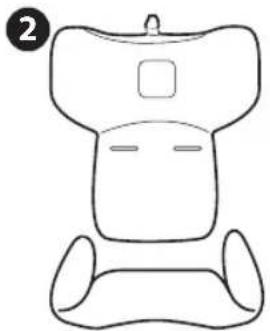
natural_image
Simple line drawing of a robot head with no text or symbols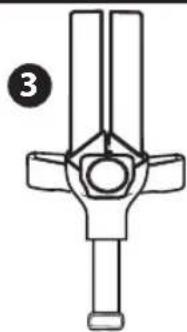
natural_image
Technical line drawing of a mechanical component with no visible text or symbols
natural_image
Simple line drawing of two identical plastic bottles with caps, no text or symbols present
EN• Spare parts available in different colours to be specified when ordering.
Thank you for choosing a Peg-Pérego product.
Product Characteristics
Group 1 "Universal" category car seat
- Approved under European standard UN/ECE R44/04 for children weighing from 9 to 18 kg (from 1 to 4 years approx).
- Suitable for installation on the majority of vehicle seats, but not all.
- The car seat can be correctly installed if the vehicle's use and maintenance manual indicates compatibility with "Universal" Group 1 restraint systems.
- This car seat is classed as "Universal" in compliance with stricter approval criteria than previous models that do not have approval labels.
- The car seat can only be used in approved vehicles, fitted with static or inertia-reel three-point safety belts, approved under regulation UN/ECE no. 16 or equivalent standards.
- Two-point belts and lap belts must not be used.
Group 1 car seat with class A "Semi-universal" Isofix Base 0+1
• Approved under European standard UN/ECE R44/04 for children weighing from 9 to 18 kg (from 1 to 4 years approx).
- The use of the Isofix Base 0+1 in vehicles ensures greater safety.
- Ensure that the vehicle is fitted with an Isofix system. Also check the list of car models provided with the product.
IMPORTANT
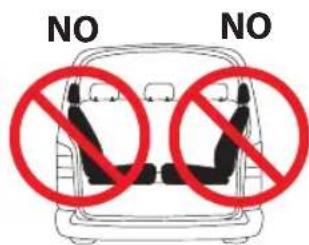
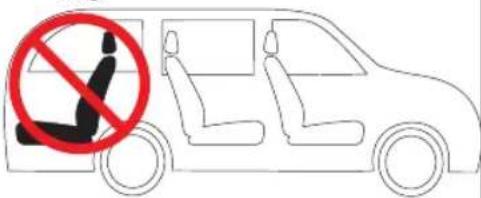
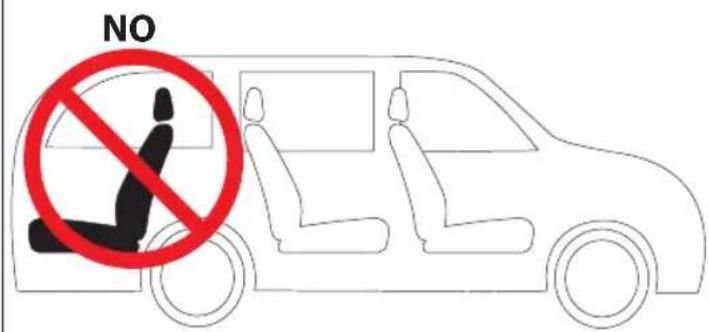
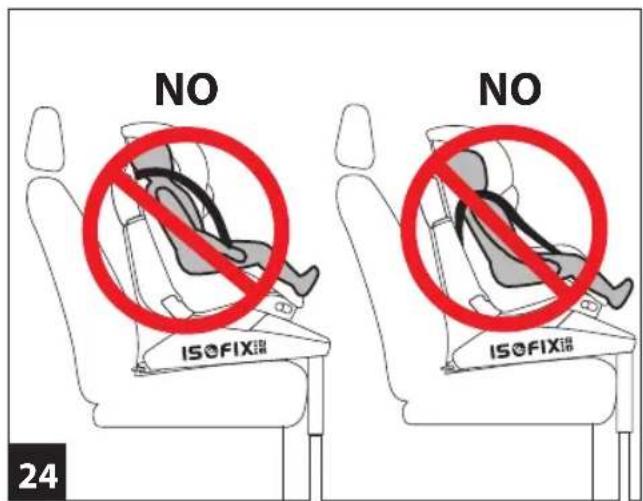
- "Viaggio1 Duo-Fix K" Group 1, must be fitted facing the vehicle's normal direction of travel.
-
Do not fit "Viaggio1 Duo-Fix K" on vehicle seats that face away or sideways with respect to the normal direction of travel of the vehicle.
-
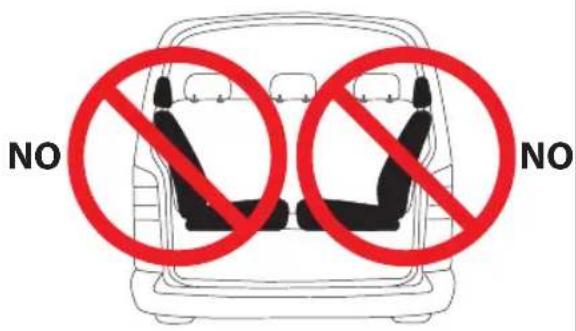
We recommend that you always use the rear seat on the opposite side to the driver's seat.
- If it is fitted on the vehicle's front seat, the car seat should be positioned as far as possible from the dashboard.
• The item is given a serial number. - If you have any difficulty fitting Viaggio1 Duo-Fix K in your car, lift up or remove the vehicle's headrests.
- If your car has storage compartments on the floor of the vehicle, in the area where the support leg is to rest, you should open the compartment and rest the leg on the bottom of it.
WARNING
- Read the instructions carefully before use and keep them in the holder provided for future reference. Failure to closely follow the installation instructions for the car seat will put your child at risk.
- The assembly and installation procedures for Viaggio1 Duo-Fix K must be carried out by adults. The assembly and installation procedures must be carried out without the child in the car seat.
- When travelling in the vehicle, never hold the child in your arms and never put him/her anywhere but in the seat. In the event of sudden braking, even at low speeds, the child would be flung forward.
- Do not insert fingers into the mechanisms.
- When travelling take particular care to make sure that luggage or other objects are not located where they may injure the child in the car seat in the event of an accident.
- Do not use installation methods different from those indicated. This would result in the risk of detachment from the vehicle's seat.
- Ensure that the vehicle's three-point safety belt securing the car seat is always taut and not twisted. It should be replaced if it undergoes significant strain due to an accident.
- Never leave the child unattended in the car seat: observe him/her even when he/she is sleeping.
- Never leave a child alone and unsupervised in a car, not even for a short time. The temperature inside the vehicle can
change rapidly and become dangerous for the child inside.
- Never remove the child from the car seat while the vehicle is in motion.
- Make sure that the car seat is not obstructed by any moving parts of the vehicle's seat or by one of the doors.
- Adjust the height and tension of the straps, ensuring that they are snug to the child's body without being too tight. Check that the harness is not twisted and that the child does not release it.
- This car seat is not designed for extended periods of sleep.
- Do not leave the car seat in vehicles exposed to the sun. Some parts might heat up and be harmful to the delicate skin of the child – check before placing the child in the seat.
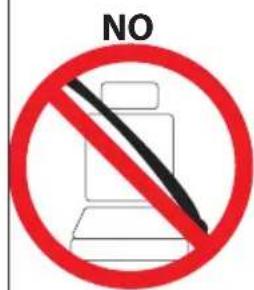
- Do not use the car seat without its fabric covering, which cannot be replaced with one not approved by the manufacturer since it is an integral part of the car seat and the safety system.
- Do not use the car seat without the protective padding for the shoulder straps as they are an integral part of the car seat and the safety system.
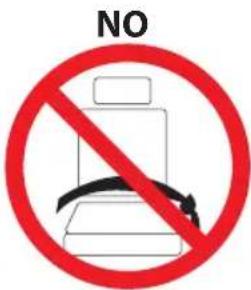
- Do not remove or replace the white polystyrene part under the seat, in the backrest and in the headrest, as it is essential for safety purposes.
- If you are unsure of anything, contact the manufacturer or the retailer of this car seat.
- Do not remove the adhesive and stitched labels as this might mean the product is no longer compliant with standards.
- Do not modify the product.
- For any repairs, replacement parts or information on the product, contact the post-sales assistance service. The relevant information is provided on the last page of this manual.
- The car seat should always be secured in the vehicle, even when the child is not present. In the event of sudden braking, it could injure the occupants of the vehicle.
- Do not use the child car seat if it is broken or if there are missing parts, or if it has been subjected to heavy impacts as a result of accidents, as it may have suffered structural damage which is not visible but is extremely hazardous.
• If using a second-hand product, make sure it is a recent
model, comes with instructions, and is fully functional in all parts. An obsolete product may not conform to safety standards, due to natural ageing of materials and updating of regulations. If you have any doubts, contact the manufacturer's customer service centre.
- Do not use accessories that are not approved by the manufacturer or by the competent authorities.
Instructions for use UNIVERSAL CATEGORY
Attachment in vehicles with safety belts
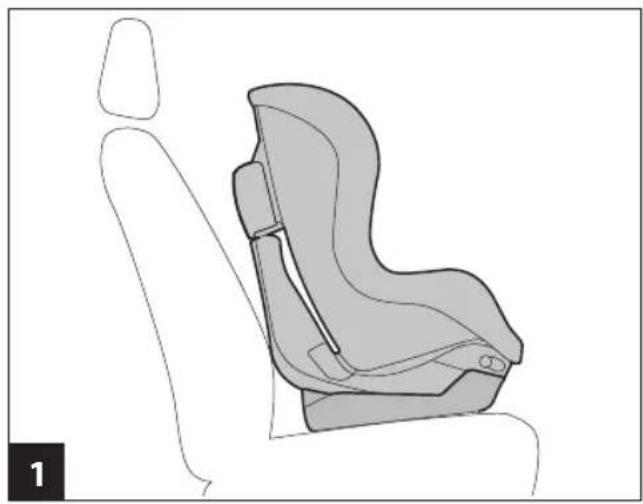
1 Place the Viaggio1 Duo-Fix K car seat on the vehicle's seat, facing in the normal direction of travel of the vehicle, as shown in the figure. The car seat is equipped with a protective base.
2 To make it easier to pass the vehicle's safety belts through the back of the car seat, it is necessary to recline the seat to the lowest position by operating the lever, as shown in the figure.
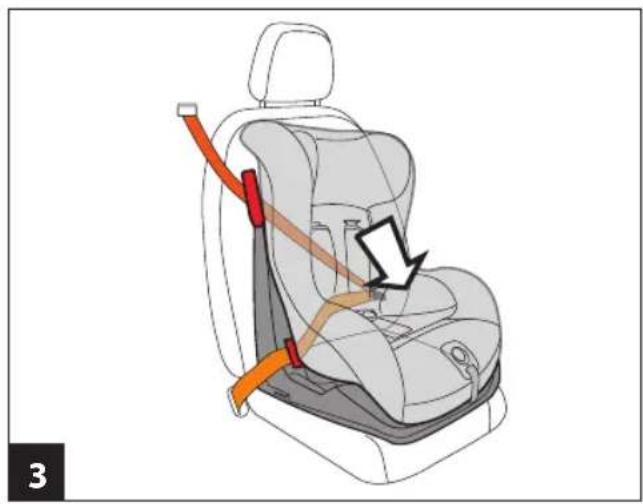
3 Pass the vehicle's safety belt between the frame and the shell of the car seat.
4 The lap belt must pass through the low slots marked in red. Fasten the belt, ensuring that it clicks into place.
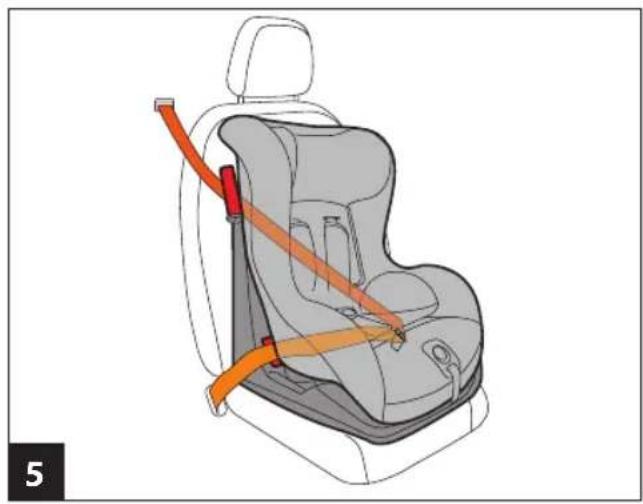
5 The figure shows Viaggio1 Duo-Fix K fitted in a vehicle.
6 Check that the lap belt has gone through the low slots marked in red and tighten it (Fig. a).
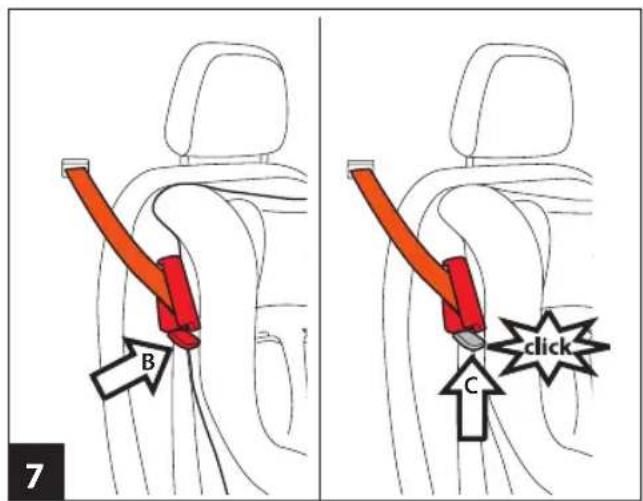
7 To complete the securing procedure in a vehicle, use the Steady Fix device. Open the clip and pass the diagonal strap through it, ensuring that it is taut and not twisted (Fig. b). Close the safety tab (Fig. c).
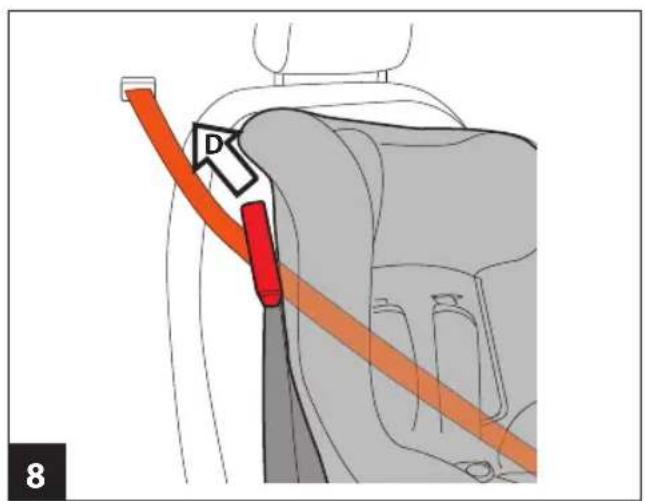
8 IMPORTANT: Take hold of the safety belt and pull it upwards firmly to fit Viaggio1 Duo-Fix K more closely to the seat of the vehicle (Fig. d).
Once the procedure is complete, it is possible to recline the seat to the desired position (See Point 2).
Do not remove it when fitting the car seat with the safety belts.
Instructions for use
SEMI-UNIVERSAL CATEGORY
Attachment in vehicles with an Isofix Base 0+1
Before attaching Viaggio1 Duo-Fix K to the Isofix Base, fit the Base on the seat of the vehicle by following the instructions provided with the base.
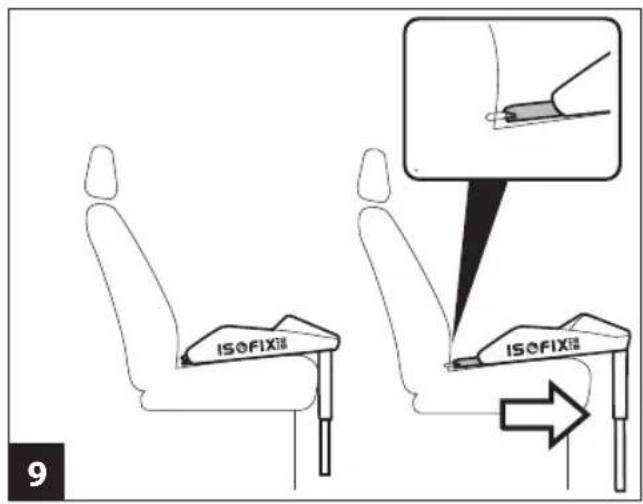
9 If the base is already attached in the vehicle, ensure that its Isofix attachments are extended to their maximum length.
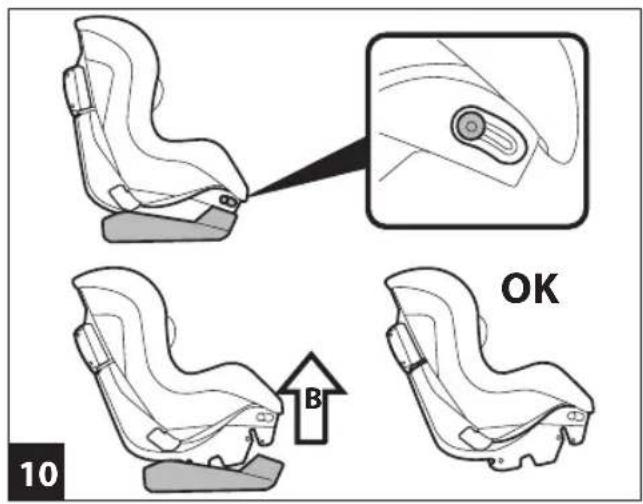
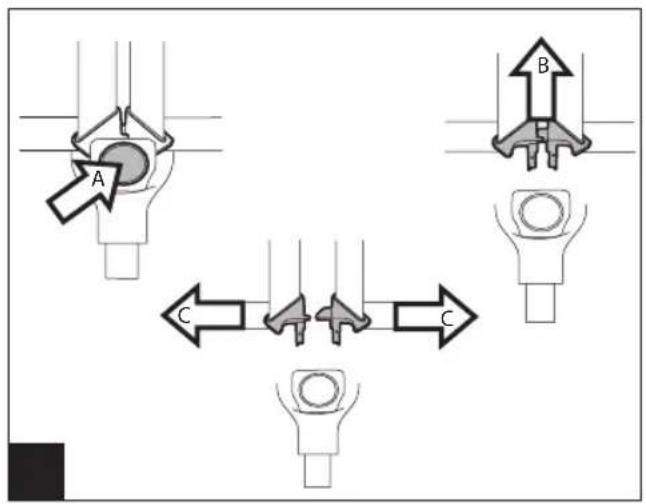
10 Remove the protective base attached to the car seat with the special release switches (Arrows A and B).
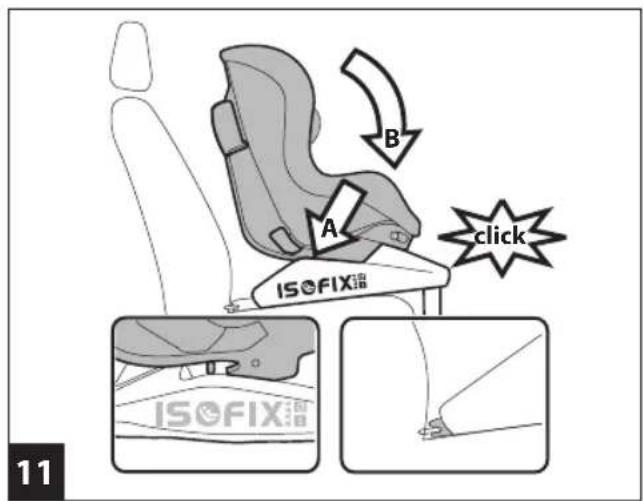
11 Position the car seat on the Isofix Base 0+1 and secure the rear connectors of the car seat to the attachment points of the base nearest to the vehicle seat (Arrow A). Press the front part of the car seat until it clicks into place (Arrow B).
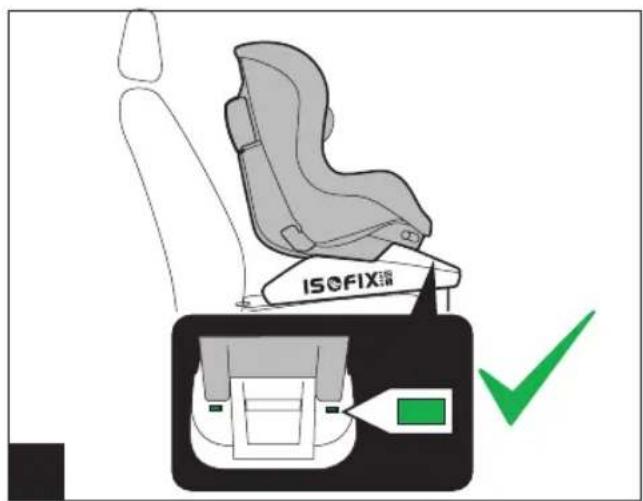
12 ▲ IMPORTANT: The two signals behind the Isofix Base go from red to green to indicate that the car seat is properly attached to the base.
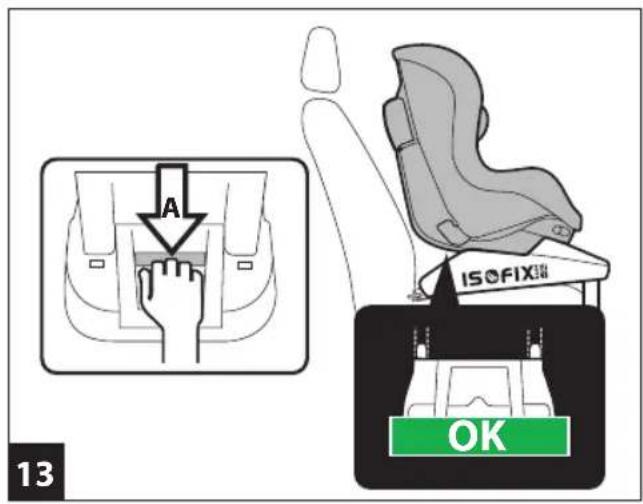
13 Pull the handle on the base (Arrow A) and push the base with the car seat against the vehicle's seat until they can go no further (Arrow B).
IMPORTANT: It is possible to check that the Isofix base is correctly positioned by looking at the signals on the handle. OK (green) indicates that the position is correct, NO (red) indicates that the procedure has been carried out incorrectly and must be repeated until the handle only shows the term "OK".
⚠️ IMPORTANT: Once the procedure is complete, move the base to check that both Isofix points are actually attached.
How to put the child in the Viaggio1 Duo-Fix K car seat
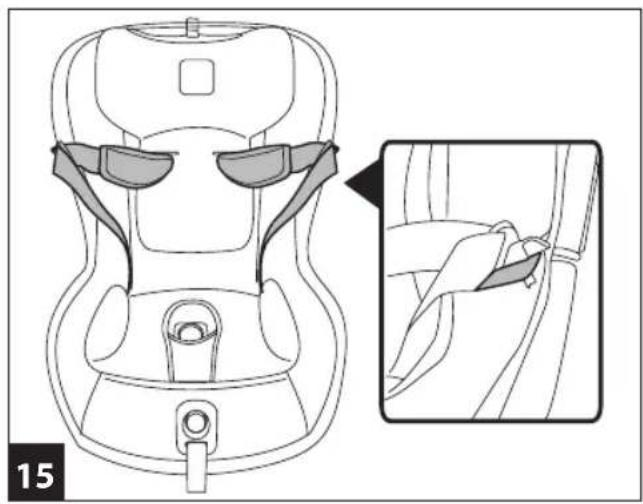
14 Before sitting the child on the stroller, release the safety harness by pushing the red button in the buckle of the leg divider strap.
15 Lift the safety harness and attach the buckles to the elastics in the sides.
16 Sit the child in the stroller and adjust the safety straps round the child's shoulders and waist, as shown in the picture.
17 Fasten the harness by overlapping the two straps and inserting the buckles into the leg divider strap until they click into place.
18 The child is sitting correctly with the safety harness fastened properly.
19 To tighten the strap, pull the central adjusting strap towards you as shown in the picture. The straps will tighten round the child. Be careful not to pull too much.
IMPORTANT: Do not tighten too much (the harness should be loose enough for you to slip a finger between the strap and the child's chest).
20 To loosen the safety straps, push the button in the middle of the car seat and at the same time pull the straps towards you.
IMPORTANT: Grab hold of the safety harness under the shoulder pads, as shown in the picture.
- The seat has a booster cushion which is suitable for small babies and when the safety harnesses are in the first level. When the child is older, remove the booster cushion.
21 To remove the booster cushion, pull it out of the safety harness and the sides of the car seat.
How to adjust the height of the head rest
The head rest must be adjusted to match the child's height. There are 7 positions.
22 To change from a lower position to a higher one: pull the strap in the upper central part of the headrest upwards. The headrest will move at the same time.
To change from a higher position to a lower one: pull the strap in the upper central part of the headrest upwards and, at the same time, push the headrest down to the desired position.
When you have finished, try moving the headrest to check it is properly attached.
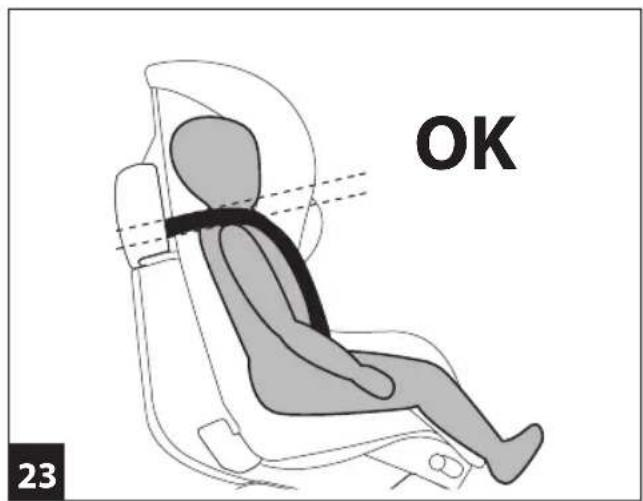
23 When the straps are positioned correctly, the child's shoulders will be just below the point where the straps pass.
24 ⚠️ IMPORTANT: The straps must not be too high or too low with respect to the child's shoulders.
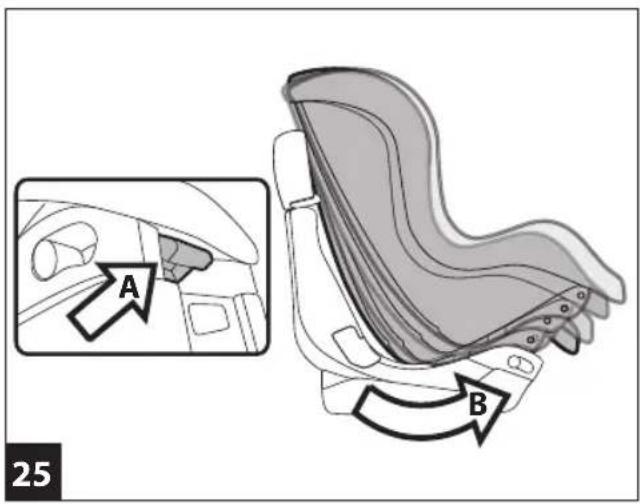
25 The Viaggio1 Duo-Fix K car seat can be inclined in 4 different positions, both when it is attached to the base and when it is attached to the Isofix Base 0+1. To incline
the car seat, press the lever underneath (fig. a) and pull it towards you into the required position (fig. b).
- To release the Viaggio1 Duo-Fix K car seat from the Isofix Base 0+1, press the same lever in the same way (See Point 10).
How to remove the lining
To remove the lining of the Viaggio1 Duo-Fix K car seat:
- slip the booster cushion off if there is one (point 21);
- unfasten the safety harness (point14);
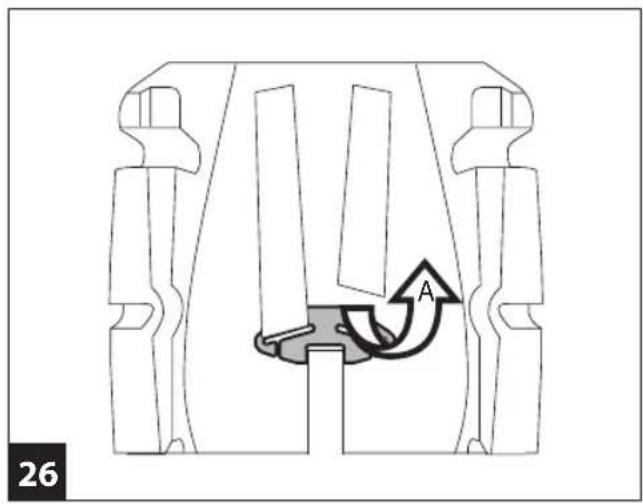
26 unfasten the straps from the back attachment point;
27 release, from the back, the safety harness straps and pull them away from the front;
28 release, from the back, the shoulder pads and pull them away from the safety harness from the front;
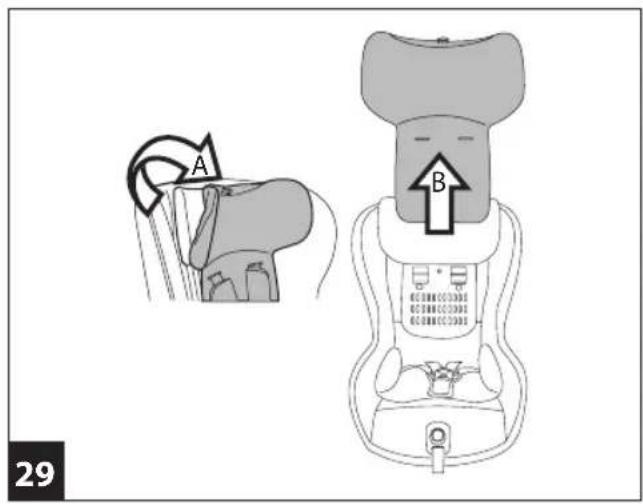
29 Slip off the adjuster strap (fig. a) and then remove the headrest from above (fig. b).
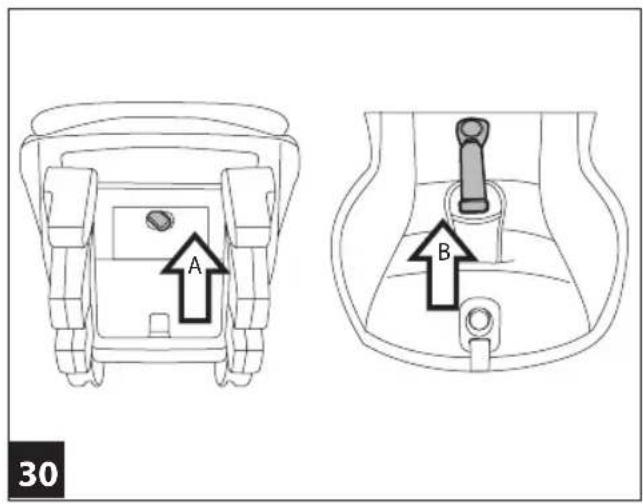
30 unfasten, from underneath the frame, the buckle of the leg divider strap (fig. a) and extract the strap from the pad of the leg divider (fig. b);
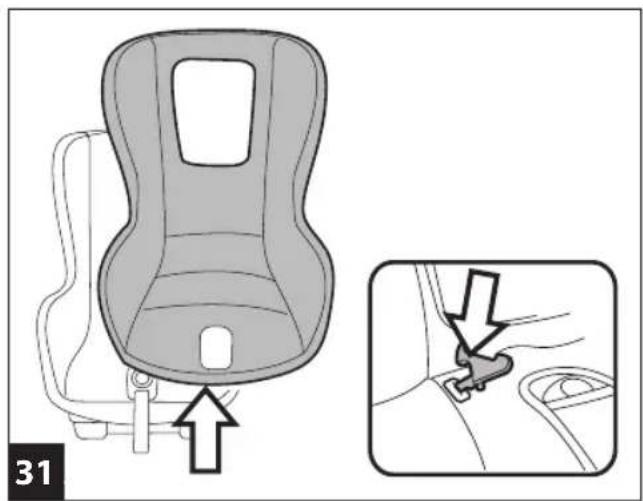
31 pull the lining upwards to remove it, checking that the strap goes through the opening.
Maintenance of the padding
Brush the fabric parts to remove dust.
- When washing, closely follow the instructions stated on the label sewn into the cover.
- Do not use chlorine bleach.
- Do not iron.
- Do not dry clean.
Do not remove stains with solvents. - Do not tumble dry.
How to replace the lining on the Viaggio1 Duo-Fix K car seat
To replace the lining of the Viaggio1 Duo-Fix K car seat:
32 insert the safety harness from underneath the frame and thread them through the openings at the base of the seat. Insert the strap in the lining of the leg divider;
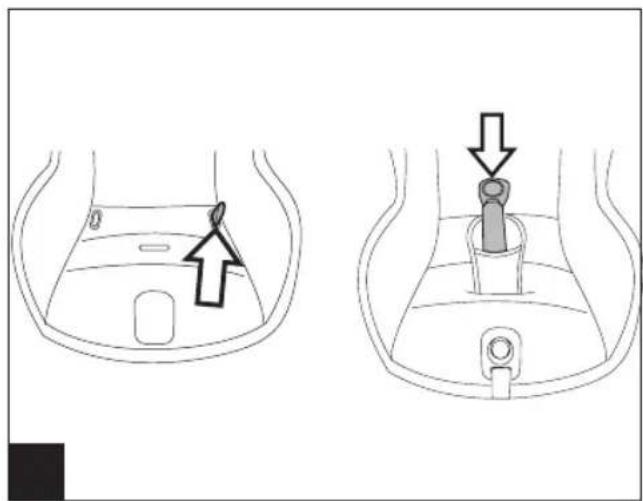
33 attach it to the opening in the frame
34 attach the strip to the attachment point of the leg divider strap
35 thread the lining starting from the seat and moving upwards, paying attention to the shape of the backrest.
36 Thread the head rest – make sure the red strip is passed through the opening in the fabric.
- Thread the shoulder straps in the safety harness.
37 Insert the safety straps in the seat in this order: begin with the buckle of the shoulder straps and then deal with the straps.
38 extend the straps and insert them in the seat's frame (the straps in the upper hole, the buckle in the lower one).
39 fasten them properly in the back, as shown in the picture.
• fasten the safety harness straps (point 17)
IMPORTANT: the straps must not be twisted around.
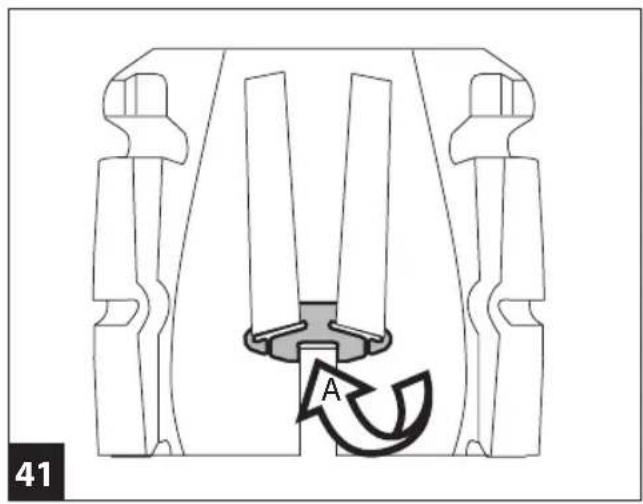
40 ATTENTION: The central adjustment strap must pass between the body and the plastic shield, as shown.
41 fasten them to the back attachment point, threading them behind the instructions tray.
- apply the booster seat if the baby is still small.
Accessories
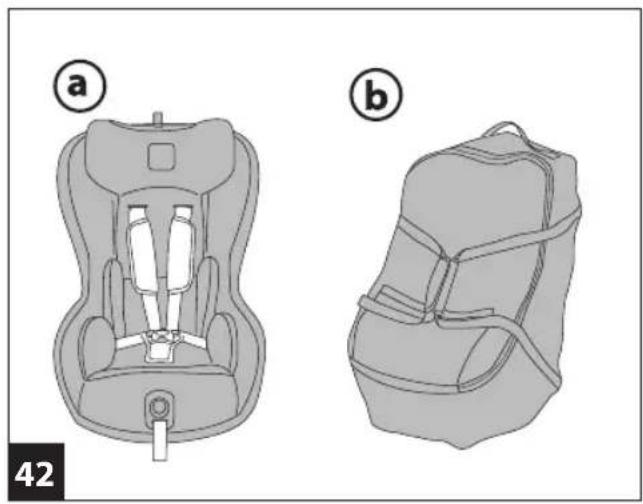
42 Clima Cover Car Seat: washable cover in Tencel, a natural heat-regulating fiber that regulates body moisture (warm in winter and cool in summer) (Fig. A).
- Travel Bag Car Seat: practical travel bag that keeps the car seat clean and protected (Fig. B).
43 Car Seat Cup Holder: practical and removable cup holder, to keep baby's drink to hand (Fig. C).
Serial numbers
44 The name of the product, production date and serial number of the Viaggio1 Duo-Fix K can be found under the seat.
45 The approval label of the Viaggio1 Duo-Fix K is behind the backrest.
46 Production date of the strap.
This information is required for any complaints.
Product cleaning
- This product requires a small amount of maintenance. Cleaning and maintenance must only be carried out by adults.
-
Keep all moving parts clean and if necessary lubricate them with light oil.
-
Clean the plastic parts periodically with a damp cloth. Do not use solvents or similar substances.
- Brush the fabric parts to remove dust.
- Do not clean the polystyrene shock absorbing device with solvents or other similar products.
- Protect the product from atmospheric agents: humidity, rain or snow. Extended exposure to sunshine can cause colour changes in many materials.
- Store the product in a dry environment.
How to read the approval label
- This paragraph explains how to interpret the approval label (orange label).
- The label is double because this car seat is approved for two types of installation in cars:
- ISOFIX attachment systems (the term SEMI-UNIVERSAL class A indicates compatibility of the car seat with vehicles fitted with this system).
- Attachment systems using static or inertia-reel three-point safety belts (the term UNIVERSAL indicates compatibility of the car seat with vehicles fitted with this type of belt).
• The top of the label displays the trademark of the manufacturing company and the name of the product.
• The letter E in a circle indicates the European approval mark and the number indicates the country that issued the approval (1: Germany, 2: France, 3: Italy, 4: Netherlands, 11: Great Britain, 24: Republic of Ireland). - Approval number: if it starts with 04, this indicates the fourth amendment (the one currently in force) of Regulation R44.
• Reference standard: UN/ECE R44/04. - Production serial number: on issue of approval, each car seat is personalized with its own number.
PEG-PÉREGO S.p.A.
Peg-Pérego SpA adopts a quality management system certified by TÜV Italia Srl in accordance with the ISO 9001 standard. Peg Pérego can make changes at any time to the models described in this publication for technical or commercial reasons.
Peg-Pérego after-sales service
If any parts of the item get lost or damaged, only use genuine Peg Pérego spare parts. For any repairs, replacements, information on the products and sales of genuine spare parts and accessories, contact the Peg Pérego Assistance Service and state the serial number of the product, if present.
tel. 0039/039/60.88.213
All intellectual property rights on the contents of this manual are property of PEG PEREGO S.p.A. and are protected by the laws in force.
FR\_Français
- To release the Viaggio1 Duo-Fix K car seat from the Isofix Base 0+1, press the same lever in the same way (See Point 10).
UNI ECE R44/04 Universal Class A
Declaration of conformity Product name
VIAGGIO 1 DUO - FIX K VIAGGIO 1 DUO - FIX K | SOFIX
Product reference number IMDA\*
Reference Standards (origin)
UNI ECE R44/04 (FU) Universal UNI ECE R44/04 Semiuniversal Class A (in combination with Isofix base 0+1 IAKISN00)
UNI ECE R44/04 Universal Class A
Declaration of conformity
PegPerego S.p.A. declares under its sole responsibility that the article to which this declaration relates has undergone internal testing and has been approved, in accordance with regulations in force, by external, independent testing laboratories.
Date and place of issue
November 2012
PegPerego S.p.A. via De Gasperi, 50 20862 Arcore (MB), ITALY
FR Français
UNI FCF R44/04 Universal Class A
UNI ECE RM4/04 Universal Class A
All of the intellectual property rights for the contents of this instruction manual belong to PEG PEREGO S.p.A. and are protected by the laws in force.
VIAGGIO 1 DUO FIX K
Peg-Pérego

- SEMI-UNIVERSAL CATEGORY 9-18 Kg Y ISOFIX
- Viaggio1 Duo-Fix K
- Thank you for choosing a Peg-Pérego product.
- Product Characteristics
- Group 1 "Universal" category car seat
- Group 1 car seat with class A "Semi-universal" Isofix Base 0+1
- IMPORTANT
- WARNING
- Instructions for use UNIVERSAL CATEGORY
- Attachment in vehicles with safety belts
- Do not remove it when fitting the car seat with the safety belts.
- Instructions for use
- SEMI-UNIVERSAL CATEGORY
- Attachment in vehicles with an Isofix Base 0+1
- How to put the child in the Viaggio1 Duo-Fix K car seat
- How to adjust the height of the head rest
- How to remove the lining
- Maintenance of the padding
- How to replace the lining on the Viaggio1 Duo-Fix K car seat
- IMPORTANT: the straps must not be twisted around.
- Accessories
- Serial numbers
- Product cleaning
- How to read the approval label
- PEG-PÉREGO S.p.A.
- Peg-Pérego after-sales service
- FR\_Français
- Declaration of conformity Product name
- Product reference number IMDA\*
- Reference Standards (origin)
- Declaration of conformity
- Date and place of issue
- FR Français
- VIAGGIO 1 DUO FIX K
- Peg-Pérego
Brand : PEG PEREGO
Model : Viaggio1 DuoFix K
Category : Car seat