
TH800D - Car radio MTX Audio - Free user manual and instructions
Find the device manual for free TH800D MTX Audio in PDF.
| Product Type | Class-D Monoblock Amplifier |
| Brand | MTX Audio |
| Model | TH800D |
| Category | Car Audio - Amplifier |
| RMS Power (CEA2006) | 1 x 800 W @ 2 ohms, 1 x 400 W @ 4 ohms (THD+N ≤ 1%) |
| Frequency Response | 20 Hz - 200 Hz (±0.5 dB) |
| Signal-to-Noise Ratio (1 W) | > 78 dB |
| Distortion (THD+N) (1 W) | ≤ 0.5% |
| Low-Pass Filter (LPF) | 24 dB/oct, variable from 40 Hz to 200 Hz |
| Subsonic Filter | 24 dB/oct, variable from 20 Hz to 50 Hz |
| Phase Adjustment | 0° or 180° |
| Input Level (RCA) | 100 mV to 6 V |
| High-Level Inputs | Yes, with Smart Engage™ technology |
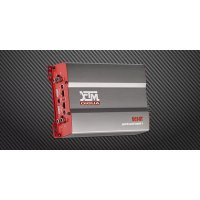
| Dimensions (L x W x H) | 383 mm x 213 mm x 52.5 mm |
| Power Supply | 12 V DC (vehicle battery) |
| Protections | Thermal (100°C), undervoltage (<9 V), overvoltage (>16.2 V), short circuit |
| Fuses | 3 x 25 A (ATC/ATO type) |
| Speaker Connectors | 10 mm² terminals (dual + and - in parallel) |
| Power Connectors | 50 mm² terminals |
| Cooling | Silent fan (XTC - Xtant Technology Cooling) |
| Additional Functions | Remote EBC subwoofer control (6 m), Adaptive Class-D, EAF Technology |
| Maintenance and Cleaning | Clean with a dry, soft cloth. Avoid moisture and abrasive products. |
| Safety | Disconnect the battery before installation. Use a fuse near the battery. Follow recommended cable sizes. |
| Spare Parts / Repairability | Spare fuses (25 A), EBC controller. In case of failure, return for repair. |
| General Information | High-performance subwoofer amplifier. Patented technology. Professional installation recommended. |
Frequently Asked Questions - TH800D MTX Audio
User questions about TH800D MTX Audio
0 question about this device. Answer the ones you know or ask your own.
Ask a new question about this device
Download the instructions for your Car radio in PDF format for free! Find your manual TH800D - MTX Audio and take your electronic device back in hand. On this page are published all the documents necessary for the use of your device. TH800D by MTX Audio.
USER MANUAL TH800D MTX Audio
Mono Block Class-D Power Amplifier
800W RMS
Designed by MTX in Phoenix, USA
www.mtx.eu.com
www.mtx.com
Introduction
Thank you for purchasing an MTX Audio Hi-Performance amplifier. Proper installation matched with MTX speakers and subwoofers provide superior sound and performance for endless hours of waking the neighbors, slam-min' your friends or flat out stomping wanna-be players. Congrats and enjoy the ultimate audio experience with MTX!
Specifications :
• Mono block class-D amplifier
• CEA2006 certified Power Output :
- 800 watts RMS x 1-channel at 2 ohm and THD+N ≤1%
- 400 watts RMS x 1-channel at 4 ohm and THD+N ≤1%
• Crossover :
- Low pass 24dB/oct variable from 40Hz to 200Hz
- Subsonic filter 24dB/oct variable from 20Hz to 50Hz
• Signal-to-Noise Ratio (1 watt) : > 78dB
- THD+Noise (Distortion) (1 watt): ≤ 0,5%
• Frequency Response (±0,5dB): 20Hz-200Hz
• Maximum Input Signal : 6V
• Maximum Sensitivity : 100mV
- Dimensions: 383mm x 213mm x 52,5mm
- Phase switch 0^ or 180^
• High level inputs with Smart Engage Technology
• EBC remote control
Features :
- XTC - (Xtant Technology Cooling) - A regulated thermal intercooler, injecting cool air through internal heat sinks. Fan speed is load dependent and continuously variable, sampling the temperature of the heat sink and transformers for maximum reliability. Intercooler exhaust is strategically placed to chill transformers and maintain exceptional performance at any volume level. (Cool eh ? An Amp with an Intercooler ! )
- Adaptive Class-D Technology - Patent N°: US06753729 - Moves the switching energy produced by the amp away from FM radio frequency's as the load and output increases. This ensures harmonics do not interfere with radio reception and are not picked up by the audio system's ground. This improves the amplifier's overall signal-to-noise ratio and eliminates interference generated by common Class-D amplifiers. Yes, we have the best engineers!
- EAF Technology (Efficient Auto Former) - Patent N°: US05598325 - Our Transformers are "Auto Formers" which allows us to use smaller magnetics (-30% to -50%) yielding increased efficiency. Turn ratios are improved due to series connections between the primary and secondary taps meaning MORE Power!
- Smart Engage™ Technology - Patent N°: US06556683 - The amp switches on and off automatically when connected with high level inputs. No need for a remote turn on wire from under the dashboard. No need to remove the head unit. Thanks MTX!
- Bi-Level Inputs - High level inputs (Speaker cables) and line level inputs (RCA) utilize the same RCA type input connections on the amp.
- 10mm ^2 Speaker Connectors - Two sets of speaker terminals are provided for dual woofer or dual voice coil applications. The two (+) connectors are paralleled internally. Same for the two (-) connectors.
- 50mm2 Power Connectors - For maximum voltage and current transfer, MTX mono blocks are equipped with MASSIVE 50mm^2 power connectors. It takes BIG power to make BIG power!
- EBC - (External Bass Control) - A 6m remote sub control allowing you to fine tune bass levels every 2 seconds from the driver seat with no need to scroll through complex head unit menus. Cool!
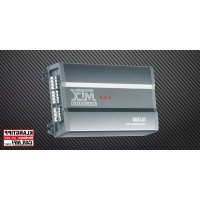
Control Panel (Top)
Connectors Panel (Side)

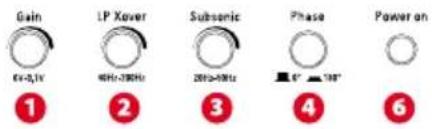
Control Panel :
1 Gain Control - The gain control matches the input sensitivity of the amplifier to the source unit being used. The operating range varies from 100mv to 6V.
Adjusting the gain
- Turn the gain control on the amplifier all the way down (counter clockwise).
- Turn up the volume control on the source unit to approximately 3/4 of maximum.
- Adjust the gain control on the amplifier until audible distortion occurs.
- Adjust the gain control down until audible distortion disappears.
- The amplifier is now calibrated to the output of the source unit.
Warning : Never adjust the gain control without a subwoofer connected.
This will damage the amp...
2 Low Pass X-Over Frequency Control - Used to select the desired LP x-over frequency. The frequency is adjustable from 40Hz to 200Hz.
3 Subsonic Frequency Control - Used to select the desired subsonic frequency (high pass). The frequency can be adjusted from 20Hz to 50Hz. The subsonic filter protects subwoofer(s) against low frequencies that can cause damage. Very useful with vented enclosures.
4 Phase switch - Used to match the bass from subwoofers and front speakers. Toggle the phase switch from 0° to 180°. Keep the loudest bass response. Also useful in bridge mode.
6 Power On LED - The LED illuminates red when the amp is switched on. For Short or Thermal protection, see points 9 and 10
Connectors panel :
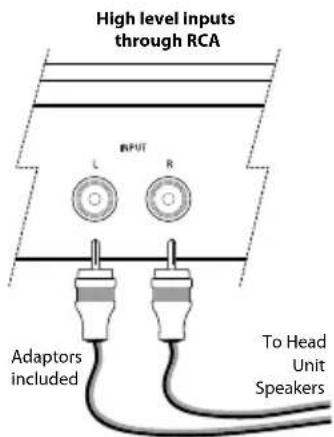
7 RCA Inputs - These RCA inputs are used with source units that have RCA or Line level outputs. (Source units need a minimum level of 100mV output for proper operation of the amplifier). MTX recommends only high quality twisted pair cables (such as StreetWires) to decrease the possibility of radiated noise entering the system.
High Level Inputs :
MTX amplifiers allow high level inputs through RCA type input connections. Simply connect the head unit speaker leads to the provided adapters.
8 Speaker Terminals - Connect subwoofer(s) to these terminals. If using two sub-woofers or a dual voice coil subwoofer, respect the phase. Attention : The two (+) connectors are wired parallel internally. Same for the two (-) connectors.
9 Thermal Protection - This LED illuminates red when the amp reaches 100°C. The LED also turns red when the power supply goes below 9V or over 16.2V.
10 Short Circuit Protection - This LED will flash yellow when the speaker outputs will short circuit. Without signal, this LED can remain yellow when the speaker outputs are short circuited.
11 Fuses - When fuses blow, replace them with the same value. Never use a higher rated fuse!
12 (+12) Power Terminal - This is the main power input for the amplifier and must be connected directly to the positive terminal of the vehicles battery for proper operation. Use caution when installing (+12) power cable in the vehicle. Avoid running this cable parallel with RCA cables, antennas, or other sensitive equipment due to massive currents that can induce noise into the audio system. It is also very important to have a tight, secure connection for maximum performance. MTX recommends using 50mm2 power wire with the MTX TH800D amplifier.
13 Remote Terminal – The amplifier can be turned on by applying 12 volts to this terminal. Typically this voltage is supplied by a wire from the source unit marked "remote" or "power antenna".
14 Ground Terminal – A proper ground is required for your amplifier to operate at peak performance. A short ground cable the same diameter as the power cable should be used to attach the ground terminal directly to the chassis of the vehicle. Always remove paint, dirt or debris to expose bare metal where the ground will be attached.
15 EBC Port (External Bass Control) - The Remote Subwoofer Level Control (EBC) plugs directly into this port, while the EBC itself can be placed anywhere in the vehicle for on demand bass adjustments. EBC is included.
MTX recommends your new Thunder amplifier be installed by an Authorized MTX retailer. Any deviation from specified installation instructions can cause serious damage to the amplifier, speakers and/or vehicles electrical system. Damage caused from improper installation is NOT covered under warranty. Please verify all connections prior to system turn on!
-
Disconnect the vehicle's negative battery cable.
-
Determine the mounting place for your MTX THUNDER amplifier. Keep in mind there should be sufficient air flow for proper cooling. Mark the mounting holes from the amplifier to be drilled. Before drilling make sure all vehicle wires, gas lines, brake lines and gas tank are clear and will not interfere with installation. Drill the desired holes and mount the MTX THUNDER amplifier.
-
Install a positive (+) power cable from the vehicle's battery through the firewall using a grommet or firewall bushing to avoid cable damage from sharp edges of the firewall. Run the cable through the interior of the vehicle and connect it to the amplifier's +BATT terminal. Do Not connect to the battery at this time.
Note : Use only proper gauge wire for both positive and negative connections.
-
Install a circuit breaker or fuse within 20cm of the battery. This effectively lowers the risk of severe damage to you or your vehicle in case of a short circuit or accident. Make sure the circuitbreaker is switched off or the fuse is taken out of the fuse holder until all connections are made. Now connect your positive power cable to the positive battery terminal of the battery.
-
Grounding - Locate a proper ground point on the vehicle's chassis and remove all paint, dirt or debris to reveal a bare metal surface. Attach the ground wire to that contact point. Connect the opposite end of the ground wire to the GND terminal on the MTX THUNDER amplifier.
-
Connect a Remote Turn-on wire from the source unit to the MTX THUNDER amplifier's Remote terminal. If the source unit does not have a dedicated Remote Turn-on lead, you may connect to the source unit's Power Antenna lead.
-
Connect RCA cables from the source unit to the MTX THUNDER amplifier's RCA Bi-level inputs. Both low and high level signals can be used. Run all signal cables away from vehicle wiring, computers and power cables. If cables must be crossed do so at a 90° angle. Use only high quality twisted pair interconnect cables to decrease radiated noise from entering the system.
- Using RCA Connections: Simply attach a signal cable from source units RCA outputs to the amp's RCA inputs. This provides input signal to the amp.
- Using Speaker Level Connections: If the source unit does not have RCA outputs, high level signals can be used by taking the supplied high level RCA adapter and connecting it to the vehicle's rear speaker wiring. Connect the left negative speaker wire to the green and black striped wire on the high level RCA adapter. Connect the left positive speaker wire to the solid green wire. Do the same for the right speaker connection using the purple wire. Now plug the RCA connectors into the amp's inputs.
-
Connect your speakers to the MTX THUNDER amplifier's speaker terminals using proper gauge wire. The amp has two PARALLEL speaker terminals, a positive and negative for a single woofer and an optional second set of positive and negative terminals for a two woofer configuration. The amp can drive a 2 ohm minimum load.
-
Double check all previous installation steps, in particular, wiring and component connections. Once verified, reconnect the vehicle's negative battery cable, turn the circuit breaker on or place the fuse in the fuse holder.
Note : Gain Levels on the amplifier should be turned all the way down (counter clockwise) before proceeding with adjustments.
Troubleshooting
Problem Cause Solution
No LED indication No +12V at remote connection Supply +12V to terminal
No +12V at Power connection Supply +12V to terminal
Insufficient ground connection Verify ground connection
Blown power fuse Replace fuse
Power LED on, no output Volume on source unit off Increase volume on source unit
Speaker connections not made Make speaker connections
Gain control on amplifier off
Signal processing units off
All speakers blown
Output distorted
Amplifier gain set too high
Balance reversed
RCA inputs reversed
Bass is weak
Not using MTX woofers
Blowing fuses
Turn up gain Apply power to sig Replace speakers Head unit volume set too high Lower amplifier ga
Speakers wired L + R reversed
Reverse RCA input
Speakers wired out of phase
Buy MTX woofers
Excessive output levels
Wire speakers with correct orientation
Wire speakers with correct phase
Lower the volume
Amplifier defective Return for service
Introduction :
PROBLÈMES CAUSES SOLUTIONS
MTX woofers no son usados
Fusibles dañados
Amplificador defectuoso
- Smart Engage™ Technology - Brevetto N°: US06556683 - The amp switches on and off automatically when connected with high level inputs. No need for a remote turn on wire from under the dashboard. No need to remove the head unit. Thanks MTX!
Warning : Never adjust the gain control without a subwoofer connected. This will damage the amp...
Painel de Conectores (Lado)

Painel de Controlo (Topo) :
Warning : Never adjust the gain control without a subwoofer connected.
This will damage the amp...
Inverta as entradas RCA
Baixos fracos
Warning : Never adjust the gain control without a subwoofer connected.
This will damage the amp...
MTX is a proud member of Mitek Corp high quality consumer audio product lines.
MiTek
MTX®
AUDIO
Coustic®
xtant
STREETWIRES®
Designed and Engineered by Mitek in Phoenix - AZ, USA. © 2008 Mitek. All rights reserved.
MTX, COUSTIC, XTANT, STREETWIRES and THUNDER are registered trademarks of Mitek.
Due to continual product development, all specifications are subject to change without notice
MTX Audio, 4545 East Baseline Rd. Phoenix, AZ 85042 USA


- Introduction
- Specifications :
- Features :
- Control Panel :
- Adjusting the gain
- Connectors panel :
- High Level Inputs :
- Troubleshooting
- Problem Cause Solution
- Introduction :
- PROBLÈMES CAUSES SOLUTIONS
- Warning : Never adjust the gain control without a subwoofer connected. This will damage the amp...
- Painel de Controlo (Topo) :
- Warning : Never adjust the gain control without a subwoofer connected.
- This will damage the amp...
Brand : MTX Audio
Model : TH800D
Category : Car radio