
TX480D - Car radio MTX Audio - Free user manual and instructions
Find the device manual for free TX480D MTX Audio in PDF.

| Product Type | 4-Channel Class-D Wideband Amplifier |
| CEA2006 Rated Power | 4 x 140 W RMS @ 2 Ω (THD+N ≤ 1%) 4 x 80 W RMS @ 4 Ω (THD+N ≤ 1%) 2 x 280 W RMS bridged @ 4 Ω (THD+N ≤ 1%) |
| High-Pass Filter (HPF) | 12 dB/oct, variable from 40 Hz to 400 Hz |
| Low-Pass Filter (LPF) | 12 dB/oct, variable from 40 Hz to 400 Hz |
| Signal-to-Noise Ratio | > 85 dB (1 W) |
| Distortion (THD+N) | ≤ 0.05% (1 W) |
| Frequency Response | 10 Hz - 40,000 Hz (±1 dB) |
| RCA Input Sensitivity Level | 200 mV to 6 V |
| Dimensions (L x W x H) | 133 mm x 216 mm x 54 mm |
| Power Supply | 12 V (terminals GND, REM, +12V) |
| External Fan Connector | Yes, thermo-regulated (max 0.5 A) |
| High-Level Inputs | Yes, with included adapters |
| Bridge Mode | Yes, minimum impedance 4 Ω |
| Protection LED | 3 red LEDs (on = operating, blinking = protection) |
Frequently Asked Questions - TX480D MTX Audio
User questions about TX480D MTX Audio
0 question about this device. Answer the ones you know or ask your own.
Ask a new question about this device
Download the instructions for your Car radio in PDF format for free! Find your manual TX480D - MTX Audio and take your electronic device back in hand. On this page are published all the documents necessary for the use of your device. TX480D by MTX Audio.
USER MANUAL TX480D MTX Audio
TX480D TX6500D TX81000D
Owner's Manual
Designed by MTX in Phoenix, AZ - USA
Specifications:
TX8100D Specifications :
- Mono block class-D amplifier
- CEA2006 certified Power Output :
- 1x 1000 Watts RMS @ 2Ω and THD+N ≤ 1%
- 1x600 Watts RMS @ 4Ω and THD+N ≤ 1%
Crossover: - Low pass 24dB/oct variable from 40Hz to 150Hz
- Subsonic filter 24dB/oc at 30Hz
- Signal-to-Noise Ratio (1 Watt): >75dB
- THD+Noise (Distortion) (1 Watt): ≤0,1%
Frequency Response (± 0,5dB) : 10Hz - 150Hz
Maximum Input Signal: 6V
Maximum Sensitivity: 100mV - EBC remote control
- Bridged mode with gain management
- Thermoregulated fan connector for an external fan(s)
- Dimensions : 366mm x 133mm x 54mm
TX6500D Specifications :
- Mono block class-D amplifier
- CEA2006 certified Power Output :
- 1x500 Watts RMS @ 2Ω and THD+N ≤ 1%
-1x300 Watts RMS @ 4Ω and THD+N ≤ 1%
Crossover: - Low pass 24dB/occt variable from 40Hz to 150Hz
- Subsonic filter 24dB/occt at 30Hz
Signal-to-Noise Ratio (1 Watt): >75dB - THD+Noise (Distortion) (1 Watt): ≤0,1%
Frequency Response (± 0,5dB) : 10Hz - 150Hz
Maximum Input Signal: 6V
Maximum Sensitivity: 100mV
EBC remote control - Bridged mode with gain management
Thermoregulated fan connector for an external fan(s) - Dimensions: 266 mm × 133 mm × 54 mm
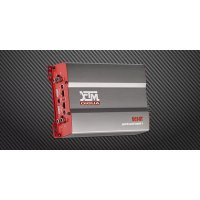
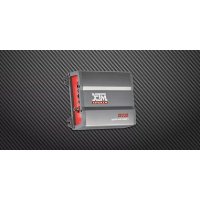
TX480D Specifications :
- 4-Channel Class-D wide range amplifier
- CEA2006 certified Power Output :
- 4x140 Watts RMS @ 2Ω and THD+N ≤ 1%
- 4x80 Watts RMS @ 4Ω and THD+N ≤ 1%
- 2x 280 Watts RMS bridged at 4Ω and THD+N ≤ 1%
Crossover: - High pass 12dB/occt variable from 40Hz to 400Hz
- Low pass 12dB/oct variable from 40Hz to 400Hz
- Signal-to-Noise Ratio (1 Watt): > 85dB
- THD+Noise (Distortion) (1 Watt): ≤ 0,05%
Frequency Response (± 1dB) : 10Hz - 40000Hz
Maximum Input Signal: 6V
Maximum Sensitivity: 200mV - Thermoregulated fan connector for an external fan
- Dimensions: 216 mm × 133 mm × 54 mm
- Settings, Power and Speaker connections :
TX81000D TX6500D

TX480D
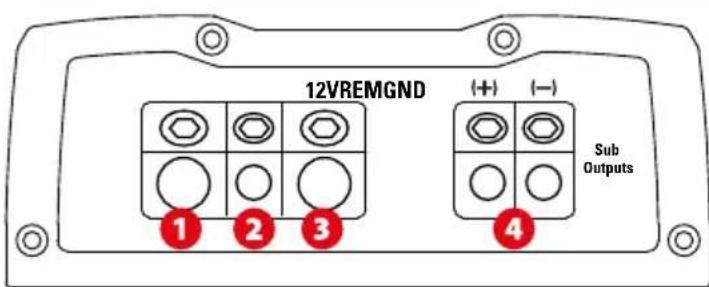
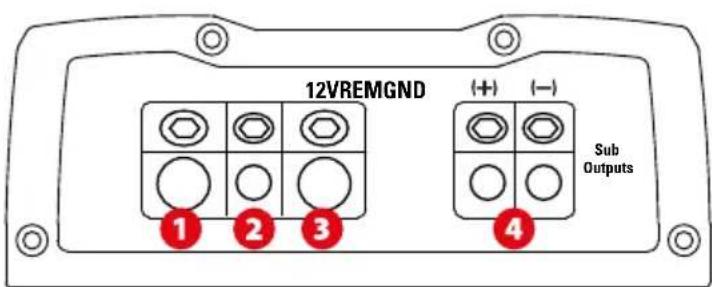
Ground Terminal (GND) - A proper ground is required for your amplifier to operate at peak performance. A short ground cable the same diameter as the power cable should be used to attach the ground terminal directly to the chassis of the vehicle. Always remove paint, dirt or debris to expose bare metal where the ground cable will be attached.
Remote Terminal (REM) - The amplifier can be turned on by applying 12 volts to this terminal. Typically this voltage is supplied by a wire from the source unit marked "remote" or "power antenna".
+12V Power Terminal (12V) - This is the main power input for the amplifier and must be connected directly to the positive terminal of the vehicles battery for proper operation. Use caution when installing (+12) power cable in the vehicle. Avoid running this cable parallel with RCA cables, antennas, or other sensitive equipment due to massive currents that can induce noise into the audio system. It is also very important to have a tight, secure connection for maximum performance. MTX recommends using 50mm^2 power wire with the MTX RFL4001D amplifier.
Speaker Terminals TX8100D TX6500D (Sub outputs) : Connect your subwoofer(s) to these terminals. If using two subwoofer or a dual voice coil subwoofer, respect the phase (+) together, (-) together...
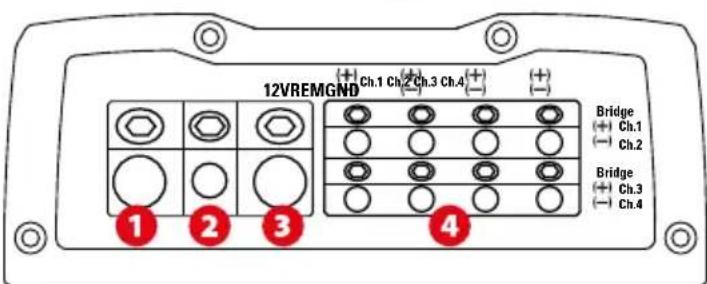
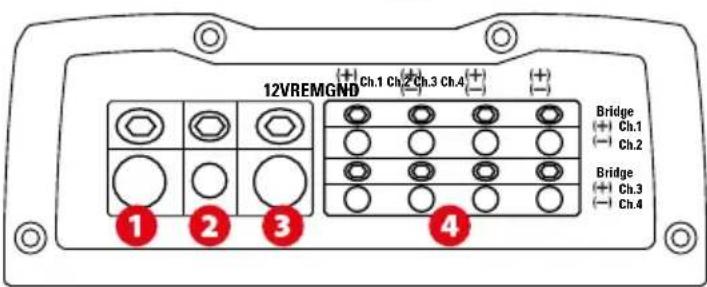
Speaker Terminals TX480D: Connect the speakers to these terminals. Observe speaker polarity throughout the system. Improper phase can result in loss of bass response and/or poor overall sound quality.
Bridge Mode :
When bridging the amplifier, use the Ch1 positive terminal and the Ch2 negative terminal only.
When bridging the amplifier, use the Ch3 positive terminal and the Ch4 negative terminal only.
Warning : do not bridge the amplifier with an impedance lower than 4Ω.
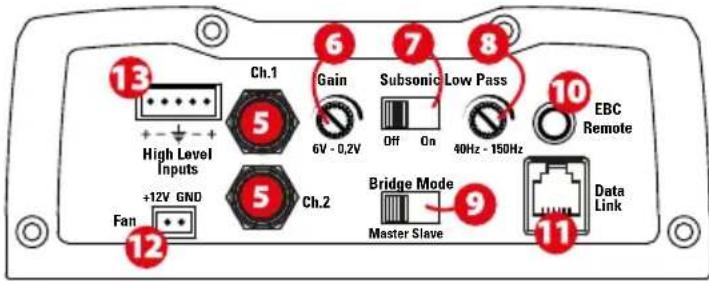
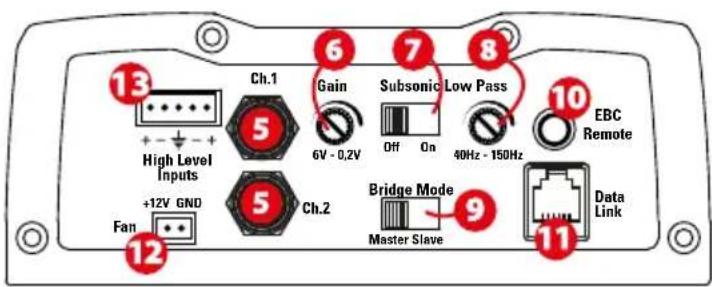
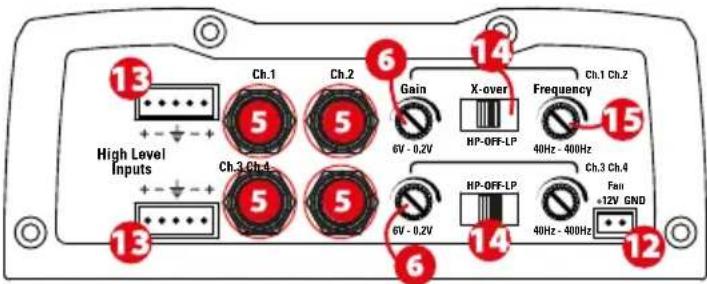
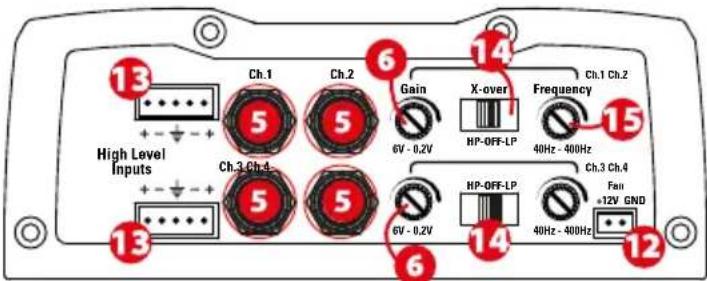
RCA Inputs (Ch.1 Ch.2 Ch.3 Ch.4) - These RCA inputs are used with head units that have RCA or Line level outputs (head units need a minimum level of 200mV output for proper operation of the amplifier). MTX recommends only high quality RCA cables to decrease the possibility of radiated noise entering the system.
Gain Control (Gain) - The gain control matches the input sensitivity of the amplifier to the head unit being used. The operating range varies from 0,2 to 6V. Adjusting the gain
- Turn the gain control on the amplifier all the way down (counter clockwise).
- Turn up the volume control on the head unit to approximately 3/4 of maximum.
- Adjust the gain control on the amplifier until audible distortion occurs.
- Adjust the gain control down until audible distortion disappears.
- The amplifier is now calibrated to the output of the head unit.
7 Subsonic Switch (Subsonic) - Used to switch the subsonic filter on or off. The subsonic filter frequency is set to 20Hz . The subsonic filter protects subwoofer(s) against low frequencies that can cause damage. Very useful with vented enclosures.
8 Low Pass X-Over Frequency Control - Used to select the desired low-pass (LP) x-over frequency. The frequency is adjustable from 40Hz to 150Hz.
Bridge mode Switch - Used to put the amp in Master mode or Slave mode when bridging two RFL4001D's. For more details, see Master/Slave Mode section.
10 EBC Port (External Bass Control) - The Remote Subwoofer Level Control (EBC) plugs directly into this port, while the EBC itself can be placed anywhere in the vehicle for on demand bass adjustments. EBC is included.
Data link Port (Data Link) : Used to connect two TX8100D or two TX6500D in bridge mode and used in Master/Slave mode. The RJ15 cable is included. For more detail see Master/Slave mode section.
12 12V thermoregulated fan connector for one or two 12V external cooling fans (Attention : 0,5A max - two fans max). The harness is included.
High level inputs (HLI): This input will allow the amplifier to operate from source units with speaker-level outputs. Output speaker leads from the source unit should be tied directly to the wire harness provided with the amplifier. Please respect the polarity to get the maximum sound quality. Note: When speaker level inputs are used, a remote turn on wire must be used to switch the amplifier on and off.
14 X-Over Switch (X-Over) :
In "LP" position, the active low pass (LP) x-over is turned on. Use this position for subwoofer application.
In "HP" position, the active high pass (HP) x -over is turned on. Use this position for speaker application.
In "Off" position, the x-over is turned off. The amp is in wide range mode.
X-Over Frequency Control (Frequency) : Used to select the desired x-over frequency. The frequency is adjustable from 0Hz to 400Hz.
16 PowerOn/Protection LED :
- The LED illuminates red when the amp is switched on.
- The LED is flashing red when the outputs are in short circuit, when the impedance is too low (2Ω minimum), when the amp is in thermal protection.
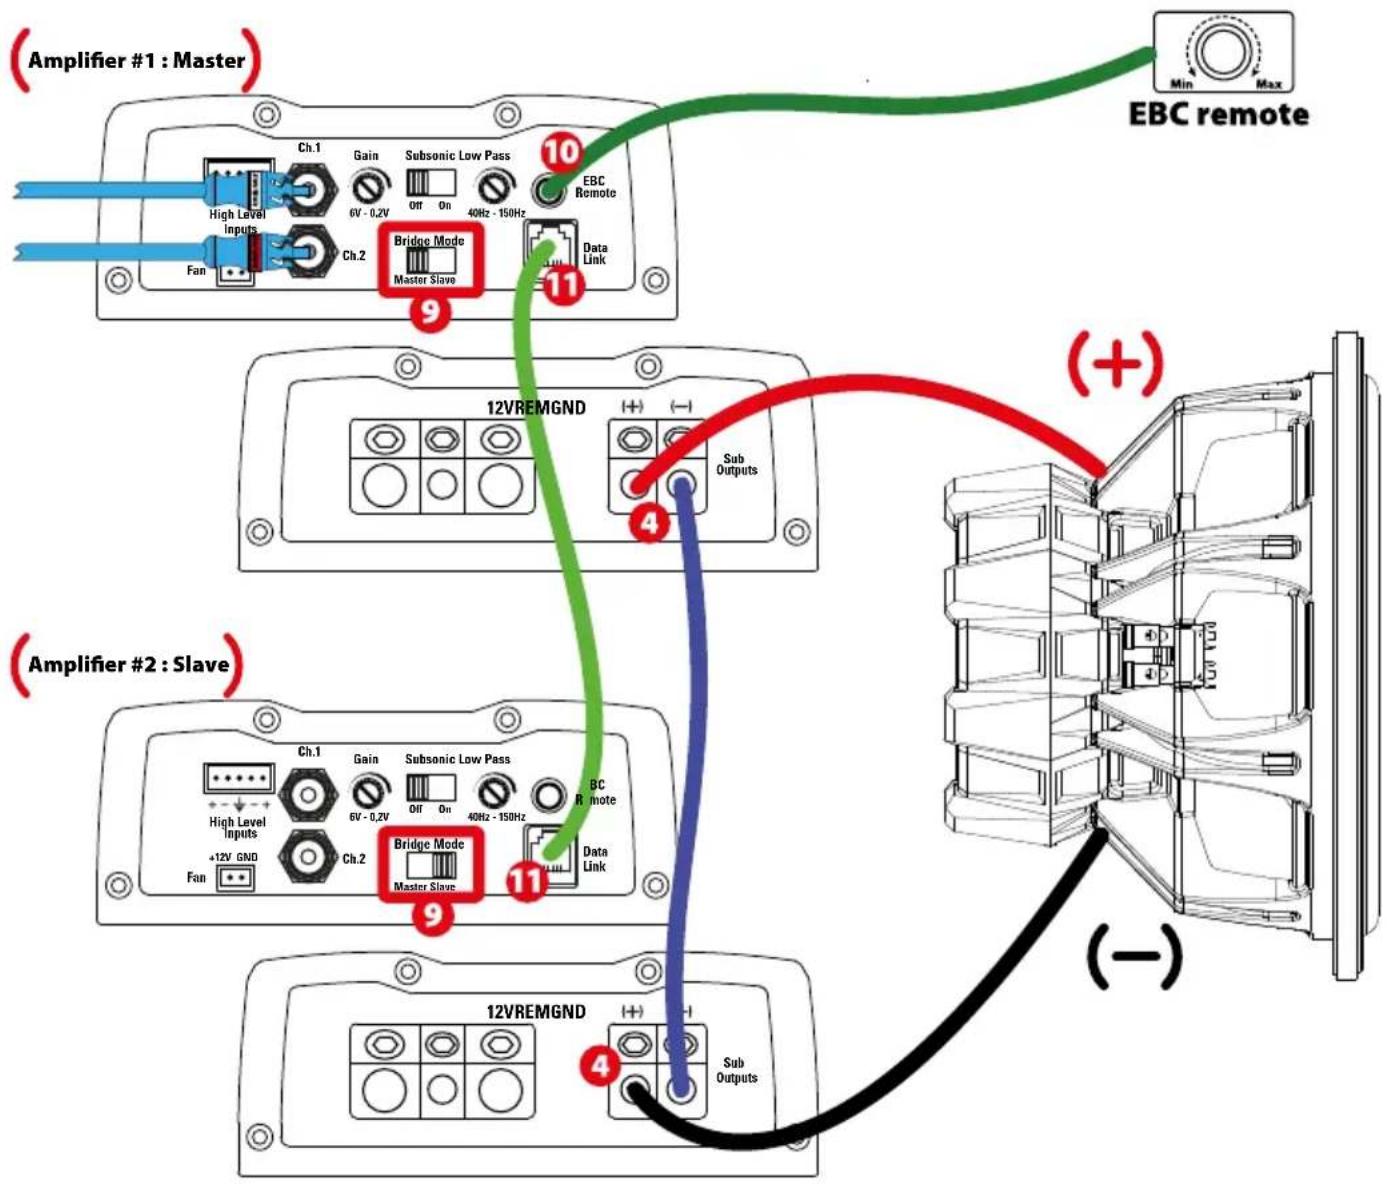
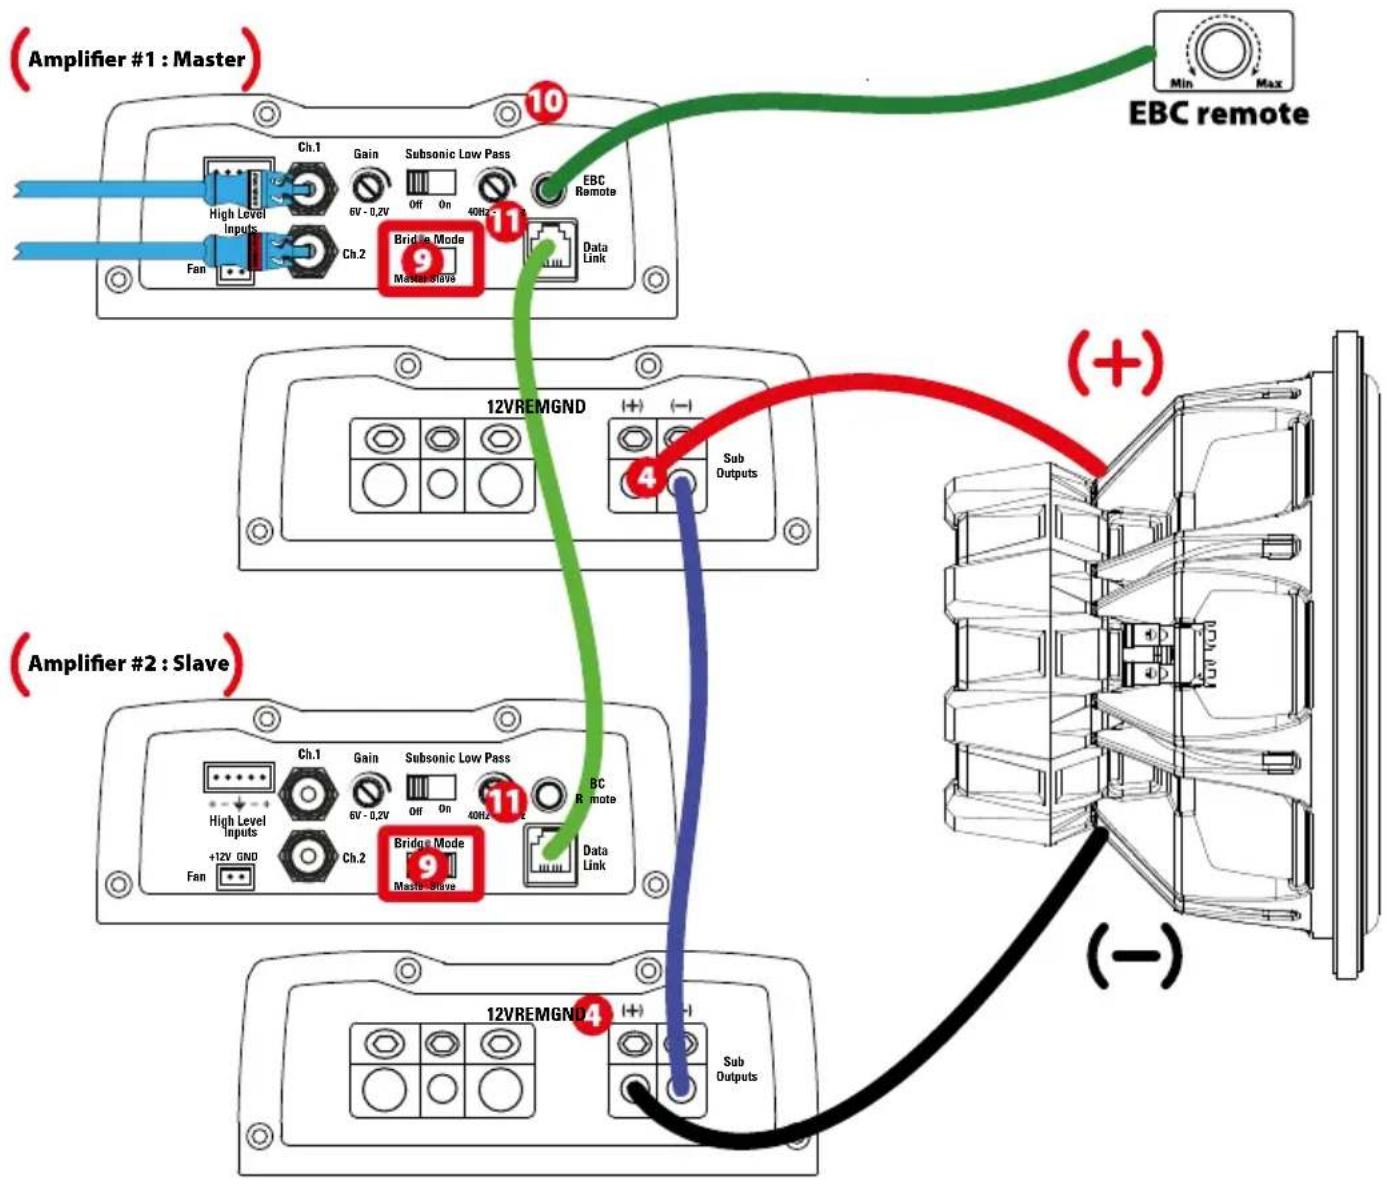
Master Slave mode (Bridge mode):
For MAXIMUM output power, two TX81000D amps can be bridged together (You can do the same with two TX6500D).
- Decide which TX81000D is the "Master" amp. The other one will be the "Slave" amp. Set the "Bridge Mode" switch (9) to "Master" on the master amp. Set the slave amp to "Slave" (9).
- Connect the input signal from the head unit to the RCA inputs of the "Master" amp. The "Slave" amp does not need RCA connections. It will take the signal from the "Master" amp through the RJ15 cable.
- Connect both "Data link" (11) ports together with one of the RJ15 included cable.
- Adjust the gain, the x-over frequency and the subsonic filter on the master amp. All the "Slave" amp controls are disconnected through "Slave" mode. The "Master" amp fully manages the "Slave" amp.
- Your (+) speaker output is the (+) speaker output from the master amp (4).
- Your (-) speaker output is the (+) speaker output from the slave amp (4).
- Connect both (-) speaker outputs together with the same cable as the one used for the subwoofer.
Note: The EBC remote works fine in master/slave mode. It only needs to be connected to the master amp (10).
Installation & Mounting :
MTX recommends your new amplifier be installed by an Authorized MTX retailer. Any deviation from specified installation instructions can cause serious damage to the amplifier, speakers and/or vehicle's electrical system. Damage caused from improper installation is NOT covered under warranty. Please verify all connections prior to system turn on!
- Disconnect the vehicle's negative battery cable.
- Determine the mounting place for your MTX amplifier. Keep in mind there should be sufficient air flow for proper cooling. Mark the mounting holes from the amplifier to be drilled. Before drilling make sure all vehicle wires, gas lines, brake lines and gas tank are clear and will not interfere with installation. Drill the desired holes and mount the MTX amplifier.
Installation & Mounting :
- Install a positive (+) power cable from the vehicle's battery through the firewall using a grommet or firewall bushing to avoid cable damage from sharp edges of the firewall. Run the cable through the interior of the vehicle and connect it to the amplifier's (12V) terminal. Do Not connect to the battery at this time.
Note : Use only proper gauge wire for both positive and negative connections. - Install a circuit breaker or fuse within 20cm of the battery. This effectively lowers the risk of severe damage to you or your vehicle in case of a short circuit or accident. Make sure the circuit breaker is switched off or the fuse is taken out of the fuse holder until all connections are made. Now connect your positive power cable to the positive battery terminal of the battery.
- Grounding - Locate a proper ground point on the vehicle's chassis and remove all paint, dirt or debris to reveal a bare metal surface. Attach the ground wire to that contact point. Connect the opposite end of the ground wire to the (GND) terminal on the MTX amplifier.
- Connect a Remote Turn-on wire from the head unit to the MTX amplifier's Remote terminal. If the head unit does not have a dedicated Remote Turn-on lead, you may connect to the head unit's Power Antenna lead.
- Connect RCA cables from the head unit to the MTX amplifier's RCA inputs. Run all signal cables away from vehicle wiring, computers and power cables. If cables must be crossed do so at a 90^ angle. Use only high quality RCA cables to decrease radiated noise from entering the system.
- Connect your speakers to the MTX amplifier's speaker terminals using proper gauge wire.
- Double check all previous installation steps, in particular, wiring and component connections. Once verified, reconnect the vehicle's negative battery cable, turn the circuit breaker on or place the fuse in the fuse holder.
Note : Gain Levels on the amplifier should be turned all the way down (counter clockwise) before proceeding with adjustments.
Troubleshooting :
Problem
Cause
Solution
3 LEDs are off No +12V at remote connection Supply +12V to terminal No +12V at Power connection Supply +12V to terminal Insufficient ground connection Verify ground connection Blown power fuse Replace fuse and try to understand why Blown amp Return for service
3 LEDs are flashing red Speaker load is too low Remove the speaker(s) The amp is in thermal protection Wait for the amp to cool down Input tension is too high or too low Check your battery and your alternator
3 LEDs are solid red, Volume on head unit off Increase volume on head unit
but no output Speaker connections not made Make speaker connections
Gain control on amplifier set to minimum Turn up gain
Signal processing units off Apply power to signal processor
All speakers blown Replace speakers
Output distorted Head unit volume set too high Lower head unit volume Amplifier gain set too high Lower amplifier gain
Balance reversed
RCA inputs reversed
Bass is weak Not using MTX woofers
Speakers wired reversed
Reverse RCA input
Wire speakers with correct orientation
Blowing fuses Amplifier defective
Speakers wired out of phase
Buy MTX woofers
Wire speakers with correct phase
Excessive output levels
Return for service
Lower the volume
How To Stay Tuned :

https://www.facebook.com/MTXEurope

https://twitter.com/MTXEurope

http://www.mtxaudio.eu
https://www.facebook.com/MTXEurope

https://twitter.com/MTXEurope

http://www.mtxaudio.eu

Technische Daten :
Master/Slave Modus (Bridge mode):
https://www.facebook.com/MTXEurope

https://twitter.com/MTXEurope

http://www.mtxaudio.eu

Caratteristiche :
https://www.facebook.com/MTXEurope

https://twitter.com/MTXEurope

http://www.mtxaudio.eu

Especificações :
https://www.facebook.com/MTXEurope

https://twitter.com/MTXEurope

http://www.mtxaudio.eu
Blaoradapm Bac 3a nokynky ycnntenl MTX Audio cepn TX KnaCca High-End . PpaBnblnha yctahOBka dHnAmNKOB n c6bypepoB MTX o6ecneuBAOT npEBOxCODhbl 3BYK n ppon3BOUNTeHbOCTb Ira beckOHeuHbIX YACOB 6oDpCTBOBaHnca C0ceJe. N03dpabnem uKeNaEM HacnaJdEnn npEBOxCODblm 3BykOM MTX!

TexHnueckme xapakTepncTNK :
TX8100D TexHHueckne xapaKTepeHCTnKn:
- MoHo 6nok knaccCa D
CEA2006 ceptnfoupoBaHHaBbIXOHaH MaHocTb: - 1x 1000 BTRMS @ 2OM u THD+ N ≤1%
- 1x600BTRMS@4OMnTHD+N≤1%
-KpoccoBep:
-HY24Db/okT,perynupeymbIOT40Tdo150Tc
-ⅠHΦpa3BykoBoi ΦnIbTp 24ДБ/OKT 30Γu
Co0THoHHeMe CnHnH-7yM (1Bt) 一 7 5 6
- THD + wym (икхөнг) (1Вt): ≤0,1%
- YactoTHbIy dHaana3OH (±0,5dB):10TJ-150TJ
- MaKcImaJIbHbI BxOJHoi CmHAn:6B
MaKcImaJIbHaYyBCTBuNTeJIbHOCTb:100MB
CnTeMa EBC duCTaHNoHHo ynpabJeHHa
MocTBoW peXmC ynpaBneHem yCnHnna
- TepMoperyu npyembni pa3bem nla BHeHero BEHTnIaTopa (OB)
Pa3MepbI: 366 MM x 133 MM x 54 MM
TX6500D TexHnueckne XapaKtepnctnKn:
- MoHOb6Iok Klnacca D
CEA2006 cepTnФицровань bIxOДнмошпochtb: - 1x500BTRMS@2OMnTHD+N≤1%
-1x300BRT RMS@4OMTHD+N≤1%
-KpoccoBep:
-HU24b/OKT BapnyeTcO 40Tdo150Tc
-ИнфраЗвковоидьт24дБ/okТ30Г
CmHn-ymM(1Bt):>75d6
-THD+Wym(nckaxheHne)(1BT):≤0,1%
ACTOTHbIaana3OH(±0,5dB):10T-150T - MakcunmaJIbHbI BxOJHOI cHnHAn: 6B
MaKcMmAbHaayyBCTbHTeNbHoct b:100MB
CnTeMa EBC dntaHOnHO ynpabJeHHN
-Мостобе ржимсурпавлиемун.
Tepmoperynpyemb pa3bem nBHeHero BEHTNPTopa (OB)
-Pa3Mepbl:266MMX133MMX54MM
TX480D Texnueckne xapakTeprnCTnK:
-4-KaHaJIbHbIy ycINITenB KnaCCa D
CEA2006 ceptnfoupoBaHnBbIXOHaMoHocTb:
-4x140BRTMRS@2OMTHD+N≤1%
-4x80BTRMS@40mTHD+N≤1%
-2x 280 BTRMS4OMMOCTNTHD+N≤1%
-KpoccoBep:
-BY 12 D6/okT,perynipyembl oT 40 T do 400 T
-HU 12b/okr,perynipyemboT40Tdo400T
-Co0THOHeHMe CnHAn-Mym (1Bt) 一 8 5 n6
-THD+UWM(mckaxKeHne)(1Bt):≤0,05%
- YachToTHbI dHaana3oH (±1D5): 10 Tg-40000 Tg
- MakcImaHbHbBxOdHou CnHaj:6B
-MakcunmaHbHa YBCTBnteJbHOctb:200MB
- TepMoperyIynpyembI pa3bEm IJIa BHeUHero BEHTINJTOPa (OB)
Pa3Mepb:216 MMx 133 MMx54 MM

Hactpoikn, Moochtb n noKIOueHne dHaMKOB:
TX81000D TX6500D
TX480D

Klemma 3aemnne (GND) -PpabnHoe 3aemnne Heo6xOIMno dna paboTa BaWero yCNInTeHa NIKOB MoOnctN. KopoTKn Kaeb 3aemnne Toro Xe DnAmetpa, YTO n CINIOBn Kaeb DoJKeH NcNb30BaTc Da IIOKnIOUeHH NkEMMb 3aemnne HEnOpCpeCTBeHHo K Waccn TpaHCnpTHOro cpeCTBa. Bcerda ydaJIyTe Kpacky, rpa3b nn MycOp Do MetaIIa B MeCe 3aemnne Kaebn.
TePMnHaI ynpaBHeHn BkIOueHem (REM) -YcNITeIb BkIOUeTc npn nOaue +12 BoIb HA 3ToTepMnHaI. KaK npabIno, 3To HApJKeHne nOaetc c npBOda ot C mapKnPobko «remote» mN «power antenna»
3 TepMNan +12 B - 30 IaBbHb BXoI NTAHnI DnI yCunNTeR. OH dONJKeh 6bIb NIOKHOH HENOCpeDCTBEHNO K IIOXHTeNBOMHY BbBOy 6bATApE aTOMO6NJ
dI npabNtboHpaobTo. Bydbte OTOPOxHb npu YcTAHOBe (+12) Ka6eNITAHnIB ABTOMO6NE. M36eAITE npOKNAKn ETO RKO6eN IAPANIEHbO C Ka6eNMI
RCA, aHTEH, mIpyrOy UYBCTBnHb HO annapatpybl, KOtOpble MOyT Bb3BaT bM y ayINOCCTMe. TaKke Oeyb BaKHO IMeTb IIOTHO, 6eONACHOe CoHNHne IMAKcIMaNbHO pOn3BODntelHoHocTHy cYNtHeL. MTX peKomeHdyET nONlb3ObaT bcynlTeMe MTX RFL4001D npOBod NTAHnI CEhenEM 50 MM2.
TePMHnblDnHaAMKOB TX81000D n TX6500D (BbIXoDbCa6Byepa): NOKJIIOHTe Ca6Byep (bl) K3TmTEpmHnHAm. PnNCNpIb3OBAHN DByxC6Byepob HnM C6ByepOB C dBoHOn 3BvKOBoK aTyuKo, NOKIIouaTe 06a npOba (+) Ha OIN TepMHnA, a (-) Ha dpYro TepMHnA...
TePMHnbl DnHAMKOB TX480D: PNOKIOUHTe DnAMNKK K 3TNM pa3bEaMaM Co6NIOAD NIOARPHOCb DnHAMNKOB BO BCE nCTeMe. HecO6NIoHEHe p3bl noKnIO-ueHn DnHAMKOB MOKeT pINBcTu K NOtepe 6aca / mnnnoxoro KaueCTBa 3ByaHnR CNTeMbI B cIeON...
MocToboe noKnIOUeHne:
PmMOCTOBOM NOKluueHn yunnten, nCnoJb3yTe nOOnkntelhBtepMnHaKan Hana CH1 n OPMaTeHbHtepMnHaKan Hana CH2.
Pn moctobom noeknoeHH ycunnten, nCnoj3yTe nonoxntelhBtepmHaan KaHAn CH 3 n optuaTehBtepmHaan KaHAn CH4.
BHHMaHHe: He donyckaIte MoCTOBOro IodKnIOUeHn yCmNTeHa cOnpTMBHeHne HnKe, Yem 4 OM.
RCA BxOdbi (Ch.1 Ch.2 Ch.3 Ch.4) - 3TN RCA BxOdbi NcNoIb3yOCTa Ira rnoOBHbX yctPoIcTB NMeIOUXRCA IINI INHeHbIe BbIXOdbI (YdoJIHKbI IMETb MMHMaBb HbI yPOBeHb BixOHOrO CnHaJ200 MB dIpaBnHbOpa6TbI yCnInTeJI). MTX peKOMeHdyet TOnbKO bICOKKaueCTBeHHbIe Ka6ENRCA, IINa yMeHbWeHn BO3MOXHOCTn IONUyeHn BHEuHN X HaboDOK.
6 YnpaBHeHne yCnEHHem (GAIN) - Pa6oOni Dnana3oH BapbpyeTcO t0,2do 6B. PerynipobKa yCmHeHna:
- Nobeprnnte peryunlptop ycnlenHIO do ynopa npotnb cacoBOn CTpeKN.
2.ПовернitepeулартгрмкoctnHaГуdo3/4(npIMepho)OTMAKcHmJIbHorOурвгррмкoctn.
3.YCTAHOBITPepyBCTBNTeBHOCTNaYcNtTeNoRnBHeHrCblbMbIX3ByKOBbIX NCKaKeHm.
4.YCTaHOBtpepyrIATOp yBCTBnteHbOCTn B NOIOXKeHne, pNk KOTopOM, 3ByKOBoe NCKaXKeHne Ncye3HT.
5.TenepbNaCTpoKa yCunInTeLa COOTBeTCTBvETyPObHIO BixOHOrO CnHana RoNOBHOrO yCTPOCTBA.
7 ΦHHT (Subsonic) -Испьзуетсдявькючehнии BBKIOUCHENH INHфра3BkyBOBOФильраз. Инфра3BvyOBaJyCTaHABINBaETcHa 20Iu.Инфра3BvYOBОФильтЗaциuaet c6bByep (bl) ot INHфpaHn3Knx YAcTOT, KOTOpbIe MOrYT npuHnITb Bpei NII BvBeCTN ca6Byepe n3 CTpo. PekomeHnyETc pinnMeHrTB b c6Byepeax C BeHTnInpyEmbIM TINOM Kopnyca.
ΦHγ -ИспόньуетсдЯ BBb6pa Heo6xodmno mononocbI nponyckaHn Hγ.Частota peryniyetcσт 40 Г do 150 Г.
9peeknoatebmoctoboro pekma -nCnoB3yETc nBa Bb6opa pekma ycnnten. GyeceTBye Tba pekma -Beyuun u Beombl (Master / Slave),Korda npon3boDnTcnoKnOueHne napRfL4001D. 7n6oee noPpO6Ho HOpMaumn cm. pa3den Master / Slave.
EBC nopt (Bheunn KOntpnb H) -Iyntb dntaHOnHoro ynpabHeHrypOBHe mcbSyepa (EBC) noKInouaeTcH enoCpeCTBeHHO K TOMy npTy, B TO BpEmKaK cam pernytOp EBC moKet 6bItb pa3MeueH b IIO6om yIO6Hom MecTe b ATObOM6HJe. Pynb DNTaHOnHOr O npPabHeHNA (EBC) BxOJIT B KOMNIEKT NocTabKn.
Popt DAnhBx (Data Link): NcnoB3yeTcIy nOdknueHn BbyTx TX81000D mN DByTx6500D B MocToBOM pexHMe mCNoB3oBaHn H B pexHMe Master / Slave. Kaebb noKIOUeHn RJ15 BXoHT B KOMPiEe NOCTABKn. BoJe e NoDpO6HO cm pa3dEe peXm Master / Slave.
Pa3bem DnnoNIOKJIIOUeHnBHeIHeRo BeHTNIaTOpa (OB) OxnaKeHn C TeMpOerpyuNPOBaHm. (BHIMaHne: 0,5A MaKc TOK nI npbl BeHTNIaTOpB). IpoBoDa
BxOdbblbIKOKoro yOBHn (HLI):3TN BxOdbI N03BOJNT NOKIIQUHTb YCNIMTeNB C BcIOKOBoNtBHX (aKycTnecknx) BbxOob DnHaMMKOB Iy. NoxaanyCTa, co6noDaIteNoJIAPHOCTbNOKIIUoyEHn dIgNoJIyEHn MaKcMmaJIbHOrKaYcTeBO 3ByaHn CnCTeMbI.
PpmeHne: Pnp nCpnoB30BaHm BxOoB BBcKoRb yPoBn HcNoB3yIe npoBdo Remote DnBkIOUeHn N BbIKIOeHn ycInTeTae.
1pepeknouateIb KpoccoBepa (X-Over):
B noJooKeHHN LP ),akTHNBbHnH3KoayctoTHbH 0nBtp (LP) BKIOueHn.1cnoJb3yIte 3to noJooKeHHn npn noJKNIOueHHm ca6Byepa.
B noJooKeHHN HP>>, aKTHBbH bblcokOaactoThb h mIbTp (HP) BkIOUeH. IcnoJIb3yIte 3TO noJooKeHHm pIu nIOKIIoueHHM dHnHaMMKOB.
B noJIOKeHHN «BbIKN», Bce fHInbTpbl OTKIouHeHb. YcHInnteH b HaxOHTCBA pexmme BocpOIm3BeDeHMA nonHOH nIOOCbYacTOT.
15 UnpaBneHme cactotamn KpoccoBepa (X-Over): IcnoIb3yETcIЯ Bby6oepa Heo6xOIMmo ChactotbKpoccoBepa (X-Over). Yactota perynipOBkn: ot 0 Tdo 400 T.
16 INHdNKaTOp BKn/3aunTa:
1.CBeToDIOrROPITKpaChbIM:ycuTTeBbKnIouHeN.
2. CBeTIOIO MnRAET KpaChbIM : Ha akyCTWueCKNX BbIXOaX KOPOTKOE 3aMbKaHne, cOpOTINBHeHne CmIKOM Hn3Koe (Mehee 2Ω) nIN yCmNTeNB HaxoNTcBApeKIMe TENIOBOI 3aUHTbl.
Pexim Master Slave (pexim Bridge) :
"ДЯ MaKmAmbHoi OTaHu N IO BbIXoHoi MoUHcTn, IBa ycNInTeNa TX81000D MOrY T 6bIT bNoKlnOueHb BMeCTe (TaKxBe Bbl MoKeTe CdeNaTb To Xe CaMOe C DByMa TX6500D).
- OnpeDenite, kakoi n3 ycInntene TX81000D BAIETCA"OChOBHbIM" (Master), a pyroin""BeIDombl" (Slave). YcTAHOBtne pekeKIOUaTeNb ha OCHOBHom ycINITe "Bridge Mode"(9) B noJooKeHne""Master". YcTAHOBtne nepeKIOUaTeNb ha BeOMOM ycINITe""Bridge Mode"(9) B noJooKeHne""Slave"(9).
- Podknoyte BxOHOH CnHAn OT roNoBHOrO yCtpoCTBa K BxOaAM RCA ha ycunntene""Master". Ycunnteio""Slave" He hyxhbl RCA coedinHeHna. OH nonyaet cHnAOT yCunnten""Master" uepe3 podknoyeHHb Ka6eb RJ15.
- CoeHnHTe npToBc yCnHnTeJe "Data link" (11) Ka6eJeR J15.
- Otperynpyte ycnneHme, cactory kpcocbepa (X-Over) nHphiPazbyKoob 0nbltp (Subsonic) ha master-ycInntene. Bce eIemehb ty npabHeHHa BeDOMoro ycInnte H "Slave" otknnoheh b Pexnme""Slave""Master" ycInnte h noHctbO ynpabTet BeDMbIM yCInnten""Slave".
- BbIXoIINHAMNkA (+) ABNAETcBbIXOOM (+) INHAMNKa N3 rNaBHOrO yCmInTeTn4.
- BbIXoD nHAmnKa (-) ABnReTcBbIXoDM (+) DnHAMnKa n3 BeDmOrO yCmnteA (4).
- CoeHnHTe 06a BbXoJa (-) DnHaMnKOB ycHnTenei""Master" u""Slave"BMeCTe npu nCnOJb3ObaHHc a6bByepom.
PnmeaHHe: nctanuohb peyraTOp 6aca (EBC) otnuho paobotaet B pexime Master / Slave. Heo6xmoToIbko noKIOHTb erO K rnaBHOmy ycnnteno (Master) (10).
yctahOBka m MOHTaK:
MTX pekomehnyet yctahabnabaB baw hobb ycnntelb ByynoHMOeHOM yctahOBouHM uehtpe MTX. IIO6oe OTKIOHEHe NT 3aadhhx uHCTpykun no yctahOBKe MoKET npBecTHK cepbe3hM nobpexdneHm ycuiTene, dHaAMNKOB / nnn 3JeKTPueckcN CTeMb ABTO6nna. Ha yIep6, npuHHHeB B peyblTa He npaBnHoro MOHTaxa, rapaHTn He pacnpocpaHReTc. Ioxanytca, npoBepeTe Bce CoedHHeNo DO BKNIOeHn yCTAHOBNEHO CNTeMb!
1.OTKINHOHTe OTPuataTeBHyb (-) Ka6eIb AKKyMnTOpa ABTOMO6nla.
2. Onpepeite MeTo MOtAka BaWero ycHntenMTX. Hmeite B BNDy, To MeCTa BOKpy ycHnten, DOnKHO 6bTb DoCTaTOHO dNBo3dyHoro NOToka n HndnkeJauero oxJaxKeHn. OImte MeTAtkHe OTBepCTna ycHnten. Pepe CbePHeHem yBeDInTe, TcBce PpOBOa ABTomOBu, TOnnHBie MaHCTpan, TopMO3hle MaHCTpann n TonnHBnBnBnBnBnBnBnBnBnBnBnBnBnBnBnBnBnBnBnBnBnBnBnBnBnBnBnBnBnBnBnBnBnBnBnBnBnBnBnBnBnBnBnBnBnBnBnBnBnBnBn
- PpOBeHtE CInIOB0 NIOKHTbHbIKa6eNb NITAHn (+) OT aTOMo6MbHorO aKKyMylTOpA, NcONb3yra 3aIHTHy BTyNky, YTO6b H36eKaTb NOBpeKHeHn Ka6eN OCTbIMN KpOMkAMN OTBepCTNa B Metanne. IpnOyCTNe Ka6eNb Upe3 cAnOH aTOMo6bU IN NOKIIouHTe ERO K NOLOXHTeNBHomY (+12 B) TepMNHany ycINNTeHn. He NoDKNIOuHte CInIOB0 Ka6eNb K aKKyMylTOpHoi 6aTaapee aTOMo6bU IN 3aEBPeHEHn BCEx CoEINHeHn. PpIMeuHnE: McnoB3yue ToIbKO peKOMeHNoBaHnOE CEeHne CInOBoro n 3aEMNHOero Ka6eN.
- UctahOBIne abTomatHueckn npdeoxpaHntelb He daaee 20 cm ot aKKymyIaTOpHo 6atape. 3To 3fOeKTHBHO cHnxKaet pCK cepbe3HOro nOBpeJHeHry cunHtien IIN BAWeRo ABTOMO6nB B Cnyae KopoTKoro 3ambKaHN Hn HecuaTHORO CnyaR. Y6eNTecb, YTO ABToMaTuWcckn npdeoxpaHntelb BblKnUoyen Hnn PnabKn npdeoxpaHntelb ydaen H3 dpKaTeN (npdeoxpaHntelbHn KO6bl) noka BCE coEHHENr He npou3BeHb. Tenepb noKnIOuHTe Baaw nOnokntelbHk Ka6en NITAHN K NOXKTelbHOMy TepMNHaIy (+12 B) 6atape an kKymyIaTopa.
5.3a3eMneHHe - Hainitpe npabnbyky ToKy 3a3eMneHn Ha aaccn ABtOMo6nna n 3auchntte NOBepxHOCTb KOHTAKT o KpaK, rpaN m Mycopa do MeTann. PIOKJIIOUHTe npoBOd 3a3eMneHn K ToKcE 3a3eMneHn. PIOKJIIOUHTe npoTbONIOJXhki KOHeu npoBOda 3a3eMneHn K (GND) TepMNHaNy yCINNTenMTX. - NIOKIOHTe npoOy npaBHeHn BkIOUeHmE O T y K TepMHAny BkIOUeHn ycIITeM MTX.EcN IY He IMeET otJeBHOrO npoBOda nCTaHNOHOrO BKIOUeHn YCINTEA, Bbl MOKeTe NIOKIOHTbc K npoBOy nTaN Hn AKTNBHO aHTHeHbI.
- NIOKIOUHTe RCA Ka6enOT rONOBHOrO yCTPOINCTBa K BXoAM RCA ycunInTeIa MTX. IPOknaIbIaIte BCE CnHAnhBHe iKa6en MAKcMnAhnHo ydaJeHHo OT npOBdKn ABTOMO6nI IN CnIOBOI npOBdKN ABTOMO6nII.ECN CnRHaJIbHbIe IN CnIOBBie Ka6en nepeceKaIOTc, To IX Heo6xOnMo npOIOKITb IOyTNOM 90°. IJRA yMeHbWeHHN BHEuHX NOMEX OT rHEpAToPA IN CnIOBOI npOBdKN ABTOMO6nIA NcOJIb3yTe TOJbKO BBICOKKaueCTBeHHbIE Ka6en RCA.
8.Подклioчte ДИнамКи K TePmHaHаЯм ДИнамКOB yCunHTeMa TMX B COOTBeTcBn C nOIOcamn.
9.Двждп npOBepbte Bce npdIyIe Wn no yCTAHOBKe, B qACTHOCTN, npOBOky I BCE KOMNOHEtB coEINHEn. Iocne npOBepK, NOIKIOHTe OTpuatelhBn Ka6en akkymnyTopHoi 6aTape n ABTomO6nla, BKIOUHTe ABtomATWcckn npEOxpaHnte bnnnoCTabBe TnABKn npEOxpaHnte B depKaTeB npEOxpaHnte (npEOxpaHnteBHyIO kon6y).
PpmeHHe: yOBeHb yCnIeHn DoJIkeH 6bIb y6paH Do ynpa npoTb Hacob O BcpeKn, nepeHaonom KoppeKtnpOBKn yOBoHy CnIeHn.

YctpaHeHne HencnpaBHOCTeI:
Ipo6nema
PnnuHa
PeweHne
3 cBeToIOJOna BbIKIOUeHb Het +12 Ha ynpabJIIOUeM npOBoJe IoKIOUHTe NtAHne Ha KNeMMy +12 B Het +12 B npn IOKIOUeHm nITAHn IooKIOUHTe NtAHne Ha KNeMMy +12 B HenpaBnIbHOe IOKIOUeHme 3aEMnEHHn IpoBepbTe 3a3EmHeHn IpepeOpEn npdeOxpanHTe b NITAHn 3aMeHte npdeOxpanHTe b NONbTaHTecb NOHrTb, NooyeMy YcunNTe h enCnpabEN Obpatntecb B cepBnc
3cBeToMnOa MmraH KpaChbIM Harpy3ka DnHAMNKOB CnHKOM Hn3Ka CHMMTe DnHAMNK (u) YcNITeNb haoDnTcB PexKIMe TepNOB 3aNTbI DaHTe YcNITeNIO OCTbIb BxOHDoe HapRaeKHe CnIKoM BbcOKO Nn CnIKoM Hn3KO IpOBepeTbe AKKyMnyTOp n RehePApOp
3cBToIIOJa rOpHT KpaChbIM, 3ByK Ha rOIOBHOM yCTpoiCTBe BbIKUoye YBeMnHbTe rPoMKoCTb Ha rOIOBHOM yCTpoiCTBe
HO HET 3ByKa He npOn3BeHeNo pOKJIIOUeyHne DInHAMNKOB BbINOHITE pOKJIIOUeyHne DInAMKKOB
PergyIaTOp UnpaBHeHnYcIIeHnEM BbICTaBHeH Na MmHMym OTrpeRyIpyIte ycIeHne
06pa6OTka CnHana BbIKIOUeHa POnaIte PnTaHne Ha npoceccop CnHaNob
Bce DInHAMKn BbIuH N3 CTPOA 3aMeHHTb DInHAMKN
BbIXOHOH CnTHaN NCKaKaTaC
YpOBeHbIpOMKoCTnIyCNIuKOMBbICOKo
NoH3bTe ypoBeHr pOmKocTn r
Ko3ΦΦnIeHTyCINHeNcIIMKOMBbICOKO
ymehbinteKo3phiuueHtYcunenHHa
Ipepyan6anaHc
IpepyntaHbXoDbRCA
Ipepyan6anaHc
PoiKJIHOHTe DHHAMMKB COOTBECTCBN C NOHOCAMN
IIOKJIQUHTE BXOdbi RCA B COOTBETCTBn C KaHAnamn I
Bac cna6b
He nnonb3yetcMTX ca6byeep
Диhammknpacfa3npoBaHbI
PoiKIIIOUHTe DnHAMNKc Cc6bIODeHMeΦa3bI
PpeoXpaHntEnHeNcnpaBhbl
https://www.facebook.com/MTXEurope

https://twitter.com/MTXEurope

http://www.mtxaudio.eu
Specificati:
TX8100D Specatcatii :
- Clasa-D amplifier Monoblock
- CEA 2006 certificat Putere de ijesire :
- 1x 1000 wati RMS @ 2Ω si THD + N ≤ 1%
- 1x600W RMS @ 4Ω sI THD + N ≤ 1%
Crossover: - Low Pass 24dB / oct variabila de la 40Hz la 150Hz
- Filtru subsonic 24dB / oct la 30Hz
- Raportul semnal-zgomot (1 Watt): >75dB
- THD + zgomot (distorsiuni) (1 Watt): ≤ 0,1%
Raspuns in freventa (± 0,5dB) :10Hz-150Hz
Semnal de intrare maxima: 6V
Sensibilitate maxima: 100mV
Control de la distanta EBC
Modul punte
Reglat termic Conector ventilator pentru un ventilator extern (s) - Dimensiuni: 366 mm × 133 mm × 54 mm
TX6500D Specificatii :
- Clasa-D amplifier Monoblock
- CEA 2006 certificat Putere de ijesire :
- 1x500W RMS @ 2Ω si THD + N ≤1%
- 1x300 wati RMS @ 4Ω si THD + N ≤ 1%
Crossover: - Low Pass 24dB / oct variabila de la 40Hz la 150Hz
- Filtru subsonic 24dB / oct la 30Hz
- Raportul semnal-zgomot (1 Watt):>75dB
- THD + zgomot (distorsiuni) (1 Watt): ≤ 0,1%
Raspuns in freventa (± 0,5dB) .. 10Hz - 150Hz
Semnal de intrare maxima: 6V
Sensibilitate maxima: 100mV
Control de la distanta EBC
Modul punte
Reglat termic Conector ventilator pentru un ventilator extern (s) - Dimensiuni: 266 mm × 133 mm × 54 mm
TX480D Specificatii :
-4 canale Clasa-D amplificator gamă largă
CEA 2,006 certificate Putere de cesire:
-4x140 wati RMS @ 2Ω si THD + N ≤1%
-4x80 wati RMS @ 4Ω si THD + N ≤1%
- 2x 280 wati RMS punte la 4 si THD + N ≤1%
Crossover:
Trece sus 12dB / oct variabela de la 40Hz la 400Hz
12dB scazut / TTPM variabela de la 40Hz la 400Hz
Raportul semnal-zgomot (1 Watt):> 85dB
- THD + zgomot (distorsiuni) (1 Watt): ≤ 0,05%
Raspuns in freventa (± 1dB) : 10Hz - 40000Hz
Semnal de intrare maxima: 6V
Sensibilitate maxima: 200mV
Reglat termic Conector ventilator pentru un ventilator extern (s)
- Dimensiuni: 216 mm × 133 mm × 54 mm
Setari, Alimentare si conexiuni Difuzoare

TX81000D TX6500D
TX480D


https://www.facebook.com/MTXEurope

https://twitter.com/MTXEurope

http://www.mtxaudio.eu
M5
AUDIO
MTX is proud to be an
American Audio Company since 1971.

MTX is a proud member of Mitek Corp high quality consumer audio product lines.

MiTek
Corporation
Designed and Engineered by Mitek
in Phoenix - AZ, USA - Assembled in Korea. © 2016 Mitek. All rights reserved.
MTX is a registered trademarks of Mitek. Due to continual product development, all specifications are subject to change without notice.
Mitek-MTX-4545 East Baseline Rd. Phoenix, AZ 85042, USA


- TX480D TX6500D TX81000D
- Owner's Manual
- Specifications:
- TX8100D Specifications :
- TX6500D Specifications :
- TX480D Specifications :
- - Settings, Power and Speaker connections :
- Master Slave mode (Bridge mode):
- Installation & Mounting :
- Troubleshooting :
- Problem
- Cause
- Solution
- How To Stay Tuned :
- Technische Daten :
- Master/Slave Modus (Bridge mode):
- Caratteristiche :
- Especificações :
- TexHnueckme xapakTepncTNK :
- TX8100D TexHHueckne xapaKTepeHCTnKn:
- TX6500D TexHnueckne XapaKtepnctnKn:
- TX480D Texnueckne xapakTeprnCTnK:
- Hactpoikn, Moochtb n noKIOueHne dHaMKOB:
- Pexim Master Slave (pexim Bridge) :
- yctahOBka m MOHTaK:
- YctpaHeHne HencnpaBHOCTeI:
- Ipo6nema
- PnnuHa
- PeweHne
- Specificati:
- TX8100D Specatcatii :
- TX6500D Specificatii :
- TX480D Specificatii :
- Setari, Alimentare si conexiuni Difuzoare
- M5
- AUDIO
Brand : MTX Audio
Model : TX480D
Category : Car radio