PM 3622 - Oven CLATRONIC - Free user manual and instructions
Find the device manual for free PM 3622 CLATRONIC in PDF.
User questions about PM 3622 CLATRONIC
0 question about this device. Answer the ones you know or ask your own.
Ask a new question about this device
Download the instructions for your Oven in PDF format for free! Find your manual PM 3622 - CLATRONIC and take your electronic device back in hand. On this page are published all the documents necessary for the use of your device. PM 3622 by CLATRONIC.
USER MANUAL PM 3622 CLATRONIC
WAARSCHUWING: Verbrandingsgevaar door damp!
WAARSCHUWING: Verbrandingsgevaar doornp!
Consommation: 1800 W
Thank you for choosing our product. We hope you enjoy using this appliance.
Symbols used in these operating instructions
Important tips for your safety are identified by a special mark. You must observe these tips to avoid accidents and damage to the appliance:

WARNING:
Warns of dangers to your health and indicates possible risks of injury.

ATTENTION:
Indicates possible hazards to the appliance or other items.

OTE:
Highlights tips and information for you.
General guidelines
Before using this appliance for the first time, please read the operating instructions very carefully and keep these safe along with the warranty certificate, receipt and, if possible, the box and inner packaging. If you give the appliance to a third party, you should also provide them with the operating instructions.
- The appliance is for personal use only and must only be used for its intended purpose. This appliance is not intended for commercial use.
- Do not use the appliance outdoors. Keep it away from heat, direct sunlight, humidity (do not submerge in liquids under any circumstances) and sharp edges. Do not use the appliance with wet hands. If the appliance becomes wet or damp, pull the plug out immediately.
- Switch the appliance off and always pull the plug out of the socket (pull on the plug, not on the cable), whenever you are not using the appliance, attaching accessories or cleaning, or if there is a fault.
- Never leave the appliance unattended when in operation. If you leave the room, always switch the appliance off. Pull the plug out of the socket.
- The appliance and the power cable must be checked regularly for signs of damage. If damage is discovered, stop using the appliance.
- Only use original accessories.
- For the safety of your children, do not place any of the packaging items (plastic bag, box, polystyrene etc.) within their reach.

WARNING:
Do not let young children play with the film. Risk of suffocation!
Special safety information for this appliance

WARNING: Hot surface!
Risk of burns!
During operation, touchable surfaces of the appliance can reach an extremely high temperature.
Therefore, only touch the appliance's handle and switches.

WARNING: risk of scalding!
Hot steam will escape when grilling and when opening the top grill plate.
ATTENTION: risk of fire!
Oils and fats may set on fire if overheated. Keep a sufficient safety distance (30 cm) from highly flammable objects such as furniture, curtains etc.
- Place the appliance onto an even surface that is resistant to moisture and heat. The surface should be easy to clean, as splashing is unavoidable. Place a heat-resistant board underneath the appliance if used on a sensitive surface.
- Due to rising heat and steam, do not use the appliance underneath wall cabinets.
- Do not move the appliance when it is in operation.
- During use, make sure that the power cable does not come into contact with hot parts of the appliance.
- Do not touch the hot parts of the appliance.
- Never operate the appliance using an external timer or a separate remote control system.
- Do not repair the appliance yourself; instead, contact an authorised professional. In order to avoid hazards, defective power cables should only be replaced with comparable cables by the manufacturer, our customer service department or by similarly qualified individuals.
- This appliance may be used by children from the age of eight and by persons with reduced physical, sensory or mental abilities and/or a lack of knowledge and experience if they are supervised, or if they have been instructed on the safe use of the appliance and are aware of and understand the dangers that may occur.
-
Do not allow children to play with the appliance.
-
Cleaning and user maintenance work must not be performed by children unless they are 8 years or older and are supervised.
- The appliance and its power cable must be kept out of reach of children under 8 years.
- This appliance is not designed to be submerged in water during cleaning. Please follow the cleaning instructions provided in the 'Cleaning' section.
Correct use of the appliance
This appliance is intended for the preparation of food in closed spaces.
It has been designed for private use in the household and for similar purposes. It should only be used as per the descriptions provided in these operating instructions. This appliance should not be used for commercial purposes.
Any other use of the appliance shall be deemed to be contrary to the intended purpose and can lead to damage to property or even to personal injury.
The manufacturer cannot be held liable for damages which arise as a result of the use of the appliance contrary to its intended purpose.
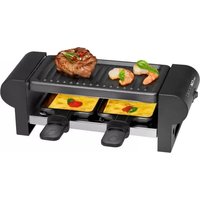
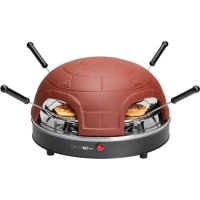
Overview of controls
1 Top baking plate
2 Bottom baking plate
3 Heat-insulated handle
4 On/Off switch/power indicator (red)
5 Temperature control light (green)
6 Temperature regulator
Unpacking the appliance
- Remove the appliance from its packaging.
- Remove all packaging materials such as film, packing material, cable clips and cardboard packaging.
- Check that nothing is missing from the delivery.
- Check the appliance for any transport damage, as this could pose a potential risk.
- If items are missing or if you notice any damage, do not operate the appliance. Return it to the vendor immediately.

NOTE:
There may still be some dust or production residue on the appliance. We recommend that you clean the appliance before use as described in the 'Cleaning' section.
Instructions for use

ATTENTION: Take care not to damage the non-stick baking surfaces!
- Only use wooden or Teflon spatulas or tools.
- Do not use sharp objects (e.g. knives, forks) on the baking surfaces.
-
Do not use any plastic utensils as these may melt.
-
The non-stick baking surfaces mean that you can cook food without using oil.
- If you do wish to use oil, a high-temperature oil such as sunflower oil is the most suitable option. Do not use olive oil or butter, as these types of oils start to produce smoke at low temperatures.
Switching on/off
- Always set the temperature regulator (6) to position 0 before connecting or disconnecting the plug.
- The red power indicator (4) shows that the appliance is in operation.
Electrical connection
Connected load
The appliance may consume a total power of 1,800 W. With this connected load, a separate supply protected by a 16 A circuit breaker is recommended.

ATTENTION:Overloading!
Do not use any extension cables or multiple sockets, as the appliance is too powerful to be used with these devices.
Connection
- Before you insert the plug into the power outlet, check that the voltage you wish to use conforms with that of the appliance. The details can be found on the nameplate.
- Connect the appliance to a properly installed earthed socket.
Before first use
- Clean the baking plates as described in the 'Cleaning' section.
- Close the Pizza-Maker.
- Operate the appliance with the baking plates closed and without any pizza dough or toppings for approx. 10 minutes (see 'Usage' section). The temperature regulator should be set to ·s for this step.
iNOTE:
It is normal for some light smoke to escape during this step. Please ensure sufficient ventilation.
- Pull the plug out of the socket.
- Allow the appliance to cool down completely.
- Wipe the baking surfaces using a damp cloth.
The appliance is then ready for operation.
Usage
- Connect the plug into the power outlet. Use the On/Off switch to turn the appliance on. The switch will light up red when the appliance is switched on. The second control light will light up green.
- Set the temperature regulator to ... The device will start to heat up.
NOTE:
- The appliance will take approx. 5 minutes to heat up.
-
When the green control light goes out, this indicates that the set temperature has been reached. It will light up and go out again during operation. This is normal and indicates that the temperature is being controlled and maintained by the thermostat.
-
Open the appliance using the handle. Position the top baking place vertically.
- Place the pizza with toppings onto the bottom baking plate.
- Slowly close the top baking plate.
- The average baking time for a pizza is between 20 and 25 minutes, depending on the thickness of the pizza base and the toppings. When your pizza is ready, open the appliance using the handle.
NOTE:
Please make sure that the topping does not touch the top plate.
WAI
WARNING: risk of scalding!
Escaping hot steam.
- Use a wooden or Teflon spatula or tool to remove the finished pizza.
i NOTE:
Please note that the appliance can also be used when open.
To do so, open the lid and lift it slightly.
Stopping operation
- Set the temperature regulator to position 0.
- Use the On/Off switch to turn the appliance off.
- The red power indicator will go out.
- Disconnect the plug.
- Allow the appliance to cool down before cleaning.
Cleaning

WARNING:
- Always disconnect the plug before cleaning.
- Do not submerge the appliance in water. Doing so may result in electric shock or fire.
- Make sure that no liquid gets inside the appliance.
ATTENTION:
- Never use a wire brush or any other abrasive objects.
- Never use harsh or abrasive detergents.
Baking plates
The baking plates are not removable.
- Clean the baking plates using warm water and a slightly damp sponge or cloth.
- Dry the baking plates using a cloth.
Housing
Clean the housing with a slightly damp cloth after use.
Storage
- Only store the appliance when it is cool and clean.
- The power cable can be wound around the cable support at the base of the appliance.
We recommend that you store the appliance in its original packaging if you do not intend to use it for a prolonged period. - Store the appliance out of the reach of children and in a well ventilated, dry place.
Recipes
Pizza base - how to make a pizza
200 g flour
100 ml lukewarm water
12 packet of dried yeast
1 / 2 tablespoon olive oil
1 pinch salt
1 pinch of sugar
- Sieve the flour and then mix with the salt in a bowl. Stir the yeast and sugar into the lukewarm water until dissolved. Work into the flour using the dough hook on a hand-held electric whisk. Add the olive oil and knead together to create a smooth dough.
- Using your hands, vigorously knead the dough on a floured work surface, and then shape it into a ball. Put the dough into a bowl, and then cover and leave to rise in a warm, draught-free place for 45 minutes.
- Vigorously knead the dough on the floured surface again, and roll out to a diameter of approx. 28 cm.
- Cover the dough with tomato sauce and the toppings of your choice.
Please make sure that the topping does not touch the top heating plate.
Troubleshooting
The appliance is not working.
Possible cause:
The appliance has no power supply.
Remedy:
- Check the socket by plugging in a different appliance.
- Make sure that power plug is inserted correctly in the socket.
- Check the mains fuse.
Possible cause:
The appliance is faulty.
Remedy:
- Contact our Service department or an electrical specialist.
Technical data
Model: .PM 3622
Power supply: 220-240 V\~, 50/60 Hz
Power consumption: 1,800 W
Protection class:
Net weight: approx. 3 kg
The right to make technical and design modifications in the course of continuous product development remains reserved.
This appliance has been tested to ensure compliance with all applicable current CE guidelines such as Electromagnetic Compatibility and the Low Voltage Directive, and has been constructed based on the latest technical safety regulations.

Disposal
Meaning of the dustbin' symbol
Save our environment: electronic appliances do not belong in household waste.
Use the collection points provided to dispose of electronic devices and hand in the electronic devices you no longer intend to use at these points.
By doing this, you are helping to avoid the potential effects on the environmental and human health caused by incorrect disposal.
You thereby contribute to recycling and other forms of utilisation of old electric and electronic appliances.
Your local council can provide you with information about collection points.
Instrukcja obslugi
CTC Clatronic Sp. z o.o
IpeDynpexKaet O Bo3MOxHOn ONaCHOCTN IJIa 3OpOBbYn pUCKe TpaBM.

BHIMAHNE!
Yka3bIbaeT Ha BO3MOXHbIe ONaCHOCTN NOBpeKdEHHa YcTpoCTBa HnDpyrNX PpeMeTOB.

YKA3AHNE!
CoepKHT COBtBu INHOpMaunIO.
06uyeka3aHn
Ipejde yem npctyntb K kcnnyataun yctpoicTba, BHIMATEbHO npouHTne u coxpaHnte 3TO pkyOBoDCTBO NOB3OBATeJI BMeCTe C rapaHTnHBIM TaIOHOM, KACCObbIM YekOM N, NO BO3MOXHOCtN, C KOp06KoN BHyTpeHHHeynakOBkOJ. Ipeedabay yctpoiCtBO TpeTbeMy NmCy, He 3a6ynde nepedaTb n pykoBDCTBO noB3OBATeJI.
- IVcnoJb3yIte yCTpoIcTB OToIbKO B JINuHOM 6bITy I NO Ha3HaueHnIO. YcTPOIcTBO He npEJaHa3HaueHO nI INcNoJIb3OBaHnB I pPomblIeHHbIX ZeJIax.
He nCnoJb3yIte yCTPOINCTBO Ha OTKpbITOM BO3dyxe. YKpbIbAte yCTPOINCTBO OT XApbl, npMbx COJIeHbIX lyuei, Bnarn (HkoRda He noPpykaInTe erO B KndKocTb), a TAKKe He IOnyckaiTe KOtakTa YCTPOINCTBa C OCTpblm YuIamn. He npKacaiTeCb K yCTPOINCTBy MOKpbIM pykAm. Ecnn yCTPOINCTBO HAMOKNO INN NOKpbIIOCB Blaor, HEmdJeHHo BbIHbTe CeTEBOI WTEKEp IN3 p03ETKn.
BbIKIOaIte yCTPOINCTBO N BbIHIMaiTe CeTEBOI TEKep n3 pO3eTKn (dEprkacb 3a wTEKeP, a He 3a WHyp), KOrJa yCTPOINCTBO He IcNtOB3yETCBA, BO BpeM yCTaHOBKn KOMIIeKTyOuXx DeTaJIeN, OCHCTKN INN B Cnyae HEnCIPaBHOCTN.
He octablaIte yctpoiCTBO 6e3 npncmOTpa. Noknda nomeueHne, Bcerda BbIKHOaIte yctpoiCTBO. BbIHMaTe ceTeBO uTEkep u03 p03tKn. - UcpoiCTBO HUHp NHTaHnHEo6xOdmo perynpaH npOBepaTb Ha HauuHne NobpeXdeHn. B cnyae 06HapyeHn NOBpeXdeHn yCtpoCTBO HcNOJb3ObaTb 60JIbIe HeJIb3I.
IcnoJb3yIte ToJIbKO opINHaJIbHbIe KOMnNeKTyUOuIe DetaII.
Дябз�acOCTBaIx DeTeH OCTaBnIte 3JIeMEnTbI yNakOBKn (IINaCTIKOBbI NaKeT, Kopo6Ky, NeHONJaCT N.T.D.) B 3OHe IV DoCTyna.

PENEYNPEXKDEHNEI
He paapeaIte deTm irpaTb c nneHko. CyueCTbyeT onacnoctb ydysb!
Oco6bIe yka3aHnI NO TexHnke 6e30nacHOCTN dJa DaHHoro yCTpOiCTBa

N3-3a BbICOKO MOUHOCTN yCTPOICTBA ero He cNeDyET NOKNOuATb K yDNHNHTeTnM MHOROKOHAKTHbIM p03ETkAM.
IopknloueHne
- PpeJxH BCTaBnTb CeTeBOI WTeKep B po3eKy, npoBepbTe, COOTBeTcByet Hn HAnpJxHe N Cetn pa6OHeMy HAnpJxHeNIO yCtPoIcTbA. Pa6OHee HAnpJxHe N yKa3aHO Ha nacnopTHo TabNIue yCtpoIcTbA.
-Подкючate yctpoCTBO TONbKO K npaBnIbHo ycta-HOBNeHHbIM 3a3eMJIeHHbIM 3JKeTpUyeCKIM pO3eTKam.
IpoIroTobKa K pa6oTe
- OuICTHe HaraPeBaTeIbHyIO NobepxHocTb, KaK OINcaHO B pa3dene «OuictKa».
- 3akpoTe neyDb nIuZbl.
- Bключite yctpoCTBO npimepHO Ha 10 MmHyT, 3aKpbIB KpbIshky n He NOMEUaB HByTp b H KOpx, Hn HauHKy dIЯ NiUcbl (CM. pa3dEe «IopraDOK paObTb C yctpoCTBOM»). IpeEd 3TNM yctahOBITE peYJrTOp Tempepa-typbl Ha OTMeTKy ...
YKA3AHHE!
He6oJIbWoE BbIeJIeHHe IbIMa npn 3TOM cHTaTeTCn HOpMaJIbHbIM RAJIeHnEM. ObecneYbTe DoCTaTOHyIO BEHTNIAJIO.
- BbItaunTe cTeBoi uTeke np 3p0eTkn.
- Doxntecb noJHoro octbAHn yctpoCTBa.
- IpoTpnte HarpeBaTeIbHyIO NOBepXHOCTb BnaKHOI TpIKNoI.
Teneb yctpoNCTBO rTOBO K nCIOJIb3OBAHnIO.
Popraokpa6OtbycyTpoNCTBOM
- Bctabte stekep nntaHnB p03eTky. BkIIOHTe yctpoiCTBO C NMOUbHO nepeKNIouateJI. Iocne BKIOHeHn OH 3arOpITcK pachbIM CBETOM. BtopoIN HdNKATOP 3arOpITc3eNEHBIM CBETOM.
- YctaHOBInTepeyIaTOpTemnepaTypbHaOTMeTKy... YcTpoiCTBOHarpeTc.
YKA3AHNE!
-
Pa30rpeBДПNTc8 OkOJI 5 MmHyt.
-Послдддддддддддддддддддддддддддддддддддддддддддддддддддддддддддддддддддддддддддддддддддддддддддддддддддд徳 3eIeHbI INdIkaTOp rachet. OH TO 3aropaetcra,TO rachet B Xode pa6oTbI yCTpOietBa.3ToHOPmaJIbHOE RAJIeHne, CBIeTeJIbCTByIOUe eOTOM, YTO pOnCxOJIT TepMOCTaTUnCeckn KOHTpONbTEMnepaTpybl N POnDEpKaHHe HxKHOrO ee 3NaueHnA. -
OtkpoIte yctpoIcTBO, B3aBImCb 3a pyKy. YcTaHOBInTe BepXHIOU qAcTb BepTKaJIbHO.
4.ПОLOXКITE NIIUcY cHaHINKoH Ha HIXKHOIO HARpeBaTeNbHyO NOBepxHOCTb. - MedneHHO 3aKpOte BepxHIOU qAcTb yctpoIcTba.
- CpeHHe Bpem npiroTOBnHn NmUcbl COCTaBnReT 20-25 MNHyT n 3aBnCnT OT TOnIuHbKopXa HauNKn. KOrda NmuZa 6yDet roToBa,OTKpoTe yCTpoiCTBO, B3raBwncb 3a pyKy.
YKA3AHNE!
CneIte 3a Tem, TTo6bHaunHka NlUcBHe conpNKacJanaC bepxHe HarpeBaTeJbHOI NOBepxHOCTbIO.

IPEyIpeKJHHeNlEOxHO noJyUHTb OXoR
UcTpoIcTBo He pa6oTaET
Bo3MOxHnA npuHnHa:
YcTpoCTBO He IIOKIIIOUHeO K po3ETke.
DienCTBNE:
- PpOBeBte pa6oTocnOC6HocTB po3eTK C NOMOuHO pyrTOy yCTPOiCTBA.
PpabnBHO BCTaBt CeTe BoH WTeKep Bpo3eTky.
-Поверъпгддханть Домового Вбда.
Bo3MOxHnA npuHa:
YcTpoIcTBo HeNCnpaBHO.
ДиCTBNE:
- 06paTntecb B Hau cepBnchbI ueHTp nI IN K cneuaNNCTy.
TexHnueckne daHHbIe
MoeB: PM 3622
3JIeKToPOnTaHHe: 220-240B,50/60T
Iotpe6JrMaM MoocHocTb: 1800 Bt
Klacc 3aunrbl:
Bec HETTO: npM. 3 K
OcTabnem 3a coBoI npaBO Ha nImeHHe TExnuecknx XapakTePncTn BHeuHero BnDa B XoJe HnpepbIBHOrO COBepseHCTBOBaHnI pOdyKun.
YcTpoCTBO npoIIO BCE nOlaHouuieCn no HopMaTHB-HbIM Tpe6OBaHnM EC npOBepKn, B TOM uCne npOBepKy Ha 3JIeKTPOMaHTHHyO COBMeTUMocTb N 6e3OnaCHOCTb HN3KOBoIbTHOrO O6OpyDoBaHn, N CCKHOpyuPoBaHO B COOTBeTCTBn C CambIMn CoBpeMeHHbIMn PpNHcUNaMn TEXHNK 6e3OnaCHOCTn.
Ihctpykci3ekcnnyataa
JaKyEmo 3a Bn6ip Haoi npOkyi. BaKaemO OTPMaTIN 3aDOBJeHHBaKOpCTyBaHHN cMm pIJaOM.
CnmbonBuiinHctpykui3eknnyatauui
Baxnbi Bka3iBk, 10 CTocyHbC8ocO6nctoi 6e3neKn, CneiaIbHO BiMueHi. Ipn 3anobirHHeuacnM BnapKam Ta npokxHnHm npnaDy cnid oob'3KOBO dOpmyBaTNCzix Bka3iBOK.

3ACTEPEXEHHJ.
PonepeJxye npo 3arpo3n dna 3dop08' Ta Bka3yE Ha MOxJIuBi pU3Nk TpaBM.

YBATA!
Bka3ye Ha moKniBi 3arpo3n dny a6o iHux npedmetiB.

KA3IBKA.
BüüinäpekomeHdaui ta iHφopMaui DnKopncyBaay.
3araanbHi Bka3iBKN
Ipeep npinHnTTB E kcnnyatauio zuoro npinanaDyjxge yBaXHO npoHTaTe IHCTpykuio 3 ekCnnyatauii Ta 36epirai- Te II pa3OM 3 rapaHTiHM TaIOHOM, KACOBIM YekOM Ta, no MOKINBOCTI, 3 KapTOHNO KOPo6KOIO BHyTpiUHbOIO yNaKOBKOIO. JaIO npINAad nepedaetbcra TpeTIm oocam, pa3OM 3 HmNOTPi6HO BiDaTu taKoX IHCTpykuio 3 ekCnnyatauii.
KopntybaTcnpnIaDM Heo6xIDHO BnHrTKOBOBno6yTOBnx zuIax Ta biNobiDHO do nepe6bHeHOrOpn3NaeHHa. Lep npIaD He np3NaeHo dI pyomncNoBOrO BnKOpNCtAHH.
- He cnid BnKOpNCbByBaTn npnaI Ha BynIci. Noro notpi6Ho obepiratn BiD cneKn, npMOrO coHryHoro BnPOMiHOBAHHa, BOIOn (y XoJHOMy BnPaIKy He 3aHypOBaTn B pINHy) Ta roctpnx KytIB. He MoXHa TopKaTnca npnaI dy BOIOrIMn pykAmn. KaIO Ha npnaI na NotpaIINa BOIora a60 BIn HAMok, TpeBa HeraHOb BnHrTa WTeNCEbHy BNkY 3 P03ETKn.
BIMnKaIte npuia Ta 3aBXd N BuTgAraTe Bnky 3i WtencelbHOi po3eTK (cIid TReHyTN 3a WTeKeP, a He 3a Ka6eJIb), KOJI npuiaOM He KOpNCTyOITcbr, iIq Yac MOHTaKy KOMIIeKTyOuHx DeTanei Ta OOnUeHHa6o 3a HABHocTi DepeKtIB.
Пд ус робтн He 3aIиаite npinad 6e3 harJy. 3aIIshauOHy npimiiEHH, cnid 3aBxN BmNKatn npinad. Heo6xIDHO BnHrtu Bnky 3i WtencenbHoi p03eTKN.
- PpinaTa Ka6eBj KInBHeHHn CnI peryIpyHnepeBiprTa Ha HArBHCtB O3HaK N0WKoDKeHH. Y pa3i BnABHeHH NoKOJKeHb PpINAd He MoXHa BnKOpNCToByBaTu dani.
BnKOpNCTOByIe BnHrTKOBO opuHaJIbHi KOMPJIeKTyUOci detani.
3aann6e3neKn diteHne cni3nwnatn BdoctynHO My micui nakybaIbHI MaTepiAn (nnactNKOBi naKeTI, KaptonHI Kopo6Ki, niHONlact Toio).

3ACTEPEXEHHJ.
He Do3B0JrT MAnIM DITM rpaTc3 nJIbKOHO. lChye 3aRpO3a3aDyXn!
CneuaIbHa iHcTpyKzIa 3 6e3neKn IJy cboRo eJeKtpoPpnaLy

3ACTEPEXEHHЯ.Гаряа nobepxн!Ichye ризNK OTpIMaHHЯ oniKy!
P03naKOByBaHnI npuJaIy
BmMItb npnna 3 ynaKOBKn.
3HIMITbBecb NaKyBaIbHm MaTepiA,I a Came:PiIBK, HanoBHIOBaUci,Ka6eJIbHi XOMyTu Ta KapTOHHe NaKyBaHHa.
- PepebiTe HaBHCtbc yic eIeMeHTeIB, kI doaHOTbcra.
-Дя yHnKHeHH He63neKe Hnoe6xIHO nepeBipTu, nH e noKdoKeHo npuad nid vac TpaHcnpTyBaHHa.
- JI KIO BMICT ynaKOBKn HEnOBHn A60 BnAByHei noWkoDxKeHH, He MoXHa BnKOpNCtOByBaTn npuJa. Heo6XiHo HeraaHNOBepHyTu NOro dInepy.
BKA3IBKA.
Ha npinaiDi moKe ige 6yTn nnn a6o 3aInuKm MaTepiAJIIB, BnKOpNCTOBvBaHnx y npoueci Bnpo6HnUcTba. PekoMeHNdyCTbcra NOnCtNTn npinai, kN OINcaHO B po3diI «OunueHHra.
Ihctpykci33acToCyBaHHa
yBAG! Heo6xioHou yHnKaTu noWkoJXeHb aHTnpuraphoro nokpTTnoBepxHi dna Bnikahnn!
BukopncToByTe NmE DepeB'ry Hn TeoHOBy IonaTky.
He 3actocobyTe Do nobepxHi IINBnIkaHnroctpi npedmetn (Hanpukna, Hoxi, BnDekn).
He BnKOpNCToBvIe INaCTMaCoBe npIaIaIaBo.BoHO MoKe po3PnBaNTuCra.
3aBnAANTnPurapHNI NOBepxHIN BUNiKaHHMOXHa NEKTN CTpaBN 6eKpy.
- RaKpo nOpi6HOBKOpnCTaTOn OIIO,TO NiXoDnTb OIiA, 0O BHTpIMyE BNCOKI TEMpepatypn, HApNknaD, CoHsHnKOBa. He cPiD BIKOpncTobYBaTN OINBKOBy OIIO a6o BePikOBe MacNo, OckIbKn ZI copTN Jxpy NouHaOTb DnMItHuABiTb Pn Hn3bkI Tempepatyi.
YbIMKHeHHBIMKHeHHH npnlaDy
3aBxDn BcTaHOBIIOtepepyTOp TempepaTypr (6) y noLoXeHHN 0, nepd NiKIOUeHHM a6o BiKIOUeHHM MepeKeBO rTekepy.
- YepBoHa lamna KOHTpOIO MepeXi (4) e iHnKaTOpOM po6oTu.
PiknoueHHdo eJekTpomepexi
3naeHHNpiKIOueHHN
3araIOM npnIaM MoKe CNOxNBAuTI NOtYKHiCTb 1800BT.
Ppi TaKOMy 3NaueHHi NiKnIOUeHHa peKOMHeIOBaHe pO3dIbHe NiKnIOUeHHa 3aNo6IXHKoM uepe3 NObytOBn 3aNo6IXHn BUMKauHa 16 A.
- BnMaIte roToBv niCy depeB'raHO u TcΦJIOHOBOH JONaTKOHO.
BKA3IBKA.
BpaxoByTe, 10 npictpi TAKOx MoXHa BnKOpNCTOBByBaTn pO3KpNTm. D'ra 6bOro BiDkprnte KpnuKy i TPOxN npniidHimIt b ii.
3aikHcHn po60Tu
- BctahOBiB peYIaTOp TEMnepaTyPy y noLoXeHHN 0.
- BmMKHtB npnad 3a donomoroio nepemkaaya yBMKHeHHBmMKHeHH.
- YepboHa JAmnoUka KOHTpoJIO MepeXi rache.
- BntTHiB mepKeBm uTekep.
- Iepu HIXK UHCTNTN npnilaI, daJIte Nomy oxoJHOHTN.
UH
3ACTEPEXEHHЯ.
- Перед Тим як чinctи пплад, Heo6xidno BiD'EDHaTи noRo BiD Мереки кИВЛeHHЯ.
He 3aHypoIe npnaIy Body! Ze moXe npn3BeCTn do ypaXeHHra eJIekTpUHm cTpyMOM a6o noXeKi.
Heo6xio hO cniikkyBaTu 3a Tm, o6 BCEpeDnHy npnaIy He notpanla pDHa!

YBAGA!
He MoxHa BnKOpNCToBByBaTn DpoTnHi a60 iHui a6pa3nBHI MaTePiaHn.
He moxha BnKOpncTOByBaTn iKi a6o a6pa3NBHIMnHi 3ac06n.
Пл actиндь Bunikahн
Пл actинд Ль вишикни He 3HimaioTbca.
- TocntbTe pIacTHHn DnBUNiKaHn 3JERKa BOIoroMOuyankoO a60 pyuHnKOM 3 TeNIO BOHO.
- BucyuItb nlaCTnH dIa BNiKaHH pyuHkOM.
Kopnyc
PicnKopntyBaHHnNoHCTtB Kopnyc 3nerKa BONORO raHupkoHO.
36epiraHHa
BiiKnadaaTe npnaad Ha 36epiraHHKoIN BIn YnCTn i BNCTN.
- MepexeBn Ka6enb MoXHa HAMOTaH Ha TpMaH dIra Ka6eHIO Ha dHi npUaNy.
- Y pa3i Tpmbanoro HeBnKOpncTahHpekOMeHDoBaHO 36epiratnpnnaD B opriHaNbHi ynakobui.
3aBxHn Heo6xIHO 36epiratnpuia n03a 30HO IOcAHHOCTi DItey cyXOMy,IO6pe npOBITpOBAHOMy MICci.
Peuentn
Ticto nni niu -IhrpeiEHTn dnniui
200r6o0nha
100Mn neBBe Teno BoN
1%ynakobkn cyxnx dpixdkib
1/2CT.IONIBKOBOI ONII
1dpi6ka coni
1dpi6ka ukykpy
- Ppocite 60pouho. Notim nepemuaaTe 3 cinnio y mncui. NepemuaTe dpixkki Ta uykop 3 neB tenno BOIOIO, pOKn dpiXkI Ta uykOp He po3HHrbcra. Ipaoute 3 hacadko pyHoro Mikcepa 3 rauchom dIy TbeDoro ticTa, 3aHypeHO B 60pouHO. OdaTe ONIBKOBy oIIIO i 3amiciTB BCE DO ODHopiHoro ticTa.
- Ha nocnaih60pOshom pOboHIO nobepxHi cnIbHO npomiciTicTo BpyHy i cOpmyTe KynIky.HakniTe TICTo I 3aJIuTIe NOrO y Mucy TeNlOMy Mici 6e3 npotraIB Ha 45 XBNIH.
- 3HOBy npomicitb ticTo ha pObooyi NOBepxHi, nocnAniH bopoWoHO i po3kataTe y diaMetpi Ha 6n. 28 cm.
- 3maXTe TICTO TOMaTHM COYCOM i NOKIaIb HauHky 3a 6axaHHm.
BpaxoByyTe, 0n HauHka He NOBHHa TOpKaTuC8 BepXHbOi PnactuHn.
YcyHeHHH HeCnpaBHOCTe
PnnaHne npauo
MoxjInBa npuHa:
PnIaI He nIckNoeHo Do MepeXi KInBHeHn.
YcyHeHHa
- PeneBipTe po3eKy 3a donomoro iHwO npnaNy.
- HanexHHM YHOM BCTaBTe WtTencJIb y po3ETKy.
-ПеревпгетаибнИк.
MoxnnaBpnuHa:
Ppnaad HecnpaBnH.
YcyHeHHa
- 3BepHITbcB Hauw cepBicnH ueHtp a6o do cneuaianica.
TexhiHn npametpn
Modelb: PM 3622
PoaJxNvBHeHH: 220-240B\~,50/60T
CnoxmbaHa nOtXkHcTB: 1800 B
Klac 3axncty:
Bara HETTO: npu6JI. 3 kr
PpaboHaTexhiH3MiHnTa3MiHn yDn3aHi 36epiraetbcB MEXkax NOCTIHORO BDOCKOHAHeHH Bnpo6IB.
Ley npnlae nepebipeho BiinobiHDo BCix peneBaHTnx DiChnx DinepKtNB EC, HanpNKlaad, DinepKTNB npo eNeKtpOMarHITy Cymichictb Ta H3bKOBoTbe O6NaHaHHa. BIn CKOHCTpyuOBaHm BiINOBiHO Do HauHOBIHx Hopm TexHikn 6e3neKn.
L
Jaa Jgai
:Jaiai
- a4 = a1 + 2d( a - 1)
jai jia jia jia jia jia jia jia jia jia
J 5
Jjlln jai ci jaoa aaiy
Jooall
3 = 1;2,6 = 2;3
aannnnn nnnn nn nnnnnn nnnnnn
Aii
PM 3622
60/50 240-220
1800
1
3 1
y jaiil Jiai Jxix ayaaai Cxxj 1
aannn
aall aalalalalalalalalalalalalalalalal
i aai ai iiaaiinai bll gil gill j
aJalal Jalal jalal
4
.5 45
Ae 1
ai a ai 分母最小值为 k .
J 1
a 1
12
Jus 2.2
A
Aalaae aee
#
aill, sall aal
a 1
j_4 = 2
ydyjbjiallalai j
Jla Jabbl 1 jgln jjll bai la
S OBC = S COD + S BOC - S BOC
C
1jy jy -jy
200
jiall cll jia 100
S OBC = S COD + S BOC - S BOC
jy j y j 1
laia
S
3y111111111111111111111111111
Sallgag g aal
a 1
L 1
li:
a 2
JSo 8olj Jal jbi jnll jil .Sswail
45 aol gol
Cuiyoojiabaiyigjibin2jol
-
-
-
-
-
-
-
-
-
-
-
-
-
-
-
-
-
-
-
-
-
-
-
-
-
-
-
-
-
-
-
-
-
- 3
-
-
-
-
-
-
-
-
-
-
-
-
-
-
-
-
-
-
-
-
-
-
-
-
-
-
-
-
-
-
-
-
aill jll 1jll 4
.5
1 6
loie 8yabll jyall juee slwge Ilaic aed 90
a a
4k = 3
a_i a a_i 的最小值为 k .
jLwJy
jplalai jglal plalil jall 7
45 - 2x = 0
aaii ailll iaiy
.054 4a 1g Clll
j
1
J 2
.3
.4
AaBaa aai j 1j 1j 5
山
pLj kJ L Joo Sgl j aal lal
j 1 j 1 1 1 1 1 1 1
a
.
yll clalall jlaa aai baa jiaai
K
J
a 1
.1jull qilu ybj .2
jù lǐ yī sān 1. sān lǐ sān 2. jū dì lǐ gǔ lǐ, jǐ lǐ lǚ
111 1
aill 0jll aia
:
gale jai lai dai bai jai jai xai jy
A. ≤ + = 1
a 4
.5
.6
1 1
1
j 1
j j 1
a 1
jll jw. 2
a.b.c.
:
J 1
y
.
1jgl jld 1Jl Jw g p
15 2
.
J 1
Jg j
"“iill”
1
aai aaii
!gluiol
Joaill (a)
jzll 1
y
jssd jolil 1 jss aodll jg jssl
AAeB
yj yj yj yj yj
- 1
j 1
aiaaa aaii
1
i#
Ae jj j j j j j
Jusill 12 (2) Jaa 25,11 bua cnaa all
SL
Jagall
g 11.4 Jaaal g a 2 j j
Jaae Jaaee
aaii iai jia jiaai jiaia jiaia jiaai
aannnnnne aannnnnne
yj 1
y j 1
- jǎn wǎn lǐ yǒu! jiè lǐ yǒu lǐ lǚ nái lǚ lǐ lǐ lǐ lǐ lǐ lǐ lǐ lǐ lǐ lǐ lǐ lǐ lǐ lǐ lǐ lǐ lǐ lǐ lǐ lǐ lǐ lǐ lǐ lǐ lǐ lǐ lǐ lǐ lǐ lǐ lǐ lǐ lǐ lǐ lǐ lǐ lǐ lǐ lǐ lǐ lǐ lǐ lǐ lǐ lǐ lǐ lǐ lǐ lǐ lǐ lǚ
Jie lii jil 1jaiy jia y jaiy
y
Jusuiy juidie pae
1
j 2
3
()()
()5
6
jglj
piai jilai jin.
aagaaagaaagaaagaaagaaagaaagaaagaaagaaagaaagaaagaaagaaagaaagaaagaaagaaagaaagaaagaaagaaagaaagaaagaaagaaagaaagaaagaaagaaagaaagaaagaaagaaagaaagaaagaaagaaagaa
aJlaS Jn jyjgjj 1
aee eae aee
a
Jaa 1aai JaiLs yie aegi iiae iis la i
jgl 1
1
ab = 12
J 1 J 1 J 1 J 1 J 1 J 1 J 1 J 1 J 1 J 1 J 1 J 1 J 1 J 1 J 1 J 1 J 1 J 1 J 1 J 1 J 1 J 1 J 1 J 1 J 1 J 1 J 1 J 1 J 1 J 1 J 1 J 1 J 1 J 1 J
jglal jgaiil aolil aollll
1jw: 1

i 1
!:
J 1
GARANTIEKARTE
garantiebewijs · carte de garantie · tarjeta de garantia · tagliando di garanzia · warranty card · karta gwarancyjna · jotallasi jegy · rapaHTnHbI TaON · rapaHTiHn TaON ·
PM 3622
24 Monate Garantie gemäß Garantieerklarung · 24 maanden garantie conform de garantieverklaring · Garantie de 24 mois conformément à la déclaration de garantie · 24 heures de garantia de conformidad con ladeclaración de garantia · Garanzia di 24 mesi come previsto dalla relativa dichiarazione · 24-month guarantee as per warranty statement · Gwarancja 24 miesiace zgodnie z deklaracja gwarancyjna · 24 honap jotlallas a jotlasi nyilatkozatnak megfeleloen · 24 mcaa rapaHTnB COOTBCTBN C rapaHTnHbIM NcBmOM · 24 mcai rapaHTii BIDNOIBHO do rapaHTiHoro NcTa · 24
Kaufdatum, Handelstermempel, Unterschrift · Aankoopdatum, dealerstempel, handtekening · Dated'chat,cachet du distributeur,signature · Fecha de compra, sello del commercio,irma · Dada d'acquisto, timbro del rivendatore,irma · Purchase date,distributor stamp, signature · Data zakupu, pleczatka sprzedawcy,podpis ^+ Vasarlas datuma, kereskedb belyegzbe, alairas · Data npoobperenny, neutatnnpora, nondnca. · Data noyunny, neutnatnnpodaunu, nindnxc · .

CHATRONIC INTERNATIONAL GMBH
www.clatronic.com
CTC
CiatRONICINTERNATIONAL GMBH
Internet: http://www.clatronic.de