
MR 4115I - Loudspeaker AEG - Free user manual and instructions
Find the device manual for free MR 4115I AEG in PDF.

| Product Type | Speaker with iPod docking station and radio alarm clock |
| Brand | AEG |
| Model | MR 4115I |
| Power supply | 230 V, 50 Hz |
| Power consumption | 11 W |
| Radio bands | FM 87.5 - 108 MHz, AM 522 - 1620 kHz |
| Number of alarms | 2 (ALARM 1 and ALARM 2) |
| Snooze function | Yes (9 minutes) |
| Sleep timer | Adjustable from 10 to 90 minutes in 10-minute steps |
| Preset equalizer (EQ) | Flat, Classic, Rock, Pop, Jazz |
| Connectivity | iPod dock (adapter included), AUX input 3.5 mm, headphone jack 3.5 mm |
| Remote control | Yes, infrared, CR2032 battery included |
| Display | LCD screen with brightness adjustment (DIMMER) |
| iPod compatibility | Yes (via adapter, depending on model) |
| Maintenance | Clean with a soft damp cloth, without detergent; unplug before cleaning |
| Safety | Do not expose to water or moisture; do not open the casing |
| Repairability | Any repair must be carried out by a qualified technician or the manufacturer |
| Protection class | II (double insulation) |
Frequently Asked Questions - MR 4115I AEG
User questions about MR 4115I AEG
0 question about this device. Answer the ones you know or ask your own.
Ask a new question about this device
Download the instructions for your Loudspeaker in PDF format for free! Find your manual MR 4115I - AEG and take your electronic device back in hand. On this page are published all the documents necessary for the use of your device. MR 4115I by AEG.
USER MANUAL MR 4115I AEG
Location of Controls. page 3
User manual page 35
Technical Specifications page 39
JEZYK POLSKI
Spis tresci
Po3TaUyBaHHopraHIB KepyBaHH 3
Iocibnk KopncTyBa. 51
Texhihi xapaKTepeNCTIKN CTOp. 55
Location of Controls
P03TaUyBaHHOprAHIBKepyBaHH
- Appuyer sur la touche MEM/CLK-ADJ (20/4) pendant environ 3 sec. L'écran va afficher "24 Hr".
- Servez-vous des touches (\text{串串串串串串串串串串串串串串串串串串串串串串串串串串串串串串串串串串串串串串串串串串串串串串串串串串串串串串串串串串串串串串串串串串串串串串串串串串串串串串串串串串串串串串串串串串串串串串串串串串串串
$$ A M = \text {m a t i n}, P M = \text {a p r e s - m i d i}. $$
VHF = FM, Onda Media = MW
Premere Anything to appear in the menu.
/ V -SCROLL/PRESET(10/14)
General Safety Guidelines
Before using this device, carefully read this user manual and keep it together with the Warranty Certificate, cashier receipt and if possible, the original package inclusive its interior packing. If you hand on the device to any third person, include the user manual as well.
- To avoid the risk of fire or electric shock, you should not expose the device to rain or humidity. Do not use the device near water (e.g. bathroom, swimming pool, humid cellars).
- The unit is designed solely for private use and its intended purpose. This unit is not designed for commercial use.
- Plug the device only into a properly installed socket. Be sure the device voltage corresponds to the grid voltage.
- When using external grid adaptors, pay attention to the correct polarity and voltage. Insert batteries correctly.
- Avoid covering the device's vent openings.
- Never open the device's case. Improper repairs can cause severe danger to the user. If the device or particularly the power cord is damaged, don't use the device any further and have it repaired by a qualified specialist. Check the power cord regularly for damages.
- To avoid any danger, a damaged power cord must be replaced only by the producer, its customer service or a similarly qualified person with an equal cord.
- If the device won't be used over an extended period of time, disconnect the power cord and remove the batteries.
These symbols may be found on the device and shall indicate the following:

The lightning symbol warns the user of dangerously high voltages inside the case.

The exclamation mark symbol points to important instruction or maintenance remarks in the accompanying guidelines.
Children and disabled persons
- For the safety of your children, keep any packing parts (plastic bags, cartilage, Styrofoam etc.) out of their reach.
WARNING!
Don't let small children play with foils for danger of suffocation!
- This device is not intended for use by persons (including children) with reduced physical, sensory or mental capabilities, or lack of experience and/or knowledge unless they have been given supervision or instructions concerning the use of the device by a person responsible for their safety.
Supervise children to ensure they do not play with the device.
Symbols in this user manual
Important notes for your safety are marked distinctively. Pay absolute attention to them to avoid accidents and damage to the device:
WARNING:
Warns of dangers for your health and indicates potential risks of injury.
CAUTION:
Indicates potential dangers for the device or other objects.
iNOTE:
Highlights tips and information for you.
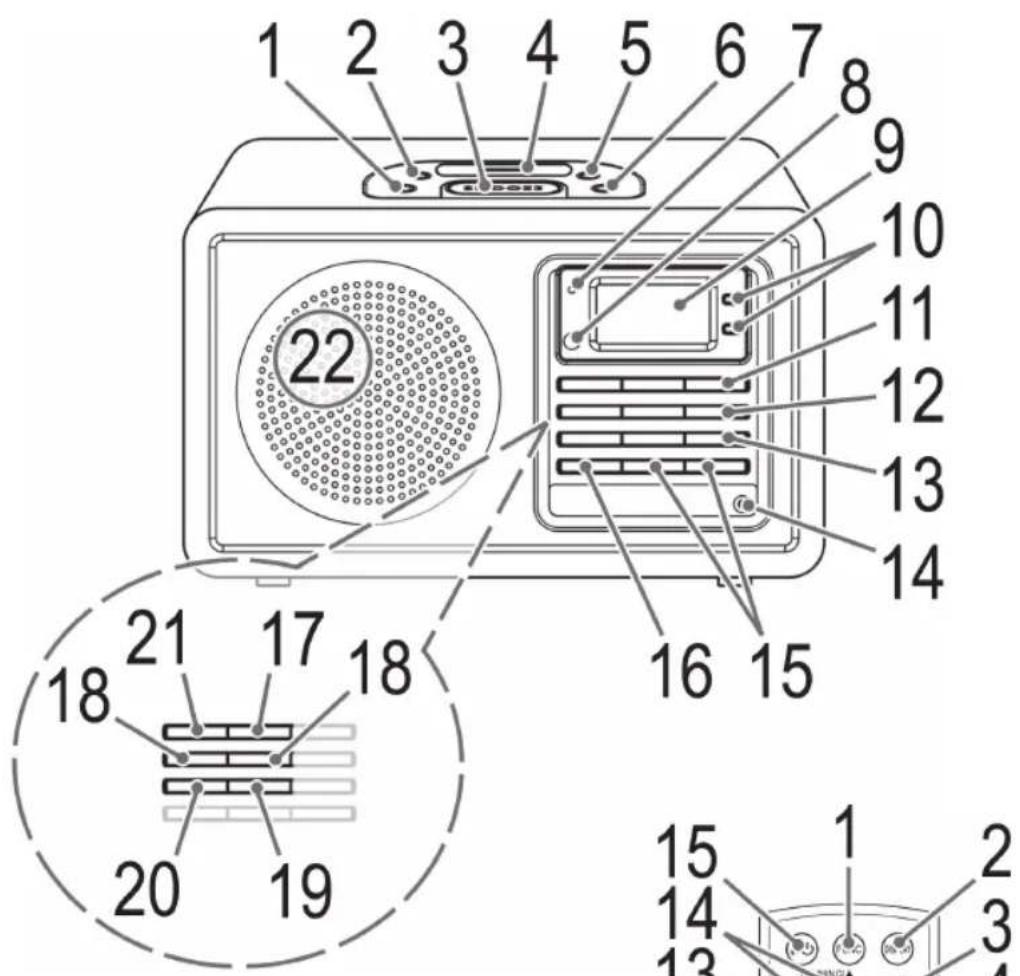
Location of Controls
1 Button for delayed switch-off (SLEEP)
2 DIMMER button
3 Alarm Interval (SNOOZE)
4 iPod connection
5 ALARM 2 (2nd alarm time) button
6 ALARM 1 (alarm 1) button
7 Standby lamp
8 IR Receiver
9 LCD Display
10 i-SCROLL/PRESET A Buttons
11 Dutton
12 (play/pause) button
13 i-ENTER button
14 PHONES Qack
15 VOL+VOL-volume control buttons
16 PRESET EQ button (equalizer)
17 FUNCTION operation selection button
18 TUNE/TUNE buttons
19 i-MENU/BAND button
20 MEM/CLK-ADJ button
21 DISPLAY button
22 Speaker
Back Side (not shown)
AUX IN jack
Remote Control
1 FUNC operation selection button
2 DISPLAY button
3 II (play/pause) button
4 CLK-ADJ/MEM button
5 BAND/j-MENU button
6 i-REPEAT/ button
7 SNOOZE button
8 EQ button
9 VOLUME+VOLUME- volume control buttons
10 ALARM 1 button
11 ALARM 2 button
12 i-ENTER button
13 i-SCROLL/RESET buttons
14 TUNING SKIP buttons (search fwd/bwd)
15I/ button
First Use of the Device/Introduction
- Before the first use of the device, read the user manual carefully.
- Select a proper place for the device such as a dry, and even non slip area where you can easily operate the device.
- Make sure the device is vented sufficiently.
- If still in place, remove the protection foil from the display.
Power supply
- Insert the grid plug into a properly installed three prong socket with 230V, 50Hz.
- Make sure the grid voltage corresponds to the figures on the rating plate.
- In case of power interruptions all clock and station settings will be lost.
Setting the clock (during standby mode)
- Hold down the MEM/CLK-ADJ button (20/4) for around 3 sec. The display will show "24 Hr".
- Use the buttons (18/14) to select between 24-hour and 12-hour display setting. Confirm with MEM/CLK-ADJ.
NOTE: The 12-hour setting will result in the following display
$$ A M = \text {m o r n i n g}, P M = \text {a f t e r n o o n}. $$
- Use buttons to set the hours. Confirm with MEM/CLK-ADJ.
- Use buttons to set the minutes.
- Press MEM/CLK-ADJ again in order to save the time settings.
Insert batteries
NOTE:
Where necessary, the lithium cell in the battery compartment of the remote has been fitted with a protective foil for transport. This extends the lifetime of the battery. Before initial use please remove this foil to prepare the remote for use.
The battery in the remote is a long-life lithium cell. Should the range of the remote shorten during use, follow the steps below:
- Open the battery compartment on the underside of the remote.
- Replace the cell with a battery of the same type (CR 2032). Make sure the polarity is correct.
- Close the battery compartment.
If the remote is not in use for a lengthy period of time, please remove the battery to prevent the battery acid from "leaking".
WARNING:
- Do not expose batteries to intense heat or direct sunlight. Never throw batteries onto a fire. Danger of explosion!
- Keep batteries out of the reach of children. They are not toys.
- Do not force batteries open.
- Avoid contact with metallic objects. (Rings, nails, screws etc.) Danger of short circuits!
- Short circuits may overheat or even ignite batteries. This may lead to combustion.
- When transporting the batteries, cover the terminals for your safety with an adhesive strip.
- If a battery leaks, do not rub the fluid into the eyes or the skin. If acid comes into contact with the eyes, rinse with purified water and seek medical advice if symptoms persist.
CAUTION:
Do not dispose of batteries with household waste. Please take used batteries to an authorised collection point or to a dealer.
Headphone jack (14)
For headphone operation, use a headphone with a 3.5mm stereo jack plug, connecting it to the PHONESO jack. The speakers will be muted.
iPod Compatibility
Due to the many different iPod-Models and generations currently available on the market, full compatibility cannot be guaranteed. Before connecting your iPod, ensure that it has a compatible interface.
Full compatibility of the remote functions also cannot be guaranteed. If necessary therefore use your iPod as normal, whilst it is plugged into the Docking Station.
General Operation
i NOTE:
Some buttons you can find as well on the device as on the remote control.
Identical buttons effect the same function.
Switch device on/off (11/15)
By pressing the I/ button, you can put the device into standby mode. The Standby lamp Lights up. Pressing the button again will switch the device on.
Display brightness
You can select or switch off the display brightness with the DIMMER button (2).
Volume
By pressing the VOL(UME) + /VOL(UME)- buttons (15/9) you can adjust the desired volume.
Infrared Remote Control
For wireless control within a distance of 5m . If the distance decreases you should change the batteries. For proper operation mind a clear view between the remote control and the sensor on the device.
PRESET EQ (16/8)
(Preset equalizer function). There are different sound modes available (FLA (FLAT), CLA (CLASSIC), roc (ROCK), POP, JAZ (JAZZ)).
Radio Tuning
- Press the button (11/15) to switch the device on.
- Repeatedly press FUNCTION button (17/1) until the display shows "TUNER".
Press i-MENU/BAND button (19/5) to select between FM and MW.
$$ V H F = F M, \text {M e d i u m W a v e} = M W $$
- Tune the program by pressing the buttons (18/14). The display will show the radio frequency and, to the left, the radio band.
- If the reception is too weak and there is interference on the channel, try to improve the reception by changing the position of the aerial and/or coil/uncoil it.
- For receiving AM programs, an antenna is included in the device. The device can be oriented to the signal by turning it.
Alarm Function
You can set two alarm times; proceed as follows:
- Hold down the ALARM 1 button (6) or Alarm 2 button (5) for around 3 sec. The currently set wake-up time appears on the display. The hours flash.
- Press the buttons to set the hours. Press the ALARM 1 or ALARM 2 button to confirm. The minutes flash.
-
Set the minutes, press the buttons. Press ALARM 1 or ALARM 2 button to confirm.
-
Using the 按钮, select how you want to be woken. Confirm your selection with the ALARM 1 or ALARM 2 button.
The following options are available:
"bu" (Buzzer):
An alarm sounds when the wake-up time is reached. The volume increases slowly.
- "tu" (Radio):
As soon as your set wake-up time is reached, the radio switches on. The last set channel will play. The volume increases slowly.
-_niPod''
CAUTION:
Before plugging in the iPod, make sure that the radio is not in iPod mode.
- Plug the adapter supplied with your iPod into the iPod Port (4). You can only ensure that the iPod fits correctly into the iPod port if the adapter is plugged in.
- Connect the iPod to the iPod dock (4).
CAUTION:
Make sure that your iPod is plugged upright into the port. Do not bend or tilt the iPod whilst it is plugged into the port. This may lead to the port/iPod being damaged.
- Playback from your iPod starts in the set mode at the set alarm time. The volume increases slowly.
i NOTE:
- Follow your iPod manual to select the desired mode.
-
If no iPod is connected the device wakes you in TUNER mode.
-
Finally now select the volume of the alarm signal with the buttons.
- Press the ALARM 1 or ALARM 2 button, the indicators "1" or "2" appears on the display. The first or second wake-up time is active.
- Switch the unit onto Standby Mode using the I/O button (11/15).
Turn Off Alarm
Press the / button to turn off the alarm until the next day.
i NOTE:
If you have activated the Snooze function, you must press the! button twice to deactivate the wake-up function until the next day.
Snoopze Function
Press the SNOOZE button (3/7) to deactivate the alarm for approx. 9 minutes.
ENGLISH
Deactivate Alarm
To deactivate the first wake-up time, press the ALARM 1 button (6). The indicator "0" goes out on the display.
To deactivate the second wake-up time, press the ALARM 2 button (5). The indicator "2" goes out on the display.
NOTE:
If you have activated the Snooze function, you must switch the unit on and off using the I/ button, before you can deactivate the wake-up time.
Sleep Timer (SLEEP button (1))
During ON mode you can set the automatic sleep timer in 10-minute steps between 90 and 10 minutes; after this period of time the device turns into standby mode. Repeatedly press this button until the desired time is displayed. SLEEP is displayed if the function is activated. After the set time the device automatically turns off.
Press the SLEEP button again to cancel the function again.
MusicPlayback from iPod
(iPod not supplied)

JTION:
Before plugging in the iPod, make sure that the radio is not in iPod mode.
- Plug the adapter supplied with your iPod into the iPod Port (4). You can only ensure that the iPod fits correctly into the iPod port if the adapter is plugged in.
- Connect your iPod to the iPod dock (4).

CAUTION:
Make sure that your iPod is plugged upright into the port. Do not bend or tilt the iPod whilst it is plugged into the port. This may lead to the port/iPod being damaged.
- Press the button (11/15) to turn the device on. Press the FUNCTION button (17/1) repeatedly, until the Display shows "iPod".
- Depending on the iPod Model, firstly release the button lock and start playing music if necessary with the button (12/3).
- Follow your iPod manual for further use of the controls.

JTION:
Return to radio mode before disconnecting your iPod from this device to avoid damages to your iPod.
Description of iPod Controls
II (12/3)
You can pause and continue music playback. Press again to continue playback.
(18/14)
Press 1x = Restart of the song from the beginning.
Press 2x = Skip to the previous song.
Press 3x = Skip to the song before the previous song, etc. Press and hold during playback to search in reverse through the song.
(18/14)
Press to skip to the next song and the following songs. Press and hold during playback to search forward through the song.
i-REPEAT/ (6 on the Remote)
Activates the Repeat function.
i-MENU/BAND (19/5)
Press this button to bring up the iPod Menu or to return to the previous menu.
i-ENTER (13/12)
Press this button to activate a function or to display the next menu.
▼vi-SCROLL/PRESET(10/14)
Press these buttons, to scroll up/down the iPod Menu.
iPod Charging
After connecting your iPod to the iPod dock the iPod battery is charged. To do this, the unit must be connected to the mains.
iNOTE:
- Use the port adapter supplied with the iPod, to guarantee that the iPod fits correctly.
- Not all iPod generations support the charge mode.
- The duration of the charging process depends on the iPod which is used and its operating condition.
AUX IN Socket (rear of the device)
Connect any analog playback source. You can also listen to other playback units such as an MP3 Player, CD player etc. through the speaker via this jack.
- Connect the external device via 3.5mm stereo jack to the AUX IN socket.
-
Now select AUX out mode with the FUNCTION button (17/1).
-
You will find further instructions in the manual of your external sound source.
- You can listen to the playback from the external unit via the speaker. You can adjust the volume with the VOL(UME) + /VOL(UME)- volume buttons (15/9).
iNO
Set the volume of the external device to a reasonable level.
Cleaning
- Before cleaning disconnect from mains power supply.
- Clean the device with a soft damp cloth without detergents.
- Do not submerge the device in water.
Technical Specifications
Model: MR 4115i
Power Supply: 230 V, 50Hz
Power Consumption: 11 W
Protection Class:
Radio
Frequency Range: FM 87.5 ~ 108MHz
AM 522 ~ 1620kHz
Technical modifications reserved!
This device complies with all current CE directives, such as electromagnetic compatibility and low voltage directive and is manufactured according to the latest safety regulations.
"Made for iPod" means that an electronic accessory has been designed to connect specifically to iPod and has been certified by the developer to meet Apple performance standards.
Apple is not responsible for the operation of this device or its compliance with safety and regulators standards.
Meaning of the "Wheelie Bin" Symbol
Take care of our environment, do not dispose of electrical.
applicances via the household waste.
Dispose of obsolete or defective electrical appliances via municipal collection points.
Please help to avoid potential environmental and health impacts through improper waste disposal.
You contribute to recycling and other forms of utilization of old electric and electronic appliances.
Your municipality provides you with information about collecting points.
PnblT nIcTaHcHOro KepyBaHHa
1 KhoNka Bn60py fynKuII FUNC
2 Khonka DISPLAY
3 KhONka II (BiTbOpEHn/Hay3a)
4 Khonka CLK-ADJ/MEM
52
YKPAIHcbla
5 KhoNka BAND/i-MENU
6 Khonka-i-REPEAT/
7 KhoIIKa SNOOZE
8 KhoNka EQ
9 KhoNKn peYnIOBaHHrauHocTi VOLUME+/VOLUME-
10 Khonka ALARM 1
11 KhoNka ALARM 2
12 KHonka i-ENTER
13 KhoKn i-SCROLL/PRESET ▲
14 Khoŋk TUNING /SKIP / Ndyuk Bnepei/ Ha3a)
15 KhoNka 1/0
BnKOpNCTaHH npHcTpoB vepse / 03HaHOMJIeHH
- PpeIeIepIiIM BnKOpIcTaHHaI npIcTpOyBaJHO npoHTaIte nocioHk KOpIcTsyBaHa.
Bn6epitb nixoanae micue dnn npncptpo, cyxe, pibHe i He KOB3Ke, De Ierko MoxHa ynpaBnTn npntpoem. - IpepeBipTe, qn npncTpi npoBipTpOcTbCra HaneKHM YHOM.
- RaKIO npICTpI BCTaHOBNeHO, 3HIMITb 3 DnCpNlEe 3axHCy CTpiKy.
HnBneHH
ПдкночьштЕКЕДоHAJIEXHBOBCTAHOBJIeHOIT PTKOHtAKTHOIpo3eKn230B,50T.
- YneBHTbC, 10 Hanpyra MepeKi BiINOBiAc 3HaHHeHHM Ha Ta6JIuCi 3TexHInHM DaHHM.
YBnnaKy 360iB y noCTaayHHi JKNBHeHHYcHaNaHTyBaHHr roHNHHka i CTaNii Byde BTPaueHO.
HanaTuBaHHRoHHNHa (BpeKmI ouikyBaHH)
- HatncHtB KhoNky MEM/CLK-ADJ (20/4) i ytpnMyte II npoTARm np6n3Ho 3 cekyHd. Ha ekpaHi 3'BAHTbca IHdkauiq "24 Hr".
- 3a donomoroH KhoH118/14) Bn6epitb 24-roHHn a6o 12-roHHn peKm BiO6pa- XHeHn. PntBepDbTe Bn6ip 3a donomoroH KhoKN MEM/CLK-ADJ.
IINPIMITHA. RaKIO BCTaHOBJeHO 12-ROdHHNpeXMM,6yDe BiO6paXaTncb Take:AM=do noLyDn,PM=nicna noyDn.
- 3a DOnOMoTOHO KHOHOBtB RoHnI. IITBePbTe Bn6ip 3a DOnOMoTOHO KHOKN MEM/ CLK-ADJ.
- 3aДОПOMOROн KHONBCTAHOBiTB XBJIINH.
- 3HOBy HATnCHITb KHOIIy MEM/CLK-ADJ Uo6 3epeTn HalaTuBaHHa Yacy.
BCTAHOBJENH6aTapei
IPIHMITKA.
3BepHt b yary Ha Te, 10 niteBa 6batape y BiDciky
dIa 6batape y npblti dNCTaHuiHoro KepyBaHH
nOKPNTa 3axnCHOO cTpiKIO DN TpaHCnOpTyBaHH,
de ue Heo6xidHO. Lpnoobkye TepMin npndaTHocti
6bataei. Ipeed nepuIM BnKOpNCtaHHM NyltTa
dnctaHuiHoro KepyBaHH 3HimItb cTpiKy.
Batape B nybti dntaHnHoro KepyBaHHMiCTNb
niTcBy 6atapeo TabnetkoBOro Tny TpNBanoro TepmiHy
npdAthocTi. Kaio nI qac BnKOpNCTHaJIbHiCTb
di Nyta 3MeHunnaCb, DOTPMMyTEcB HabeDeHnx
HHKHe KpOKiB.
BiKpnTe BiCik dIa 6atapey HnXHi yacthi nyIbTa.
3amHtB 6aTaPeHO Ha 6aTapeHO TaKOrO JTKnTy (CR 2032).Ipepeipte npabInbHicb nolpHocti.
3akpiTe Bicik nla 6atapei.
KU O npbT He BnKOpNCtOByBaTMeTBcN pOToTROM TpBnAoR O uacy, BmMiTb 6aTapeo, Uo6 yHnKHyTN "BNTiKaHH" KcNToN 6aTaapei.
A NOPEPEDHEHHA.
He 3aIiwaIte 6atapei i y cneKOTHomy Micci a6o nI npRMM COHrHM IpomHHM. HikoN He KndaIte 6atapei y BORHO. IChyE He6e3neKa Bn- 6xy!
TpmaTe 6atapei no3a Mekamn DocKaHocti dTei. He irpaakn.
He BiDkPnBaIte 6atapei cnloio.
- YHnKaIe IX KOHTaKTy 3 MetaJIeBIMM INpeJMeTaMM (raKam, UBrXaMn, RbHrTaMn Ta IH.). IChyE He6e3neKa KOpOTKOrO 3AMnKaHH!
KopOTke 3aMnKaHH MoKe npN3BecTNo nepeRpiBaHH6atapea 60 BOHMOKyTB 3arOpitncb.Le MOKe cnpuHHTn NOKeKY.
-Пд уac trpaHcnpOpTyBaHHa 6batapei 3 MeToIO 6e3-NeKN 3akneIte II KOHTaKTn KLeNko O cTpiKoHO.
- RaIIO 6aTaper noteKna, cnIkyIte, IIO6 piINHa He nOtpanIna B oOi aO ha Ukipy. RaIIO KncIoTa nOtpanIna B Oci, npOMnTe ix YNCTOIO BOIOI i, RaIIO CmIMITOMn He 3HNIKHytb, BiDpa3y 3BepHITbcra Do Nikapra.
yBtA.
He ytni3yIte 6atapei pa30m i3 no6yTOBIM CmITrM. BiDnecitb 6atapei do aBtOpn3ObaHOi TOKn 36opy ao do dInepa.
Po3'EMIHaHabyHnKIB (14)
LIO6 BnKOpNCToBbATn npncTpii 3HaByuHnKaMn, niE'edNaHTe HabyuHnKn 3i cTepeop03'emOM 3,5 MM do po3'emy PHONES npcntpo. rYHOMOBci 6yde BmKHeHO.
Cymichictb i3 iPod
Y 3B'3Ky 3 BeINKIM piHOMaHITTM NOKOIiHb I MoDeIe iPod, dOCTynHX y MaRa3HHax, NOBHa cyMICHiCTb He rapaHTycBa. Nepw HIX NiD'edHyBatn iPod, npebpTe cyMICHiCTb IHO rItePeyCy.
TakoHe MoKe rapaHTyBaTncb NOBHa cymichicTh fHKui npIbTa nCTaHuiHoro KepyBaHHra. Kaio noTpi6Ho, 0o6 iPod npauobab HopMaIbHo, iKluOHTb Ioro do dok-CTaHii.
3araIbHa iHΦopMaui npo po6Otu npuCTpOHO
I P N M I T K A.
Jeknki ICHNYIb Ra Ha npictpoi, Ta Ka Hnyblti nctauHoro KepyBaHHa. IdENTnHi KNONB BIKOHyOTb OndaKOBi FyHKuII.
YBIMKHeHHBMMKHeHHnPnCtpo10 (11/15)
KuHaTnCHyTH KONkyI/Opncptpi nepeinde B pexmOuykBaHH.3acBtntbcaIHdkatop pekmy OUYBaHH. KaHo HATnCHyTH KONky 3HOby, npctpi yBIMKHETbcra.
Ackpabictb dncnne
Bn6paTn a6o BmKHyTN HalaHTyBaHHr RCKpaBOCTe ekpHa MoKHs 3a dOnomOrIO KhoNk DIMMER (2).
IyHictb
Notp6Hy rhyHCTb MoKHa halaWtYBaTn 3a Donomoroh KhoNOK VOL(UME) ^+ /VOL(UME)- (15/9).
IhpaepBOHn nylbT nctaunHoro KepyBaHHA
BnKOpNCTOByeTbCa IJn6e3dpoTOBOY npaBnHn npnCTPOeHa BiDcTaH Do 5 M. RaKo daIbHicTB II nybTa 3MeHunacb, ZAMiHtB 6atapei. IJn HopMaIbHOI pOboTH NybTa NotpioHo, OIO6 mix HmI npnMauem Ha npnCTpOI He 6yNo nepeuKoD.
PRESET EQ (16/8)
XbniIyJKe BncoKoi YacToN (VHF) = FM, XbniI cepeHboi YacToN = MW
Hanautyte nporpamy 3a donomoroo Khoonok (18/14).Ha dinnei Biio6pa3ntbcra paiaoyactota, a libopycmyra yactot.
RkHnHa HADTO CnA6Kn Ta icHyOt b nepeUkoDn Ha KaHani, cnpo6yTe NOKpaunTn npinMaHHaCnHany 3mHn NOIOxHeHH aHTeHH Ta/a60 LJAXOM II 3roptAHHH/PO3roptAHHH.
AM-npOpaMn npHMaHOb3a DoNOMoHO B6ydoBaHOY npNCptpi aHTeHN. LIO6 OTpIMyBaTN cnHaI AM-CTaHci, cIId NOBepHyTn pncpti.
Будньнк
Ha npicptoi MOKHa BCTaHOBnTn Dba pi3Hi HanaHTyBaHHa Yacny dny 6yDnIbHnKa.
HaTnCHiB Ta yTpmyte KhoNky ALARM 1 (6) a6o Alarm 2 (5) npotrom 3 cekyHd. Ha dincnnei 6yde BiO6paKaTncb nToUHN BCTaHOBHeHn Yac 6yDnIbHnka. Bydytb 6JImaTH roDHH.
LIO6 BCTaHOBHTI ROINHy, HATNCKaIte KHONKII. IJIa NiITBepDKEHH HAITCHITb KHONKY ALARM 1 a6o ALARM 2. NouHyTb 6IMaTHx VBNIHNH.
3a donomoroKhoNOK BcTaHOBtB XBNHn. I na nTBePdKeHHHaTNCHTb KhoNky ALARM 1 a6o ALARM 2.
3a donomoroo Khoonk Bn6epitb pekm cnpa- 1b0ByBaHH6yDnIbHnka. IiTBePdbTe Bn6ip 3a donomoroo Khoonk ALARM 1 a6o ALARM 2. DocTyHi taKi peKm6yDnIbHnka:
“bu”(3BykoBn CnHaJ)
Y BCTaHOBHeHn Yac npo3ByuHTb 3ByKOBn CnHaN 6yDnIbHnKa. FyuHicTb CnHaNy 6yDe Notpoxy 3pOCTaTn.
- "tu" (Panoio)
Y BCTAHOBHeH yac yBIMKHeTbcra paio. Byde BiBTBOPHOBaTcB ocTaHHi HanaWTOBaHH KHaJI. TpyHicTb 6ynde NOTPOxH 3pOCTaTH.
-IPod":

YBARA.
Pepen nid'ednHaHm iPod nepeBipTe, 0o6 paio He nepe6yBaNo B peKmI iPod.
PiD'edhaTe aanTep, 10 doaTaBcH, 10 iPoddo pO3'Emy dNia iPod (4). iPod moXHa BCTaHOBTn HaneXHM YNHOM y po3'Em nia iPod tiIbKn ToDi, KOHNiD'EDHaHO aanTep.
-Пд'едауte iPoddo po3'emyДЯй iPod(4).

YBATA.
IpebipTe,io6 iPod 6byNo BcTaHOBneHo BepnKaIbHO B po3'Em.He HarnHaTe Ta He haxnnaTe iPod,DOnOKn Bi nIKJIIOUeHn Ido po3'Emy.Le MoKe np3BecTn do noIshKoJKeHHa KOnTaKtIB po3'Emy/iPod.
BiTbOpEHn3 iPod po3noHetbc3 toro KpeKIMy, AKN 6yNo BCTaHOBNeHO dIpeKIMy 6yDnIbHnka. FyHicTh 6yDe notpoxy 3pOCTaTH.
I P N M I T K A.
-ДЯ BИБОРу notpio6HOro peKIMy DnBiTbCЯ noci6HnK KopncTyBaaya iPod.
- RaKuo IPod He niiEeHaHo, 6yDnJIbHnK npIcTpoU yBIMKHeTBcB B peXnMI TUNER.
I HapeWti, Bn6epitb piBHeIyHocTi dna CnHaNy 6yDnblbNka 3a DOnOMoTOIO KHOIOK
HaTnCHIb KHOIpKy ALARM 1 a6o ALARM 2,Ha dncnnie BiO6pa3NbC8iHdkaTOp "a" a6o "B.ByndeAKTINBOBaHO nepuH a6o dpuyn CnHan 6yDnJIbHNka.
- YbIMKHTb peKIM ouikyBaHHa 3a donomoro HKHON KI /Q(11/15).
BmKHeHH6yHnIbHnKa
HaTnCHiB KhONkY/0o6 BnMkHyTN 6yDnJIbHnK DO HAcTyNHO DnH.
I INPIMITKA.
RyBIMKHeO peKIM NOBTOpeHHcHany, cniD BiiHa HtCHyTH KHOKNy I/0u6 BmKHyTN 6yHnblHNK DO HAcTyHNO DnH.
PekHM NOBTOpeHHaCnHaNy
HaTnCHiB KhoNky SNOOZE (3/7), 106 BmKHyTN 6yDnblbHk np6nHn3Ho Ha 9 XBnH.
BmKHeHH6yDnIbHnka
LIO6 BIMKHyTN NepuHn qac CNrHany,HaTNCiB KhoNky ALARM 1 (6).IHNkAToP "0" 3HNKHe 3 DnCnnie.
LlO6BmKHyTnIpyrHuaCnHany,HaTnCHITb KHOJky ALARM 2 (5).IHNiKaTop“3HnKHe 3 DnC- nJe.
I P N M I T K A.
KuO 6yIO AKTBOBaHO peXIM NOBTOpeHHa CnHaNy, nepu HIX BmKHyTN ac CNHany 6yDnJIbHNka, NOTiHO yBIMKHyTN Ta BmKHyTN npHCTpi3 a DonoMOrOIO KhONKn I/
Taimep chy (KHonka SLEEP (1))
KUpo npictpi yBIMKHeHO,MOHHa HalaHTyBaTn aBTOMaTHHH Taimep CHy 3 KpOKom 10 XBUNH y npomIKky BID 90 do 10 XBUNH; KOJI BCTAHOBHeH yac MHe, npCTPII nepeJe DE B peKM OikYBaHH. HatNCKaTeIO KHONKY, DOnOKn HE BiO6pa3NTbCnOTpiHn Yac. KUso FyHKUO yBIMKHeHO, Na DIncPiEi 3'ABNTbcnIHNDKaJIS SLEEP. KOJI MNHe BCTAHOBHeH yac, npCTPII BIMKHETBCR aBTOMaTHHQ.
LIOB BIMKHyTHIHO FyHKUHO, 3HOBy HATNCITb KHONKY SLEEP.
BiTbOpEHMy3HKn 3 iPod
(iPod He dOdaTbcra)
yBARA.
IpeepiD'εnHaHm iPod nepebipte,io6 paio He nepe6yBaNo B peximi iPod.
1.Пд' endaite a anTep, lo doaetbcr do iPod,do po3'Emy dIra iPod (4).iPod moKHa BCTaHOBnHaI neKHM uHOM y po3'em dIra iPod tiIbKn Toi, konni ndaHOn aanTep.
2.Пд'Енайт ePoddo po03'Emy dЯ iPod (4).
YBAGA.
Ipebeipte,io6 iPod 6yNo BcTaHOBHeBepTnKaIbHO B po3'em.He HarnHaTe Ta He HaxnPaTe iPod,DOnOKn BiN niKlnOeHn Do po3'emy.LeMOKe np3BeCTn DO N0WKoJKeHHa KOHTaKTiB po3'emy/iPod.
- Lio6 yBimKHytn npHcTpi, HATNCHTb KHOHNy/ (11/15). HATNCKaTe KHOKNy FUNCTION (17/1), DO- NOKn Ha DnCnJIeI He 3'ABNTbcra IHINkaiai "IPod".
- 3aIeKHO BiD MoDeni iPod cnepy 3HIMtB 6nOyBaHH KhONOK i PO3NoHITb BiTbOpEHMy3NKn, RkUo NotPi6Ho, HATNCHywN KHONK 一 (12/3).
- По викорисангся лементов упралинна утайту посбнику корисьвача iPod.
YBAGA.
Lio6 he nooKoHTn iPod, nepu HiK BiD'EnHyBaTn Ioro biI cIbOro npncIpoH, yBIMKHITb peXm paio.
Onnc eJeMeHTB ynpabJIHH iPod
II (12/3)
3yHnKa Ta npoOBKeHHB iDToBpeHH My3nKn. HATCHITb 1e pa3, 106 npoOBKnTH BiDToBpeHH.
(18/14)
1HaTNCHeHH=po3NouHaBcBiITBOpEHnIiChi 3 noaATKy.
2HaTnCHeHHra = nponyckaHHra do nonepedHboi nichi.
3HaTnCHeHHN = nponyckaHHN do nici nepei nonepeHbOIO nICHEo i T.D. HATnCHiB i ytpmMyte niD qac BiTbOpEHn DnI NOwky Ha3aI.
(18/14)
HaTnCHiB, 106 nponycHTn Do HAcTyNHOi nicHi Ta HaCTynHnx 3a Heo niceHB. HaTnCHiB Ta yTpmyTe niD Yac BiIDTBOpEHn DnI NOnyKy Bnepe.
i-REPEAT/ (6 Ha nyIbTI)
OaBOJIe aKTHyBaTH yHKUIO NOBTOPOBaHOro BiTBOpeHH.
i-MENU/BAND (19/5)
HaTnCHiB tIO KhoNkU, Uo6 BiDkpTN MeHIO iPod a60 NOBepHyTncb Do nonepedhboro MeHIO.
i-ENTER (13/12)
O3BOJRAe aKTHByBaTH ΦyHKUHO a6o BiO6pa3HTN HaCTyNHMeHIO.
V -SCROLL/PRESET(10/14)
LKHONKa BnKOpNCTOByETbCra DnI npOKpyTKn Bropy/ BHn3 y MeHIO iPod.
3apdKaHH iPod
Eatarpe iPod noyne 3apdkaatncb nicn ni'edhaHHiPod do po3'emy dnn iPod. nIa bOro npicptpi cnidniEeHaTHo do po3eTKn.
IIPMHITKA.
BnKOpncToByte aanTep, 10doaetbca Do iPod, nHaJeKHO r iDcHann H iPod.
He Bci noKoiinHn iPod niTpmyoTb peKIM 3apJxKaHH.
TpmbaicTb 3apdkaHHa3aleKHTb BiD TORO, kN BnKOpNCTOBycTBcH iPod,i yMOB noRo BnKOpNCtAH Hr.
Po3'EM AUX IN (Ha 3aHni nanei npnctpoHO)
BnKOpNCTOByETcD nI niEeHaHH6yDb-koRo aHAnorOBOrO DKepeNa CnHany BiTbOpEHn. TaKoX uepe3 ue po3'em i ryHOMOBueb MOxHa npocnyoBvBaTu IHwi npCTpoi BiTbOpEHn, Taki NKpOrpaBau MP3, nporpaBau KOMnAaT-DnCKiB ta IH.
1.Пд'Енайтse 3OBHиHи npictpiuepe3 ctepeo po3'em 3,5 MMdo po3'emy AUX IN.
2. Bn6epitb bnxidn pekm AUX 3a donomoroh KhoNk FUNCTION (17/1).
3. PódaIbIi IHCTpyKuII MOxHa 3HaItn B NocioHky KOpncTyBaay dKepeena 30BHIuHbOro cHany.
4. BiTbOpBaHe Ha 30BHIiHbMy npIcTpO MoKHa
yTuYepe3 rYuHOMoBeUc. PiBeHr yuHocTi MoKHa
HaIaIyBaTu 3a dONOMoTO KhoNOK VOL(UME)+/VOL(UME)-(15/9).
I P H M I T K A.
BctaHObitb ruyHictb 30BHIHHbOTo npictpoHa pOzymnPiBeHb.
UH
- Ipeed TmM AYK UcHCTHTN pncTpiB, BiD'eHaHTe NOro BiD MepeXi XnBHeHHa.
- YnCTbTe npntcpiB OBOrOIO M'RAKOIO rAHHipKOIO, 6e3 3ac06IB DnR NsueHH.
He 3aHpyIOte npncTpiy y BDOy.
TexhiHi xapaKTepeNCTnKN
MoeIb: MR 4115i
KnBlenHn: 230B,50T
CnoKnBaHH eJekTpoeHepri: 11 Bt
Klaac 6e3neKn:
Papio


- JEZYK POLSKI
- Spis tresci
- / V -SCROLL/PRESET(10/14)
- General Safety Guidelines
- Children and disabled persons
- WARNING!
- Symbols in this user manual
- WARNING:
- CAUTION:
- iNOTE:
- Location of Controls
- Back Side (not shown)
- Remote Control
- First Use of the Device/Introduction
- Power supply
- Setting the clock (during standby mode)
- Insert batteries
- NOTE:
- Headphone jack (14)
- iPod Compatibility
- General Operation
- i NOTE:
- Radio Tuning
- Alarm Function
- Turn Off Alarm
- Snoopze Function
- ENGLISH
- Deactivate Alarm
- Sleep Timer (SLEEP button (1))
- MusicPlayback from iPod
- JTION:
- Description of iPod Controls
- II (12/3)
- (18/14)
- i-REPEAT/ (6 on the Remote)
- i-MENU/BAND (19/5)
- i-ENTER (13/12)
- ▼vi-SCROLL/PRESET(10/14)
- iPod Charging
- AUX IN Socket (rear of the device)
- iNO
- Cleaning
- Technical Specifications
- Meaning of the "Wheelie Bin" Symbol
- PnblT nIcTaHcHOro KepyBaHHa
- YKPAIHcbla
- BnKOpNCTaHH npHcTpoB vepse / 03HaHOMJIeHH
- HnBneHH
- HanaTuBaHHRoHHNHa (BpeKmI ouikyBaHH)
- BCTAHOBJENH6aTapei
- IPIHMITKA.
- A NOPEPEDHEHHA.
- yBtA.
- Po3'EMIHaHabyHnKIB (14)
- Cymichictb i3 iPod
- 3araIbHa iHΦopMaui npo po6Otu npuCTpOHO
- I P N M I T K A.
- YBIMKHeHHBMMKHeHHnPnCtpo10 (11/15)
- Ackpabictb dncnne
- IyHictb
- IhpaepBOHn nylbT nctaunHoro KepyBaHHA
- PRESET EQ (16/8)
- Будньнк
- YBARA.
- YBATA.
- BmKHeHH6yHnIbHnKa
- I INPIMITKA.
- PekHM NOBTOpeHHaCnHaNy
- BmKHeHH6yDnIbHnka
- Taimep chy (KHonka SLEEP (1))
- BiTbOpEHMy3HKn 3 iPod
- YBAGA.
- Onnc eJeMeHTB ynpabJIHH iPod
- i-REPEAT/ (6 Ha nyIbTI)
- V -SCROLL/PRESET(10/14)
- 3apdKaHH iPod
- IIPMHITKA.
- Po3'EM AUX IN (Ha 3aHni nanei npnctpoHO)
- I P H M I T K A.
- UH
- TexhiHi xapaKTepeNCTnKN
Brand : AEG
Model : MR 4115I
Category : Loudspeaker