
IMS 4442 - Loudspeaker AEG - Free user manual and instructions
Find the device manual for free IMS 4442 AEG in PDF.
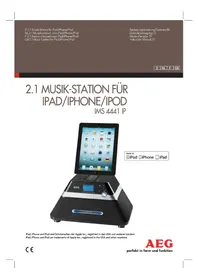
| Product type | Speaker with docking station for iPod/iPhone and FM radio |
| Brand | AEG |
| Model | IMS 4442 |
| Power supply | 230 V, 50 Hz |
| Power consumption | 60 W |
| Protection class | II |
| Net weight | 16.2 kg |
| Radio frequency range | FM 87.5 - 108 MHz |
| iPod/iPhone compatibility | Docking station with supplied adapter (compatible models) |
| Audio connectors | AUDIO IN input (3.5 mm stereo jack) front, AUX input (RCA) rear |
| Antenna | FM wire antenna included |
| Remote control | Infrared, AAA batteries (2x 1.5 V) included |
| Sound settings | Adjustable treble and bass (TREB and SUB buttons on remote) |
| Standby function | Yes, with indicator light |
| Maintenance and cleaning | Unplug before cleaning; use a soft, damp cloth without detergent; removable grille for cleaning |
| Safety instructions | Do not expose to moisture, do not open the casing, check the power cord |
| Supplied accessories | Power cord, FM antenna, remote control, iPod dock adapter |
| Spare parts and repairability | Contact the manufacturer or a qualified technician for any replacement |
Frequently Asked Questions - IMS 4442 AEG
User questions about IMS 4442 AEG
0 question about this device. Answer the ones you know or ask your own.
Ask a new question about this device
Download the instructions for your Loudspeaker in PDF format for free! Find your manual IMS 4442 - AEG and take your electronic device back in hand. On this page are published all the documents necessary for the use of your device. IMS 4442 by AEG.
USER MANUAL IMS 4442 AEG
iPhone and iPod are trademarks of Apple Inc., registered in the USA and other countries.
PERFECT IN FORM AND FUNCTION
AEG
Deutsch
Inhalt
Location of Controls. page 3
User manual page 35
Technical Specifications page 39
JEZYK POLSKI
Spis tresci
Po3TaUyBaHHopraHIB KepyBaHH 3
Iocibnk KopncTyBa. 51
Texhihi xapaKTepeNCTIKN CTOp. 55
Location of Controls
P03TaUyBaHHOprAHIBKepyBaHH
Interruptor principal
Mando a distancia
Interruptor principal
Controlo Remoto
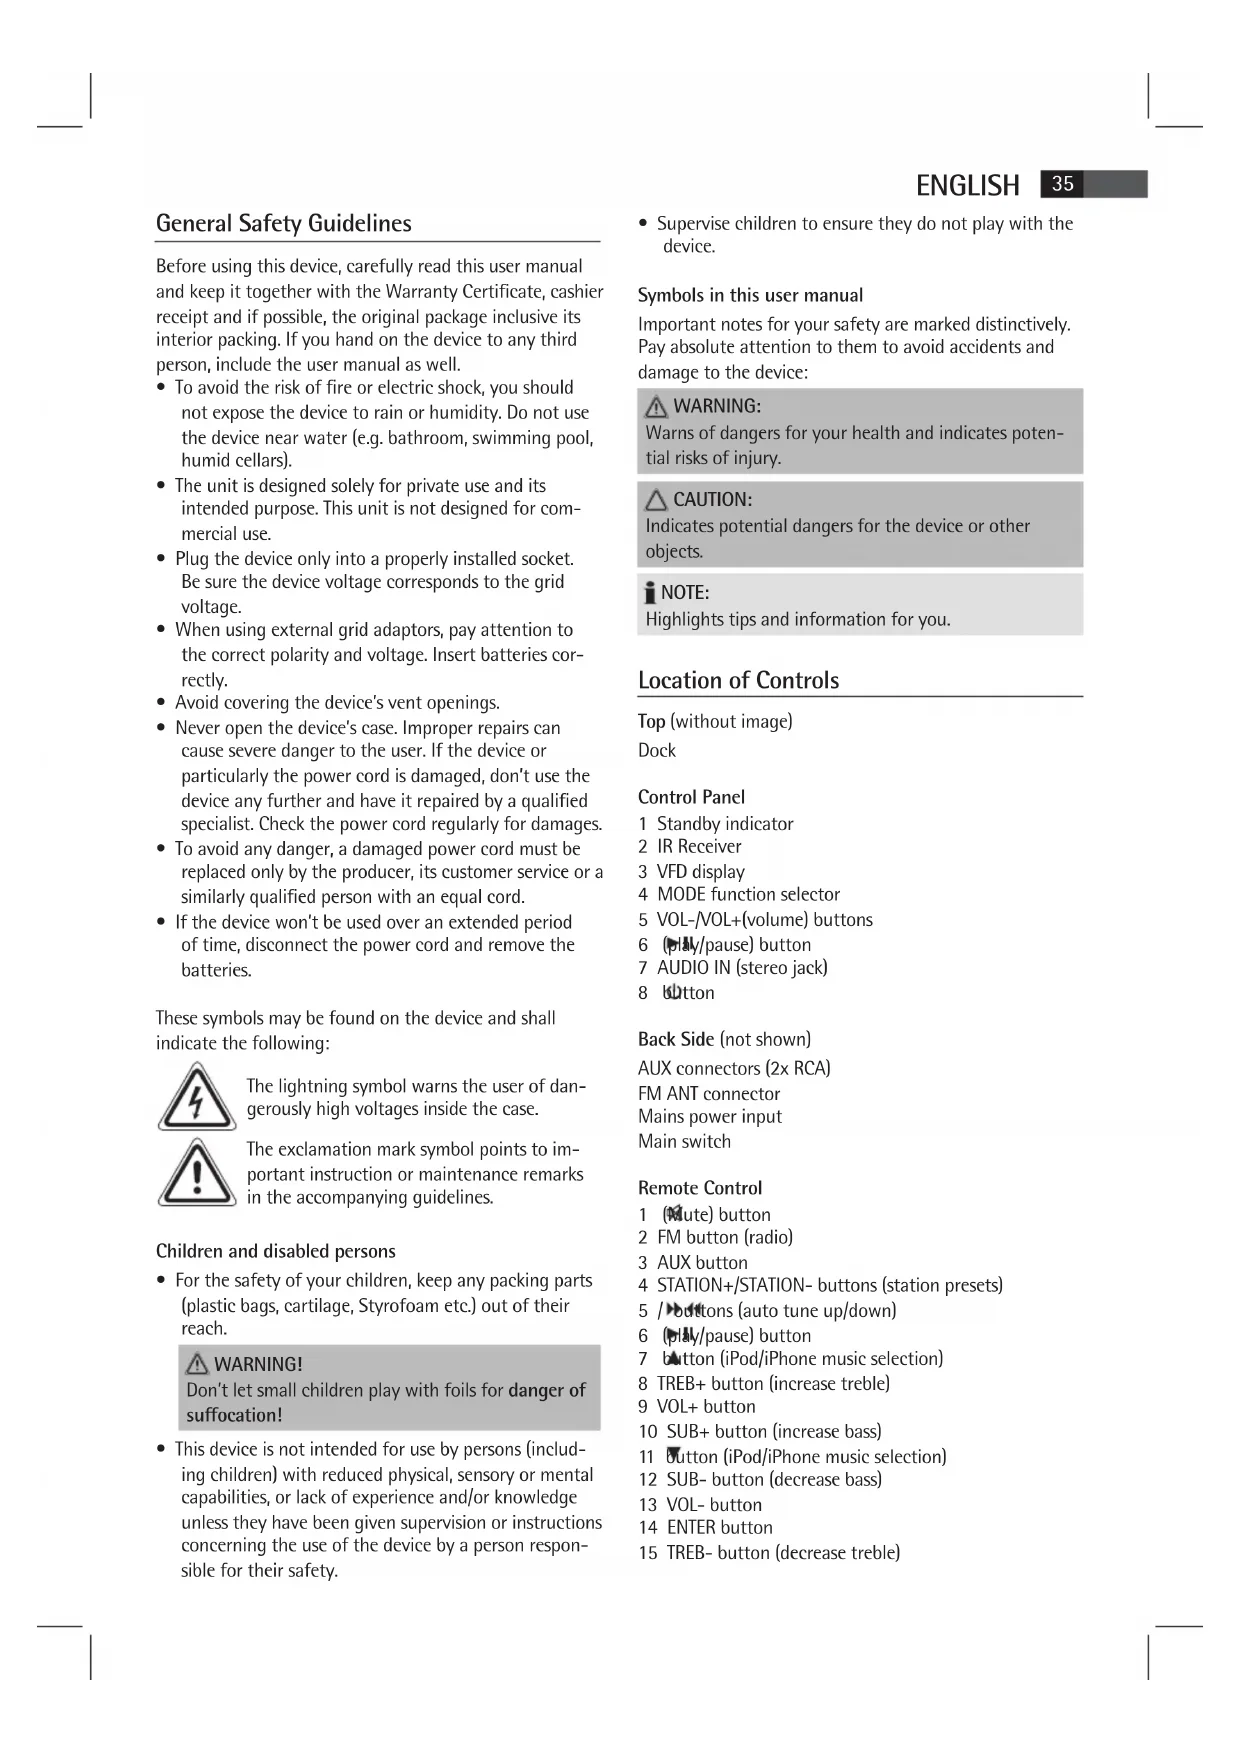
General Safety Guidelines
Before using this device, carefully read this user manual and keep it together with the Warranty Certificate, cashier receipt and if possible, the original package inclusive its interior packing. If you hand on the device to any third person, include the user manual as well.
- To avoid the risk of fire or electric shock, you should not expose the device to rain or humidity. Do not use the device near water (e.g. bathroom, swimming pool, humid cellars).
- The unit is designed solely for private use and its intended purpose. This unit is not designed for commercial use.
- Plug the device only into a properly installed socket. Be sure the device voltage corresponds to the grid voltage.
- When using external grid adaptors, pay attention to the correct polarity and voltage. Insert batteries correctly.
- Avoid covering the device's vent openings.
- Never open the device's case. Improper repairs can cause severe danger to the user. If the device or particularly the power cord is damaged, don't use the device any further and have it repaired by a qualified specialist. Check the power cord regularly for damages.
- To avoid any danger, a damaged power cord must be replaced only by the producer, its customer service or a similarly qualified person with an equal cord.
- If the device won't be used over an extended period of time, disconnect the power cord and remove the batteries.
These symbols may be found on the device and shall indicate the following:
The lightning symbol warns the user of dangerously high voltages inside the case.

The exclamation mark symbol points to important instruction or maintenance remarks in the accompanying guidelines.
Children and disabled persons
- For the safety of your children, keep any packing parts (plastic bags, cartilage, Styrofoam etc.) out of their reach.
WARNING!
Don't let small children play with foils for danger of suffocation!
- This device is not intended for use by persons (including children) with reduced physical, sensory or mental capabilities, or lack of experience and/or knowledge unless they have been given supervision or instructions concerning the use of the device by a person responsible for their safety.
Supervise children to ensure they do not play with the device.
Symbols in this user manual
Important notes for your safety are marked distinctively. Pay absolute attention to them to avoid accidents and damage to the device:
WARNING:
Warns of dangers for your health and indicates potential risks of injury.
CAUTION:
Indicates potential dangers for the device or other objects.
i NOTE:
Highlights tips and information for you.
Location of Controls
Top (without image)
Dock
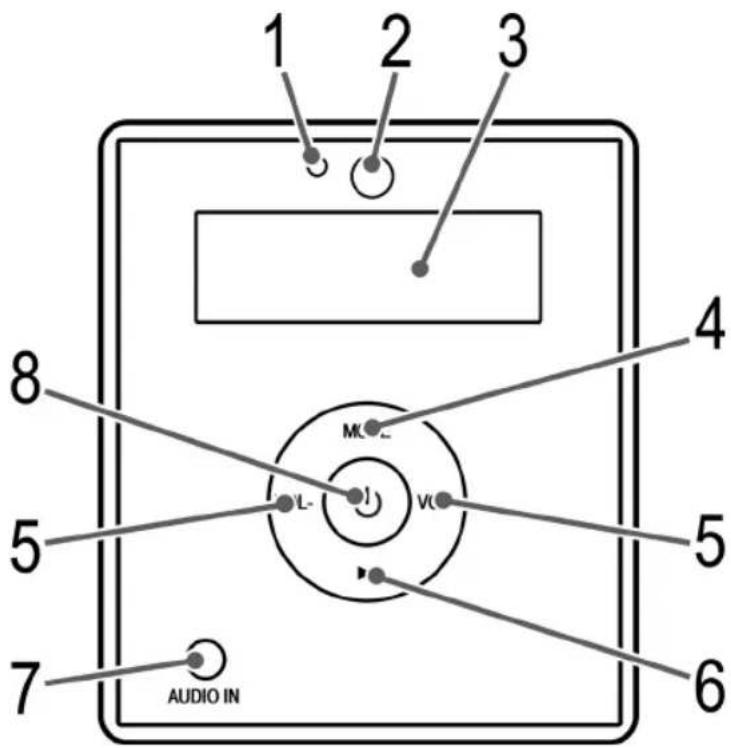
Control Panel
1 Standby indicator
2 IR Receiver
3 VFD display
4 MODE function selector
5 VOL-/VOL+(volume) buttons
6 (pause) button
7 AUDIO IN (stereo jack)
8 Ditton
Back Side (not shown)
AUX connectors (2x RCA)
FM ANT connector
Mains power input
Main switch
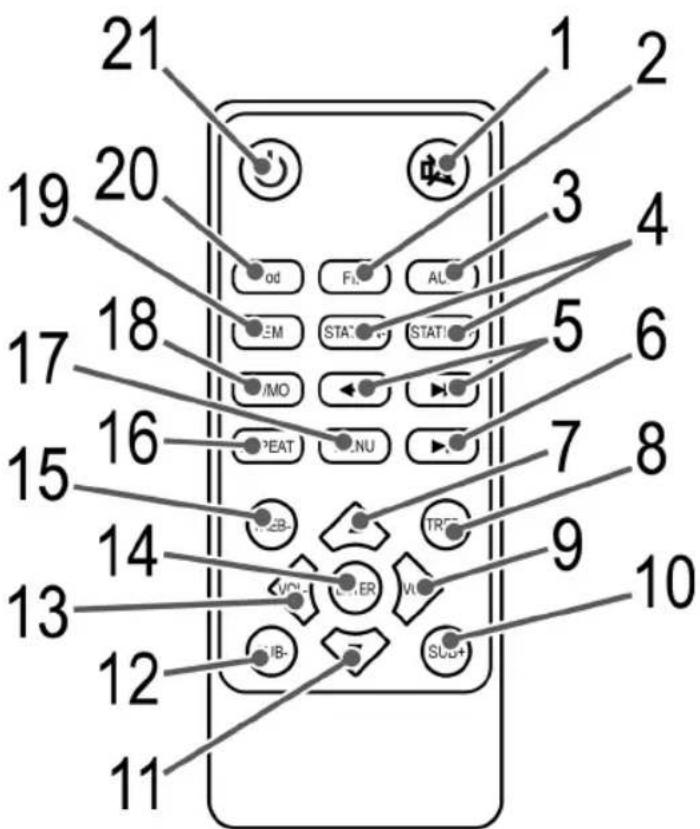
Remote Control
1 (dute) button
2 FM button (radio)
3 AUX button
4 STATION+/STATION- buttons (station presets)
5 / buttons (auto tune up/down)
6 (pause) button
7 button (iPod/iPhone music selection)
8 TREB+ button (increase treble)
9 VOL+ button
10 SUB+ button (increase bass)
11 Button (iPod/iPhone music selection)
12 SUB- button (decrease bass)
13 VOL- button
14 ENTER button
15 TReB- button (decrease treble)
ENGLISH
16 REPEAT button
17 MENU button
18 ST/MO button (stereo/mono)
19 MEM button (preset)
20 iPOD button
21Button (On/Off)
Accessories (no image)
Mains power cord
FM wire antenna
Special Safety Precautions for this device

WARNING:
Avoid hearing loss due to extreme volume.
CAUTION:
- Do not subject the speakers to extreme heat, cold or humidity.
- Do not operate the device on maximum volume. This can cause damage.
- Do not touch the speaker membranes with fingers or objects. This will cause damage to the membranes.
First Use of the Device/Introduction
- Select a proper place for the device. A dry, level and slip-proof surface is suitable.
- Do not place objects (such as vases) on top of the speaker.
- Make sure the device is vented sufficiently!
- If still in place, remove the protection foil from the display.
Mount Pedestal
- Carefully turn the speaker box upside down.
i NOTE:
Place a blanket under the speaker to avoid scratching the surface.
- Place the four spacers on the screw holes.
- Mount the bottom plate with four screws at the bottom of the speaker box.
- Now turn the speaker box on its feet again.
Power supply
- Connect the mains power cord to the mains power input on the back of the device.
- Insert the grid plug into a properly installed three prong socket with 230V, 50Hz.
- Make sure the grid voltage corresponds to the figures on the rating plate.
NOTE:
Disconnect from mains power supply during longer periods of non-use. This clears the station presets and the latest settings (source, volume).
Insert/Replace Battery in Remote Control
- Open the battery compartment on the underside of the remote.
- Insert 2 batteries type R03 "AAA" 1.5V. Check that the polarity is correct (see battery compartment).
- Close the battery compartment.
If the remote is not in use for a lengthy period of time, please remove the battery to prevent the battery acid from "leaking".
WARNING:
- Do not expose batteries to intense heat or direct sunlight. Never throw batteries onto a fire. Danger of explosion!
- Keep batteries out of the reach of children. They are not toys.
- Do not force batteries open.
- Avoid contact with metallic objects. (Rings, nails, screws etc.) Danger of short circuits!
- Short circuits may overheat or even ignite batteries. This may lead to combustion.
- When transporting the batteries, cover the terminals for your safety with an adhesive strip.
- If a battery leaks, do not rub the fluid into the eyes or the skin. If acid comes into contact with the eyes, rinse with purified water and seek medical advice if symptoms persist.
CAUTION:
- Never use different battery types or new and used batteries together.
- Batteries must not be disposed of in the garbage. Please bring used batteries to competent collection centers or back to the dealer.
iPod/iPhone Compatibility
Due to the large variety of iPod and iPhone models and generations on the market, full compatibility cannot be guaranteed. Before connecting your iPod/iPhone, ensure that it has a compatible interface.
Full compatibility of the remote functions also cannot be guaranteed. Operate your iPod/iPhone as normal, while it sits in the docking station.

NOTE:
Depending on the software version of your iPhone the following error message may be displayed: "This accessory was not developed for iPhone use. It is possible that noise occurs and signal strength is reduced." In this case press "OK".
General Operation

NOTE:
Some buttons you can find as well on the device as on the remote control. Identical buttons effect the same function.
Switch device on/off
To turn the device on, set the main switch POWER on the back of the device to "ON".
- Press the button (8/21) to toggle the device between standby and operating mode. In standby mode, the standby indicator (1) turns on.
- To turn the device off, set the main switch POWER on the back of the device to "OFF".

NOTE:
The station presets and the latest settings (source, volume) are deleted when switching the device off.
Volume
By pressing the VOL+VOL- buttons (5/9/13) you can adjust the desired volume.
Infrared Remote Control
For wireless control within a distance of 5m . If the distance decreases you should change the batteries. For proper operation mind a clear view between the remote control and the sensor on the device.
Sound Settings (on RC)
- Press the TREB+/TREB- buttons (8/15) to set the treble value.
- Press the SUB + / SUB - buttons (10/12) to set the bass value.

NOTE: During iPod/iPhone Music Playback
For optimum sound, change the EQ setting on your iPod/iPhone as required.
(1 on RC)
For immediate muting of the volume. The Volume display flashes. Press again to cancel the function.
Radio Tuning
- Press the button (8/21) to switch the device on.
- Press the FM button (2 on RC).
- Tune the program by pressing the buttons (5).
- If the reception is too weak and there is interference on the channel, try to improve the reception by changing the position of the aerial and/or coil/uncoil it.
i NOTE:
Press the ST/MO button to toggle to mono if the reception is noisy.
Save Radio Station
- Press the MEM button (19) to save the station to the presets. A preset flashes on the display (e.g. P01).
- Press the STATION+/STATION- buttons (4) to select a station preset between P01 and P20.
- Briefly press the MEM button to save the radio station.
i NOTE:
The station presets and the latest settings (source, volume) are deleted when disconnecting the device from mains power supply.
Recall Saved Radio Stations
Press the STATION+/STATION- buttons (4) to access the station presets.
MusicPlaybackfromiPod/iPhone
(iPod/iPhone not supplied)

CAUTION:
Before plugging in the iPod/iPhone, make sure that the radio is not in iPod/iPhone mode.
- Insert the adapter supplied with your iPod into the dock. You can only ensure that the iPod fits correctly into the iPod port if the adapter is plugged in.
- Insert your iPod/iPhone into the dock.

CAUTION:
Make sure that your iPod/iPhone is plugged upright into the port. Do not bend or tilt the iPod/iPhone whilst it is plugged into the port. This may cause damage to the dock or the iPod/iPhone.
- Press the button (8/21) to switch the device on. Repeatedly press the MODE button (4 on device) until "iPod" is displayed.

NOTE:
Alternatively press the iPod button (20 on RC) to select iPod mode.
ENGLISH
- Depending on the iPod/iPhone Model, firstly release the button lock and start playing music if necessary with the button (6/6).
- Follow your iPod/iPhone manual for further use of the controls.

CAUTION:
Return to radio mode before disconnecting your iPod/ iPhone from this device to avoid damages to your iPod/ iPhone.

NOTE:
If you have an incoming call when playing back music with the iPhone docked, then playback stops and you can hear the ring tone.
Description of iPod/iPhone Controls
II (6/6)
You can pause and continue music playback. Press again to continue playback.
(5 on FB)
Press 1x = Restart of the song from the beginning.
Press 2x = Skip to the previous song.
Press 3x = Skip to the song before the previous song, etc. Press and hold during playback to search in reverse through the song.
(5 on FB)
Press to skip to the next song and the following songs.
Press and hold during playback to search forward through the song.
REPEAT (16 on RC)
Activates the Repeat function.
MENU (17 on RC)
Press this button to bring up the iPod/iPhone Menu or to return to the previous menu.
ENTER (14 on RC)
Press this button to activate a function or to display the next menu.
/ (7 / 11 on FB)
Press these buttons, to scroll up/down the iPod/iPhone Menu.
iPod/iPhone Charging
Your iPod/iPhone battery is charged as soon as the iPod/ iPhone is docked. To do this, the unit must be connected to the mains.
i NOTE:
- Use the adapter supplied with your iPod to ensure that your iPod fits correctly.
- Not all iPod/iPhone generations support the charge mode.
- The duration of the charging process depends on the iPod/iPhone which is used and its operating condition.
Connect External Devices
This device is equipped with two connectors for analogue playback devices. AUDIO IN (7) on the front and AUX on the back of the device. To listen to the music via the speakers, connect playback devices such as MP3 player, CD player, etc..
-
Connect the external device as follows:
-
Via 3.5mm stereo jack to AUDIO IN (7).
- Via RCA cable (2x RCA) to AUX on the back of the device.

NOTE:
If external devices are connected to both inputs, playback via AUDIO IN (7) is preferred.
- Now select AUX out mode with the MODE button (4).

Alternatively select AUX mode by pressing the AUX button (3 on RC).
- You will find further instructions in the manual of your external sound source.
- Listen to music playback from external playback devices via the speakers. Press the VOL+VOL- buttons (5/9/13) to set the volume level.
NOTE:
Set the volume of the external device to a reasonable level.
Cleaning
- Before cleaning disconnect from mains power supply.
- Clean the device with a soft damp cloth without detergents.
- Do not submerge the device in water.
- Remove the speaker grill and clean, for instance with a vacuum cleaner or a lint brush. Replace the grill onto the mountings after cleaning.
Technical Specifications
| Model: | IMS 4442 |
| Power supply: | 230V, 50Hz |
| Power Consumption: | .60W |
| Protection Class: | II |
| Net weight: | 16.2kg |
| Radio Frequency Range: | FM 87.5 ~ 108 MHz |
Technical modifications reserved!
This device complies with all current CE directives, such as electromagnetic compatibility and low voltage directive and is manufactured according to the latest safety regulations.
"Made for iPod" and "Made for iPhone" mean that an electronic accessory has been designed to connect specifically to iPod or iPhone and has been certified by the developer to meet Apple performance standards. Apple is not responsible for the operation of this device or its compliance with safety and regulators standards.

Meaning of the "Wheelie Bin" Symbol
Take care of our environment, do not dispose of electrical.
applicances via the household waste.
Dispose of obsolete or defective electrical appliances via municipal collection points.
Please help to avoid potential environmental and health impacts through improper waste disposal.
You contribute to recycling and other forms of utilization of old electric and electronic appliances.
Your municipality provides you with information about collecting points.
BnKOpncTaHnI npncTroIO Bneppe/ O3HaHOMJIeHH
Bn6epitb nixoanme micue nIpyntpo. Iy 1b0rnpaTHa cyxa npacka HecIn3bKa nobepxH.
He po3taWObyIte 6yIb-riK npEaMeTn (HaPnKnaD Ba3N) Ha BepxHi nOBepxHi.
- IpepeBipTe, YI npHCTpiI npoBITpIOeTbCra HaJIeKHM qHHOM!
- RaIIO npicpiBCTaHOBneHO, 3HIMITb 3 DnCpner 3axHCNY CTpiKy.
KpinnnHn niDCTaBKn
- ObepeKHo napeBepHitb Kopnyc ryHOMOBua Doropu.
IINPIMITKA.
PpOCTeNITb nID rUHOMOBeCb KOBdpy, 0o6 He no-dprnATn NOBepxHIO.
- Pokla.iTb cyTnpi npoklaikn Ha rBHTObi OTBOpn.
PnKpyTbOtnpMa rBnHTamn PnactHy do HxHbOIO nobepxHi Kopnyca ryHOMOBua.
Tenepe napeBepHitb Kopnyc ryHOMOBua i noCTaTe Ha hiKKn.
HKBneHH
PiéHaite UHyp KINBHeHHI Do BXOy JINBHeHHI BID MepeKi, 30 3hAxOnITbcra 33aNy npunctpoio.
ПдкночьштЕКерdoHAJIEXHOBCTAHOBHeHOTnKoHTaKTHOi po3eTKn 230B,50T.
- YneBhitbcr, IIO Hanpyra Mepek BiINOBiAc 3HaHHeHHM Ha Ta6JIuCi 3TexHiHm DaHmN.
IINPIMITKA.
BiD'EnHyIe npncpii BiM MepeKj KINBLeHHRAKUHe KopnCTyeTecn Hm DoBn Ipomixok yacy. IHaK-We MOXHb BTPaNTn NonepeDi HanaWtBuHHc TcHui Ta HeoOdaBHi HanaWtBuHHa (3Byk, rYHicTb).
BctaHOBLeHH/3amHeHH 6aTapei B nyIbTi nCTaHcuiHoro KepyBaHH
BiKpnTe BiCik dIa 6atapey HnXHi yactnHi nyIbTa.
BCTaBTe DbI 6atapei Tnny R03 "AAA"1,5 B.IpeBipTe npabNtHiCt b NpHPOCTi (Cxemy npBedeHo y BiDciky).
3akpiTe Bicik dJa 6atapei.
Ku npIbHe BnKOpNCTOByBaTMeTbCnPOTaROM TpBAnoro uacy,BmMItb 6aTapeo,Uo6 yHnKHyTu "BntiKaHH" KcNToN 6aTaapei.
A NOPEPEDXEHHA.
He 3aIIwaIte 6atapei y cneKOthOMy Micci a6o nID npRMM COHrHMM npOMHHAM. HikoN He KndaTe 6atapei y BORHO. IChye He6e3neKa Bn6yxy!
TpmaTe 6atapei no3a MeXaMn DoCAxHocti dTei. He irpaakn.
He BiKpnBaIte 6atapei cnloio.
- YHnKaIe IX KOHTaKTy 3 MeTaJIeBIMM INpeIMTaAM (raKamN, UBrXaMn, TBINrTaMn Ta IH.). IChyE He6e3neKa KOpOTKOrO 3AmHKAHH!
KopOTKe 3aMnKaHH MoKe npH3BcTn Do nepeRpiBaHH6aTapea 60 BOH MoKyTb 3arOpitncb. LcMoKe cnpuHHTn NoKeKy.
IiudactpaHcnpOpTyBaHH6Batape3MeToIO6e3- neKn 3akneTe II KOHTaKTn KNeKkoCTpiKo.
- RaIIO 6aTaper noteKna, cnIkyIte, IIO6 piINHa He nOTpannla B oOi aO ha uKipy. RaIIO KNCIoTa notpapanla B oOi, npOMnTe ix NcTOIO BOIOI i, RaIIO CmIMITOMn HE 3HnKHyTb, BiDpa3y 3BepHITbcra Do likapra.

YBAGA.
He KopnctyntecaiHIMTNOM6atapeaHOBIMNaCTAPIMN6ataperMOnHOHocHo
He ytni3yte 6atapei pa3om i3 no6ytoBm cmittram. BnKopncTahi 6atapei 3daabaTe y BiNIO-BiHN nyHKT npHOMy a6o nobepTaIe ix y nyHKT npuD6aHH.
Cymichictb i3 iPod/iPhone
Y 3B'3Ky 3 BeINKIM pi3HOMaHITTM NOKOJIiHb i MoDenei iPod i iPhone, DocTyNHx y Mara3nHax, nobHa cymichicthe rapaHTyctbca. Nepw hix niDi'edHyBatn iPod/iPhone, nepebipte cymichictb Noro iTepfeycy.
TakoHe MoKe rapaHTyBaTnc NobHa cymichcIb
fHKnI PyNbTa NCTaHnIHoro KepyBaHHra.
noTpi6Ho, 0o iPod/iPhone npauOBab HopMaJIbHO,
niKIOHITb Ioro Do DOK-CTAHII.
IIPMHITKA.
B 3aJIeKHOCTI BiD BepCII nporpAMHOrO 3a6e3neueHHA, BcTaHOBHeHOrO Ha iPhone, MoKyTb BiIO6paKaTnCSHaCTyNHi NOBIOMJIeHHI pO NOMNIK.
"Lei akcecyap Henpndaatn I na BukopncTaHHa 3 iPhone. BukopncTaHHa Moke npnbecTu DO noABu Wymib i nocnaBneHHa CnHany."
Bcbomy BnnaKHy HATNCHb KhoNkY "OK".
3araIbHa iHΦopMaizi npo po6Otu npnCTpoHO
IPIHMITKA.
IeKki KhoNk iChHyToB Ra Ka npicTpoi, TaK i Ha NyblTi InCTaHuiHoro KepyBaHH.
IDeHTnHi KHONK BIKOHyOToB ODAHakOBi FyHKu.
YBIMKHeHHBMMKHeHHnPnCTpO
- YbIMKnHtB npncTpi, npeBeDItb BmHKaU POWER 33aNy Ha npncTpoi y noJooKeHHA "ON".
HaTnCKaTe KhoNky (8/21), 0o6 nepemKATnCmX pexHMOM pOBoTN npIcTPOTo TapeKIMOM OuyiBaHH. Y peKMI OUYiBaHH BmKAeTbCn IHNkATOp peKIMy OUYiBaHH (1).
BnMKHb npncTpi, nepeBeidtb BmHKaUPower 33aNy ha npncTpoi y noLoKeHHra "OFF".
IPIHMITKA.
PonepeHn HanaTByBaHHcTaHci i HeoDaBHn HanaTByBaHH (3ByK, rHyHicTB) BndaJIaIObCn, KOIN pncptpi BNIMkaETbCn.
TgammaCTb
Notpi6Hy rhyHCTb MOKHa HalaHTyBaTn 3a DOnOMoHO KhoNOK VOL+/VOL-(5/9/13).
IHphiapepBOHn NylbT dNCTaHcHOro KepyBaHH
BnKOpNCTOByeTbCnIa63dpoTOBOYypabInHH npnCTpOemHa BiDcTaHIO5M.Keo daIbHicTB IIpybTa 3MeHunacb,3amHt6atapei.InHopMaIbHOi pOBoTN pybTa Notpi6Ho,io6 mixn Hm i npnMaueHn npnCTpOI He 6yNo nepeuKoJ.
HanaWtYBaHH3Byky(Ha PIK)
- HaTnCKaIe KhoNkTNREB+/TREB-(8/15), 0o6 BCTaHOBHTN3HaueHnB BepxHix YactOT.
- HatnckaTe KhoNkN SUB+/SUB-(10/12), 1o6 BcTaHOBNTN 3HaueHHH HxHix YactOT.
I PIMITKA.Пд уac BiTBopeHЯ My3HH 3 iPod/iPhone
Длг ONТIMаьHOrO 3ByaHHa 3MiHITb HanaIHTyBaHHa EQ Ha iPod/iPhone.
(1 Ha PIK)
Iner HeraHoro BIMKHeHHr rHyHOCT. Ekapn BiOo6paKeHHPiBHa rHyHOCTi NOUHe 6bIMaTH. HaTCHITb KHONky 8e pa3, 0o6 yBIMKHyTN rHyHICTb.
HanaHTyBaHHpaio
HaTnCHiB KhONky (8/21), 0o6 yBIMKHytn npn-ctpi.
- HaTnCHiBtKhONkY FM (2 Na PIK).
Hanautyte nporpamy 3a donomoroIO KhoNOK
KuO CnHAn DyKe Cna6Kn i HnBHi 3aBAn, cnpo6yIte NOKpaunTn npMmaHH CnHany XJXOM 3mHN NOLOKeHH aHTeHH Ta/a6o UJnxom II 3roptAHHa/po3roptaHH.
IIPMHMITKA.
HaTnckaIte KhoNky ST/MO, 0o6 nepemikatncB peKIM MOHO, RaIO 3a6arato UyMOBNx 3aBaI.
36epekeHHpaioctanii
- HATNCHTb KONky MEM (19), 0o6 36epeTn paDiOCTaHcIIO Do nonepedHix HanaU TyBaHb. 3NaueHHnonepedHbOro HanaU TyBaHHa 6NIMae Ha ekpaHi (Hanp.P01).
- HATINCHITb KNONKSTATION+/STATION-(4),IO6 Bn6paTHI ONepeHc HanaHTyBaHHra CTAHii BiP01 do P20.
- Kopotko Hatnchitb KhoNky MEM, 06 36epertn paioctaHIO.
IPIIMITKA.
PonepeHn HanaTuBaHH n TaHui i HeoDaHn HanaTuBaHH (3Byk, rYHcTb) BnAaHOTbcR, KOnn npncptpi BiEChyETcb Bi MepeKx KMBneHH.
BnJIHK 36epeKeHnx cTaHciI
HaTnCHiB KHOHKn STATION+/STATION- (4), OTpMaTn DoCTyn Do nonepedhix HanaHTyBaHb CTaHui.
BiTbOpHnMy3nKn 3 iPod/iPhone
(iPod/iPhone He BXOДNTB B KOMNJIeKT NOCTaBKN)
YBAGA.
IpeepiNidEHaHnHm iPod/iPhone nepeBipTe,io6 paio He nepe6yBaNo B pexmi iPod/iPhone.
54
YKPAIHCbKA
1.Пд' endaHTe DOK- aanTep (BXOHTb B KOMnneKT nocTaBKn)doDOKy iPod.iPod moXHa BCTaHOBnTH naExHm YHOM y po3'EM dIa iPod TiIbKn Todi, KOJI niD' endaHo aanTep.
2.Пд'снайтI Pod/Phone do DKy.
yBATA.
Ipebeipte,io6 iPod/iPhone 6yno BCTaHOBNeHo BeptnKaIbHbPo3'em. He HarnHaIe Ta He HaXnJIte iPod/iPhone,doNOK Bin NiKIOUeHm do po3'emy.Lc moKe nooKOHTn DOK a6o/ta iPod/ iPhone.
- HatnciTb KhoNky (8/21), 106 yBIMKHyTN npnctpii. KiIbKa pa3iB HATNCaIte KhoNky MODE (4 Ha npncTpoi), DOKn He 3'HBNTcR no3HaUka "iPod".
IIPIMITKA.
IhaKHe HATNCiHb KHOJIky iPOD (20 Ha PIK), 106 Bn6paTn peKIM iPod.
- 3aIeKHO BiD Moeni iPod/iPhone cnepuy 3HIMiTb 6IOKyBaHHa KHONoK i po3noHHTB BiITBopeHNMy3IKN, RaIIO NoTI6HO, HATNCHyBUN KHNkY (6/6).
- По викоростангсяе мenteовупарынгсячтайу посбнky корстваая iPhone.
YBATA.
Lio6 He nookoHTn iPod/iPhone, nepw hix BiEcdhyBaTn Ioro BiD cIbOrO npIcTpO, yBIMKHiB peXIM paio.
IIPMIMTKA.
Aku oPhone nEHaHO do doky i niuac BiTBopeHHa My3KNIOCTynae BxIDHn D3BIOHK, BiTBOpeHH 3yINHReTbC, InuHAc BIKNIK.
Onnc eJeMeHTiB ynpabJIHHa iPod/iPhone II (6/6)
3ynnKa Ta npoOBKeHHB BiTbOpEHMy3KN. HatncHtB ue pa3, 0o6 npoOBKHTN BiTbOpEHHr.
(5HaNk)
1HaTNCHeHH=po3IOUHnAe BiITBOpEHnPiChi 3 noaATKy.
2HaTnCHeHHN = npOnyckaHnI Do nonepeHbOi nichi.
3HaTnCHeHHN = npOnyckaHHNdo nici nepeD nonepeHbOIO nichEoi T.D. HATnCHiB i ytpmyTe ni d ac BiITbOpEHnI DnI NooKy Ha3aI.
(5Ha\PK)
HaTnCHiB, 106 nponycHTn Do HAcTyNHOi nicHi Ta HaCTynHnx 3a Heo niceHb. HaTnCHiB Ta ytpmMyTe niD Yac BiIDTBOpEHn DnI NOwky BnepeI.
REPEAT (16 Na PIK)
03BONc aKTHByBaTH ΦyHKUHO NOBTOPOBaHOro BiTBOpeHH.
MENU (17 Na PIK)
HaTnCHiB 10K HONKy, 106 BiDkPNTM MeHIO iPod/ iPhone a6o NOBepHyTncb do nonpehBoTo MeHIO.
ENTER (14 ha ΠK)
O3BOJAE aKTHByBaTH ΦyHKUHO a6o BiIObpa3HTN HaCTyNHMeHIO.
7/11 Ha NK
LKHONKa BnKOpNcTOByeTbCdIa npokpyTKn Bropy/ BHn3 y MeHIO iPod/iPhone.
3apdkaHH iPod/iPhone
Batape iPod/iPhone nouhe 3apjxkaTncb nicna nid'edhannH iPod/iPhone do po3'emy.Дляцboro npntpi cnid ndhATn do po3etkn.
ITPIMITKA.
KopncTyIeTcRdok-aDAnTePOM3KOMnIeKtynoCTaBKn,Uo63a6e3neuHTn npaBnIbHe BnKOpncTaHHra pncTropo iPod.
He Bci noKoJIiHHa iPod/iPhone niTpmyIb peJHKIM 3apAJaHHa.
TpnaJIcTb3apJkaHnHa3aIeKHTb BiD TOrO,Kn BnKOpNCTOByEcTbca iPod/iPhone,i yMOB NOro BNKOpNCtAHnH.
IiD'cHaHHa30BHiHix npncTpoIB
Ley npctpi 6bnaHaHO dBOMa po3'EMAMN dna ananorobnx npctpoB BiTbOpEHn. NepuH AUDIO IN (7) Ha nepeHni nobepxHi npctpO, a pyruH AUX -Ha 3aHNI. PIIKIOauTe taki npctpO BI TbOpEHn, k MP3-nIeep, CD-nIeep, too, uO6 npocnyoxByBatm My3NKy chepe3 ryHOMOBui.
-
30BHIiHi npHCTpoi NiE'EDHyIOb TaKIM YINHOM:
-
Upees 3,5 MM cTepeop03'EM do pox'Emy AUDIO IN (7).
3a donomoro kabeRCA (2x RCA) uepe3 po3EM AUX 33aNy Ha npictpoi.
IINPHMITKA.
Kuio 30BhiHpiNCTpoi niEHaHO do o6ox po3EMIB, HadaetbcnpeBara po3'Emy AUDIO IN (7).
- Bn6epitb bixiDnH peKIM AUX 3a donomoroo KhoNk MODE (4).
IINPHMITKA.
IHaKHe Bn6epiB peKIM AUX HaTnCKaHHaM KhoNkAUX (3 Ha PIK).
- Пдалшійспукш можна 3найтВ рбнky Корисьачдахерета звишьогу сгнану.
- Порocлуховпу Музну 3i 30Bишix npicstpoiB BiTBopeHnY uepe3 ryHOMOBuI. HATNCKaIte KhoNKn VOL+/VOL- (5/9/13), lo6 hanaHTyBaTH pIBeHb ryHocTi.
IINPIMITKA.
BctaHObitryHicTh30BHIHHbOTo npictpoHa pO3ymnPiBeHb.
UH
- Ipeed TmM Jk YnCTHTn Pnctpi, BiD'edHaIte Noro BiD MepeKj XnBHeHn.
- YnCTbTe npncptpi BONoroIO M'RAKOIO raHcyipkoIO, 6e3 3ac06IB DnIyUHeHH.
He 3aHpyIOte npncTpiy BDOy.
3HIMITb peWitKy 3 rUyHOMOBuTa NaOnHCTtB II,Ha-npNKlaIa,IINIOOCoM a60 M'RAKOIO uTkoIO. Iicra YnueHH BCTaBte peWitKy Ha Micue.
TexhiHi xapaKTepeNCTnKN
MoeIb: IMS 4442
KuBHeHHa: 230B,50T
CnoXnBaHH enekTpoeHepri: 60BT
Kla3axncty:
Bara HeTo: 16,2 Kr
Papio
Diana3OH yactor: FM 87,5-108 M
TexhiH3MiH MoKe 6yTu BHeceHo 6e3 nonepdKeHNr!
Cen pncptpi BiINOBiJaB Cbim DIOOHM NnpeKTHBaM PaNc EbpOnn, 3OKpeMa 0oO eneKtpomarHITHOI cymichoCTi nPeKTHBi 0oO Hn3bKOi Hanpyr, Ta Bnpo6JIeHn BiINOBiIDHO DO OCTAHIX BmOR 63neKn.
I03haqun "Made for iPod" i "Made for iPhone" 03hauOtB, 10 eNeKtpoHHe 6bnaHaHHa 6yNo BnroTOBLeHO dA nIKnOeHHa cAme Do iPod a6o iPhone i ix cepTnΦiKOBaHO Bnpo6HkOM 10oD BiNobIDHocTi CTAndaptam po6Ot N Komnahii Apple. Apple He Hece BiNobIDaJIbHocTi 3a po6Otu npICtpoU qH NOrO BiNObBiHDHcTB CTAndaptAm I HopMaM 6e3neKn.
-
1
-
1
GARANTIE-KARTE


- Deutsch
- Inhalt
- JEZYK POLSKI
- Spis tresci
- Mando a distancia
- Controlo Remoto
- General Safety Guidelines
- Children and disabled persons
- WARNING!
- Symbols in this user manual
- WARNING:
- CAUTION:
- i NOTE:
- Location of Controls
- Control Panel
- Back Side (not shown)
- Remote Control
- ENGLISH
- Special Safety Precautions for this device
- First Use of the Device/Introduction
- Mount Pedestal
- Power supply
- NOTE:
- Insert/Replace Battery in Remote Control
- iPod/iPhone Compatibility
- General Operation
- Switch device on/off
- Volume
- Infrared Remote Control
- Sound Settings (on RC)
- NOTE: During iPod/iPhone Music Playback
- (1 on RC)
- Radio Tuning
- Save Radio Station
- Recall Saved Radio Stations
- MusicPlaybackfromiPod/iPhone
- iPod/iPhone Charging
- Connect External Devices
- Cleaning
- Technical Specifications
- Meaning of the "Wheelie Bin" Symbol
- BnKOpncTaHnI npncTroIO Bneppe/ O3HaHOMJIeHH
- KpinnnHn niDCTaBKn
- IINPIMITKA.
- HKBneHH
- BctaHOBLeHH/3amHeHH 6aTapei B nyIbTi nCTaHcuiHoro KepyBaHH
- A NOPEPEDXEHHA.
- YBAGA.
- Cymichictb i3 iPod/iPhone
- IIPMHITKA.
- 3araIbHa iHΦopMaizi npo po6Otu npnCTpoHO
- IPIHMITKA.
- YBIMKHeHHBMMKHeHHnPnCTpO
- TgammaCTb
- IHphiapepBOHn NylbT dNCTaHcHOro KepyBaHH
- HanaWtYBaHH3Byky(Ha PIK)
- I PIMITKA.Пд уac BiTBopeHЯ My3HH 3 iPod/iPhone
- (1 Ha PIK)
- HanaHTyBaHHpaio
- IIPMHMITKA.
- 36epekeHHpaioctanii
- IPIIMITKA.
- BnJIHK 36epeKeHnx cTaHciI
- BiTbOpHnMy3nKn 3 iPod/iPhone
- YKPAIHCbKA
- yBATA.
- IIPIMITKA.
- IIPMIMTKA.
- Onnc eJeMeHTiB ynpabJIHHa iPod/iPhone II (6/6)
- (5HaNk)
- (5Ha\PK)
- REPEAT (16 Na PIK)
- MENU (17 Na PIK)
- ENTER (14 ha ΠK)
- 7/11 Ha NK
- 3apdkaHH iPod/iPhone
- ITPIMITKA.
- IiD'cHaHHa30BHiHix npncTpoIB
- IINPHMITKA.
- UH
- TexhiHi xapaKTepeNCTnKN
- GARANTIE-KARTE
Brand : AEG
Model : IMS 4442
Category : Loudspeaker