
MC 4457 DAB+ - Loudspeaker AEG - Free user manual and instructions
Find the device manual for free MC 4457 DAB+ AEG in PDF.
| Product type | Compact stereo speaker with DAB+/FM radio |
| Brand | AEG |
| Model | MC 4457 DAB+ |
| Power supply | 220-240 V~50 Hz, 40 W |
| Net weight | 2.63 kg |
| Radio | DAB/DAB+ (174-240 MHz) and FM (87.5-108 MHz) |
| Players | CD, CD-R, CD-RW, MP3, USB |
| Bluetooth | Version 2.1+EDR, range ~15 m, profiles A2DP/AVRCP |
| Auxiliary input | 2 x RCA (AUDIO IN) |
| Speaker output | SPEAKERS terminals (polarity respected) |
| Remote control | Infrared, range 5 m, AAA batteries (not included) |
| Functions | Alarm, programmable standby (SLEEP), equalizer (Jazz, Rock, Classical, Pop, Live, Dance), random play, repeat, track programming |
| Display | LCD screen with radio and playback information |
| Maintenance | Clean with a slightly damp cloth without additives |
| Protection class | II (double insulation) |
| Laser safety | Class 1 laser, do not open the housing |
| Repairability | Have it repaired by a qualified technician, power cord replaced only by the manufacturer |
| Included accessories | Remote control, FM dipole antenna, power cord |
| Documentation | Manual available in French and other languages |
Frequently Asked Questions - MC 4457 DAB+ AEG
User questions about MC 4457 DAB+ AEG
0 question about this device. Answer the ones you know or ask your own.
Ask a new question about this device
Download the instructions for your Loudspeaker in PDF format for free! Find your manual MC 4457 DAB+ - AEG and take your electronic device back in hand. On this page are published all the documents necessary for the use of your device. MC 4457 DAB+ by AEG.
USER MANUAL MC 4457 DAB+ AEG
Location of Controls . Page 3
Menu Overview.. Page 4
User manual.. Page 51
Technical Specifications . Page 59
Disposal . Page 59
Location of Controls

Abb.1/Fig.1
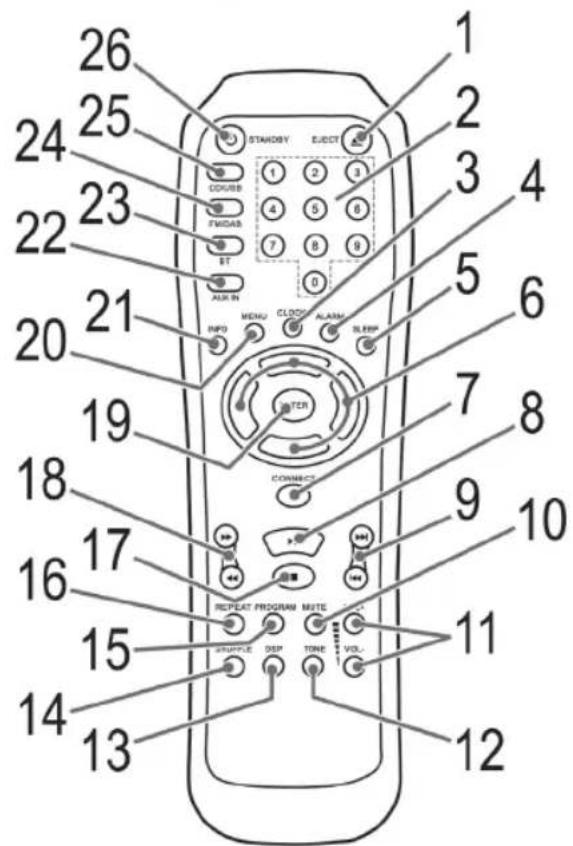
Abb.2/Fig.2
4 Menu Übersicht
Menuverzicht
Aperçu du menu
Resumen del menu
Panorama menu Menu Overview
Bedienungsanleitung
VOL+/VOL- Volume (11/5)
DAB stations scanner
VOL+/VOL- Volume (11/5)
Balayer les stations FM
Digital Audio Broadcasting (DAB) is a digital broad casing standard for terrestrial reception of digital radio. A list of radio stations which can be received in Germany is available on the Internet at www.digitalradio.de.
i NOTA:
▶II PLAY / PAUSE (8/3)
VOL+/VOL- Volume (11/5)
Supporto Bluetooth: V2.1 + EDR
Gamma: ca. 15 metric
Thank you for choosing our product. We hope you will enjoy using the appliance.
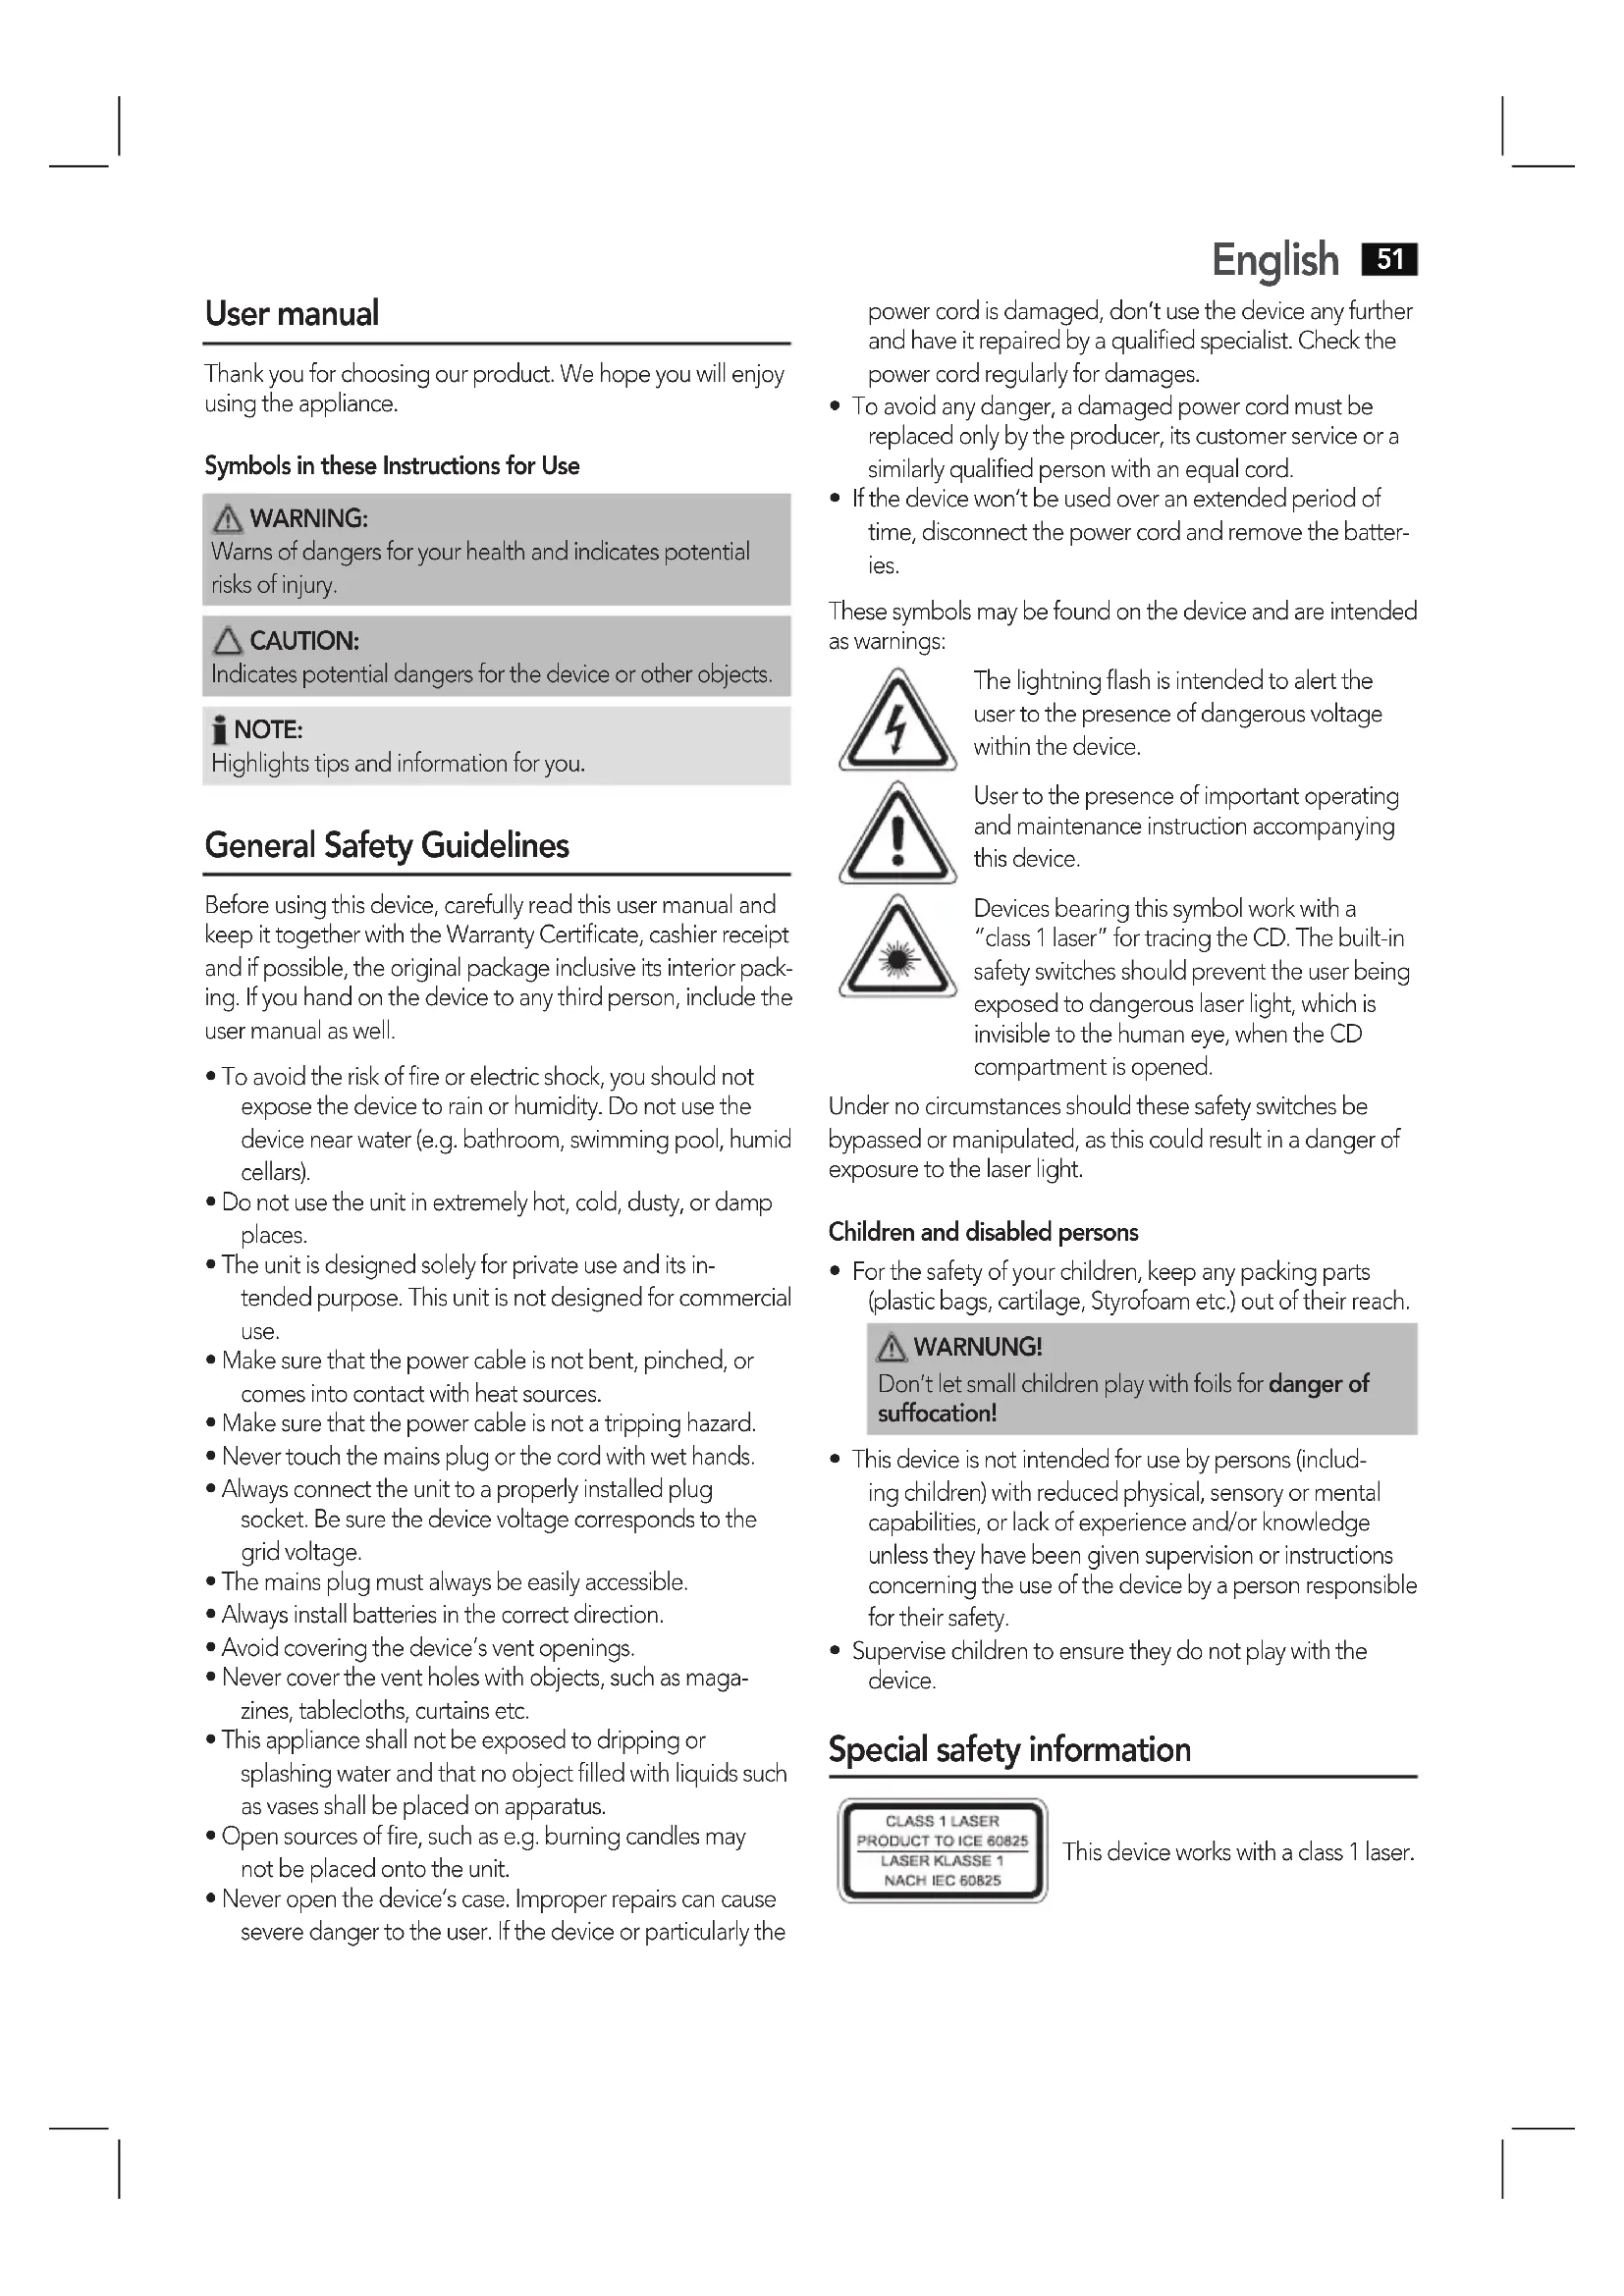
Symbols in these Instructions for Use
WARNING: Warnings of dangers for your health and indicates potential risks of injury.
CAUTION: Indicates potential dangers for the device or other objects.
i NOTE: Highlights tips and information for you.
General Safety Guidelines
Before using this device, carefully read this user manual and keep it together with the Warranty Certificate, cashier receipt and if possible, the original package inclusive its interior packing. If you hand on the device to any third person, include the user manual as well.
- To avoid the risk of fire or electric shock, you should not expose the device to rain or humidity. Do not use the device near water (e.g. bathroom, swimming pool, humid cellars).
- Do not use the unit in extremely hot, cold, dusty, or damp places.
The unit is designed solely for private use and its intended purpose. This unit is not designed for commercial use.
Make sure that the power cable is not bent, pinched, or comes into contact with heat sources. - Make sure that the power cable is not a tripping hazard.
- Never touch the mains plug or the cord with wet hands.
- Always connect the unit to a properly installed plug socket. Be sure the device voltage corresponds to the grid voltage.
The mains plug must always be easily accessible.
Always install batteries in the correct direction. - Avoid covering the device's vent openings.
- Never cover the vent holes with objects, such as magazines, tablecloths, curtains etc.
- This appliance shall not be exposed to dripping or splashing water and that no object filled with liquids such as vases shall be placed on apparatus.
- Open sources of fire, such as e.g. burning candles may not be placed onto the unit.
- Never open the device's case. Improper repairs can cause severe danger to the user. If the device or particularly the
English
power cord is damaged, don't use the device any further and have it repaired by a qualified specialist. Check the power cord regularly for damages.
- To avoid any danger, a damaged power cord must be replaced only by the producer, its customer service or a similarly qualified person with an equal cord.
- If the device won't be used over an extended period of time, disconnect the power cord and remove the batteries.
These symbols may be found on the device and are intended as warnings:
The lightning flash is intended to alert the user to the presence of dangerous voltage within the device.

User to the presence of important operating and maintenance instruction accompanying this device.

Devices bearing this symbol work with a "class 1 laser" for tracing the CD. The built-in safety switches should prevent the user being exposed to dangerous laser light, which is invisible to the human eye, when the CD compartment is opened.
Under no circumstances should these safety switches be bypassed or manipulated, as this could result in a danger of exposure to the laser light.
Children and disabled persons
- For the safety of your children, keep any packing parts (plastic bags, cartilage, Styrofoam etc.) out of their reach.
WARNING!
Don't let small children play with foils for danger of suffocation!
- This device is not intended for use by persons (including children) with reduced physical, sensory or mental capabilities, or lack of experience and/or knowledge unless they have been given supervision or instructions concerning the use of the device by a person responsible for their safety.
Supervise children to ensure they do not play with the device.
Special safety information

This device works with a class 1 laser.
52 English Overview of the components
Front (Fig.1)
1 IR - Sensor for the remote control
2 EJECT button (extend and retract CD tray)
3 PAUSE button (Replay/Pause)
4 STOP button (stop)
5 VOLUME control
6 USB connection
7 CD tray
8 NEXT button (next music piece)
PRV button (previous music piece)
- IRSEUT button (input)
10 STANDBY button (on/ operational readiness)
11 Bluetooth control lamp
12 LCD display
Rear view (without illustration)
FM ANT-Dipole antenna
AUDIO INPUT connectors (2x RCA)
Power supply connector
SPEAKERS - Loudspeaker terminals
Remote control (Fig. 2)
1 EJECT button (extend and retract CD tray)
2 Number buttons
3 CLOCK button
4 ALARM button (alarm function)
5 SLEEP button
6 Direction buttons
7 CONNECT button (connect)
8 button (playback/pause)
9. Buttons (Next/ previous title)
10 MUTE button (mute)
11 VOL+VOL- Buttons (volume)
12 TONE button (sound setting)
13 DSP button (equalizer)
14 SHUFFLE button (random playback)
15 PROGRAM button (memory)
16 REPEAT button (repeat)
17 button (stop)
18 button (music search)
19 ENTER button (confirm)
20 MENU button
21 INFO button
22 AUXIN button
23 BT button (Bluetooth)
24 FM/DAB button
25 CD/USB button
26 STANDBY button (on/ operational readiness)
Installation
- Read the manual thoroughly before operating the device!
- Choose a suitable location for the device. Suitable locations are dry, even and antislip surfaces on which you may operate the device easily.
Make sure there is proper ventilation for the device! - Hook-up the loudspeakers to the "SPEAKERS" connections on the rear of the device. While doing so, pay attention to the correct polarity (black to black).
- Remove, if necessary, the protection sheet from the display.
Power supply
- Insert the grid plug into a properly installed three prong socket with 230V,50Hz
- Make sure the grid voltage corresponds to the figures on the rating plate.
NOTE:
Disconnect from mains power supply during longer periods of non-use.
Insert/Replace Battery in Remote Control
(Batteries not included in the scope of delivery)
- Open the battery compartment on the underside of the remote.
- Insert 2 batteries of the type R03 "AAA" 1.5 V. Check that the polarity is correct (see battery compartment).
- Close the battery compartment.
If the remote is not in use for a lengthy period of time, please remove the battery to prevent the battery acid from "leaking".
WARI
Do not expose the batteries to intense heat, such as sunlight, fire or similar. Danger of explosion!
CAUTION:
- Different battery types or new and spent batteries may not be used together.
- Batteries must not be disposed of in the garbage. Please bring used batteries to competent collection centers or back to the dealer.
Installation
- Align the dipole antenna vertically.
- Turn the device on with the STANDBY button (10/26). The device automatically searches for DAB stations. SCANNING... and a progress bar appears on the display. The figure on the right of the display shows the number of radio stations found. The first alphanumeric DAB station is played.
When playing a radio station, the time and date is taken from the broadcasting service. If the device does not receive DAB stations in your location, set the time manually as described in "General operation".
General operation
NOTE:
The device is operated primarily with the remote control. Thus the descriptions refer to the buttons on the remote control. Some buttons are also on the device. Buttons with the same name have the same function.
STANDBY (26/10)
Switch the device to standby operation with the STAND-BY/ON button (the time display will appear). If you press the button again, the device will turn back on.
NOTE:
The device notes the last mode and the volume before switching off. After switching on again the device starts in this mode and this volume.
FM/DAB button (24)
For switching between DAB and FM mode.
CD/USB button (25)
For switching between CD and USB mode.
INPUT button (9 on the device)
Press this button multiple times to select the different modes.
VOL+/VOL- Volume (11/5)
Adjust to your preferred volume level.
MUTE (10)
Serves for the quick turning off of the sound. When activating the function, the notification "MUTE ON" will be displayed for a short time. Press this button again to deactivate the function. "MUTE OFF" will be displayed for a short time.
NOTE:
The activated function cannot be permanently shown in the display for technical reasons.
TONE button (12)
Press this button repeatedly to adjust the total volume (MAS-TER VOLUME), the basses (BASS) and the trebles (TREBLE). Change the settings with the VOL+/VOL buttons (11).
NOTE:
The settings are lost if you select one of the preset equalizer modes.
DSP button (13)
(Preset equalizer function). Different sound modes are available (JAZZ, ROCK, CLASSICS, POP, LIVE, DANCE, OFF (Off)).
Infrared Remote Control
For wireless control within a distance of 5m If the distance decreases you should change the batteries. For proper operation mind a clear view between the remote control and the sensor on the device.
Delayed shut-off (SLEEP)
The device automatically switches off when the selected time is reached.
- Select the time by repeatedly pressing the SLEEP button (5), after which the device switches off. Select from: 10, 20, 30, 45, 60, 90 and 120 minutes.
- The SLEEP OFF setting deactivates this function.
Manual time setting (in standby)
Adjust the settings with the direction buttons V/AnTo change to the next number, press the direction button>
- While in standby, press the CLOCK button (3). [SETTING CLOCK] will appear in the display and the left digit will blink.
- After you have set the time, press the CLOCK button to change the date entry. [SETTING DATE] will appear in the display and the left digit will blink.
NOTE:
If no button is pushed within 5 seconds, the display will change back to the normal display. The settings are automatically stored.
Listening to the radio
Scan FM stations
- Repeatedly press FM/DAB button (24) until the display shows "FM".
-
You have two options for tuning a station:
-
Press the > buttons (6). You are changing the frequency in 0.05 MHz steps.
-
Press the buttons (6). The device will search to the next or the previous radio station.
-
If the reception is too weak and the received station has noise, try to improve the reception by turning and by uncoiling or coiling the antenna.
54 English
Show FM information
Press the INFO button (21) to show the following information, if broadcasted by a radio station.
- Radio Text is shown by default on the display. If no information is available, [No RadioText] appears on the display.
The program type (PTY) of the station is displayed (e.g. Pop music, news etc.). If no PTY is received, [No PTY] appears on the display. - Display the station name. If no name is received, [No Name] appears on the display.
- The current audio mode is shown. Stereo or Mono.
Scan DAB stations
Digital Audio Broadcasting (DAB) is a digital broadcasting standard for terrestrial reception of digital radio. A list of radio stations which can be received in Germany is available on the Internet at www.digitalradio.de.
i NOTE:
In Germany approx. 70% of the country's area is covered by digital radio broadcasts (as of Nov. 2011). In the individual areas however, coverage and provision vary greatly. If the DAB stations in your region cannot be received or only with interferences depending on location, in this case you can switch to the FM band to receive this station. This is only possible however if these stations are broadcast via UKW. Find out more on the internet site of the radio station.
- Press the FM/DAB button (24) repeatedly until "DAB" appears on the display.
- You can select the next or the previous station by using the / < buttons (6).
- If the reception is too weak and the received station "motorboats", try to improve the reception by changing the position of the antenna.
i NOTE:
- For an optimal DAB reception, we recommend that the dipole antenna be aligned vertically.
- You cannot toggle between Mono and Stereo during DAB reception.
- To manually set a DAB frequency, proceed as described in the "Settings menu" section.
Display additional DAB information
In DAB mode, you can display the following additional information if broadcast by the radio station. To do so, press the INFO button (21).
The DLS text is shown on the display by default.
- DLS: Short for Dynamic Label Segment. This involves complementary data. This content may be e.g. information about the station or the music title and artist being played.
-
Displays the received signal strength.
-
This indicates the station category (e.g. Pop-Music, News etc.).
- Displays the name of the station group (e.g. DR Deutschland). Frequency of the current radio station.
The "SIGNAL ERROR" display shows the signal quality. The lower the adjacent figure, the better the quality. - Displays the digital Audio Bit Rate. / Transmission Standard.
Save station
Keep the desired number button (0-9) on which you want to store the station pressed. "PRESET STORED" is shown in the display for a short period.
Select a preset station
Press the respective number button on the remote control.
Settings menu
Numerous settings are made via the Settings menu (see page 4).
In the Settings menu you can find the main menu and the related submenus with the individual options.
To call up the menu, press the MENU (20) button during operation.
- Use the > 按钮 (6) to navigate in the menu.
- Use the ENTER button (19) to select a submenu, or confirm a setting.
- To leave the menu, press the MENU button once more.
NOTE:
- If you do not press any button within 10 seconds, the menu is hidden.
The currently set option is highlighted by
A Settings menu can be found in DAB mode, as well as in FM mode. The DAB and FM menu is explained below along with the general SYSTEM menu.
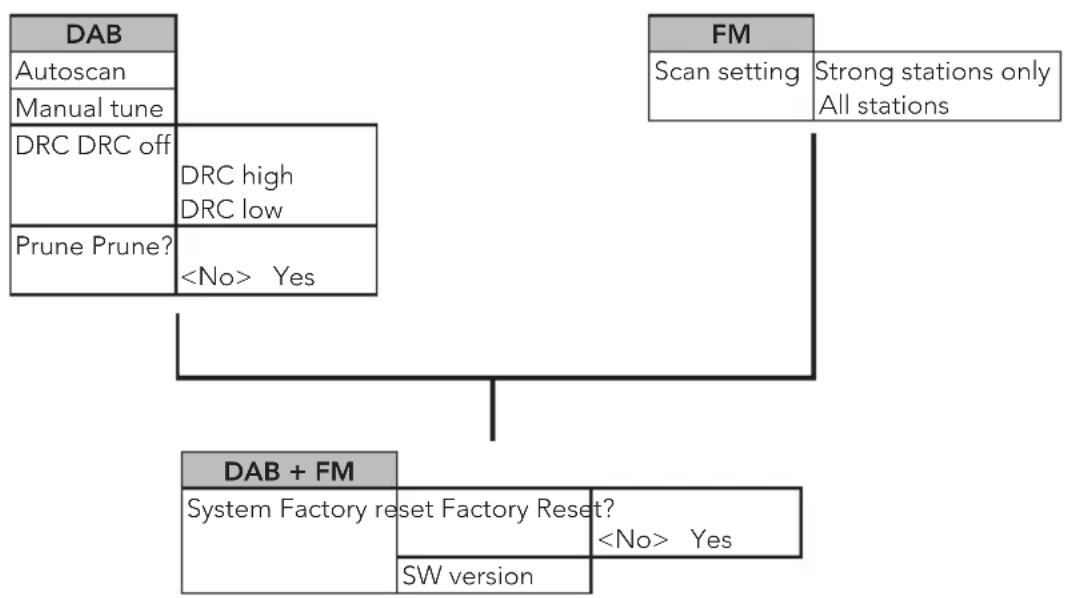
DAB Menu
The DAB menu is divided into menus: Autoscan, Manual tune, DRC and Prune.
Autoscan: Starts the station scan. The DAB frequency band is scanned for stations.
- Manual tune: To do so you need to know the station frequency. This can be found on the internet site of the broadcasting service. Select individual frequencies using the >/<buttons (6).
- DRC: short for Digital Range Control (dynamic range). The term DRC describes the ratio between the quietest and the loudest sound. If the dynamic range is very high there are very soft sounds as well as very loud sounds. Under some circumstances this may present a problem
with playback. Let us assume that you are listening to a radio station in a relatively loud environment. By increasing the volume you can play the quiet sections louder. This however has the disadvantage that the loud sections become uncomfortably loud. It makes sense here to reduce the dynamic range. Select between the options:
- DRC off: The dynamic range is not reduced.
- DRC high: The dynamic range is sharply reduced.
-
DRC low: The dynamic range is slightly reduced.
-
Prune: It may be that you can no longer receive some stations after a station scan or change of location. With this function you can delete these stations from the reception list. Select "YES" and confirm with the ENTER button.
FM Menu
-
Scan setting: Select the desired option in order to perform an automatic station scan.
-
Strong stations only: Only search for strong radio stations.
- All stations: Search for all receivable radio stations. In doing so, the scan also pauses on weak stations.
DAB + FM Menu (SYSTEM)
The following submenus can be found in the SYSTEM menu.
Factory reset: Select the "YES" command if you want to reset the device again to the factory defaults. All settings which you have made will be lost.
- SW version: Here, you can display the Software Version of the device.
AUDIO IN jacks (rear of the device)
For the connection of analog playback devices via this socket, you may also hear the sound from other playback devices such as MP3 players, CD players, etc., through the loud-speakers.
- Connect the external device to the AUDIO IN jacks on the rear of the device with a cinch cable (2x RCA). If required, use a suitable adapter (not included).
- Press the AUX IN button (22). The notification "AUX" will be shown in the display. You may also select the AUX mode by repeatedly pressing the INPUT button (9 on the device).
- Start the playback of your audio source. Listen to the sound playback via the speaker. You can adjust the volume using the VOL+VOL- buttons (11/5).
- For the further procedure, please refer to the user manual of the external audio source.
NOTE:
If possible, adjust the volume of the external unit to a comfortable level.
To play back music via Bluetooth
Bluetooth involves a technology for wireless radio connection of devices over a short distance. Devices with Bluetooth standard are transmitting between 2.402 and 2.480GHz in the ISM band (Industrial, Scientific and Medical). Interference can be caused for example by WLAN-networks, DAB radios, cordless phones, or microwave ovens which work on the same frequency band.
This device offers you the possibility to use a Bluetooth-enabled device. The functional radius is limited to approx. 15 metres depending on the surroundings and the unit used. If your playing device supports the A2DP profile (Advanced Audio Distribution Profile) and has a music-player function, then you can also wirelessly transfer music to the device. The A2DP profile involves a multi-vendor Bluetooth profile. By streaming, stereo-audio signals are wirelessly transferred between the playing device (source) and the receiving device. To be able to control the source remotely, the playback device must support the AVRCP profile (Audio Video Remote Control Profile).
Due to the different device manufacturers, models, and software versions, a full functionality cannot be guaranteed.
Logging on devices (Pairing)
Before you listen to music via the unit, you must pair the devices.
- Ensure, that the Bluetooth function is activated in your player (e.g. mobile phone). For this, refer to the operation manual of your player.
- Press the BT button (23). The control lamp (11) will blink rapidly.
- Chose the Bluetooth menu in your player and register the device in your player. For this, refer to the operation manual of your player. The device "AEG MC 4457" will show in your player as a selection.
NOTE:
Only one playback device may be connected with the music center at one time. If the music center is already connected with a different playback device, the music center will not appear in the BT selection menu. Press the CONNECT button (7) to separate the already connected devices. Now you may connect the music center with another playback device as described above.
- Now enter the password "0000" in your player, depending on the device manufacturers, model, and software version.
If the application was executed successfully, the control lamp (11) will light.
For the further procedure, please refer to the user manual of the playback unit. If possible, adjust the volume of the external unit to a comfortable level.
56
English
iN0
Depending on the device manufacturer, you need to perform the registration (PAIRING) again to connect the devices.
- The Bluetooth compatibility cannot be ensured for devices (e.g. mobile phones) getting released in the future.
To ensure an optimal connection, make sure that the battery of your player is completely charged.
Some of the mobile phone brands have an energy-saving mode. Deactivate the energy-saving mode as it can otherwise result in problems during the data transfer through Bluetooth.
To be able to transfer audio data, Bluetooth needs to stay activated in your player Observe the operation manual of your player.
- If a mobile phone on which you are playing music receives a call, the music will be interrupted. The sound is played back by the loudspeakers depending on the mobile phone. To transfer the conversation to your mobile phone, observe the fading-in in the display of the mobile phone. After you have completed your phone call, the devices are reconnected with each other. You may have to possibly restart the playback.
Control lamp (11 on the device)
The control lamp blinks or lights depending on the function of the device.
| Control lamp Function of the device |
| Blinks rapidly CO-NECT mode. A connection with a new audio source can now be created. |
| Blinks slowly PAIRING mode. A connection to an already previously registered audio source can be reestablished. |
| Lights up Bluetooth connection to the audio source has been created. |
USB port (6)
This device has been developed in line with the latest technical advances in the USB field. The wide range of different USB storage devices of all types which are currently on the market, unfortunately do not allow us to guarantee full compatibility with all USB storage devices. For this reason, in rare cases there may be problems in playing back files from USB storage devices. This is not a malfunction of the device.
- Press the CD/USB button (25) repeatedly until "SOURCE [USB]" is shown on the display.
- Connect a USB storage device directly into the port. The message "USB CHECKING..." will appear for a short time after a few seconds. Then the playback will start. The symbol "▶", "MP3", the current title and its elapsed playing time, as well as the total number of titles will be shown in the display.
For operation, please refer to the section "Description of the controls".
NOTE:
Always directly connect a USB storage medium to the USB port to prevent any malfunctions.
The USB port is not designed for charging external devices.
- If the USB storage media is not recognized, the message "NOT FIND USB" will appear in the display.
CAUTION:
Before removing the USB storage device, switch the device to another mode using the INPUT button (9 on the device).
Playback of CDs/MP3 CD
- Press the CD/USB button (25). The notification "CD" will be shown in the display.
- Press the JECT button (1/2), to open the CD tray (7).
- Place a CD with the label side up onto the CD tray. Press the EJECT button once more to close the CD compartment.
- The message "LOADING DISC" appears in the display. The playback then starts. The symbol "▶", the CD type (CDDA = Audio CD or MP3 = MP3 CD), the current title and its elapsed playing time, as well as the total number of titles will be shown in the display.
For the operation, please refer to the section "Description of the controls". Always keep the CD tray closed.
NOTE:
If a disc is inserted the wrong way around, respectively if no disc is inserted, "NO DISC" (no disc) will appear in the display.
The replay of CD's created by the user may not be guaranteed due to the multitude of the available software and CD media.
Description of the controls
II PLAY/PAUSE (8/3)
You can briefly interrupt and resume playback using this button. The display shows the symbol II. Pressing again continues playback.
NEXTPREV(9/8)
- With the NEXT button you may jump to the next, respectively to the next but one title, etc.
- You may operate the PREV button as follows: Pressing 1x = Jumps to the previous title.
Pressing 2x = Plays a song before that, etc.
18)
A music search run is started. The symbol “ ” respectively “ ” appears in the display. Press the PLAY/PAUSE button to return to normal playback.
STOP (9/11)
The playback is stopped.
REPEAT (16)
Pressing 1 × = "REP: One" appears in the display for a short time. The current song is constantly repeated.
Pressing 2 × = "REP: All" appears in the display for a short time. All songs are constantly repeated.
Pressing 3 × = "REP: Off" appears in the display for a short time. All functions are stopped. The normal playback operation is continued.
NOTE:
The activated function may not permanently be shown in the display due to technical reasons.
SHUFFLE (14)
Pressing 1x = All titles of the audio CD are played in random order. The playback stops after all the titles were played.
Pressing 2 × = All titles of the audio CD are repeatedly played in random order.
NOTE:
This function is only available for audio CD's (CDDA).
- The activated function may not permanently be shown in the display due to technical reasons.
Number buttons (2)
To directly select a title, enter the requested title number. Press the ENTER (19) button to play the title.
Programmed Play
This can be used to program any desired sequence of tracks. Only for audio CDs (CDDA).
- Press the STOP button (17/4).
- Press the PROGRAM button (15). The display shows: PROGRAM INPUT 01[00]02[00]
- Enter the requested order of titles with the number buttons. You will be moving the cursor in the display with the direction buttons x < 0 to display the next two memory locations, press the direction button
NOTE:
- At least two titles must be programmed to be able to start the playback.
-
Up to 20 titles can be programmed. The same title can appear more than once in the list.
-
Repeat the procedure until all the desired tracks are selected.
- After you have programmed all the titles, select the symbol "←" with the direction buttons. Press the ENTER button for confirmation. The playback starts. The symbol "▶", "CDDA", "P", the current title and its elapsed playing time, as well as the total number of titles will be shown in the display.
- When you press the button (17/4) once, playback is stopped and the current program is erased. The "P" control lamp goes out.
The device stops automatically once the entire sequence of programmed tracks is completed. The abbreviation "P" goes off and the programmed order of tracks is deleted from the memory.
Playing back Music in MP3 Format
With this device it is possible to play back pieces of music in MP3 format. The device also supports all standard CD types: CD, CD-RW, CD-R.
This machine of is able to play MP3 CDs. Up to 200 tracks can be compressed and stored on these CDs. Your machine detects an MP3 CD automatically (the total number of tracks and MP3s appears in the display). If you would like to play one of these CDs, proceed as described under "Playing CDs/MP3".
Please note:
There are a number of different recording and compression methods, as well as quality differences between CDs and self-recorded CDs.
Furthermore, the music industry does not adhere to fixed standards (copy protection).
For these reasons it is possible that in rare cases there are problems with the playback of CDs and MP3 CDs. This is not a malfunction of the device.
Alarm function
You can set the device in such a way that it switches on at a specific time.
To select an option, press the buttons (6).
Perform the setting of the digits with the direction buttons To change to the next digit, press the direction button>
- Select an option with the ALARM button (4).

NOTE:
If no button is pushed within 5 seconds, the display will change back to the normal display. The settings are automatically stored.
Setting the alarm time
- Press the ALARM button during standby operation. "SETTING ALARM 1" is shown on the display.
- Select the time at which the alarm time needs to be activated. Select from: ALL DAYS, ONCE, WEEKENDS, WEEKDAYS. The setting ALARM OFF deactivates the function.
- Now set the alarm time.
- SOURCE: Select a source by which you want to be awakened. Select from: DAB, FM, CD, USB, AUX, B.T.

NOTE:
- When choosing DAB or FM, the last set radio station will be selected.
- When choosing CD or USB, a medium must be inserted, respectively connected.
- When choosing AUX, the connected audio source must also be programmed to the same point in time.
-
When choosing B.T., the Bluetooth function must be turned on at the device and must have been connected with the device previously. The functionality of the alarm through Bluetooth is dependent on your playback device.
-
Finally select the volume at which you want to be awaken- ened.
- After you have adjusted the settings for the first alarm time, you will get to the settings of a second alarm time. "SETTING ALARM 2" will be shown in the display. To set the second alarm time, proceed as described above (point 2-5).
The activated alarm function is shown on the display by the
symbol. If you have set both alarm times, two symbols will be displayed.
Deactivate alarm function
Select the option "ALARM OFF" in the section "Setting the alarm time" (point 2).
Cleaning and maintenance
- Disconnect the mains plug before cleaning.
- You may wipe off external stains, using a slightly damp cloth without any additives.
Troubleshooting
| Problem Cause | Solution | |
| The unit cannot be operated | The unit is blocked and "hangs" | Pull the mains plug for approximately 5 seconds. Then connect the unit again |
| Reset the device to the factory defaults. ⇒ see "Settings menu" | ||
| No DAB Radio reception | Dipole antenna not aligned correctly | Align the dipole antenna vertically |
| No Digital Radio can be received in your area | ||
| Problems with DAB radio reception | Depending on the location, you may not be able to receive some stations at all or with interference in your region. ⇒ see also note on page 54 | Switch to FM mode to receive these stations. If these stations are transmitted via UKW. Find out more on the internet site of the radio station. |
| No sound Volume | me is too low Increase the volume | |
| Poor sound quality | Radio signal too weak | Try to adjust the antenna position. |
| No audio signal during Bluetooth con- nection | Device has not been registered with the audio source. | Check whether there is a connection. Reregister the device with the audio source, if necessary. |
| Volume too low Increase the volume on the device. | Increase the volume on the audio source. | |
| Bluetooth con- nection cannot be established | Device is not in CONNECT mode. The LED (11) blinks slowly. | Press the CONNECT button (button 7 on the RC). The LED will blink rapidly. Try to reconnect the devices with each other. |
| Registration doesn't work | Check, whether the audio source supports the A2DP protocol. | |
| Audio source is turned off | Turn the audio source on | |
| Bluetooth con- nection cannot be established | Bluetooth is turned off on the audio source. | Turn on the Bluetooth function on the audio source. |
| Bluetooth version is not supported. | Use a different play- back device. | |
Technical Specifications
Model: MC 4457 DAB+/BT
Power supply: 220 - 240 V~50 Hz
Power consumption: 40 W
Protection class:
Net weight: 2.63 kg
Radio: Frequency ranges: VHF/FM 87.5 ~ 108.0 MHz DAB/DAB+ 174 ~ 240 MHz
Bluetooth
Bluetooth support: V2.1 + EDR
Range: approx. 15 metre
Transmission frequency: 2.4 - 2.48 GHz
Protocols: A2DP/AVRCP
The right to make technical and design modifications in the course of continuous product development remains reserved.
This device has been tested according to all relevant current CE guidelines, such as electromagnetic compatibility and low voltage directives, and has been constructed in accordance with the latest safety regulations.

Disposal
Meaning of the "Wheelie Bin" Symbol
Take care of our environment, do not dispose of electrical.
applicances via the household waste.
Dispose of obsolete or defective electrical appliances via municipal collection points.
Please help to avoid potential environmental and health impacts through improper waste disposal.
You contribute to recycling and other forms of utilization of old electric and electronic appliances.
Your municipality provides you with information about collecting points.


GARANTIE-KARTE


- Menu Übersicht
- Bedienungsanleitung
- VOL+/VOL- Volume (11/5)
- DAB stations scanner
- Balayer les stations FM
- i NOTA:
- ▶II PLAY / PAUSE (8/3)
- Symbols in these Instructions for Use
- General Safety Guidelines
- English
- Children and disabled persons
- WARNING!
- Special safety information
- English Overview of the components
- Front (Fig.1)
- Rear view (without illustration)
- Remote control (Fig. 2)
- Installation
- Power supply
- NOTE:
- Insert/Replace Battery in Remote Control
- WARI
- CAUTION:
- General operation
- STANDBY (26/10)
- FM/DAB button (24)
- CD/USB button (25)
- INPUT button (9 on the device)
- MUTE (10)
- TONE button (12)
- DSP button (13)
- Infrared Remote Control
- Delayed shut-off (SLEEP)
- Manual time setting (in standby)
- Listening to the radio
- Scan FM stations
- English
- Show FM information
- Scan DAB stations
- i NOTE:
- Display additional DAB information
- Save station
- Select a preset station
- Settings menu
- DAB Menu
- FM Menu
- DAB + FM Menu (SYSTEM)
- AUDIO IN jacks (rear of the device)
- To play back music via Bluetooth
- Logging on devices (Pairing)
- iN0
- Control lamp (11 on the device)
- USB port (6)
- Playback of CDs/MP3 CD
- Description of the controls
- II PLAY/PAUSE (8/3)
- NEXTPREV(9/8)
- 18)
- STOP (9/11)
- REPEAT (16)
- SHUFFLE (14)
- Number buttons (2)
- Programmed Play
- Playing back Music in MP3 Format
- Please note:
- Alarm function
- Setting the alarm time
- Deactivate alarm function
- Cleaning and maintenance
- Technical Specifications
- Bluetooth
- Disposal
- Meaning of the "Wheelie Bin" Symbol
- GARANTIE-KARTE
Brand : AEG
Model : MC 4457 DAB+
Category : Loudspeaker